analitics

Pages

Sunday, May 21, 2023

Python 3.11.3 : Using Jupyter Lab on Fedora linux distro.

JupyterLab is the latest web-based interactive development environment for notebooks, code, and data. Its flexible interface allows users to configure and arrange workflows in data science, scientific computing, computational journalism, and machine learning.
Follow these steps:
  1. Install the jupyterlab python package using pip. This will allow you to run Jupyter notebooks in the terminal.
    pip install jupyterlab
  2. Open a Jupyter Lab session in the terminal using the command:
    jupyter lab
  3. Create a new notebook file and save it with the .ipynb extension.
  4. In the notebook file, add the source code to work with the Python programming language and save the file notebook.
See the next screenshot how this works:

Friday, May 5, 2023

Python 3.8.10 : My colab tutorials and news from colab - part 033.

Colab comes with new changes:
Starting today paid users can select their preferred NVIDIA GPU. Visit Runtime > Change runtime type and choose between T4, V100, and A100. We'll do our best to assign your choice based on GPU availability.
Today I tested a new python package called News API with colab to search for news.
News API is a simple, easy-to-use REST API that returns JSON search results for current and historic news articles published by over 80,000 worldwide sources.
You can find my sample code in my collaboration area of the GitHub repository.

Saturday, April 29, 2023

Extension for inkscape with python.

Today, I created the first Python extension for Inkscape, and although in theory, it seems easy, it is not really so.
You have to study a little and search the web, but I created a tutorial on one of my website.
The idea is to use at least two files with different extensions.
I named one catafest_extension.inx and the other catafest_extension.py.
For the Python file, I used this source code:
#!/usr/bin/env python
# coding=utf-8
#
# Copyright (C) 2023 Catalin George Festila, catafest@yahoo.com
#

"""
Simple test extension for inkscape
"""

import inkex
# add by me 

from lxml import etree
def draw_SVG_square(w,h, x,y, parent):
    style = { 'stroke'        : 'none',
              'stroke-width'  : '1',
              'fill'          : '#0000FF'
            }

    attribs = {
        'style'     : str(inkex.Style(style)),
        'height'    : str(h),
        'width'     : str(w),
        'x'         : str(x),
        'y'         : str(y)
            }
    patrat = etree.SubElement(
        parent, inkex.addNS('rect','svg'), attribs )
    return patrat

class MyExtension(inkex.Effect):
    def __init__(self):
        super().__init__()

    def effect(self):
        self.msg("This is an empty extension created by catafest !")
        parent = self.svg.get_current_layer()
        draw_SVG_square(100,100, 0,0, parent)

if __name__ == '__main__':
    MyExtension().run()
The result is this

Python 3.8.10 : My colab tutorials - part 032.

I haven't written for the python community in a long time, here is another example that I created using a tool from google called colab.
catafest_038.ipynb - simple example with StableDiffusionPipeline and DiffusionPipeline to generate images based a text ...
This and the other examples can be found in my repository named colab_google on my GitHub account.

Monday, April 17, 2023

Python Qt6 : use sqlite - part 002.

In this article tutorial I will show you how to read from the sqlite file the content of the table: files.
In the last article tutorial, I create a interface with PyQt6 that search files by regular expresion and result is add to sqlite file named: file_paths.db.
I used same steps with a default python class and I used QSqlTableModel to show the content received.
The script will create a window with this QSqlTableModel, then reads the file and add the result.
Let's see the source code:
import sys
from PyQt6.QtWidgets import QApplication, QMainWindow, QTableView
from PyQt6.QtSql import QSqlDatabase, QSqlQuery, QSqlTableModel

class MainWindow(QMainWindow):
    def __init__(self):
        super().__init__()

        # Initialize the database
        self.init_db()

        # Set up the GUI
        self.table_view = QTableView(self)
        self.setCentralWidget(self.table_view)

        # Set up the model and connect it to the database
        self.model = QSqlTableModel(self)
        self.model.setTable('files')
        self.model.select()
        self.table_view.setModel(self.model)

    def init_db(self):
        # Connect to the database
        db = QSqlDatabase.addDatabase('QSQLITE')
        db.setDatabaseName('file_paths.db')
        if not db.open():
            print('Could not open database')
            sys.exit(1)

    def create_table(self):
        # Create the 'files' table if it doesn't exist
        query = QSqlQuery()
        query.exec('CREATE TABLE IF NOT EXISTS files (id INTEGER PRIMARY KEY, path TEXT)')

if __name__ == '__main__':
    app = QApplication(sys.argv)
    window = MainWindow()
    window.show()
    sys.exit(app.exec())
I add this source code into a python script named view.py and I run it.
This is the result of the running script:

Python Qt6 : use sqlite - part 001.

This will default update for any python project:
python.exe -m pip install --upgrade pip --user
...
Successfully installed pip-23.1
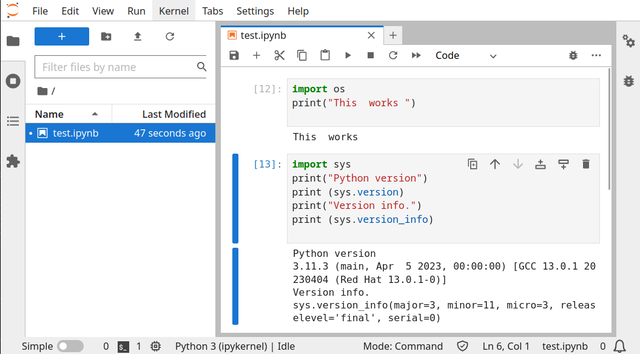
The sqlite3 is already on my python instalation because I use version 3.11.0, you can see the official webpage.
Install the PyQt6 with the pip tool, I have this python package:
pip install PyQt6 --user
Requirement already satisfied: PyQt6 in c:\python311\lib\site-packages (6.4.1)
...
The next source of code will create a windows with two buttons and one edit area.
The PyQt6 graphics user interface use these elements: QPushButton, QLineEdit and QMessageBox from QWidget.
The python class will create a window with these elements and dor each of these is need to have methods.
First you need to select the folder, then use an regular expresion for search.
I used this : .*\.blend1$ this means *.blend1.
The last step is to use FindFiles button to search all blend files, in this case and add path of each of these to the sqlite database into a table named: files .
If you select the root C: then will take some time to search the files.
Let's see the source code:
import sys
import os
import re
from PyQt6.QtWidgets import *
from PyQt6.QtCore import *
import sqlite3

class FindFiles(QWidget):
    def __init__(self):
        super().__init__()
        self.setWindowTitle("Find Files")
        self.setGeometry(100, 100, 500, 300)

        self.folder_button = QPushButton("Choose Folder")
        self.folder_button.clicked.connect(self.choose_folder)
        self.pattern_edit = QLineEdit()
        self.pattern_edit.setPlaceholderText("Enter regular expression pattern")
        self.pattern_edit.setFixedWidth(250)
        self.find_button = QPushButton("Find Files")
        self.find_button.clicked.connect(self.find_files)

        layout = QVBoxLayout()
        layout.addWidget(self.folder_button)
        layout.addWidget(self.pattern_edit)
        layout.addWidget(self.find_button)
        self.setLayout(layout)

        self.folder_path = ""

        self.conn = sqlite3.connect("file_paths.db")
        self.cursor = self.conn.cursor()
        self.cursor.execute("CREATE TABLE IF NOT EXISTS files (id INTEGER PRIMARY KEY, path TEXT)")

    def choose_folder(self):
        self.folder_path = QFileDialog.getExistingDirectory(self, "Choose Folder")
        if self.folder_path:
            self.folder_button.setText(self.folder_path)

    def find_files(self):
        if not self.folder_path:
            QMessageBox.warning(self, "Warning", "Please choose a folder first!")
            return

        pattern = self.pattern_edit.text()

        if not pattern:
            QMessageBox.warning(self, "Warning", "Please enter a regular expression pattern!")
            return

        file_paths = []
        for root, dirs, files in os.walk(self.folder_path):
            for file in files:
                if re.match(pattern, file):
                    file_path = os.path.join(root, file)
                    file_paths.append(file_path)
                    self.cursor.execute("INSERT INTO files (path) VALUES (?)", (file_path,))
        self.conn.commit()

        QMessageBox.information(self, "Information", f"Found {len(file_paths)} files that match the pattern!")

if __name__ == "__main__":
    app = QApplication(sys.argv)
    find_files = FindFiles()
    find_files.show()
    sys.exit(app.exec())
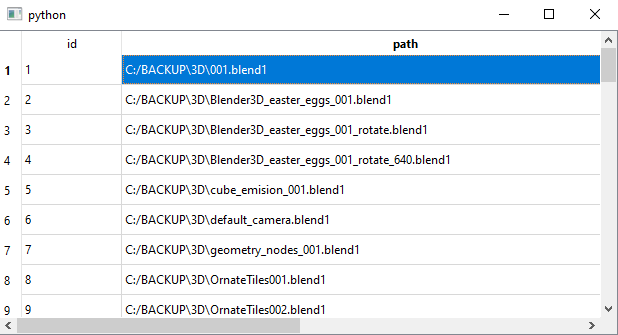
I put this source code into a file named:main.py and I run it.
python main.py
The result is this:

Tuesday, April 11, 2023

Python 3.11.0 : about consolemenu .

This simple console menu can help to create menus, you can find the project on GitHub project.
pip install console-menu --user
For testing, I used the default example, and works well.
# Import the necessary packages
from consolemenu import *
from consolemenu.items import *

# Create the menu
menu = ConsoleMenu("Title", "Subtitle")

# Create some items

# MenuItem is the base class for all items, it doesn't do anything when selected
menu_item = MenuItem("Menu Item")

# A FunctionItem runs a Python function when selected
function_item = FunctionItem("Call a Python function", input, ["Enter an input"])

# A CommandItem runs a console command
command_item = CommandItem("Run a console command",  "touch hello.txt")

# A SelectionMenu constructs a menu from a list of strings
selection_menu = SelectionMenu(["item1", "item2", "item3"])

# A SubmenuItem lets you add a menu (the selection_menu above, for example)
# as a submenu of another menu
submenu_item = SubmenuItem("Submenu item", selection_menu, menu)

# Once we're done creating them, we just add the items to the menu
menu.append_item(menu_item)
menu.append_item(function_item)
menu.append_item(command_item)
menu.append_item(submenu_item)

# Finally, we call show to show the menu and allow the user to interact
menu.show()

Saturday, April 8, 2023

Create an ovoid with python on Blender 3D.

Blender 3D use python version 3.10.9 and you can write your scripts with the Blender 3D features. This script can also be found on the website where I write tutorials. This Python script for Blender 3D creates an ovoid model using the math formula for ovoid:
import bpy
import math

# Define the parameters of the ovoid
a = 1.9
b = 1.5
c = 1.5

# Define the number of vertices in each direction
n_long = 32
n_lat = 16

# Create a new mesh
mesh = bpy.data.meshes.new(name="Ovoid")

# Create the vertices
verts = []
for j in range(n_lat):
    lat = (j / (n_lat - 1)) * math.pi
    for i in range(n_long):
        lon = (i / (n_long - 1)) * 2 * math.pi
        x = a * math.sin(lat) * math.cos(lon)
        y = b * math.sin(lat) * math.sin(lon)
        z = c * math.cos(lat)
        verts.append((x, y, z))

# Create the faces
faces = []
for j in range(n_lat - 1):
    for i in range(n_long - 1):
        v1 = j * n_long + i
        v2 = j * n_long + i + 1
        v3 = (j + 1) * n_long + i + 1
        v4 = (j + 1) * n_long + i
        faces.append((v1, v2, v3, v4))

# Create the mesh and object
mesh.from_pydata(verts, [], faces)
obj = bpy.data.objects.new(name="Ovoid", object_data=mesh)

# Add the object to the scene
scene = bpy.context.scene
scene.collection.objects.link(obj)

Saturday, April 1, 2023

Python 3.11.0 : about execnet python package - part 001.

The execnet Python package allows you to use lightweight interprocess communication using remote Python interpreters. It provides a simple way to execute code in a remote Python interpreter, allowing for easy distribution of work across multiple machines or processes.
With this package, you can create gateways to remote Python interpreters and then execute Python code in that interpreter.
This package provides a simple interface for creating these gateways and for executing code on them, making it easy to distribute work and run code in parallel.
It can be particularly useful for running tests on multiple versions of Python or for distributing computational tasks across multiple machines.
Let's see the first example:
import execnet

def multiplier(channel, factor):
    while not channel.isclosed():
        param = channel.receive()
        channel.send(param * factor)

gw = execnet.makegateway()
channel = gw.remote_exec(multiplier, factor=10)
print(channel)
for i in range(5):
    channel.send(i)
    result = channel.receive()
    print(result)
    assert result == i * 10
gw.exit()
This is the result
<Channel id=1 open>
0
10
20
30
40
Let's see the next example:
import execnet

gw = execnet.makegateway() 
channel = gw.remote_exec("""
    def multiply(x, y):
        return x * y
    
    result = 0
    for i in range(10):
        result += multiply(i, 1)
        print("This is result for ",i," ",result)    
    channel.send(result)

""")

result = channel.receive()
print("This is channel receive result : ", result)
assert result == 45
This is result:
This is channel receive result :  45

Wednesday, March 29, 2023

Python : Open3D cannot be used on Windows 10 and Fedora Linux Distro .

Open3D is an open-source library that supports rapid development of software that deals with 3D data. The Open3D frontend exposes a set of carefully selected data structures and algorithms in both C++ and Python. The backend is highly optimized and is set up for parallelization. Open3D was developed from a clean slate with a small and carefully considered set of dependencies. It can be set up on different platforms and compiled from source with minimal effort. The code is clean, consistently styled, and maintained via a clear code review mechanism. Open3D has been used in a number of published research projects and is actively deployed in the cloud. We welcome contributions from the open-source community.
Today I tested this python package with Windows 10 and Fedora Linux Distro with python versions 11 and 10 ...
This package does not work and you will see why ...
C:\PythonProjects\Open3D001>git clone https://github.com/isl-org/Open3D.git
Cloning into 'Open3D'...
remote: Enumerating objects: 67435, done.
remote: Counting objects: 100% (2280/2280), done.
remote: Compressing objects: 100% (1894/1894), done.
remote: Total 67435 (delta 886), reused 599 (delta 385), pack-reused 65155
Receiving objects: 100% (67435/67435), 237.23 MiB | 17.11 MiB/s, done.

Resolving deltas: 100% (50682/50682), done.
Updating files: 100% (2315/2315), done.

C:\PythonProjects\Open3D001>cd Open3D

C:\PythonProjects\Open3D001\Open3D>mkdir build

C:\PythonProjects\Open3D001\Open3D>cd build

C:\PythonProjects\Open3D001\Open3D\build>cmake -DBUILD_SHARED_LIBS=ON -DCMAKE_INSTALL_PREFIX=C:\open3d_install ..
-- Building for: Visual Studio 17 2022
-- Setting build type to Release as none was specified.
-- CMAKE_BUILD_TYPE is set to Release.
-- Downloading third-party dependencies to C:/PythonProjects/Open3D001/Open3D/3rdparty_downloads
CMake Deprecation Warning at CMakeLists.txt:189 (cmake_policy):
  The OLD behavior for policy CMP0072 will be removed from a future version
  of CMake.

  The cmake-policies(7) manual explains that the OLD behaviors of all
  policies are deprecated and that a policy should be set to OLD only under
  specific short-term circumstances.  Projects should be ported to the NEW
  behavior and not rely on setting a policy to OLD.

...
According to this issue number 4796 and my test on Windows 10 with a Python version greater than 10 and on Fedora Linux Distro you cannot use this python package.
You can try an older version of Python and try it, see this example:
C:\PythonProjects\Open3D001>C:\Python310\python.exe -m pip install --user open3d --no-warn-script-location
C:\PythonProjects\Open3D001>C:\Python310\python.exe -c "import open3d as o3d; print(o3d)"
Traceback (most recent call last):
 ...
    from open3d.cpu.pybind import (core, camera, data, geometry, io, pipelines,
ImportError: DLL load failed while importing pybind: A dynamic link library (DLL) initialization routine failed.
...
pip install pybind --user
Collecting pybind
  Using cached pybind-0.1.35.tar.gz (15.5 MB)
ERROR: Could not install packages due to an OSError: [WinError 206] The filename or extension is too 
long: 'C:\\Users\\catafest\\AppData\\Local\\Temp\\pip-install-7ccpzu3z\\pybind_
...
Basically, this python package cannot be used with an old python version in Windows 10.

Sunday, March 26, 2023

Python 3.11.0 : Image generation with OpenAI.

In this tutorial I will show you a python script with PyQt6 and OpenAI that generates an image based on OpenAI token keys and a text that describes the image.
The script is quite simple and requires the installation of python packets: PyQt6,openai.
In the script you can find a python class called MainWindow in which graphic user interface elements are included and openai elements for generating images.
You also need a token key from the official openai page to use for generation.
The script runs with the command python numa_script.py and in the two editboxes is inserted chaie from token API OpenAI and the text that will describe the image to be generated.
This is the python script with the source code:
#create_image.py

import os
import openai

from PyQt6.QtCore import Qt, QSize
from PyQt6.QtGui import QImage, QPixmap
from PyQt6.QtWidgets import QApplication, QWidget, QLabel, QLineEdit, QVBoxLayout, QHBoxLayout, QPushButton
import requests

class MainWindow(QWidget):
    def __init__(self):
        super().__init__()
        self.resize(500, 500)
        self.setWindowTitle("AI Data Input")
        
        # create widgets
        self.image_label = QLabel(self)
        self.image_label.setFixedSize(QSize(300, 300))
        self.url_edit = QLineEdit(self)
        self.api_key = QLineEdit(self)
        self.send_button = QPushButton("Send data to AI", self)
        self.send_button.clicked.connect(self.on_send_button_clicked)
        
        # create layout
        layout = QVBoxLayout()
        url_layout = QHBoxLayout()
        url_layout.addWidget(QLabel("Text request AI: "))
        url_layout.addWidget(self.url_edit)
        api_layout = QHBoxLayout()
        api_layout.addWidget(QLabel("OpenAI API Key: "))
        api_layout.addWidget(self.api_key)

        layout.addLayout(url_layout)
        layout.addLayout(api_layout)
        layout.addWidget(self.image_label, alignment=Qt.AlignmentFlag.AlignCenter)
        layout.addWidget(self.send_button, alignment=Qt.AlignmentFlag.AlignCenter)
        
        self.setLayout(layout)
    
    def on_send_button_clicked(self):
        #openai.api_key = "your api key generated by OpenAI API"
        openai.api_key = self.api_key.text()
        PROMPT = self.url_edit.text()
        url = openai.Image.create(
            prompt=PROMPT,
            n=1,
            size="256x256",
        )

        # extract the url value
        url_value = url['data'][0]['url']
        if url_value :
            response = requests.get(url_value)
            if response.status_code == 200:
                image = QImage.fromData(response.content)
                pixmap = QPixmap.fromImage(image)
                self.image_label.setPixmap(pixmap)
                self.image_label.setScaledContents(True)

if __name__ == "__main__":
    app = QApplication([])
    window = MainWindow()
    window.show()
    app.exec()
This is the result of the source script:

Wednesday, March 22, 2023

Python 3.11.0 : clean from frequent folder and the list of recent files.

This python script that clears all entries in the Windows File Explorer from frequent folder and the list of recent files:
import os
import shutil

# Quick Access folder path on Windows
quick_access_path = os.path.join(os.environ['USERPROFILE'], 'AppData', 'Roaming', 'Microsoft', 'Windows', 'Recent', 'AutomaticDestinations')

# List all files in the Quick Access folder
files = os.listdir(quick_access_path)
print(files)
# Loop through all files in the Quick Access folder
for file in files:
    # Check if the file name contains "tmp" or "temp"
    if 'tmp' in file.lower() or 'temp' in file.lower():
        # Construct the full file path
        file_path = os.path.join(quick_access_path, file)
        # Delete the file
        os.remove(file_path)
        # Print a message to the console
        print(f"{file_path} deleted successfully.")

# Clear Frequent folder
frequent_folder = os.path.join(os.environ['APPDATA'], 'Microsoft', 'Windows', 'Recent', 'AutomaticDestinations')
os.system('del /f /q "{}\*"'.format(frequent_folder))

# Clear Recent files list
recent_folder = os.path.join(os.environ['APPDATA'], 'Microsoft', 'Windows', 'Recent')
os.system('del /f /q "{}\*"'.format(recent_folder))

Monday, March 20, 2023

Python 3.11.0 : PySimpleGUI - part 001.

PySimpleGUI runs on Windows, Linux and Mac, just like tkinter, Qt, WxPython and Remi do.
pip install PySimpleGUI --user
Collecting PySimpleGUI
  Downloading PySimpleGUI-4.60.4-py3-none-any.whl (509 kB)
     ---------------------------------------- 510.0/510.0 kB 2.5 MB/s eta 0:00:00
Installing collected packages: PySimpleGUI
Successfully installed PySimpleGUI-4.60.4
I try the default source code and works well:
import PySimpleGUI as sg
sg.theme('DarkAmber')   # Add a little color to your windows
# All the stuff inside your window. This is the PSG magic code compactor...
layout = [  [sg.Text('Some text on Row 1')],
            [sg.Text('Enter something on Row 2'), sg.InputText()],
            [sg.OK(), sg.Cancel()]]

# Create the Window
window = sg.Window('Window Title', layout)
# Event Loop to process "events"
while True:             
    event, values = window.read()
    if event in (sg.WIN_CLOSED, 'Cancel'):
        break

window.close()