analitics

Pages

Showing posts with label 2020 news. Show all posts

Saturday, October 31, 2020

Python 3.9.0 : Testing twisted python module - part 001 .

Today I tested two python modules named: twisted and twisted[tls].
Twisted is an event-driven network programming framework written in Python and licensed under the MIT License. Twisted projects variously support TCP, UDP, SSL/TLS, IP multicast, Unix domain sockets, many protocols (including HTTP, XMPP, NNTP, IMAP, SSH, IRC, FTP, and others), and much more. Twisted is based on the event-driven programming paradigm, which means that users of Twisted write short callbacks which are called by the framework., see wikipedia webpage.
In this tutorial I will show you only some of these tests and how you can work with these python modules.
About twisted you can read more at the official webpage. In Fedora distro version 33 you can use the dnf tool to search for and install these python packages.
[root@desk mythcat]# dnf search twisted
...
python3-twisted.x86_64 : Twisted is a networking engine written in Python
python3-twisted+tls.x86_64 : Metapackage for python3-twisted: tls extras
You can also use the pip tool for installation:
[mythcat@desk ~]$ cd PythonProjects/
[mythcat@desk PythonProjects]$ pip3 install twisted
...
[mythcat@desk PythonProjects]$ pip3 install twisted[tls]
...
I used python 3.9.0 to test if this python package works:
[mythcat@desk PythonProjects]$ python3.9
Python 3.9.0 (default, Oct  6 2020, 00:00:00) 
[GCC 10.2.1 20200826 (Red Hat 10.2.1-3)] on linux
Type "help", "copyright", "credits" or "license" for more information.
>>> from twisted.protocols import basic
Let's test with simple example using the reactor and protocol:
from twisted.internet import reactor, protocol

class ClientEcho(protocol.Protocol):
    def connectionMade(self):
        self.transport.write("Hello, world!".encode('utf-8'))

    def dataReceived(self, data):
        print ("Server: ", data)
        self.transport.loseConnection()

class FactoryEcho(protocol.ClientFactory):
    def buildProtocol(self, addr):
        return ClientEcho()

    def clientConnectionFailed(self, connector, reason):
        print ("Connection failed")
        reactor.stop()

    def clientConnectionLost(self, connector, reason):
        print ("Connection lost")
        reactor.stop()

reactor.connectTCP("localhost", 8080, FactoryEcho())
reactor.run()
Your protocol handling class will usually subclass twisted.internet.protocol.Protocol.
The default factory class twisted.internet.protocol.Factory just instantiates each Protocol and lets every Protocol access, and possibly modify, the persistent configuration.
This protocol responds to the initial connection with a well known quote, and then terminates the connection.
The protocol never waits for an event because handles data in an asynchronous manner.
The reactor interface lets many different loops handle the networking code.
The source code have two classes each is used to show a simple echo client on port 8080 - you can use any port.
This source code is the most simple example to understand the relation between factory , protocol and reactor.
The result is this:
[mythcat@desk PythonProjects]$ python3.9 echo_client_001.py 
Server:  b'Hello, world!'
Connection lost
Sunday, August 30, 2020

Python 3.8.5 : Testing with openpyxl - part 002 .

Today I will show you how can use Levenshtein ratio and distance between two strings, see wikipedia.
I used three files created with LibreOffice and save it like xlsx file type.
All of these files come with the column A fill with strings of characters, in this case, numbers.
The script will read all of these files from the folder named xlsx_files and will calculate Levenshtein ratio and distance between the strings of name of these files and column A.
Finally, the result is shown into a graph with matplotlib python package.
Let's see the python script:
import os
from glob import glob

from openpyxl import load_workbook
import numpy as np 
import matplotlib.pyplot as plt 

def levenshtein_ratio_and_distance(s, t, ratio_calc = False):
    """ levenshtein_ratio_and_distance - distance between two strings.
        If ratio_calc = True, the function computes the
        levenshtein distance ratio of similarity between two strings
        For all i and j, distance[i,j] will contain the Levenshtein
        distance between the first i characters of s and the
        first j characters of t
    """
    # Initialize matrix of zeros
    rows = len(s)+1
    cols = len(t)+1
    distance = np.zeros((rows,cols),dtype = int)

    # Populate matrix of zeros with the indeces of each character of both strings
    for i in range(1, rows):
        for k in range(1,cols):
            distance[i][0] = i
            distance[0][k] = k
    for col in range(1, cols):
        for row in range(1, rows):
            # check the characters are the same in the two strings in a given position [i,j] 
            # then the cost is 0
            if s[row-1] == t[col-1]:
                cost = 0 
            else:             
                # calculate distance, then the cost of a substitution is 1.
                if ratio_calc == True:
                    cost = 2
                else:
                    cost = 1
            distance[row][col] = min(distance[row-1][col] + 1,      # Cost of deletions
                                 distance[row][col-1] + 1,          # Cost of insertions
                                 distance[row-1][col-1] + cost)     # Cost of substitutions
    if ratio_calc == True:
        # Ration computation of the Levenshtein Distance Ratio
        Ratio = ((len(s)+len(t)) - distance[row][col]) / (len(s)+len(t))
        return Ratio
    else:
        return distance[row][col]


PATH = "/home/mythcat/xlsx_files/"
result = [y for x in os.walk(PATH) for y in glob(os.path.join(x[0], '*.xlsx'))]
result_files = [os.path.join(path, name) for path, subdirs, files in os.walk(PATH) for name in files]
#print(result)
row_0 = []

for r in result:
    n = 0
    wb = load_workbook(r)
    sheets = wb.sheetnames
    ws = wb[sheets[n]]
    for row in ws.rows:
            if (row[0].value) != None :
                rows = row[0].value
                row_0.append(rows)

print("All rows of column A ")
print(row_0)
files = []
for f in result_files:
    ff = str(f).split('/')[-1:][0]
    fff = str(ff).split('.xlsx')[0]
    files.append(fff)

print(files)
# define tree lists for levenshtein
list1 = []
list2 = []

for l in row_0:
    str(l).lower()
    for d in files:
        Distance = levenshtein_ratio_and_distance(str(l).lower(),str(d).lower())   
        Ratio = levenshtein_ratio_and_distance(str(l).lower(),str(d).lower(),ratio_calc = True)
        list1.append(Distance)
        list2.append(Ratio)
        
print(list1, list2)
# plotting the points  
plt.plot(list1,'g*', list2, 'ro' )
plt.show()
The result is this:
[mythcat@desk ~]$ python test_xlsx.py
All rows of column A 
[11, 2, 113, 4, 1111, 4, 4, 111, 2, 1111, 5, 4, 4, 3, 1111, 1, 2, 1113, 4, 115, 1, 2, 221, 1, 1,
 43536, 2, 34242, 3, 1]
['001', '002', '003']
[2, 3, 3, 3, 2, 3, 3, 3, 2, 3, 3, 3, 3, 4, 4, 3, 3, 3, 3, 3, 3, 2, 3, 3, 3, 2, 3, 3, 4, 4, 3, 3, 
3, 3, 3, 3, 3, 3, 3, 3, 3, 2, 3, 4, 4, 2, 3, 3, 3, 2, 3, 3, 4, 3, 3, 3, 3, 3, 3, 3, 2, 3, 3, 3, 
2, 3, 2, 3, 3, 2, 3, 3, 2, 3, 3, 5, 5, 4, 3, 2, 3, 5, 4, 5, 3, 3, 2, 2, 3, 3] [0.4, 0.0, 0.0, 0.0, 
0.5, 0.0, 0.3333333333333333, 0.0, 0.3333333333333333, 0.0, 0.0, 0.0, 0.2857142857142857, 0.0, 0.0,
 0.0, 0.0, 0.0, 0.0, 0.0, 0.0, 0.3333333333333333, 0.0, 0.0, 0.0, 0.5, 0.0, 0.2857142857142857, 0.0,
 0.0, 0.0, 0.0, 0.0, 0.0, 0.0, 0.0, 0.0, 0.0, 0.0, 0.0, 0.0, 0.5, 0.2857142857142857, 0.0, 0.0, 0.5,
 0.0, 0.0, 0.0, 0.5, 0.0, 0.2857142857142857, 0.0, 0.2857142857142857, 0.0, 0.0, 0.0, 0.3333333333333333,
 0.0, 0.0, 0.5, 0.0, 0.0, 0.0, 0.5, 0.0, 0.3333333333333333, 0.3333333333333333, 0.0, 0.5, 0.0, 0.0,
 0.5, 0.0, 0.0, 0.0, 0.0, 0.25, 0.0, 0.5, 0.0, 0.0, 0.25, 0.25, 0.0, 0.0, 0.5, 0.5, 0.0, 0.0]

Sunday, August 23, 2020

Python 3.8.5 : Testing with openpyxl - part 001 .

The Python executes the code line by line because is an interpreter language.
This allows users to solve issues in the programming area, fast and easy.
I use python versiono 3.8.5 build on Aug 12 2020 at 00:00:00, see the result of interactive mode:
[mythcat@desk ~]$ python
Python 3.8.5 (default, Aug 12 2020, 00:00:00) 
[GCC 10.2.1 20200723 (Red Hat 10.2.1-1)] on linux
Type "help", "copyright", "credits" or "license" for more information.
Today I will show you how to start using openpyxl python package.
Another tutorial about python and documents can be found here.
The openpyxl was created by Eric Gazoni, Charlie Clark, and is a Python library to read/write Excel 2010 xlsx/xlsm/xltx/xltm files.
Let's install the openpyxl python package:
[mythcat@desk ~]$ pip3 install openpyxl --user
Collecting openpyxl
...
Installing collected packages: openpyxl
Successfully installed openpyxl-3.0.5
I tested with the default example source code and works well.
from openpyxl import Workbook
wb = Workbook()

# grab the active worksheet
ws = wb.active

# Data can be assigned directly to cells
ws['A1'] = 42

# Rows can also be appended
ws.append([1, 2, 3])

# Python types will automatically be converted
import datetime
ws['A2'] = datetime.datetime.now()

# Save the file
wb.save("sample.xlsx")
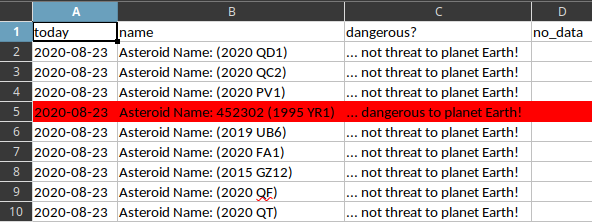
The next example gets all data about asteroids close to planet Earth and put into xlsx file type.
The rows with dangerous asteroids are fill with the red color:
# check asteroids close to planet Earth and add it to file
# import json python package
import json, urllib.request, time

# import openpyxl python package
from openpyxl import Workbook
from openpyxl.styles import PatternFill
# use active worksheet
wb = Workbook()
ws = wb.active

today = time.strftime('%Y-%m-%d', time.gmtime())
print("Time is: " + today)
now = today
# retrieve data about asteroids approaching planet Earth into json format
url = "https://api.nasa.gov/neo/rest/v1/feed?start_date=" + today + "&end_date=" + today + "&api_key=DEMO_KEY"
response = urllib.request.urlopen(url)
result = json.loads(response.read())

print("Now, " + str(result["element_count"]) + " asteroids is close to planet Earth.")
asteroids = result["near_earth_objects"]

no_data = ""
dangerous = ""

ws.append(['today', 'name', 'dangerous?', 'no_data'])
# parsing all the JSON data and add to file
for asteroid in asteroids:
    for field in asteroids[asteroid]:

      try:
        name = "Asteroid Name: " + field["name"]

        if field["is_potentially_hazardous_asteroid"]:   
          dangerous = "... dangerous to planet Earth!"

        else:
          dangerous = "... not threat to planet Earth!"

      except:
        no_data = "no data"
      ws.append([today, name, dangerous, no_data]) 

# create a red patern to fill
redFill = PatternFill(start_color='FFFF0000',
                   end_color='FFFF0000',
                   fill_type='solid')

# check the row with the dangerous asteroid and fill it
for row in ws.rows:
 if row[2].value == "... dangerous to planet Earth!":
  for cell in row:
      cell.fill = redFill

# write all data to file 
wb.save(str(now)+"_asteroids.xlsx")
I run it and result working well:
[mythcat@desk ~]$ python asteroid_data.py 
Time is: 2020-08-23
Now, 9 asteroids is close to planet Earth.
... see the next screenshot:


Saturday, August 22, 2020

Python 3.8.5 : Testing the pyre tool - part 001.

The Pyre is a static analysis tool to detect and prevent security issues in Python code that can be found on the official website.
The Pyre tool supports the Language Server Protocol and has an extension for VSCode.
The team development comes at August 7, 2020, with this intro:
Pyre is a performant type checker for Python. Statically typing what are essentially fully dynamic languages has a long tradition at Facebook. We've done this for PHP with Hack and for Javascript with Flow.
The install is easy to do with pip tool:
[mythcat@desk ~]$ pip install pyre-check
Defaulting to user installation because normal site-packages is not writeable
Collecting pyre-check
  Using cached pyre_check-0.0.52-py3-none-manylinux1_x86_64.whl (22.9 MB)
...
Installing collected packages: pyre-check
Successfully installed pyre-check-0.0.52
If you want to use a virtual environment:
[mythcat@desk ~]$ mkdir my_project && cd my_project
[mythcat@desk my_project]$ python3 -m venv ~/.venvs/venv
[mythcat@desk my_project]$ source ~/.venvs/venv/bin/activate
(venv) [mythcat@desk my_project]$ pip install pyre-check
Collecting pyre-check
...
(venv) [mythcat@desk my_project]$ pyre init
 ƛ Which directory should pyre be initialized in? (Default: `.`): 
(venv) [mythcat@desk my_project]$ cat .pyre_configuration
{
  "binary": "/home/mythcat/.venvs/venv/bin/pyre.bin",
  "source_directories": [
    "."
  ],
  "taint_models_path": "/home/mythcat/.venvs/venv/lib/pyre_check/taint/",
  "typeshed": "/home/mythcat/.venvs/venv/lib/pyre_check/typeshed/"
}
(venv) [mythcat@desk my_project]$ ls .pyre
my_project  pid_files  pyre.stderr
(venv) [mythcat@desk my_project]$ pyre
 ƛ No watchman binary found. 
To enable pyre incremental, you can install watchman: https://facebook.github.io/watchman/docs/install
 ƛ Defaulting to non-incremental check.
 ƛ No type errors found
Let's test with the default example from documentation:
(venv) [mythcat@desk my_project]$ echo "i: int = 'string'" > test.py
(venv) [mythcat@desk my_project]$ pyre
 ƛ No watchman binary found. 
To enable pyre incremental, you can install watchman: https://facebook.github.io/watchman/docs/install
 ƛ Defaulting to non-incremental check.
 ƛ Found 1 type error!
test.py:1:0 Incompatible variable type [9]: i is declared to have type `int` but is used as type `str`.
(venv) [mythcat@desk my_project]$ cat test.py 
i: int = 'string'
You can see is working well and detect the problem.
A short intro can found on the Facebook developers youtube channel:

Monday, May 18, 2020

News : Microsoft Build digital event for Python users.

We in the Python team are excited to be joining Microsoft Build 2020, which is starting next Tuesday, May 19. During a global pandemic, Build has turned into a digital-only event, running for 48 continuous hours, that is open to anyone around the world, at no cost.

At Build, we’ll demo the new capabilities we’ve been building recently. We’ll also showcase the work we have been doing to enable Python developers to build applications and analyze data using Visual Studio Code. Lastly, we’ll show how you can run Python web apps and machine learning models on the cloud with Azure.

Our friends across Microsoft will also present services and tools that developers, including those working with Python, can leverage to remain productive and continue collaborating even in remote, distributed teams.

You can participate in a live Q&A stream session:
This event can be found at the official webpage.