analitics

Pages

Showing posts with label PyQt5. Show all posts

Sunday, March 5, 2023

Python Qt5 : OpenStreetMap with PyQtWebEngine.

You need to install the PyQtWebEngine python package and to have the PyQt5 python package installed.
PyQt6 works in the same way as PyQt5 but with small differences ...
pip install PyQtWebEngine --user
Collecting PyQtWebEngine
  Downloading PyQtWebEngine-5.15.6-cp37-abi3-win_amd64.whl (182 kB)
     ---------------------------------------- 182.7/182.7 kB 580.6 kB/s eta 0:00:00
...
     ---------------------------------------- 60.0/60.0 MB 655.7 kB/s eta 0:00:00
...
Installing collected packages: PyQtWebEngine-Qt5, PyQtWebEngine
Successfully installed PyQtWebEngine-5.15.6 PyQtWebEngine-Qt5-5.15.2
import sys
from PyQt5.QtWebEngineWidgets import QWebEngineView
from PyQt5.QtWidgets import QApplication, QWidget, QVBoxLayout

class MapWidget(QWidget):
    def __init__(self, parent=None):
        super().__init__(parent)

        # Create a QWebEngineView object to display the map
        self.map = QWebEngineView()
        self.map.setHtml("""
            <!DOCTYPE html>
            <html>
                <head>
                    <meta name="viewport" content="width=device-width, initial-scale=1.0">
                    <style>
                        #map {
                            height: 100%;
                        }
                    </style>
                </head>
                <body>
                    <div id="map"></div>
                    <script src="https://openlayers.org/en/v4.6.5/build/ol.js"></script>
                    <script>
                        var map = new ol.Map({
                            target: 'map',
                            layers: [
                                new ol.layer.Tile({
                                    source: new ol.source.OSM()
                                })
                            ],
                            view: new ol.View({
                                center: ol.proj.fromLonLat([0, 0]),
                                zoom: 2
                            })
                        });
                    </script>
                </body>
            </html>
        """)

        # Create a QVBoxLayout to hold the map widget
        layout = QVBoxLayout()
        layout.addWidget(self.map)
        self.setLayout(layout)

if __name__ == '__main__':
    app = QApplication(sys.argv)
    widget = MapWidget()
    widget.show()
    sys.exit(app.exec_())
The run of this python script will show a window with the OpenStreetMap map.

Monday, January 3, 2022

Python Qt6 : The basic differences between PyQt5 and PyQt6.

Python Qt6 known as PyQt6 is a binding of the cross-platform GUI toolkit Qt, implemented as a Python plug-in with Qt 6 the latest version of Qt.
The PyQt6 first stable release was on 6 January 2021, developed by Riverbank Computing Ltd and the last release was on 2 December 2021 with the version PyQt v6.2.2.
This release is license GPL or commercial on Python 3 platform.
Let's see some differences between PyQt5 and PyQt6.
The .exec() method is used in Qt to start the event loop of your QApplication or dialog boxes. In Python 2.7 exec was a keyword and Python 3 removed the exec keyword.
The first difference as a result of PyQt6 .exec() calls are named just as in Qt.
If you read the documentation from the official webpage, then in your PyQt6 source code you need to use these changes:
QEvent.Type.MouseButtonPress
...
Qt.MouseButtons.RightButton
...
Both PyQt5 and PyQt6, although seemingly easy to use for complex applications, will require extra effort.

Tuesday, December 7, 2021

Python Qt5 : Simple browser with QWebEngineView.

This is a simple example with PyQt5 and QWebEngineView.
You can see this example and use it from my GitHub account.

Monday, December 6, 2021

Python Qt5 : QtWebEngineWidgets and button.

In this tutorial I will show you how to add a simple button to the application build with QtWebEngineWidgets using the addWidget to a QVBoxLayout with a lay variable.
The button named PyQt5 nothing button is not connected.
Let's see this default example:
import sys

from PyQt5.QtCore import QUrl
from PyQt5.QtWidgets import QApplication, QPushButton, QMainWindow, QVBoxLayout, QWidget
from PyQt5.QtWebEngineWidgets import QWebEnginePage, QWebEngineSettings, QWebEngineView

class Widget(QWidget):
    def __init__(self, parent=None):
        super().__init__(parent)
        self.view = QWebEngineView()
        lay = QVBoxLayout(self)
        lay.addWidget(self.view)
        self.resize(640, 480)

class WebEnginePage(QWebEnginePage):
    def createWindow(self, _type):
        w = Widget()
        w.show()
        return w.view.page()

class MainWindow(QMainWindow):
    def __init__(self, parent=None):
        super(MainWindow, self).__init__(parent=None)

        self.setWindowTitle("PyQt5 ... another example !!")
        central_widget = QWidget()
        self.setCentralWidget(central_widget)
        
        button = QPushButton('PyQt5 nothing button', self)
        button.setToolTip('This is an example button')

        self.webview = QWebEngineView()
        self.page = WebEnginePage()
        self.webview.setPage(self.page)
        self.webview.settings().setAttribute(
            QWebEngineSettings.FullScreenSupportEnabled, True
        )

        self.webview.load(
            QUrl("https://www.youtube.com/watch?v=BVT3acNFzqc?rel=0&showinfo=0")
        )

        lay = QVBoxLayout(central_widget)
        lay.addWidget(button)
        lay.addWidget(self.webview)

def main():
    app = QApplication(sys.argv)
    window = MainWindow()
    window.show()
    app.exec_()

if __name__ == "__main__":
    main()

Thursday, November 25, 2021

Python Qt5 : QtWebEngineWidgets and YouTube Video.

In this tutorial I will show you how to play a video from Youtube using PyQt5 and this standard URL type:
http://www.youtube.com/watch_popup?v=VIDEOID
I used this version of python, version 3.9.6.
python
Python 3.9.6 (tags/v3.9.6:db3ff76, Jun 28 2021, 15:26:21) [MSC v.1929 64 bit (AMD64)] on win32
Type "help", "copyright", "credits" or "license" for more information.
...
The source code is simple:
import time

import sys

from PyQt5.QtCore import QUrl
from PyQt5.QtWebEngineWidgets import QWebEngineView, QWebEngineProfile
from PyQt5.QtWebEngineWidgets import QWebEnginePage, QWebEngineSettings
from PyQt5.QtWidgets import QApplication

if __name__ == '__main__':


    app = QApplication(sys.argv)

    webview = QWebEngineView()
    profile = QWebEngineProfile("my_profile", webview)
    profile.defaultProfile().setPersistentCookiesPolicy(QWebEngineProfile.ForcePersistentCookies)
    webpage = QWebEnginePage(profile, webview)
    webpage.settings().setAttribute(QWebEngineSettings.PlaybackRequiresUserGesture, False)

    webview.setPage(webpage)
    webview.load(QUrl("http://www.youtube.com/watch_popup?v=aw4ZDQsFxv0"))
    webview.show()

    sys.exit(app.exec_())
The song is: SO EMOTIONAL- Olivia Rodrigo - Traitor | Allie Sherlock cover, see it on youtube.

Friday, November 5, 2021

Python Qt5 : Drag and drop examples - part 001.

This tutorial si about drag and drop with PyQt5 and Python 3.9.6.
The drag and drop feature is very intuitive for the user.
The widgets should respond to the drag and drop events in order to store the data dragged into them. 
  • DragEnterEvent provides an event which is sent to the target widget as dragging action enters it.
  • DragMoveEvent is used when the drag and drop action is in progress.
  • DragLeaveEvent is generated as the drag and drop action leaves the widget.
  • DropEvent, on the other hand, occurs when the drop is completed. The event’s proposed action can be accepted or rejected conditionally.
Let's see two example, first is a drag and drop for one button:
#!/usr/bin/python
import sys
from PyQt5.QtCore import Qt, QMimeData
from PyQt5.QtGui import QDrag
from PyQt5.QtWidgets import QPushButton, QWidget, QApplication

class Button(QPushButton):

    def __init__(self, title, parent):
        super().__init__(title, parent)

    def mouseMoveEvent(self, e):

        if e.buttons() != Qt.RightButton:
            return

        mimeData = QMimeData()

        drag = QDrag(self)
        drag.setMimeData(mimeData)
        drag.setHotSpot(e.pos() - self.rect().topLeft())
        dropAction = drag.exec_(Qt.MoveAction)

    def mousePressEvent(self, e):
        super().mousePressEvent(e)
        if e.button() == Qt.LeftButton:
            print('press')


class Example(QWidget):

    def __init__(self):
        super().__init__()

        self.initUI()

    def initUI(self):

        self.setAcceptDrops(True)

        self.button = Button('Button', self)
        self.button.move(100, 65)

        self.setWindowTitle('Drag and drop with mouse - right click to move Button!')
        self.setGeometry(300, 300, 550, 450)

    def dragEnterEvent(self, e):
        e.accept()

    def dropEvent(self, e):
        position = e.pos()
        self.button.move(position)

        e.setDropAction(Qt.MoveAction)
        e.accept()

def main():
    
    app = QApplication(sys.argv)
    ex = Example()
    ex.show()
    app.exec_()

if __name__ == '__main__':
    main()
... this source code is for a drag and drop for a image file:
import sys, os
from PyQt5.QtWidgets import QApplication, QWidget, QLabel, QVBoxLayout
from PyQt5.QtCore import Qt
from PyQt5.QtGui import QPixmap


class ImageLabel(QLabel):
    def __init__(self):
        super().__init__()

        self.setAlignment(Qt.AlignCenter)
        self.setText('\n\n Drop Image Here \n\n')
        self.setStyleSheet('''
            QLabel{
                border: 3px dashed #bbb
            }
        ''')

    def setPixmap(self, image):
        super().setPixmap(image)

class AppDemo(QWidget):
    def __init__(self):
        super().__init__()
        
        self.setWindowTitle('Drag and drop one image to this window!')
        self.setGeometry(300, 300, 550, 450)

        self.setAcceptDrops(True)

        mainLayout = QVBoxLayout()

        self.photoViewer = ImageLabel()
        mainLayout.addWidget(self.photoViewer)

        self.setLayout(mainLayout)

    def dragEnterEvent(self, event):
        if event.mimeData().hasImage:
            event.accept()
        else:
            event.ignore()

    def dragMoveEvent(self, event):
        if event.mimeData().hasImage:
            event.accept()
        else:
            event.ignore()

    def dropEvent(self, event):
        if event.mimeData().hasImage:
            event.setDropAction(Qt.CopyAction)
            file_path = event.mimeData().urls()[0].toLocalFile()
            self.set_image(file_path)

            event.accept()
        else:
            event.ignore()

    def set_image(self, file_path):
        self.photoViewer.setPixmap(QPixmap(file_path))

app = QApplication(sys.argv)
demo = AppDemo()
demo.show()
sys.exit(app.exec_())

Friday, October 1, 2021

Python Qt5 : The QSvgWidget for the SVG image format.

In this example tutorial, I will show you how can show an SVG image format with the PyQt5 and QSvgWidget.
I used Fedora 35 Beta with python pyqt5 package install with pip tool.
$ pip install pyqt5
The source code in the Python programming language is this:
The result image is this:

Sunday, July 4, 2021

Python Qt5 : Parse files and show image with QPixmap .

This tutorial is about how to create a simple script in python with a few features:
You can see I used these python packages: argparse, PIL, glob, io, PyQt5 to fulfill the issue.
The PIL python package is used to use PNG images.
The argparse python package is used to get inputs from arguments.
The glob python package is used to parse folders and files.
The io python package is used to open images:
The PyQt5 python package is used to show images on canvas:
This is the source code in python I used to parse a folder with images and show one image:
import os
import io
import sys
import glob

from PIL import Image
from PIL import UnidentifiedImageError

from PyQt5.QtGui import QPixmap
from PyQt5.QtWidgets import QMainWindow, QApplication, QLabel

import argparse
from pathlib import Path

parser = argparse.ArgumentParser()

parser.add_argument("files_path", type=Path, help='PATH of folder with files ')
parser.add_argument('-p','--print_files', action='store_true', 
    help='Print files from folder ')
parser.add_argument('-s','--show', action='store_true', 
    help='Show image in PyQt5 canvas!')
args = vars(parser.parse_args())

p = parser.parse_args()
print(p.files_path, type(p.files_path), p.files_path.exists())
print(p.show)
files = os.listdir(p.files_path)
file_list = []
image_list = []
bad_files_list =[]

if args['print_files']: 
    print("These are files from folder "+str(p.files_path))
    for f in file_list:
	    print(f)

images_ext = str(Path(p.files_path))+'/*.png'
print("images_ext: "+images_ext)
for filename in glob.glob(images_ext): #assuming png
    try:
        f = open(filename, 'rb')
        file = io.BytesIO(f.read())
        im = Image.open(file)
        image_list.append(filename)
        print(str(len(image_list))+" good file is"+filename)
    except Image.UnidentifiedImageError:
        bad_files_list.append(str(p.files_path)+"/"+str(filename))

for f in bad_files_list:
	print("bad file is : " + f)


if args['show']:
    value = input("Please enter the index of PNG image :\n")
    try:
        int(value)
        print("Image number select default : " + value)      
        value = int(value)
        if value &lt= len(image_list):
            value = int(value)
        else:
            print("The number image selected is greater then len of list images!")
            value = len(image_list)
    except:
        print("This is not a number, I set first image number.")
        value = 1

    class MainWindow(QMainWindow):

        def __init__(self):
            super(MainWindow, self).__init__()
            self.title = "Image Viewer"
            self.setWindowTitle(self.title)

            label = QLabel(self)
            pixmap = QPixmap(image_list[int(value)])
            label.setPixmap(pixmap)
            self.setCentralWidget(label)
            self.resize(pixmap.width(), pixmap.height())

    app = QApplication(sys.argv)
    w = MainWindow()
    w.show()
    sys.exit(app.exec_())
These are the output of the script:
[mythcat@desk PIL001]$ python  tool001.py 
usage: tool001.py [-h] [-p] [-s] files_path
tool001.py: error: the following arguments are required: files_path
[mythcat@desk PIL001]$ python  tool001.py ~/Pictures/
/home/mythcat/Pictures  True
False
images_ext: /home/mythcat/Pictures/*.png
1 good file is/home/mythcat/Pictures/keyboard.png
2 good file is/home/mythcat/Pictures/Fedora_The_Pirate_CaribbeanHunt.png
3 good file is/home/mythcat/Pictures/website.png
4 good file is/home/mythcat/Pictures/Screenshot from 2021-02-19 19-24-32.png
...
97 good file is/home/mythcat/Pictures/Screenshot from 2021-07-03 17-31-23.png
98 good file is/home/mythcat/Pictures/Screenshot from 2021-07-03 17-46-05.png
bad file is : /home/mythcat/Pictures//home/mythcat/Pictures/Screenshot from 2021-02-07 14-58-56.png
bad file is : /home/mythcat/Pictures//home/mythcat/Pictures/evolution_logo.png
[mythcat@desk PIL001]$ python  tool001.py ~/Pictures/ -p
/home/mythcat/Pictures  True
False
These are files from folder /home/mythcat/Pictures
images_ext: /home/mythcat/Pictures/*.png
1 good file is/home/mythcat/Pictures/keyboard.png
2 good file is/home/mythcat/Pictures/Fedora_The_Pirate_CaribbeanHunt.png
3 good file is/home/mythcat/Pictures/website.png
...
97 good file is/home/mythcat/Pictures/Screenshot from 2021-07-03 17-31-23.png
98 good file is/home/mythcat/Pictures/Screenshot from 2021-07-03 17-46-05.png
bad file is : /home/mythcat/Pictures//home/mythcat/Pictures/Screenshot from 2021-02-07 14-58-56.png
bad file is : /home/mythcat/Pictures//home/mythcat/Pictures/evolution_logo.png
[mythcat@desk PIL001]$ python  tool001.py ~/Pictures/ -s
/home/mythcat/Pictures  True
True
images_ext: /home/mythcat/Pictures/*.png
...
97 good file is/home/mythcat/Pictures/Screenshot from 2021-07-03 17-31-23.png
98 good file is/home/mythcat/Pictures/Screenshot from 2021-07-03 17-46-05.png
bad file is : /home/mythcat/Pictures//home/mythcat/Pictures/Screenshot from 2021-02-07 14-58-56.png
bad file is : /home/mythcat/Pictures//home/mythcat/Pictures/evolution_logo.png
Please enter the index of PNG image :
6
Image number select default : 6

Tuesday, September 29, 2020

Python Qt5 : Use QStandardItem with Images.

This tutorial show you how to use QStandardItem with Images.

The source code is simple to understand.

import sys
from PyQt5.QtWidgets import QApplication, QMainWindow, QTreeView
from PyQt5.QtCore import  Qt
from PyQt5.QtGui import QFont, QColor, QImage, QStandardItemModel, QStandardItem

class ItemImage(QStandardItem):
    def __init__(self, txt='', image_path='', set_bold=False, color=QColor(0, 0, 0)):
        super().__init__()

        self.setEditable(False)
        self.setForeground(color)
        self.setText(txt)

        if image_path:
            image = QImage(image_path)
            self.setData(image, Qt.DecorationRole)

class MyApp(QMainWindow):
    def __init__(self):
        super().__init__()
        self.resize(1200, 1200)

        treeView = QTreeView()
        treeView.setHeaderHidden(True)
        treeView.header().setStretchLastSection(True)

        treeModel = QStandardItemModel()
        rootNode = treeModel.invisibleRootItem()

        robots = ItemImage('Robots', '', set_bold=True)

        aaa = ItemImage('aaa.jpg', 'aaa.jpg', 14)
        robots.appendRow(aaa)

        bbb = ItemImage('bbb.jpg', 'bbb.jpg', 16)
        robots.appendRow(bbb)

        robots2 = ItemImage('Robots 2', '', set_bold=False)

        aaa = ItemImage('ccc.png', 'ccc.png', 14)
        robots2.appendRow(aaa)

        bbb = ItemImage('ddd.jpg', 'ddd.jpg', 16)
        robots2.appendRow(bbb)

        rootNode.appendRow(robots)
        rootNode.appendRow(robots2)
        treeView.setModel(treeModel)
        treeView.expandAll()

        self.setCentralWidget(treeView)

app = QApplication(sys.argv)        
demo = MyApp()
demo.show()
sys.exit(app.exec_())

The result is this:

Monday, August 24, 2020

Python Qt5 : Get item data from QTreeWidgets.

In this example, I create a tree view with QTreeView with all folders tree.
I add a context_menu with two options.
One option is to get the data from item and is the name of the folder.
The second option is to close the application.
Let's see the source code:
import sys
from PyQt5.QtWidgets import QApplication, QFileSystemModel, QDesktopWidget
from PyQt5.QtWidgets import QTreeView, QWidget, QVBoxLayout, QMenu
from PyQt5.QtGui import QIcon
from PyQt5 import QtCore
from PyQt5.QtCore import Qt, QObject

class my_app_tree(QWidget):

    def __init__(self):
        super().__init__()
        self.title = "show files and folders on tree view"
        #self.left = 0
        #self.top = 0
        #self.width = 640
        #self.height = 480
        self.center()
        self.resize(640,480)
        self.initUI()

    def center(self):
        frame_geometry = self.frameGeometry()
        center_position = QDesktopWidget().availableGeometry().center()
        frame_geometry.moveCenter(center_position)
        self.move(frame_geometry.topLeft())

    def context_menu(self, position):
        menu = QMenu()
        copy_action = menu.addAction("Get folder")
        quit_action = menu.addAction("Quit")
        action = menu.exec_(self.tree.mapToGlobal(position))
        # quit application
        if action == quit_action:
            my_application.quit()
        # copy folder name from item
        elif action == copy_action:
            item = self.tree.selectedIndexes()[0].data()
            print("name folder is: "+str(item))

    def initUI(self):
        self.setWindowTitle(self.title)
        #the next source code line is used with left, top, width, height from __init__
        #self.setGeometry(self.left, self.top, self.width, self.height)
        
        self.model = QFileSystemModel()
        self.model.setRootPath('')
        self.tree = QTreeView()
        self.tree.setModel(self.model)
        
        self.tree.setAnimated(False)
        self.tree.setIndentation(20)
        self.tree.setSortingEnabled(True)
        
        self.tree.setWindowTitle("Dir View")
        self.tree.resize(640, 480)
        
        windowLayout = QVBoxLayout()
        windowLayout.addWidget(self.tree)
        self.setLayout(windowLayout)

        self.tree.setContextMenuPolicy(Qt.CustomContextMenu)
        self.tree.customContextMenuRequested.connect(self.context_menu)
        
        self.show()

if __name__ == '__main__':
    my_application = QApplication(sys.argv)
    example = my_app_tree()
    sys.exit(my_application.exec_())
The result of this source code can be see in the next image:

Sunday, August 23, 2020

Python Qt5 : Add and remove items between two QTreeWidgets.

Today's tutorial will show you how to add and remove items between two QTreeWidgets.
The source code is very simple to understand: the user interface is created with two QTreeWidgets.
One is completed with elements and when the buttons are pressed, the elements are interchanged.
import sys
from PyQt5.QtWidgets import QApplication, QWidget, QDesktopWidget, QPushButton
from PyQt5.QtWidgets import QBoxLayout,QTreeWidget,QTreeWidgetItem

class my_app_class(QWidget):
    def __init__(self):
        super().__init__()

        self.add_button=QPushButton('Add item here')
        self.remove_button=QPushButton('Remove item')
        self.wishlist=QTreeWidget(self)
        self.tree_list=QTreeWidget(self)
        # init the UI
        self.initUI()

    def initUI(self):
        # set title of window
        self.setWindowTitle('add and remove items from QTreeWidget!')

        self.init_tree()

        self.resize(800, 480)
        self.center()
        self.show()

    def center(self):
        geometry_frame = self.frameGeometry()
        center_pos = QDesktopWidget().availableGeometry().center()
        geometry_frame.moveCenter(center_pos)
        self.move(geometry_frame.topLeft())


    def init_tree(self):
        headers = ['A','B','C','D']

        self.tree_list.setColumnCount(len(headers))
        self.tree_list.setHeaderLabels(headers)

        self.wishlist.setColumnCount(len(headers))
        self.wishlist.setHeaderLabels(headers)


        list_layout = QBoxLayout(QBoxLayout.LeftToRight)
        list_layout.addWidget(self.tree_list)
        list_layout.addWidget(self.wishlist)

        tree_root = QTreeWidget.invisibleRootItem(self.tree_list)
        # add data to QTreeWidget with QTreeWidgetItem
        my_data = ['1','2','3','4']
        item = QTreeWidgetItem()
        for idx, data in enumerate(my_data):
            item.setText(idx, data)

        tree_root.addChild(item)

        my_data = ['11','10','01','D']
        item = QTreeWidgetItem()
        for idx, data in enumerate(my_data):
            item.setText(idx, data)

        tree_root.addChild(item)

        my_data = ['s', 'c', 'c', 'c']
        item = QTreeWidgetItem()
        for idx, data in enumerate(my_data):
            item.setText(idx, data)

        tree_root.addChild(item)

        btn_layout = QBoxLayout(QBoxLayout.RightToLeft)
        btn_layout.addWidget(self.add_button)
        btn_layout.addWidget(self.remove_button)

        main_layout = QBoxLayout(QBoxLayout.TopToBottom)
        main_layout.addLayout(list_layout)
        main_layout.addLayout(btn_layout)

        self.add_button.clicked.connect(self.move_item)
        self.remove_button.clicked.connect(self.move_item)

        self.setLayout(main_layout)
        return main_layout


    def move_item(self):
        sender = self.sender()

        if self.add_button == sender:
            source = self.tree_list
            target = self.wishlist
        else:
            source = self.wishlist
            target = self.tree_list

        item = QTreeWidget.invisibleRootItem(source).takeChild(source.currentIndex().row())
        QTreeWidget.invisibleRootItem(target).addChild(item)

if __name__=='__main__':
    # start the QApplication
    my_application = QApplication(sys.argv)
    # create aplication with the class
    example = my_app_class()
    # use exit for QApplication
    sys.exit(my_application.exec_())

Saturday, July 18, 2020

Python Qt5 : Create a simple web browser.

This python package named PyQtWebEngine, see the official webpage for more infos:
The team development comes with this intro:
PyQtWebEngine is a set of Python bindings for The Qt Company’s Qt WebEngine framework. The framework provides the ability to embed web content in applications and is based on the Chrome browser. The bindings sit on top of PyQt5 and are implemented as three separate modules corresponding to the different libraries that make up the framework.
I used my python version: Python 3.8.3rc1 (tags/v3.8.3rc1:802eb67, Apr 29 2020, 21:39:14) [MSC v.1924 64 bit (AMD64)] on win32
... and PyQt5 version PyQt version: 5.15.0:
>>> from PyQt5.Qt import PYQT_VERSION_STR        
>>> print("PyQt version:", PYQT_VERSION_STR)  
PyQt version: 5.15.0
First, let's install this python package:
pip3 install PyQtWebEngine --user
Collecting PyQtWebEngine
  Using cached PyQtWebEngine-5.15.0-5.15.0-cp35.cp36.cp37.cp38-none-win_amd64.whl (57.9 MB)
Collecting PyQt5-sip<13>=12.8
  Using cached PyQt5_sip-12.8.0-cp38-cp38-win_amd64.whl (63 kB)
Collecting PyQt5>=5.15
  Using cached PyQt5-5.15.0-5.15.0-cp35.cp36.cp37.cp38-none-win_amd64.whl (64.5 MB)
Installing collected packages: PyQt5-sip, PyQt5, PyQtWebEngine
  WARNING: The scripts pylupdate5.exe, pyrcc5.exe and pyuic5.exe are installed in 
'C:\Users\catal\AppData\Roaming\Python\Python38\Scripts' which is not on PATH.
  Consider adding this directory to PATH or, if you prefer to suppress this warning, 
use --no-warn-script-location.
Successfully installed PyQt5-5.15.0 PyQt5-sip-12.8.0 PyQtWebEngine-5.15.0
The WARNING reflects the path for this tool, but you can find on user folder, see:
C:\Users\catal>pylupdate5.exe
Usage:
    pylupdate5 [options] project-file
    pylupdate5 [options] source-files -ts ts-files

Options:
    -help  Display this information and exit
    -version
           Display the version of pylupdate5 and exit
    -verbose
           Explain what is being done
    -noobsolete
           Drop all obsolete strings
    -tr-function name
           name() may be used instead of tr()
    -translate-function name
           name() may be used instead of translate()

C:\Users\catal>
This is a simple source code with an browser example:
import sys
from PyQt5.Qt import *
from PyQt5 import QtCore, QtWidgets
from PyQt5.QtWidgets import QMainWindow, QWidget, QLabel, QLineEdit
from PyQt5.QtWidgets import QPushButton
from PyQt5.QtCore import QSize, QUrl
from PyQt5.QtWebEngineWidgets import *
from PyQt5.QtWebEngineWidgets import QWebEnginePage, QWebEngineView
class MainWindow(QMainWindow):
    def __init__(self):
        super(MainWindow, self).__init__()

        self.setWindowTitle('catafest browser')

        self.browser_toolbar = QToolBar()
        self.addToolBar(self.browser_toolbar)
        self.back_button = QPushButton()
        #self.back_button.setIcon(QIcon('left.png'))
        self.back_button.clicked.connect(self.back_page)
        self.browser_toolbar.addWidget(self.back_button)
        self.forward_button = QPushButton()
        #self.forward_button.setIcon(QIcon('right.png'))
        self.forward_button.clicked.connect(self.forward_page)
        self.browser_toolbar.addWidget(self.forward_button)

        self.web_address = QLineEdit()
        self.web_address.returnPressed.connect(self.load_page)
        self.browser_toolbar.addWidget(self.web_address)

        self.web_browser = QWebEngineView()
        self.setCentralWidget(self.web_browser)
        first_url = "https://pypi.org/project/PyQt5/"

        self.web_address.setText(first_url)
        self.web_browser.load(QUrl(first_url))
        self.web_browser.page().titleChanged.connect(self.setWindowTitle)
        self.web_browser.page().urlChanged.connect(self.changed_page)
        
    def load_page(self):
        url = QUrl.fromUserInput(self.web_address.text())
        if url.isValid():
            self.web_browser.load(url)

    def back_page(self):
        self.web_browser.page().triggerAction(QWebEnginePage.Back)

    def forward_page(self):
        self.web_browser.page().triggerAction(QWebEnginePage.Forward)

    def changed_page(self, url):
        self.web_address.setText(url.toString())
        
if __name__ == "__main__":
    app = QtWidgets.QApplication(sys.argv)
    mainWin = MainWindow()
    availableGeometry = app.desktop().availableGeometry(mainWin)
    mainWin.resize(availableGeometry.width(), availableGeometry.height())
    mainWin.show()
    sys.exit( app.exec_() )

Tuesday, May 26, 2020

Python Qt5 : PyQt5 and PyGame compatibility with source code.

This tutorial tries to solve from the objectives related to solving and stabilizing compatibility errors between PyQt4 and PyQt5 and creating a common interface between PyQt5 and PyGame.
There is always the same problem in programming when the developer for some reason has to change classes, methods and functions and reusing the old code is no longer valid.
In this case, common or other errors occur, which leads to a waste of time.
I will present a simple way to solve these problems.
I really like to use the PyQt5 module to create interfaces for my python programs and scripts.
Like any programmer who hasn't fully used all A.P.I, I always use the old source code I programmed in the past.
What the developer says about the transition from PyQt4 to PyQt5 we can see on the official page.
Obviously, you will have to move on to things to know but it is quite difficult to always come back and read this content when you have programming errors.
Today, I wanted to make a simple drawing interface in PyGame that would be included in a PyQt5 interface.
I tried to use an old code created by me in PyQt4 but I realized that I had encountered errors before switching to the new PyQt5.
This compatibility problem generates errors and can be solved as follows: by knowing the exact solution and fixing errors in real time, studying the changes created by the developer or the classic search for errors.
My solution comes with the help of these solutions and requires a simple step using the commented source code.
To show you how simple it is to understand I will show you the source code for the interface I built that simply to solves the problem of understanding compatibility by reading the developer source code with simple and useful comments.
#the old import for PyQt4
#from PyQt4 import QtGui

#the new import for PyQt5
#from PyQt5 import QtCore, QtGui, QtWidgets
#class MainWindow(QtWidgets.QMainWindow, UI.MainUI.Ui_MainWindow):

from PyQt5 import QtGui
from PyQt5 import QtWidgets
import pygame
import sys

# old definition for PyQt4 for QWidget
#class ImageWidget(QtGui.QWidget):
class ImageWidget(QtWidgets.QWidget):   
    def __init__(self,surface,parent=None):
        super(ImageWidget,self).__init__(parent)
        w=surface.get_width()
        h=surface.get_height()
        self.data=surface.get_buffer().raw
        self.image=QtGui.QImage(self.data,w,h,QtGui.QImage.Format_RGB32)

    def paintEvent(self,event):
        my_paint=QtGui.QPainter()
        # the definitions for PyQt4 and PyQt5 use QtGui.QPainter()     
        my_paint.begin(self)
        my_paint.drawImage(0,0,self.image)
        my_paint.end()
        
# old definition for PyQt4 for QMainWindow
#class MainWindow(QtGui.QMainWindow):
class MainWindow(QtWidgets.QMainWindow):
    def __init__(self,surface,parent=None):
        super(MainWindow,self).__init__(parent)
        self.setFixedSize(640, 480)
        self.setCentralWidget(ImageWidget(surface))
# this part of source code need to be updated if you want to use animation        
# init PyGame 
pygame.init()
# define a surface 
my_surface=pygame.Surface((640,480))
# fill the surface, see https://www.pygame.org/docs/ref/surface.html#pygame.Surface.fill
my_surface.fill((0,0,255,176))
# draw circle see https://www.pygame.org/docs/ref/draw.html#pygame.draw.circle
pygame.draw.circle(my_surface,(0,0,127,255),(76,76),76)
# draw ellipse (surface, color(R,G,B), size (x,y,x+dx, y+y+dy) )
pygame.draw.ellipse(my_surface,(127,0,0,0),(0,0,12,76))
 
# this part of source code will show 
# the my_surface created with PyGame in PyQt5
# old definition for PyQt4
#app=QtGui.QApplication(sys.argv)
app=QtWidgets.QApplication(sys.argv)
my_window=MainWindow(my_surface)
my_window.show()
app.exec_()

Monday, May 11, 2020

Python Qt5 : Simple text editor with QPlainTextEdit.

I haven't played python in a long time. It can be seen after the last article.
Today I installed Python 3.8.3 and my favorite PyQt5 and started to see how much I forgot from what I knew.
Installing PyQt5 python mode was simple.
pip3 install PyQt5
Collecting PyQt5
  Downloading PyQt5-5.14.2-5.14.2-cp35.cp36.cp37.cp38-none-win_amd64.whl (52.9 MB)
     |████████████████████████████████| 52.9 MB 80 kB/s
Collecting PyQt5-sip<13>=12.7
  Downloading PyQt5_sip-12.7.2-cp38-cp38-win_amd64.whl (59 kB)
     |████████████████████████████████| 59 kB 4.1 MB/s
Installing collected packages: PyQt5-sip, PyQt5
Successfully installed PyQt5-5.14.2 PyQt5-sip-12.7.2

The next step was to use QPlainTextEdit so the task was simple: an editor.
Because I created another article about a publisher, see this tutorial, I decided to attach a main menu with submenus and customize it.
The source code is simple to understand and is commented for a better understanding.
# -*- coding: utf-8 -*-
"""
@author: catafest
"""
import sys
import sys, os
from PyQt5 import QtCore, QtWidgets
from PyQt5.QtWidgets import QMainWindow, QAction, qApp, QApplication, QDesktopWidget
from PyQt5.QtWidgets import QMenu, QPlainTextEdit, QSizePolicy
from PyQt5.QtGui import QIcon
from PyQt5.QtCore import Qt,QSize

class Example(QMainWindow):
    #init the example class to draw the window application    
    def __init__(self, parent = None):
        super(Example,self).__init__(parent)  
        size_policy = self.sizePolicy()
        size_policy.setHeightForWidth(True)
        size_policy.setVerticalPolicy(QSizePolicy.Preferred)
        self.setSizePolicy(size_policy)  
        self.initUI()

    #create the def center to select the center of the screen         
    def center(self):
        # geometry of the main window
        qr = self.frameGeometry()
        
        # center point of screen
        cp = QDesktopWidget().availableGeometry().center()
        # move rectangle's center point to screen's center point
        qr.moveCenter(cp)
        # top left of rectangle becomes top left of window centering it
        self.move(qr.topLeft())

    #create the init UI to draw the application
    def initUI(self):               
        #create the action for the exit application with shortcut and icon
        #you can add new action for File menu and any actions you need
        #self.setMinimumSize(QSize(440, 240))    
        self.setWindowTitle("parse sensors output - catafest")
        self.editor_text = QPlainTextEdit(self)
        # font
        default_font = self.editor_text.font()
        default_font.setPointSize(9)
        self.editor_text.setFont(default_font)

        self.setCentralWidget(self.editor_text)
        #self.editor_text.setMinimumSize(400,600)

        self.editor_text.setVerticalScrollBarPolicy(QtCore.Qt.ScrollBarAsNeeded)
        self.editor_text.setHorizontalScrollBarPolicy(QtCore.Qt.ScrollBarAsNeeded)
        
        self.editor_text.setObjectName("editor_text")
        self.editor_text.setEnabled(True)
        
        openAct = QAction(QIcon('open.png'), '&Open', self)        
        openAct.setShortcut('Ctrl+O')
        openAct.setStatusTip('Open file')
        openAct.triggered.connect(self.my_OpenDialog)

        exitAct = QAction(QIcon('exit.png'), '&Exit', self)        
        exitAct.setShortcut('Ctrl+Q')
        exitAct.setStatusTip('Exit application')
        exitAct.triggered.connect(qApp.quit)
        #create the status bar for menu 
        self.statusBar()
        #create the menu with the text File , add the exit action 
        #you can add many items on menu with actions for each item
        menubar = self.menuBar()
        fileMenu = menubar.addMenu('&File')
        # create open 
        fileMenu.addAction(openAct)
        # create exit 
        fileMenu.addAction(exitAct)
        
        # add submenu to menu 
        submenu = QMenu('Submenu',self)

        # some dummy actions
        submenu.addAction('Submenu 1')
        submenu.addAction('Submenu 2')
        
        # allow adding a sphere
        meshMenu = submenu.addMenu('Mesh')
        self.add_sphere_action = QAction('Add Sphere', self)
        self.add_sphere_action.triggered.connect(self.add_sphere)
        meshMenu.addAction(self.add_sphere_action)

        # add to the top menu
        menubar.addMenu(submenu)

        #layout = QtWidgets.QGridLayout(self)
        #layout.addWidget(self.editor_text)
        self.editor_text

        #resize the window application 
        self.resize(960, 720)
        #draw on center of the screen 
        self.center()
        #add title on windows application 
        self.setWindowTitle('Simple menu')
        #show the application
        self.show()
        #close the UI class

    def my_OpenDialog(self):
        path = QtWidgets.QFileDialog.getOpenFileName(
            self, 'Open file', '',
            'Text files (*.txt);;HTML files (*.html)')[0]
        if path:
            file = QtCore.QFile(path)
            if file.open(QtCore.QIODevice.ReadOnly):
                stream = QtCore.QTextStream(file)
                text = stream.readAll()
                info = QtCore.QFileInfo(path)
                if info.completeSuffix() == 'txt':
                    #self.editor_text.setHtml(text)
                    self.editor_text.insertPlainText(text)
                else:
                    self.editor_text.setPlainText(text)
                file.close()

    def add_sphere(self):
        """ add text with sphere """
        print("sphere")
        
if __name__ == '__main__':
    #create the application 
    app = QApplication(sys.argv)
    #use the UI with new  class
    ex = Example()
    #run the UI 
    sys.exit(app.exec_())

Sunday, March 1, 2020

Python Qt5 : Create a spectrum equalizer.

I haven't written much for a while on these issues about python and PyQt5.
Today I will show a complex example of QtMultimedia and how to create a spectrum equalizer.
First, the PyQt5 bindings come with this python module named QtMultimedia.
The main reason was the lack of time and focus of my effort on more stringent elements of my life.
Let's start with the few lines of source code that show us how can use this python module.
[mythcat@desk ~]$ python3 
Python 3.7.6 (default, Jan 30 2020, 09:44:41) 
[GCC 9.2.1 20190827 (Red Hat 9.2.1-1)] on linux
Type "help", "copyright", "credits" or "license" for more information.
>>> import PyQt5
>>> from PyQt5.QtMultimedia import *
>>> dir(PyQt5.QtMultimedia)
['QAbstractVideoBuffer', 'QAbstractVideoFilter', 'QAbstractVideoSurface', 'QAudio', 'QAudioBuffer',
 'QAudioDecoder', 'QAudioDeviceInfo', 'QAudioEncoderSettings', 'QAudioFormat', 'QAudioInput', 'QAudioOutput',
 'QAudioProbe', 'QAudioRecorder', 'QCamera', 'QCameraExposure', 'QCameraFocus', 'QCameraFocusZone',
 'QCameraImageCapture', 'QCameraImageProcessing', 'QCameraInfo', 'QCameraViewfinderSettings', 
 'QImageEncoderSettings','QMediaBindableInterface', 'QMediaContent', 'QMediaControl', 'QMediaMetaData', 
 'QMediaObject', 'QMediaPlayer', 'QMediaPlaylist', 'QMediaRecorder', 'QMediaResource', 'QMediaService', 
 'QMediaTimeInterval', 'QMediaTimeRange', 'QMultimedia', 'QRadioData', 'QRadioTuner', 'QSound', 'QSoundEffect',
 'QVideoEncoderSettings', 'QVideoFilterRunnable', 'QVideoFrame', 'QVideoProbe', 'QVideoSurfaceFormat',
 '__doc__', '__file__', '__loader__', '__name__', '__package__', '__spec__']
The next issue is creating a random equalizer effect with bars.

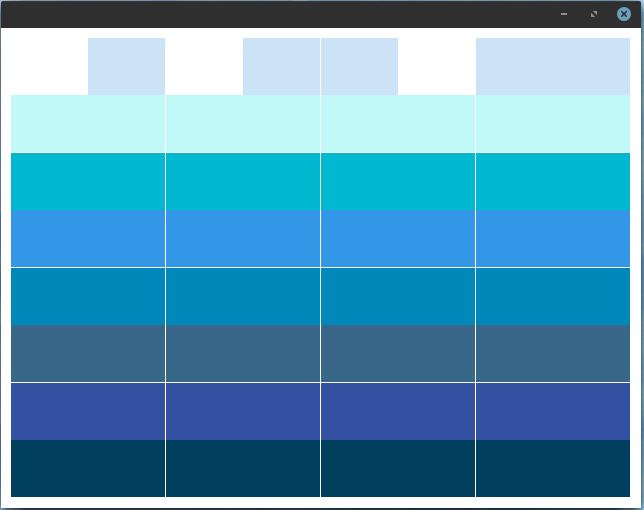
This source doesn't use the QtMultimedia but can be implemented in the random area of equalizer set by update_values function:
import random
import sys
from PyQt5 import QtCore, QtGui, QtWidgets
from PyQt5.QtCore import Qt
from PyQt5.QtCore import pyqtSignal as Signal

print("load all modules!")

class Equalizer_Bars(QtWidgets.QWidget):

    def __init__(self, bars, steps, *args, **kwargs):
        super().__init__(*args, **kwargs)
        # this fit the size to equalizer bars area
        self.setSizePolicy(
            QtWidgets.QSizePolicy.MinimumExpanding,
            QtWidgets.QSizePolicy.MinimumExpanding
        )
        # set the size of the window
        self.setMinimumHeight(480)
        self.setMinimumWidth(640)
        
        if isinstance(steps, list):
            # list of colours.
            self.n_steps = len(steps)
            self.steps = steps

        elif isinstance(steps, int):
            # int number of bars, defaults to blue.
            self.n_steps = steps
            self.steps = ['blue'] * steps
        else:
            raise TypeError('steps variable set wrong, try with a list or int')
        
        # create bars
        self.set_bars = bars
        # define settings of bars
        self.set_space_between_bars = 1
        self.set_height_of_bars = 1
        # set color of background
        self.set_background_color = QtGui.QColor('white')
        # set padding by pixel .
        self.set_padding = 10  

        # create timer 
        self.set_timer = None
        # set decay for move bars 
        self.set_decay_frequency_ms(76)
        self.set_decay_value= 10

        # set values for minim and maxim 
        self.set_min_value = 0
        self.set_max_value = 100

        # store all current values in a list.
        self.set_all_values= [0.0] * bars


    def paintEvent(self, e):
        # create a painter
        painter = QtGui.QPainter(self)
        # create a brush for drawing 
        brush = QtGui.QBrush()
        brush.setColor(self.set_background_color)
        brush.setStyle(Qt.SolidPattern)
        rect = QtCore.QRect(0, 0, painter.device().width(), painter.device().height())
        painter.fillRect(rect, brush)
        
        # set the canvas.
        d_height = painter.device().height() - (self.set_padding * 2)
        d_width = painter.device().width() - (self.set_padding * 2)

        # set the bars.
        step_y = d_height / self.n_steps
        bar_height = step_y * self.set_height_of_bars
        bar_height_space = step_y * (1 - self.set_space_between_bars) / 2

        step_x = d_width / self.set_bars
        bar_width = step_x * self.set_space_between_bars
        bar_width_space = step_x * (1 - self.set_height_of_bars) / 2

        for i in range(self.set_bars):

            # calculating the y position for this bar for stop, from the value in range.
            c = (self.set_all_values[i] - self.set_min_value) / (self.set_max_value - self.set_min_value)
            n_steps_to_draw = int(c * self.n_steps)

            for n in range(n_steps_to_draw):
                brush.setColor(QtGui.QColor(self.steps[n]))
                rect = QtCore.QRect(
                    self.set_padding + (step_x * i) + bar_width_space,
                    self.set_padding + d_height - ((1 + n) * step_y) + bar_height_space,
                    bar_width,
                    bar_height
                )
                painter.fillRect(rect, brush)

        painter.end()

    def _trigger_refresh(self):
        self.update()

    def set_decay_trick(self, f):
        self.set_decay_value= float(f)

    def set_decay_frequency_ms(self, ms):
        if self.set_timer:
            self.set_timer.stop()

        if ms:
            self.set_timer = QtCore.QTimer()
            self.set_timer.setInterval(ms)
            self.set_timer.timeout.connect(self.set_decay_beat)
            self.set_timer.start()

    def set_decay_beat(self):
        self.set_all_values= [
            max(0, v - self.set_decay_value)
            for v in self.set_all_values
        ]
        self.update()  # Redraw new position.

    def size_values(self, v):
        self.set_all_values= v
        self.update()

    def values(self):
        return self.set_all_values

    def set_range(self, vmin, vmax):
        assert float(vmin) < float(vmax)
        self.set_min_value, self.set_max_value = float(vmin), float(vmax)
    # will be used with QBrush 
    def setColor(self, color):
        self.steps = [color] * self._bar.n_steps
        self.update()

    def set_color_bars(self, colors):
        self.n_steps = len(colors)
        self.steps = colors
        self.update()

    def set_bar_padding(self, i):
        self.set_padding = int(i)
        self.update()

    def set_bar_solid_percent(self, f):
        self._bar_solid_percent = float(f)
        self.update()

    def set_background_color(self, color):
        self.set_background_color = QtGui.QColor(color)
        self.update()


class Window(QtWidgets.QMainWindow):

    def __init__(self):
        super().__init__()

        self.equalizer = Equalizer_Bars(8, \
        ['#00405e', '#3350a1', '#386787','#0088ba','#3396e6', '#00b9d0','#c1f9f9', '#cce2f7'])

        self.setCentralWidget(self.equalizer)

        self.set_timer = QtCore.QTimer()
        self.set_timer.setInterval(100)
        self.set_timer.timeout.connect(self.update_values)
        self.set_timer.start()

    def update_values(self):
        self.equalizer.size_values([
            min(100, i+random.randint(0, 500) if random.randint(0, 10) > 2 else i)
            for i in self.equalizer.values()
            ])
            
# start the program 
app = QtWidgets.QApplication([])
w = Window()
w.show()
app.exec_()

Wednesday, February 19, 2020

Python 3.7.5 : The PyQtChart from python Qt5.

The PyQtChart is a set of Python bindings for The Qt Company’s Qt Charts library and is implemented as a single module.
Let's install this python package with the pip3 tool:
[mythcat@desk ~]$ pip3 install PyQtChart --user
...
Installing collected packages: PyQtChart
Successfully installed PyQtChart-5.14.0
Let's test with a simple example:
from PyQt5.QtWidgets import QApplication, QMainWindow
import sys
from PyQt5.QtChart import QChart, QChartView, QPieSeries, QPieSlice
from PyQt5.QtGui import QPainter, QPen
from PyQt5.QtCore import Qt

class Window(QMainWindow):
    def __init__(self):
        super().__init__()

        self.setWindowTitle("testing Pie Chart")
        self.setGeometry(100,100, 640,480)
        self.show()
        self.create_piechart()

    def create_piechart(self):

        series = QPieSeries()
        #append all values with a sum of 360 
        series.append("size 5", 5)
        series.append("size 10", 10)
        series.append("size 30", 30)
        series.append("size 45", 45)
        series.append("size 90", 90)
        series.append("size 180", 180)

        #adding slice 
        slice = QPieSlice()
        slice = series.slices()[2]
        slice.setExploded(True)
        slice.setLabelVisible(True)
        slice.setPen(QPen(Qt.darkGreen, 1))
        slice.setBrush(Qt.green)
        slice = series.slices()[4]
        slice.setExploded(False)
        slice.setLabelVisible(True)
        slice.setPen(QPen(Qt.red, 1))
        #slice.setBrush(Qt.blue)

        #create chart 
        chart = QChart()
        #chart.legend().hide()
        chart.addSeries(series)
        chart.createDefaultAxes()
        chart.setAnimationOptions(QChart.SeriesAnimations)
        chart.setTitle("The all 360 on  chart .")

        chart.legend().setVisible(True)
        chart.legend().setAlignment(Qt.AlignBottom)

        chartview = QChartView(chart)
        chartview.setRenderHint(QPainter.Antialiasing)

        self.setCentralWidget(chartview)

App = QApplication(sys.argv)
window = Window()
sys.exit(App.exec_())
The result can be seen in the next image:

Sunday, December 22, 2019

Python 3.7.5 : The new PyQt5 released.

The PyQt v5.14.0 has been released with support for Qt v5.14.0.
[mythcat@desk ~]$ pip3 install --upgrade PyQt5 --user
Collecting PyQt5
...
Installing collected packages: PyQt5-sip, PyQt5
Successfully installed PyQt5-5.14.0 PyQt5-sip-12.7.0
Let's see how can see the version:
[mythcat@desk ~]$ python3 
Python 3.7.5 (default, Dec 15 2019, 17:54:26) 
[GCC 9.2.1 20190827 (Red Hat 9.2.1-1)] on linux
Type "help", "copyright", "credits" or "license" for more information.
>>> from PyQt5.Qt import PYQT_VERSION_STR
>>> print("PyQt version:", PYQT_VERSION_STR)
PyQt version: 5.14.0


Sunday, October 6, 2019

Python Qt5 : the drag and drop feature.

Today I tested drag and drop feature with PyQt5.
Python 3.7.4 (default, Jul  9 2019, 16:32:37) 
[GCC 9.1.1 20190503 (Red Hat 9.1.1-1)] on linux
This is a simple example using setAcceptDrops and setDragEnabled:
import sys
from PyQt5.QtWidgets import QApplication, QWidget, QListWidget, QHBoxLayout,QListWidgetItem
from PyQt5.QtGui import QIcon

class Window(QWidget):
    def __init__(self):
        super().__init__()

        self.myListWidget1 = QListWidget()
        self.myListWidget2 = QListWidget()
        self.myListWidget2.setViewMode(QListWidget.IconMode)
        self.myListWidget1.setAcceptDrops(True)
        self.myListWidget1.setDragEnabled(True)
        self.myListWidget2.setAcceptDrops(True)
        self.myListWidget2.setDragEnabled(True)
        self.setGeometry(480, 400, 640, 480)
        self.myLayout = QHBoxLayout()
        self.myLayout.addWidget(self.myListWidget1)
        self.myLayout.addWidget(self.myListWidget2)

        l1 = QListWidgetItem(QIcon('house.png'), "House")
        l2 = QListWidgetItem(QIcon('cloud.png'), "Clouds ")
        l3 = QListWidgetItem(QIcon('user.png'), "User")
        l4 = QListWidgetItem(QIcon('save.png'), "Save")

        self.myListWidget1.insertItem(1, l1)
        self.myListWidget1.insertItem(2, l2)
        self.myListWidget1.insertItem(3, l3)
        self.myListWidget1.insertItem(4, l4)

        QListWidgetItem(QIcon('house.png'), "House", self.
                        myListWidget2)
        QListWidgetItem(QIcon('cloud.png'), "Clouds", self.
                        myListWidget2)
        QListWidgetItem(QIcon('save.png'), "Save", self.
                        myListWidget2)

        self.setWindowTitle('Example: Drag and Drop');
        self.setLayout(self.myLayout)

        self.show()

App = QApplication(sys.argv)
window = Window()
sys.exit(App.exec())
The result is a windows with two QListWidget with an drag and drop feature.

Wednesday, August 21, 2019

Python Qt5 : contextMenu example.

A context menu is a menu in a graphical user interface (GUI) that appears upon user interaction, such as a right-click mouse operation.
I create the default application and I use QMenu to create this context menu with New, Open and Quit.
from PyQt5 import QtGui
from PyQt5.QtWidgets import QApplication, QMainWindow, QMenu
import sys


class Window(QMainWindow):
    def __init__(self):
        super().__init__()
        self.title = "PyQt5 Context Menu"
        self.top = 100
        self.left = 100
        self.width = 640
        self.height = 480
        self.InitWindow()


    def InitWindow(self):
        self.setWindowIcon(QtGui.QIcon("icon.png"))
        self.setWindowTitle(self.title)
        self.setGeometry(self.left, self.top, self.width, self.height)
        self.show()

    def contextMenuEvent(self, event):
        contextMenu = QMenu(self)
        new_Act = contextMenu.addAction("New")
        open_Act = contextMenu.addAction("Open")
        quit_Act = contextMenu.addAction("Quit")
        action = contextMenu.exec_(self.mapToGlobal(event.pos()))
        if action == quit_Act:
            self.close()


App = QApplication(sys.argv)
window = Window()
sys.exit(App.exec())

Tuesday, August 20, 2019

Python Qt5 : the QTimer class.

I haven't written about PyQt5 in a while and today I decided to add a short tutorial on this python module.
The QTimer class is a high-level programming interface for timers and provides repetitive and single-shot timers.
I this example I call a method every second with these lines:
        self.timer = QTimer()
        self.timer.timeout.connect(self.handleTimer)
        self.timer.start(1000)
The timer is stop when the value check by handleTimer has value 100 else the ProgressBar increment the default value with 1.
The full source of code is this:
import sys
from PyQt5.QtCore import QTimer
from PyQt5.QtWidgets import QApplication, QMainWindow, QProgressBar
from PyQt5.QtCore import Qt

class QTimer_ProgressBar(QMainWindow):

    def __init__(self):
        super().__init__()

        self.pbar = QProgressBar(self)
        self.pbar.setGeometry(30, 70,400, 50)
        self.pbar.setValue(0)

        self.setWindowTitle("QTimer Progressbar")
        self.setGeometry(64,64,640,480)
        self.show()

        self.timer = QTimer()
        self.timer.timeout.connect(self.handleTimer)
        self.timer.start(1000)

    def handleTimer(self):
        value = self.pbar.value()
        if value < 100:
            value = value + 1
            self.pbar.setValue(value)
        else:
            self.timer.stop()


if __name__ == '__main__':
    app = QApplication(sys.argv)
    ex = QTimer_ProgressBar()
    sys.exit(app.exec_())
You can also use it like this:
def Qt():
    try:
        # Do things
    finally:
        QTimer.singleShot(5000, Qt)

Qt()