analitics

Pages

Friday, December 22, 2023

Python : MLOps with neptune.ai .

I just started testing with neptune.ai.
Neptune is the MLOps stack component for experiment tracking. It offers a single place to log, compare, store, and collaborate on experiments and models.
MLOps or ML Ops is a paradigm that aims to deploy and maintain machine learning models in production reliably and efficiently.
MLOps is practiced between Data Scientists, DevOps, and Machine Learning engineers to transition the algorithm to production systems.
MLOps aims to facilitate the creation of machine learning products by leveraging these principles: CI/CD automation, workflow orchestration, reproducibility; versioning of data, model, and code; collaboration; continuous ML training and evaluation; ML metadata tracking and logging; continuous monitoring; and feedback loops.
You will understand these features of MLOps if you look at these practical examples.
Neptune uses a token:
Your Neptune API token is like a password to the application. By saving your token as an environment variable, you avoid putting it in your source code, which is more convenient and secure.
When I started I tested with this default project:
example-project-tensorflow-keras
Another good feature is the working team, by adding collaborators in the People section of your workspace settings.
  • For a free account you can have these options:
  • 5 users
  • 1 active project
  • Unlimited archived projects
  • Unlimited experiments
  • Unlimited model versions
  • Unlimited logging hours
  • Artifacts tracking
  • Service accounts for CI/CD pipelines
  • 200 GB storage
Let's see the default source code shared by neptune.ai for that default project:
import glob
import hashlib

import matplotlib.pyplot as plt
import neptune.new as neptune
import numpy as np
import pandas as pd
import tensorflow as tf
from neptune.new.integrations.tensorflow_keras import NeptuneCallback
from scikitplot.metrics import plot_roc, plot_precision_recall

# Select project
run = neptune.init(project='common/example-project-tensorflow-keras',
                   tags=['keras', 'fashion-mnist'],
                   name='keras-training')

# Prepare params
parameters = {'dense_units': 128,
              'activation': 'relu',
              'dropout': 0.23,
              'learning_rate': 0.15,
              'batch_size': 64,
              'n_epochs': 30}

run['model/params'] = parameters

# Prepare dataset
(x_train, y_train), (x_test, y_test) = tf.keras.datasets.fashion_mnist.load_data()
x_train = x_train / 255.0
x_test = x_test / 255.0

class_names = ['T-shirt/top', 'Trouser', 'Pullover', 'Dress', 'Coat',
               'Sandal', 'Shirt', 'Sneaker', 'Bag', 'Ankle boot']

# Log data version
run['data/version/x_train'] = hashlib.md5(x_train).hexdigest()
run['data/version/y_train'] = hashlib.md5(y_train).hexdigest()
run['data/version/x_test'] = hashlib.md5(x_test).hexdigest()
run['data/version/y_test'] = hashlib.md5(y_test).hexdigest()
run['data/class_names'] = class_names

# Log example images
for j, class_name in enumerate(class_names):
    plt.figure(figsize=(10, 10))
    label_ = np.where(y_train == j)
    for i in range(9):
        plt.subplot(3, 3, i + 1)
        plt.xticks([])
        plt.yticks([])
        plt.grid(False)
        plt.imshow(x_train[label_[0][i]], cmap=plt.cm.binary)
        plt.xlabel(class_names[j])
    run['data/train_sample'].log(neptune.types.File.as_image(plt.gcf()))
    plt.close('all')

# Prepare model
model = tf.keras.Sequential([
    tf.keras.layers.Flatten(input_shape=(28, 28)),
    tf.keras.layers.Dense(parameters['dense_units'], activation=parameters['activation']),
    tf.keras.layers.Dropout(parameters['dropout']),
    tf.keras.layers.Dense(parameters['dense_units'], activation=parameters['activation']),
    tf.keras.layers.Dropout(parameters['dropout']),
    tf.keras.layers.Dense(10, activation='softmax')
])
optimizer = tf.keras.optimizers.SGD(learning_rate=parameters['learning_rate'])
model.compile(optimizer=optimizer,
              loss='sparse_categorical_crossentropy',
              metrics=['accuracy'])

# Log model summary
model.summary(print_fn=lambda x: run['model/summary'].log(x))

# Train model
neptune_cbk = NeptuneCallback(run=run, base_namespace='metrics')

model.fit(x_train, y_train,
          batch_size=parameters['batch_size'],
          epochs=parameters['n_epochs'],
          validation_split=0.2,
          callbacks=[neptune_cbk])

# Log model weights
model.save('trained_model')
run['model/weights/saved_model'].upload('trained_model/saved_model.pb')
for name in glob.glob('trained_model/variables/*'):
    run[name].upload(name)

# Evaluate model
eval_metrics = model.evaluate(x_test, y_test, verbose=0)
for j, metric in enumerate(eval_metrics):
    run['test/scores/{}'.format(model.metrics_names[j])] = metric

# Log predictions as table
y_pred_proba = model.predict(x_test)
y_pred = np.argmax(y_pred_proba, axis=1)
y_pred = y_pred
df = pd.DataFrame(data={'y_test': y_test, 'y_pred': y_pred, 'y_pred_probability': y_pred_proba.max(axis=1)})
run['test/predictions'] = neptune.types.File.as_html(df)

# Log model performance visualizations
fig, ax = plt.subplots()
plot_roc(y_test, y_pred_proba, ax=ax)
run['charts/ROC'] = neptune.types.File.as_image(fig)

fig, ax = plt.subplots()
plot_precision_recall(y_test, y_pred_proba, ax=ax)
run['charts/precision-recall'] = neptune.types.File.as_image(fig)
plt.close('all')

run.wait()
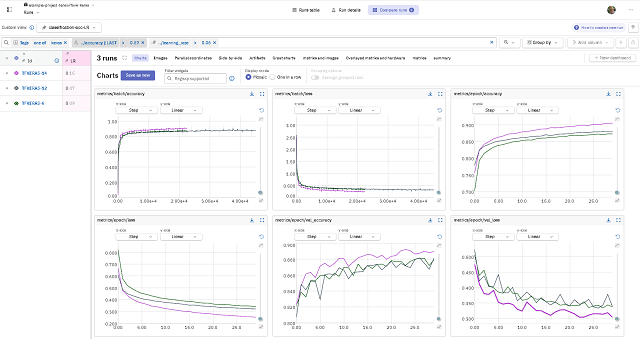
This screenshot shows the web interface for neptune.ai:
Sunday, December 10, 2023

Python 3.10.12 : Simple examples with some Python modules - part 042.

I added some simple examples in my repo on GitHub where I have notebooks from Google Colab.
Python usage is limited to this type of interface with Python version stability rules.
You can see the Python version that Colab is using with this command in the code area:
!python
Python 3.10.12 (main, Nov 20 2023, 15:14:05) [GCC 11.4.0] on linux
Type "help", "copyright", "credits" or "license" for more information.
These are the Python packages I used: cartopy, matplotlib, numpy, geemap, earthengine-api, rasterio.
Of these examples, some require some Google configuration, others require knowledge of topography ... or are very simple to use with a dedicated module as we have visualized more special types of image files.
See there an example with the cartopy python package :
import matplotlib.pyplot as plt

import cartopy.crs as ccrs
from cartopy.io import shapereader
from cartopy.mpl.gridliner import LONGITUDE_FORMATTER, LATITUDE_FORMATTER

import cartopy.io.img_tiles as cimgt

extent = [15, 25, 55, 35]

request = cimgt.OSM()

fig = plt.figure(figsize=(9, 13))
ax = plt.axes(projection=request.crs)
gl = ax.gridlines(draw_labels=True, alpha=0.2)
gl.top_labels = gl.right_labels = False
gl.xformatter = LONGITUDE_FORMATTER
gl.yformatter = LATITUDE_FORMATTER

ax.set_extent(extent)

ax.add_image(request, 11)

plt.show()

Thursday, December 7, 2023

Python 3.13.0a1 : Testing with scapy - part 001.

Scapy is a powerful interactive packet manipulation library written in Python. Scapy is able to forge or decode packets of a wide number of protocols, send them on the wire, capture them, match requests and replies, and much more. see the official website.
You need to install NPCap.
Beacon frames are transmitted periodically, they serve to announce the presence of a wireless LAN and to synchronise the members of the service set.
In IBSS network beacon generation is distributed among the stations.
Beacon frames are transmitted by the access point (AP) in an infrastructure basic service set (BSS).
Beacon frames include information about the access point and supported data rates and what encryption is being used.
These are received by your device’s wireless network interface and interpreted by your operating system to build the list of available networks.
The beacon variable indicates the capabilities of our access point.
Let's see the source code:
C:\PythonProjects\scapy_001>pip install scapy
Collecting scapy
  Downloading scapy-2.5.0.tar.gz (1.3 MB)
     ---------------------------------------- 1.3/1.3 MB 3.5 MB/s eta 0:00:00
  Installing build dependencies ... done
...
Successfully built scapy
Installing collected packages: scapy
Successfully installed scapy-2.5.0
The source code is simple:
from scapy.all import Dot11,Dot11Beacon,Dot11Elt,RadioTap,sendp,hexdump

netSSID = 'testSSID'       #Network name here
iface = 'Realtek PCIe GbE Family Controller'         #Interface name here

dot11 = Dot11(type=0, subtype=8, addr1='ff:ff:ff:ff:ff:ff',
addr2='22:22:22:22:22:22', addr3='33:33:33:33:33:33')
beacon = Dot11Beacon(cap='ESS+privacy')
essid = Dot11Elt(ID='SSID',info=netSSID, len=len(netSSID))
rsn = Dot11Elt(ID='RSNinfo', info=(
'\x01\x00'                 #RSN Version 1
'\x00\x0f\xac\x02'         #Group Cipher Suite : 00-0f-ac TKIP
'\x02\x00'                 #2 Pairwise Cipher Suites (next two lines)
'\x00\x0f\xac\x04'         #AES Cipher
'\x00\x0f\xac\x02'         #TKIP Cipher
'\x01\x00'                 #1 Authentication Key Managment Suite (line below)
'\x00\x0f\xac\x02'         #Pre-Shared Key
'\x00\x00'))               #RSN Capabilities (no extra capabilities)

frame = RadioTap()/dot11/beacon/essid/rsn

frame.show()
print("\nHexdump of frame:")
hexdump(frame)
input("\nPress enter to start\n")

sendp(frame, iface=iface, inter=0.100, loop=1)
Let's run this source code:
python scapy_network_001.py
###[ RadioTap ]###
  version   = 0
  pad       = 0
  len       = None
  present   = None
  notdecoded= ''
###[ 802.11 ]###
     subtype   = Beacon
     type      = Management
     proto     = 0
     FCfield   =
     ID        = 0
     addr1     = ff:ff:ff:ff:ff:ff (RA=DA)
     addr2     = 22:22:22:22:22:22 (TA=SA)
     addr3     = 33:33:33:33:33:33 (BSSID/STA)
     SC        = 0
###[ 802.11 Beacon ]###
        timestamp = 0
        beacon_interval= 100
        cap       = ESS+privpython scapy_network_001.py
###[ RadioTap ]### tion Element ]###
  version   = 0      = SSID
  pad       = 0      = 8
  len       = None   = 'testSSID'
  present   = Noneation Element ]###
  notdecoded= ''     = RSN
###[ 802.11 ]###     = None
     subtype   = Beacon'\x01\x00\x00\x0f¬\x02\x02\x00\x00\x0f¬\x04\x00\x0f¬\x02\x01\x00\x00\x
     type      = Management
     proto     = 0
     FCfield   =
     ID        = 0
     addr1     = ff:ff:ff:ff:ff:ff (RA=DA)FF FF FF FF  ................
     addr2     = 22:22:22:22:22:22 (TA=SA)33 33 00 00  ..""""""333333..
     addr3     = 33:33:33:33:33:33 (BSSID/STA)8 74 65  ........d.....te
     SC        = 049 44 30 1C 01 00 00 0F C2 AC 02 02  stSSID0.........
###[ 802.11 Beacon ]### 00 0F C2 AC 02 01 00 00 0F C2  ................
        timestamp = 0                                  ....
        beacon_interval= 100
        cap       = ESS+privacy
###[ 802.11 Information Element ]###
           ID        = SSID..................................................................
           len       = 8.....................................................................
           info      = 'testSSID'
###[ 802.11 Information Element ]###
           ID        = RSN
           len       = None>
           info      = '\x01\x00\x00\x0f¬\x02\x02\x00\x00\x0f¬\x04\x00\x0f¬\x02\x01\x00\x00\x0f¬\x02\x00\x00'


Hexdump of frame:
0000  00 00 08 00 00 00 00 00 80 00 00 00 FF FF FF FF  ................
0010  FF FF 22 22 22 22 22 22 33 33 33 33 33 33 00 00  ..""""""333333..
0020  00 00 00 00 00 00 00 00 64 00 11 00 00 08 74 65  ........d.....te
0030  73 74 53 53 49 44 30 1C 01 00 00 0F C2 AC 02 02  stSSID0.........
0040  00 00 0F C2 AC 04 00 0F C2 AC 02 01 00 00 0F C2  ................
0050  AC 02 00 00                                      ....

Press enter to start

.................................................................
Sent 130 packets.

Wednesday, December 6, 2023

Python 3.10.12 : Simple example with SymPy - part 041.

SymPy is a Python library for symbolic mathematics. If you are new to SymPy, start with the introductory tutorial.
You can find a simple example with a partial differentiation on my GitHub colab repo.

Monday, November 27, 2023

Python 3.10.12 : My colab get images from imdb.com by the name - part 040.

Transformers provides thousands of pretrained models to perform tasks on different modalities such as text, vision, and audio.
You find more on my Colab Github repo.

Python 3.13.0a1 : How to use PyOTP for Microsoft Authenticator.

PyOTP is a Python library for generating and verifying one-time passwords. It can be used to implement two-factor (2FA) or multi-factor (MFA) authentication methods in web applications and in other systems that require users to log in.
Read more on this official webpage.
Install with pip tool and use this source code:
import pyotp

# Generare secret pentru utilizator
secret = pyotp.random_base32()

# Generare URL pentru codul QR
uri = pyotp.totp.TOTP(secret).provisioning_uri(name="UtilizatorExemplu", issuer_name="NumeServer")

# Exemplu de folosire a URI-ului într-o aplicație web sau pentru a genera un cod QR
print("Scanati urmatorul QR code in aplicatia Microsoft Authenticator:")
print(uri)
I run the python script:
python test_001.py
Scanati urmatorul QR code in aplicatia Microsoft Authenticator:
otpauth://totp/NumeServer:UtilizatorExemplu?secret=SPZICPQHAMWOIYCAZEHXZTPQDXEXZSWL&issuer=NumeServer
I used the uri output with one online tool to generate this QR image code and I tested with the aplication.
The account is added with NumeServer and UtilizatorExemplu.

Python 3.10.12 : My colab get images from imdb.com by the name - part 039.

You can use gspread and google-auth to get data from a spreadsheet from google drive and use it.
The colab notebook can be found on my colab repo on Github.
from google.colab import auth
auth.authenticate_user()

import gspread
from google.auth import default
creds, _ = default()

gc = gspread.authorize(creds)

# Open the spreadsheet by name
spreadsheet = gc.open('fiecare_saptamana')

# Choose a worksheet from the spreadsheet
worksheet = spreadsheet.get_worksheet(0)  # 0 represents the index of the first worksheet

# Get and print the data
data = worksheet.get_all_values()

#uncoment this line to print data sau add more source code to parse data
#print(data)

#the result will be 
#[['noreply@projects.blender.org', '437', 'notifications@github.com',  ...

Thursday, November 16, 2023

Python processing LiDAR data with Ouster SDK.

Lidar sensors for high-resolution, long range use in autonomous vehicles, robotics, mapping. Low-cost & reliable for any use case. Shipping today. See more on the official website.
You can download sample LiDAR data and test and use the Ouster Python SDK from the Ouster website.
The documentation for this python package can be found on this website.
See a simple demo on this youtube video named: 0 to SLAM in 60 Seconds.

Monday, November 13, 2023

PyScript - online tool .

PyScript is a platform for Python in the browser.
PyScript brings together two of the most vibrant technical ecosystems on the planet. If the web and Python had a baby, you'd get PyScript.
PyScript works because modern browsers support WebAssembly (abbreviated to WASM) - an instruction set for a virtual machine with an open specification and near native performance. PyScript takes versions of the Python interpreter compiled to WASM, and makes them easy to use inside the browser.
You can read more on the official webpage.
You can see my project tested with source code from a basic GitHub example.

Sunday, November 12, 2023

Python 3.13.0a1 : Testing basic instalation.

Today I tested a prerelease version of Python which is version python-3.13.0a1-amd64, the maintenance status is prerelease, the first release was 2024-10-01, the end of support is 2029-10, and the release schedule is PEP 719.
I got this version of python from the official python page.
The checksum for the downloaded file is from the same page and I checked with the WinMD5Free tool.
WinMD5Free is a tiny and fast utility to compute MD5 hash value for files. It works with Microsoft Windows 98, 2000, XP, Vista, and Windows 7/8/10/11.
The installation is simple, theoretically you don't have to make changes, you can only select a custom folder.
Open a command line and type the python command to see the installed version.
python
Python 3.13.0a1 (tags/v3.13.0a1:ad056f0, Oct 13 2023, 09:51:17) [MSC v.1935 64 bit (AMD64)] on win32
Type "help", "copyright", "credits" or "license" for more information.
>>>
In the command line opened by python with >>>, I tested the old specific commands:
>>> help()

Welcome to Python 3.13's help utility!

If this is your first time using Python, you should definitely check out
the tutorial on the internet at https://docs.python.org/3.13/tutorial/.

Enter the name of any module, keyword, or topic to get help on writing
Python programs and using Python modules.  To quit this help utility and
return to the interpreter, just type "quit".

To get a list of available modules, keywords, symbols, or topics, type
"modules", "keywords", "symbols", or "topics".  Each module also comes
with a one-line summary of what it does; to list the modules whose name
or summary contain a given string such as "spam", type "modules spam".

help> modules

Please wait a moment while I gather a list of all available modules...

test_sqlite3: testing with SQLite version 3.43.1
__future__          _testcapi           fractions           runpy
__hello__           _testclinic         ftplib              sched
__phello__          _testclinic_limited functools           secrets
_abc                _testconsole        gc                  select
_aix_support        _testimportmultiple genericpath         selectors
_ast                _testinternalcapi   getopt              shelve
_asyncio            _testmultiphase     getpass             shlex
_bisect             _testsinglephase    gettext             shutil
_blake2             _thread             glob                signal
_bz2                _threading_local    graphlib            site
_codecs             _tkinter            gzip                smtplib
_codecs_cn          _tokenize           hashlib             socket
_codecs_hk          _tracemalloc        heapq               socketserver
_codecs_iso2022     _typing             hmac                sqlite3
_codecs_jp          _uuid               html                sre_compile
_codecs_kr          _warnings           http                sre_constants
_codecs_tw          _weakref            idlelib             sre_parse
_collections        _weakrefset         imaplib             ssl
_collections_abc    _winapi             importlib           stat
_compat_pickle      _wmi                inspect             statistics
_compression        _xxinterpchannels   io                  string
_contextvars        _xxsubinterpreters  ipaddress           stringprep
_csv                _zoneinfo           itertools           struct
_ctypes             abc                 json                subprocess
_ctypes_test        antigravity         keyword             symtable
_datetime           argparse            linecache           sys
_decimal            array               locale              sysconfig
_elementtree        ast                 logging             tabnanny
_functools          asyncio             lzma                tarfile
_hashlib            atexit              mailbox             tempfile
_heapq              base64              marshal             test
_imp                bdb                 math                textwrap
_io                 binascii            mimetypes           this
_json               bisect              mmap                threading
_locale             builtins            modulefinder        time
_lsprof             bz2                 msvcrt              timeit
_lzma               cProfile            multiprocessing     tkinter
_markupbase         calendar            netrc               token
_md5                cmath               nt                  tokenize
_multibytecodec     cmd                 ntpath              tomllib
_multiprocessing    code                nturl2path          trace
_opcode             codecs              numbers             traceback
_opcode_metadata    codeop              opcode              tracemalloc
_operator           collections         operator            tty
_osx_support        colorsys            optparse            turtle
_overlapped         compileall          os                  turtledemo
_pickle             concurrent          pathlib             types
_py_abc             configparser        pdb                 typing
_pydatetime         contextlib          pickle              unicodedata
_pydecimal          contextvars         pickletools         unittest
_pyio               copy                pip                 urllib
_pylong             copyreg             pkgutil             uuid
_queue              csv                 platform            venv
_random             ctypes              plistlib            warnings
_sha1               curses              poplib              wave
_sha2               dataclasses         posixpath           weakref
_sha3               datetime            pprint              webbrowser
_signal             dbm                 profile             winreg
_sitebuiltins       decimal             pstats              winsound
_socket             difflib             pty                 wsgiref
_sqlite3            dis                 py_compile          xml
_sre                doctest             pyclbr              xmlrpc
_ssl                email               pydoc               xxsubtype
_stat               encodings           pydoc_data          zipapp
_statistics         ensurepip           pyexpat             zipfile
_string             enum                queue               zipimport
_strptime           errno               quopri              zlib
_struct             faulthandler        random              zoneinfo
_symtable           filecmp             re
_sysconfig          fileinput           reprlib
_testbuffer         fnmatch             rlcompleter

Enter any module name to get more help.  Or, type "modules spam" to search
for modules whose name or summary contain the string "spam".
help> ^Z
>>>
I tried to use quit and exit to return to the interactive Python shell but these not work. I need to use Ctr +Z.
Just for testing, I installed some Python modules, my recommendation is to use a virtualenv for each project.
For update I used:
python.exe -m pip install --upgrade pip

Python 3.8.12 : Django with replit online tool - part 001.

Now with the replit online tool it is easy to test projects in Django. You must set a variable SECRET_KEY in settings.py and press the Run button. This will open the web page with your project.
In the command line area you can use python to generate this variable, see the source code:
~/Django001$ python
Python 3.8.12 (default, Aug 30 2021, 16:42:10) 
[GCC 10.3.0] on linux
Type "help", "copyright", "credits" or "license" for more information.
>>> import secrets
>>> secrets.token_urlsafe(32)
'yIXPv6u4uCt4AUWlkU4NCuoyJiZlLx5IFm8kG6h8RtA'
This is result of these first steps:
Use this command to create a website named catafest001:
~/Django001$ python manage.py startapp catafest001
Add this website to settings.py from django_project:
INSTALLED_APPS = [
    'django.contrib.admin',
    'django.contrib.auth',
    'django.contrib.contenttypes',
    'django.contrib.sessions',
    'django.contrib.messages',
    'django.contrib.staticfiles',
    'catafest001',
]
Use this command to create an user with a password:
~/Django001$ python manage.py createsuperuser
Username (leave blank to use 'runner'): 
Email address: catafest@yahoo.com
Password: 
Password (again): 
The password is too similar to the username.
Bypass password validation and create user anyway? [y/N]: y
Superuser created successfully.
You can see I let the username runner and the password I set to adminadmin.
Into web area I set the URL to /admin and I use the username and the password to login into admin area.
NOTE: Although I did the correct steps for a simple project in django with admin page, it won't let me login as admin ... maybe the replit online tool needs some other changes or the cause is different ...

Saturday, November 4, 2023

News : NINJA-IDE version 2.4

The NINJA-IDE is a cross-platform integrated development environment (IDE). NINJA-IDE runs on Linux/X11, Mac OS X and Windows desktop operating systems, and allows developers to create applications for several purposes using all the tools and utilities of NINJA-IDE, making the task of writing software easier and more enjoyable.
You can download it from the offical website.
I did not find any significant changes compared to the previous version.

Thursday, October 26, 2023

News : Django 5.0 beta 1 released.

Django 5.0 beta 1 is now available. It represents the second stage in the 5.0 release cycle and is an opportunity for you to try out the changes coming in Django 5.0.
Django 5.0 brings a deluge of exciting new features which you can read about in the in-development 5.0 release notes.
This can be easily install with the pip3 tool:
pip3 install Django==5.0b1
Collecting Django==5.0b1
...
Installing collected packages: tzdata, sqlparse, asgiref, Django
Successfully installed Django-5.0b1 asgiref-3.7.2 sqlparse-0.4.4 tzdata-2023.3

Monday, October 23, 2023

Python 3.10.12 : My colab get images from imdb.com by the name - part 038.

This colab notebook named catafest_050.ipynb will let you to get images from imdb.com by the name of the actor/actress.
You can find this notebook on my GitHub project.

Friday, October 20, 2023

Python 3.12.0 : Plyer example 001.

Plyer is a platform-independent api to use features commonly found on various platforms, notably mobile ones, in Python.
The project can be found on this GitHub project.
import time
from plyer import notification

if __name__ == "__main__":
	while True:
		notification.notify(title="Test",message="Text message",timeout=10)
		time.sleep(3000)
Let's see the most simple example with this python module.

Wednesday, October 18, 2023

Python 3.12.0 : PyAutoGUI example.

PyAutoGUI lets your Python scripts control the mouse and keyboard to automate interactions with other applications.
Make sure the modal dialog window is active and the desired text is visible before running the script.
This script waits for the user to activate the modal dialog window (for example, by clicking on the dialog window) and then moves the cursor to the coordinates of the label in the dialog window.
Copies the selected text to the clipboard using the classic Ctr and C keys.
Let's see the source code that does this.
import pyautogui
import time

# Display a short notification to prompt the user to activate the modal dialog window
print("Please activate the modal dialog window.")

# Wait for the user to activate the modal dialog window (you can click in the dialog window)
time.sleep(10) # Wait 10 seconds or enough time to activate the window

# Get the coordinates where you want to read the text on the label
x_label = 200 # Replace with the correct x coordinates
y_label = 300 # Replace with the correct y coordinates

# Move the mouse cursor to the coordinates of the label
pyautogui.moveTo(x_label, y_label)

# Select the text in the label using the mouse
pyautogui.dragTo(x_label + 200, y_label, duration=1) # Substitute the appropriate coordinates and duration

# Copies the selected text to the clipboard
pyautogui.hotkey("ctrl", "c")

# You can use the clipboard to access the read text
import clipboard
text_copied = clipboard.paste()

Friday, October 13, 2023

Blender 3D and python scripting - part 026.

Today I tested the bpy python module from Blender 3D software version 3.5 and I made this lite addon that showed me a modal dialog and checked and installed the Pillow python module.
The script don't install Pillow because is not fixed.
The main reason was to add my Python tools and features to Blender 3D and share with you.
bl_info = {
    "name": "Tools by catafest",
    "blender": (3, 0, 0),
    "category": "3D View",
}

import bpy
from bpy.types import Operator, Panel
from bpy.props import StringProperty

try:
    import importlib
    importlib.import_module("Pillow")
    PIL_installed = True
except ImportError:
    PIL_installed = False

def install_pillow():
    import subprocess
    try:
        subprocess.run([bpy.app.binary_path, '--python-exit-code', '1', '-m', 'ensurepip'])
        subprocess.check_call([bpy.app.binary_path, '-m', 'pip', 'install', 'Pillow'])
    except subprocess.CalledProcessError as e:
        print("Eroare la instalarea Pillow:", e)

# Operator pentru a afișa fereastra modală cu informații despre instalarea Pillow
class CATAFEST_IMAGES_OT_show_pillow_message(Operator):
    bl_idname = "catafest.show_pillow_message"
    bl_label = "Show Pillow Message"

    def execute(self, context):
        global PIL_installed
        message = "Pillow este instalat." if PIL_installed else "Pillow nu este instalat."

        # Dacă Pillow nu este instalat, încercați să-l instalați
        if not PIL_installed:
            install_pillow()
            try:
                import importlib
                importlib.import_module("Pillow")
                PIL_installed = True
                message = "Pillow a fost instalat cu succes!" if PIL_installed else "Eroare la instalarea Pillow."
            except ImportError:
                PIL_installed = False

        # Afișați fereastra modală în centrul ecranului
        bpy.ops.catafest.show_modal_message('INVOKE_DEFAULT', title="Starea Pillow", message=message)
        return {'FINISHED'}

    def invoke(self, context, event):
        return self.execute(context)

# Operator pentru a afișa fereastra modală personalizată
class CATAFEST_IMAGES_OT_show_modal_message(Operator):
    bl_idname = "catafest.show_modal_message"
    bl_label = "Show Modal Message"

    title: bpy.props.StringProperty(default="Message")
    message: bpy.props.StringProperty(default="")

    def execute(self, context):
        return {'FINISHED'}

    def invoke(self, context, event):
        wm = context.window_manager
        return wm.invoke_props_dialog(self, width=400)

    def draw(self, context):
        layout = self.layout
        layout.label(text=self.message)

# Panel pentru bara laterală din 3D View
class VIEW3D_PT_tools_image(Panel):
    bl_label = "Images"
    bl_idname = "VIEW3D_PT_tools_image"
    bl_space_type = 'VIEW_3D'
    bl_region_type = 'UI'
    bl_category = 'Tools by catafest'

    def draw(self, context):
        layout = self.layout
        layout.operator(CATAFEST_IMAGES_OT_show_modal_message.bl_idname)
        layout.operator(CATAFEST_IMAGES_OT_show_pillow_message.bl_idname)

def register():
    bpy.utils.register_class(CATAFEST_IMAGES_OT_show_modal_message)
    bpy.utils.register_class(CATAFEST_IMAGES_OT_show_pillow_message)
    bpy.utils.register_class(VIEW3D_PT_tools_image)

def unregister():
    bpy.utils.unregister_class(CATAFEST_IMAGES_OT_show_modal_message)
    bpy.utils.unregister_class(CATAFEST_IMAGES_OT_show_pillow_message)
    bpy.utils.unregister_class(VIEW3D_PT_tools_image)

if __name__ == "__main__":
    register()

Python tool oletools.

The recommended Python version to run oletools is the latest Python 3.x (3.9 for now). Python 2.7 is still supported for the moment, even if it reached end of life in 2020 (for projects still using Python 2/PyPy 2 such as ViperMonkey). It is highly recommended to switch to Python 3 if possible.
You can find it on this GitHub project.
See the all tools : mraptor, msodde, olebrowse, oledir, oleid, olemap, olemeta, oleobj, oletimes, olevba, pyxswf, rtfobj.

Sunday, October 1, 2023

Python 3.11.1 : PyScripter and Delphi VCL crash the python.

I tried to install PyScripter and Delphi VCL from embarcadero make this :
python.exe
Could  not find platform independent libraries <prefix>
Python path configuration:
  PYTHONHOME = (not set)
  PYTHONPATH = (not set)
  program name = 'python.exe'
  isolated = 0
  environment = 1
  user site = 1
  safe_path = 0
  import site = 1
  is in build tree = 0
  stdlib dir = 'C:\Python311\Lib'
  sys._base_executable = 'C:\\Users\\catafest\\AppData\\Local\\Programs\\Python\\Python311\\python.exe'
  sys.base_prefix = 'C:\\Python311'
  sys.base_exec_prefix = 'C:\\Python311'
  sys.platlibdir = 'DLLs'
  sys.executable = 'C:\\Users\\catafest\\AppData\\Local\\Programs\\Python\\Python311\\python.exe'
  sys.prefix = 'C:\\Python311'
  sys.exec_prefix = 'C:\\Python311'
  sys.path = [
    'C:\\Users\\catafest\\AppData\\Local\\Programs\\Python\\Python311\\python311.zip',
    'C:\\Python311\\DLLs',
    'C:\\Python311\\Lib',
    'C:\\Users\\catafest\\AppData\\Local\\Programs\\Python\\Python311',
  ]
Fatal Python error: init_fs_encoding: failed to get the Python codec of the filesystem encoding
Python runtime state: core initialized
ModuleNotFoundError: No module named 'encodings'

Current thread 0x00000020 (most recent call first):
  <no Python frame>

Tuesday, September 19, 2023

News : Django 5.0 alpha 1 released.

Django 5.0 alpha 1 is now available. It represents the first stage in the 5.0 release cycle and is an opportunity for you to try out the changes coming in Django 5.0.
Django 5.0 brings a deluge of exciting new features which you can read about in the in-development 5.0 release notes.
Now Django 5.0 supports Python 3.10, 3.11, and 3.12.
At that time, you should be able to run your package’s tests using python -Wd so that deprecation warnings appear.
Django 5.0 introduces the concept of a field group, and field group templates.
Database-computed default values
Database generated model field
More options for declaring field choices
New decorators now support wrapping asynchronous
... a lot of features deprecated in 5.0
You can read more on the official website.

Monday, September 18, 2023

News : Amazon free python audible audiobook.

Although Python programming language comes with many learning resources, you can find a lot of free audiobooks on Amazon.
You can try a free trial then you need to pay $14.95 a month after 30 days - cancel online anytime.

Saturday, September 9, 2023

News : Python 3.12.0 release candidate 2 now available.

This new release comes with many improvements for developers.
Here are some of them.
Modules from the standard library are now potentially suggested as part of the error messages displayed by the interpreter ...
NameError: name 'sys' is not defined. Did you forget to import 'sys'?
  • Many large and small performance improvements like - PEP 709;
  • Support for the Linux perf profiler to report Python function names in traces;
  • New type annotation syntax for generic classes - PEP 695;
  • More flexible f-string parsing, allowing many things previously disallowed - PEP 701;
  • Support for the buffer protocol in Python code - PEP 688;
  • A new debugging/profiling API - PEP 669;
  • Support for isolated sub interpreters with separate Global Interpreter Locks - PEP 684;
All PEPs can be found on this GitHub project.

Saturday, September 2, 2023

Python 3.11.4 : Issues in Fedora with PyGobject and sway-tests

Today I wanted to test this repo named sway-tests.
I followed the steps there and received an error from gi.repository.
This error is related to another issue related to PyGobject.
In Fedora Linux distro, installing PyGobject is done with pip like this:
$ pip install PyGobject
In order to have no errors, the dnf or dnf5 tool should be used like this ...
I tested the functionality of this installation with a simple example:
import gi

gi.require_version("Gtk", "3.0")
from gi.repository import Gtk

win = Gtk.Window()
win.connect("destroy", Gtk.main_quit)
win.show_all()
Gtk.main()
It worked very well.
After solving this issue, I returned to the initial one and tested the sway-tests.
$ whereis sway
$ env/bin/pytest --sway=/usr/bin/sway
$ sudo env/bin/pytest --sway=/usr/bin/sway
I used the command both with and without sudo.
Both generated the same errors.
For the following command I had to install ... xorg-x11-server-Xephyr:
Xephyr is an X server which has been implemented as an ordinary X application. It runs in a window just like other X applications, but it is an X server ...
... the fixed centered black window specific to the xorg runtime appeared and somewhere on the side the terminal showed me a bunch of errors.
... obviously, I don't know how well sway-tests is implemented, now it's an archived repo, but I solved the use of PyGobject in python on the Fedora linux distribution.

Friday, September 1, 2023

Python 3.11.0 : Use python to set your R application on shinyapps.io.

If you use the R programming language and shinyapps.io then you can use Python to set up your application.
I create my folder and I install the rsconnect-python python package.
mkdir rsconnect-python-001
cd rsconnect-python-001
pip install rsconnect-python --user
Collecting rsconnect-python
From the shinyapps webpage, I got my token and my secret for my account and I used this command:
rsconnect add --account catafest --name catafest --token YOUR_TOKEN --secret YOUR_SECRET
Detected the following inputs:
    name: COMMANDLINE
    insecure: DEFAULT
    account: COMMANDLINE
    token: COMMANDLINE
    secret: COMMANDLINE
Checking shinyapps.io credential...              [OK]
Added shinyapps.io credential "catafest".
You can see is set and working.
I used a simple R source code named app.r:
library(shiny)

# Definirea interfeței utilizatorului
ui <- fluidPage(
  titlePanel("Aplicație Shiny Simplă"),
  sidebarLayout(
    sidebarPanel(
      numericInput("num", "Introduceți un număr:", value = 1),
      actionButton("goButton", "Generează")
    ),
    mainPanel(
      textOutput("rezultat")
    )
  )
)

# Definirea serverului
server <- function(input, output) {
  observeEvent(input$goButton, {
    num <- input$num
    output$rezultat <- renderText({
      paste("Numărul introdus este:", num)
    })
  })
}

# Crearea aplicației Shiny
shinyApp(ui, server)
The app.py file has this source code:
import dash
import dash_core_components as dcc
import dash_html_components as html
from dash.dependencies import Input, Output

# Creați o aplicație Dash
app = dash.Dash(__name__)

# Definiți aspectul și structura aplicației
app.layout = html.Div([
    html.H1("Aplicație Dash Simplă"),
    dcc.Graph(id='grafic'),
    dcc.Input(id='input-numar', type='number', value=1),
    html.Div(id='rezultat')
])

# Definiți funcția callback pentru actualizarea graficului
@app.callback(
    Output('grafic', 'figure'),
    Input('input-numar', 'value')
)
def actualizare_grafic(numar):
    # Implementați logica de actualizare a graficului aici
    # Exemplu simplu: Un grafic cu o linie dreaptă cu panta egală cu numărul introdus
    import plotly.express as px
    import pandas as pd
    
    data = pd.DataFrame({'x': range(10), 'y': [numar * x for x in range(10)]})
    
    fig = px.line(data, x='x', y='y', title='Graficul personalizat')
    
    return fig

# Rulează aplicația
if __name__ == '__main__':
    app.run_server(debug=True)
I run this command into the RGUI command :
shiny::runApp("C:/PythonProjects/rsconnect-python-001/")

Listening on http://127.0.0.1:7036
The result on browser is this:
I used this command to deploy the application on shinyapps.io:
>rsconnect deploy shiny . --name catafest --title test
[WARNING] 2023-09-01T22:28:10+0300 Can't determine entrypoint; defaulting to 'app'
    Warning: Capturing the environment using 'pip freeze'.
             Consider creating a requirements.txt file instead.
...
Task done: Stopping old instances
Application successfully deployed to https://catafest.shinyapps.io/test/
...
  deploying - Starting instances
Task done: Stopping old instances
Application successfully deployed to https://catafest.shinyapps.io/rsconnect-python-001/
←[32;20m        [OK]
←[0m←[0mSaving deployed information...←[0m←[32;20m      [OK]
←[0m
The result can be found on the shinyapps.io - admin.
I need to fix this error, but first test without app.py was deploy on web.
[notice] A new release of pip is available: 23.1.2 -> 23.2.1
[notice] To update, run: /srv/connect/venv/bin/python3 -m pip install --upgrade pip
[2023-09-01T22:43:31.378864990+0000] Copying file manifest.json
←[31;20m        [ERROR]: Application deployment failed with error: Unhandled Exception: Child Task 1332185768 error: 
Unhandled Exception: 599
←[0mError: Application deployment failed with error: Unhandled Exception: Child Task 1332185768 error: 
Unhandled Exception: 599
I will come with better results.

Wednesday, August 23, 2023

Python 3.11.0 : Testing PE executable files x64 with capstone and pefile python modules.

You need to install the capstone python module.
pip install capstone --user
Collecting capstone
  Obtaining dependency information for capstone from https://files.pythonhosted.org/packages/d0/dd/b28df50316ca193
  
  dd1275a4c47115a720796d
  
  9e1501c1888c4bfa5dc2260/capstone-5.0.1-py3-none-win_amd64.whl.metadata
  
  Downloading capstone-5.0.1-py3-none-win_amd64.whl.metadata (3.5 kB)
Downloading capstone-5.0.1-py3-none-win_amd64.whl (1.3 MB)
   ---------------------------------------- 1.3/1.3 MB 1.6 MB/s eta 0:00:00
Installing collected packages: capstone
Successfully installed capstone-5.0.1
You need to install the pefile.
pip install pefile --user
Collecting pefile
  Downloading pefile-2023.2.7-py3-none-any.whl (71 kB)
     ---------------------------------------- 71.8/71.8 kB 564.7 kB/s eta 0:00:00
Installing collected packages: pefile
Successfully installed pefile-2023.2.7
I used an old simple PE64 executable create with fasm tool from this source code:
format PE64 GUI 5.0
entry start
include 'INCLUDE\win64a.inc'
section '.text' code readable executable
  start:
        push    rbp
        invoke  GetModuleHandle,0
        invoke  DialogBoxParam,rax,37,HWND_DESKTOP,DialogProc,0
        invoke  ExitProcess,0
proc DialogProc uses rbx rsi rdi,hWnd,wMsg,wParam,lParam
        mov             [hWnd],rcx
        mov             [wMsg],rdx
        mov             [wParam],r8
        mov             [lParam],r9

        cmp     [wMsg],WM_COMMAND
        je      wmcommand
        cmp     [wMsg],WM_CLOSE
        je      wmclose
        cmp     [wMsg],WM_SYSCOMMAND
        je      wmsyscommand
        xor     rax,rax
        jmp     finish
wmsyscommand:
        cmp     [wParam],SC_RESTORE
        je      sc_restore
        invoke  DefWindowProc,[hWnd],[wMsg],[wParam],[lParam]
        ret
   sc_restore:
        invoke  AnimateWindow,[hWnd],DWORD 1000,0x00040004      ;HERE IT IS
        invoke  ShowWindow,[hWnd],SW_RESTORE
        mov     rax,1
        ret
wmcommand:
        cmp     [wParam],BN_CLICKED shl 16 + IDOK
        jne     processed
        invoke  ShowWindow,[hWnd],SW_MINIMIZE
        ret
wmclose:
        invoke  EndDialog,[hWnd],0
processed:
        mov     rax,1
        ret ; this no need and use cmp to get error
;        cmp rax,0
;        je show_error
;        show_error:
;        invoke  GetLastError ;must call this first and save the result before doing anything else
;        invoke  wsprintf,...
;        invoke  MessageBox,...
finish:
        ret
endp
section '.idata' import data readable writeable
  library kernel,'KERNEL32.DLL',\
          user,'USER32.DLL'
  import kernel,\
         GetModuleHandle,'GetModuleHandleA',\
         ExitProcess,'ExitProcess'
  import user,\
         DialogBoxParam,'DialogBoxParamA',\
         CheckRadioButton,'CheckRadioButton',\
         GetDlgItemText,'GetDlgItemTextA',\
         IsDlgButtonChecked,'IsDlgButtonChecked',\
         MessageBox,'MessageBoxA',\
         DefWindowProc,'DefWindowProcA',\
         EndDialog,'EndDialog',\
         AnimateWindow,'AnimateWindow',\
         ShowWindow,'ShowWindow'
section '.rsrc' resource data readable
  directory RT_DIALOG,dialogs
  resource dialogs,\
           37,LANG_ENGLISH+SUBLANG_DEFAULT,demonstration
  dialog demonstration,'Create message box',70,70,190,175,WS_CAPTION+WS_POPUP+WS_SYSMENU+DS_MODALFRAME
       dialogitem 'BUTTON','OK',IDOK,85,150,45,15,WS_VISIBLE+WS_TABSTOP+BS_DEFPUSHBUTTON
  enddialog
This is the source code for python script:
import pefile
from capstone import *

exe_file = 'test_001_no_err_imp.EXE'
pe = pefile.PE(exe_file)

# find text section
offset = False
for section in pe.sections:
    if section.Name == b'.text\x00\x00\x00':
        offset = section.VirtualAddress
        codePtr = section.PointerToRawData
        codeEndPtr = codePtr+section.SizeOfRawData
        break

code = pe.get_memory_mapped_image()[codePtr:codeEndPtr]

# start disassembling text section
md = Cs(CS_ARCH_X86, CS_MODE_32)
md.detail = True
if offset:
    for i in md.disasm(code, offset):
        print('0x%x:\t%s\t%s' % (i.address, i.mnemonic, i.op_str))
This is the result:
python capstone_test_001.py
0x1000: push    ebp
0x1001: dec     eax
0x1002: sub     esp, 0x20
0x1005: dec     eax
0x1006: mov     ecx, 0
0x100c: call    dword ptr [0x105e]
0x1012: dec     eax
0x1013: add     esp, 0x20
0x1016: dec     eax
0x1017: sub     esp, 0x30
0x101a: dec     eax
0x101b: mov     ecx, eax
0x101d: dec     eax
0x101e: mov     edx, 0x25
0x1024: dec     ecx
0x1025: mov     eax, 0
0x102b: dec     ecx
0x102c: mov     ecx, 0x40105a
0x1032: dec     eax
0x1033: mov     dword ptr [esp + 0x20], 0
0x103b: call    dword ptr [0x109f]
0x1041: dec     eax
0x1042: add     esp, 0x30
0x1045: dec     eax
0x1046: sub     esp, 0x20
0x1049: dec     eax
0x104a: mov     ecx, 0
0x1050: call    dword ptr [0x1022]
0x1056: dec     eax
0x1057: add     esp, 0x20
0x105a: push    ebp
0x105b: dec     eax
0x105c: mov     ebp, esp
0x105e: dec     eax
0x105f: sub     esp, 8
0x1062: push    ebx
0x1063: push    esi
0x1064: push    edi
0x1065: dec     eax
0x1066: mov     dword ptr [ebp + 0x10], ecx
0x1069: dec     eax
0x106a: mov     dword ptr [ebp + 0x18], edx
0x106d: dec     esp
0x106e: mov     dword ptr [ebp + 0x20], eax
0x1071: dec     esp
0x1072: mov     dword ptr [ebp + 0x28], ecx
0x1075: dec     eax
0x1076: cmp     dword ptr [ebp + 0x18], 0x111
0x107d: je      0x1110
0x1083: dec     eax
0x1084: cmp     dword ptr [ebp + 0x18], 0x10
0x1088: je      0x1135
0x108e: dec     eax
0x108f: cmp     dword ptr [ebp + 0x18], 0x112
0x1096: je      0x10a0
0x1098: dec     eax
0x1099: xor     eax, eax
0x109b: jmp     0x115a
0x10a0: dec     eax
0x10a1: cmp     dword ptr [ebp + 0x20], 0xf120
0x10a8: je      0x10cd
0x10aa: dec     eax
0x10ab: sub     esp, 0x20
0x10ae: dec     eax
0x10af: mov     ecx, dword ptr [ebp + 0x10]
0x10b2: dec     eax
0x10b3: mov     edx, dword ptr [ebp + 0x18]
0x10b6: dec     esp
0x10b7: mov     eax, dword ptr [ebp + 0x20]
0x10ba: dec     esp
0x10bb: mov     ecx, dword ptr [ebp + 0x28]
0x10be: call    dword ptr [0x1024]
0x10c4: dec     eax
0x10c5: add     esp, 0x20
0x10c8: pop     edi
0x10c9: pop     esi
0x10ca: pop     ebx
0x10cb: leave
0x10cc: ret
0x10cd: dec     eax
0x10ce: sub     esp, 0x20
0x10d1: dec     eax
0x10d2: mov     ecx, dword ptr [ebp + 0x10]
0x10d5: mov     edx, 0x3e8
0x10da: dec     ecx
0x10db: mov     eax, 0x40004
0x10e1: call    dword ptr [0x1011]
0x10e7: dec     eax
0x10e8: add     esp, 0x20
0x10eb: dec     eax
0x10ec: sub     esp, 0x20
0x10ef: dec     eax
0x10f0: mov     ecx, dword ptr [ebp + 0x10]
0x10f3: dec     eax
0x10f4: mov     edx, 9
0x10fa: call    dword ptr [0x1000]
0x1100: dec     eax
0x1101: add     esp, 0x20
0x1104: dec     eax
0x1105: mov     eax, 1
0x110b: pop     edi
0x110c: pop     esi
0x110d: pop     ebx
0x110e: leave
0x110f: ret
0x1110: dec     eax
0x1111: cmp     dword ptr [ebp + 0x20], 1
0x1115: jne     0x114e
0x1117: dec     eax
0x1118: sub     esp, 0x20
0x111b: dec     eax
0x111c: mov     ecx, dword ptr [ebp + 0x10]
0x111f: dec     eax
0x1120: mov     edx, 6
0x1126: call    dword ptr [0xfd4]
0x112c: dec     eax
0x112d: add     esp, 0x20
0x1130: pop     edi
0x1131: pop     esi
0x1132: pop     ebx
0x1133: leave
0x1134: ret
0x1135: dec     eax
0x1136: sub     esp, 0x20
0x1139: dec     eax
0x113a: mov     ecx, dword ptr [ebp + 0x10]
0x113d: dec     eax
0x113e: mov     edx, 0
0x1144: call    dword ptr [0xfa6]
0x114a: dec     eax
0x114b: add     esp, 0x20
0x114e: dec     eax
0x114f: mov     eax, 1
0x1155: pop     edi
0x1156: pop     esi
0x1157: pop     ebx
0x1158: leave
0x1159: ret
0x115a: pop     edi
0x115b: pop     esi
0x115c: pop     ebx
0x115d: leave
0x115e: ret
0x115f: add     byte ptr [eax], al
0x1161: add     byte ptr [eax], al
0x1163: add     byte ptr [eax], al
0x1165: add     byte ptr [eax], al
0x1167: add     byte ptr [eax], al
0x1169: add     byte ptr [eax], al
0x116b: add     byte ptr [eax], al
0x116d: add     byte ptr [eax], al
0x116f: add     byte ptr [eax], al
0x1171: add     byte ptr [eax], al
0x1173: add     byte ptr [eax], al
0x1175: add     byte ptr [eax], al
0x1177: add     byte ptr [eax], al
0x1179: add     byte ptr [eax], al
0x117b: add     byte ptr [eax], al
0x117d: add     byte ptr [eax], al
0x117f: add     byte ptr [eax], al
0x1181: add     byte ptr [eax], al
0x1183: add     byte ptr [eax], al
0x1185: add     byte ptr [eax], al
0x1187: add     byte ptr [eax], al
0x1189: add     byte ptr [eax], al
0x118b: add     byte ptr [eax], al
0x118d: add     byte ptr [eax], al
0x118f: add     byte ptr [eax], al
0x1191: add     byte ptr [eax], al
0x1193: add     byte ptr [eax], al
0x1195: add     byte ptr [eax], al
0x1197: add     byte ptr [eax], al
0x1199: add     byte ptr [eax], al
0x119b: add     byte ptr [eax], al
0x119d: add     byte ptr [eax], al
0x119f: add     byte ptr [eax], al
0x11a1: add     byte ptr [eax], al
0x11a3: add     byte ptr [eax], al
0x11a5: add     byte ptr [eax], al
0x11a7: add     byte ptr [eax], al
0x11a9: add     byte ptr [eax], al
0x11ab: add     byte ptr [eax], al
0x11ad: add     byte ptr [eax], al
0x11af: add     byte ptr [eax], al
0x11b1: add     byte ptr [eax], al
0x11b3: add     byte ptr [eax], al
0x11b5: add     byte ptr [eax], al
0x11b7: add     byte ptr [eax], al
0x11b9: add     byte ptr [eax], al
0x11bb: add     byte ptr [eax], al
0x11bd: add     byte ptr [eax], al
0x11bf: add     byte ptr [eax], al
0x11c1: add     byte ptr [eax], al
0x11c3: add     byte ptr [eax], al
0x11c5: add     byte ptr [eax], al
0x11c7: add     byte ptr [eax], al
0x11c9: add     byte ptr [eax], al
0x11cb: add     byte ptr [eax], al
0x11cd: add     byte ptr [eax], al
0x11cf: add     byte ptr [eax], al
0x11d1: add     byte ptr [eax], al
0x11d3: add     byte ptr [eax], al
0x11d5: add     byte ptr [eax], al
0x11d7: add     byte ptr [eax], al
0x11d9: add     byte ptr [eax], al
0x11db: add     byte ptr [eax], al
0x11dd: add     byte ptr [eax], al
0x11df: add     byte ptr [eax], al
0x11e1: add     byte ptr [eax], al
0x11e3: add     byte ptr [eax], al
0x11e5: add     byte ptr [eax], al
0x11e7: add     byte ptr [eax], al
0x11e9: add     byte ptr [eax], al
0x11eb: add     byte ptr [eax], al
0x11ed: add     byte ptr [eax], al
0x11ef: add     byte ptr [eax], al
0x11f1: add     byte ptr [eax], al
0x11f3: add     byte ptr [eax], al
0x11f5: add     byte ptr [eax], al
0x11f7: add     byte ptr [eax], al
0x11f9: add     byte ptr [eax], al
0x11fb: add     byte ptr [eax], al
0x11fd: add     byte ptr [eax], al

Sunday, August 20, 2023

News : supervision python package.

We write your reusable computer vision tools. Whether you need to load your dataset from your hard drive, draw detections on an image or video, or count how many detections are in a zone. You can count on us!
I tested today with Fedora 39 Linux Distro using the GitHub project.
The installation from the source code worked with the following commands:
# clone repository and navigate to root directory
git clone https://github.com/roboflow/supervision.git
cd supervision

# setup python environment and activate it
python3 -m venv venv
source venv/bin/activate

# headless install
pip install -e "."

# desktop install
pip install -e ".[desktop]"
You can see more examples with this python package on this twitter account - skalskip92 !

Friday, August 18, 2023

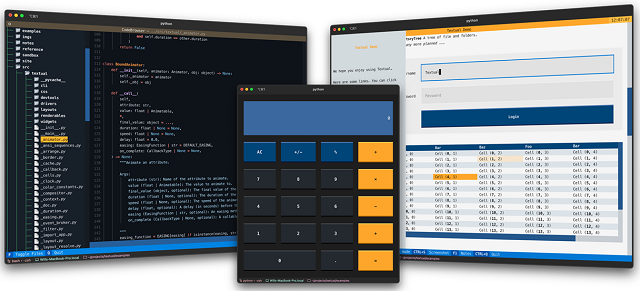
News : Textual - Rapid Application Development.

Textual is a Rapid Application Development framework for Python.
Build sophisticated user interfaces with a simple Python API. Run your apps in the terminal and (coming soon) a web browser!

Sunday, August 13, 2023

Python 3.10.12 : My colab test with Gated recurrent unit mechanism - part 037.

This is a simple example for Gated recurrent unit mechanism known as GRUs.
You can find this in my GitHub colab project.
import numpy as np
import tensorflow as tf
import keras
from keras import layers
units = 64
tf.keras.layers.GRU(
    units,
    activation="tanh",
    recurrent_activation="sigmoid",
    use_bias=True,
    kernel_initializer="glorot_uniform",
    recurrent_initializer="orthogonal",
    bias_initializer="zeros",
    kernel_regularizer=None,
    recurrent_regularizer=None,
    bias_regularizer=None,
    activity_regularizer=None,
    kernel_constraint=None,
    recurrent_constraint=None,
    bias_constraint=None,
    dropout=0.0,
    recurrent_dropout=0.0,
    return_sequences=False,
    return_state=False,
    go_backwards=False,
    stateful=False,
    unroll=False,
    time_major=False,
    reset_after=True,
)
inputs = tf.random.normal([32, 10, 8])
gru = tf.keras.layers.GRU(4)
output = gru(inputs)
print(output.shape)

gru = tf.keras.layers.GRU(4, return_sequences=True, return_state=True)
whole_sequence_output, final_state = gru(inputs)
print(whole_sequence_output.shape)
print(final_state.shape)

Saturday, August 12, 2023

Python 3.10.12 : My colab tutorials and news from colab - part 036.

Today I recapitulated a bit the artificial intelligence part and a simple example for google drive.
I created two notebooks in collaboration and added them to my github repo.
The most interesting is the one with textgenrnn.
textgenrnn is an modern neural network architecture which utilizes new techniques as attention-weighting and skip-embedding to accelerate training
The last notebook colab is catafest_045.

News : Colab behavior through runtime .

I would like Google to emphasize more on the development side some elements that work like robots by interfacing with the development side.
Today I worked a little on artificial intelligence and I realized that it doesn't create textgenrnn_weights.hdf5 file for training created with the Python textgenrnn mode.
A solution is to reset the runtime with Ctrl+M and resume running.
They specify RESTART RUNTIME when using Python modules, see:
WARNING: The following packages were previously imported in this runtime:
   [numpy]
You must restart the runtime in order to use newly installed versions.
In this case, with the creation of textgenrnn_weights.hdf5 file, it is more difficult to understand and cannot be seen easily.

Thursday, August 10, 2023

Python 3.10.12 : My colab tutorials and news from colab - part 035.

In this notebook I will show you how to use python to run a program written in the programming language for CUDA.
This allows you to use NVIDIA CUDA Compiler Driver NVCC, see this official webpage.
NVCC Plugin for Jupyter Notebook by https://github.com/andreinechaev/nvcc4jupyter.
The example I tested is simple:
# This is formatted as CUDA code
__global__ void cuda_hello(){
    printf("Hello World from GPU!\n");
}

int main() {
    cuda_hello<<<1,1>>>();
    return 0;
}

Tuesday, July 11, 2023

Python 3.8.10 : My colab tutorials and news from colab - part 034.

I add a new colab notebook with a simple source code to list all running VM processes from the colab notebook
You can see more examples on my GitHub colab google repo.
This is the source code:
%%sh
echo "List all running VM processes."
ps -ef
echo "Done"

Monday, July 10, 2023

News : About my work and one of my websites.

I would like to bring to the attention of those who follow my activity on my websites and appreciate the inability to continue with one of the websites: free-tutorials.org. It is currently hosted on a free host, but I cannot import it 100%, which has led me not to complete it with new posts. The continuation of the activities there, considering the limited time, will be carried out on my blogs with the defined theme with which I started: Linux - Fedora, Graphics, Python, Pygame.
In the meantime, because the host is expensive and until now someone has helped me to host it on his server, it is possible to sell the domain: free-tutorials.org - I receive purchase offers at my personal Yahoo email address catafest@yahoo.com.
Minimum starting price 250 euros, because the domain is old from 2018.

Monday, June 26, 2023

Python : Fix error user on install with requirements.txt.

The error show like this :
ERROR: Could not install packages due to an OSError: [WinError 5] Access is denied: 'C:\\Python311\\share'
Consider using the `--user` option or check the permissions.
This can be easy fix with :
pip install -r requirements.txt --user
By using the --user flag, the packages will be installed in the user-specific site-packages directory, ensuring that the packages are installed only for the current user and not affecting the system-wide Python installation.

Wednesday, June 14, 2023

News : OSINT - Open Source Intelligence python course.

For those who want to learn Python in order to: 
  • become a really good developer; 
  • to take the exam to get into university; 
  • to be interviewed for a job.
This course omits VERY many important things and sometimes even recommends what could have been called bad practice. There are things that don't matter when writing small automations for everyday OSINT tasks, but are extremely important when creating serious team projects.
You cam see the project on this GhitHub account.

Sunday, June 11, 2023

News : JupyterLab 4.0 released.

The Jupyter contributor community is proud to announce JupyterLab 4.0, the next major release of our full-featured development environment. The package is now available on PyPI and conda-forge. You can upgrade by running pip install --upgrade jupyterlab or conda install -c conda-forge jupyterlab.
You can read more on the official website.

Python Qt6 : Download for youtube with PyQt6.

Simple example with PyQt6 to create an interface to download a video using a URL from youtube.
This simple example has some limitations, the filtering of the results is done according to the possibilities of the pytube mode and only after video, it does not use multithread and it does not have multiple selection possibilities and options. In conclusion, it offers a simple download functionality.
You can see more on my GitHub account.
import sys
from PyQt6.QtWidgets import QApplication, QMainWindow, QWidget, QVBoxLayout, QHBoxLayout, QLineEdit, QPushButton, QProgressBar, QDialog, QComboBox, QLabel, QMessageBox
from PyQt6.QtGui import QIcon, QPixmap
from pytube import YouTube
from PyQt6.QtCore import Qt
from PyQt6.QtWidgets import QDialogButtonBox


class FormatChecker:
    def __init__(self, url):
        self.url = url

    def check_formats(self):
        try:
            yt = YouTube(self.url)
            formats = []
            streams = yt.streams.filter(only_video=True)
            for stream in streams:
                if stream.url:
                    format_info = {
                        'resolution': stream.resolution,
                        'file_extension': stream.mime_type.split("/")[-1]
                    }
                    formats.append(format_info)
                    print(" format_info ",format_info)
            return formats
        except Exception as e:
            print("Error:", str(e))
            return []


class FormatInfo:
    def __init__(self, resolution, file_formats):
        self.resolution = resolution
        self.file_formats = file_formats


class ResolutionDialog(QDialog):
    def __init__(self, formats, parent=None):
        super().__init__(parent)
        self.setWindowTitle("Select Resolution and File Format")
        self.formats = formats

        layout = QVBoxLayout(self)

        self.resolution_combo = QComboBox(self)
        for format_info in formats:
            resolution = format_info.resolution
            self.resolution_combo.addItem(resolution)
        layout.addWidget(self.resolution_combo)

        self.file_format_combo = QComboBox(self)
        self.update_file_formats(self.resolution_combo.currentText())
        layout.addWidget(self.file_format_combo)

        button_box = QDialogButtonBox(QDialogButtonBox.StandardButton.Ok | QDialogButtonBox.StandardButton.Cancel)
        button_box.accepted.connect(self.accept)
        button_box.rejected.connect(self.reject)
        layout.addWidget(button_box)

        self.resolution_combo.currentIndexChanged.connect(self.on_resolution_changed)

    def update_file_formats(self, resolution):
        self.file_format_combo.clear()
        for format_info in self.formats:
            if format_info.resolution == resolution:
                file_formats = format_info.file_formats
                self.file_format_combo.addItems(file_formats)

    def selected_resolution(self):
        return self.resolution_combo.currentText()

    def selected_file_format(self):
        return self.file_format_combo.currentText()

    def on_resolution_changed(self, index):
        resolution = self.resolution_combo.currentText()
        self.update_file_formats(resolution)


class MainWindow(QMainWindow):
    def __init__(self):
        super().__init__()
        self.setWindowTitle("YouTube Downloader - selected - only_video =True")
        self.setFixedWidth(640)

        central_widget = QWidget(self)
        self.setCentralWidget(central_widget)

        layout = QVBoxLayout(central_widget)

        self.url_edit = QLineEdit()
        layout.addWidget(self.url_edit)

        download_button = QPushButton("Download")
        download_button.clicked.connect(self.show_resolution_dialog)
        layout.addWidget(download_button)

        progress_layout = QHBoxLayout()
        layout.addLayout(progress_layout)

        self.progress_bar = QProgressBar()
        self.progress_bar.setTextVisible(True)
        progress_layout.addWidget(self.progress_bar)

        self.progress_icon_label = QLabel(self)
        pixmap = QPixmap("youtube.png")  # Înlocuiți "path_to_icon.png" cu calea către iconul dorit
        self.progress_icon_label.setPixmap(pixmap)
        progress_layout.addWidget(self.progress_icon_label)

    def show_resolution_dialog(self):
        url = self.url_edit.text()
        if url:
            format_checker = FormatChecker(url)
            formats = format_checker.check_formats()
            format_infos = []
            for format in formats:
                resolution = format['resolution']
                file_extension = format['file_extension']
                format_info = next((info for info in format_infos if info.resolution == resolution), None)
                if format_info:
                    format_info.file_formats.append(file_extension)
                else:
                    format_info = FormatInfo(resolution, [file_extension])
                    format_infos.append(format_info)

            dialog = ResolutionDialog(format_infos, self)
            if dialog.exec() == QDialog.DialogCode.Accepted:
                resolution = dialog.selected_resolution()
                file_format = dialog.selected_file_format()
                self.download_video(url, resolution, file_format)
        else:
            print("Please enter a valid YouTube URL.")

    def download_video(self, url, resolution, file_format):
        try:
            yt = YouTube(url)
            stream = yt.streams.filter(only_video=True, resolution=resolution, mime_type="video/" + file_format).first()
            if stream:
                stream.download()
                print("Download completed!")
                QMessageBox.question(self, "Download Completed", "The video has been downloaded successfully.", QMessageBox.StandardButton.Ok)
            else:
                print("Error: The selected video format is not available for download.")
                QMessageBox.question(self, "Download Error", "The selected video format is not available for download.", QMessageBox.StandardButton.Ok)
        except Exception as e:
            print("Error:", str(e))
            QMessageBox.question(self, "Download Error", "An error occurred during the download.", QMessageBox.StandardButton.Ok)


def main():
    app = QApplication(sys.argv)
    window = MainWindow()
    window.show()
    sys.exit(app.exec())


if __name__ == "__main__":
    main()

Wednesday, May 24, 2023

Python 3.11.0 : Exo - domain-specific programming language in python.

Exo is a domain-specific programming language that helps low-level performance engineers transform very simple programs that specify what they want to compute into very complex programs that do the same thing as the specification, only much, much faster.
You can find it on GitHub project and on the official webpage.
Let's install it with pip tool:
C:\PythonProjects>mkdir exo-lang_001

C:\PythonProjects>cd exo-lang_001

C:\PythonProjects\exo-lang_001>pip install exo-lang --user
Collecting exo-lang
  Downloading exo_lang-0.0.2-py3-none-any.whl (142 kB)
  ...
Successfully installed PySMT-0.9.5 asdl-0.1.5 asdl-adt-0.1.0 astor-0.8.1 exo-lang-0.0.2 tomli-2.0.1 
yapf-0.33.0 z3-solver-4.12.2.0
Let's test with this default example but using virtual environments
This allow me to install Python packages in an isolated location from the rest of your system instead of installing them system-wide.
C:\PythonProjects\exo-lang_001>pip install virtualenv --user
...
C:\PythonProjects\exo-lang_001>python -m venv venv
C:\PythonProjects\exo-lang_001>venv\Scripts\activate.bat

(venv) C:\PythonProjects\exo-lang_001>python -m pip install -U setuptools wheel
Successfully installed setuptools-67.8.0 wheel-0.40.0

[notice] A new release of pip available: 22.3 -> 23.1.2
[notice] To update, run: python.exe -m pip install --upgrade pip
(venv) C:\PythonProjects\exo-lang_001>python.exe -m pip install --upgrade pip
Requirement already satisfied: pip in c:\pythonprojects\exo-lang_001\venv\lib\site-packages (22.3)
Collecting pip
  Using cached pip-23.1.2-py3-none-any.whl (2.1 MB)
...
Successfully installed pip-23.1.2
(venv) C:\PythonProjects\exo-lang_001>python -m pip install exo-lang
...
Installing collected packages: z3-solver, PySMT, asdl, tomli, numpy, attrs, astor, yapf, asdl-adt, exo-lang
Successfully installed PySMT-0.9.5 asdl-0.1.5 asdl-adt-0.1.0 astor-0.8.1 attrs-23.1.0 exo-lang-0.0.2 numpy-1.24.3
tomli-2.0.1 yapf-0.33.0 z3-solver-4.12.2.0
Let's try a simple example from official webpage:
(venv) C:\PythonProjects\exo-lang_001>notepad example.py
# example.py
from __future__ import annotations
from exo import *

@proc
def example_sgemm(
    M: size,
    N: size,
    K: size,
    C: f32[M, N] @ DRAM,
    A: f32[M, K] @ DRAM,
    B: f32[K, N] @ DRAM,
):
    for i in seq(0, M):
        for j in seq(0, N):
            for k in seq(0, K):
                C[i, j] += A[i, k] * B[k, j]
Use this command and check the out folder:
(venv) C:\PythonProjects\exo-lang_001>cd out
(venv) C:\PythonProjects\exo-lang_001\out>dir 
...
 example.c   example.h
If you want to know more see this video from youtube:

Sunday, May 21, 2023

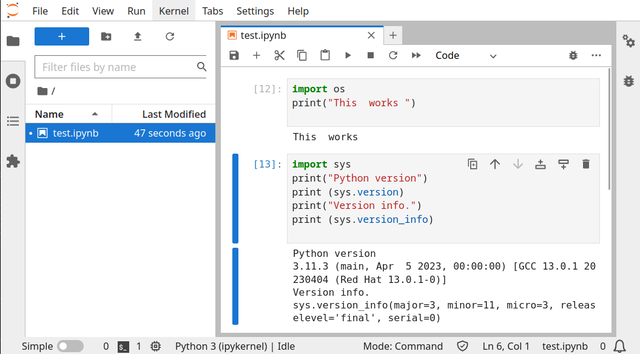
Python 3.11.3 : Using Jupyter Lab on Fedora linux distro.

JupyterLab is the latest web-based interactive development environment for notebooks, code, and data. Its flexible interface allows users to configure and arrange workflows in data science, scientific computing, computational journalism, and machine learning.
Follow these steps:
  1. Install the jupyterlab python package using pip. This will allow you to run Jupyter notebooks in the terminal.
    pip install jupyterlab
  2. Open a Jupyter Lab session in the terminal using the command:
    jupyter lab
  3. Create a new notebook file and save it with the .ipynb extension.
  4. In the notebook file, add the source code to work with the Python programming language and save the file notebook.
See the next screenshot how this works:

Friday, May 5, 2023

Python 3.8.10 : My colab tutorials and news from colab - part 033.

Colab comes with new changes:
Starting today paid users can select their preferred NVIDIA GPU. Visit Runtime > Change runtime type and choose between T4, V100, and A100. We'll do our best to assign your choice based on GPU availability.
Today I tested a new python package called News API with colab to search for news.
News API is a simple, easy-to-use REST API that returns JSON search results for current and historic news articles published by over 80,000 worldwide sources.
You can find my sample code in my collaboration area of the GitHub repository.

Saturday, April 29, 2023

Extension for inkscape with python.

Today, I created the first Python extension for Inkscape, and although in theory, it seems easy, it is not really so.
You have to study a little and search the web, but I created a tutorial on one of my website.
The idea is to use at least two files with different extensions.
I named one catafest_extension.inx and the other catafest_extension.py.
For the Python file, I used this source code:
#!/usr/bin/env python
# coding=utf-8
#
# Copyright (C) 2023 Catalin George Festila, catafest@yahoo.com
#

"""
Simple test extension for inkscape
"""

import inkex
# add by me 

from lxml import etree
def draw_SVG_square(w,h, x,y, parent):
    style = { 'stroke'        : 'none',
              'stroke-width'  : '1',
              'fill'          : '#0000FF'
            }

    attribs = {
        'style'     : str(inkex.Style(style)),
        'height'    : str(h),
        'width'     : str(w),
        'x'         : str(x),
        'y'         : str(y)
            }
    patrat = etree.SubElement(
        parent, inkex.addNS('rect','svg'), attribs )
    return patrat

class MyExtension(inkex.Effect):
    def __init__(self):
        super().__init__()

    def effect(self):
        self.msg("This is an empty extension created by catafest !")
        parent = self.svg.get_current_layer()
        draw_SVG_square(100,100, 0,0, parent)

if __name__ == '__main__':
    MyExtension().run()
The result is this

Python 3.8.10 : My colab tutorials - part 032.

I haven't written for the python community in a long time, here is another example that I created using a tool from google called colab.
catafest_038.ipynb - simple example with StableDiffusionPipeline and DiffusionPipeline to generate images based a text ...
This and the other examples can be found in my repository named colab_google on my GitHub account.

Monday, April 17, 2023

Python Qt6 : use sqlite - part 002.

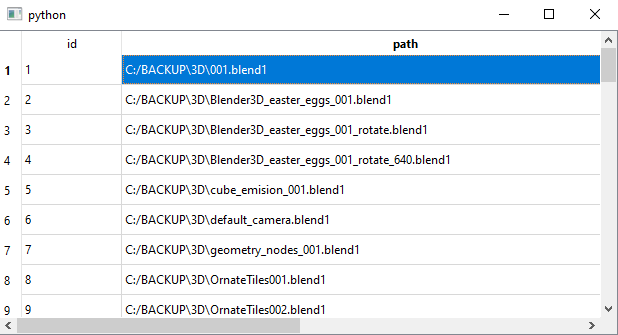
In this article tutorial I will show you how to read from the sqlite file the content of the table: files.
In the last article tutorial, I create a interface with PyQt6 that search files by regular expresion and result is add to sqlite file named: file_paths.db.
I used same steps with a default python class and I used QSqlTableModel to show the content received.
The script will create a window with this QSqlTableModel, then reads the file and add the result.
Let's see the source code:
import sys
from PyQt6.QtWidgets import QApplication, QMainWindow, QTableView
from PyQt6.QtSql import QSqlDatabase, QSqlQuery, QSqlTableModel

class MainWindow(QMainWindow):
    def __init__(self):
        super().__init__()

        # Initialize the database
        self.init_db()

        # Set up the GUI
        self.table_view = QTableView(self)
        self.setCentralWidget(self.table_view)

        # Set up the model and connect it to the database
        self.model = QSqlTableModel(self)
        self.model.setTable('files')
        self.model.select()
        self.table_view.setModel(self.model)

    def init_db(self):
        # Connect to the database
        db = QSqlDatabase.addDatabase('QSQLITE')
        db.setDatabaseName('file_paths.db')
        if not db.open():
            print('Could not open database')
            sys.exit(1)

    def create_table(self):
        # Create the 'files' table if it doesn't exist
        query = QSqlQuery()
        query.exec('CREATE TABLE IF NOT EXISTS files (id INTEGER PRIMARY KEY, path TEXT)')

if __name__ == '__main__':
    app = QApplication(sys.argv)
    window = MainWindow()
    window.show()
    sys.exit(app.exec())
I add this source code into a python script named view.py and I run it.
This is the result of the running script:

Python Qt6 : use sqlite - part 001.

This will default update for any python project:
python.exe -m pip install --upgrade pip --user
...
Successfully installed pip-23.1
The sqlite3 is already on my python instalation because I use version 3.11.0, you can see the official webpage.
Install the PyQt6 with the pip tool, I have this python package:
pip install PyQt6 --user
Requirement already satisfied: PyQt6 in c:\python311\lib\site-packages (6.4.1)
...
The next source of code will create a windows with two buttons and one edit area.
The PyQt6 graphics user interface use these elements: QPushButton, QLineEdit and QMessageBox from QWidget.
The python class will create a window with these elements and dor each of these is need to have methods.
First you need to select the folder, then use an regular expresion for search.
I used this : .*\.blend1$ this means *.blend1.
The last step is to use FindFiles button to search all blend files, in this case and add path of each of these to the sqlite database into a table named: files .
If you select the root C: then will take some time to search the files.
Let's see the source code:
import sys
import os
import re
from PyQt6.QtWidgets import *
from PyQt6.QtCore import *
import sqlite3

class FindFiles(QWidget):
    def __init__(self):
        super().__init__()
        self.setWindowTitle("Find Files")
        self.setGeometry(100, 100, 500, 300)

        self.folder_button = QPushButton("Choose Folder")
        self.folder_button.clicked.connect(self.choose_folder)
        self.pattern_edit = QLineEdit()
        self.pattern_edit.setPlaceholderText("Enter regular expression pattern")
        self.pattern_edit.setFixedWidth(250)
        self.find_button = QPushButton("Find Files")
        self.find_button.clicked.connect(self.find_files)

        layout = QVBoxLayout()
        layout.addWidget(self.folder_button)
        layout.addWidget(self.pattern_edit)
        layout.addWidget(self.find_button)
        self.setLayout(layout)

        self.folder_path = ""

        self.conn = sqlite3.connect("file_paths.db")
        self.cursor = self.conn.cursor()
        self.cursor.execute("CREATE TABLE IF NOT EXISTS files (id INTEGER PRIMARY KEY, path TEXT)")

    def choose_folder(self):
        self.folder_path = QFileDialog.getExistingDirectory(self, "Choose Folder")
        if self.folder_path:
            self.folder_button.setText(self.folder_path)

    def find_files(self):
        if not self.folder_path:
            QMessageBox.warning(self, "Warning", "Please choose a folder first!")
            return

        pattern = self.pattern_edit.text()

        if not pattern:
            QMessageBox.warning(self, "Warning", "Please enter a regular expression pattern!")
            return

        file_paths = []
        for root, dirs, files in os.walk(self.folder_path):
            for file in files:
                if re.match(pattern, file):
                    file_path = os.path.join(root, file)
                    file_paths.append(file_path)
                    self.cursor.execute("INSERT INTO files (path) VALUES (?)", (file_path,))
        self.conn.commit()

        QMessageBox.information(self, "Information", f"Found {len(file_paths)} files that match the pattern!")

if __name__ == "__main__":
    app = QApplication(sys.argv)
    find_files = FindFiles()
    find_files.show()
    sys.exit(app.exec())
I put this source code into a file named:main.py and I run it.
python main.py
The result is this:

Tuesday, April 11, 2023

Python 3.11.0 : about consolemenu .

This simple console menu can help to create menus, you can find the project on GitHub project.
pip install console-menu --user
For testing, I used the default example, and works well.
# Import the necessary packages
from consolemenu import *
from consolemenu.items import *

# Create the menu
menu = ConsoleMenu("Title", "Subtitle")

# Create some items

# MenuItem is the base class for all items, it doesn't do anything when selected
menu_item = MenuItem("Menu Item")

# A FunctionItem runs a Python function when selected
function_item = FunctionItem("Call a Python function", input, ["Enter an input"])

# A CommandItem runs a console command
command_item = CommandItem("Run a console command",  "touch hello.txt")

# A SelectionMenu constructs a menu from a list of strings
selection_menu = SelectionMenu(["item1", "item2", "item3"])

# A SubmenuItem lets you add a menu (the selection_menu above, for example)
# as a submenu of another menu
submenu_item = SubmenuItem("Submenu item", selection_menu, menu)

# Once we're done creating them, we just add the items to the menu
menu.append_item(menu_item)
menu.append_item(function_item)
menu.append_item(command_item)
menu.append_item(submenu_item)

# Finally, we call show to show the menu and allow the user to interact
menu.show()

Saturday, April 8, 2023

Create an ovoid with python on Blender 3D.

Blender 3D use python version 3.10.9 and you can write your scripts with the Blender 3D features. This script can also be found on the website where I write tutorials. This Python script for Blender 3D creates an ovoid model using the math formula for ovoid:
import bpy
import math

# Define the parameters of the ovoid
a = 1.9
b = 1.5
c = 1.5

# Define the number of vertices in each direction
n_long = 32
n_lat = 16

# Create a new mesh
mesh = bpy.data.meshes.new(name="Ovoid")

# Create the vertices
verts = []
for j in range(n_lat):
    lat = (j / (n_lat - 1)) * math.pi
    for i in range(n_long):
        lon = (i / (n_long - 1)) * 2 * math.pi
        x = a * math.sin(lat) * math.cos(lon)
        y = b * math.sin(lat) * math.sin(lon)
        z = c * math.cos(lat)
        verts.append((x, y, z))

# Create the faces
faces = []
for j in range(n_lat - 1):
    for i in range(n_long - 1):
        v1 = j * n_long + i
        v2 = j * n_long + i + 1
        v3 = (j + 1) * n_long + i + 1
        v4 = (j + 1) * n_long + i
        faces.append((v1, v2, v3, v4))

# Create the mesh and object
mesh.from_pydata(verts, [], faces)
obj = bpy.data.objects.new(name="Ovoid", object_data=mesh)

# Add the object to the scene
scene = bpy.context.scene
scene.collection.objects.link(obj)

Saturday, April 1, 2023

Python 3.11.0 : about execnet python package - part 001.

The execnet Python package allows you to use lightweight interprocess communication using remote Python interpreters. It provides a simple way to execute code in a remote Python interpreter, allowing for easy distribution of work across multiple machines or processes.
With this package, you can create gateways to remote Python interpreters and then execute Python code in that interpreter.
This package provides a simple interface for creating these gateways and for executing code on them, making it easy to distribute work and run code in parallel.
It can be particularly useful for running tests on multiple versions of Python or for distributing computational tasks across multiple machines.
Let's see the first example:
import execnet

def multiplier(channel, factor):
    while not channel.isclosed():
        param = channel.receive()
        channel.send(param * factor)

gw = execnet.makegateway()
channel = gw.remote_exec(multiplier, factor=10)
print(channel)
for i in range(5):
    channel.send(i)
    result = channel.receive()
    print(result)
    assert result == i * 10
gw.exit()
This is the result
<Channel id=1 open>
0
10
20
30
40
Let's see the next example:
import execnet

gw = execnet.makegateway() 
channel = gw.remote_exec("""
    def multiply(x, y):
        return x * y
    
    result = 0
    for i in range(10):
        result += multiply(i, 1)
        print("This is result for ",i," ",result)    
    channel.send(result)

""")

result = channel.receive()
print("This is channel receive result : ", result)
assert result == 45
This is result:
This is channel receive result :  45

Wednesday, March 29, 2023

Python : Open3D cannot be used on Windows 10 and Fedora Linux Distro .

Open3D is an open-source library that supports rapid development of software that deals with 3D data. The Open3D frontend exposes a set of carefully selected data structures and algorithms in both C++ and Python. The backend is highly optimized and is set up for parallelization. Open3D was developed from a clean slate with a small and carefully considered set of dependencies. It can be set up on different platforms and compiled from source with minimal effort. The code is clean, consistently styled, and maintained via a clear code review mechanism. Open3D has been used in a number of published research projects and is actively deployed in the cloud. We welcome contributions from the open-source community.
Today I tested this python package with Windows 10 and Fedora Linux Distro with python versions 11 and 10 ...
This package does not work and you will see why ...
C:\PythonProjects\Open3D001>git clone https://github.com/isl-org/Open3D.git
Cloning into 'Open3D'...
remote: Enumerating objects: 67435, done.
remote: Counting objects: 100% (2280/2280), done.
remote: Compressing objects: 100% (1894/1894), done.
remote: Total 67435 (delta 886), reused 599 (delta 385), pack-reused 65155
Receiving objects: 100% (67435/67435), 237.23 MiB | 17.11 MiB/s, done.

Resolving deltas: 100% (50682/50682), done.
Updating files: 100% (2315/2315), done.

C:\PythonProjects\Open3D001>cd Open3D

C:\PythonProjects\Open3D001\Open3D>mkdir build

C:\PythonProjects\Open3D001\Open3D>cd build

C:\PythonProjects\Open3D001\Open3D\build>cmake -DBUILD_SHARED_LIBS=ON -DCMAKE_INSTALL_PREFIX=C:\open3d_install ..
-- Building for: Visual Studio 17 2022
-- Setting build type to Release as none was specified.
-- CMAKE_BUILD_TYPE is set to Release.
-- Downloading third-party dependencies to C:/PythonProjects/Open3D001/Open3D/3rdparty_downloads
CMake Deprecation Warning at CMakeLists.txt:189 (cmake_policy):
  The OLD behavior for policy CMP0072 will be removed from a future version
  of CMake.

  The cmake-policies(7) manual explains that the OLD behaviors of all
  policies are deprecated and that a policy should be set to OLD only under
  specific short-term circumstances.  Projects should be ported to the NEW
  behavior and not rely on setting a policy to OLD.

...
According to this issue number 4796 and my test on Windows 10 with a Python version greater than 10 and on Fedora Linux Distro you cannot use this python package.
You can try an older version of Python and try it, see this example:
C:\PythonProjects\Open3D001>C:\Python310\python.exe -m pip install --user open3d --no-warn-script-location
C:\PythonProjects\Open3D001>C:\Python310\python.exe -c "import open3d as o3d; print(o3d)"
Traceback (most recent call last):
 ...
    from open3d.cpu.pybind import (core, camera, data, geometry, io, pipelines,
ImportError: DLL load failed while importing pybind: A dynamic link library (DLL) initialization routine failed.
...
pip install pybind --user
Collecting pybind
  Using cached pybind-0.1.35.tar.gz (15.5 MB)
ERROR: Could not install packages due to an OSError: [WinError 206] The filename or extension is too 
long: 'C:\\Users\\catafest\\AppData\\Local\\Temp\\pip-install-7ccpzu3z\\pybind_
...
Basically, this python package cannot be used with an old python version in Windows 10.

Sunday, March 26, 2023

Python 3.11.0 : Image generation with OpenAI.

In this tutorial I will show you a python script with PyQt6 and OpenAI that generates an image based on OpenAI token keys and a text that describes the image.
The script is quite simple and requires the installation of python packets: PyQt6,openai.
In the script you can find a python class called MainWindow in which graphic user interface elements are included and openai elements for generating images.
You also need a token key from the official openai page to use for generation.
The script runs with the command python numa_script.py and in the two editboxes is inserted chaie from token API OpenAI and the text that will describe the image to be generated.
This is the python script with the source code:
#create_image.py

import os
import openai

from PyQt6.QtCore import Qt, QSize
from PyQt6.QtGui import QImage, QPixmap
from PyQt6.QtWidgets import QApplication, QWidget, QLabel, QLineEdit, QVBoxLayout, QHBoxLayout, QPushButton
import requests

class MainWindow(QWidget):
    def __init__(self):
        super().__init__()
        self.resize(500, 500)
        self.setWindowTitle("AI Data Input")
        
        # create widgets
        self.image_label = QLabel(self)
        self.image_label.setFixedSize(QSize(300, 300))
        self.url_edit = QLineEdit(self)
        self.api_key = QLineEdit(self)
        self.send_button = QPushButton("Send data to AI", self)
        self.send_button.clicked.connect(self.on_send_button_clicked)
        
        # create layout
        layout = QVBoxLayout()
        url_layout = QHBoxLayout()
        url_layout.addWidget(QLabel("Text request AI: "))
        url_layout.addWidget(self.url_edit)
        api_layout = QHBoxLayout()
        api_layout.addWidget(QLabel("OpenAI API Key: "))
        api_layout.addWidget(self.api_key)

        layout.addLayout(url_layout)
        layout.addLayout(api_layout)
        layout.addWidget(self.image_label, alignment=Qt.AlignmentFlag.AlignCenter)
        layout.addWidget(self.send_button, alignment=Qt.AlignmentFlag.AlignCenter)
        
        self.setLayout(layout)
    
    def on_send_button_clicked(self):
        #openai.api_key = "your api key generated by OpenAI API"
        openai.api_key = self.api_key.text()
        PROMPT = self.url_edit.text()
        url = openai.Image.create(
            prompt=PROMPT,
            n=1,
            size="256x256",
        )

        # extract the url value
        url_value = url['data'][0]['url']
        if url_value :
            response = requests.get(url_value)
            if response.status_code == 200:
                image = QImage.fromData(response.content)
                pixmap = QPixmap.fromImage(image)
                self.image_label.setPixmap(pixmap)
                self.image_label.setScaledContents(True)

if __name__ == "__main__":
    app = QApplication([])
    window = MainWindow()
    window.show()
    app.exec()
This is the result of the source script: