analitics

Pages

Sunday, July 24, 2022

Python 3.11.0a7 : image conversions in Python.

Image processing is very important in development, therefore also in python.
The image processing packages used in python have undergone changes over time.
Pillow and PIL cannot co-exist in the same environment. Before installing Pillow, please uninstall PIL.
Pillow higher than version 10 no longer supports import Image. Please use from PIL import Image instead.
Pillow higher than version 2.1.0 no longer supports import _imaging. Please use from PIL.Image import core as _imaging instead.
Although the image formats are old compared to the newer ones in vector format, they are preferred depending on the field of work.
You can see all of these file image formats on the official python package.
First, the basic installation start with upgrade the pip tool:
C:\PythonProjects\ConvertImages>python -m pip install --upgrade pip
Requirement already satisfied: pip in c:\python311alpha\lib\site-packages (22.1.
2)
Collecting pip
  Downloading pip-22.2-py3-none-any.whl (2.0 MB)
     ---------------------------------------- 2.0/2.0 MB 3.3 MB/s eta 0:00:00
Installing collected packages: pip
  Attempting uninstall: pip
    Found existing installation: pip 22.1.2
    Uninstalling pip-22.1.2:
      Successfully uninstalled pip-22.1.2
Successfully installed pip-22.2
Secondary, the install of the Pillow python package:
C:\PythonProjects\ConvertImages>python  -m pip install --upgrade Pillow
Collecting Pillow
  Downloading Pillow-9.2.0-cp311-cp311-win_amd64.whl (3.3 MB)
     ---------------------------------------- 3.3/3.3 MB 4.0 MB/s eta 0:00:00
Installing collected packages: Pillow
Successfully installed Pillow-9.2.0
I have a webp image here that I have scaled to smaller sizes and that I will test its conversion from webp format to png format.
The image is named waterski2 and I'm using the 3.11.0a7 python version.
Let's see the source code:
from PIL import Image

# open the image file WEBP
image = Image.open('waterski2.webp')

# show the image 
image.show()

# convert the image to RGB color
image = image.convert('RGB')

# save PNG RGB image
image.save('waterski2_RGB_PNG.png', 'png')

# save JPG RGB image
image.save('waterski2_RGB_JPG.jpg', 'jpeg')

# open the image file JPG
image_jpg = Image.open('waterski2_RGB_JPG.jpg')

# convert the image to RGB color
image_rgb_jpg = image_jpg.convert('RGB')

# save PNG RGB image from JPG
image_rgb_jpg.save('new-image_RGB_PNG_from_JPG.png', 'png')

#same process of conversion to WEBP file type
# from png image
image = Image.open('waterski2_RGB_PNG.png')
image = image.convert('RGB')
image.save('new-image_RGB_WEBP_from_png.webp', 'webp')
# from jpg image
image = Image.open('waterski2_RGB_JPG.jpg')
image = image.convert('RGB')
image.save('new-image_RGB_WEBP_from_jpg.webp', 'webp')
Here is a screenshot with these converted images and the processed image.

Saturday, July 23, 2022

Blender 3D and python scripting - part 023.

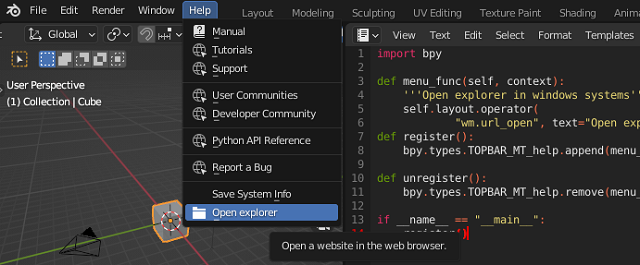
This script will add a submenu to the main Help menu with an icon with a folder that will open the explorer from the Windows operating system.
I have not solved the tooltip of this button, it is set to show a message about opening a URL.
This is the source code:
import bpy

def menu_func(self, context):
    '''Open explorer in windows systems'''
    self.layout.operator(
            "wm.url_open", text="Open explorer", icon='FILE_FOLDER').url = "C:/"
def register():
    bpy.types.TOPBAR_MT_help.append(menu_func)

def unregister():
    bpy.types.TOPBAR_MT_help.remove(menu_func)

if __name__ == "__main__":
    register()
If you want to change the tooltip then need to create a class OpenOperator and wrapper for this operator function and set the bl_label and all you need to have it.
The menu_func will get the layout operator with all defined in the class OpenOperator and will set the tooltip with the text: Open explorer in windows systems.
See this new source code:
import bpy

def menu_func(self, context):
    self.layout.operator(
            OpenOperator.bl_idname, text="Open explorer", icon='FILE_FOLDER')

class OpenOperator(bpy.types.Operator):
    """Open explorer in windows systems"""
    bl_idname = "wm.open_explorer"
    bl_label = "Open explorer"

    def execute(self, context):
        bpy.ops.wm.url_open(url="C:/")
        return {'FINISHED'}


def register():
    bpy.utils.register_class(OpenOperator)
    bpy.types.TOPBAR_MT_help.append(menu_func)


def unregister():
    bpy.utils.unregister_class(OpenOperator)
    bpy.types.TOPBAR_MT_help.remove(menu_func)


if __name__ == "__main__":
    register()

Saturday, July 16, 2022

Python 3.7.13 : My colab tutorials - part 026.

Vosk is an offline open source speech recognition toolkit. It enables speech recognition for 20+ languages and dialects - English, Indian English, German, French, Spanish, Portuguese, Chinese, Russian, Turkish, Vietnamese, Italian, Dutch, Catalan, Arabic, Greek, Farsi, Filipino, Ukrainian, Kazakh, Swedish, Japanese, Esperanto, Hindi, Czech, Polish. More to come.
Today I tested this Python package with a video that contains sound content in the Chinese language
I created a simple interface where you can test other videos on youtube and where you can select the language and start time and duration for the detection sequence with the python vosk package.
I used the python youtube_dl package to take portions of wav sound from a youtube video.
I haven't done tests on other videos but it should work.
You can find it on this colab notebook.

Wednesday, July 13, 2022

Python 3.11.0a7 : local script for update python packages.

If you want to upgrade all local packages from a local script for pip with version greater than 10.0.1 version use a local python script with this source code:
import pkg_resources
from subprocess import call

packages = [dist.project_name for dist in pkg_resources.working_set]
call("pip install --upgrade " + ' '.join(packages), shell=True)
Run it with the python executable and you will see something like this:
C:\Python311alpha>python.exe update_python.py
...
Requirement already satisfied: pip-api in c:\python311alpha\lib\site-packages (0.0.29)
Requirement already satisfied: pypng in c:\python311alpha\lib\site-packages (0.0.21)
Requirement already satisfied: PyGetWindow in c:\python311alpha\lib\site-packages (0.0.9)
Requirement already satisfied: bs4 in c:\python311alpha\lib\site-packages (0.0.1)

Tuesday, July 12, 2022

Python 3.7.13 : My colab tutorials - part 025.

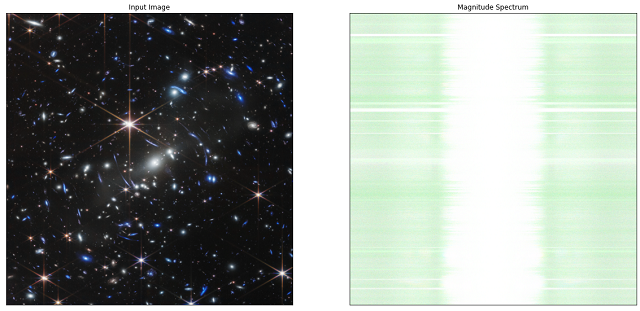
Today I tested a simple data processing example with the first image from NASA's James Webb Space Telescope
You can find this example and more on my GitHub repository for colab.
This is one of results of data processing with a simple logaritm function to see magnitude spectrum of Fourier transform X by shifting the zero-frequency map:

Thursday, July 7, 2022

Blender 3D and python scripting - part 022.

In the last tutorial, we exemplified with the default template from Blender 3D how to create a panel in the Object area.
Today I will show you how to modify this panel with some useful elements for developing an addon.
The purpose of the old tutorial on this is the differences and changes that must be made to the template source code to introduce the following functions:
    StringProperty(
    BoolProperty( 
    IntProperty(
    IntVectorProperty(
    FloatProperty(
    FloatVectorProperty(
    BoolVectorProperty(
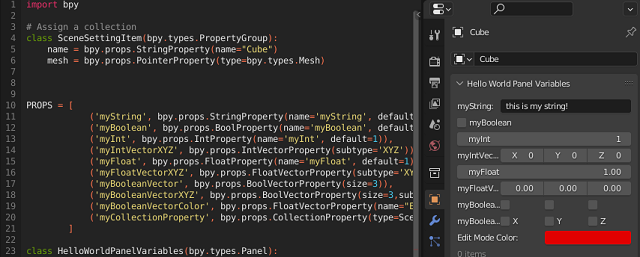
Some arguments need to be modified to have different input data, see the selection of colors in the attached image:
I commented on the source code areas in the template and added my changes:
The class also called SceneSettingItem and CollectionProperty is currently being tested and is not finalized to be implemented, it can be seen in panel: 0 items.
It can be seen that any defined class must be registered and unregistered
Here is the source code used to get the new screenshot changes:
import bpy

# Assign a collection
class SceneSettingItem(bpy.types.PropertyGroup):
    name = bpy.props.StringProperty(name="Cube")
    mesh = bpy.props.PointerProperty(type=bpy.types.Mesh)


PROPS = [
            ('myString', bpy.props.StringProperty(name='myString', default='this is my string!')),
            ('myBoolean', bpy.props.BoolProperty(name='myBoolean', default=False)),
            ('myInt', bpy.props.IntProperty(name='myInt', default=1)),
            ('myIntVectorXYZ', bpy.props.IntVectorProperty(subtype='XYZ')),
            ('myFloat', bpy.props.FloatProperty(name='myFloat', default=1)),
            ('myFloatVectorXYZ', bpy.props.FloatVectorProperty(subtype='XYZ')),
            ('myBooleanVector', bpy.props.BoolVectorProperty(size=3)),
            ('myBooleanVectorXYZ', bpy.props.BoolVectorProperty(size=3,subtype='XYZ')),
            ('myBooleanVectorColor', bpy.props.FloatVectorProperty(name="Edit Mode Color", subtype='COLOR',  default=(0.76, 0.0, 0.0), size=3, min=0, max=1)),
            ('myCollectionProperty', bpy.props.CollectionProperty(type=SceneSettingItem)),
        ]    

class HelloWorldPanelVariables(bpy.types.Panel):
    """Creates a Panel in the Object properties window"""
    bl_label = "Hello World Panel Variables"
    bl_idname = "OBJECT_PT_hello"
    bl_space_type = 'PROPERTIES'
    bl_region_type = 'WINDOW'
    bl_context = "object"

#    def draw(self, context):
#        layout = self.layout
#        obj = context.object
#        row = layout.row()
#        row.label(text="Hello world!", icon='WORLD_DATA')
#        row = layout.row()
#        row.label(text="Active object is: " + obj.name)
#        row = layout.row()
#        row.prop(obj, "name")
#        row = layout.row()
#        row.operator("mesh.primitive_cube_add")

    def draw(self, context):
        col = self.layout.column()
        for (prop_name, _) in PROPS:
            row = col.row()
            row.prop(context.scene, prop_name)

        
def register():
    bpy.utils.register_class(SceneSettingItem)
    bpy.utils.register_class(HelloWorldPanelVariables)
    for (prop_name, prop_value) in PROPS:
        setattr(bpy.types.Scene, prop_name, prop_value)

def unregister():
    bpy.utils.unregister_class(SceneSettingItem)
    bpy.utils.unregister_class(HelloWorldPanelVariables)    
    for (prop_name, _) in PROPS:
        delattr(bpy.types.Scene, prop_name)

if __name__ == "__main__":
    register()

Wednesday, July 6, 2022

Blender 3D and python scripting - part 021.

I will continue the series of tutorials with python and the Blender 3D software interface.
From the main menu we can get to the scripting part and here we choose Templates - Python - Ui Panel Simple.
The source code will be added to the python editor.
Save this source code with a name and load it as an addon.
After loading this source code it can be found at Properties at Object, see screenshot.
You can see the source code from the Ui Panel Simple template that I used.
import bpy

class HelloWorldPanel(bpy.types.Panel):
    """Creates a Panel in the Object properties window"""
    bl_label = "Hello World Panel"
    bl_idname = "OBJECT_PT_hello"
    bl_space_type = 'PROPERTIES'
    bl_region_type = 'WINDOW'
    bl_context = "object"

    def draw(self, context):
        layout = self.layout

        obj = context.object

        row = layout.row()
        row.label(text="Hello world!", icon='WORLD_DATA')

        row = layout.row()
        row.label(text="Active object is: " + obj.name)
        row = layout.row()
        row.prop(obj, "name")

        row = layout.row()
        row.operator("mesh.primitive_cube_add")

def register():
    bpy.utils.register_class(HelloWorldPanel)


def unregister():
    bpy.utils.unregister_class(HelloWorldPanel)

if __name__ == "__main__":
    register()

Saturday, July 2, 2022

Python 3.7.10 : Simple example with PyQRCode.

The pyqrcode module is a QR code generator that can automate most of the building process for creating QR codes.
The pypng python library is required to save and upload PNG images.
I had to install them both with the pip utility.
pip install pyqrcode
Collecting pyqrcode
  Using cached PyQRCode-1.2.1-py3-none-any.whl
Installing collected packages: pyqrcode
Successfully installed pyqrcode-1.2.1
WARNING: There was an error checking the latest version of pip.
...
pip install pypng
Collecting pypng
  Using cached pypng-0.0.21-py3-none-any.whl (48 kB)
Installing collected packages: pypng
Successfully installed pypng-0.0.21
WARNING: There was an error checking the latest version of pip.
Let's try some simple examples:
import pyqrcode
url = pyqrcode.create('https://ro.wikipedia.org/wiki/Utilizator:Catalin_Festila', error='H', mode='binary')
url.svg('uca-url.svg', scale=8)
url.eps('uca-url.eps', scale=2)
url.png('code.png', scale=5, module_color=[0, 0, 0, 128], background=[0, 0, 128])
url.show()
print(url.terminal(quiet_zone=1))
This is the result of this source code: