analitics

Pages

Showing posts with label linux tools. Show all posts

Thursday, April 4, 2024

Python 3.12.2 : Python and the Fedora Messaging Infrastructure - part 001.

I tried using the Fedora Messaging online tool with the python package of the same name on Python version 3.12.2.
You can find the documentation on the official page./div>
I created a working folder called FedoraMessaging:
[mythcat@fedora PythonProjects]$ mkdir FedoraMessaging
[mythcat@fedora PythonProjects]$ cd FedoraMessaging
You need to install the fedora-messaging and rabbitmq-server packages.
[root@fedora FedoraMessaging]# dnf5 install fedora-messaging
Updating and loading repositories:
Repositories loaded.
Package                             Arch    Version                       Repository         Size
Installing:                                                                                      
 fedora-messaging                   noarch  3.5.0-1.fc41                  rawhide        38.6 KiB
...
[root@fedora FedoraMessaging]# dnf install rabbitmq-server
At some point it will ask for a reboot.
You need to install the python package named fedora-messaging.
[root@fedora FedoraMessaging]# pip install --user fedora-messaging
Collecting fedora-messaging
...
Installing collected packages: pytz, incremental, wrapt, tomli, rpds-py, pyasn1, pika, hyperlink, constantly, attrs, 
referencing, pyasn1-modules, automat, twisted, jsonschema-specifications, service-identity, jsonschema, crochet, 
fedora-messaging
Successfully installed attrs-23.2.0 automat-22.10.0 constantly-23.10.4 crochet-2.1.1 fedora-messaging-3.5.0 
hyperlink-21.0.0 incremental-22.10.0 jsonschema-4.21.1 jsonschema-specifications-2023.12.1 pika-1.3.2 pyasn1-0.6.0 
pyasn1-modules-0.4.0 pytz-2024.1 referencing-0.34.0 rpds-py-0.18.0 service-identity-24.1.0 tomli-2.0.1 twisted-24.3.0 
wrapt-1.16.0
You need to start the broker:
[mythcat@fedora FedoraMessaging]$ sudo systemctl start rabbitmq-server
I used the source code from the documentation to test its functionality with a python script named hello_test.py.
from fedora_messaging import api, config

config.conf.setup_logging()
api.consume(lambda message: print(message))

from fedora_messaging import api, config

config.conf.setup_logging()
api.publish(api.Message(topic="hello by mythcat", body={"Hello": "world!"}))
I ran it and got this response:
[mythcat@fedora FedoraMessaging]$ python hello_test.py
[fedora_messaging.message INFO] Registering the 'base.message' key as the '<class 'fedora_messaging.message.Message'>' 
class in the Message class registry
[fedora_messaging.twisted.protocol INFO] Waiting for 0 consumer(s) to finish processing before halting
[fedora_messaging.twisted.protocol INFO] Finished canceling 0 consumers
[fedora_messaging.twisted.protocol INFO] Disconnect requested, but AMQP connection already gone
I created another python script named my_consumer.py, to check if this works:
from fedora_messaging import api, config
# Setup logging
config.conf.setup_logging()
# Define the callback function to process messages
def process_message(message):
    # Check if the message topic matches "hello by mythcat"
    if message.topic == "hello by mythcat":
        print(f"Received message: {message.body}")
    else:
        print(f"Ignoring message with topic: {message.topic}")
# Consume messages
api.consume(process_message)
I ran it and got this response:
[mythcat@fedora FedoraMessaging]$ python my_consumer.py
[fedora_messaging.twisted.protocol INFO] Successfully registered AMQP consumer Consumer(queue=amq.gen-9lKk7sGeYY5I40bdc5VrzQ,
callback=<function process_message at 0x7fdb0f5da160>)
[fedora_messaging.message INFO] Registering the 'base.message' key as the '<class 'fedora_messaging.message.Message'>'
class in the Message class registry
[fedora_messaging.twisted.consumer INFO] Consuming message from topic hello by mythcat 
(message id 800a1540-1e91-4b4a-a125-15e33eebb699)
Received message: {'Hello': 'world!'}
[fedora_messaging.twisted.consumer INFO] Successfully consumed message from topic hello by mythcat 
(message id 800a1540-1e91-4b4a-a125-15e33eebb699)
It can be seen that the answer is received and displayed correctly.
Sunday, May 21, 2023

Python 3.11.3 : Using Jupyter Lab on Fedora linux distro.

JupyterLab is the latest web-based interactive development environment for notebooks, code, and data. Its flexible interface allows users to configure and arrange workflows in data science, scientific computing, computational journalism, and machine learning.
Follow these steps:
  1. Install the jupyterlab python package using pip. This will allow you to run Jupyter notebooks in the terminal.
    pip install jupyterlab
  2. Open a Jupyter Lab session in the terminal using the command:
    jupyter lab
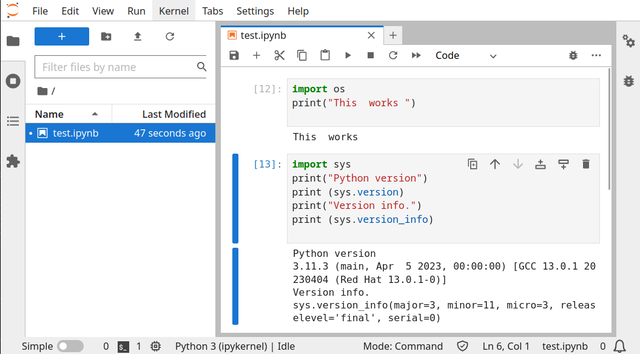
  3. Create a new notebook file and save it with the .ipynb extension.
  4. In the notebook file, add the source code to work with the Python programming language and save the file notebook.
See the next screenshot how this works:

Friday, January 14, 2022

Python 3.10.1 : Django and channels on Fedora distro - sync and async features.

A consumer is a subclass of either channels.consumer.AsyncConsumer or channels.consumer.SyncConsumer.
Consumers do a couple of things in particular: 
  • Structures your code as a series of functions to be called whenever an event happens, rather than making you write an event loop. 
  • Allow you to write synchronous or async code and deals with handoffs and threading for you.
This is another tutorial about Django and channels, you can see the first one.
For testing area you need the postman tool and I install and used with snap tool.
[root@fedora mythcat]# dnf install snapd
Last metadata expiration check: 0:40:03 ago on Fri 14 Jan 2022 03:38:55 PM EET.
...
[root@fedora mythcat]# ln -s /var/lib/snapd/snap /snap
[root@fedora mythcat]# snap install postman
2022-01-14T16:22:15+02:00 INFO Waiting for automatic snapd restart...
postman (v9/stable) 9.8.3 from Postman, Inc. (postman-inc✓) installed
[mythcat@fedora ~]$ snap run postman
Let's go on the project folder:
[mythcat@fedora ~]$ cd djangotest001/
[mythcat@fedora djangotest001]$ cd website001/
In this folder I have two folders: appsite001 and website001.
In the appsite001 I add these scripts.
I create a new python script named consumers.py with this source code:
from channels.consumer import SyncConsumer, AsyncConsumer
from channels.exceptions import StopConsumer

class MySyncConsumer(SyncConsumer):
    def websocket_connect(self,event):
        print('Websocket Connected ...')
        self.send({
        'type':'websocket.accept',
        })
    def websocket_receive(self, event):
        print('Messaged Received ...')
        print(event['text'])
        self.send({
        'type':'websocket.send',
        'text':'Message sent to client'
        })
    def websocket_diconnect(self, event):
        print('Websocket Disconnected ...')
        raise StopConsumer
        
class MyAsyncConsumer(AsyncConsumer):
    async def websocket_connect(self,event):
        print('Websocket Connected ...')
    async def websocket_receive(self, event):
        print('Messaged Received ...')
    async def websocket_diconnect(self, event):
        print('Websocket Disconnected ...')
I created routing.py python script with this source code:
from django.urls import path
from . import consumers

websocket_urlpatterns = [
    path('ws/sc/',consumers.MySyncConsumer.as_asgi()),
    ]
In the website001 I change this script named asgi.py.
import os

from django.core.asgi import get_asgi_application

from channels.routing import ProtocolTypeRouter, URLRouter

import appsite001.routing

os.environ.setdefault('DJANGO_SETTINGS_MODULE', 'website001.settings')

application = ProtocolTypeRouter({
    'http':get_asgi_application(),
    'websocket':URLRouter(
        appsite001.routing.websocket_urlpatterns
    )
})
Run the Django project with :
[mythcat@fedora website001]$ python manage.py runserver
Watching for file changes with StatReloader
Performing system checks...

System check identified no issues (0 silenced).
January 14, 2022 - 15:32:29
Django version 4.0.1, using settings 'website001.settings'
Starting ASGI/Channels version 3.0.4 development server at http://127.0.0.1:8000/
Quit the server with CONTROL-C.
WebSocket HANDSHAKING /ws/sc/ [127.0.0.1:33944]
Websocket Connected ...
WebSocket CONNECT /ws/sc/ [127.0.0.1:33944]
Messaged Received ...
This is a message from mythcat
...
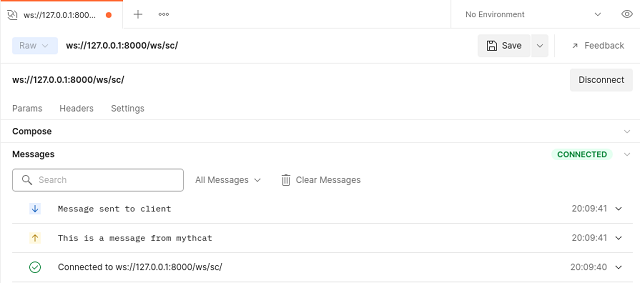
Use postman tool with websocket to send this message to Django project:
This is a message from mythcat
You can see how this works:

Saturday, October 26, 2019

Python 3.7.4 : About with the PyOpenCL python module.

PyOpenCL lets you access GPUs and other massively parallel compute devices from Python.
It is important to note that OpenCL is not restricted to GPUs.
In fact, no special hardware is required to use OpenCL for computation–your existing CPU is enough.
The documentation of this project can be found at this website.
Let's install the python module for python 3 version:
[mythcat@desk ~]$ pip3 install pyopencl --user
Collecting pyopencl
...
Successfully built pytools
Installing collected packages: pytools, pyopencl
Successfully installed pyopencl-2019.1.1 pytools-2019.1.1
The install of OpenCL driver can be done with these commands:
# get OpenCL driver automated installer (installs kernel 4.7)
curl https://software.intel.com/sites/default/files/managed/f6/77/install_OCL_driver.sh_.txt > install_OCL\
_driver.sh
chmod +x install_OCL_driver.sh
# install OpenCL driver
sudo ./install_OCL_driver.sh install
# check
ls /boot/vmlinuz-*intel*
This is a simple python script to test the opencl context:
import pyopencl as cl
import numpy as np
ctx = cl.create_some_context()
# cet platforms, both CPU and GPU
my_plat= cl.get_platforms()
CPU = my_plat[0].get_devices()
try:
    GPU = my_plat[1].get_devices()
except IndexError:
    GPU = "none"
# create context for GPU/CPU
if GPU != "none":
    ctx = cl.Context(GPU)
else:
    ctx = cl.Context(CPU)
# create queue for each kernel execution
queue = cl.CommandQueue(ctx)
mf = cl.mem_flags
This is another simple python script:
# -*- coding: utf-8 -*-
import pyopencl as cl 
import numpy
a = numpy.random.rand(50000).astype(numpy.float32)
ctx = cl.create_some_context()
queue = cl.CommandQueue(ctx)
a_buf = cl.Buffer(ctx ,cl.mem_flags.READ_WRITE,size=a.nbytes)
cl.enqueue_write_buffer(queue, a_buf , a)

prg= cl.Program(ctx,
"""
__kernel void twice(__global float ∗a)
{
 int gid=get_global_id(0);
 a[gid] ∗= 2;
}"""
). build()

prg.twice(queue, a.shape, None,a_buf ).wait()

Sunday, October 20, 2019

Python 3.7.4 : Usinge pytesseract for text recognition.

About this python module named tesseract, you can read here.
I tested with the tesseract tool install on my Fedora 30 distro and python module pytesseract version 0.3.0.
[root@desk mythcat]# dnf install tesseract
Last metadata expiration check: 0:24:18 ago on Sun 20 Oct 2019 10:56:23 AM EEST.
Package tesseract-4.1.0-1.fc30.x86_64 is already installed.
Dependencies resolved.
Nothing to do.
Complete!
[root@desk mythcat]# whereis tesseract
tesseract: /usr/bin/tesseract /usr/share/tesseract
[mythcat@desk ~]$ pip3 install pytesseract --user
Collecting pytesseract
...
Installing collected packages: pytesseract
Successfully installed pytesseract-0.3.0
I test with many images and texts and works very well.
Text images with a printed font are very well recognized.
This test with this image does not have very good accuracy.

The result of the handwriting image.
[mythcat@desk ~]$ python3 ocr_image.py 001.png 
rake Yous mnislakes,
take you chances,
look silby,

bul hep. mv going
dont freeze up

Tuesday, October 1, 2019

Python 3.7.4 : Install the protobuf from sources on Fedora distro.

Today I will show you how to build protobuf from sources using the Fedora distro.
The google team comes with this intro:
Protocol buffers are Google's language-neutral, platform-neutral, extensible mechanism for serializing structured data – think XML, but smaller, faster, and simpler...
This google project comes with these tutorials.
The GitHub project can be found here.
To install the compiler, download the package.
[mythcat@desk ~]$ cd Downloads/
[mythcat@desk Downloads]$ cp protobuf-python-3.9.2.tar.gz ~/
[mythcat@desk Downloads]$ cd ..
[mythcat@desk ~]$ tar xvzf protobuf-python-3.9.2.tar.gz 
...
protobuf-3.9.2/aclocal.m4
protobuf-3.9.2/install-sh
protobuf-3.9.2/generate_descriptor_proto.sh
protobuf-3.9.2/CHANGES.txt
protobuf-3.9.2/configure.ac
protobuf-3.9.2/configure
Let's see the content:
[mythcat@desk ~]$ cd protobuf-3.9.2/
[mythcat@desk protobuf-3.9.2]$ ls
aclocal.m4                   config.sub                    ltmain.sh            README.md
ar-lib                       configure                     m4                   six.BUILD
autogen.sh                   configure.ac                  Makefile.am          src
benchmarks                   conformance                   Makefile.in          test-driver
BUILD                        CONTRIBUTORS.txt              missing              third_party
CHANGES.txt                  depcomp                       objectivec           update_file_lists.sh
cmake                        editors                       protobuf.bzl         util
compile                      examples                      protobuf_deps.bzl    WORKSPACE
compiler_config_setting.bzl  generate_descriptor_proto.sh  protobuf-lite.pc.in
config.guess                 install-sh                    protobuf.pc.in
config.h.in                  LICENSE                       python
[mythcat@desk protobuf-3.9.2]$ ./configure
...
checking how to run the C preprocessor... gcc -E
checking how to run the C++ preprocessor... /lib/cpp
configure: error: in `/home/mythcat/protobuf-3.9.2':
configure: error: C++ preprocessor "/lib/cpp" fails sanity check
See `config.log' for more details
...
[root@desk protobuf-3.9.2]# dnf install g++
...
Installed:
  gcc-c++-9.2.1-1.fc30.x86_64                                                                               

Complete![root@desk protobuf-3.9.2]# exit
exit
Let's build again:
[mythcat@desk protobuf-3.9.2]$ ./configure
checking whether to enable maintainer-specific portions of Makefiles... yes
checking build system type... x86_64-pc-linux-gnu
...
checking that generated files are newer than configure... done
configure: creating ./config.status
config.status: creating Makefile
config.status: creating scripts/gmock-config
config.status: creating build-aux/config.h
config.status: executing depfiles commands
config.status: executing libtool commands
[mythcat@desk protobuf-3.9.2]$ nproc --all
2
[mythcat@desk protobuf-3.9.2]$ make -j2
...
  CXXLD    protoc
make[2]: Leaving directory '/home/mythcat/protobuf-3.9.2/src'
make[1]: Leaving directory '/home/mythcat/protobuf-3.9.2'
[mythcat@desk protobuf-3.9.2]$ make check -j2
...PASS: protobuf-lazy-descriptor-test
PASS: protobuf-lite-test
PASS: google/protobuf/compiler/zip_output_unittest.sh
PASS: google/protobuf/io/gzip_stream_unittest.sh
PASS: protobuf-lite-arena-test
PASS: no-warning-test
PASS: protobuf-test
============================================================================
Testsuite summary for Protocol Buffers 3.9.2
============================================================================
# TOTAL: 7
# PASS:  7
# SKIP:  0
# XFAIL: 0
# FAIL:  0
# XPASS: 0
# ERROR: 0
============================================================================
make[3]: Leaving directory '/home/mythcat/protobuf-3.9.2/src'
make[2]: Leaving directory '/home/mythcat/protobuf-3.9.2/src'
make[1]: Leaving directory '/home/mythcat/protobuf-3.9.2/src'
The last steps is for install:
[mythcat@desk protobuf-3.9.2]$ sudo make install
[sudo] password for mythcat: 
...
make[2]: Leaving directory '/home/mythcat/protobuf-3.9.2/src'
make[1]: Leaving directory '/home/mythcat/protobuf-3.9.2/src'
[mythcat@desk protobuf-3.9.2]$ sudo ldconfig 
Let's test it:
[mythcat@desk protobuf-3.9.2]$ protoc --version
libprotoc 3.9.2
Now the next step comes for python module:
[mythcat@desk protobuf-3.9.2]$ cd python/
[mythcat@desk python]$ ls
google  MANIFEST.in  mox.py  README.md  release  release.sh  setup.cfg  setup.py  stubout.py  tox.ini
[mythcat@desk python]$ python setup.py build
...
testSerialize (google.protobuf.internal.unknown_fields_test.UnknownFieldsTest) ... ok
testSerializeMessageSetWireFormatUnknownExtension 
(google.protobuf.internal.unknown_fields_test.UnknownFieldsTest) ... ok
testSerializeProto3 (google.protobuf.internal.unknown_fields_test.UnknownFieldsTest) ... ok
testByteSizeFunctions (google.protobuf.internal.wire_format_test.WireFormatTest) ... ok
testPackTag (google.protobuf.internal.wire_format_test.WireFormatTest) ... ok
testUnpackTag (google.protobuf.internal.wire_format_test.WireFormatTest) ... ok
testZigZagDecode (google.protobuf.internal.wire_format_test.WireFormatTest) ... ok
testZigZagEncode (google.protobuf.internal.wire_format_test.WireFormatTest) ... ok

----------------------------------------------------------------------
Ran 818 tests in 5.343s

OK (skipped=10)
Let's test the python module:
[mythcat@desk python]$ python3
Python 3.7.4 (default, Jul  9 2019, 16:32:37) 
[GCC 9.1.1 20190503 (Red Hat 9.1.1-1)] on linux
Type "help", "copyright", "credits" or "license" for more information.
>>> import google
>>> from google.protobuf import descriptor as _descriptor
>>> from google.protobuf import message as _message
>>> from google.protobuf import reflection as _reflection
>>> from google.protobuf import symbol_database as _symbol_database
>>> from google.protobuf import descriptor_pb2
>>> from google.protobuf import text_format
>>> dir(_descriptor)
['Descriptor', 'DescriptorBase', 'DescriptorMetaclass', 'EnumDescriptor', 'EnumValueDescriptor', 
'Error', 'FieldDescriptor', 'FileDescriptor', 'MakeDescriptor', 'MethodDescriptor', 'OneofDescriptor', 
'ServiceDescriptor', 'TypeTransformationError', '_Lock', '_NestedDescriptorBase', '_OptionsOrNone', 
'_ParseOptions', '_ToCamelCase', '_ToJsonName', '_USE_C_DESCRIPTORS', '__author__', '__builtins__', 
'__cached__', '__doc__', '__file__', '__loader__', '__name__', '__package__', '__spec__', '_lock', 
'api_implementation', 'six', 'threading']
Now I can to define the structure for the data structured as messages
These message is a small logical record of information containing a series of name-value pairs called fields.
The protobuffers compiler (protoc) to generate the source code in the language you need (from the .proto file).
To generate a Python file, you need to execute:
protoc -I=$SRC_DIR --python_out=$DST_DIR $SRC_DIR/my_example.proto
Let's test with am example (you can use any proto file) in default folder (use . for default folder):
[mythcat@desk python]$ protoc -I=. --python_out=. my_example.proto
[mythcat@desk python]$ ls my_example*
my_example_pb2.py  my_example.proto
[mythcat@desk python]$ python3
Python 3.7.4 (default, Jul  9 2019, 16:32:37) 
[GCC 9.1.1 20190503 (Red Hat 9.1.1-1)] on linux
Type "help", "copyright", "credits" or "license" for more information.
>>> import my_example_pb2
>>> dir(my_example_pb2)
['AddressBook', 'DESCRIPTOR', 'Person', '_ADDRESSBOOK', '_PERSON', '_PERSON_PHONENUMBER', '_PERSON_PHONETYPE',
 '__builtins__', '__cached__', '__doc__', '__file__', '__loader__', '__name__', '__package__', '__spec__',
 '_b', '_descriptor', '_message', '_reflection', '_sym_db', '_symbol_database', 'sys']