analitics

Pages

Showing posts with label django. Show all posts

Sunday, April 28, 2024

News : New Django Builder online tool.

Django builder is free to use, and a personal project worked on in my spare time.
Any donations are very much appreciated.
If you want to, feel free to donate using the BitCoin address or PayPal link below.
Here is a new online tool that allows you to create projects with the Django framework and manage them more easily. It comes with different versions of Django, you can include channels and HTMX.
I don't see a command line to manage the project...

Wednesday, March 27, 2024

Python 2.7.12 : Django running on glitch website.

Django was design and developed by Lawrence journal world in 2003 and publicly released under BSD license in July 2005. Currently, DSF (Django Software Foundation) maintains its development and release cycle.
Django was released on 21, July 2005. Its current stable version is 2.2.5 which was released April 1, 2019.
It is maintained by the Django Software Foundation
Some time ago, the website bug allowed the use of Python language.
Today I looked at the core project in Django, fixed it and added a test user called test with the password password_test
You can test in the admin area.
I did not add new functionalities and pages because I wanted it to be a default start project.
Here's how I set permissions for this test user.

Sunday, November 12, 2023

Python 3.8.12 : Django with replit online tool - part 001.

Now with the replit online tool it is easy to test projects in Django. You must set a variable SECRET_KEY in settings.py and press the Run button. This will open the web page with your project.
In the command line area you can use python to generate this variable, see the source code:
~/Django001$ python
Python 3.8.12 (default, Aug 30 2021, 16:42:10) 
[GCC 10.3.0] on linux
Type "help", "copyright", "credits" or "license" for more information.
>>> import secrets
>>> secrets.token_urlsafe(32)
'yIXPv6u4uCt4AUWlkU4NCuoyJiZlLx5IFm8kG6h8RtA'
This is result of these first steps:
Use this command to create a website named catafest001:
~/Django001$ python manage.py startapp catafest001
Add this website to settings.py from django_project:
INSTALLED_APPS = [
    'django.contrib.admin',
    'django.contrib.auth',
    'django.contrib.contenttypes',
    'django.contrib.sessions',
    'django.contrib.messages',
    'django.contrib.staticfiles',
    'catafest001',
]
Use this command to create an user with a password:
~/Django001$ python manage.py createsuperuser
Username (leave blank to use 'runner'): 
Email address: catafest@yahoo.com
Password: 
Password (again): 
The password is too similar to the username.
Bypass password validation and create user anyway? [y/N]: y
Superuser created successfully.
You can see I let the username runner and the password I set to adminadmin.
Into web area I set the URL to /admin and I use the username and the password to login into admin area.
NOTE: Although I did the correct steps for a simple project in django with admin page, it won't let me login as admin ... maybe the replit online tool needs some other changes or the cause is different ...

Thursday, October 26, 2023

News : Django 5.0 beta 1 released.

Django 5.0 beta 1 is now available. It represents the second stage in the 5.0 release cycle and is an opportunity for you to try out the changes coming in Django 5.0.
Django 5.0 brings a deluge of exciting new features which you can read about in the in-development 5.0 release notes.
This can be easily install with the pip3 tool:
pip3 install Django==5.0b1
Collecting Django==5.0b1
...
Installing collected packages: tzdata, sqlparse, asgiref, Django
Successfully installed Django-5.0b1 asgiref-3.7.2 sqlparse-0.4.4 tzdata-2023.3

Tuesday, September 19, 2023

News : Django 5.0 alpha 1 released.

Django 5.0 alpha 1 is now available. It represents the first stage in the 5.0 release cycle and is an opportunity for you to try out the changes coming in Django 5.0.
Django 5.0 brings a deluge of exciting new features which you can read about in the in-development 5.0 release notes.
Now Django 5.0 supports Python 3.10, 3.11, and 3.12.
At that time, you should be able to run your package’s tests using python -Wd so that deprecation warnings appear.
Django 5.0 introduces the concept of a field group, and field group templates.
Database-computed default values
Database generated model field
More options for declaring field choices
New decorators now support wrapping asynchronous
... a lot of features deprecated in 5.0
You can read more on the official website.

Saturday, May 7, 2022

Python : Use django-allauth on heruko - part 001.

Today I am going to show you how to implement a google authentication using Django on the Heroku server.
The tutorial is almost complete. This introductory part is not finalized on the display side of the style and some elements ...
This python module is needed to run the web service.
pip install gunicorn
Collecting gunicorn
  Downloading gunicorn-20.1.0-py3-none-any.whl (79 kB)
     ---------------------------------------- 79.5/79.5 KB 184.8 kB/s eta 0:00:00
Requirement already satisfied: setuptools>=3.0 in c:\python311alpha\lib\site-packages (from gunicorn) (58.1.0)
Installing collected packages: gunicorn
Successfully installed gunicorn-20.1.0
Create and activate a virtual environment:
python -m venv venv
venv\Scripts\activate
The next commands will be on the (venv)
Let's install the Django
(venv) python -m pip install django
Installing collected packages: tzdata, sqlparse, asgiref, django
Successfully installed asgiref-3.5.1 django-4.0.4 sqlparse-0.4.2 tzdata-2022.1
One way is to use this command to start the project
(venv) django-admin startproject herokuweb
I used it in this way, see the dot symbol:
(venv) django-admin startproject herokuweb . 
The next command will start an application
(venv) python manage.py startapp catafest
This python module needs to use google authentification:
(venv) pip install django-allauth
...
Successfully built django-allauth cffi
Installing collected packages: certifi, urllib3, tzdata, sqlparse, pyjwt, pycpar
ser, oauthlib, idna, defusedxml, charset-normalizer, asgiref, requests, python3-
openid, Django, cffi, requests-oauthlib, cryptography, django-allauth
Successfully installed Django-4.0.4 asgiref-3.5.1 certifi-2021.10.8 cffi-1.15.0
charset-normalizer-2.0.12 cryptography-37.0.2 defusedxml-0.7.1 django-allauth-0.
50.0 idna-3.3 oauthlib-3.2.0 pycparser-2.21 pyjwt-2.3.0 python3-openid-3.2.0 req
uests-2.27.1 requests-oauthlib-1.3.1 sqlparse-0.4.2 tzdata-2022.1 urllib3-1.26.9
Let's make changes in the settings.py file
INSTALLED_APPS = [
    'django.contrib.admin',
    'django.contrib.auth',
    'django.contrib.contenttypes',
    'django.contrib.sessions',
    'django.contrib.messages',
    'django.contrib.staticfiles',
    'django.contrib.sites',
    'catafest',
    'allauth',
    'allauth.account',
    'allauth.socialaccount',
    'allauth.socialaccount.providers.google',
]
...
AUTHENTIFICATION_BACKENDS = [
    'django.contrib.auth.backends.ModelBackend',
    'allauth.account.auth_backends.AuthenticationBackend',
]
...
STATIC_URL = '/static/'
SITE_ID = 1
LOGIN_REDIRECT_URL = '/'
SOCIALACCOUNT_PROVIDERS = {
'google': {
    'SCOPE': [
'profile',
'email',
    ],
'AUTH_PARAMS': {
    'access_type': 'online',
}
    }
}
Use Django features ...
python manage.py makemigrations
No changes detected
...
python manage.py migrate
...
  Applying sites.0002_alter_domain_unique... OK
  Applying socialaccount.0001_initial... OK
  Applying socialaccount.0002_token_max_lengths... OK
  Applying socialaccount.0003_extra_data_default_dict... OK
Create one superuser:
python manage.py createsuperuser
Username (leave blank to use 'catafest'):
Email address: catafest@yahoo.com
Password:
Password (again):
This password is too short. It must contain at least 8 characters.
This password is too common.
Bypass password validation and create user anyway? [y/N]: y
Superuser created successfully.
Create templates, catafest folders
Add the index.html file on the catafest folder
Make changes in url.py in the heroku web folder project:
from django.contrib import admin
    from django.urls import path, include
    from django.views.generic import TemplateView
    
    urlpatterns = [
        path('', TemplateView.as_view(template_name="catafest/index.html")),
        path('admin/', admin.site.urls),
        path('accounts/', include('allauth.urls')),
    ]
In the settings.py add templates feature make this change:
import os
...
'DIRS': [os.path.join(BASE_DIR, 'templates')],
Open a google console application and set Credentials to OAuth client ID for the web.
Follow the basic steps like for any basic project
I set for my project: Authorized JavaScript origins: https://catafest.herokuapp.com
... and: Authorized redirect URIs: https://catafest.herokuapp.com/accounts/google/login/callback
Finally, you need to have these: The 'OAuth client created' with 'Your Client ID' and 'Your Client Secret' .
You can test your Django project with this command:
python manage.py runserver
Open the admin area http://127.0.0.1:8000/admin/socialaccount/socialapp/ and add a social application
These commands will log in to the Heroku browser webpage and will create the application:
heroku login
 »   Warning: heroku update available from 7.53.0 to 7.60.2.
...
heroku create catafest
 »   Warning: heroku update available from 7.53.0 to 7.60.2.
Creating ⬢ catafest... done
https://catafest.herokuapp.com/ | https://git.heroku.com/catafest.git
Then create requirements.txt and fill it with this command:
pip freeze > requirements.txt
make this change in settings.py :

...
ALLOWED_HOSTS = ['.herokuapp.com','127.0.0.1']
...
STATIC_ROOT = os.path.join(BASE_DIR,"staticfiles")
...
Upload changes with these commands:
git add .
git commit -am "add requirements.txt and changes STATIC_ROOT"
git push heroku master
Enumerating objects: 39, done.
Counting objects: 100% (39/39), done.
...
To https://git.heroku.com/catafest.git
 * [new branch]      master -> master
Open the online Heroku application, and see all errors with the command: heroku logs --tail
This error is normal because is not set in one web service:
... at=error code=H14 desc="No web processes running" method=GET path="/" host
Create Procfile file in the web001 folder and fill it with:
Add this to the file:
web: gunicorn catafest.wsgi
Add changes and make changes all with these commands:
git add .
git commit -am "add Procfile"
Push to the Django application on the Heroku server:
git push heroku master
Enumerating objects: 6, done.
Counting objects: 100% (6/6), done.
Delta compression using up to 2 threads
...
You can test the result on my heroku application , see also this google gign in link.

Wednesday, May 4, 2022

Python 3.11.0a7 : Django-hypergen on Fedora 36 distro.

You can write server-rendered reactive HTML live views for Django in pure python, see the GitHub webpage.
I tested with python version 3.11.0a7 and Django version 4.0.4 on Fedora 36 Linux distro.
I started with the cloning process of the GitHub project and I set a virtual environment:
[mythcat@fedora ~]$ git clone http://github.com/runekaagaard/django-hypergen.git
Cloning into 'django-hypergen'
...
[mythcat@fedora ~]$ cd django-hypergen/
[mythcat@fedora django-hypergen]$ virtualenv -p python3.11 venv
created virtual environment
... 
[mythcat@fedora django-hypergen]$ source venv/bin/activate
I install the requirements from the project:
(venv) [mythcat@fedora django-hypergen]$
(venv) [mythcat@fedora django-hypergen]$ pip install -r requirements.txt
...Successfully installed Django-4.0.4 asgiref-3.5.1 attrs-21.4.0 beautifulsoup4-4.9.3 
iniconfig-1.1.1 packaging-21.3 pluggy-1.0.0 py-1.11.0 pyparsing-3.0.8 pyperclip-1.8.1 
pyrsistent-0.16.1 pytest-7.1.2 pyyaml-6.0 six-1.16.0 soupsieve-2.3.2.post1 sqlparse-0.4.2 
tomli-2.0.1 yapf-0.32.0WARNING: You are using pip version 21.3.1; 
however, version 22.0.4 is available.
You should consider upgrading via the '/home/mythcat/django-hypergen/venv/bin/python -m pip install --upgrade pip' command.
This gives some errors ...
(venv) [mythcat@fedora django-hypergen]$ pip install -r examples/requirements.txt
...Successfully built pyprof2calltreeFailed to build cymem numpy
ERROR: Could not build wheels for cymem, numpy, which is required to install pyproject.toml-based projects 
The last step is the migrate project and test the example
(venv) [mythcat@fedora django-hypergen]$ 
(venv) [mythcat@fedora django-hypergen]$ cd examples/
(venv) [mythcat@fedora examples]$ python manage.py migrate
... 
(venv) [mythcat@fedora examples]$ python manage.py runserver
Watching for file changes with ...
Starting development server at http://127.0.0.1:8000/
... and the result can be seen in this screenshot:

Friday, January 14, 2022

Python 3.10.1 : Django and channels on Fedora distro - sync and async features.

A consumer is a subclass of either channels.consumer.AsyncConsumer or channels.consumer.SyncConsumer.
Consumers do a couple of things in particular: 
  • Structures your code as a series of functions to be called whenever an event happens, rather than making you write an event loop. 
  • Allow you to write synchronous or async code and deals with handoffs and threading for you.
This is another tutorial about Django and channels, you can see the first one.
For testing area you need the postman tool and I install and used with snap tool.
[root@fedora mythcat]# dnf install snapd
Last metadata expiration check: 0:40:03 ago on Fri 14 Jan 2022 03:38:55 PM EET.
...
[root@fedora mythcat]# ln -s /var/lib/snapd/snap /snap
[root@fedora mythcat]# snap install postman
2022-01-14T16:22:15+02:00 INFO Waiting for automatic snapd restart...
postman (v9/stable) 9.8.3 from Postman, Inc. (postman-inc✓) installed
[mythcat@fedora ~]$ snap run postman
Let's go on the project folder:
[mythcat@fedora ~]$ cd djangotest001/
[mythcat@fedora djangotest001]$ cd website001/
In this folder I have two folders: appsite001 and website001.
In the appsite001 I add these scripts.
I create a new python script named consumers.py with this source code:
from channels.consumer import SyncConsumer, AsyncConsumer
from channels.exceptions import StopConsumer

class MySyncConsumer(SyncConsumer):
    def websocket_connect(self,event):
        print('Websocket Connected ...')
        self.send({
        'type':'websocket.accept',
        })
    def websocket_receive(self, event):
        print('Messaged Received ...')
        print(event['text'])
        self.send({
        'type':'websocket.send',
        'text':'Message sent to client'
        })
    def websocket_diconnect(self, event):
        print('Websocket Disconnected ...')
        raise StopConsumer
        
class MyAsyncConsumer(AsyncConsumer):
    async def websocket_connect(self,event):
        print('Websocket Connected ...')
    async def websocket_receive(self, event):
        print('Messaged Received ...')
    async def websocket_diconnect(self, event):
        print('Websocket Disconnected ...')
I created routing.py python script with this source code:
from django.urls import path
from . import consumers

websocket_urlpatterns = [
    path('ws/sc/',consumers.MySyncConsumer.as_asgi()),
    ]
In the website001 I change this script named asgi.py.
import os

from django.core.asgi import get_asgi_application

from channels.routing import ProtocolTypeRouter, URLRouter

import appsite001.routing

os.environ.setdefault('DJANGO_SETTINGS_MODULE', 'website001.settings')

application = ProtocolTypeRouter({
    'http':get_asgi_application(),
    'websocket':URLRouter(
        appsite001.routing.websocket_urlpatterns
    )
})
Run the Django project with :
[mythcat@fedora website001]$ python manage.py runserver
Watching for file changes with StatReloader
Performing system checks...

System check identified no issues (0 silenced).
January 14, 2022 - 15:32:29
Django version 4.0.1, using settings 'website001.settings'
Starting ASGI/Channels version 3.0.4 development server at http://127.0.0.1:8000/
Quit the server with CONTROL-C.
WebSocket HANDSHAKING /ws/sc/ [127.0.0.1:33944]
Websocket Connected ...
WebSocket CONNECT /ws/sc/ [127.0.0.1:33944]
Messaged Received ...
This is a message from mythcat
...
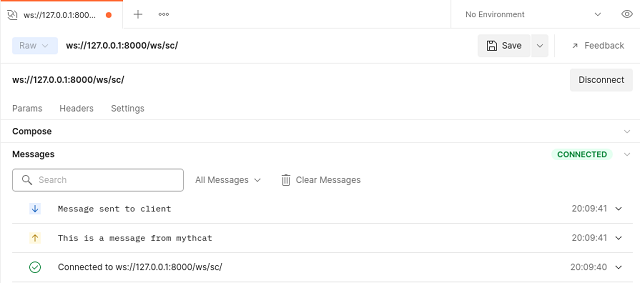
Use postman tool with websocket to send this message to Django project:
This is a message from mythcat
You can see how this works:

Saturday, January 8, 2022

Python 3.10.1 : Django and channels on Fedora distro.

Today I tested the Django version 4.0.1 with channels features on Fedora 35.
For the channels package, I used the pip tool and I install the version
The python package channels come with features like:
Channels augments Django to bring WebSocket, long-poll HTTP, task offloading, and other async support to your code, using familiar Django design patterns and a flexible underlying framework that lets you not only customize behaviors but also write support for your own protocols and needs. see the GitHub website.
Let's install the Django package
[mythcat@fedora ~]$ pip3 install django --user
Requirement already satisfied: django in /usr/local/lib/python3.10/site-packages (4.0.1)
Requirement already satisfied: sqlparse>=0.2.2 in /usr/local/lib/python3.10/site-packages (from django) (0.4.2)
Requirement already satisfied: asgiref<4>=3.4.1 in ./.local/lib/python3.10/site-packages (from django) (3.4.1)
The next step is to create the project named website001:
[mythcat@fedora ~]$ mkdir djangotest001
[mythcat@fedora ~]$ cd djangotest001/
[mythcat@fedora djangotest001]$ django-admin startproject website001
[mythcat@fedora djangotest001]$ cd website001/
[mythcat@fedora website001]$ python3 manage.py runserver
Watching for file changes with StatReloader
Performing system checks...

System check identified no issues (0 silenced).

You have 18 unapplied migration(s). Your project may not work properly until you apply the migrations for app(s): admin, auth, contenttypes, sessions.
Run 'python manage.py migrate' to apply them.
January 08, 2022 - 13:26:21
Django version 4.0.1, using settings 'website001.settings'
Starting development server at http://127.0.0.1:8000/
Quit the server with CONTROL-C.
...
Let's create the application named appsite001:
[mythcat@fedora website001]$ django-admin startapp  appsite001
[mythcat@fedora website001]$ ls
appsite001  db.sqlite3  manage.py  website00
The apps.py file is this:
[mythcat@fedora website001]$ cat  appsite001/apps.py 
from django.apps import AppConfig

class Appsite001Config(AppConfig):
    default_auto_field = 'django.db.models.BigAutoField'
    name = 'appsite001'
Let's add this on the settings.py file config:
[mythcat@fedora website001]$ vi website001/settings.py
    
# Application definition

INSTALLED_APPS = [
    'django.contrib.admin',
    'django.contrib.auth',
    'django.contrib.contenttypes',
    'django.contrib.sessions',
    'django.contrib.messages',
    'django.contrib.staticfiles',
    'appsite001',
]
Use the migrate feature to fix all:
[mythcat@fedora website001]$ python manage.py migrate
Operations to perform:
  Apply all migrations: admin, auth, contenttypes, sessions
Running migrations:
  Applying contenttypes.0001_initial... OK
  Applying auth.0001_initial... OK
  Applying admin.0001_initial... OK
  Applying admin.0002_logentry_remove_auto_add... OK
  Applying admin.0003_logentry_add_action_flag_choices... OK
  Applying contenttypes.0002_remove_content_type_name... OK
  Applying auth.0002_alter_permission_name_max_length... OK
  Applying auth.0003_alter_user_email_max_length... OK
  Applying auth.0004_alter_user_username_opts... OK
  Applying auth.0005_alter_user_last_login_null... OK
  Applying auth.0006_require_contenttypes_0002... OK
  Applying auth.0007_alter_validators_add_error_messages... OK
  Applying auth.0008_alter_user_username_max_length... OK
  Applying auth.0009_alter_user_last_name_max_length... OK
  Applying auth.0010_alter_group_name_max_length... OK
  Applying auth.0011_update_proxy_permissions... OK
  Applying auth.0012_alter_user_first_name_max_length... OK
  Applying sessions.0001_initial... OK
Create the superuser named admin with password admin and set the email address:
[mythcat@fedora website001]$ python manage.py createsuperuser
Username (leave blank to use 'mythcat'): admin
Email address: admin@server.com
Password: 
Password (again): 
The password is too similar to the username.
This password is too short. It must contain at least 8 characters.
This password is too common.
Bypass password validation and create user anyway? [y/N]: y
Superuser created successfully.

http://127.0.0.1:8000/admin/
...
Let's install the channels package for the Django project:
[mythcat@fedora website001]$ pip install channels
...
Successfully installed Automat-20.2.0 autobahn-21.11.1 channels-3.0.4 constantly-15.1.0 
daphne-3.0.2 hyperlink-21.0.0 incremental-21.3.0 pyasn1-0.4.8 pyasn1-modules-0.2.8 
service-identity-21.1.0 twisted-21.7.0 txaio-21.2.1 zope.interface-5.4.0
Add this package into the settinngs.py config file:
[mythcat@fedora website001]$ vi website001/settings.py
INSTALLED_APPS = [
    'channels',
    'django.contrib.admin',
    'django.contrib.auth',
    'django.contrib.contenttypes',
    'django.contrib.sessions',
    'django.contrib.messages',
    'django.contrib.staticfiles',
    'appsite001',
]
...
#WSGI_APPLICATION = 'website001.wsgi.application'
ASGI_APPLICATION = 'website001.asgi.application'
...
Make these changes to switch from wsgi to asgi features for channels package:
[mythcat@fedora website001]$ cp website001/wsgi.py website001/asgi.py 
[mythcat@fedora website001]$ vi website001/asgi.py 
import os

from django.core.asgi import get_asgi_application
from channels.routing import ProtocolTypeRouter
os.environ.setdefault('DJANGO_SETTINGS_MODULE', 'website001.settings')

application = ProtocolTypeRouter({
    'http':get_asgi_application(),
})
I tested on the admin area how the settings for this packet will work:
[mythcat@fedora website001]$ python3 manage.py runserver
Watching for file changes with StatReloader
Performing system checks...

System check identified no issues (0 silenced).
January 08, 2022 - 14:20:53
Django version 4.0.1, using settings 'website001.settings'
Starting ASGI/Channels version 3.0.4 development server at http://127.0.0.1:8000/
Quit the server with CONTROL-C.
...
The result shows that it works:
The next theoretical steps would be to determine how the channels package will work and routing for access to appsite001.

Tuesday, January 26, 2021

Python 3.6.0 : Django 3.2 alpha 1 released.

Django is a high-level Python Web framework that encourages rapid development and clean, pragmatic design. Built by experienced developers, it takes care of much of the hassle of Web development, so you can focus on writing your app without needing to reinvent the wheel. It’s free and open source. 

I tested it and I was satisfied with the way it works with this framework and it has many good features for the web. 
Django 3.2 is designated as a long-term support release.

Today, Django 3.2 alpha 1 is available with new features.
A good roadmap towards Django 3.2. can be found on this schedule webpage.
As with all alpha and beta packages, this is not for production use.
Django 3.2 supports Python 3.6, 3.7, 3.8, and 3.9. The next release is expected in April 2021, see:
  • January 14, 2021, Django 3.2 alpha; feature freeze;
  • February 18 Django 3.2 beta; non-release blocking bug fix freeze;
  • March 18 Django 3.2 RC 1; translation string freeze;
  • April 6 Django 3.2 final release.

Saturday, June 20, 2020

Python 3.7.5 : Django on Fedora distro.

[mythcat@desk django]$ source env/bin/activate
(env) [mythcat@desk django]$ python3 
Python 3.7.6 (default, Dec 19 2019, 22:52:49) 
[GCC 9.2.1 20190827 (Red Hat 9.2.1-1)] on linux
Type "help", "copyright", "credits" or "license" for more information.
>>> import django
>>> django.VERSION
(3, 0, 1, 'final', 1) 

Static files are those files that can not be processed, generated or modified by the server.
Static files improve the performance of the website with the template inheritance method.
Static file management is an important factor in web development.
I will show you how static file works on Django project.
The new static files folder is set on settings.py file:
...
# Static files (CSS, JavaScript, Images)

STATIC_URL = '/static/'

STATIC_ROOT = os.path.join(BASE_DIR, '/home/mythcat/projects/django/mysite/test001/')
STATICFILES_DIRS = [
   os.path.join(BASE_DIR, 'static'),
 ]
...
Let's run the server:
(env) [mythcat@desk mysite]$ python3 manage.py runserver
Watching for file changes with StatReloader
Performing system checks...

System check identified no issues (0 silenced).
January 26, 2020 - 09:01:10
Django version 3.0.1, using settings 'mysite.settings'
Starting development server at http://127.0.0.1:8000/
Quit the server with CONTROL-C. 
If I try to use the admin area then we can see the bad result for static files. 
...
[26/Jan/2020 09:10:02] "GET /admin/test001/post/ HTTP/1.1" 200 5935
[26/Jan/2020 09:10:02] "GET /static/admin/css/changelists.css HTTP/1.1" 200 6190
[26/Jan/2020 09:10:02] "GET /admin/jsi18n/ HTTP/1.1" 200 3223
[26/Jan/2020 09:10:02] "GET /static/admin/js/jquery.init.js HTTP/1.1" 200 363
[26/Jan/2020 09:10:02] "GET /static/admin/js/urlify.js HTTP/1.1" 200 8941
[26/Jan/2020 09:10:02] "GET /static/admin/js/actions.js HTTP/1.1" 200 6766
[26/Jan/2020 09:10:02] "GET /static/admin/js/prepopulate.js HTTP/1.1" 200 1530
[26/Jan/2020 09:10:02] "GET /static/admin/js/core.js HTTP/1.1" 200 5723
[26/Jan/2020 09:10:02] "GET /static/admin/js/admin/RelatedObjectLookups.js HTTP/1.1" 200 6918
[26/Jan/2020 09:10:02] "GET /static/admin/css/fonts.css HTTP/1.1" 200 423
[26/Jan/2020 09:10:02] "GET /static/admin/js/vendor/jquery/jquery.js HTTP/1.1" 200 280364
[26/Jan/2020 09:10:02] "GET /static/admin/js/vendor/xregexp/xregexp.js HTTP/1.1" 200 128820
[26/Jan/2020 09:10:02] "GET /static/admin/img/tooltag-add.svg HTTP/1.1" 200 331
[26/Jan/2020 09:10:02] "GET /static/admin/img/sorting-icons.svg HTTP/1.1" 200 1097
Not Found: /favicon.ico
... 
Now I can try to run the command collectstatic.
When this command is executed, Django performs these operations:
  • it looks for static files in all the directories listed in STATICFILES_DIRS;
  • the static-files are then copied and saved in STATIC_ROOT directory;
  • when the server is requested for static content, it will fetch a file from STATIC_ROOT;
  • that file will have its URL modified with STATIC_URL.
These errors show us many informations about this process:
 (env) [mythcat@desk mysite]$ python3 manage.py collectstatic

You have requested to collect static files at the destination
location as specified in your settings:

    /home/mythcat/projects/django/mysite

This will overwrite existing files!
Are you sure you want to do this?

Type 'yes' to continue, or 'no' to cancel: yes
Found another file with the destination path 'admin/js/urlify.js'. It will be ignored since only the first 
encountered file is collected. If this is not what you want, make sure every static file has a unique path.
...
Found another file with the destination path 'django.png'. It will be ignored since only the first 
encountered file is collected. If this is not what you want, make sure every static file has a unique path.
Found another file with the destination path 'favicon.ico'. It will be ignored since only the first 
encountered file is collected. If this is not what you want, make sure every static file has a unique path.
Found another file with the destination path 'admin/js/urlify.js'. It will be ignored since only the first 
encountered file is collected. If this is not what you want, make sure every static file has a unique path.
...

Found another file with the destination path 'rest_framework/js/prettify-min.js'. 
It will be ignored since only the first encountered file is collected. If this is not what you want, make
 sure every static file has a unique path.
...
166 static files copied to '/home/mythcat/projects/django/mysite'. 
But, Django respects the order of your applications in settings.py file the INSTALLED_APPS area, when running collectstatic command.
If you have two installed apps that write the same static files then Django collectstatic command will write the static files for the app appearing first in the list.
In my case: django.contrib.admin , test001 and ... .
Also, is need to set this code source on urls.py to return the proper URL pattern for serving static files to your already defined pattern list.
from django.contrib.staticfiles.urls import staticfiles_urlpatterns
...
urlpatterns += staticfiles_urlpatterns()
Let's run the runserver:
 (env) [mythcat@desk mysite]$ python3 manage.py runserver
...
[26/Jan/2020 09:29:18] "GET /static/admin/css/fonts.css HTTP/1.1" 200 423
Not Found: /favicon.ico 
You can see the /favicon.ico is not found in the default path and need to move it at /home/mythcat/projects/django/mysite/test001.
After these changes let's fix all the problems I created with these learning steps on static issues.
Let's move the static folder into mysite folder.
Change the settings.py file for the static issue with this source of code:
# Static files (CSS, JavaScript, Images)

STATIC_URL = '/static/'

STATIC_ROOT = os.path.join(BASE_DIR, 'static')
STATICFILES_DIRS = [
   os.path.join(BASE_DIR, 'static'),
 ]
Run the (env) [mythcat@desk mysite]$ python3 manage.py collectstatic
(env) [mythcat@desk mysite]$ python3 manage.py collectstatic

You have requested to collect static files at the destination
location as specified in your settings:

    /home/mythcat/projects/django/mysite/static

This will overwrite existing files!
Are you sure you want to do this?

Type 'yes' to continue, or 'no' to cancel: yes

163 static files copied to '/home/mythcat/projects/django/mysite/static', 2 unmodified.
(env) [mythcat@desk mysite]$ ls
db.sqlite3  favicon.ico  manage.py  mysite  rest_framework  static  test001
(env) [mythcat@desk mysite]$ cd static/
(env) [mythcat@desk static]$ ls
admin  django.png  favicon.ico  rest_framework
This is a simple base tutorial.
In this point you can select the way of your Django project.

Wednesday, June 17, 2020

Python 3.8.2 : Create a Django Calendar - part 002.

I was a bit busy with another project I am working on and this is the reason that led to the delay of this tutorial.
The big problem with Django tutorials is the volume of the source code.
Because of this, this tutorial will highlight changes to the source code and share it in my GitHub account.
Let's see the changes into my project tree and files:
└───test_calendar
    ├───first_calendar
    │   ├───migrations
    │   └───static
    │       └───first_calendar
    │           └───css
    ├───media
    ├───templates
    └───test_calendar
The settings.py file:
...
INSTALLED_APPS = [
    'django.contrib.admin',
    'django.contrib.auth',
    'django.contrib.contenttypes',
    'django.contrib.sessions',
    'django.contrib.messages',
    'django.contrib.staticfiles',
    'first_calendar.apps.FirstCalendarConfig',
]
...
# Static files (CSS, JavaScript, Images)
# https://docs.djangoproject.com/en/2.0/howto/static-files/

STATICFILES_DIRS = [
    os.path.join(BASE_DIR, '/static/')
]

STATIC_ROOT = os.path.join(BASE_DIR, 'static')
STATIC_URL = '/static/'

MEDIA_ROOT = os.path.join(BASE_DIR, 'media')
MEDIA_URL = '/media/'
The complete project is a basic calendar, which can be modified by adding events or linked to a Google calendar.
The source code can be found here.

Saturday, June 13, 2020

Python 3.8.2 : Create a Django Calendar - part 001.

This tutorial show you how can use pipenv tool and set the Django project in order to create a calendar with Django project.
First, install the pipenv tool using the pip tool:
python -m pip install pipenv
Collecting pipenv
...
Successfully installed pipenv-2020.6.2 virtualenv-clone-0.5.4
You can see all options and features with this command:
pipenv
Usage: pipenv [OPTIONS] COMMAND [ARGS]...

Options:
  --where                         Output project home information.
  --venv                          Output virtualenv information.
  --py                            Output Python interpreter information.
  --envs                          Output Environment Variable options.
  --rm                            Remove the virtualenv.
  --bare                          Minimal output.
  --completion                    Output completion (to be executed by the
                                  shell).

  --man                           Display manpage.
  --support                       Output diagnostic information for use in
                                  GitHub issues.

  --site-packages / --no-site-packages
                                  Enable site-packages for the virtualenv.
                                  [env var: PIPENV_SITE_PACKAGES]

  --python TEXT                   Specify which version of Python virtualenv
                                  should use.

  --three / --two                 Use Python 3/2 when creating virtualenv.
  --clear                         Clears caches (pipenv, pip, and pip-tools).
                                  [env var: PIPENV_CLEAR]

  -v, --verbose                   Verbose mode.
  --pypi-mirror TEXT              Specify a PyPI mirror.
  --version                       Show the version and exit.
  -h, --help                      Show this message and exit.


Usage Examples:
   Create a new project using Python 3.7, specifically:
   $ pipenv --python 3.7

   Remove project virtualenv (inferred from current directory):
   $ pipenv --rm

   Install all dependencies for a project (including dev):
   $ pipenv install --dev

   Create a lockfile containing pre-releases:
   $ pipenv lock --pre

   Show a graph of your installed dependencies:
   $ pipenv graph

   Check your installed dependencies for security vulnerabilities:
   $ pipenv check

   Install a local setup.py into your virtual environment/Pipfile:
   $ pipenv install -e .

   Use a lower-level pip command:
   $ pipenv run pip freeze

Commands:
  check      Checks for PyUp Safety security vulnerabilities and against PEP
             508 markers provided in Pipfile.

  clean      Uninstalls all packages not specified in Pipfile.lock.
  graph      Displays currently-installed dependency graph information.
  install    Installs provided packages and adds them to Pipfile, or (if no
             packages are given), installs all packages from Pipfile.

  lock       Generates Pipfile.lock.
  open       View a given module in your editor.
  run        Spawns a command installed into the virtualenv.
  shell      Spawns a shell within the virtualenv.
  sync       Installs all packages specified in Pipfile.lock.
  uninstall  Uninstalls a provided package and removes it from Pipfile.
  update     Runs lock, then sync.
Create a folder for your project, I used this folder named django_test_002:
mkdir django_test_002
Create a virtualenv using the pipenv shell
django_test_002>pipenv shell
Creating a virtualenv for this project…
Pipfile: D:\Projects\Python\django_test_002\Pipfile
Using D:/Python38/python.exe (3.8.2) to create virtualenv…
...
Install Django python package:
(django_test_002-bp-hUvnN) D:\Projects\Python\django_test_002> pipenv install Django
Installing Django…
Adding Django to Pipfile's [packages]…
Installation Succeeded
Pipfile.lock not found, creating…
Locking [dev-packages] dependencies…
Locking [packages] dependencies…
 Locking...Building requirements...
Resolving dependencies...
Success!
Updated Pipfile.lock (a6086c)!
Installing dependencies from Pipfile.lock (a6086c)…
  ================================ 0/0 - 00:00:00
Let's test the pipenv shell tool with a simple example for activate, deactivate and exit:
D:\Projects\Python\django_test_002>pipenv shell
Launching subshell in virtual environment…
Microsoft Windows [Version 10.0.18363.900]
(c) 2019 Microsoft Corporation. All rights reserved.

(django_test_002-bp-hUvnN) D:\Projects\Python\django_test_002>activate

(django_test_002) (django_test_002-bp-hUvnN) D:\Projects\Python\django_test_002>deactivate
(django_test_002-bp-hUvnN) D:\Projects\Python\django_test_002>exit
Stores all the python packages you installed into a requirements.txt file
D:\Projects\Python\django_test_002>pipenv shell
Launching subshell in virtual environment…
Microsoft Windows [Version 10.0.18363.900]
(c) 2019 Microsoft Corporation. All rights reserved.

(django_test_002-bp-hUvnN) D:\Projects\Python\django_test_002>pip3 freeze > requirements.txt
Create django project named test_calendar:
(django_test_002-bp-hUvnN) D:\Projects\Python\django_test_002>django-admin startproject test_calendar
Start server to check that our project is running at localhost:8000.
(django_test_002-bp-hUvnN) D:\Projects\Python\django_test_002>cd test_calendar

(django_test_002-bp-hUvnN) D:\Projects\Python\django_test_002\test_calendar>python manage.py runserver
Watching for file changes with StatReloader
Performing system checks...

System check identified no issues (0 silenced).

You have 17 unapplied migration(s). Your project may not work properly until you apply the migrations 
for app(s): admin, auth, contenttypes, sessions.
Run 'python manage.py migrate' to apply them.
June 13, 2020 - 20:52:00
Django version 3.0.7, using settings 'test_calendar.settings'
Starting development server at http://127.0.0.1:8000/
Quit the server with CTRL-BREAK.
Now, you can open with your browser the default link http://127.0.0.1:8000/ and you will see the start page of Django framework.
Use Ctrl+C keys to stop it, and create an application.
I used the next command to create first_calendar application.
D:\Projects\Python\django_test_002\test_calendar>python manage.py startapp first_calendar
Into the folder application first_calendar make these changes to views.py from to create a index view:
from django.shortcuts import render
from django.http import HttpResponse

# Create your views here.

def index(request):
    return HttpResponse('hello')
Create a new file named urls.py in the folder first_calendar and add this source code:
from django.conf.urls import url
from . import views

app_name = 'first_calendar'
urlpatterns = [
    #url(r'^index/$', views.index, name='index'),
    url('', views.index,  name='index'),
]
Return to the project base folder and add the view to urls.py from the project test_calendar folder:
from django.contrib import admin
from django.urls import path, include

urlpatterns = [
    path('admin/', admin.site.urls),
    path('', include('first_calendar.urls')),
]
Into the project folder test_calendar add the application to the file settings.py.
INSTALLED_APPS = [
    'django.contrib.admin',
    'django.contrib.auth',
    'django.contrib.contenttypes',
    'django.contrib.sessions',
    'django.contrib.messages',
    'django.contrib.staticfiles',
    'first_calendar',
]
Use migrate option to migrate the project:
(django_test_002-bp-hUvnN) D:\Projects\Python\django_test_002\test_calendar>python manage.py migrate
Operations to perform:
  Apply all migrations: admin, auth, contenttypes, sessions
Running migrations:
  Applying contenttypes.0001_initial... OK
  Applying auth.0001_initial... OK
  Applying admin.0001_initial... OK
  Applying admin.0002_logentry_remove_auto_add... OK
  Applying admin.0003_logentry_add_action_flag_choices... OK
  Applying contenttypes.0002_remove_content_type_name... OK
  Applying auth.0002_alter_permission_name_max_length... OK
  Applying auth.0003_alter_user_email_max_length... OK
  Applying auth.0004_alter_user_username_opts... OK
  Applying auth.0005_alter_user_last_login_null... OK
  Applying auth.0006_require_contenttypes_0002... OK
  Applying auth.0007_alter_validators_add_error_messages... OK
  Applying auth.0008_alter_user_username_max_length... OK
  Applying auth.0009_alter_user_last_name_max_length... OK
  Applying auth.0010_alter_group_name_max_length... OK
  Applying auth.0011_update_proxy_permissions... OK
  Applying sessions.0001_initial... OK
Go back to default project folder. Now you can test using this command:
(django_test_002-bp-hUvnN) D:\Projects\Python\django_test_002\test_calendar>python manage.py runserver
Watching for file changes with StatReloader
Performing system checks...

System check identified no issues (0 silenced).
June 13, 2020 - 21:52:42
Django version 3.0.7, using settings 'test_calendar.settings'
Starting development server at http://127.0.0.1:8000/
Quit the server with CTRL-BREAK.
You will see a simple word: hello. Let's fix the admin login by adding user:
python manage.py createsuperuser
Username (leave blank to use 'catal'): catafest
Email address: catafest@yahoo.com
Password:
I set user catafest and password admin76 and then use the next command to see the result on http://127.0.0.1:8000/admin:
python manage.py runserver
The next step is to create a Event class into models.py file from first_calendar:
from django.db import models

class Event(models.Model):
    title = models.CharField(max_length=200)
    description = models.TextField()
    start_time = models.DateTimeField()
    end_time = models.DateTimeField()
Then add this class into admin.py file:
from django.contrib import admin
from first_calendar.models import Event

admin.site.register(Event)
This tutorial set the one default Django project with the Django framework version 3.0.7 .

Wednesday, January 22, 2020

Python 3.7.5 : Django security issues - part 003.

Let's update this subject today with another new tutorial.
In the last tutorial about Django security I wrote about python package named django-axes.
First, let's fix an old issue about a URL pattern that matches anything and expects an integer that generates errors like:
...
  File "/home/mythcat/.local/lib/python3.7/site-packages/django/db/models/fields/__init__.py", line 1772, 
in get_prep_value
    ) from e
ValueError: Field 'id' expected a number but got 'favicon.ico'.
[22/Jan/2020 21:50:06] "GET /favicon.ico/ HTTP/1.1" 500 130547
Now, let's start my project:
[mythcat@desk ~]$ cd projects/
[mythcat@desk projects]$ cd django/
[mythcat@desk django]$ source env/bin/activate
Create a new folder named static in the test001 folder and add a icon file named favicon.ico.
(env) [mythcat@desk django]$ cd mysite/test001/
(env) [mythcat@desk test001]$ mkdir static 
In the settings.py file you need to have this source code:

STATIC_URL = '/static/'

STATICFILES_DIRS = [
    os.path.join(BASE_DIR, "static"),
]
Change in the urls.py this line of source code to fix the error:
path('<int:author_id>/',views.index_next, name = 'index_next'),
Let's run the Django project server with:
(env) [mythcat@desk django]$ cd mysite/
(env) [mythcat@desk mysite]$ python3 manage.py runserver
I login into my admin area with user catalin and password adminadmin.
If you try to login with a bad password then the account is locked by django-axes python package.
Use this command to reset all lockouts and access records.
(env) [mythcat@desk mysite]$ python3 manage.py axes_reset
No attempts found.
Into admin area you can see the AXES area with Access attempts and Access logs.
Axes listens to the following signals from django.contrib.auth.signals to log access attempts.
In this case Axes lockout responses on failed user authentication attempts from login views.
The Access logs shows access log, see examples:
Jan. 22, 2020, 8:46 p.m.-127.0.0.1catalinMozilla/5.0 (X11; Linux x86_64) AppleWebKit/537.36 (KHTML, like Gecko) Chrome/79.0.3945.130 Safari/537.36/admin/login/
Jan. 21, 2020, 6:42 p.m.Jan. 22, 2020, 8:45 p.m.127.0.0.1catalinMozilla/5.0 (X11; Linux x86_64) AppleWebKit/537.36 (KHTML, like Gecko) Chrome/79.0.3945.130 Safari/537.36/admin/login/
You can set the axes into settings.py file , see this link.


Tuesday, January 21, 2020

Python 3.7.5 : Use Django Formsets.

Django Formsets manage the complexity of multiple copies of a form in a view.
This simplifies the task of creating a formset for a form that handles multiple instances of a model.
Let's start with my old project:
[mythcat@desk ~]$ cd projects/
[mythcat@desk projects]$ cd django/
[mythcat@desk django]$ source env/bin/activate
Into models.py I add these classes:
#create Inline Form with book and author
class Author(models.Model):
    author_book = models.CharField(max_length = 100)
    def __str__(self):
        return self.author_book

class Book(models.Model):
    book_name = models.CharField(max_length = 100)
    author_book_name = models.ForeignKey(Author,on_delete=models.CASCADE)
    def __str__(self):
        return self.book_name

(env) [mythcat@desk mysite]$ python3 manage.py makemigrations
Migrations for 'test001':
  test001/migrations/0004_author_book.py
    - Create model Author
    - Create model Book
(env) [mythcat@desk mysite]$ python3 manage.py migrate
Operations to perform:
  Apply all migrations: admin, auth, axes, contenttypes, sessions, test001
Running migrations:
  Applying test001.0004_author_book... OK
Add the classes to admin.py:
from .models import Author, Book
...
admin.site.register(Author)
admin.site.register(Book)
Now you can log in into the admin area and add authors and then add books.

Add the source code to views.py:
...
# add to views.py Author and Book 
from .models import Author, Book
# Author , Book redirect 
from django.shortcuts import redirect
...
# author and book source code 
def index_next(request, author_id):
    author = Author.objects.get(pk=author_id)
    BookFormset = inlineformset_factory(Author,Book, fields=('book_name',))
    if request.method == 'POST':
        formset = BookFormset(request.POST,instance = author)
        if formset.is_valid():
            formset.save()
            return redirect('index_next',author_id = author_id)
    formset = BookFormset(instance = author)
    return render(request, 'index_next.html', {'formset': formset})
...
Let's fix the URL for the next step.
Add the source code to urls.py:
...
# add index_next to urls.py 
from test001.views import index_next
...
urlpatterns = [
    ...
    path('&lt author_id &gt',views.index_next, name = 'index_next'),
    ...
    ]
Add index_next.html file into the template folder and into this file write HTML5 with a form and one submit button.
In the form tag add this:
{{ formset.as_p }}
Run the runserver command:
(env) [mythcat@desk mysite]$ python3 manage.py runserver
Use this http://127.0.0.1:8000/1 to see the first on the database shown on the browser.
You can customize the output of inline form, see source code:
...
BookFormset = inlineformset_factory(Author,Book, fields=('book_name',), can_delete=False, extra=1)
...
See the full project on my GitHub account at django_chart project repo.

Monday, January 20, 2020

Python 3.7.5 : Django security issues - part 002.

The project can be found at this Github project.
Let's start with my default project and activate the env:
[mythcat@desk ~]$ cd projects/
[mythcat@desk projects]$ cd django/
[mythcat@desk django]$ source env/bin/activate
Let's install this python module:
(env) [mythcat@desk django]$ pip3 install django-axes --user
Make these changes into settings.py:
(env) [mythcat@desk django]$ cd mysite/
(env) [mythcat@desk mysite]$ ls
db.sqlite3  manage.py  mysite  test001
(env) [mythcat@desk mysite]$ cd mysite/
(env) [mythcat@desk mysite]$ vim settings.py 
Into your settings.py add axes:
INSTALLED_APPS = [
    'django.contrib.admin',
    'django.contrib.auth',
    'django.contrib.contenttypes',
    'django.contrib.sessions',
    'django.contrib.messages',
    'django.contrib.staticfiles',
    'test001',
    'rest_framework',
    'axes'
] 
Add this source code in settings.py:
AUTHENTICATION_BACKENDS = [
    # AxesBackend should be the first backend in the AUTHENTICATION_BACKENDS list.
    'axes.backends.AxesBackend',

    # Django ModelBackend is the default authentication backend.
    'django.contrib.auth.backends.ModelBackend',
] 
Add axes.middleware.AxesMiddleware into MIDDLEWARE area:
MIDDLEWARE = [
    'django.middleware.security.SecurityMiddleware',
    'django.contrib.sessions.middleware.SessionMiddleware',
    'django.middleware.common.CommonMiddleware',
    'django.middleware.csrf.CsrfViewMiddleware',
    'django.contrib.auth.middleware.AuthenticationMiddleware',
    'django.contrib.messages.middleware.MessageMiddleware',
    'django.middleware.clickjacking.XFrameOptionsMiddleware',
    'axes.middleware.AxesMiddleware',
] 
Check the configuration with this command:
(env) [mythcat@desk mysite]$ cd ..
(env) [mythcat@desk mysite]$ python manage.py check
System check identified no issues (0 silenced).
Use this command to sync the database:
(env) [mythcat@desk mysite]$ python manage.py migrate
Operations to perform:
  Apply all migrations: admin, auth, axes, contenttypes, sessions, test001
Running migrations:
  Applying axes.0001_initial... OK
  Applying axes.0002_auto_20151217_2044... OK
  Applying axes.0003_auto_20160322_0929... OK
  Applying axes.0004_auto_20181024_1538... OK
  Applying axes.0005_remove_accessattempt_trusted... OK
  Applying axes.0006_remove_accesslog_trusted... OK
Once Axes is is installed and configured, you can login and logout of your application via the django.contrib.auth views.
This python package can be integrated with some popular 3rd party packages such as Django Allauth, Django REST Framework, and other tools.
I will come with additional information about this python package in the future.

Saturday, January 18, 2020

Python 3.7.5 : Django security issues - part 001.

Django like any website development and framework implementation requires security settings and configurations.
Today I will present some aspects of this topic and then I will come back with other information.
1. First, check your security vulnerabilities by the following command:
[mythcat@desk django]$ source env/bin/activate
(env) [mythcat@desk django]$ cd mysite
(env) [mythcat@desk mysite]$ python3 manage.py check --deploy
...
  File "/home/mythcat/projects/django/mysite/mysite/settings.py", line 14
    <<<<<<< HEAD
     
This shows us the bad changes in source code, is added by GitHub features.
Let's run it again:
(env) [mythcat@desk mysite]$ python3 manage.py check --deploy
System check identified some issues:

WARNINGS:
?: (security.W004) You have not set a value for the SECURE_HSTS_SECONDS setting. 
If your entire site is served only over SSL, you may want to consider setting a value and 
enabling HTTP Strict Transport Security. Be sure to read the documentation first; enabling
 HSTS carelessly can cause serious, irreversible problems.
?: (security.W008) Your SECURE_SSL_REDIRECT setting is not set to True. Unless your site 
should be available over both SSL and non-SSL connections, you may want to either set this 
setting True or configure a load balancer or reverse-proxy server to redirect all connections to HTTPS.
?: (security.W012) SESSION_COOKIE_SECURE is not set to True. Using a secure-only session cookie makes 
it more difficult for network traffic sniffers to hijack user sessions.
?: (security.W016) You have 'django.middleware.csrf.CsrfViewMiddleware' in your MIDDLEWARE, but you have
 not set CSRF_COOKIE_SECURE to True. Using a secure-only CSRF cookie makes it more difficult for network
 traffic sniffers to steal the CSRF token.
?: (security.W018) You should not have DEBUG set to True in deployment.
?: (security.W020) ALLOWED_HOSTS must not be empty in deployment.
?: (security.W022) You have not set the SECURE_REFERRER_POLICY setting. Without this, your site 
will not send a Referrer-Policy header. You should consider enabling this header to protect user privacy.

System check identified 7 issues (0 silenced).
This output show us the security warnning problems.
2. Use the Observatory by Mozilla site to scan the security status of your Django website.
3. Django has built-in security against most forms of CSRF threats, but The CSRF protection cannot protect against man-in-the-middle attacks.
Use HTTPS with HTTP Strict Transport Security by add these lines in your settings.py file.
CSRF_COOKIE_SECURE = True #to avoid transmitting the CSRF cookie over HTTP accidentally.
SESSION_COOKIE_SECURE = True #to avoid transmitting the session cookie over HTTP accidentally.
4. A Cross-site Scripting (XSS) allows an attacker to inject a script into the content of a website or application.
In your settings.py use this:
django.middleware.security.SecurityMiddleware
...
SECURE_BROWSER_XSS_FILTER = True
SECURE_CONTENT_TYPE_NOSNIFF = True
5. You can create fake admin login page using django-admin-honeypot to attempt unauthorized access.
6. Use SSL Redirect on your settings.py file.
SECURE_SSL_REDIRECT = True
7. Add Content Security Policy (CSP) to your Django website with the installed django-csp, add following lines to your settings.py file:
# Content Security Policy
CSP_DEFAULT_SRC = ("'none'", )
CSP_STYLE_SRC = ("'self'", )
CSP_SCRIPT_SRC = ("'self'", )
CSP_IMG_SRC = ("'self'", )
CSP_FONT_SRC = ("'self'", )
# Google Tag Manager or Google Analytics should be allowed in your CSP policy. 
CSP_DEFAULT_SRC = ("'none'", )
CSP_STYLE_SRC = ("'self'", "fonts.googleapis.com", "'sha256-/3kWSXHts8LrwfemLzY9W0tOv5I4eLIhrf0pT8cU0WI='")
CSP_SCRIPT_SRC = ("'self'", "ajax.googleapis.com", "www.googletagmanager.com", "www.google-analytics.com")
CSP_IMG_SRC = ("'self'", "data:", "www.googletagmanager.com", "www.google-analytics.com")
CSP_FONT_SRC = ("'self'", "fonts.gstatic.com")
CSP_CONNECT_SRC = ("'self'", )
CSP_OBJECT_SRC = ("'none'", )
CSP_BASE_URI = ("'none'", )
CSP_FRAME_ANCESTORS = ("'none'", )
CSP_FORM_ACTION = ("'self'", )
CSP_INCLUDE_NONCE_IN = ('script-src',)
The HTTP Strict Transport Security can be set into your settings.py file:
SECURE_HSTS_SECONDS = 86400  # 1 day
SECURE_HSTS_INCLUDE_SUBDOMAINS = True
SECURE_HSTS_PRELOAD = True
8. Use records login attempts to your Django powered site and prevents attackers from brute forcing using the django-axes.
This tutorial solves most of the security issues of any website built with Django and not just related to this framework.


Monday, January 6, 2020

Python 3.7.5 : Post class and migration process.

Today I will solve some issues with the Django framework like:
  • create a new class for posts;
  • explain how the migration process works.
  • use the database with Django shell;
Let's activate the environment:
[mythcat@desk django]$ source env/bin/activate
I used my old project django-chart, see my old tutorials.
Let's add some source code to the models.py to create a class for the post into my website:
...
# Post data 
from django.utils import timezone
from django.contrib.auth.models import User
...
#create a post
class Post(models.Model):
  title = models.CharField(max_length = 100)
  content = models.TextField()
  date_posted = models.DateTimeField(default = timezone.now)
  #if the user is deleted their posts is deleted 
  author = models.ForeignKey(User, on_delete = models.CASCADE)
Let's use the migration process to update the database:
(env) [mythcat@desk django]$ cd mysite/
(env) [mythcat@desk mysite]$ python3 manage.py makemigrations
Migrations for 'test001':
  test001/migrations/0003_post.py
  - Create model Post
Before to run the migrate command I will show what happened with this migration output from SQL view.
This is great to solve issues and see the exact SQL code generated.
I have in the output of command makemigrations the application name test001 and the migration number 0003.
I will use all of this information output to show how you can see the SQL code:
(env) [mythcat@desk mysite]$ python3 manage.py sqlmigrate test001 0003
BEGIN;
--
-- Create model Post
--
CREATE TABLE "test001_post" ("id" integer NOT NULL PRIMARY KEY AUTOINCREMENT, 
"title" varchar(100) NOT NULL, "content" text NOT NULL, "date_posted" datetime NOT NULL, 
"author_id" integer NOT NULL REFERENCES "auth_user" ("id") DEFERRABLE INITIALLY DEFERRED);
CREATE INDEX "test001_post_author_id_fed29ee6" ON "test001_post" ("author_id");
COMMIT;
This print SQL code that it's going to run when I will use the next command:
(env) [mythcat@desk mysite]$ python3 manage.py migrate
Operations to perform:
  Apply all migrations: admin, auth, contenttypes, sessions, test001
Running migrations:
  Applying test001.0003_post... OK
The migration process solves issues linked to changes in the database.
Let's use the Django shell to see the User changes into the database:
(env) [mythcat@desk mysite]$ python3 manage.py shell
Python 3.7.5 (default, Dec 15 2019, 17:54:26) 
[GCC 9.2.1 20190827 (Red Hat 9.2.1-1)] on linux
Type "help", "copyright", "credits" or "license" for more information.
(InteractiveConsole)
>>> from test001.models import Post
>>> from django.contrib.auth.models import User
>>> User.objects.all()
...
>>> User.objects.first()
...
>>> User.objects.filter(username='catalin')
...
>>> User.objects.filter(username='catalin').first()
...
>>> user = User.objects.filter(username='catalin').first()
>>> user
...
>>> user.id
1
>>> user.pk
1
>>> Post.objects.all()
...
Let's add a post to the database and show it:
>>> post_1=Post(title='First title', content='The first content!',author=user)
>>> post_1.save()
>>> Post.objects.all()
...
I can see the posts and information about the user with the Django shell.
>>> post = Post.objects.first()
>>> post.content
'The first content!'
>>> post.date_posted
...
>>> post.author
...
>>> post.author.email
...
>>> user.post_set.all()
...
You need to add to views.py the new model changes:
...
from .models import Post
...
def posts(request):
  context = {
  'posts':Post.objects.all()
  }
  return render(request, 'test001/posts.html', context)
...
Into the templates folder, I created the file named posts.html to load the data to HTML5.
{% extends 'base.html' %}
{% block content %}
  {% for post in posts %}
  <article>
  <div>{{ post.title }}</div>
  <div>{{ post.content }}</div>
  <div>{{ post.author }}</div>
  <div>{{ post.date_posted|date:"F d, Y" }}</div>
  </article>
  {% endfor %}
{% endblock content %}
To see these changes into the website I add the route to this HTML5 file posts.html into urls.py file:
app_name = 'test001'
urlpatterns = [
...
    path('posts/',posts, name = 'posts'),
...
]
Now I can run the server and see the output from the database into posts URL.
(env) [mythcat@desk mysite]$ python3 manage.py runserver
Watching for file changes with StatReloader
Performing system checks...

System check identified no issues (0 silenced).
January 06, 2020 - 17:52:29
Django version 3.0.1, using settings 'mysite.settings'
Starting development server at http://127.0.0.1:8000/
Quit the server with CONTROL-C.
...
This is the output of my running server...

Python 3.7.5 : Set json with settings in Django project.

[mythcat@desk django]$ source env/bin/activate
(env) [mythcat@desk django]$ cd mysite/
(env) [mythcat@desk mysite]$ ls
db.sqlite3  manage.py  mysite  test001
(env) [mythcat@desk mysite]$ pwd
/home/mythcat/projects/django/mysite
Create a file named config.json in the folder django:
(env) [mythcat@desk mysite]$ vim /home/mythcat/projects/django/config.json
Open your settings.py file from your Django project and copy your secret key from this file to config.json, see:
{ 
  "SECRET_KEY":"your_secret_key_from_settings.py"
}
Change your settings.py file with these changes:
...
import json 
...
with open('/home/mythcat/projects/django/config.json') as config_file:
    config = json.load(config_file)
...
# SECURITY WARNING: keep the secret key used in production secret!
SECRET_KEY = config['SECRET_KEY']
This allows us to get the SECRET_KEY from the config.json file.
We can add many variables into file config.json, like EMAIL_USER and EMAIL_PASS.
You need to have a validate JSON file and the settings.py will change from this:
EMAIL_HOST_USER = os.environ.get('EMAIL_USER')
...
to this source code for EMAIL_USER variable:
EMAIL_HOST_USER = config.get('EMAIL_USER')
...

Saturday, December 28, 2019

Python 3.7.5 : Fix to python language the GitHub project.

I created a GitHub project with Django and I saw is detect like tcl programming language:

You need to create a file named .gitattributes in the root folder of my repository.
Use this source code to tell GitHub is a python project:
* linguist-vendored
*.py linguist-vendored=false
Now the project will be target with python language.