analitics

Pages

Showing posts with label online tool. Show all posts

Sunday, April 28, 2024

News : New Django Builder online tool.

Django builder is free to use, and a personal project worked on in my spare time.
Any donations are very much appreciated.
If you want to, feel free to donate using the BitCoin address or PayPal link below.
Here is a new online tool that allows you to create projects with the Django framework and manage them more easily. It comes with different versions of Django, you can include channels and HTMX.
I don't see a command line to manage the project...

Thursday, April 4, 2024

Python 3.12.2 : Python and the Fedora Messaging Infrastructure - part 001.

I tried using the Fedora Messaging online tool with the python package of the same name on Python version 3.12.2.
You can find the documentation on the official page./div>
I created a working folder called FedoraMessaging:
[mythcat@fedora PythonProjects]$ mkdir FedoraMessaging
[mythcat@fedora PythonProjects]$ cd FedoraMessaging
You need to install the fedora-messaging and rabbitmq-server packages.
[root@fedora FedoraMessaging]# dnf5 install fedora-messaging
Updating and loading repositories:
Repositories loaded.
Package                             Arch    Version                       Repository         Size
Installing:                                                                                      
 fedora-messaging                   noarch  3.5.0-1.fc41                  rawhide        38.6 KiB
...
[root@fedora FedoraMessaging]# dnf install rabbitmq-server
At some point it will ask for a reboot.
You need to install the python package named fedora-messaging.
[root@fedora FedoraMessaging]# pip install --user fedora-messaging
Collecting fedora-messaging
...
Installing collected packages: pytz, incremental, wrapt, tomli, rpds-py, pyasn1, pika, hyperlink, constantly, attrs, 
referencing, pyasn1-modules, automat, twisted, jsonschema-specifications, service-identity, jsonschema, crochet, 
fedora-messaging
Successfully installed attrs-23.2.0 automat-22.10.0 constantly-23.10.4 crochet-2.1.1 fedora-messaging-3.5.0 
hyperlink-21.0.0 incremental-22.10.0 jsonschema-4.21.1 jsonschema-specifications-2023.12.1 pika-1.3.2 pyasn1-0.6.0 
pyasn1-modules-0.4.0 pytz-2024.1 referencing-0.34.0 rpds-py-0.18.0 service-identity-24.1.0 tomli-2.0.1 twisted-24.3.0 
wrapt-1.16.0
You need to start the broker:
[mythcat@fedora FedoraMessaging]$ sudo systemctl start rabbitmq-server
I used the source code from the documentation to test its functionality with a python script named hello_test.py.
from fedora_messaging import api, config

config.conf.setup_logging()
api.consume(lambda message: print(message))

from fedora_messaging import api, config

config.conf.setup_logging()
api.publish(api.Message(topic="hello by mythcat", body={"Hello": "world!"}))
I ran it and got this response:
[mythcat@fedora FedoraMessaging]$ python hello_test.py
[fedora_messaging.message INFO] Registering the 'base.message' key as the '<class 'fedora_messaging.message.Message'>' 
class in the Message class registry
[fedora_messaging.twisted.protocol INFO] Waiting for 0 consumer(s) to finish processing before halting
[fedora_messaging.twisted.protocol INFO] Finished canceling 0 consumers
[fedora_messaging.twisted.protocol INFO] Disconnect requested, but AMQP connection already gone
I created another python script named my_consumer.py, to check if this works:
from fedora_messaging import api, config
# Setup logging
config.conf.setup_logging()
# Define the callback function to process messages
def process_message(message):
    # Check if the message topic matches "hello by mythcat"
    if message.topic == "hello by mythcat":
        print(f"Received message: {message.body}")
    else:
        print(f"Ignoring message with topic: {message.topic}")
# Consume messages
api.consume(process_message)
I ran it and got this response:
[mythcat@fedora FedoraMessaging]$ python my_consumer.py
[fedora_messaging.twisted.protocol INFO] Successfully registered AMQP consumer Consumer(queue=amq.gen-9lKk7sGeYY5I40bdc5VrzQ,
callback=<function process_message at 0x7fdb0f5da160>)
[fedora_messaging.message INFO] Registering the 'base.message' key as the '<class 'fedora_messaging.message.Message'>'
class in the Message class registry
[fedora_messaging.twisted.consumer INFO] Consuming message from topic hello by mythcat 
(message id 800a1540-1e91-4b4a-a125-15e33eebb699)
Received message: {'Hello': 'world!'}
[fedora_messaging.twisted.consumer INFO] Successfully consumed message from topic hello by mythcat 
(message id 800a1540-1e91-4b4a-a125-15e33eebb699)
It can be seen that the answer is received and displayed correctly.

Wednesday, March 27, 2024

Python 2.7.12 : Django running on glitch website.

Django was design and developed by Lawrence journal world in 2003 and publicly released under BSD license in July 2005. Currently, DSF (Django Software Foundation) maintains its development and release cycle.
Django was released on 21, July 2005. Its current stable version is 2.2.5 which was released April 1, 2019.
It is maintained by the Django Software Foundation
Some time ago, the website bug allowed the use of Python language.
Today I looked at the core project in Django, fixed it and added a test user called test with the password password_test
You can test in the admin area.
I did not add new functionalities and pages because I wanted it to be a default start project.
Here's how I set permissions for this test user.

Saturday, February 24, 2024

Python 3.12.1 : The kaitai python module and IDE online tool.

Kaitai Struct is a declarative language used to describe various binary data structures, laid out in files or in memory: i.e. binary file formats, network stream packet formats, etc.
The main idea is that a particular format is described in Kaitai Struct language (.ksy file) and then can be compiled with ksc into source files in one of the supported programming languages. These modules will include a generated code for a parser that can read the described data structure from a file or stream and give access to it in a nice, easy-to-comprehend API.
Let's install the Python module:
python3 -m pip install --upgrade kaitaistruct
Python was not found; run without arguments to install from the Microsoft Store, or disable this shortcut from Settings > Manage App Execution Aliases.

C:\PythonProjects\kaitai_001>python -m pip install --upgrade kaitaistruct
Collecting kaitaistruct
  Downloading kaitaistruct-0.10-py2.py3-none-any.whl.metadata (2.5 kB)
Downloading kaitaistruct-0.10-py2.py3-none-any.whl (7.0 kB)
Installing collected packages: kaitaistruct
Successfully installed kaitaistruct-0.10
The Kaitai compiler can be downloaded from the official website.
After installation, you can use the compiler ...
kaitai-struct-compiler.bat --version
kaitai-struct-compiler 0.10
...
kaitai-struct-compiler.bat --help
kaitai-struct-compiler 0.10
Usage: kaitai-struct-compiler [options] ...

  ...                source files (.ksy)
  -t, --target   target languages (graphviz, csharp, rust, all, perl, java, go, cpp_stl, php, lua, python, nim, html, ruby, construct, javascript)
  -d, --outdir 
                           output directory (filenames will be auto-generated); on Unix-like shells, the short form `-d` requires arguments to be preceded by `--`
  -I, --import-path ;;...
                           .ksy library search path(s) for imports (see also KSPATH env variable)
  --cpp-namespace 
                           C++ namespace (C++ only, default: none)
  --cpp-standard 
                           C++ standard to target (C++ only, supported: 98, 11, default: 98)
  --go-package    Go package (Go only, default: none)
  --java-package 
                           Java package (Java only, default: root package)
  --java-from-file-class 
                           Java class to be invoked in fromFile() helper (default: io.kaitai.struct.ByteBufferKaitaiStream)
  --dotnet-namespace 
                           .NET Namespace (.NET only, default: Kaitai)
  --php-namespace 
                           PHP Namespace (PHP only, default: root package)
  --python-package 
                           Python package (Python only, default: root package)
  --nim-module     Path of Nim runtime module (Nim only, default: kaitai_struct_nim_runtime)
  --nim-opaque     Directory of opaque Nim modules (Nim only, default: directory of generated module)
  --opaque-types    opaque types allowed, default: false
  --ksc-exceptions         ksc throws exceptions instead of human-readable error messages
  --ksc-json-output        output compilation results as JSON to stdout
  --verbose         verbose output
  --no-auto-read           disable auto-running `_read` in constructor
  --read-pos               `_read` remembers attribute positions in stream
  --debug                  same as --no-auto-read --read-pos (useful for visualization tools)
  --help                   display this help and exit
  --version                output version information and exit
Steps to use this tool with Python. You need to use a defined kaitai file format for your file type - for example, gif file format, compile this kaitai then you can use it in this manner:
from kaitaistruct import __version__ as ks_version, KaitaiStruct, KaitaiStream, BytesIO
import mmap
print('kaitai version : ', ks_version)
f = open("python_giphy.gif", "rb")
with mmap.mmap(f.fileno(), 0, access=mmap.ACCESS_READ) as buf:
    stream = KaitaiStream(BytesIO(buf))
    obj1 = print(stream)
    obj2 = print(stream)
    obj3 = print(stream)
stream.close()
I only test a little but is a great tool.
Kaitai Struct is free and open-source software, licensed under the following terms: Compiler and visualizer — GPLv3+ and these Runtime libraries:
  • C++/STL — MIT
  • C# — MIT
  • Go — MIT
  • Java — MIT
  • JavaScript — Apache v2
  • Lua — MIT
  • Nim — MIT
  • Perl — MIT
  • PHP — MIT
  • Python — MIT
  • Ruby — MIT
  • Rust — MIT
  • Swift — MIT
    Is easier to understand if you use the IDE on the web. On the left side you can see a cloud icon for upload, first, select the kaitai GIF type from formats/image/gif.ksy from web IDE, then select a GIF file from your computer and upload.
    The default IDE looks like this:

    Friday, December 22, 2023

    Python : MLOps with neptune.ai .

    I just started testing with neptune.ai.
    Neptune is the MLOps stack component for experiment tracking. It offers a single place to log, compare, store, and collaborate on experiments and models.
    MLOps or ML Ops is a paradigm that aims to deploy and maintain machine learning models in production reliably and efficiently.
    MLOps is practiced between Data Scientists, DevOps, and Machine Learning engineers to transition the algorithm to production systems.
    MLOps aims to facilitate the creation of machine learning products by leveraging these principles: CI/CD automation, workflow orchestration, reproducibility; versioning of data, model, and code; collaboration; continuous ML training and evaluation; ML metadata tracking and logging; continuous monitoring; and feedback loops.
    You will understand these features of MLOps if you look at these practical examples.
    Neptune uses a token:
    Your Neptune API token is like a password to the application. By saving your token as an environment variable, you avoid putting it in your source code, which is more convenient and secure.
    When I started I tested with this default project:
    example-project-tensorflow-keras
    Another good feature is the working team, by adding collaborators in the People section of your workspace settings.
    • For a free account you can have these options:
    • 5 users
    • 1 active project
    • Unlimited archived projects
    • Unlimited experiments
    • Unlimited model versions
    • Unlimited logging hours
    • Artifacts tracking
    • Service accounts for CI/CD pipelines
    • 200 GB storage
    Let's see the default source code shared by neptune.ai for that default project:
    import glob
    import hashlib
    
    import matplotlib.pyplot as plt
    import neptune.new as neptune
    import numpy as np
    import pandas as pd
    import tensorflow as tf
    from neptune.new.integrations.tensorflow_keras import NeptuneCallback
    from scikitplot.metrics import plot_roc, plot_precision_recall
    
    # Select project
    run = neptune.init(project='common/example-project-tensorflow-keras',
                       tags=['keras', 'fashion-mnist'],
                       name='keras-training')
    
    # Prepare params
    parameters = {'dense_units': 128,
                  'activation': 'relu',
                  'dropout': 0.23,
                  'learning_rate': 0.15,
                  'batch_size': 64,
                  'n_epochs': 30}
    
    run['model/params'] = parameters
    
    # Prepare dataset
    (x_train, y_train), (x_test, y_test) = tf.keras.datasets.fashion_mnist.load_data()
    x_train = x_train / 255.0
    x_test = x_test / 255.0
    
    class_names = ['T-shirt/top', 'Trouser', 'Pullover', 'Dress', 'Coat',
                   'Sandal', 'Shirt', 'Sneaker', 'Bag', 'Ankle boot']
    
    # Log data version
    run['data/version/x_train'] = hashlib.md5(x_train).hexdigest()
    run['data/version/y_train'] = hashlib.md5(y_train).hexdigest()
    run['data/version/x_test'] = hashlib.md5(x_test).hexdigest()
    run['data/version/y_test'] = hashlib.md5(y_test).hexdigest()
    run['data/class_names'] = class_names
    
    # Log example images
    for j, class_name in enumerate(class_names):
        plt.figure(figsize=(10, 10))
        label_ = np.where(y_train == j)
        for i in range(9):
            plt.subplot(3, 3, i + 1)
            plt.xticks([])
            plt.yticks([])
            plt.grid(False)
            plt.imshow(x_train[label_[0][i]], cmap=plt.cm.binary)
            plt.xlabel(class_names[j])
        run['data/train_sample'].log(neptune.types.File.as_image(plt.gcf()))
        plt.close('all')
    
    # Prepare model
    model = tf.keras.Sequential([
        tf.keras.layers.Flatten(input_shape=(28, 28)),
        tf.keras.layers.Dense(parameters['dense_units'], activation=parameters['activation']),
        tf.keras.layers.Dropout(parameters['dropout']),
        tf.keras.layers.Dense(parameters['dense_units'], activation=parameters['activation']),
        tf.keras.layers.Dropout(parameters['dropout']),
        tf.keras.layers.Dense(10, activation='softmax')
    ])
    optimizer = tf.keras.optimizers.SGD(learning_rate=parameters['learning_rate'])
    model.compile(optimizer=optimizer,
                  loss='sparse_categorical_crossentropy',
                  metrics=['accuracy'])
    
    # Log model summary
    model.summary(print_fn=lambda x: run['model/summary'].log(x))
    
    # Train model
    neptune_cbk = NeptuneCallback(run=run, base_namespace='metrics')
    
    model.fit(x_train, y_train,
              batch_size=parameters['batch_size'],
              epochs=parameters['n_epochs'],
              validation_split=0.2,
              callbacks=[neptune_cbk])
    
    # Log model weights
    model.save('trained_model')
    run['model/weights/saved_model'].upload('trained_model/saved_model.pb')
    for name in glob.glob('trained_model/variables/*'):
        run[name].upload(name)
    
    # Evaluate model
    eval_metrics = model.evaluate(x_test, y_test, verbose=0)
    for j, metric in enumerate(eval_metrics):
        run['test/scores/{}'.format(model.metrics_names[j])] = metric
    
    # Log predictions as table
    y_pred_proba = model.predict(x_test)
    y_pred = np.argmax(y_pred_proba, axis=1)
    y_pred = y_pred
    df = pd.DataFrame(data={'y_test': y_test, 'y_pred': y_pred, 'y_pred_probability': y_pred_proba.max(axis=1)})
    run['test/predictions'] = neptune.types.File.as_html(df)
    
    # Log model performance visualizations
    fig, ax = plt.subplots()
    plot_roc(y_test, y_pred_proba, ax=ax)
    run['charts/ROC'] = neptune.types.File.as_image(fig)
    
    fig, ax = plt.subplots()
    plot_precision_recall(y_test, y_pred_proba, ax=ax)
    run['charts/precision-recall'] = neptune.types.File.as_image(fig)
    plt.close('all')
    
    run.wait()
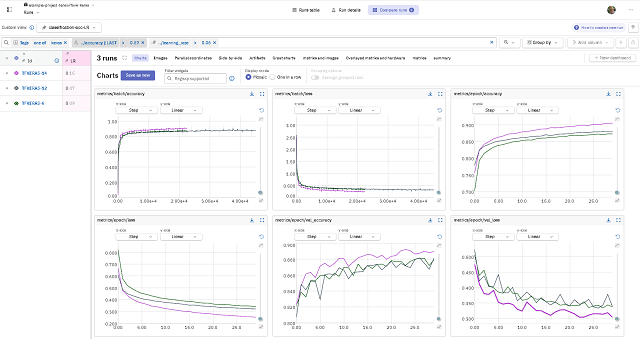
    This screenshot shows the web interface for neptune.ai:

    Thursday, November 16, 2023

    Python processing LiDAR data with Ouster SDK.

    Lidar sensors for high-resolution, long range use in autonomous vehicles, robotics, mapping. Low-cost & reliable for any use case. Shipping today. See more on the official website.
    You can download sample LiDAR data and test and use the Ouster Python SDK from the Ouster website.
    The documentation for this python package can be found on this website.
    See a simple demo on this youtube video named: 0 to SLAM in 60 Seconds.

    Sunday, November 12, 2023

    Python 3.8.12 : Django with replit online tool - part 001.

    Now with the replit online tool it is easy to test projects in Django. You must set a variable SECRET_KEY in settings.py and press the Run button. This will open the web page with your project.
    In the command line area you can use python to generate this variable, see the source code:
    ~/Django001$ python
    Python 3.8.12 (default, Aug 30 2021, 16:42:10) 
    [GCC 10.3.0] on linux
    Type "help", "copyright", "credits" or "license" for more information.
    >>> import secrets
    >>> secrets.token_urlsafe(32)
    'yIXPv6u4uCt4AUWlkU4NCuoyJiZlLx5IFm8kG6h8RtA'
    This is result of these first steps:
    Use this command to create a website named catafest001:
    ~/Django001$ python manage.py startapp catafest001
    Add this website to settings.py from django_project:
    INSTALLED_APPS = [
        'django.contrib.admin',
        'django.contrib.auth',
        'django.contrib.contenttypes',
        'django.contrib.sessions',
        'django.contrib.messages',
        'django.contrib.staticfiles',
        'catafest001',
    ]
    Use this command to create an user with a password:
    ~/Django001$ python manage.py createsuperuser
    Username (leave blank to use 'runner'): 
    Email address: catafest@yahoo.com
    Password: 
    Password (again): 
    The password is too similar to the username.
    Bypass password validation and create user anyway? [y/N]: y
    Superuser created successfully.
    You can see I let the username runner and the password I set to adminadmin.
    Into web area I set the URL to /admin and I use the username and the password to login into admin area.
    NOTE: Although I did the correct steps for a simple project in django with admin page, it won't let me login as admin ... maybe the replit online tool needs some other changes or the cause is different ...

    Thursday, February 9, 2023

    Python 3.6.9 : Anvil platform for web with python - part 001.

    Anvil is a platform for building and hosting full-stack web apps written entirely in Python. Drag and drop your UI, then write Python on the front-end and back-end to make it all work ...
    Yesterday I tested Anvil with python and was amazed at how simple it can be used to develop a web application. Anvil use python version 3.6.9. The tutorial I tested is available on the official website and is a feedback form that sends an email with your name, email address and content to your Anvil account address.
    You can see this web application I follow from web tutorials on this webpage.
    You can find some tutorials on this webpage.
    How it works: Create a free account that can also be paid for via a web interface that you build with drag and drop and populate interface properties, add defined python modules and services, and write source code. I noticed that it uses beginner level python decorators and not very complex source code. The good part is that it is a fast development and the bad part is that it is limited to the free tier. After only three emails received, they came back with messages saying: ... his email quota has been exceeded.
    These are features for anvil, I used in my project just the email:

    Saturday, February 4, 2023

    Python 3.7.0 : CodeSkulptor online compiler and editor.

    CodeSkulptor uses Skulpt to provide a browser-based coding environment and can be tested on the official website.
    You can see an online default example with simplegui python package on that website with online editor.

    Saturday, April 9, 2022

    Python : Starting learn with futurecoder online tool.

    This website with online tool can be a good start for test and learn python language programming.
    They come with this intro:
    This is a 100% free and interactive course for people to teach themselves programming in Python, especially complete beginners at programming. It is carefully designed to reduce frustration and guide the user while still ensuring that they learn how to solve problems. The goal is for as many people as possible to learn programming.
    You can try it out here: https://futurecoder.io .
    Please consider contributing or donating!
    You can see in the next video tutorial how this works:

    Saturday, March 23, 2019

    Fix errors with the python errors encyclopedia.

    Today I will present a website that I find very useful in learning and developing with the Python programming language.
    This very short tutorial it is very useful for newcomers to get rid of all sorts of common questions about certain errors.
    I encounter these types of errors when using stackoverflow account and can be a time consuming for most people who use it.
    Try to read all about these errors on the python errors encyclopedia.

    Tuesday, June 26, 2018

    Python 3.6.4 : Trying to use the python azurure on the windows.

    In this tutorial, I used the python version 3.6.4 and Windows 8.1 OS.
    You can start with pip install tool for some azure modules:
    Install the latest Batch runtime library
    C:\Python364\Scripts>pip install azure-batch 
    This will install the latest Storage management library
    C:\Python364\Scripts>pip install azure-mgmt-scheduler 
    Will install only the latest compute installed using the --pre flag:
    C:\Python364\Scripts>pip install --pre azure-mgmt-compute 
    Finally the storage I used into this tutorial:
    C:\Python364\Scripts>pip install azure-storage --upgrade
    You can install all of the azure python modules:
    C:\Python364\Scripts>pip install --pre azure
    ...
    Installing collected packages: azure-storage-nspkg, azure-storage-common, azure-
    storage-queue, azure-servicebus, azure-servicefabric, azure-storage-file, azure-
    servicemanagement-legacy, azure-mgmt-consumption, azure-mgmt-media, azure-mgmt-d
    ns, azure-mgmt-search, azure-mgmt-cdn, azure-mgmt-compute, azure-mgmt-eventhub,
    azure-mgmt-containerinstance, azure-mgmt-datalake-nspkg, azure-mgmt-datalake-ana
    lytics, azure-mgmt-recoveryservices, azure-mgmt-authorization, azure-mgmt-adviso
    r, azure-mgmt-recoveryservicesbackup, azure-mgmt-billing, azure-mgmt-devtestlabs
    , azure-mgmt-network, azure-mgmt-web, azure-mgmt-applicationinsights, azure-mgmt
    -cognitiveservices, azure-mgmt-rdbms, azure-mgmt-monitor, azure-mgmt-reservation
    s, azure-mgmt-notificationhubs, azure-mgmt-loganalytics, azure-mgmt-logic, azure
    -mgmt-iothubprovisioningservices, azure-mgmt-marketplaceordering, azure-mgmt-res
    ource, azure-mgmt-scheduler, azure-mgmt-powerbiembedded, azure-mgmt-servicefabri
    c, azure-mgmt-commerce, azure-mgmt-sql, azure-mgmt-cosmosdb, azure-mgmt-relay, a
    zure-mgmt-storage, azure-mgmt-redis, azure-mgmt-managementpartner, azure-mgmt-tr
    afficmanager, azure-mgmt-machinelearningcompute, azure-mgmt-datafactory, azure-m
    gmt-hanaonazure, azure-mgmt-iothub, azure-mgmt-servermanager, azure-mgmt-batch,
    azure-mgmt-keyvault, azure-mgmt-subscription, azure-mgmt-eventgrid, azure-mgmt-s
    ervicebus, azure-mgmt-batchai, azure-mgmt-containerservice, azure-mgmt-container
    registry, azure-mgmt-msi, azure-mgmt-datalake-store, azure-mgmt, azure-datalake-
    store, azure-eventgrid, azure-keyvault, azure-cosmosdb-nspkg, futures, azure-cos
    mosdb-table, azure-graphrbac, azure-storage-blob, azure
    I tested with all azure python modules, but you can use just you need.
    The next step is to open the Azure account - I have a trial free account.
    I create a Resource Group named python-azure and a Storage account named pythonazure.
    Into pythonazure I add the Files service and I upload an HTML file named default.html .
    See the next images with the steps I make:
    Let's make one simple test:
    C:\Python364\Scripts>python
    Python 3.6.4 (v3.6.4:d48eceb, Dec 19 2017, 06:54:40) [MSC v.1900 64 bit (AMD64)]
     on win32
    Type "help", "copyright", "credits" or "license" for more information.
    >>> from azure.common.credentials import UserPassCredentials
    >>> from azure.mgmt.resource import ResourceManagementClient
    >>> from azure.mgmt.storage import StorageManagementClient
    >>> from azure.storage import CloudStorageAccount
    >>> from azure.storage.blob.models import ContentSettings, PublicAccess
    >>> 
    I have not been able to authenticate myself with a python script in Azure.
    I found some inconsistencies and issues on GitHub so I still have to document.

    Any help in this regard is welcome.

    Monday, April 2, 2018

    The jdoodle online tool for python 3.

    This online tool from jdoodle website lets you to programming online with python 3 version.
    To see all python modules used by this editor just add this python script and use Execute button.
    import sys
    import os 
    print(help('modules'))

    Wednesday, March 14, 2018

    The regex online tool for python and any programming languages.

    Today I tested this online tool.
    Is a tool for a regular expression (regex or regexp for short) for many programming languages.
    These programming languages are php, javascript, golang and python.
    The tool is easy to use it.
    First, you need to select the programming language that is used for regular expression.
    The next step is to put the regular expression into the edit box and add your text to be parsed by this regular expression.
    For example, if you use this inputs for a regular expression:
    ([a-zA-Z]+) \d+
    and this text example:
    March 7 1976, June 1, August 9, Dec 25
    the result output will be this:
    March , June , August , Dec