analitics

Pages

Sunday, December 26, 2021

Python 3.7.11 : My colab tutorials - part 022.

Here is another notebook with two python scripts.
You may be wondering why I add them here and the index of 022 blog posts does not match the 026 index of those on the GitHub website.
The answer is simple: here I post them when I have time for evaluation and there they are added when they are created and tested.
The posts here are for a share of those who want to learn simple python programming to solve common issues by anyone with minimal school knowledge and for supporting the python programming community.
In this notebook you will find a script that uses a python packet that does a simple search using Google and one that does an image search.

Tuesday, December 7, 2021

Python Qt5 : Simple browser with QWebEngineView.

This is a simple example with PyQt5 and QWebEngineView.
You can see this example and use it from my GitHub account.

Monday, December 6, 2021

Python Qt5 : QtWebEngineWidgets and button.

In this tutorial I will show you how to add a simple button to the application build with QtWebEngineWidgets using the addWidget to a QVBoxLayout with a lay variable.
The button named PyQt5 nothing button is not connected.
Let's see this default example:
import sys

from PyQt5.QtCore import QUrl
from PyQt5.QtWidgets import QApplication, QPushButton, QMainWindow, QVBoxLayout, QWidget
from PyQt5.QtWebEngineWidgets import QWebEnginePage, QWebEngineSettings, QWebEngineView

class Widget(QWidget):
    def __init__(self, parent=None):
        super().__init__(parent)
        self.view = QWebEngineView()
        lay = QVBoxLayout(self)
        lay.addWidget(self.view)
        self.resize(640, 480)

class WebEnginePage(QWebEnginePage):
    def createWindow(self, _type):
        w = Widget()
        w.show()
        return w.view.page()

class MainWindow(QMainWindow):
    def __init__(self, parent=None):
        super(MainWindow, self).__init__(parent=None)

        self.setWindowTitle("PyQt5 ... another example !!")
        central_widget = QWidget()
        self.setCentralWidget(central_widget)
        
        button = QPushButton('PyQt5 nothing button', self)
        button.setToolTip('This is an example button')

        self.webview = QWebEngineView()
        self.page = WebEnginePage()
        self.webview.setPage(self.page)
        self.webview.settings().setAttribute(
            QWebEngineSettings.FullScreenSupportEnabled, True
        )

        self.webview.load(
            QUrl("https://www.youtube.com/watch?v=BVT3acNFzqc?rel=0&showinfo=0")
        )

        lay = QVBoxLayout(central_widget)
        lay.addWidget(button)
        lay.addWidget(self.webview)

def main():
    app = QApplication(sys.argv)
    window = MainWindow()
    window.show()
    app.exec_()

if __name__ == "__main__":
    main()

Saturday, December 4, 2021

Python 3.6.9 : Unarchive a RAR file with UnRAR and python.

In this tutorial, I will show you how can unrar a RAR archive with and without a password.
First, go to this website and install the UnRAR.dll file.
After you install into default path: C:\Program Files (x86)\UnrarDLL you need to create and set a new environment variable named UNRAR_LIB_PATH.
You need to select the 32 or 64 paths to this environment variable, and this depends on the test archive.
Because I create a RAR archive with x64 version I used this path for the environment variable: C:\Program Files (x86)\UnrarDLL\x64\UnRAR64.dll.
The first test archive I created was named TestRAR.rar and I used a password 111 with encryption.
The second one is named TestRAR001.rar and has no password.
Let's install the unrar python module with the pip tool.
pip install unrar
Requirement already satisfied: unrar in c:\python39\lib\site-packages (0.4)
Let's see the source code in python version 3.6.9
from unrar import rarfile

print("-----------------")
#archiveRARFile = r"C:\\PythonProjects\\RARArchive\\TestRAR.rar"
archiveRARFile = r"C:\\PythonProjects\\RARArchive\\TestRAR001.rar"
extractPath = r"C:\\PythonProjects\\RARArchive"

files = []
#with rarfile.RarFile(archiveRARFile,"r","111") as rarFile:
with rarfile.RarFile(archiveRARFile,"r","") as rarFile:
    files = rarFile.namelist()
    rarFile.extractall(extractPath)

print("files ",files)

for file in files:
    pathFile = fr"{extractPath}+{file}"
    with open(file,"r") as f:
        data = f.readlines()
        for line in data:
            line = line.strip()
            print(line)
You can see I commented two rows for each archive in order to test each one:
After I tested, this is the result of each test and both work great.
C:\PythonProjects\RARArchive>python unrarFile.py
-----------------
files  ['TestRAR.txt']
This is a test for RAR archive.

C:\PythonProjects\RARArchive>python unrarFile.py
-----------------
files  ['TestRAR.txt']
This is a test for RAR archive.

Thursday, November 25, 2021

Python Qt5 : QtWebEngineWidgets and YouTube Video.

In this tutorial I will show you how to play a video from Youtube using PyQt5 and this standard URL type:
http://www.youtube.com/watch_popup?v=VIDEOID
I used this version of python, version 3.9.6.
python
Python 3.9.6 (tags/v3.9.6:db3ff76, Jun 28 2021, 15:26:21) [MSC v.1929 64 bit (AMD64)] on win32
Type "help", "copyright", "credits" or "license" for more information.
...
The source code is simple:
import time

import sys

from PyQt5.QtCore import QUrl
from PyQt5.QtWebEngineWidgets import QWebEngineView, QWebEngineProfile
from PyQt5.QtWebEngineWidgets import QWebEnginePage, QWebEngineSettings
from PyQt5.QtWidgets import QApplication

if __name__ == '__main__':


    app = QApplication(sys.argv)

    webview = QWebEngineView()
    profile = QWebEngineProfile("my_profile", webview)
    profile.defaultProfile().setPersistentCookiesPolicy(QWebEngineProfile.ForcePersistentCookies)
    webpage = QWebEnginePage(profile, webview)
    webpage.settings().setAttribute(QWebEngineSettings.PlaybackRequiresUserGesture, False)

    webview.setPage(webpage)
    webview.load(QUrl("http://www.youtube.com/watch_popup?v=aw4ZDQsFxv0"))
    webview.show()

    sys.exit(app.exec_())
The song is: SO EMOTIONAL- Olivia Rodrigo - Traitor | Allie Sherlock cover, see it on youtube.

Wednesday, November 17, 2021

Python 3.7.11 : My colab tutorials - part 021.

This is a simple notebook tutorial about how can test and get info from GPU on colab online tool.
This tutorial can be found on my GitHub account.

Tuesday, November 16, 2021

Python 3.7.11 : My colab tutorials - part 020.

The tutorial I created is a test and use of the Selenium WebDriver python package for to automate web browser interaction from Python.
This tutorial can be found on my GitHub account.

Friday, November 5, 2021

Python Qt5 : Drag and drop examples - part 001.

This tutorial si about drag and drop with PyQt5 and Python 3.9.6.
The drag and drop feature is very intuitive for the user.
The widgets should respond to the drag and drop events in order to store the data dragged into them. 
  • DragEnterEvent provides an event which is sent to the target widget as dragging action enters it.
  • DragMoveEvent is used when the drag and drop action is in progress.
  • DragLeaveEvent is generated as the drag and drop action leaves the widget.
  • DropEvent, on the other hand, occurs when the drop is completed. The event’s proposed action can be accepted or rejected conditionally.
Let's see two example, first is a drag and drop for one button:
#!/usr/bin/python
import sys
from PyQt5.QtCore import Qt, QMimeData
from PyQt5.QtGui import QDrag
from PyQt5.QtWidgets import QPushButton, QWidget, QApplication

class Button(QPushButton):

    def __init__(self, title, parent):
        super().__init__(title, parent)

    def mouseMoveEvent(self, e):

        if e.buttons() != Qt.RightButton:
            return

        mimeData = QMimeData()

        drag = QDrag(self)
        drag.setMimeData(mimeData)
        drag.setHotSpot(e.pos() - self.rect().topLeft())
        dropAction = drag.exec_(Qt.MoveAction)

    def mousePressEvent(self, e):
        super().mousePressEvent(e)
        if e.button() == Qt.LeftButton:
            print('press')


class Example(QWidget):

    def __init__(self):
        super().__init__()

        self.initUI()

    def initUI(self):

        self.setAcceptDrops(True)

        self.button = Button('Button', self)
        self.button.move(100, 65)

        self.setWindowTitle('Drag and drop with mouse - right click to move Button!')
        self.setGeometry(300, 300, 550, 450)

    def dragEnterEvent(self, e):
        e.accept()

    def dropEvent(self, e):
        position = e.pos()
        self.button.move(position)

        e.setDropAction(Qt.MoveAction)
        e.accept()

def main():
    
    app = QApplication(sys.argv)
    ex = Example()
    ex.show()
    app.exec_()

if __name__ == '__main__':
    main()
... this source code is for a drag and drop for a image file:
import sys, os
from PyQt5.QtWidgets import QApplication, QWidget, QLabel, QVBoxLayout
from PyQt5.QtCore import Qt
from PyQt5.QtGui import QPixmap


class ImageLabel(QLabel):
    def __init__(self):
        super().__init__()

        self.setAlignment(Qt.AlignCenter)
        self.setText('\n\n Drop Image Here \n\n')
        self.setStyleSheet('''
            QLabel{
                border: 3px dashed #bbb
            }
        ''')

    def setPixmap(self, image):
        super().setPixmap(image)

class AppDemo(QWidget):
    def __init__(self):
        super().__init__()
        
        self.setWindowTitle('Drag and drop one image to this window!')
        self.setGeometry(300, 300, 550, 450)

        self.setAcceptDrops(True)

        mainLayout = QVBoxLayout()

        self.photoViewer = ImageLabel()
        mainLayout.addWidget(self.photoViewer)

        self.setLayout(mainLayout)

    def dragEnterEvent(self, event):
        if event.mimeData().hasImage:
            event.accept()
        else:
            event.ignore()

    def dragMoveEvent(self, event):
        if event.mimeData().hasImage:
            event.accept()
        else:
            event.ignore()

    def dropEvent(self, event):
        if event.mimeData().hasImage:
            event.setDropAction(Qt.CopyAction)
            file_path = event.mimeData().urls()[0].toLocalFile()
            self.set_image(file_path)

            event.accept()
        else:
            event.ignore()

    def set_image(self, file_path):
        self.photoViewer.setPixmap(QPixmap(file_path))

app = QApplication(sys.argv)
demo = AppDemo()
demo.show()
sys.exit(app.exec_())

Saturday, October 30, 2021

Python 3.7.11 : My colab tutorials - part 019.

The tutorial I created is a test and use Probabilistic Graphical Models for the most basic problem the coin problem with the pgmpy python module.
This tutorial can be found on my GitHub account.

Sunday, October 10, 2021

News : The new python version 3.10.0.

Almost six days ago, the new version of python was released, version 3.10.0, see this.
Its installation on windows operating systems is done in the same way as the old installations, with the same steps and the same settings.
After installation, I turned it on and tested some of the new features.
C:\Python310>python
Python 3.10.0 (tags/v3.10.0:b494f59, Oct  4 2021, 19:00:18) [MSC v.1929 64 bit (AMD64)] on win32
Type "help", "copyright", "credits" or "license" for more information.
Python 3.10 comes with precise and constructive error messages like:
...
SyntaxError: '{' was never closed
...
>>> foo(a, b for b in range(5), c)
...
    foo(a, b for b in range(5), c)
           ^^^^^^^^^^^^^^^^^^^
SyntaxError: Generator expression must be parenthesized
...
>>> {a, b for (a, b) in zip("a", "b")}
...
    {a, b for (a, b) in zip("a", "b")}
     ^^^^
SyntaxError: did you forget parentheses around the comprehension target?
...
SyntaxError: expected ':'
...
SyntaxError: invalid syntax. Perhaps you forgot a comma?
...
SyntaxError: ':' expected after dictionary key
...
SyntaxError: expected 'except' or 'finally' block
...
SyntaxError: cannot assign to attribute here. Maybe you meant '==' instead of '='?
...
IndentationError: expected an indented block after 'if' statement in line ...
...
>>> import collections
>>> collections.namedtoplo
...
AttributeError: module 'collections' has no attribute 'namedtoplo'. Did you mean: 'namedtuple'?
...
>>> a = 0
>>> aa
...
NameError: name 'aa' is not defined. Did you mean: 'a'?
PEP 634: Structural Pattern Matching Structural 
... the pattern matching is a comprehensive addition to the Python language. 
They tell us: Pattern matching enables programs to extract information from complex data types, branch on the structure of data, and apply specific actions based on different forms of data.
PEP 604: New Type Union Operator as X|Y 
PEP 613: Explicit Type Aliases 
PEP 647: User-Defined Type Guards 
PEP 612: Parameter Specification Variables
You can see more on the official webpage.

Friday, October 1, 2021

Python Qt5 : The QSvgWidget for the SVG image format.

In this example tutorial, I will show you how can show an SVG image format with the PyQt5 and QSvgWidget.
I used Fedora 35 Beta with python pyqt5 package install with pip tool.
$ pip install pyqt5
The source code in the Python programming language is this:
The result image is this:

Wednesday, September 22, 2021

The Hitchhiker’s Guide to Python.

Greetings, Earthling! Welcome to The Hitchhiker’s Guide to Python.
This project comes with this license, is free, and help you to learn Python:
Creative Commons Legal Code
Attribution-NonCommercial-ShareAlike 3.0 Unported ...
This guide is currently under heavy development. This opinionated guide exists to provide both novice and expert Python developers a best practice handbook to the installation, configuration, and usage of Python on a daily basis.
You can contribute to this project on the GitHub project.

Saturday, September 18, 2021

Python 3.7.11 : My colab tutorials - part 018.

In this colab tutorial, you can see how to use the webcam with python and javascript.
This colab notebook can be found on my colab project on the GitHub webpage.
  • catafest_001.ipynb - first step, import TensorFlow;
  • catafest_002.ipynb - testing the GPU , Linux commands and python modules torch and fastai;
  • catafest_003.ipynb - testing the Altair;
  • catafest_004.ipynb - testing the cirq python package for quantum computing;
  • catafest_005.ipynb - using the estimator on tensoflow 2.0;
  • python_imdb_001.ipynb - using the colab with python module imdbpy;
  • catafest_006.ipynb - google authentification and google.colab drive and files
  • catafest_007.ipynb - test with https://github.com/harrism/numba_examples/blob/master/mandelbrot_numba.ipynb
  • catafest_008.ipynb - few simple examples with selenium and chromium-chromedriver;
  • catafest_009.ipynb - show you how to use %% colab features;
  • catafest_010.ipynb - example with Detectron2 is Facebook AI Research's with state-of-the-art object detection algorithms;
  • catafest_011.ipynb - test a sound classification with YAMNet from a web example - not very happy with the result;
  • catafest_012.ipynb - a simple tutorial about Colab tool and HTML and JavaScript with examples;
  • catafest_013.ipynb - a simple tutorial with settings for TPU and IMDB dataset;
  • catafest_014.ipynb - get IMDB review dataset and show it;
  • catafest_015.ipynb - how to get, show and use it data and create a new train data set from IMDB dataset;
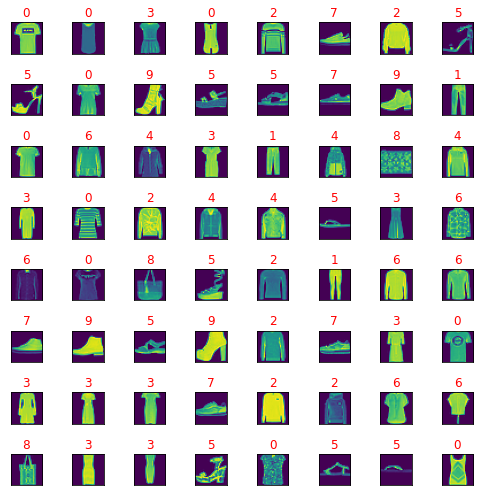
  • catafest_016.ipynb - show the shape of the Fashion-MNIST dataset;
  • catafest_017.ipynb - this example show you how to write another python script in colab and run it;
  • catafest_018.ipynb - PIFuHD demo;
  • catafest_019.ipynb - get title from tiles.virtualearth.net;
  • catafest_020.ipynb - get video from youtube with pytube, converting to audio, show signal wave, energy and frequency;
  • catafest_021.ipynb - BERT is a transformers model with example and sentiment-analysis;
  • catafest_022.ipynb - webcam on colab with python and javascript;

Saturday, September 11, 2021

Python 3.7.11 : My colab tutorials - part 017.

BERT: Pre-training of Deep Bidirectional Transformers for Language Understanding, see this https://arxiv.org/abs/1810.04805.
See this colab notebook with examples at my GitHub account.

Thursday, September 2, 2021

Python 3.7.11 : My colab tutorials - part 016.

This new colab notebook comes with: get youtube videos with pytube, converting to audio, show signals, energy and frequency.
You can see this work on the GitHub account.

Saturday, August 28, 2021

Python 3.7.11 : My colab tutorials - part 015.

Google Maps explicitly forbid using map tiles offline or caching them, but I think Microsoft Bing Maps don't say anything explicitly against it, and I guess you are not planning to use your program commercially (?)
This colab notebook show you how to get a title from tiles.virtualearth.net.
The source code is simple:
class TileServer(object):
    def __init__(self):
        self.imagedict = {}
        self.mydict = {}
        self.layers = 'ROADMAP'
        self.path = './'
        self.urlTemplate = 'http://ecn.t{4}.tiles.virtualearth.net/tiles/{3}{5}?g=0'
        self.layerdict = {'SATELLITE': 'a', 'HYBRID': 'h', 'ROADMAP': 'r'}

    def tiletoquadkey(self, xi, yi, z, layers):
        quadKey = ''
        for i in range(z, 0, -1):
            digit = 0
            mask = 1 << (i - 1)
            if(xi & mask) != 0:
                digit += 1
            if(yi & mask) != 0:
                digit += 2
            quadKey += str(digit)
        return quadKey

    def loadimage(self, fullname, tilekey):
        im = Image.open(fullname)
        self.imagedict[tilekey] = im
        return self.imagedict[tilekey]

    def tile_as_image(self, xi, yi, zoom):
        tilekey = (xi, yi, zoom)
        result = None
        try:
            result = self.imagedict[tilekey]
            print(result)
        except:
            print(self.layers)
            filename = '{}_{}_{}_{}.jpg'.format(zoom, xi, yi, self.layerdict[self.layers])
            print("filename is " + filename)
            fullname = self.path + filename
            try:
                result = self.loadimage(fullname, tilekey)
            except:
                server = random.choice(range(1,4))
                quadkey = self.tiletoquadkey(*tilekey)
                print (quadkey)
                url = self.urlTemplate.format(xi, yi, zoom, self.layerdict[self.layers], server, quadkey)
                print ("Downloading tile %s to local cache." % filename)
                urllib.request.urlretrieve(url, fullname)
                #urllib.urlretrieve(url, fullname)
                result = self.loadimage(fullname, tilekey)
        return result

Monday, July 26, 2021

Simple install of python in Windows O.S.

Today I create this simple video tutorial for new python users.
In this video tutorial I show you how easy is to install the python programming language in Windows O.S.
After install you can use the command python and you can use the python shell to test this programming language.
Also, you can create a script file with any name.
for example name the file: test.py and run in the windows shell with: python test.py.
You can see this video tutorial on my youtube account.

Saturday, July 17, 2021

Python Qt6 : Install and use python with Visual Studio.

Visual Studio is a very good tool for python programming language development.
Today I will show you how to use it with Visual Studio on a Windows operating system.
If you don't have Python install then start the Visual Studio installer and from all presents select the Python development workload.
Start Visual Studio and open a folder or open an empty file and save with the python language-specific extension: py.
Select the Python environment and add the new package with pip tool.
This is the python script I used to test:
import sys
from PyQt6.QtWidgets import QApplication, QWidget

def main():

    app = QApplication(sys.argv)

    w = QWidget()
    w.resize(250, 200)
    w.move(300, 300)

    w.setWindowTitle('Simple')
    w.show()

    sys.exit(app.exec())

if __name__ == '__main__':
    main()
You can see the video tutorial about how you can use it:

Tuesday, July 6, 2021

Python Qt6 : First example on Fedora 34 Linux distro.

Qt for Python is the project that provides the official set of Python bindings (PySide6) that will supercharge your Python applications. While the Qt APIs are world renowned, there are more reasons why you should consider Qt for Python.
I tested with Fedora 34 Linux distro:
[root@desk mythcat]# dnf search PyQt6
Last metadata expiration check: 2:03:10 ago on Tue 06 Jul 2021 08:52:41 PM EEST.
No matches found. 
First stable release for PyQt6 was on Jan 2021 by Riverbank Computing Ltd. under GPL or commercial and can be used with Python 3.
Let's install with pip tool:
[mythcat@desk ~]$ /usr/bin/python3 -m pip install --upgrade pip
...
  WARNING: The scripts pip, pip3 and pip3.9 are installed in '/home/mythcat/.local/bin' which is not on PATH.
  Consider adding this directory to PATH or, if you prefer to suppress this warning, 
  use --no-warn-script-location.
Successfully installed pip-21.1.3
[mythcat@desk ~]$ pip install PyQt6 --user
...
Let's see a simple example with this python package:
import sys
from PyQt6.QtCore import Qt
from PyQt6.QtWidgets import QApplication, QLabel

def main():
    app = QApplication(sys.argv)
    win = QLabel()
    win.resize(640, 498)
    win.setText("Qt is awesome!!!")
    win.show()
    app.exec()

if __name__ == "__main__":
    main()
I tested and run well.

Sunday, July 4, 2021

Python Qt5 : Parse files and show image with QPixmap .

This tutorial is about how to create a simple script in python with a few features:
You can see I used these python packages: argparse, PIL, glob, io, PyQt5 to fulfill the issue.
The PIL python package is used to use PNG images.
The argparse python package is used to get inputs from arguments.
The glob python package is used to parse folders and files.
The io python package is used to open images:
The PyQt5 python package is used to show images on canvas:
This is the source code in python I used to parse a folder with images and show one image:
import os
import io
import sys
import glob

from PIL import Image
from PIL import UnidentifiedImageError

from PyQt5.QtGui import QPixmap
from PyQt5.QtWidgets import QMainWindow, QApplication, QLabel

import argparse
from pathlib import Path

parser = argparse.ArgumentParser()

parser.add_argument("files_path", type=Path, help='PATH of folder with files ')
parser.add_argument('-p','--print_files', action='store_true', 
    help='Print files from folder ')
parser.add_argument('-s','--show', action='store_true', 
    help='Show image in PyQt5 canvas!')
args = vars(parser.parse_args())

p = parser.parse_args()
print(p.files_path, type(p.files_path), p.files_path.exists())
print(p.show)
files = os.listdir(p.files_path)
file_list = []
image_list = []
bad_files_list =[]

if args['print_files']: 
    print("These are files from folder "+str(p.files_path))
    for f in file_list:
	    print(f)

images_ext = str(Path(p.files_path))+'/*.png'
print("images_ext: "+images_ext)
for filename in glob.glob(images_ext): #assuming png
    try:
        f = open(filename, 'rb')
        file = io.BytesIO(f.read())
        im = Image.open(file)
        image_list.append(filename)
        print(str(len(image_list))+" good file is"+filename)
    except Image.UnidentifiedImageError:
        bad_files_list.append(str(p.files_path)+"/"+str(filename))

for f in bad_files_list:
	print("bad file is : " + f)


if args['show']:
    value = input("Please enter the index of PNG image :\n")
    try:
        int(value)
        print("Image number select default : " + value)      
        value = int(value)
        if value &lt= len(image_list):
            value = int(value)
        else:
            print("The number image selected is greater then len of list images!")
            value = len(image_list)
    except:
        print("This is not a number, I set first image number.")
        value = 1

    class MainWindow(QMainWindow):

        def __init__(self):
            super(MainWindow, self).__init__()
            self.title = "Image Viewer"
            self.setWindowTitle(self.title)

            label = QLabel(self)
            pixmap = QPixmap(image_list[int(value)])
            label.setPixmap(pixmap)
            self.setCentralWidget(label)
            self.resize(pixmap.width(), pixmap.height())

    app = QApplication(sys.argv)
    w = MainWindow()
    w.show()
    sys.exit(app.exec_())
These are the output of the script:
[mythcat@desk PIL001]$ python  tool001.py 
usage: tool001.py [-h] [-p] [-s] files_path
tool001.py: error: the following arguments are required: files_path
[mythcat@desk PIL001]$ python  tool001.py ~/Pictures/
/home/mythcat/Pictures  True
False
images_ext: /home/mythcat/Pictures/*.png
1 good file is/home/mythcat/Pictures/keyboard.png
2 good file is/home/mythcat/Pictures/Fedora_The_Pirate_CaribbeanHunt.png
3 good file is/home/mythcat/Pictures/website.png
4 good file is/home/mythcat/Pictures/Screenshot from 2021-02-19 19-24-32.png
...
97 good file is/home/mythcat/Pictures/Screenshot from 2021-07-03 17-31-23.png
98 good file is/home/mythcat/Pictures/Screenshot from 2021-07-03 17-46-05.png
bad file is : /home/mythcat/Pictures//home/mythcat/Pictures/Screenshot from 2021-02-07 14-58-56.png
bad file is : /home/mythcat/Pictures//home/mythcat/Pictures/evolution_logo.png
[mythcat@desk PIL001]$ python  tool001.py ~/Pictures/ -p
/home/mythcat/Pictures  True
False
These are files from folder /home/mythcat/Pictures
images_ext: /home/mythcat/Pictures/*.png
1 good file is/home/mythcat/Pictures/keyboard.png
2 good file is/home/mythcat/Pictures/Fedora_The_Pirate_CaribbeanHunt.png
3 good file is/home/mythcat/Pictures/website.png
...
97 good file is/home/mythcat/Pictures/Screenshot from 2021-07-03 17-31-23.png
98 good file is/home/mythcat/Pictures/Screenshot from 2021-07-03 17-46-05.png
bad file is : /home/mythcat/Pictures//home/mythcat/Pictures/Screenshot from 2021-02-07 14-58-56.png
bad file is : /home/mythcat/Pictures//home/mythcat/Pictures/evolution_logo.png
[mythcat@desk PIL001]$ python  tool001.py ~/Pictures/ -s
/home/mythcat/Pictures  True
True
images_ext: /home/mythcat/Pictures/*.png
...
97 good file is/home/mythcat/Pictures/Screenshot from 2021-07-03 17-31-23.png
98 good file is/home/mythcat/Pictures/Screenshot from 2021-07-03 17-46-05.png
bad file is : /home/mythcat/Pictures//home/mythcat/Pictures/Screenshot from 2021-02-07 14-58-56.png
bad file is : /home/mythcat/Pictures//home/mythcat/Pictures/evolution_logo.png
Please enter the index of PNG image :
6
Image number select default : 6

Tuesday, June 15, 2021

Python 3.6.9 : My colab tutorials - part 014.

Here we come to the 16th notebook created with the colab utility from Google.
In this notebook, I will show you how you can view a dataset of images.
See the next image with a few of the shapes of the dataset:
You can find the full source code on my GitHub account.

Saturday, June 5, 2021

Python 3.6.9 : My colab tutorials - part 013.

In this tutorial created with the online tool google colab, we exemplified again how to access the IMDB dataset, which contains from the index point of view and what is the correspondence with the IMDB reviews, as well as how to work and create several sets of data for trains and what is the difference between them.
You can see the source code in python on this notebook.

Tuesday, June 1, 2021

Python 3.6.9 : My colab tutorials - part 012.

The purpose of this tutorial is to show the IMDB review dataset.
You can find the source code on my GitHub account here.

Thursday, May 27, 2021

Python 3.6.9 : My colab tutorials - part 011.

The purpose of this tutorial is to use the google TPU device together with Keras.
You need to set from the Edit menu and set for the notebook the device called TPU.
You can find the source code on my GitHub account here.

Tuesday, May 18, 2021

Python 3.9.1 : ABC - Abstract Base Classes - part 001.

Abstract classes are classes that contain one or more abstract methods.
By default, Python does not provide abstract classes.
Python comes with a module that provides the base for defining Abstract Base Classes (named ABC).
An abstract class can be considered as a blueprint for other classes.
By defining an abstract base class, you can define a common API for a set of subclasses.
A class that is derived from an abstract class cannot be instantiated unless all of its abstract methods are overridden.
[mythcat@desk ~]$ python3.9
Python 3.9.5 (default, May  4 2021, 00:00:00) 
[GCC 10.3.1 20210422 (Red Hat 10.3.1-1)] on linux
Type "help", "copyright", "credits" or "license" for more information.
>>> from abc import ABC
>>> class Test_ABC(ABC):
...     pass
... 
>>> Test_ABC.register(tuple)

>>> assert issubclass(tuple,Test_ABC)
>>> assert isinstance((), Test_ABC)
>>> class Foo:
...     def __getitem__(self, index):
...         ...
...     def __len__(self):
...         ...
...     def get_iterator(self):
...         return iter(self)
... 
>>> Test_ABC.register(Foo)
...
Let's see an example:
from abc import ABC, abstractmethod
 
class Vehicle(ABC):
    @abstractmethod
    def action(self):
        pass

class Air(Vehicle):
    # overriding abstract method
    def action(self):
        print("this flies in the air")
 
class Ground(Vehicle):
    # overriding abstract method
    def action(self):
        print("this running on the field")

class Civil(Ground):
    def action(self):
        print("Civil class - running on the field")

# Can't instantiate abstract class with abstract method action, don't use it
# abc = Vehicle()

abc = Air()
abc.action()

abc = Ground()
abc.action()

abc = Civil()
abc.action()

print( issubclass(Civil, Vehicle))
print( isinstance(Civil(), Vehicle))
This is the result:
[mythcat@desk PythonProjects]$ python3.9 ABC_001.py 
this flies in the air
this running on the field
Civil class - running on the field
True
True

Saturday, February 27, 2021

Python 2.7.18 : Kick Start Google - Boring Numbers.

Today I solved one of the problems required for solving Google Kick Start in 2020, see on my account.
Round H 2020 - Kick Start 2020 Boring Numbers (7pts, 12pts) Problem Ron read a book about boring numbers. According to the book, a positive number is called boring if all of the digits at even positions in the number are even and all of the digits at odd positions are odd. The digits are enumerated from left to right starting from 1. For example, the number 1478 is boring as the odd positions include the digits {1, 7} which are odd and even positions include the digits {4, 8} which are even. Given two numbers L and R, Ron wants to count how many numbers in the range [L, R] (L and R inclusive) are boring. Ron is unable to solve the problem, hence he needs your help.
Let's try to find the solution:
import math
print("Round H 2020 - Kick Start 2020: Detect is positive number is called boring.\n")
nr = int(input("get natural positive number: "))

all_cond = []
# detect if the number is odd or even number
def detect_odd_even(num):
  if (num % 2) == 0:  
    #print("{0} is Even number".format(num)) 
    detect = True  
  else:  
    #print("{0} is Odd number".format(num))  
    detect = False
  return detect
# check if is an boring number.
def boring_number(num):
    for p,num in enumerate(str(num),1):
        print(p,num)
        if (detect_odd_even(p) == detect_odd_even(int(num))): all_cond.append(True)
        else:
          all_cond.append(False)

# check the number is 
boring_number(nr)
# print result if the positive number is boring
if (all(all_cond) == True): print("{0} is an positive boring number".format(nr))
else:
  print("{0} is not a positive boring number".format(nr))
Let's test it:
~/mathissues$ python math_003.py 
Round H 2020 - Kick Start 2020: Detect is positive number is called boring.

get natural positive number: 345
(1, '3')
(2, '4')
(3, '5')
345 is an positive boring number
Then la last step is to test any number from range of given two numbers L and R.
The new source code is this:
import math
print("Round H 2020 - Kick Start 2020: Detect is positive number is called boring.\n")
#nr = int(input("get natural positive number: "))

all_cond = []
# detect if the number is odd or even number
def detect_odd_even(num):
  if (num % 2) == 0:  
    #print("{0} is Even number".format(num)) 
    detect = True  
  else:  
    #print("{0} is Odd number".format(num))  
    detect = False
  return detect
# check if is an boring number.
def boring_number(num):
    for p,num in enumerate(str(num),1):
        print(p,num)
        if (detect_odd_even(p) == detect_odd_even(int(num))): all_cond.append(True)
        else:
          all_cond.append(False)

# check the number is 
#boring_number(nr)
# print result if the positive number is boring

nr1 = int(input("get firt natural positive number: "))
nr2 = int(input("get firt natural positive number: "))
if nr1 < nr2:
  n1 = nr1
  n2 = nr2
else: 
  n1 = nr2
  n2 = nr1
for all_nr in range(n1,n2):
  all_cond = []
  boring_number(all_nr)
  print(all_nr)
# print result if the positive number is boring
  if (all(all_cond) == True): print("{0} is an positive boring number".format(all_nr))
  else: print("{0} is not a positive boring number".format(all_nr))
  all_cond = [] 
The final solution result to test all numbers in range given two numbers L and R can be see bellow:
~/mathissues$ python math_003.py 
Round H 2020 - Kick Start 2020: Detect is positive number is called boring.

get firt natural positive number: 11
get firt natural positive number: 16
(1, '1')
(2, '1')
11
11 is not a positive boring number
(1, '1')
(2, '2')
12
12 is an positive boring number
(1, '1')
(2, '3')
13
13 is not a positive boring number
(1, '1')
(2, '4')
14
14 is an positive boring number
(1, '1')
(2, '5')
15
15 is not a positive boring number

Thursday, February 25, 2021

Python 3.9.1 : Python and Spectator Earth.

The Spectator Earth allows you to track satellites, access their imagery, and easily build new information, based on data from this amazing orbital infrastructure.
You need just an API KEY to use it with cURL, Python, or JavaScript. 
In this tutorial, I will show you how can be used.
Login on the app.spectator.earth and get your API Key. 
Let's see some simple examples.
This first example shows you the satellite by id:
import requests

id = input("Type id sattelite: ")
satellite_id = id
url = 'https://api.spectator.earth/satellite/{satellite_id}'.format(satellite_id=satellite_id)

response = requests.get(url)
data = response.json()
print(data)
Let's see some satellite by ids:
[mythcat@desk Spectator]$ python  satellite_all.py 
Type id sattelite: 1
{'id': 1, 'type': 'Feature', 'geometry': {'type': 'Point', 'coordinates': [-51.88851761326367, 
70.75978200389422]}, 'properties': {'name': 'Sentinel-1A', 'norad_id': 39634, 'sensors': 
[{'type': 'SAR', 'avg_footprint_width': '3.20'}], 'open': True, 'platform': 'Sentinel-1A'}}
[mythcat@desk Spectator]$ python  satellite_all.py 
Type id sattelite: 2
{'id': 2, 'type': 'Feature', 'geometry': {'type': 'Point', 'coordinates': [42.046601163641796, 
-14.660442921557335]}, 'properties': {'name': 'Sentinel-2A', 'norad_id': 40697, 'sensors': 
[{'type': 'OPTICAL', 'avg_footprint_width': '2.32'}], 'open': True, 'platform': 'Sentinel-2A'}}
[mythcat@desk Spectator]$ python  satellite_all.py 
Type id sattelite: 3
{'id': 3, 'type': 'Feature', 'geometry': {'type': 'Point', 'coordinates': [-91.98478583784988, 
79.45732380441011]}, 'properties': {'name': 'Sentinel-3A', 'norad_id': 41335, 'sensors': 
[{'type': 'OPTICAL', 'avg_footprint_width': '10.16'}, {'type': 'OPTICAL', 
'avg_footprint_width': '11.20'}], 'open': True, 'platform': 'Sentinel-3A'}}
[mythcat@desk Spectator]$ python  satellite_all.py 
Type id sattelite: 4
Let's see one example with satellite overpasses:
import requests
import json
api_key = input("api_key :")
bbox = '19.59,49.90,20.33,50.21'
satellites = 'Sentinel-2A,Sentinel-2B'
url = 'https://api.spectator.earth/overpass/?api_key={api_key}&bbox={bbox}&
satellites={satellites}'.format(api_key=api_key, bbox=bbox, satellites=satellites)
response = requests.get(url)
data = response.json()
print(type(data))
print(data)
You can query for overpasses of the chosen satellite over a defined area of interest and the output provides you with a satellite sensor footprint for the nearest overpass, overpass frequency in seconds, and all information available.
Query parameters for the URL variable are:
The result is this:
[mythcat@desk Spectator]$ python satellite.py 
api_key :....
...
{'frequency': 93996, 'overpasses': [{'id': 16486437, 'acquisition': True, 'date': 
'2021-02-26T09:57:00Z', 'footprint': {'type': 'Polygon', 'coordinates': 
...
footprint': {'type': 'Polygon', 'coordinates': 
...
[[[19.153675312697636, 46.847554078717884], ... 
Query parameters for the url :
  • api_key - your API key
  • bbox - area of interest bounding box list of coords (lon, lat, lon, lat);
  • satellites - which satellites to include like: (Sentinel-1A, Sentinel-1A, Sentinel-2A, Sentinel-2B, Sentinel-3A, Landsat-8) - optional;
  • days_before - a number of days before the current date for which overpasses should be computed integer optional, default=0;
  • days_after - a number of days after the current date for which overpasses should be computed integer optional, default=7;
You can see a image get from my location:

Tuesday, January 26, 2021

Python 3.6.0 : Django 3.2 alpha 1 released.

Django is a high-level Python Web framework that encourages rapid development and clean, pragmatic design. Built by experienced developers, it takes care of much of the hassle of Web development, so you can focus on writing your app without needing to reinvent the wheel. It’s free and open source. 

I tested it and I was satisfied with the way it works with this framework and it has many good features for the web. 
Django 3.2 is designated as a long-term support release.

Today, Django 3.2 alpha 1 is available with new features.
A good roadmap towards Django 3.2. can be found on this schedule webpage.
As with all alpha and beta packages, this is not for production use.
Django 3.2 supports Python 3.6, 3.7, 3.8, and 3.9. The next release is expected in April 2021, see:
  • January 14, 2021, Django 3.2 alpha; feature freeze;
  • February 18 Django 3.2 beta; non-release blocking bug fix freeze;
  • March 18 Django 3.2 RC 1; translation string freeze;
  • April 6 Django 3.2 final release.