This is one of the several ways to use RevitPythonWrapper:
- pyRevit;
- RevitPythonShell;
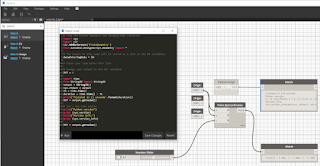
- Dynamo;
This tool help you to use python with the Revit tool and can be found at the GitHub webpage.
They say:The RevitPythonShell adds an IronPython interpreter to Autodesk Revit and Vasari. The RevitPythonShell (RPS) lets you to write plugins for Revit in Python, my favourite scripting language! But even better, it provides you with an interactive shell that lets you see the results of your code as you type it. This is great for exploring the Revit API while writing your Revit Addins - use this in combination with the RevitLookup database exploration tool to become a Revit API Ninja :)
You need to install your instaler according with the Revit version.
You can start it from Main Menu - Add-Ins and you see it.
Is very easy to use it, let's see one simple example:
import clr
clr.AddReference("RevitAPI")
from Autodesk.Revit.DB import BuiltInCategory as Bic
from Autodesk.Revit.DB import FilteredElementCollector as Fec
from Autodesk.Revit.DB import Transaction
# reference to the current open revit model is
doc = __revit__.ActiveUIDocument.DocumentIronPython 2.7.7 (2.7.7.0) on .NET 4.0.30319.42000 (64-bit)
Type "help", "copyright", "credits" or "license" for more information.
>>> a = b = 1
>>> c = a + b + 1
>>> print(c)
3
>>> from Autodesk.Revit.DB import FilteredElementCollector as Fec
>>> from Autodesk.Revit.DB import BuiltInCategory as Bic
>>> doors = Fec(doc).OfCategory(Bic.OST_Doors).WhereElementIsNotElementType().ToElements()
>>> print(dir(doors))
['Add', 'AddRange', 'AsReadOnly', 'BinarySearch', 'Capacity', 'Clear', 'Contains', 'ConvertAll', 'CopyTo',
'Count', 'Enumerator', 'Equals', 'Exists', 'Find', 'FindAll', 'FindIndex', 'FindLast', 'FindLastIndex',
'ForEach', 'GetEnumerator', 'GetHashCode', 'GetRange', 'GetType', 'IndexOf', 'Insert', 'InsertRange',
'IsReadOnly', 'IsSynchronized', 'Item', 'LastIndexOf', 'MemberwiseClone', 'ReferenceEquals', 'Remove',
'RemoveAll', 'RemoveAt', 'RemoveRange', 'Reverse', 'Sort', 'SyncRoot', 'ToArray', 'ToString', 'TrimExcess',
'TrueForAll', '__add__', '__class__', '__contains__', '__delattr__', '__doc__', '__format__',
'__getattribute__', '__getitem__', '__hash__', '__init__', '__iter__', '__len__', '__new__',
'__reduce__', '__reduce_ex__', '__repr__', '__setattr__', '__setitem__', '__sizeof__',
'__str__', '__subclasshook__']
>>> for each_door in doors:
... print(each_door.Id)
... print(each_door.Mirrored)
... print(each_door.Symbol.LookupParameter("Type Name").ToString())
...
840590
False
Autodesk.Revit.DB.Parameter
>>>
Let's see the output of this code on Revit.