analitics

Pages

Saturday, April 29, 2023

Extension for inkscape with python.

Today, I created the first Python extension for Inkscape, and although in theory, it seems easy, it is not really so.
You have to study a little and search the web, but I created a tutorial on one of my website.
The idea is to use at least two files with different extensions.
I named one catafest_extension.inx and the other catafest_extension.py.
For the Python file, I used this source code:
#!/usr/bin/env python
# coding=utf-8
#
# Copyright (C) 2023 Catalin George Festila, catafest@yahoo.com
#

"""
Simple test extension for inkscape
"""

import inkex
# add by me 

from lxml import etree
def draw_SVG_square(w,h, x,y, parent):
    style = { 'stroke'        : 'none',
              'stroke-width'  : '1',
              'fill'          : '#0000FF'
            }

    attribs = {
        'style'     : str(inkex.Style(style)),
        'height'    : str(h),
        'width'     : str(w),
        'x'         : str(x),
        'y'         : str(y)
            }
    patrat = etree.SubElement(
        parent, inkex.addNS('rect','svg'), attribs )
    return patrat

class MyExtension(inkex.Effect):
    def __init__(self):
        super().__init__()

    def effect(self):
        self.msg("This is an empty extension created by catafest !")
        parent = self.svg.get_current_layer()
        draw_SVG_square(100,100, 0,0, parent)

if __name__ == '__main__':
    MyExtension().run()
The result is this

Python 3.8.10 : My colab tutorials - part 032.

I haven't written for the python community in a long time, here is another example that I created using a tool from google called colab.
catafest_038.ipynb - simple example with StableDiffusionPipeline and DiffusionPipeline to generate images based a text ...
This and the other examples can be found in my repository named colab_google on my GitHub account.

Monday, April 17, 2023

Python Qt6 : use sqlite - part 002.

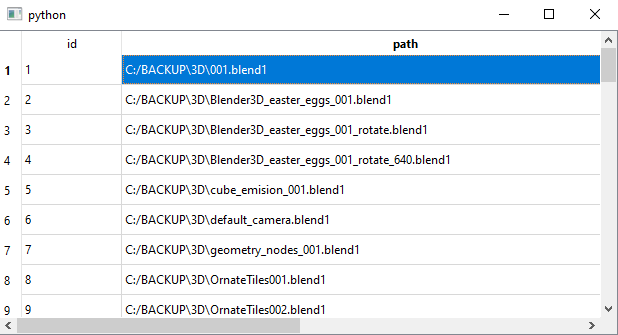
In this article tutorial I will show you how to read from the sqlite file the content of the table: files.
In the last article tutorial, I create a interface with PyQt6 that search files by regular expresion and result is add to sqlite file named: file_paths.db.
I used same steps with a default python class and I used QSqlTableModel to show the content received.
The script will create a window with this QSqlTableModel, then reads the file and add the result.
Let's see the source code:
import sys
from PyQt6.QtWidgets import QApplication, QMainWindow, QTableView
from PyQt6.QtSql import QSqlDatabase, QSqlQuery, QSqlTableModel

class MainWindow(QMainWindow):
    def __init__(self):
        super().__init__()

        # Initialize the database
        self.init_db()

        # Set up the GUI
        self.table_view = QTableView(self)
        self.setCentralWidget(self.table_view)

        # Set up the model and connect it to the database
        self.model = QSqlTableModel(self)
        self.model.setTable('files')
        self.model.select()
        self.table_view.setModel(self.model)

    def init_db(self):
        # Connect to the database
        db = QSqlDatabase.addDatabase('QSQLITE')
        db.setDatabaseName('file_paths.db')
        if not db.open():
            print('Could not open database')
            sys.exit(1)

    def create_table(self):
        # Create the 'files' table if it doesn't exist
        query = QSqlQuery()
        query.exec('CREATE TABLE IF NOT EXISTS files (id INTEGER PRIMARY KEY, path TEXT)')

if __name__ == '__main__':
    app = QApplication(sys.argv)
    window = MainWindow()
    window.show()
    sys.exit(app.exec())
I add this source code into a python script named view.py and I run it.
This is the result of the running script:

Python Qt6 : use sqlite - part 001.

This will default update for any python project:
python.exe -m pip install --upgrade pip --user
...
Successfully installed pip-23.1
The sqlite3 is already on my python instalation because I use version 3.11.0, you can see the official webpage.
Install the PyQt6 with the pip tool, I have this python package:
pip install PyQt6 --user
Requirement already satisfied: PyQt6 in c:\python311\lib\site-packages (6.4.1)
...
The next source of code will create a windows with two buttons and one edit area.
The PyQt6 graphics user interface use these elements: QPushButton, QLineEdit and QMessageBox from QWidget.
The python class will create a window with these elements and dor each of these is need to have methods.
First you need to select the folder, then use an regular expresion for search.
I used this : .*\.blend1$ this means *.blend1.
The last step is to use FindFiles button to search all blend files, in this case and add path of each of these to the sqlite database into a table named: files .
If you select the root C: then will take some time to search the files.
Let's see the source code:
import sys
import os
import re
from PyQt6.QtWidgets import *
from PyQt6.QtCore import *
import sqlite3

class FindFiles(QWidget):
    def __init__(self):
        super().__init__()
        self.setWindowTitle("Find Files")
        self.setGeometry(100, 100, 500, 300)

        self.folder_button = QPushButton("Choose Folder")
        self.folder_button.clicked.connect(self.choose_folder)
        self.pattern_edit = QLineEdit()
        self.pattern_edit.setPlaceholderText("Enter regular expression pattern")
        self.pattern_edit.setFixedWidth(250)
        self.find_button = QPushButton("Find Files")
        self.find_button.clicked.connect(self.find_files)

        layout = QVBoxLayout()
        layout.addWidget(self.folder_button)
        layout.addWidget(self.pattern_edit)
        layout.addWidget(self.find_button)
        self.setLayout(layout)

        self.folder_path = ""

        self.conn = sqlite3.connect("file_paths.db")
        self.cursor = self.conn.cursor()
        self.cursor.execute("CREATE TABLE IF NOT EXISTS files (id INTEGER PRIMARY KEY, path TEXT)")

    def choose_folder(self):
        self.folder_path = QFileDialog.getExistingDirectory(self, "Choose Folder")
        if self.folder_path:
            self.folder_button.setText(self.folder_path)

    def find_files(self):
        if not self.folder_path:
            QMessageBox.warning(self, "Warning", "Please choose a folder first!")
            return

        pattern = self.pattern_edit.text()

        if not pattern:
            QMessageBox.warning(self, "Warning", "Please enter a regular expression pattern!")
            return

        file_paths = []
        for root, dirs, files in os.walk(self.folder_path):
            for file in files:
                if re.match(pattern, file):
                    file_path = os.path.join(root, file)
                    file_paths.append(file_path)
                    self.cursor.execute("INSERT INTO files (path) VALUES (?)", (file_path,))
        self.conn.commit()

        QMessageBox.information(self, "Information", f"Found {len(file_paths)} files that match the pattern!")

if __name__ == "__main__":
    app = QApplication(sys.argv)
    find_files = FindFiles()
    find_files.show()
    sys.exit(app.exec())
I put this source code into a file named:main.py and I run it.
python main.py
The result is this:

Tuesday, April 11, 2023

Python 3.11.0 : about consolemenu .

This simple console menu can help to create menus, you can find the project on GitHub project.
pip install console-menu --user
For testing, I used the default example, and works well.
# Import the necessary packages
from consolemenu import *
from consolemenu.items import *

# Create the menu
menu = ConsoleMenu("Title", "Subtitle")

# Create some items

# MenuItem is the base class for all items, it doesn't do anything when selected
menu_item = MenuItem("Menu Item")

# A FunctionItem runs a Python function when selected
function_item = FunctionItem("Call a Python function", input, ["Enter an input"])

# A CommandItem runs a console command
command_item = CommandItem("Run a console command",  "touch hello.txt")

# A SelectionMenu constructs a menu from a list of strings
selection_menu = SelectionMenu(["item1", "item2", "item3"])

# A SubmenuItem lets you add a menu (the selection_menu above, for example)
# as a submenu of another menu
submenu_item = SubmenuItem("Submenu item", selection_menu, menu)

# Once we're done creating them, we just add the items to the menu
menu.append_item(menu_item)
menu.append_item(function_item)
menu.append_item(command_item)
menu.append_item(submenu_item)

# Finally, we call show to show the menu and allow the user to interact
menu.show()

Saturday, April 8, 2023

Create an ovoid with python on Blender 3D.

Blender 3D use python version 3.10.9 and you can write your scripts with the Blender 3D features. This script can also be found on the website where I write tutorials. This Python script for Blender 3D creates an ovoid model using the math formula for ovoid:
import bpy
import math

# Define the parameters of the ovoid
a = 1.9
b = 1.5
c = 1.5

# Define the number of vertices in each direction
n_long = 32
n_lat = 16

# Create a new mesh
mesh = bpy.data.meshes.new(name="Ovoid")

# Create the vertices
verts = []
for j in range(n_lat):
    lat = (j / (n_lat - 1)) * math.pi
    for i in range(n_long):
        lon = (i / (n_long - 1)) * 2 * math.pi
        x = a * math.sin(lat) * math.cos(lon)
        y = b * math.sin(lat) * math.sin(lon)
        z = c * math.cos(lat)
        verts.append((x, y, z))

# Create the faces
faces = []
for j in range(n_lat - 1):
    for i in range(n_long - 1):
        v1 = j * n_long + i
        v2 = j * n_long + i + 1
        v3 = (j + 1) * n_long + i + 1
        v4 = (j + 1) * n_long + i
        faces.append((v1, v2, v3, v4))

# Create the mesh and object
mesh.from_pydata(verts, [], faces)
obj = bpy.data.objects.new(name="Ovoid", object_data=mesh)

# Add the object to the scene
scene = bpy.context.scene
scene.collection.objects.link(obj)

Saturday, April 1, 2023

Python 3.11.0 : about execnet python package - part 001.

The execnet Python package allows you to use lightweight interprocess communication using remote Python interpreters. It provides a simple way to execute code in a remote Python interpreter, allowing for easy distribution of work across multiple machines or processes.
With this package, you can create gateways to remote Python interpreters and then execute Python code in that interpreter.
This package provides a simple interface for creating these gateways and for executing code on them, making it easy to distribute work and run code in parallel.
It can be particularly useful for running tests on multiple versions of Python or for distributing computational tasks across multiple machines.
Let's see the first example:
import execnet

def multiplier(channel, factor):
    while not channel.isclosed():
        param = channel.receive()
        channel.send(param * factor)

gw = execnet.makegateway()
channel = gw.remote_exec(multiplier, factor=10)
print(channel)
for i in range(5):
    channel.send(i)
    result = channel.receive()
    print(result)
    assert result == i * 10
gw.exit()
This is the result
<Channel id=1 open>
0
10
20
30
40
Let's see the next example:
import execnet

gw = execnet.makegateway() 
channel = gw.remote_exec("""
    def multiply(x, y):
        return x * y
    
    result = 0
    for i in range(10):
        result += multiply(i, 1)
        print("This is result for ",i," ",result)    
    channel.send(result)

""")

result = channel.receive()
print("This is channel receive result : ", result)
assert result == 45
This is result:
This is channel receive result :  45