The 1st of January 2020 will mark the sunset of Python 2.7.
It’s clear that Python 3 is more popular these days.
You can learn more about the popularity of both on Google Trends.
Python 3.0 was released in December 2008.
The main goal was to fix problems existing in Python 2.
Since the 1st January 2020, Python 2 will no longer receive any support whatsoever from the core Python team.
Migrating to Python 3 is recommended, including some of the top libraries, such as machine learning.
Showing posts with label 2019. Show all posts
Showing posts with label 2019. Show all posts
Tuesday, December 31, 2019
Saturday, December 28, 2019
Python 3.7.5 : Fix to python language the GitHub project.
I created a GitHub project with Django and I saw is detect like tcl programming language:
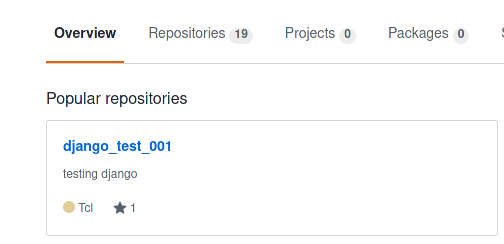
You need to create a file named .gitattributes in the root folder of my repository.
Use this source code to tell GitHub is a python project:
You need to create a file named .gitattributes in the root folder of my repository.
Use this source code to tell GitHub is a python project:
* linguist-vendored
*.py linguist-vendored=falseTuesday, December 24, 2019
Python 3.7.5 : Is Django the best web framework?
This is the question for today in order to lineup the Django features with any web framework from my point of view.
Let's start with a brief introduction to this framework:
Django was created in the fall of 2003, when the web programmers at the Lawrence Journal-World newspaper, Adrian Holovaty and Simon Willison, began using Python to build applications. Jacob Kaplan-Moss was hired early in Django’s development shortly before Simon Willison's internship ended.[16] It was released publicly under a BSD license in July 2005. The framework was named after guitarist Django Reinhardt.[17], see wikipedia.
The Python which is a high-level programming language interpreted with general-purpose and together with the Django web framework creates a solution in fulfilling the objectives of web programming.
The problem of most of those who do not know closely the programming of this framework remains unknown and can be difficult to understand only from examples and tutorials.
Here are some of the difficulties that I personally encountered and had to solve them step by step.
- understand how to use the link system between the python files created by Django;
- how to use the templates and how to update them with the Django specific syntax;
- understanding the way of displaying and resolving specific errors in Django;
- using and setting the settings.py file;
- understanding of how the web framework interacts with web technologies;
- the development is easier with good and lower development costs and so are the additions and upgrades;
- security is very good, see security documentation and deployment checklist;
- is an open-source framework and updated by developers who use it;
- most used and crowd tested and used to develop DropBox, Quora, Google, and Reddit;
- comes with extensive documentation;
- a large and community;
Monday, December 23, 2019
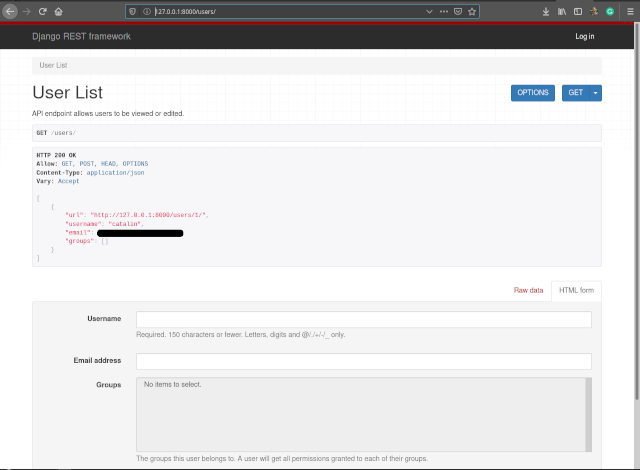
Python 3.7.5 : About Django REST framework.
First, let's activate my Python virtual environment:
The Django implements serializers for this.
Serializers provide deserialization, allowing parsed data to be converted back into complex types and allow complex data such as querysets and model instances to be converted to native Python datatypes that can then be easily rendered into JSON, XML or other content types.
Let's create the mysite/serializers.py:
My urls.py file from the Django-chart project is this:
[mythcat@desk django]$ source env/bin/activate(env) [mythcat@desk django]$ pip3 install --upgrade django --user
Collecting django
...
Successfully uninstalled Django-3.0
Successfully installed django-3.0.1(env) [mythcat@desk django]$ pip3 install djangorestframework --user
Collecting djangorestframework
...
Installing collected packages: djangorestframework
Successfully installed djangorestframework-3.11.0(env) [mythcat@desk django]$ cd mysite/
(env) [mythcat@desk mysite]$ python3 manage.py makemigrations
No changes detected
(env) [mythcat@desk mysite]$ python3 manage.py migrate
Operations to perform:
Apply all migrations: admin, auth, contenttypes, sessions, test001
Running migrations:
No migrations to apply.The Django implements serializers for this.
Serializers provide deserialization, allowing parsed data to be converted back into complex types and allow complex data such as querysets and model instances to be converted to native Python datatypes that can then be easily rendered into JSON, XML or other content types.
Let's create the mysite/serializers.py:
(env) [mythcat@desk mysite]$ cd mysite/
(env) [mythcat@desk mysite]$ vim serializers.py from django.contrib.auth.models import User, Group
from rest_framework import serializers
class UserSerializer(serializers.HyperlinkedModelSerializer):
class Meta:
model = User
fields = ['url', 'username', 'email', 'groups']
class GroupSerializer(serializers.HyperlinkedModelSerializer):
class Meta:
model = Group
fields = ['url', 'name']My urls.py file from the Django-chart project is this:
from django.contrib import admin
from django.urls import path
from test001.views import home_page
from test001.views import Test001ChartView
#
from django.urls import include, path
from rest_framework import routers
from test001 import views

router = routers.DefaultRouter()
router.register(r'users', views.UserViewSet)
router.register(r'groups', views.GroupViewSet)

app_name = 'test001'
urlpatterns = [
    path('admin/', admin.site.urls),
    #path('', home_page, name ='home'),
    path('', Test001ChartView.as_view(), name = 'home'),
    # Use automatic URL routing
    # Can also include login URLs for the browsable API
    path('', include(router.urls)),
    path('api-auth/', include('rest_framework.urls', namespace='rest_framework'))
]from django.http import HttpResponse
from django.shortcuts import render
# snippet
from django.shortcuts import get_object_or_404
# for chart
from django.views.generic import TemplateView
from .models import Test001, Snippet
#
#def home_page(request):
# return HttpResponse('Home page!')
# django framework
from django.contrib.auth.models import User, Group
from rest_framework import viewsets
from mysite.serializers import UserSerializer, GroupSerializer
def home_page(request):
return render(request, 'test001/home.html',{
'name':'CGF',
'html_items': ['a','b','c','d','e']
})
# define view for chart
class Test001ChartView(TemplateView):
template_name = 'test001/chart.html'
def get_context_data(self, **kwargs):
context = super().get_context_data(**kwargs)
context["qs"] = Test001.objects.all()
return context
def snippet_detail(request, id):
snippet = get_object_or_404(Snippet, id=id)
return render(request, 'test001/snippets_detail.html', {'snippet': snippet})
class UserViewSet(viewsets.ModelViewSet):
"""
API endpoint allows users to be viewed or edited.
"""
queryset = User.objects.all().order_by('-date_joined')
serializer_class = UserSerializer
class GroupViewSet(viewsets.ModelViewSet):
"""
API endpoint allows groups to be viewed or edited.
"""
queryset = Group.objects.all()
serializer_class = GroupSerializerINSTALLED_APPS = [
...
'rest_framework',
]python3 manage.py runserverSunday, December 22, 2019
Python 3.7.5 : The new PyQt5 released.
The PyQt v5.14.0 has been released with support for Qt v5.14.0.
[mythcat@desk ~]$ pip3 install --upgrade PyQt5 --user
Collecting PyQt5
...
Installing collected packages: PyQt5-sip, PyQt5
Successfully installed PyQt5-5.14.0 PyQt5-sip-12.7.0[mythcat@desk ~]$ python3
Python 3.7.5 (default, Dec 15 2019, 17:54:26)
[GCC 9.2.1 20190827 (Red Hat 9.2.1-1)] on linux
Type "help", "copyright", "credits" or "license" for more information.
>>> from PyQt5.Qt import PYQT_VERSION_STR
>>> print("PyQt version:", PYQT_VERSION_STR)
PyQt version: 5.14.0Saturday, December 21, 2019
Python 3.7.5 : Simple web search with google python package.
This is a simple search on the web with python google package.
From the python package, I need to import just the search and used it.
The python package need a variable string named query.
The search wants to know the words from query and arguments, see the help:
[mythcat@desk ~]$ pip3 install google --user
Collecting google
...
Installing collected packages: google
Successfully installed google-2.0.3From the python package, I need to import just the search and used it.
The python package need a variable string named query.
The search wants to know the words from query and arguments, see the help:
Help on function search in module googlesearch:

search(query, tld='com', lang='en', tbs='0', safe='off', num=10, start=0, stop=None,
domains=None, pause=2.0, tpe='', country='', extra_params=None, user_agent=None)
Search the given query string using Google.
:param str query: Query string. Must NOT be url-encoded.
:param str tld: Top level domain.
:param str lang: Language.
:param str tbs: Time limits (i.e "qdr:h" => last hour,
"qdr:d" => last 24 hours, "qdr:m" => last month).
:param str safe: Safe search.
:param int num: Number of results per page.
:param int start: First result to retrieve.
:param int stop: Last result to retrieve.
Use None to keep searching forever.
:param list domains: A list of web domains to constrain
the search.
:param float pause: Lapse to wait between HTTP requests.
A lapse too long will make the search slow, but a lapse too short may
cause Google to block your IP. Your mileage may vary!
:param str tpe: Search type (images, videos, news, shopping, books, apps)
Use the following values {videos: 'vid', images: 'isch',
news: 'nws', shopping: 'shop', books: 'bks', applications: 'app'}
:param str country: Country or region to focus the search on. Similar to
changing the TLD, but does not yield exactly the same results.
Only Google knows why...
:param dict extra_params: A dictionary of extra HTTP GET
parameters, which must be URL encoded. For example if you don't want
Google to filter similar results you can set the extra_params to
{'filter': '0'} which will append '&filter=0' to every query.
:param str user_agent: User agent for the HTTP requests.
Use None for the default.
:rtype: generator of str
:return: Generator (iterator) that yields found URLs.
If the stop parameter is None the iterator will loop forever.
[mythcat@desk ~]$ python3
Python 3.7.5 (default, Dec 15 2019, 17:54:26)
[GCC 9.2.1 20190827 (Red Hat 9.2.1-1)] on linux
Type "help", "copyright", "credits" or "license" for more information.
>>> from googlesearch import search
>>> query = "protv news 2019"
>>> my_results_list = []
>>> for url in search(query,
...     tld = 'com',
...     lang = 'en',
...     num = 10,
...     start = 0,
...     stop = None,
...     pause = 2.0,):
...     my_results_list.append(url)
...     print(url)
...
https://stirileprotv.ro/protvnews/
https://stirileprotv.ro/
https://stirileprotv.ro/superbun/protv-news.html
https://www.facebook.com/ProTvNews/
https://www.youtube.com/playlist?list=PLCJaU-QvLGR_FSZw6yeqBJHDe9LgFDRdy
https://www.youtube.com/watch?v=HaiQtDlaNic
https://www.youtube.com/watch?v=hxMEgAANSl4
https://www.youtube.com/channel/UCbbDChpDluLkdnH8QMwN6qA
https://www.youtube.com/watch?v=5zuN9uWFcTE
https://protvplus.ro/tv-live/1-pro-tv
https://en.wikipedia.org/wiki/Pro_TV
https://pro-tv.com/news/page/2/
https://m.youtube.cat/channel/UCbbDChpDluLkdnH8QMwN6qA
...Sunday, December 15, 2019
Python 3.7.5 : Simple intro in CSRF.
CSRF or Cross-Site Request Forgery is a technique used by cyber-criminals to force users into executing unwanted actions on a web application.
To protect against web form CSRF attacks, it's isn't sufficient for web applications to trust authenticated users, must be equipped with a unique identifier called a CSRF token similar to a session identifier.
Django 3.0 can be used with CSRF, see the documentation page.
The CSRF process is a simple one in Django framework.
However, it's highly recommended to use the CsrfViewMiddleware instead.
To activate the django.middleware.csrf.CsrfViewMiddleware in the settings.py file.
Basically, you can use the decorator method in the view.py file.
For example, see documentation:
This annotation CSRF tells Django I'm not handling CSRF properly and don't fail this.
If I don't use this annotation then the CSRF is on if the post request is on by default and I will receive a 403 error.
As the developer using templates you don't have to know anything about that and you can use this in your template HTML5 file.
You can used in any forms tag area like: input ...
Using my old example from GitHub.
First, I start the project:
The documentation tells us:
The CSRF protection cannot protect against man-in-the-middle attacks, so use HTTPS with HTTP Strict Transport Security. It also assumes validation of the HOST header and that there aren’t any cross-site scripting vulnerabilities on your site (because XSS vulnerabilities already let an attacker do anything a CSRF vulnerability allows and much worse).
To protect against web form CSRF attacks, it's isn't sufficient for web applications to trust authenticated users, must be equipped with a unique identifier called a CSRF token similar to a session identifier.
Django 3.0 can be used with CSRF, see the documentation page.
The CSRF process is a simple one in Django framework.
However, it's highly recommended to use the CsrfViewMiddleware instead.
To activate the django.middleware.csrf.CsrfViewMiddleware in the settings.py file.
Basically, you can use the decorator method in the view.py file.
For example, see documentation:
@csrf_protectThis annotation CSRF tells Django I'm not handling CSRF properly and don't fail this.
If I don't use this annotation then the CSRF is on if the post request is on by default and I will receive a 403 error.
As the developer using templates you don't have to know anything about that and you can use this in your template HTML5 file.
{% csrf_token %}from django.middleware.csrf import get_tokenYou can used in any forms tag area like: input ...
def my_csrf_form(request):
response = """ ... type = "hidden" name = "csrfmiddlewaretoken" value = "__token__" ... """token = get_token(request)
response = response.replace('__token__', html.escape(token))
response += dumpdata('POST', request.POST)
return HttpResponse(response)Using my old example from GitHub.
First, I start the project:
[mythcat@desk projects]$ source django/env/bin/activate
(env) [mythcat@desk projects]$ ls
cache  django  kaggle  logs  OSMnx  pygal_ex  SantaClaus.py
(env) [mythcat@desk projects]$ cd django/
(env) [mythcat@desk django]$ ls
env  mysite  venv
(env) [mythcat@desk django]$ cd mysite/... {% csrf_token %} ... var csrftoken = jQuery("[name=csrfmiddlewaretoken]").val();...
# use csrf_protect
from django.views.decorators.csrf import csrf_protect
from django.utils.decorators import method_decorator
...
# define view for chart
class Test001ChartView(TemplateView):
csrf_protected_method = method_decorator(csrf_protect)The documentation tells us:
The CSRF protection cannot protect against man-in-the-middle attacks, so use HTTPS with HTTP Strict Transport Security. It also assumes validation of the HOST header and that there aren’t any cross-site scripting vulnerabilities on your site (because XSS vulnerabilities already let an attacker do anything a CSRF vulnerability allows and much worse).
Saturday, December 14, 2019
Python 3.7.5 : Django admin shell by Grzegorz Tężycki.
Today I tested another python package for Django named django-admin-shell.
This package created by Grzegorz Tężycki can be found on GitHub and come with the intro:
Django application can execute python code in your project’s environment on django admin site. You can use similar as python manage shell without reloading the environment.
This screenshot shows me is working well:

This package created by Grzegorz Tężycki can be found on GitHub and come with the intro:
Django application can execute python code in your project’s environment on django admin site. You can use similar as python manage shell without reloading the environment.
[mythcat@desk ~]$ cd projects/
[mythcat@desk projects]$ cd django/
...
[mythcat@desk projects]$ source django/env/bin/activate
(env) [mythcat@desk projects]$
(env) [mythcat@desk projects]$ pip3 install django-admin-shell --user
Collecting django-admin-shell
...
Installing collected packages: django-admin-shell
Successfully installed django-admin-shell-0.1 (env) [mythcat@desk projects]$ cd django/
(env) [mythcat@desk django]$ ls
env mysite venv
(env) [mythcat@desk django]$ cd mysite/
(env) [mythcat@desk mysite]$ ls
db.sqlite3 manage.py mysite test001
(env) [mythcat@desk mysite]$ python3 manage.py runserver
Watching for file changes with StatReloader
Performing system checks...
System check identified no issues (0 silenced).
December 14, 2019 - 18:23:47
Django version 3.0, using settings 'mysite.settings'
Starting development server at http://127.0.0.1:8000/
Quit the server with CONTROL-C. INSTALLED_APPS = [
...
'django_admin_shell',
...
]...
from django.conf.urls import include, url
...
urlpatterns = [
...
# admin shell
url(r'^admin/shell/', include('django_admin_shell.urls')),
]This screenshot shows me is working well:
Wednesday, December 11, 2019
Python 3.7.5 : The Pygal python package.
Today's tutorial aims to get data from a URL and display it with the Pygal python package.
I believe that global warming is a very important topic for human evolution.
You can read more about this topic on this website.
About this python package you can learn more at the official website.

I believe that global warming is a very important topic for human evolution.
You can read more about this topic on this website.
About this python package you can learn more at the official website.
[mythcat@desk ~]$ pip3 install Pygal --user
Collecting Pygal
...
Installing collected packages: Pygal
Successfully installed Pygal-2.4.0import pygal
import pandas as pd
import numpy as np
URL = 'https://data.giss.nasa.gov/gistemp/graphs/graph_data/
Global_Mean_Estimates_based_on_Land_and_Ocean_Data/graph.txt'
df = pd.read_fwf(
URL,
skiprows=(0,1,2,4),
index_col=0,
)
print(df.head)
year_data = df['No_Smoothing']
print(year_data.head)
one_chart = pygal.Bar()
one_chart.title = "Land-Ocean Temperature Index (C)"
one_chart.add("",year_data)
one_chart.render_in_browser()Monday, December 9, 2019
Python 3.7.5 : The OSMnx python package.
About this python package named OSMnx, you can read on GitHub.
OSMnx is a Python package that lets you download spatial geometries and model, project, visualize, and analyze street networks from OpenStreetMap's APIs. Users can download and model walkable, drivable, or bikable urban networks with a single line of Python code, and then easily analyze and visualize them ...
You cannot install osmnx directly in Fedora 31 Linux distro because of the dependency with python packages.
You can select a polygon area and show the map.
This is the result of source code from this tutorial:

OSMnx is a Python package that lets you download spatial geometries and model, project, visualize, and analyze street networks from OpenStreetMap's APIs. Users can download and model walkable, drivable, or bikable urban networks with a single line of Python code, and then easily analyze and visualize them ...
You cannot install osmnx directly in Fedora 31 Linux distro because of the dependency with python packages.
[mythcat@desk projects]$ pip3 install osmnx --user[root@desk projects]# dnf install python3-rtree.noarch
...
Installed:
python3-rtree-0.9.1-1.fc31.noarch spatialindex-1.9.3-1.fc31.x86_64
Complete![mythcat@desk projects]$ pip3 install osmnx --user
Collecting osmnx
...
Installing collected packages: pyparsing, kiwisolver, cycler, matplotlib, descartes, networkx, Shapely, pyproj, click, click-plugins, cligj, attrs, munch, fiona, geopandas, osmnx
Successfully installed Shapely-1.6.4.post2 attrs-19.3.0 click-7.0 click-plugins-1.1.1 cligj-0.5.0 cycler-0.10.0 descartes-1.1.0 fiona-1.8.13 geopandas-0.6.2 kiwisolver-1.1.0 matplotlib-3.1.2 munch-2.5.0 networkx-2.4 osmnx-0.11 pyparsing-2.4.5 pyproj-2.4.2.post1[mythcat@desk projects]$ python3
Python 3.7.5 (default, Oct 17 2019, 12:16:48)
[GCC 9.2.1 20190827 (Red Hat 9.2.1-1)] on linux
Type "help", "copyright", "credits" or "license" for more information.
>>> import osmnx as ox
>>> ox.config(log_file=True, log_console=True, use_cache=True)
Configured osmnx
>>> my_loc = ox.graph_from_address('Fălticeni, Suceava, 725200, Romania', network_type= 'all', retain_all =True)
Geocoded "Fa?lticeni, Suceava, 725200, Romania" to (47.4597637, 26.30255)
Projected the GeoDataFrame "geometry to project" to UTM-35 in 0.01 seconds
Projected the GeoDataFrame "geometry to project" to default_crs in 0.01 seconds
Created bounding box 1000 meters in each direction from (47.4597637, 26.30255): 47.46876106367192,47.45076632191398,26.31581675508982,26.289283302659218
Projected the GeoDataFrame "geometry to project" to UTM-35 in 0.01 seconds
Projected the GeoDataFrame "geometry to project" to default_crs in 0.01 seconds
Projected the GeoDataFrame "geometry to project" to UTM-35 in 0.01 seconds
Projected the GeoDataFrame "geometry to project" to default_crs in 0.01 seconds
Requesting network data within bounding box from API in 1 request(s)
Retrieved response from cache file "cache/eb15fb167cf173e622992dbc2b7b7c77.json" for URL "http://overpass-api.de/api/interpreter?data=%5Bout%3Ajson%5D%5Btimeout%3A180%5D%3B%28way%5B%22highway%22%5D%5B%22area%22%21~%22yes%22%5D%5B%22highway%22%21~%22proposed%7Cconstruction%7Cabandoned%7Cplatform%7Craceway%22%5D%5B%22service%22%21~%22private%22%5D%5B%22access%22%21~%22private%22%5D%2847.446267%2C26.282649%2C47.473260%2C26.322452%29%3B%3E%3B%29%3Bout%3B"
Got all network data within bounding box from API in 1 request(s) and 0.01 seconds
Creating networkx graph from downloaded OSM data...
Created graph with 2,003 nodes and 3,930 edges in 0.08 seconds
Added edge lengths to graph in 0.06 seconds
Truncated graph by bounding box in 0.05 seconds
Begin topologically simplifying the graph...
Identified 339 edge endpoints in 0.03 seconds
Constructed all paths to simplify in 0.01 seconds
Simplified graph (from 2,003 to 339 nodes and from 3,930 to 803 edges) in 0.22 seconds
Truncated graph by bounding box in 0.01 seconds
Got the counts of undirected street segments incident to each node (before removing peripheral edges) in 0.07 seconds
graph_from_bbox() returning graph with 235 nodes and 556 edges
graph_from_point() returning graph with 235 nodes and 556 edges
graph_from_address() returning graph with 235 nodes and 556 edges
>>> my_proj = ox.project_graph(my_loc)
Created a GeoDataFrame from graph in 0.05 seconds
Projected the GeoDataFrame "unnamed_nodes" to UTM-35 in 0.03 seconds
Projected the GeoDataFrame "unnamed_edges" to UTM-35 in 0.10 seconds
Extracted projected node geometries from GeoDataFrame in 0.01 seconds
Rebuilt projected graph in 0.94 seconds
>>> fig, ax = ox.plot_graph(my_proj)
Begin plotting the graph...
Created GeoDataFrame "unnamed_UTM_edges" from graph in 0.07 seconds
Drew the graph edges in 0.04 secondsYou can select a polygon area and show the map.
This is the result of source code from this tutorial:
Sunday, December 8, 2019
Python 3.7.5 : Starting with kaggle platform.
Kaggle is the world's largest community of data scientists and the platform is the fastest way to get started on a new data science project.
A good choice to use Kaggle is this feature: Kaggle provides free access to NVidia K80 GPUs in kernels.
The tutorial for today is about kaggle and is new for me because I hear about this opportunity last year.
This platform that hosts data science and machine learning competitions can give the people a good area for development.
The official blog can tell you more about how can this platform works.
The kaggle A.P.I. can be found at GitHub.
Let's start the tutorial with the pip3 install tool:
The process of using models need the datasets and you can use the kaggle datasets.
You can use the New Notebook button from that page to start using the datasets.
The datasets can be load from kaggle or can be uploaded.
The next window let you to Select new notebook settings.
I used Python with a notebook and I got the default source code:
(read-only data) and output from kaggle with pandas module:
You can see my online test I created with dataset Lego and python on my kaggle page.
A good choice to use Kaggle is this feature: Kaggle provides free access to NVidia K80 GPUs in kernels.
The tutorial for today is about kaggle and is new for me because I hear about this opportunity last year.
This platform that hosts data science and machine learning competitions can give the people a good area for development.
The official blog can tell you more about how can this platform works.
The kaggle A.P.I. can be found at GitHub.
Let's start the tutorial with the pip3 install tool:
[mythcat@desk kaggle]$ pip3 install kaggle --upgrade --user
Collecting kaggle
...
[mythcat@desk kaggle]$ mkdir ~/.kaggle/
[mythcat@desk kaggle]$ mv kaggle.json ~/.kaggle/kaggle.json
[mythcat@desk kaggle]$ kaggle
Warning: Your Kaggle API key is readable by other users on this system! To fix this, you can
run 'chmod 600 /home/mythcat/.kaggle/kaggle.json'
usage: kaggle [-h] [-v] {competitions,c,datasets,d,kernels,k,config} ...
kaggle: error: the following arguments are required: command
[mythcat@desk kaggle]$ chmod 600 /home/mythcat/.kaggle/kaggle.json[mythcat@desk kaggle]$ kaggle competitions list
ref deadline category reward teamCount
userHasEntered
--------------------------------------------- ------------------- --------------- --------- ---------
--------------
digit-recognizer 2030-01-01 00:00:00 Getting Started Knowledge 2305
False
titanic 2030-01-01 00:00:00 Getting Started Knowledge 17135
False
house-prices-advanced-regression-techniques 2030-01-01 00:00:00 Getting Started Knowledge 5532
False
imagenet-object-localization-challenge 2029-12-31 07:00:00 Research Knowledge 57
False
google-quest-challenge 2020-02-10 23:59:00 Featured $25,000 410
False
tensorflow2-question-answering 2020-01-22 23:59:00 Featured $50,000 810
False
data-science-bowl-2019 2020-01-22 23:59:00 Featured $160,000 1762
False
pku-autonomous-driving
...kaggle competitions {list, files, download, submit, submissions, leaderboard}
kaggle datasets {list, files, download, create, version, init}
kaggle kernels {list, init, push, pull, output, status}
kaggle config {view, set, unset}The process of using models need the datasets and you can use the kaggle datasets.
You can use the New Notebook button from that page to start using the datasets.
The datasets can be load from kaggle or can be uploaded.
The next window let you to Select new notebook settings.
I used Python with a notebook and I got the default source code:
# This Python 3 environment comes with many helpful analytics libraries installed
# It is defined by the kaggle/python docker image: https://github.com/kaggle/docker-python
# For example, here's several helpful packages to load in

import numpy as np # linear algebra
import pandas as pd # data processing, CSV file I/O (e.g. pd.read_csv)

# Input data files are available in the "../input/" directory.
# For example, running this (by clicking run or pressing Shift+Enter) will list all files under the input
directory
import os
for dirname, _, filenames in os.walk('/kaggle/input'):
for filename in filenames:
print(os.path.join(dirname, filename))
# Any results you write to the current directory are saved as output.(read-only data) and output from kaggle with pandas module:
data = pd.read_csv("../input/lego-database/colors.csv")
data.head()You can see my online test I created with dataset Lego and python on my kaggle page.
Saturday, December 7, 2019
Python 3.7.5 : Using the django with javascript.
The Django framework can work great with javascript.
I start this project a few days ago.
You can start a simple Django project, see my old tutorials.
I used a template for main page in my template folder named chart.html.
The chart.min.js is set on base.html.
The links work from the Django framework to HTML5 templates with javascript.
The full project can be found on my GitHub project.
See the screen output:
Thursday, December 5, 2019
Python 3.7.5 : About PEP 8.
Today is December 5, 2019, and this is the reason I wrote about PEP 8.
The official webpage can be found at this webpage.
PEP 8 recommends using 4 spaces to show indentation and tabs should only be used to maintain consistency in the code.
The Python Library is conservative and 79 characters are the maximum required line limit as suggested by PEP 8.
The main goal is to avoid line wrapping.
Indentation allows you to differentiate between multiple lines of code and a single line of code that spans multiple lines.
The closing braces with the first white-space character of the last line.
The use of blank lines can greatly improve the readability of your code.
This rule allows the reader to understand the separation of the sections of code and the relation between them.
About comments, PEP 8 basically recommends using block comments for general-purpose coding.
Document strings or docstrings start at the first line of any function, class, file, module or method.
These type of comments are enclosed between single quotations ( ''') or double quotations ( """ ).
To improving the readability of expressions and statements use whitespace for any character or sequence of characters.
We need to avoiding whitespaces:
You can check whether your code actually complies with the rules and regulations of PEP 8 or not.
The linters is a program that analyzes your code and detects program errors, syntax errors, bugs, and structural problems.
An autoformatted tool will format your code to adapt to PEP 8 automatically.
Both tools used to implement and check PEP 8 compliance.
To know more about PEP 8 and its book of guidelines, you can refer to pep8.org.
You can check it online at this webpage.
The official webpage can be found at this webpage.
PEP 8 recommends using 4 spaces to show indentation and tabs should only be used to maintain consistency in the code.
The Python Library is conservative and 79 characters are the maximum required line limit as suggested by PEP 8.
The main goal is to avoid line wrapping.
Indentation allows you to differentiate between multiple lines of code and a single line of code that spans multiple lines.
The closing braces with the first white-space character of the last line.
The use of blank lines can greatly improve the readability of your code.
This rule allows the reader to understand the separation of the sections of code and the relation between them.
| Type | Naming Conventions | Examples |
|---|---|---|
| Variable | Using short names with CapWords. | T, AnyString, My_First_Variable |
| Function | Using a lowercase word or words with underscores to improve readability. | function, my_first_function |
| Class | Using CapWords and do not use underscores between words. | Student, MyFirstClass |
| Method | Using lowercase words separated by underscores. | Student_method, method |
| Constants | Using all capital letters with underscores separating words | TOTAL, MY_CONSTANT, MAX_FLOW |
| Exceptions | Using CapWords without underscores. | IndexError, NameError |
| Module | Using short lower-case letters using underscores. | module.py, my_first_module.py |
| Package | Using short lowercase words and underscores are discouraged. | package, my_first_package |
Document strings or docstrings start at the first line of any function, class, file, module or method.
These type of comments are enclosed between single quotations ( ''') or double quotations ( """ ).
To improving the readability of expressions and statements use whitespace for any character or sequence of characters.
We need to avoiding whitespaces:
- inside parentheses, brackets, or braces;
- before a comma, a semicolon, or a colon;
- before open parenthesis that initiates the argument list of a function call;
- before an open bracket that begins an index or a slice;
- between a trailing comma and a closing parenthesis;
- to adjust assignment operators;
You can check whether your code actually complies with the rules and regulations of PEP 8 or not.
The linters is a program that analyzes your code and detects program errors, syntax errors, bugs, and structural problems.
An autoformatted tool will format your code to adapt to PEP 8 automatically.
Both tools used to implement and check PEP 8 compliance.
To know more about PEP 8 and its book of guidelines, you can refer to pep8.org.
You can check it online at this webpage.
Tuesday, December 3, 2019
Python 3.7.5 : The new Django version 3.0 .
On December 2, 2019, comes with Django 3.0 Released.
This new release comes with many changes and features, let's see :
This new release comes with many changes and features, let's see :
- Django 3.0 supports new versions of Python 3.6, 3.7, and 3.8 (the old Django 2.2.x series is the last to support Python 3.5);
- Django now officially supports MariaDB 10.1 and higher;
- Django is fully async-capable by providing support for running as an ASGI application;
- The exclusion class constraints on PostgreSQL;
- the output BooleanField may now be used directly in QuerySet filters;
- you can have custom enumeration types
- cache features: add_never_cache_headers() and never_cache() now add the private directive to Cache-Control headers;
- file storage, forms, internationalization, and logging features;
- the management commands are new options;
- the Requests and Responses, Models and Security has many changes and new features;
- the Tests and test cases have a good implementation;
- new minor features for django.contrib.admin, django.contrib.auth, django.contrib.gis, django.contrib.postgres, django.contrib.sessions, django.contrib.syndication and more
Friday, November 29, 2019
Python 3.7.5 : Script install and import python packages.
This script will try to import Python packages from a list.
If these packages are not installed then they will be installed on the system.
If these packages are not installed then they will be installed on the system.
import sys
import subprocess

if __name__ == '__main__':
    def ModuleInstall(package_name):
        try:
            subprocess.check_call(['python3', '-m', 'pip3', 'install', package_name, "--user"])
        except:
            subprocess.check_call(['python', '-m', 'pip', 'install', package_name, "--user"])
    def ModuleLoaded(package_name):
        __import__(package_name)
        print ("Successfully imported ", package_name, '.')

    required_libs = [
    "optparse",
    "socket",
    "select",
    "threading",
    "time",
    "re",
    "ssl",
    "textwrap",
    "sys",
    "random",
    "traceback",
    "binascii",
    "struct",
    "inspect"]
    for lib_name in required_libs:
        try:
            ModuleLoaded(lib_name)
        except:
ModuleInstall(lib_name)Monday, November 25, 2019
Python 3.7.5 : Python and SQL, a fast approach.
Today he had to solve a task that required declaring a series of consecutive days to read from several SQL tables.
As you know, this task would require a complex query to include statements.
I solved it quite simply by using a python script that would automatically generate the days and then concatenate them into a query.
It may not be the best solution but it is very fast and does not require very advanced SQL knowledge.
Let's see the source code:
from datetime import date, timedelta

start_date = date(2019, 01, 1)
end_date = date(2019, 11, 24)
delta = timedelta(days=1)
q1 = str("SELECT DATE_FORMAT(updated, '%Y-%m-%d') AS day, intern, COUNT(*) FROM `intern")
q2 = str("` WHERE intern = 0 GROUP BY intern, day UNION ALL ")
while start_date <= end_date:
    print (q1+start_date.strftime("%Y_%m_%d")+q2)
start_date += deltaSELECT DATE_FORMAT(updated, "%Y-%m-%d") AS day, intern, COUNT(*) FROM `intern2019_01_01` GROUP BY intern,
day UNION ALL
SELECT DATE_FORMAT(updated, "%Y-%m-%d") AS day, intern, COUNT(*) FROM `intern2019_01_02` GROUP BY intern,
day UNION ALL
...
SELECT DATE_FORMAT(updated, "%Y-%m-%d") AS day, intern, COUNT(*) FROM `intern2019_11_24` GROUP BY intern,
day UNION ALLSaturday, November 23, 2019
Python 3.7.5 : Create GUI with npyscreen.
This python module solves the issue of creating easy GUI in the terminal.
The development team tells us:
Npyscreen is a python widget library and application framework for programming terminal or console applications.
The development of this python module is similar to the PyQt python module.
The npyscreen comes with many widgets and easy development.
The GitHub repo for this python module comes with many examples.
The documentation of this python module can be found at this
[mythcat@desk ~]$ pip3 install npyscreen --user
Collecting npyscreen
...
Installing collected packages: npyscreen
Successfully installed npyscreen-4.10.5#!/usr/bin/env python3
import npyscreen
class ProductForm(npyscreen.Form):
def create(self):
self.product_name = self.add(npyscreen.TitleText, name='Name')
self.category = self.add(npyscreen.TitleSelectOne, scroll_exit=True,\
max_height=3, name='Category', values = ['Products 1', 'Products 2', 'Products 3'])
self.myDate = self.add(npyscreen.TitleDateCombo, name='Date stocking')
class MyTest(npyscreen.NPSAppManaged):
def onStart(self):
self.addForm('MAIN', ProductForm, name='New product')
if __name__ == '__main__':
TestApp = MyTest().run() Tuesday, November 19, 2019
Python 3.7.5 : Display a file in the hexadecimal and binary output.
This is an example with a few python3 modules that display a file in the hexadecimal and binary output:
import sys
import os.path
import argparse

parser = argparse.ArgumentParser()
parser.add_argument("FILE", help="the file that you wish to dump to hexadecimal", type=str)
parser.add_argument("-b", "--binary", help="display bytes in binary format instead of hexadecimal")
args = parser.parse_args()

try:
    with open(args.FILE, "rb") as f:
        n = 0
        b = f.read(16)
        while b:
            if not args.binary:
                s1 = " ".join([format(i,'02x') for i in b])
                s1 = s1[0:23] + " " + s1[23:]
                width = 48
            else:
                s1 = " ".join([format(i,'08b') for i in b])
                s1 = s1[0:71] + " " + s1[71:]
                width = 144
            s2 = "".join([chr(i) if 32 <= i <= 127 else "." for i in b])
            print(format(n * 16,'08x'), format(s1), format(s2))
            n += 1
            b = f.read(16)

    print(format(os.path.getsize(args.FILE),'08x'))

except Exception as e:
print(__file__, ": ", type(e).__name__, " - ", e, sep="", file=sys.stderr)[mythcat@desk test]$ python3 hex.py sec.png
00000000 89 50 4e 47 0d 0a 1a 0a 00 00 00 0d 49 48 44 52 .PNG........IHDR
00000010 00 00 01 0b 00 00 00 bd 08 03 00 00 00 93 6f a8 ..............o.
00000020 bc 00 00 00 5d 50 4c 54 45 ff ff ff ab ab ab fc ....]PLTE.......
00000030 fc fc a0 a0 a0 f5 f5 f5 a6 a6 a6 f9 f9 f9 9e 9e ................
00000040 9e f1 f1 f1 fa fa fa ea ea ea ad ad ad a4 a4 a4 ................
00000050 d0 d0 d0 f6 f6 f6 e5 e5 e5 bc bc bc c3 c3 c3 97 ................
00000060 97 97 b4 b4 b4 d8 d8 d8 bf bf bf cb cb cb db db ................
00000070 db e1 e1 e1 93 93 93 7f 7f 7f 8d 8d 8d 85 85 85 .............
00000080 79 79 79 70 70 70 d9 a6 b1 29 00 00 08 fa 49 44 yyyppp...)....ID
00000090 41 54 78 9c e5 9d 89 92 a3 2a 14 40 45 45 09 a8 ATx......*.@EE..
000000a0 80 18 34 d3 3d ef ff 3f f3 69 92 4e 67 71 45 90 ..4.=..?.i.NgqE.
000000b0 65 4e 55 4f a5 7b 52 c6 20 dc 9d 4b 14 f9 46 f7 eNUO.{R. ..K..F.
000000c0 87 36 79 8d 6d df 86 75 28 03 e4 4f c4 cb 28 ca .6y.m..u(..O..(.
000000d0 63 db f7 62 97 36 91 8f e9 80 72 ce 6c de 8b 65 c..b.6....r.l..e
000000e0 c8 f9 f9 b7 14 53 68 eb 4e ac 73 a1 ef 7f 91 d2 .....Sh.N.s....
000000f0 c6 7d 6c 04 71 91 e9 be 66 f2 31 14 51 04 dd 97 .}l.q...f.1.Q...
00000100 a0 9c d0 8e e8 be 66 33 f6 d7 5a f3 a7 68 a7 e4 ......f3..Z..h..
00000110 91 f6 f9 8b c1 e8 9f 45 aa f5 53 34 93 45 71 7e .......E..S4.Eq~
00000120 7d 21 4a 9d 97 9d 98 00 ba 67 9f 4e b2 3a 61 a2 }!J......g.N.:a.
00000130 bb bd 96 10 f5 ff e2 b2 c3 d5 ee eb b6 13 b3 4c ...............L
00000140 a0 dd 97 36 06 96 51 c7 7f 7e 41 02 00 c8 da 86 ...6..Q.~A.....
00000150 13 00 bb 7d d7 9d 94 0b f9 88 44 75 03 fc f5 f6 ...}......Du....
00000160 9c d2 d3 fd 45 d2 ff 34 cf 0f 17 89 75 aa 26 46 ....E..4....u.&F
00000170 b4 2d b9 98 fc 7f a0 75 29 ea 43 4e df b2 68 a2 .-....u).CN..h.
...[mythcat@desk test]$ python3 hex.py -b FILE sec.png
00000000 10001001 01010000 01001110 01000111 00001101 00001010 00011010 00001010
00000000 00000000 00000000 00001101 01001001 01001000 01000100 01010010 .PNG........IHDR
00000010 00000000 00000000 00000001 00001011 00000000 00000000 00000000 10111101
00001000 00000011 00000000 00000000 00000000 10010011 01101111 10101000 ..............o.
00000020 10111100 00000000 00000000 00000000 01011101 01010000 01001100 01010100
01000101 11111111 11111111 11111111 10101011 10101011 10101011 11111100 ....]PLTE.......
00000030 11111100 11111100 10100000 10100000 10100000 11110101 11110101 11110101
10100110 10100110 10100110 11111001 11111001 11111001 10011110 10011110 ................
00000040 10011110 11110001 11110001 11110001 11111010 11111010 11111010 11101010
11101010 11101010 10101101 10101101 10101101 10100100 10100100 10100100 ................
00000050 11010000 11010000 11010000 11110110 11110110 11110110 11100101 11100101
11100101 10111100 10111100 10111100 11000011 11000011 11000011 10010111 ................
00000060 10010111 10010111 10110100 10110100 10110100 11011000 11011000 11011000
10111111 10111111 10111111 11001011 11001011 11001011 11011011 11011011 ................
00000070 11011011 11100001 11100001 11100001 10010011 10010011 10010011 01111111
01111111 01111111 10001101 10001101 10001101 10000101 10000101 10000101 .............
00000080 01111001 01111001 01111001 01110000 01110000 01110000 11011001 10100110
10110001 00101001 00000000 00000000 00001000 11111010 01001001 01000100 yyyppp...)....ID
00000090 01000001 01010100 01111000 10011100 11100101 10011101 10001001 10010010
10100011 00101010 00010100 01000000 01000101 01000101 00001001 10101000 ATx......*.@EE..
...Friday, November 15, 2019
Python 3.7.5 : About PEP 8016.
Let's start with PEP 8012 which proposes a new model of Python governance based on consensus and voting, without the role of a centralized singular leader or a governing council and was rejected.
The PEP 8015 formalize the current organization of the Python community and proposes changes.
This PEP 8015 was rejected by a core developer vote described in PEP 8001 on Monday, December 17, 2018.
The next PEP 8016 proposes a model of Python governance based around a steering council.
All candidate PEPs are listed in PEP 8000 and consists of all PEPs numbered in the 801X range.
The PEP 8001 refers to the voting process and choose which governance PEP should be implemented by the Python project.
All these PEP's 2012, 2013, 2014, 2015 are rejected.
The last one PEP 2016 named The Steering Council Model was accepted.
The PEP 2016 comes with these new rules:
This PEP proposes a model of Python governance based around a steering council. The council has broad authority, which they seek to exercise as rarely as possible; instead, they use this power to establish standard processes, like those proposed in the other 801x-series PEPs. This follows the general philosophy that it's better to split up large changes into a series of small changes that can be reviewed independently: instead of trying to do everything in one PEP, we focus on providing a minimal-but-solid foundation for further governance decisions.
You can read more about this PEP on this webpage.
Tuesday, November 5, 2019
Python 3.7.5 : About PEP 3107.
The PEP 3107 introduces a syntax for adding arbitrary metadata annotations to Python functions.
The function annotations refer to syntax parameters with an expression.
This lets you rewrite Python 3 code with function annotations to be compatible with both Python 3 and Python 2.
Type hints are a specialization of function annotations, and they can also work side by side with other function annotations.
Annotations have no standard meaning or semantics.
There are several benefits to the annotations:
See example with my_func:
The function annotations refer to syntax parameters with an expression.
def my_function(x: expression, y: expression = 5):
...>>> def show(myvar:np.float64):
... print(type(myvar))
... print(myvar)
...
>>> show(1.1)
1.1
>>> def files(filename: str, dot='.') -> list:
... print(filename)
... print(type(filename))
...
>>> files('file.txt')
file.txt
>>> print(files.__annotations__)
{'filename': , 'return': }
>>> print(show.__annotations__)
{'myvar': }
... This lets you rewrite Python 3 code with function annotations to be compatible with both Python 3 and Python 2.
Type hints are a specialization of function annotations, and they can also work side by side with other function annotations.
Annotations have no standard meaning or semantics.
There are several benefits to the annotations:
- if you rename an argument, the documentation docstring version may be out of date and is easier to see if an argument is not documented;
- is no need to come up with a special format of argument because the annotations attribute provides a direct, standard mechanism of access;
>>> Temperature = float
>>> def forecast(local_temperature: Temperature) -> str:
...     print(local_temperature)
...
>>> forecast(13.1)
13.1
...
>>> def div(a: dict(type=float, help='the dividend'), b: dict(type=float, help='this <> 0)') ) ->
dict(type=float, help='the result of dividing a by b'):
...     return a / b
...
>>> div(3,4)
0.75
...See example with my_func:
def my_func(*args: expression, *kwargs: expression):
...
Subscribe to:
Comments (Atom)