analitics

Pages

Showing posts with label "tips and tricks". Show all posts

Wednesday, March 6, 2024

Python Qt6 : Test application with unittest and QtTest.

In this simple example, I add a test class with unittest to sleep the application and QtTest to wait for the window to open after pressing the button.
To run the unittest you need to uncomment this row of source code:
#unittest.main()
Let's see the source code:
import sys

from PyQt6.QtWidgets import QApplication, QDialog, QMainWindow, QPushButton
from PyQt6 import QtCore, QtGui, QtWidgets
from PyQt6 import QtTest 

# Unitest area
import unittest
from time import sleep
def sleep_sec(sec):
    sleep(10*sec)
#
#define class for unittest
class Test(unittest.TestCase):
    def test_square(self):
        sleep_sec(5)

class Ui_Dialog(object):
    def setupUi(self, Dialog):
        Dialog.setObjectName("Dialog")
        Dialog.resize(640, 480)
        self.verticalLayout = QtWidgets.QVBoxLayout(Dialog)

    def retranslateUi(self, Dialog):
        _translate = QtCore.QCoreApplication.translate

class Window(QMainWindow):
    """Main window."""
    def __init__(self, parent=None):
        """Initializer."""
        super().__init__(parent)
        # Use a QPushButton for the central widget
        self.centralWidget = QPushButton("Test_Button")

        # Connect the .clicked() signal with the .onTest_BtnClicked() slot
        self.centralWidget.clicked.connect(self.onTest_BtnClicked)
        self.setCentralWidget(self.centralWidget)

    # Create a slot for launching the Test_ dialog
    def onTest_BtnClicked(self):
        """Launch the Test_ dialog."""
        dlg = Test_Dlg(self)
        # This will test with QtTest just for click 
        QtTest.QTest.qWait(2500)

        dlg.exec()

class Test_Dlg(QDialog):
    """Test dialog."""
    def __init__(self, parent=None):
        super().__init__(parent)
        # Create an instance of the GUI
        self.ui = Ui_Dialog()
        # Run the .setupUi() method to show the GUI
        self.ui.setupUi(self)

if __name__ == "__main__":
    # this test all run of application and show :
    # Ran 1 test in 50.001s
    # uncoment this
    #unittest.main()
    
    # Create the application
    app = QApplication(sys.argv)
    # Create and show the application's main window
    win = Window()
    win.show()
    # Run the application's main loop
    sys.exit(app.exec())
Monday, April 17, 2023

Python Qt6 : use sqlite - part 002.

In this article tutorial I will show you how to read from the sqlite file the content of the table: files.
In the last article tutorial, I create a interface with PyQt6 that search files by regular expresion and result is add to sqlite file named: file_paths.db.
I used same steps with a default python class and I used QSqlTableModel to show the content received.
The script will create a window with this QSqlTableModel, then reads the file and add the result.
Let's see the source code:
import sys
from PyQt6.QtWidgets import QApplication, QMainWindow, QTableView
from PyQt6.QtSql import QSqlDatabase, QSqlQuery, QSqlTableModel

class MainWindow(QMainWindow):
    def __init__(self):
        super().__init__()

        # Initialize the database
        self.init_db()

        # Set up the GUI
        self.table_view = QTableView(self)
        self.setCentralWidget(self.table_view)

        # Set up the model and connect it to the database
        self.model = QSqlTableModel(self)
        self.model.setTable('files')
        self.model.select()
        self.table_view.setModel(self.model)

    def init_db(self):
        # Connect to the database
        db = QSqlDatabase.addDatabase('QSQLITE')
        db.setDatabaseName('file_paths.db')
        if not db.open():
            print('Could not open database')
            sys.exit(1)

    def create_table(self):
        # Create the 'files' table if it doesn't exist
        query = QSqlQuery()
        query.exec('CREATE TABLE IF NOT EXISTS files (id INTEGER PRIMARY KEY, path TEXT)')

if __name__ == '__main__':
    app = QApplication(sys.argv)
    window = MainWindow()
    window.show()
    sys.exit(app.exec())
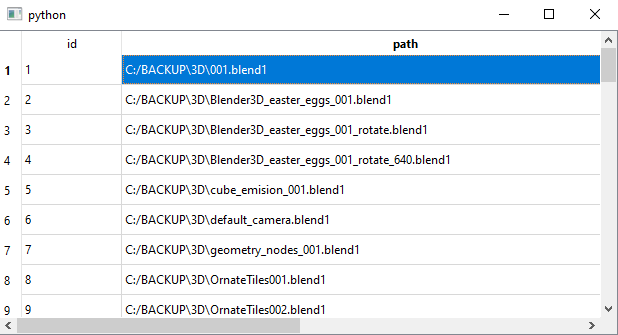
I add this source code into a python script named view.py and I run it.
This is the result of the running script:

Python Qt6 : use sqlite - part 001.

This will default update for any python project:
python.exe -m pip install --upgrade pip --user
...
Successfully installed pip-23.1
The sqlite3 is already on my python instalation because I use version 3.11.0, you can see the official webpage.
Install the PyQt6 with the pip tool, I have this python package:
pip install PyQt6 --user
Requirement already satisfied: PyQt6 in c:\python311\lib\site-packages (6.4.1)
...
The next source of code will create a windows with two buttons and one edit area.
The PyQt6 graphics user interface use these elements: QPushButton, QLineEdit and QMessageBox from QWidget.
The python class will create a window with these elements and dor each of these is need to have methods.
First you need to select the folder, then use an regular expresion for search.
I used this : .*\.blend1$ this means *.blend1.
The last step is to use FindFiles button to search all blend files, in this case and add path of each of these to the sqlite database into a table named: files .
If you select the root C: then will take some time to search the files.
Let's see the source code:
import sys
import os
import re
from PyQt6.QtWidgets import *
from PyQt6.QtCore import *
import sqlite3

class FindFiles(QWidget):
    def __init__(self):
        super().__init__()
        self.setWindowTitle("Find Files")
        self.setGeometry(100, 100, 500, 300)

        self.folder_button = QPushButton("Choose Folder")
        self.folder_button.clicked.connect(self.choose_folder)
        self.pattern_edit = QLineEdit()
        self.pattern_edit.setPlaceholderText("Enter regular expression pattern")
        self.pattern_edit.setFixedWidth(250)
        self.find_button = QPushButton("Find Files")
        self.find_button.clicked.connect(self.find_files)

        layout = QVBoxLayout()
        layout.addWidget(self.folder_button)
        layout.addWidget(self.pattern_edit)
        layout.addWidget(self.find_button)
        self.setLayout(layout)

        self.folder_path = ""

        self.conn = sqlite3.connect("file_paths.db")
        self.cursor = self.conn.cursor()
        self.cursor.execute("CREATE TABLE IF NOT EXISTS files (id INTEGER PRIMARY KEY, path TEXT)")

    def choose_folder(self):
        self.folder_path = QFileDialog.getExistingDirectory(self, "Choose Folder")
        if self.folder_path:
            self.folder_button.setText(self.folder_path)

    def find_files(self):
        if not self.folder_path:
            QMessageBox.warning(self, "Warning", "Please choose a folder first!")
            return

        pattern = self.pattern_edit.text()

        if not pattern:
            QMessageBox.warning(self, "Warning", "Please enter a regular expression pattern!")
            return

        file_paths = []
        for root, dirs, files in os.walk(self.folder_path):
            for file in files:
                if re.match(pattern, file):
                    file_path = os.path.join(root, file)
                    file_paths.append(file_path)
                    self.cursor.execute("INSERT INTO files (path) VALUES (?)", (file_path,))
        self.conn.commit()

        QMessageBox.information(self, "Information", f"Found {len(file_paths)} files that match the pattern!")

if __name__ == "__main__":
    app = QApplication(sys.argv)
    find_files = FindFiles()
    find_files.show()
    sys.exit(app.exec())
I put this source code into a file named:main.py and I run it.
python main.py
The result is this:

Thursday, January 5, 2023

Python Qt6 : Create a tray icon application.

The notification area known as system tray is located in the Windows Taskbar area, usually at the bottom right corner.
I tested with:
Python 3.10.2 (tags/v3.10.2:a58ebcc, Jan 17 2022, 14:12:15) [MSC v.1929 64 bit (AMD64)] on win32
...
pip show pyqt6
Name: PyQt6
Version: 6.4.0
Summary: Python bindings for the Qt cross platform application toolkit
I created a trayicon application with PyQt6 that show a menu with two entry: Show Window and Exit.
The Show Window will sow a default window and the Exit will close the application.
This is the source code I tested, you need an icon.png in the same folder with this script.
import sys
from PyQt6.QtCore import Qt, QEvent, QPoint
from PyQt6.QtGui import QGuiApplication, QIcon, QAction
from PyQt6.QtWidgets import QApplication, QSystemTrayIcon, QMainWindow, QMenu

# create the default application
app = QApplication(sys.argv)

# create the main window
window = QMainWindow()
# set the title for the window
window.setWindowTitle("My Window")

# this set the tray icon and menu
tray_icon = QSystemTrayIcon()
tray_icon.setIcon(QIcon("icon.png"))
menu = QMenu()

# add an action to the menu to show the window
show_window_action = QAction("Show Window", None)
show_window_action.triggered.connect(window.show)
menu.addAction(show_window_action)

# add an action to the menu to exit the application
exit_action = QAction("Exit", None)
exit_action.triggered.connect(app.quit)
menu.addAction(exit_action)

# set the context menu
tray_icon.setContextMenu(menu)

# show the tray icon
tray_icon.show()

# run the application
app.exec()

Monday, January 2, 2023

Python Qt6 : Show any CSV file with QTableWidget.

In this tutorial, I will show you how easy it is to work with PyQt6 and QTableWidget to display any CSV file.
The source code lines are already commented to understand how this source code works.
This is the content of the csv file named my.csv:
id,firstname,lastname,email,email2,profession
100,Maud,Callista,Maud.Callista@yopmail.com,Maud.Callista@gmail.com,police officer
101,Justinn,Rona,Justinn.Rona@yopmail.com,Justinn.Rona@gmail.com,worker
102,Gabriellia,Robertson,Gabriellia.Robertson@yopmail.com,Gabriellia.Robertson@gmail.com,police officer
103,Gwenneth,Payson,Gwenneth.Payson@yopmail.com,Gwenneth.Payson@gmail.com,firefighter
104,Lynea,Robertson,Lynea.Robertson@yopmail.com,Lynea.Robertson@gmail.com,developer
This is the source I used:
import sys
import csv
from PyQt6.QtWidgets import QApplication, QMainWindow, QTableWidget, QTableWidgetItem
from PyQt6.QtCore import Qt

# the main window class
class MainWindow(QMainWindow):
    # the init definition of the class
    def __init__(self):
        super().__init__()

        # the window title
        self.setWindowTitle('Table Viewer for any CSV file.')

        # this create the table widget
        self.table = QTableWidget(self)

        # the table dimensions is set default
        self.table.setColumnCount(0)
        self.table.setRowCount(0)

        # this read the CSV file named my.csv
        with open('my.csv', 'r') as file:
            # use the reader for file 
            reader = csv.reader(file)
            # this get the column labels from the first row
            headers = next(reader)
            # this set the number of columns based on the number of headers
            self.table.setColumnCount(len(headers))
            # this set the horizontal header labels
            self.table.setHorizontalHeaderLabels(headers)
            # for each row iterate the rows in the CSV file
            for row in reader:
                # add a row to the table
                row_index = self.table.rowCount()
                self.table.insertRow(row_index)
                # add data to cells 
                for col_index, cell in enumerate(row):
                    self.table.setItem(row_index, col_index, QTableWidgetItem(cell))
        
        # setting for the table as the central widget
        self.setCentralWidget(self.table)

# this run the application
if __name__ == '__main__':
    app = QApplication(sys.argv)
    window = MainWindow()
    window.show()
    sys.exit(app.exec())
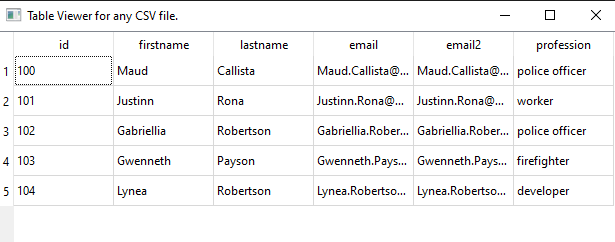
Here is what the result of running the source code:

Monday, January 3, 2022

Python Qt6 : The basic differences between PyQt5 and PyQt6.

Python Qt6 known as PyQt6 is a binding of the cross-platform GUI toolkit Qt, implemented as a Python plug-in with Qt 6 the latest version of Qt.
The PyQt6 first stable release was on 6 January 2021, developed by Riverbank Computing Ltd and the last release was on 2 December 2021 with the version PyQt v6.2.2.
This release is license GPL or commercial on Python 3 platform.
Let's see some differences between PyQt5 and PyQt6.
The .exec() method is used in Qt to start the event loop of your QApplication or dialog boxes. In Python 2.7 exec was a keyword and Python 3 removed the exec keyword.
The first difference as a result of PyQt6 .exec() calls are named just as in Qt.
If you read the documentation from the official webpage, then in your PyQt6 source code you need to use these changes:
QEvent.Type.MouseButtonPress
...
Qt.MouseButtons.RightButton
...
Both PyQt5 and PyQt6, although seemingly easy to use for complex applications, will require extra effort.

Tuesday, May 26, 2020

Python Qt5 : PyQt5 and PyGame compatibility with source code.

This tutorial tries to solve from the objectives related to solving and stabilizing compatibility errors between PyQt4 and PyQt5 and creating a common interface between PyQt5 and PyGame.
There is always the same problem in programming when the developer for some reason has to change classes, methods and functions and reusing the old code is no longer valid.
In this case, common or other errors occur, which leads to a waste of time.
I will present a simple way to solve these problems.
I really like to use the PyQt5 module to create interfaces for my python programs and scripts.
Like any programmer who hasn't fully used all A.P.I, I always use the old source code I programmed in the past.
What the developer says about the transition from PyQt4 to PyQt5 we can see on the official page.
Obviously, you will have to move on to things to know but it is quite difficult to always come back and read this content when you have programming errors.
Today, I wanted to make a simple drawing interface in PyGame that would be included in a PyQt5 interface.
I tried to use an old code created by me in PyQt4 but I realized that I had encountered errors before switching to the new PyQt5.
This compatibility problem generates errors and can be solved as follows: by knowing the exact solution and fixing errors in real time, studying the changes created by the developer or the classic search for errors.
My solution comes with the help of these solutions and requires a simple step using the commented source code.
To show you how simple it is to understand I will show you the source code for the interface I built that simply to solves the problem of understanding compatibility by reading the developer source code with simple and useful comments.
#the old import for PyQt4
#from PyQt4 import QtGui

#the new import for PyQt5
#from PyQt5 import QtCore, QtGui, QtWidgets
#class MainWindow(QtWidgets.QMainWindow, UI.MainUI.Ui_MainWindow):

from PyQt5 import QtGui
from PyQt5 import QtWidgets
import pygame
import sys

# old definition for PyQt4 for QWidget
#class ImageWidget(QtGui.QWidget):
class ImageWidget(QtWidgets.QWidget):   
    def __init__(self,surface,parent=None):
        super(ImageWidget,self).__init__(parent)
        w=surface.get_width()
        h=surface.get_height()
        self.data=surface.get_buffer().raw
        self.image=QtGui.QImage(self.data,w,h,QtGui.QImage.Format_RGB32)

    def paintEvent(self,event):
        my_paint=QtGui.QPainter()
        # the definitions for PyQt4 and PyQt5 use QtGui.QPainter()     
        my_paint.begin(self)
        my_paint.drawImage(0,0,self.image)
        my_paint.end()
        
# old definition for PyQt4 for QMainWindow
#class MainWindow(QtGui.QMainWindow):
class MainWindow(QtWidgets.QMainWindow):
    def __init__(self,surface,parent=None):
        super(MainWindow,self).__init__(parent)
        self.setFixedSize(640, 480)
        self.setCentralWidget(ImageWidget(surface))
# this part of source code need to be updated if you want to use animation        
# init PyGame 
pygame.init()
# define a surface 
my_surface=pygame.Surface((640,480))
# fill the surface, see https://www.pygame.org/docs/ref/surface.html#pygame.Surface.fill
my_surface.fill((0,0,255,176))
# draw circle see https://www.pygame.org/docs/ref/draw.html#pygame.draw.circle
pygame.draw.circle(my_surface,(0,0,127,255),(76,76),76)
# draw ellipse (surface, color(R,G,B), size (x,y,x+dx, y+y+dy) )
pygame.draw.ellipse(my_surface,(127,0,0,0),(0,0,12,76))
 
# this part of source code will show 
# the my_surface created with PyGame in PyQt5
# old definition for PyQt4
#app=QtGui.QApplication(sys.argv)
app=QtWidgets.QApplication(sys.argv)
my_window=MainWindow(my_surface)
my_window.show()
app.exec_()

Tuesday, April 28, 2020

Python : Open any Jupiter notebook from GitHub in Colab.

In this tutorial I will show you how to open any Jupiter notebook from GitHub in the Google online Colab area.
First, go to the jupyter notebook in GitHub project.
Example:
https://github.com/catafest/colab_google/blob/master/catafest_001.ipynb
Change the link by adding the world tocolab after github, see the following example:
https://githubtocolab.com/catafest/colab_google/blob/master/catafest_001.ipynb
This will open the google colab notebook with the content of Jupiter notebook.
For more information about using Google Colab with GitHub, see this notebook from the Google Colab research.

Friday, June 21, 2013

Simple way to find your script under linux.

Many python users have a lot of scripts.

They use some words for classes or some functions.

Sometime is hard to remember where it's this scripts.

So the easy way to do that is to find the script where is some words.

For example you need to find this : word_in_your_script

To do that just see next linux command:

$ find ~/ -type f -iname "*.py" -exec grep -l 'word_in_your_script' {} \;

Tuesday, April 19, 2011

Things that prevent complications ... part 1

The difference between ... input and raw_input
input returns an object that's the result of evaluating the expression. raw_input returns a string ...

The difference between ... Python 3 and Python 2
If you run the Python 3, do not use sample code written for Python 2, you'll just end with many errors and much confusion ...

The difference between ... extend and append on a list
Extend just extend a list with another list by adding each element on list, append add the list like one element...

The difference between ... function and method
Method is a function with an extra parameter which is the object that it's to run on...

The difference between ... deleting a variable and deleting its contents
By removing its contents by setting NoneType variable allows you to add a new value.

These are just a few differences, in reality they are much more ... I will return with others ...