analitics

Pages

Tuesday, June 26, 2018

Python 3.6.4 : Trying to use the python azurure on the windows.

In this tutorial, I used the python version 3.6.4 and Windows 8.1 OS.
You can start with pip install tool for some azure modules:
Install the latest Batch runtime library
C:\Python364\Scripts>pip install azure-batch 
This will install the latest Storage management library
C:\Python364\Scripts>pip install azure-mgmt-scheduler 
Will install only the latest compute installed using the --pre flag:
C:\Python364\Scripts>pip install --pre azure-mgmt-compute 
Finally the storage I used into this tutorial:
C:\Python364\Scripts>pip install azure-storage --upgrade
You can install all of the azure python modules:
C:\Python364\Scripts>pip install --pre azure
...
Installing collected packages: azure-storage-nspkg, azure-storage-common, azure-
storage-queue, azure-servicebus, azure-servicefabric, azure-storage-file, azure-
servicemanagement-legacy, azure-mgmt-consumption, azure-mgmt-media, azure-mgmt-d
ns, azure-mgmt-search, azure-mgmt-cdn, azure-mgmt-compute, azure-mgmt-eventhub,
azure-mgmt-containerinstance, azure-mgmt-datalake-nspkg, azure-mgmt-datalake-ana
lytics, azure-mgmt-recoveryservices, azure-mgmt-authorization, azure-mgmt-adviso
r, azure-mgmt-recoveryservicesbackup, azure-mgmt-billing, azure-mgmt-devtestlabs
, azure-mgmt-network, azure-mgmt-web, azure-mgmt-applicationinsights, azure-mgmt
-cognitiveservices, azure-mgmt-rdbms, azure-mgmt-monitor, azure-mgmt-reservation
s, azure-mgmt-notificationhubs, azure-mgmt-loganalytics, azure-mgmt-logic, azure
-mgmt-iothubprovisioningservices, azure-mgmt-marketplaceordering, azure-mgmt-res
ource, azure-mgmt-scheduler, azure-mgmt-powerbiembedded, azure-mgmt-servicefabri
c, azure-mgmt-commerce, azure-mgmt-sql, azure-mgmt-cosmosdb, azure-mgmt-relay, a
zure-mgmt-storage, azure-mgmt-redis, azure-mgmt-managementpartner, azure-mgmt-tr
afficmanager, azure-mgmt-machinelearningcompute, azure-mgmt-datafactory, azure-m
gmt-hanaonazure, azure-mgmt-iothub, azure-mgmt-servermanager, azure-mgmt-batch,
azure-mgmt-keyvault, azure-mgmt-subscription, azure-mgmt-eventgrid, azure-mgmt-s
ervicebus, azure-mgmt-batchai, azure-mgmt-containerservice, azure-mgmt-container
registry, azure-mgmt-msi, azure-mgmt-datalake-store, azure-mgmt, azure-datalake-
store, azure-eventgrid, azure-keyvault, azure-cosmosdb-nspkg, futures, azure-cos
mosdb-table, azure-graphrbac, azure-storage-blob, azure
I tested with all azure python modules, but you can use just you need.
The next step is to open the Azure account - I have a trial free account.
I create a Resource Group named python-azure and a Storage account named pythonazure.
Into pythonazure I add the Files service and I upload an HTML file named default.html .
See the next images with the steps I make:
Let's make one simple test:
C:\Python364\Scripts>python
Python 3.6.4 (v3.6.4:d48eceb, Dec 19 2017, 06:54:40) [MSC v.1900 64 bit (AMD64)]
 on win32
Type "help", "copyright", "credits" or "license" for more information.
>>> from azure.common.credentials import UserPassCredentials
>>> from azure.mgmt.resource import ResourceManagementClient
>>> from azure.mgmt.storage import StorageManagementClient
>>> from azure.storage import CloudStorageAccount
>>> from azure.storage.blob.models import ContentSettings, PublicAccess
>>> 
I have not been able to authenticate myself with a python script in Azure.
I found some inconsistencies and issues on GitHub so I still have to document.

Any help in this regard is welcome.
Sunday, June 24, 2018

Python 3.6.4 : Using python client with blogger API .

I used a new project into console cloud google.
I used the google-api-python-client from here with OAuth service.
You need to create a project and add the blogger API to use it.
For credentials, I used OAuth with the JSON file from google.
This is the source code:
#!/usr/bin/env python
# -*- coding: utf-8 -*-
from __future__ import print_function

__author__ = 'Catalin George Festila ( catafest , mythcat )'

import sys

from oauth2client import client
from googleapiclient import sample_tools


def main(argv):
  # Authenticate and construct service.
  service, flags = sample_tools.init(
      argv, 'blogger', 'v3', __doc__, __file__,
      scope='https://www.googleapis.com/auth/blogger')

  try:

      users = service.users()

      # Retrieve this user's profile information
      thisuser = users.get(userId='self').execute()
      print('This user\'s display name is: %s' % thisuser['displayName'])

      blogs = service.blogs()

      # Retrieve the list of Blogs this user has write privileges on
      thisusersblogs = blogs.listByUser(userId='self').execute()
      for blog in thisusersblogs['items']:
        print('The blog named \'%s\' is at: %s' % (blog['name'], blog['url']))

      posts = service.posts()

      # List the posts for each blog this user has
      for blog in thisusersblogs['items']:
        print('The posts for %s:' % blog['name'])
        request = posts.list(blogId=blog['id'])
        while request != None:
          posts_doc = request.execute()
          if 'items' in posts_doc and not (posts_doc['items'] is None):
            for post in posts_doc['items']:
              print('  %s (%s)' % (post['title'], post['url']))
          request = posts.list_next(request, posts_doc)

  except client.AccessTokenRefreshError:
    print ('The credentials have been revoked or expired, please re-run'
      'the application to re-authorize')

if __name__ == '__main__':
  main(sys.argv)
The content of the folder project named google_api_python.
c:\Python364\google_api_python>dir
06/24/2018  08:27 PM             1,096 blogger.dat
06/24/2018  07:49 PM             2,599 blogger.py
06/24/2018  08:24 PM               309 client_secrets.json
06/24/2018  08:26 PM                76 debug.log
               4 File(s)          4,080 bytes
               2 Dir(s)  201,382,006,784 bytes free
You need to add the client_id and client_secret from google project into file client_secrets.json.
Run the python script:
c:\Python364\google_api_python>python.exe blogger.py
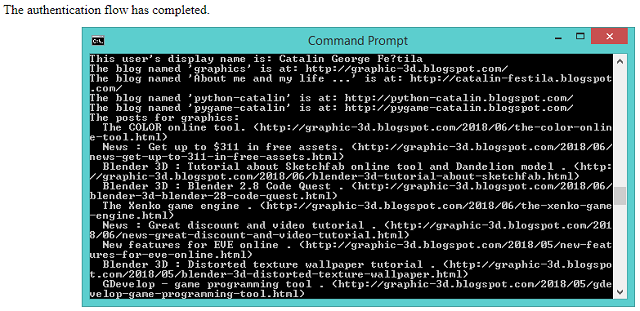
The google will ask you about the authentification and will run the script:

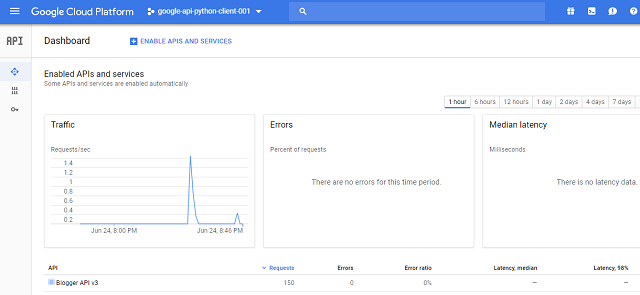
Google show us all the infos about this project into dashboard:

Wednesday, June 6, 2018

Python 3.6.4 : The qrcode python module .

This python module named qrcode is a suite of tools to Generate QR codes.
Let's start the tutorial with the install steep :
c:\Python364\Scripts>pip install qrcode[pil]
Collecting qrcode[pil]
... 
Successfully installed qrcode-6.0 
Let's see the output for dir:
>>> import qrcode
>>> from qrcode import *
>>> dir(qrcode)
['ERROR_CORRECT_H', 'ERROR_CORRECT_L', 'ERROR_CORRECT_M', 'ERROR_CORRECT_Q', 'LU
T', 'QRCode', '__builtins__', '__cached__', '__doc__', '__file__', '__loader__',
 '__name__', '__package__', '__path__', '__spec__', 'base', 'constants', 'except
ions', 'image', 'main', 'make', 'run_example', 'util']
>>> dir(qrcode.util)
['ALPHA_NUM', 'BCH_digit', 'BCH_type_info', 'BCH_type_number', 'BIT_LIMIT_TABLE'
, 'BitBuffer', 'G15', 'G15_MASK', 'G18', 'LUT', 'MODE_8BIT_BYTE', 'MODE_ALPHA_NU
M', 'MODE_KANJI', 'MODE_NUMBER', 'MODE_SIZE_LARGE', 'MODE_SIZE_MEDIUM', 'MODE_SI
ZE_SMALL', 'NUMBER_LENGTH', 'PAD0', 'PAD1', 'PATTERN_POSITION_TABLE', 'QRData',
'RE_ALPHA_NUM', '__builtins__', '__cached__', '__doc__', '__file__', '__loader__
', '__name__', '__package__', '__spec__', '_data_count', '_lost_point_level1', '
_lost_point_level2', '_lost_point_level3', '_lost_point_level4', '_optimal_split
', 'base', 'create_bytes', 'create_data', 'exceptions', 'length_in_bits', 'lost_
point', 'mask_func', 'math', 'mode_sizes_for_version', 'optimal_data_chunks', 'o
ptimal_mode', 'pattern_position', 're', 'six', 'to_bytestring', 'xrange']
>>> dir(qrcode.image)
['__builtins__', '__cached__', '__doc__', '__file__', '__loader__', '__name__',
'__package__', '__path__', '__spec__', 'base']
>>> dir(qrcode.run_example)
['__annotations__', '__call__', '__class__', '__closure__', '__code__', '__defau
lts__', '__delattr__', '__dict__', '__dir__', '__doc__', '__eq__', '__format__',
 '__ge__', '__get__', '__getattribute__', '__globals__', '__gt__', '__hash__', '
__init__', '__init_subclass__', '__kwdefaults__', '__le__', '__lt__', '__module_
_', '__name__', '__ne__', '__new__', '__qualname__', '__reduce__', '__reduce_ex_
_', '__repr__', '__setattr__', '__sizeof__', '__str__', '__subclasshook__']
>>> 
This is the test python script I used to test this python module:
import qrcode
from  qrcode import *
qr = qrcode.QRCode(
    version=1,
    error_correction=qrcode.constants.ERROR_CORRECT_L,
    box_size=10,
    border=4,
)
qr.add_data('https://python-catalin.blogspot.com/')
qr.make(fit=True)

img = qr.make_image(fill_color="black", back_color="white")
with open('my_qr_test.png', 'wb') as qrfile:
    img.save(qrfile)
This is the output of QR file: