analitics

Pages

Showing posts with label OpenAI. Show all posts

Sunday, March 26, 2023

Python 3.11.0 : Image generation with OpenAI.

In this tutorial I will show you a python script with PyQt6 and OpenAI that generates an image based on OpenAI token keys and a text that describes the image.
The script is quite simple and requires the installation of python packets: PyQt6,openai.
In the script you can find a python class called MainWindow in which graphic user interface elements are included and openai elements for generating images.
You also need a token key from the official openai page to use for generation.
The script runs with the command python numa_script.py and in the two editboxes is inserted chaie from token API OpenAI and the text that will describe the image to be generated.
This is the python script with the source code:
#create_image.py

import os
import openai

from PyQt6.QtCore import Qt, QSize
from PyQt6.QtGui import QImage, QPixmap
from PyQt6.QtWidgets import QApplication, QWidget, QLabel, QLineEdit, QVBoxLayout, QHBoxLayout, QPushButton
import requests

class MainWindow(QWidget):
    def __init__(self):
        super().__init__()
        self.resize(500, 500)
        self.setWindowTitle("AI Data Input")
        
        # create widgets
        self.image_label = QLabel(self)
        self.image_label.setFixedSize(QSize(300, 300))
        self.url_edit = QLineEdit(self)
        self.api_key = QLineEdit(self)
        self.send_button = QPushButton("Send data to AI", self)
        self.send_button.clicked.connect(self.on_send_button_clicked)
        
        # create layout
        layout = QVBoxLayout()
        url_layout = QHBoxLayout()
        url_layout.addWidget(QLabel("Text request AI: "))
        url_layout.addWidget(self.url_edit)
        api_layout = QHBoxLayout()
        api_layout.addWidget(QLabel("OpenAI API Key: "))
        api_layout.addWidget(self.api_key)

        layout.addLayout(url_layout)
        layout.addLayout(api_layout)
        layout.addWidget(self.image_label, alignment=Qt.AlignmentFlag.AlignCenter)
        layout.addWidget(self.send_button, alignment=Qt.AlignmentFlag.AlignCenter)
        
        self.setLayout(layout)
    
    def on_send_button_clicked(self):
        #openai.api_key = "your api key generated by OpenAI API"
        openai.api_key = self.api_key.text()
        PROMPT = self.url_edit.text()
        url = openai.Image.create(
            prompt=PROMPT,
            n=1,
            size="256x256",
        )

        # extract the url value
        url_value = url['data'][0]['url']
        if url_value :
            response = requests.get(url_value)
            if response.status_code == 200:
                image = QImage.fromData(response.content)
                pixmap = QPixmap.fromImage(image)
                self.image_label.setPixmap(pixmap)
                self.image_label.setScaledContents(True)

if __name__ == "__main__":
    app = QApplication([])
    window = MainWindow()
    window.show()
    app.exec()
This is the result of the source script:

Tuesday, January 24, 2023

Python 3.11.0 : The openai python package - part 001.

The OpenAI Python library provides convenient access to the OpenAI API from applications written in the Python language. It includes a pre-defined set of classes for API resources that initialize themselves dynamically from API responses which makes it compatible with a wide range of versions of the OpenAI API.
You can see more about this on the GitHub project.
in order to use this package you need to have a A.P.I. key for OpenAI beta features from this website.
Create a key and copy into file or clipboard beacuse this cannot be accesed after you created.
Use the pip tool to install the openai package:
pip3 install openai --user
I tested with a default example and a simple question: What is the python programmin language?
import os
import openai


openai.api_key = "your_API_OpenAI_key"

response = openai.Completion.create(
    model="text-davinci-003",
    prompt="What is the python programmin language?",
    temperature=0.7,
    max_tokens=100,
    top_p=1,
    frequency_penalty=0,
    presence_penalty=0
)

print(response)
I run this python script code and the result is this:
python openai001.py
{
  "choices": [
    {
      "finish_reason": "stop",
      "index": 0,
      "logprobs": null,
      "text": "\n\nPython is a high-level, interpreted, general-purpose programming language. 
      It was created by Guido van Rossum and first released in 1991. Python has a wide variety of 
      uses and is a popular language for data science, web development, automation, and artificial 
      intelligence. It is also a popular language for scripting and general-purpose programming."
    }
  ],
  "created": 1674588982,
  "id": "cmpl-6cJNeACMtayBlExV1GJpilde0KcBN",
  "model": "text-davinci-003",
  "object": "text_completion",
  "usage": {
    "completion_tokens": 71,
    "prompt_tokens": 8,
    "total_tokens": 79
  }
}

Thursday, January 12, 2023

Python 3.11.0 : The numpy-quaternion python package - part 001.

I write an article on my website about artificial intelligence and I used python to show a simple example with quaternions.
This Python module adds a quaternion dtype to NumPy and you can read about this on the official website.
I may have mistakenly installed a python packet with a similar name and I had to install it with the command:
python -m pip uninstall quaternion
the next step was to install this command
python -m pip install --upgrade --no-deps --force-reinstall numpy-quaternion
The source code I used defines two quaternions, one with real part a and imaginary parts, and one quaternion using Euler angles.
Then is perform the rotation uses quaternion multiplication.
Let's see the source code
import numpy as np
import quaternion

# define a quaternion with real part a and imaginary parts bi, cj, dk
a = 1
b = 2
c = 3
d = 4
q = np.quaternion(a, b, c, d)

# define a quaternion using euler angles
x = 1.0
y = 2.0
z = 3.0
q2 = quaternion.from_euler_angles(x, y, z)

# define a vector to rotate
v = [1, 0, 0]

# perform the rotation using quaternion multiplication

# quaternion multiplication is not commutative, the order matters
# because this line of source code will not work:  rotated_v = q2 * v * q2.conj()

rotated_v = (q2 * quaternion.quaternion(0, *v)) * q2.conj()

print(rotated_v)
This is the result:
quaternion(0, 0.103846565151668, 0.422918571742548, 0.900197629735517)

Wednesday, January 11, 2023

Python 3.7.9 : simple zodiac diagrams with ephem and matplotlib.

I used openai chat to test another issue with these python packages: ephem and matplotlib.
It seems that openai is limited to new changes in python packages, but it resolves quite well combinations of source code that it has corrected with defined errors. It can't really extract source code from general questions. Anyway, it is a very good help for a programmer in the initial phase of any project.
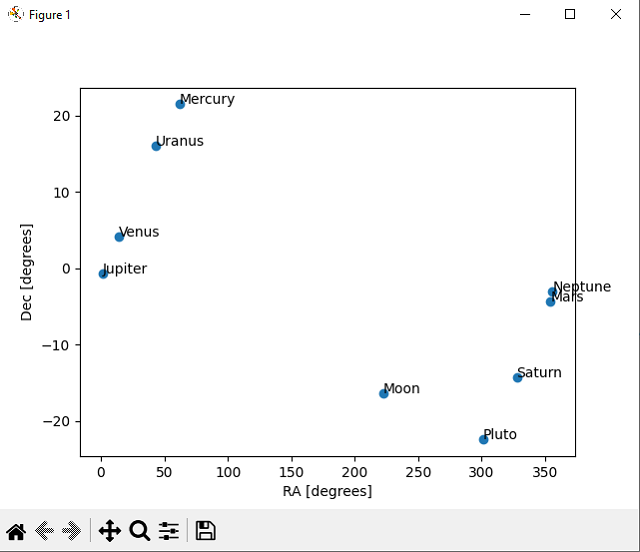
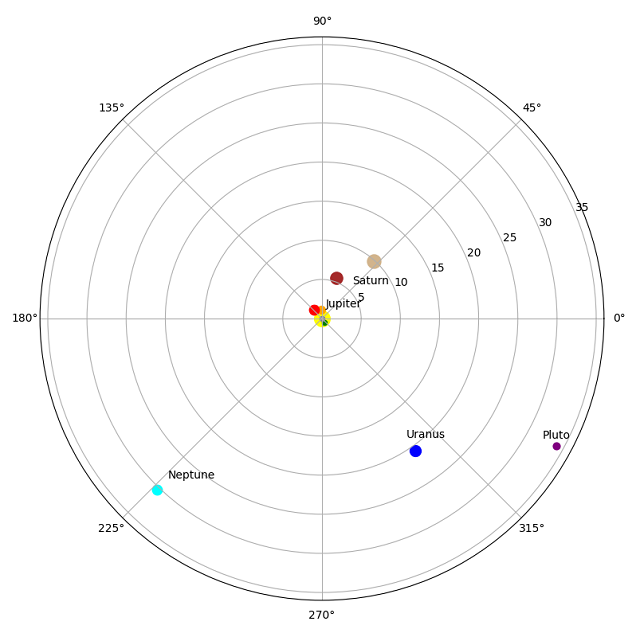
This source code show two diagrams about the solar system on a specific date:
import ephem
import matplotlib.pyplot as plt

# create an observer
obs = ephem.Observer()

# set the observer's location
obs.lat = '47.27' # latitude
obs.lon = '26.18' # longitude
obs.elevation = 307 # elevation (meters)

# set the date and time of the observation
obs.date = '2022/05/15 12:00:00' # date and time
# if you want you can use now() for real time data

# create the bodies
mercury = ephem.Mercury(obs)
venus = ephem.Venus(obs)
mars = ephem.Mars(obs)
jupiter = ephem.Jupiter(obs)
saturn = ephem.Saturn(obs)
uranus = ephem.Uranus(obs)
neptune = ephem.Neptune(obs)
pluto = ephem.Pluto(obs)
moon = ephem.Moon(obs) 

# compute the position of each planet and the moon
mercury.compute(obs)
venus.compute(obs)
mars.compute(obs)
jupiter.compute(obs)
saturn.compute(obs)
uranus.compute(obs)
neptune.compute(obs)
pluto.compute(obs)
moon.compute(obs)  

# extract ra and dec coordinates of each body
ra = [mercury.ra, venus.ra, mars.ra, jupiter.ra, saturn.ra, uranus.ra, neptune.ra, pluto.ra,moon.ra]
dec = [mercury.dec, venus.dec, mars.dec, jupiter.dec, saturn.dec, uranus.dec, neptune.dec, pluto.dec,moon.dec]

# convert ra,dec from radians to degrees
ra = [r*180/ephem.pi for r in ra]
dec = [d*180/ephem.pi for d in dec]
print(ra,dec)
# create a scatter plot of the positions
plt.scatter(ra, dec)

# add labels for each planet
plt.annotate('Mercury', (ra[0], dec[0]))
plt.annotate('Venus', (ra[1], dec[1]))
plt.annotate('Mars', (ra[2], dec[2]))
plt.annotate('Jupiter', (ra[3], dec[3]))
plt.annotate('Saturn', (ra[4], dec[4]))
plt.annotate('Uranus', (ra[5], dec[5]))
plt.annotate('Neptune', (ra[6], dec[6]))
plt.annotate('Pluto', (ra[7], dec[7]))
plt.annotate('Moon', (ra[8], dec[8]))

plt.xlabel("RA [degrees]")
plt.ylabel("Dec [degrees]")

# show the plot
plt.show()

# Set the figure size
plt.figure(figsize=(10, 10))

# Define the polar axis
ax = plt.subplot(111, projection='polar')

# Set the axis limits
ax.set_ylim(0, 36)

# Plot the Sun at the center
plt.scatter(0, 0, s=200, color='yellow')

mercury_distance = mercury.earth_distance
venus_distance= venus.earth_distance
mars_distance= mars.earth_distance
jupiter_distance= jupiter.earth_distance
saturn_distance= saturn.earth_distance
uranus_distance= uranus.earth_distance
neptune_distance= neptune.earth_distance
pluto_distance= pluto.earth_distance
moon_distance= moon.earth_distance
print(mercury_distance)
distance = [mercury_distance,venus_distance,mars_distance,jupiter_distance,saturn_distance,uranus_distance,neptune_distance,pluto_distance,moon_distance]

# Plot the planets
plt.scatter(ra[0], distance[0], s=20, color='green')
plt.scatter(ra[1], distance[1], s=50, color='orange')
plt.scatter(ra[2], distance[2], s=80, color='red')
plt.scatter(ra[3], distance[3], s=120, color='brown')
plt.scatter(ra[4], distance[4], s=150, color='tan')
plt.scatter(ra[5], distance[5], s=100, color='blue')
plt.scatter(ra[6], distance[6], s=80, color='cyan')
plt.scatter(ra[7], distance[7], s=40, color='purple')
plt.scatter(ra[8], distance[8], s=20, color='gray')

# add the labels for each planet
plt.annotate('Mercury',(ra[0], distance[0]),xytext=(ra[0], distance[0] - 2))
plt.annotate('Venus',(ra[1], distance[1]),xytext=(ra[1], distance[1] - 2))
plt.annotate('Mars',(ra[2], distance[2]),xytext=(ra[2], distance[2] - 2))
plt.annotate('Jupiter',(ra[3], distance[3]),xytext=(ra[3], distance[3] - 4))
plt.annotate('Saturn',(ra[4], distance[4]),xytext=(ra[4], distance[4] - 4))
plt.annotate('Uranus',(ra[5], distance[5]),xytext=(ra[5], distance[5] - 2))
plt.annotate('Neptune',(ra[6], distance[6]),xytext=(ra[6], distance[6] - 2))
plt.annotate('Pluto',(ra[7], distance[7]),xytext=(ra[7], distance[7] - 2))
plt.annotate('Moon',(ra[8], distance[8]),xytext=(ra[8], distance[8] - 2))

# Show the plot
plt.show()
This is the result of this source code:

Python 3.7.9 : simple zodiac constellation with ephem.

This time I used openai chat to create my source code and with small changes it worked…
PyEphem provides an ephem Python package for performing high-precision astronomy computations. The underlying numeric routines are coded in C and are the same ones that drive the popular XEphem astronomy application, whose author, Elwood Charles Downey, generously gave permission for their use in PyEphem. The name ephem is short for the word ephemeris, which is the traditional term for a table giving the position of a planet, asteroid, or comet for a series of dates.
import ephem

# create an observer
obs = ephem.Observer()

# set the observer's location
obs.lat = '47.27' # latitude
obs.lon = '26.18' # longitude
obs.elevation = 307 # elevation (meters)

# set the date and time of the observation
obs.date = '2022/05/15 12:00:00' # date and time

# create the bodies
mercury = ephem.Mercury(obs)
venus = ephem.Venus(obs)
mars = ephem.Mars(obs)
jupiter = ephem.Jupiter(obs)
saturn = ephem.Saturn(obs)
uranus = ephem.Uranus(obs)
neptune = ephem.Neptune(obs)
pluto = ephem.Pluto(obs)
moon = ephem.Moon(obs)

# print the constellation
print("Mercury:", ephem.constellation(mercury))
print("Venus:", ephem.constellation(venus))
print("Mars:", ephem.constellation(mars))
print("Jupiter:", ephem.constellation(jupiter))
print("Saturn:", ephem.constellation(saturn))
print("Uranus:", ephem.constellation(uranus))
print("Neptune:", ephem.constellation(neptune))
print("Pluto:", ephem.constellation(pluto))
print("Moon:", ephem.constellation(moon))
This is result of the running source code:
python constelation001.py
Mercury: ('Tau', 'Taurus')
Venus: ('Psc', 'Pisces')
Mars: ('Aqr', 'Aquarius')
Jupiter: ('Psc', 'Pisces')
Saturn: ('Cap', 'Capricornus')
Uranus: ('Ari', 'Aries')
Neptune: ('Psc', 'Pisces')
Pluto: ('Sgr', 'Sagittarius')
Moon: ('Lib', 'Libra')

Monday, December 12, 2022

OpenAI knows how to write source code for Blender 3D.

I tested the new OpenAI chat from with this question:
Please write a 3d blender script in Python that moves a camera around an object 360 degrees facing it.

import bpy

# Set the object that the camera will orbit around
target_object = bpy.data.objects["MyObject"]

# Set the starting position for the camera
camera = bpy.data.objects["Camera"]
camera.location = (0, 0, 5)

# Set the number of degrees to rotate the camera around the object
degrees = 360

# Set the distance that the camera should be from the object
distance = 5

# Set the speed at which the camera should orbit
speed = 1

# Set the direction in which the camera should orbit (1 for clockwise, -1 for counter-clockwise)
direction = 1

# Calculate the number of frames needed for the camera to orbit
# around the object by the desired number of degrees
num_frames = degrees / speed

# Set the camera to track the object
bpy.ops.object.select_all(action="DESELECT")
camera.select_set(True)
bpy.context.view_layer.objects.active = camera
bpy.ops.object.track_set(type="TRACKTO")

# Animate the camera orbiting around the object
for frame in range(0, num_frames):
    # Set the current frame
    bpy.context.scene.frame_set(frame)

    # Calculate the new position for the camera based on its distance from the object
    x = distance * math.sin(math.radians(frame*speed*direction))
    y = distance * math.cos(math.radians(frame*speed*direction))
    camera.location = (x,y,0)
I tested with the latest version of Blender 3D and it works well with some small changes it can be improved.
This error for this script:
Python: Traceback (most recent call last):
...
TypeError: 'float' object cannot be interpreted as an integer
If you ask more than once you will get different source code and I encountered a network error.
I tried several times and the network error did not let me take the more complex and complete source code.

Sunday, December 11, 2022

Python 3.10.2 : Quickstart OpenAI example.

Since it's Christmas time, here's a short introduction to OpenAI and python. An example is from the official page.
OpenAI has trained cutting-edge language models that are very good at understanding and generating text. Our API provides access to these models and can be used to solve virtually any task that involves processing language. In this quickstart tutorial, you’ll build a simple sample application. Along the way, you’ll learn key concepts and techniques that are fundamental to using the API for any task, including: Content generation Summarization Classification, categorization, and sentiment analysis Data extraction Translation Many more!
Because I run this example in Windows 10 operating system, you need to step over some commands from the official webpage. For example, this is a Linux command:
. venv/bin/activate
Create a token into an OpenAI account to use it, then use these commands:
git clone https://github.com/openai/openai-quickstart-python.git
cd openai-quickstart-python
pip install Flask
pip install -r requirements.txt --user
Change the app.py source code with your token, like this:
openai.api_key = "your_token"
Run the application with this command:
python -m flask run
The result in the command prompt area is this:
 * Restarting with stat
 * Debugger is active!
 * Debugger PIN: 102-938-829
 * Running on http://127.0.0.1:5000/ (Press CTRL+C to quit)
127.0.0.1 - - [11/Dec/2022 16:13:06] "POST / HTTP/1.1" 302 -
127.0.0.1 - - [11/Dec/2022 16:13:06] "GET /?result=+The+Flash%2C+Speedy%2C+Sonic+the+Hedgehog HTTP/1.1" 200 -
127.0.0.1 - - [11/Dec/2022 16:13:06] "GET /static/main.css HTTP/1.1" 304 -
127.0.0.1 - - [11/Dec/2022 16:13:06] "GET /static/dog.png HTTP/1.1" 304 -
127.0.0.1 - - [11/Dec/2022 16:13:11] "POST / HTTP/1.1" 302 -
127.0.0.1 - - [11/Dec/2022 16:13:11] "GET /?result=+Speedy%2C+The+Flash%2C+Sonic HTTP/1.1" 200 -
127.0.0.1 - - [11/Dec/2022 16:13:12] "GET /static/main.css HTTP/1.1" 304 -
127.0.0.1 - - [11/Dec/2022 16:13:12] "GET /static/dog.png HTTP/1.1" 304 -
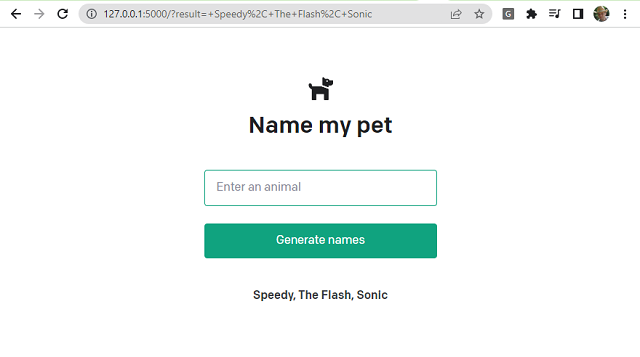
This is the result of the running source code: