analitics

Pages

Sunday, March 12, 2023

Python 3.11.0 : testing discord application with python bot.

Today I opened the online discord and found that the Roblox bot works without problems, so I tested another python bot this time.
Discord settings are difficult for the application because they need to generate an authentication URL to your discord server.
Go to your applications area and select your application, see this webpage.
They ssay: "OAuth2 Use Discord as an authorization system or use our API on behalf of your users. Add a redirect URI, pick your scopes, roll a D20 for good luck, and go! ... Redirects You must specify at least one URI for authentication to work. If you pass a URI in an OAuth request, it must exactly match one of the URIs you enter here. "
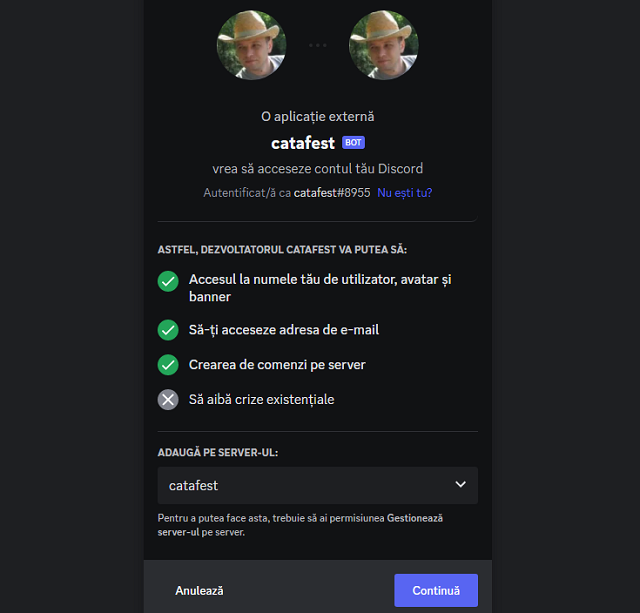
I select my URL from my server discord then I set the In-App Authorization with SCOPES set to bot and applications.commands .
The source code for this bot needs to be able to send messages, select the Send Messages permission.
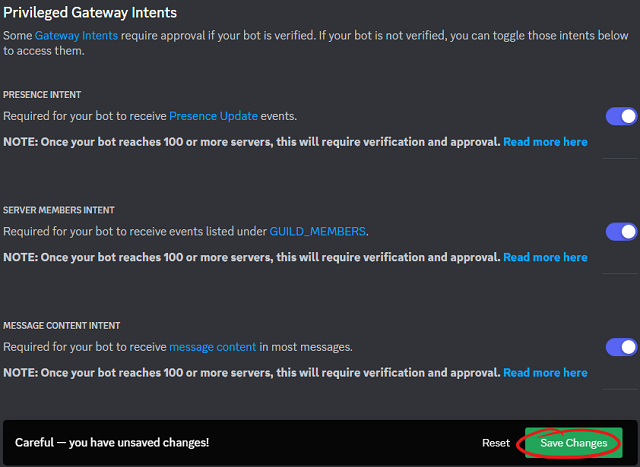
Select the permisions for Privileged Gateway Intents section:
The result of these settings will be an URL for authentification into GENERATED URL area.
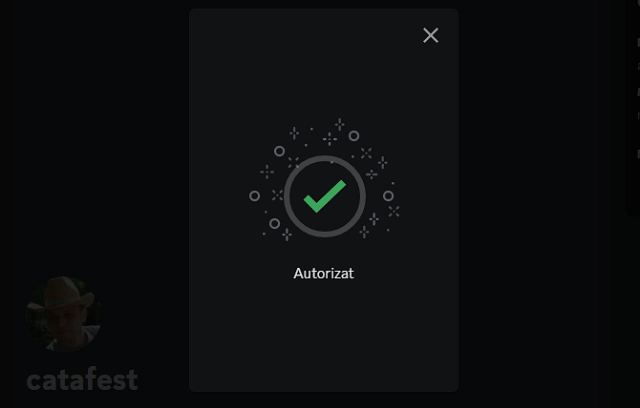
Use this URL to make authentification with your discord server.
In my case the application and the server has the same name: catafest.
This is the source code I used in a python script named catafest_bot.py.
import discord
from discord.ext import commands

intents = discord.Intents.default()
intents.members = True

client = commands.Bot(command_prefix='!', intents=intents)

@client.event
async def on_ready():
    print('Bot is ready!')

@client.command()
async def send_message(ctx):
# Replace CHANNEL_ID with the ID of the channel you want to send the message
    channel = client.get_channel(CHANNEL_ID) 
    await channel.send('Hello there! This is a test message.') 

client.run('app_token')
I used pip tool to install the discord python package:
pip install discord --user
I run the script with python:
python catafest_bot.py
[2023-03-12 16:18:26] [WARNING ] discord.ext.commands.bot: Privileged message content intent is missing, commands may
not work as expected.
[2023-03-12 16:18:26] [INFO    ] discord.client: logging in using static token
[2023-03-12 16:18:27] [INFO    ] discord.gateway: Shard ID None has connected to Gateway (Session ID: 76b32c93c4...).
Bot is ready!
I used /msg to send the command to bot, !send_message:
The result on my server is this:

Thursday, March 9, 2023

Python 3.11.0 : The yattag python package.

Yattag is a Python library for generating HTML or XML in a pythonic way.
You can find more information on the official webpage.
Installation can be done easily with the pip utility:
pip install yattag --user
I test a simple example code from the official documentation and works well:
from yattag import Doc

doc, tag, text = Doc(
    defaults = {
        'title': 'Untitled',
        'contact_message': 'You just won the lottery!'
    },
    errors = {
        'contact_message': 'Your message looks like spam.'
    }
).tagtext()

with tag('h1'):
    text('Contact form')
with tag('form', action = ""):
    doc.input(name = 'title', type = 'text')
    with doc.textarea(name = 'contact_message'):
        pass
    doc.stag('input', type = 'submit', value = 'Send my message')

print(doc.getvalue())

Sunday, March 5, 2023

Python Qt5 : OpenStreetMap with PyQtWebEngine.

You need to install the PyQtWebEngine python package and to have the PyQt5 python package installed.
PyQt6 works in the same way as PyQt5 but with small differences ...
pip install PyQtWebEngine --user
Collecting PyQtWebEngine
  Downloading PyQtWebEngine-5.15.6-cp37-abi3-win_amd64.whl (182 kB)
     ---------------------------------------- 182.7/182.7 kB 580.6 kB/s eta 0:00:00
...
     ---------------------------------------- 60.0/60.0 MB 655.7 kB/s eta 0:00:00
...
Installing collected packages: PyQtWebEngine-Qt5, PyQtWebEngine
Successfully installed PyQtWebEngine-5.15.6 PyQtWebEngine-Qt5-5.15.2
import sys
from PyQt5.QtWebEngineWidgets import QWebEngineView
from PyQt5.QtWidgets import QApplication, QWidget, QVBoxLayout

class MapWidget(QWidget):
    def __init__(self, parent=None):
        super().__init__(parent)

        # Create a QWebEngineView object to display the map
        self.map = QWebEngineView()
        self.map.setHtml("""
            <!DOCTYPE html>
            <html>
                <head>
                    <meta name="viewport" content="width=device-width, initial-scale=1.0">
                    <style>
                        #map {
                            height: 100%;
                        }
                    </style>
                </head>
                <body>
                    <div id="map"></div>
                    <script src="https://openlayers.org/en/v4.6.5/build/ol.js"></script>
                    <script>
                        var map = new ol.Map({
                            target: 'map',
                            layers: [
                                new ol.layer.Tile({
                                    source: new ol.source.OSM()
                                })
                            ],
                            view: new ol.View({
                                center: ol.proj.fromLonLat([0, 0]),
                                zoom: 2
                            })
                        });
                    </script>
                </body>
            </html>
        """)

        # Create a QVBoxLayout to hold the map widget
        layout = QVBoxLayout()
        layout.addWidget(self.map)
        self.setLayout(layout)

if __name__ == '__main__':
    app = QApplication(sys.argv)
    widget = MapWidget()
    widget.show()
    sys.exit(app.exec_())
The run of this python script will show a window with the OpenStreetMap map.

Friday, March 3, 2023

Python 3.11.0 : OpenCV - part 001.

A few years ago I made a series of several tutorials about python and OpenCV. They were functional, but I know that due to time, changes in development can lead to changes in the source code. Today I tested a script with this python package and it worked quite well.
In some cases, depending on the web camera and the operating system, the way of capturing images can be modified with the two specific elements: cv2.VideoCapture(cv2.CAP_DSHOW) or cv2.VideoCapture(cv2.CAP_V4L2)
This is the source code I used:
import cv2
import numpy as np
import time 

def draw_hist(name, gray):
    hist = cv2.calcHist([gray], [0], None, [256], [0,256])
    MAX = max(hist)
    plot = np.zeros((512,1024))
    for i in range(255):
        x1 = 4*i
        x2 = 4*(i+1)
        y1 = int(hist[i]*512/MAX)
        y2 = int(hist[i+1]*512/MAX)
        cv2.line(plot, (x1,y1), (x2,y2), 1, 3)
    cv2.imshow(name + "-gray", gray)
    cv2.imshow(name + "-hist", plot)


def main():
    cam = cv2.VideoCapture(0)
    #while cv2.waitKey(10) == -1:
    start_time = time.time()
    while time.time() - start_time < 30:
        ret, img = cam.read()
        if not ret:  # add check for empty image
            continue
        gray = cv2.cvtColor(img, cv2.COLOR_BGR2GRAY)
        draw_hist("cam",gray)
        cv2.waitKey(10)

if __name__=="__main__":
    main()

Wednesday, March 1, 2023

Python 3.11.0 : The sunpy python package - part 002.

In the last article tutorial, I show some simple examples with the sunpy python package.
Today I installed it again with all of these python packages using the pip tool.
You don't need all of these if you just start, but in time you will need to install them:
pip install sunpy --user
Collecting sunpy
  Downloading sunpy-4.1.3.tar.gz (3.6 MB)
     ---------------------------------------- 3.6/3.6 MB 3.6 MB/s eta 0:00:00
     ...
     Successfully installed PyYAML-6.0 aioftp-0.21.4 astropy-5.2.1 pyerfa-2.0.0.1 sunpy-4.1.3
...
pip install zeep --user
Collecting zeep
  Using cached zeep-4.2.1-py3-none-any.whl (101 kB)  
  ...
  Successfully installed isodate-0.6.1 pytz-2022.7.1 requests-file-1.5.1 requests-toolbelt-0.10.1 zeep-4.2.1
  ...
pip install drms --user
Collecting drms
  Downloading drms-0.6.3-py3-none-any.whl (35 kB)
  ...
  Successfully installed drms-0.6.3 pandas-1.5.3
pip install hvpy --user
Collecting hvpy
  Downloading hvpy-1.0.1-py3-none-any.whl (44 kB)
     ---------------------------------------- 44.0/44.0 kB 359.5 kB/s eta 0:00:00
     ...
     Successfully installed hvpy-1.0.1
pip install scipy --user
Collecting scipy
  Downloading scipy-1.10.1-cp311-cp311-win_amd64.whl (42.2 MB)
     ---------------------------------------- 42.2/42.2 MB 7.4 MB/s eta 0:00:00
     ...
     Successfully installed scipy-1.10.1 
pip install glymur --user
Collecting glymur
  Downloading Glymur-0.12.2-py3-none-any.whl (2.7 MB)
     ---------------------------------------- 2.7/2.7 MB 4.2 MB/s eta 0:00:00
     ...
     Successfully installed glymur-0.12.2
     
Let's use the 1600 Angstrom from these all data of spectral range: 335 Angstrom, 131 Angstrom, 191-195 Angstrom, 211 Angstrom, 1600 Angstrom, 1700 Angstrom, 4500 Angstrom, 171-175 Angstrom, 304 Angstrom, 94 Angstrom
from datetime import datetime
from hvpy import createMovie, DataSource, create_events, create_layers
createMovie(
     startTime=datetime(2023, 2, 27),                    # start from 1st September 2022
     endTime=datetime(2023, 2, 28),                      # end at 5th September 2022
     layers=create_layers([(DataSource.AIA_1600, 100)]), # use AIA_193 Lens with 100% Opacity
     events=create_events(["CH"]),                      # show the Active regions
     eventsLabels=True,                                 # event labels should be included
     imageScale=1,                                      # Image scale in arcseconds per pixel
     hq=True,                                           # Download a higher-quality movie file
     timeout=10,                                        # Wait 10 minutes to get a response
     overwrite=True
)
The result is a video that looks like this :
There are easier ways to get information about the sun…
You can take one screenshot using the api.helioviewer.org feature in your browser.
https://api.helioviewer.org/v2/takeScreenshot/?imageScale=1&layers=[SDO,AIA,AIA,304,1,100]&events=&eventLabels=true&scale=true&scaleType=earth&scaleX=0&scaleY=0&date=2023-02-28T15:00:00.000Z&x1=-1100.0&x2=1100.0&y1=-1100.0&y2=1100.0&display=true&watermark=true&events=[CH,all,1]
You can find movies of the last two days of HMI magnetograms and intensitygrams on this webpage.

Monday, February 27, 2023

Python 3.11.0 : EbookLib python library - part 002.

The last version 3.3 of this file type was published by the EPUB 3 Working Group as a Candidate Recommendation Snapshot on 21 February 2023 ...
I haven't written about the ePub format and python since 2022 because I was busy with all kinds of tasks.
Then I presented a short introduction with some examples on how to create an ePUB file, see that tutorial article.
I like this file type, especially the last format that allows many features, including inserting SVG vector files.
Installing the package is easy on a windows 10 with the pip utility.
pip install ebooklib --user
In the folder with the svg image named cover.svg I created a python file with this content.
from ebooklib import epub

# Create a new EPUB book
book = epub.EpubBook()

# Set the book metadata
book.set_title('My EPUB Book')
book.set_language('en')

# Add a cover image
cover_svg = epub.EpubItem(uid="cover_svg", file_name="cover.svg", media_type="image/svg+xml", content=open("cover.svg").read())
book.add_item(cover_svg)

# Create a new chapter for the cover page
cover_page = epub.EpubHtml(title='Cover Page', file_name='cover.xhtml', lang='en')
cover_page.content = '<img alt="Cover Image" src="cover.svg" />'

# Add the cover page to the book
book.add_item(cover_page)

# Add a chapter to the book
chapter1 = epub.EpubHtml(title='Chapter 1', file_name='chap_1.xhtml', lang='en')
chapter1.content = '<h1>Chapter 1</h1><p>This is the first chapter of my book.</p>'

# Add the chapter to the book
book.add_item(chapter1)

# Create the spine
book.spine = [cover_page, chapter1]

# Generate the EPUB file
epub.write_epub('my_book.epub', book, {})
after running the script this was the result a epub file named my_book.epub.
The result is this simple epub with an SVG file from Wikipedia, see the screenshot take with the Sumatra PDF free software.