analitics

Pages

Tuesday, January 3, 2023

Manim python example.

I have written before about manim as a Python package in this tutorial.
It's quite powerful for animation and I recommend it to content producers who need a tool for school board-like graphics.
Today I'm back with a link that a document written in Jupiter notebook with Manim package from manim community, see this link.

Monday, January 2, 2023

News : PyTorch machine learning framework compromised with malicious dependency.

If you installed PyTorch-nightly on Linux via pip between December 25, 2022 and December 30, 2022, please uninstall it and torchtriton immediately, and use the latest nightly binaries (newer than Dec 30th 2022).
Read more on the official website.

Python Qt6 : Show any CSV file with QTableWidget.

In this tutorial, I will show you how easy it is to work with PyQt6 and QTableWidget to display any CSV file.
The source code lines are already commented to understand how this source code works.
This is the content of the csv file named my.csv:
id,firstname,lastname,email,email2,profession
100,Maud,Callista,Maud.Callista@yopmail.com,Maud.Callista@gmail.com,police officer
101,Justinn,Rona,Justinn.Rona@yopmail.com,Justinn.Rona@gmail.com,worker
102,Gabriellia,Robertson,Gabriellia.Robertson@yopmail.com,Gabriellia.Robertson@gmail.com,police officer
103,Gwenneth,Payson,Gwenneth.Payson@yopmail.com,Gwenneth.Payson@gmail.com,firefighter
104,Lynea,Robertson,Lynea.Robertson@yopmail.com,Lynea.Robertson@gmail.com,developer
This is the source I used:
import sys
import csv
from PyQt6.QtWidgets import QApplication, QMainWindow, QTableWidget, QTableWidgetItem
from PyQt6.QtCore import Qt

# the main window class
class MainWindow(QMainWindow):
    # the init definition of the class
    def __init__(self):
        super().__init__()

        # the window title
        self.setWindowTitle('Table Viewer for any CSV file.')

        # this create the table widget
        self.table = QTableWidget(self)

        # the table dimensions is set default
        self.table.setColumnCount(0)
        self.table.setRowCount(0)

        # this read the CSV file named my.csv
        with open('my.csv', 'r') as file:
            # use the reader for file 
            reader = csv.reader(file)
            # this get the column labels from the first row
            headers = next(reader)
            # this set the number of columns based on the number of headers
            self.table.setColumnCount(len(headers))
            # this set the horizontal header labels
            self.table.setHorizontalHeaderLabels(headers)
            # for each row iterate the rows in the CSV file
            for row in reader:
                # add a row to the table
                row_index = self.table.rowCount()
                self.table.insertRow(row_index)
                # add data to cells 
                for col_index, cell in enumerate(row):
                    self.table.setItem(row_index, col_index, QTableWidgetItem(cell))
        
        # setting for the table as the central widget
        self.setCentralWidget(self.table)

# this run the application
if __name__ == '__main__':
    app = QApplication(sys.argv)
    window = MainWindow()
    window.show()
    sys.exit(app.exec())
Here is what the result of running the source code:

Wednesday, December 28, 2022

Python 3.10.2 : Copernicus A.P.I. and python sentinelsat python package - part 001.

Last night I worked a bit with python and tested on the online tool from Copernicus.
Copernicus is the European Union's Earth observation programme, which analyzes our planet and its environment for the benefit of all European citizens.
If you want to test it with python or another A.P>I. you need to create an user and a apassword.This is the source code I used with S:
from sentinelsat import SentinelAPI, read_geojson, geojson_to_wkt
from datetime import date
# Connect to the Sentinel API
api = SentinelAPI('___', '___', 'https://scihub.copernicus.eu/dhus')
#
api.download('___from_copernicus_website___')
# Search for Sentinel-2 images covering a specific area
footprint = geojson_to_wkt(read_geojson('area_of_interest.geojson'))

products = api.query(footprint,
                     date=('20211201', '20211205'),
                     platformname='Sentinel-1')
# convert to Pandas DataFrame
products_df = api.to_dataframe(products)
print(products_df)
# sort and limit to first 5 sorted products
products_df_sorted = products_df.sort_values(['link'], ascending=[True])
products_df_sorted = products_df_sorted.head(5)

# download sorted and reduced products
api.download_all(products_df_sorted.index)
You need a JSOn file to select the area of interest:
After I run this python script, the result is this:
python test001.py
                                                                                  title  ... productconsolidation
8f12995e-8f4b-4634-91bb-4971a1bdd0c3  S1B_IW_SLC__1SDV_20211201T160049_20211201T1601...  ...                  NaN
c62ceac6-c9ac-409d-bea9-d1bc23b1b183  S1B_IW_GRDH_1SDV_20211201T160050_20211201T1601...  ...                  NaN
2d1319c5-60af-468b-904a-5dfbdd5f205c  S1B_IW_RAW__0SDV_20211201T160046_20211201T1601...  ...                SLICE

[3 rows x 36 columns]
Downloading S1B_IW_GRDH_1SDV_20211201T160050_20211201T160115_029834_038FB2_A390.zip: 100%|█| 929M/929M [02:44<00:00, 5.
Downloading products:  33%|██████████████████▋                                     | 1/3 [02:58<05:57, 178.58s/product]
Downloading S1B_IW_RAW__0SDV_20211201T160046_20211201T160119_029834_038FB2_D35D.zip:  83%|▊| 1.31G/1.58G [03:21<00:26,
Downloading S1B_IW_SLC__1SDV_20211201T160049_20211201T160116_029834_038FB2_AC13.zip:  31%|▎| 1.33G/4.35G [03:18<04:16,
...
The copernicus online map can be seen in the next inage:

News : Inkscape team hiring python developer.

For the Inkscape project and its users, interoperability with other software packages, both free and commercial, is of high importance. The PLC has decided to hire a developer for the equivalent of 1.5 months (part-time schedule available) to implement importing functionality of a file format for which Inkscape yet lacks proper support. An extension of the project to up to 3 months (with additional compensation) may be granted depending on the success of the first half ...
You can find more information on the official website.

Saturday, December 24, 2022

Python 3.8.16 : My colab tutorials - part 028.

Today I added a new example to my GitHub repo on colab with a simple example of how to search for images using Google's custom search A.P.I. You can find this example on my Github webpage example.

Monday, December 19, 2022

Python 3.10.2 : MoviePy - part 001.

MoviePy is a Python module for video editing, which can be used for basic operations (like cuts, concatenations, title insertions), video compositing (a.k.a. non-linear editing), video processing, or to create advanced effects. It can read and write the most common video formats, including GIF.
You can read more about this python package on this webpage.
I install this python package with the pip3 tool:
pip3 install MoviePy --user
I have an AVI file type created with the Blender 3D software, named anime_effect_001.avi, you can find it on my youtube channel.
I used this source code to convert it into an mp4 file type:
import moviepy.editor as moviepy
clip = moviepy.VideoFileClip("anime_effect_001.avi")
clip.write_videofile("MP4_anime_effect_001.mp4")
I run with this command:
python moviepy_001.py
Moviepy - Building video MP4_anime_effect_001.mp4.
Moviepy - Writing video MP4_anime_effect_001.mp4
...
Moviepy - Done !
Moviepy - video ready MP4_anime_effect_001.mp4
I play the MP4 file with the VLC video player and works great.

Saturday, December 17, 2022

Python 3.10.2 : Suite for Computer-Assisted Music in Python known as SCAMP.

SCAMP is an computer-assisted composition framework in Python designed to act as a hub, flexibly connecting the composer-programmer to a wide variety of resources for playback and notation. SCAMP allows the user to manage the flow of musical time, play notes either using FluidSynth or via MIDI or OSC messages to an external synthesizer, and ultimately quantize and export the result to music notation in the form of MusicXML or Lilypond. Overall, the framework aims to address pervasive technical challenges while imposing as little as possible on the aesthetic choices of the composer-programmer.
Let's install with pip3 python tool in Windows O.S..
pip3 install --user scamp
I created a python script named music001_test001.py with this source code:
from scamp import *
import random

s = Session()

guitar = s.new_part("Guitar")

text = "this is a test text"

for char in text:
    if char == " ":
        wait(0.2)
    elif char.isalnum():
        for x in range (0,10):
            guitar.play_note(ord(char) - random.randrange(50, 75), random.randint(0,5), random.random()/5)
    else:
        wait(0.2)
        guitar.play_note(ord(char), 0.8, 0.06)
        wait(0.2)
The source code is easy to understand. I use random to play into for loop.
I play these with preset Jazz Guitar for Guitar.
I could say that the result is quite good for the random function.
In my internet searches, I also found a rather interesting PDF file about this Python module and other enhancements. You can find it here.

Monday, December 12, 2022

OpenAI knows how to write source code for Blender 3D.

I tested the new OpenAI chat from with this question:
Please write a 3d blender script in Python that moves a camera around an object 360 degrees facing it.

import bpy

# Set the object that the camera will orbit around
target_object = bpy.data.objects["MyObject"]

# Set the starting position for the camera
camera = bpy.data.objects["Camera"]
camera.location = (0, 0, 5)

# Set the number of degrees to rotate the camera around the object
degrees = 360

# Set the distance that the camera should be from the object
distance = 5

# Set the speed at which the camera should orbit
speed = 1

# Set the direction in which the camera should orbit (1 for clockwise, -1 for counter-clockwise)
direction = 1

# Calculate the number of frames needed for the camera to orbit
# around the object by the desired number of degrees
num_frames = degrees / speed

# Set the camera to track the object
bpy.ops.object.select_all(action="DESELECT")
camera.select_set(True)
bpy.context.view_layer.objects.active = camera
bpy.ops.object.track_set(type="TRACKTO")

# Animate the camera orbiting around the object
for frame in range(0, num_frames):
    # Set the current frame
    bpy.context.scene.frame_set(frame)

    # Calculate the new position for the camera based on its distance from the object
    x = distance * math.sin(math.radians(frame*speed*direction))
    y = distance * math.cos(math.radians(frame*speed*direction))
    camera.location = (x,y,0)
I tested with the latest version of Blender 3D and it works well with some small changes it can be improved.
This error for this script:
Python: Traceback (most recent call last):
...
TypeError: 'float' object cannot be interpreted as an integer
If you ask more than once you will get different source code and I encountered a network error.
I tried several times and the network error did not let me take the more complex and complete source code.

Python 3.10.2 : Quickstart with streamlit python package.

In today's tutorial, I will give you a brief introduction to the streamlit packet.
Streamlit turns data scripts into shareable web apps in minutes. All in pure Python. No front‑end experience required.
Let's install with the pip tool:
pip install streamlit
After installation, I tested their example with the following command:
python -m streamlit hello
The result in the browser will be this:
You can create a working folder to add a python file called myapp001.py with the following continue:
import streamlit as st 

st.write("""
#testing streamlit
""")
To run this python file with streamlit use the following command:
python -m streamlit run myapp001.py

  Welcome to Streamlit!

  If you’d like to receive helpful onboarding emails, news, offers, promotions,
  and the occasional swag, please enter your email address below. Otherwise,
  leave this field blank.

  Email:  catafest@yahoo.com

  You can find our privacy policy at https://streamlit.io/privacy-policy

  Summary:
  - This open source library collects usage statistics.
  - We cannot see and do not store information contained inside Streamlit apps,
    such as text, charts, images, etc.
  - Telemetry data is stored in servers in the United States.
  - If you'd like to opt out, add the following to %userprofile%/.streamlit/config.toml,
    creating that file if necessary:

    [browser]
    gatherUsageStats = false


  You can now view your Streamlit app in your browser.
...

Sunday, December 11, 2022

Python 3.10.2 : Quickstart OpenAI example.

Since it's Christmas time, here's a short introduction to OpenAI and python. An example is from the official page.
OpenAI has trained cutting-edge language models that are very good at understanding and generating text. Our API provides access to these models and can be used to solve virtually any task that involves processing language. In this quickstart tutorial, you’ll build a simple sample application. Along the way, you’ll learn key concepts and techniques that are fundamental to using the API for any task, including: Content generation Summarization Classification, categorization, and sentiment analysis Data extraction Translation Many more!
Because I run this example in Windows 10 operating system, you need to step over some commands from the official webpage. For example, this is a Linux command:
. venv/bin/activate
Create a token into an OpenAI account to use it, then use these commands:
git clone https://github.com/openai/openai-quickstart-python.git
cd openai-quickstart-python
pip install Flask
pip install -r requirements.txt --user
Change the app.py source code with your token, like this:
openai.api_key = "your_token"
Run the application with this command:
python -m flask run
The result in the command prompt area is this:
 * Restarting with stat
 * Debugger is active!
 * Debugger PIN: 102-938-829
 * Running on http://127.0.0.1:5000/ (Press CTRL+C to quit)
127.0.0.1 - - [11/Dec/2022 16:13:06] "POST / HTTP/1.1" 302 -
127.0.0.1 - - [11/Dec/2022 16:13:06] "GET /?result=+The+Flash%2C+Speedy%2C+Sonic+the+Hedgehog HTTP/1.1" 200 -
127.0.0.1 - - [11/Dec/2022 16:13:06] "GET /static/main.css HTTP/1.1" 304 -
127.0.0.1 - - [11/Dec/2022 16:13:06] "GET /static/dog.png HTTP/1.1" 304 -
127.0.0.1 - - [11/Dec/2022 16:13:11] "POST / HTTP/1.1" 302 -
127.0.0.1 - - [11/Dec/2022 16:13:11] "GET /?result=+Speedy%2C+The+Flash%2C+Sonic HTTP/1.1" 200 -
127.0.0.1 - - [11/Dec/2022 16:13:12] "GET /static/main.css HTTP/1.1" 304 -
127.0.0.1 - - [11/Dec/2022 16:13:12] "GET /static/dog.png HTTP/1.1" 304 -
This is the result of the running source code:

Tuesday, November 8, 2022

News : Snowpark for Python.

Snowpark for Python, now generally available, empowers the growing Python community of data scientists, data engineers, and developers to build secure and scalable data pipelines and machine learning (ML) workflows directly within Snowflake—taking advantage of Snowflake’s performance, elasticity, and security benefits, which are critical for production workloads., read more on this news on the official blog.
The official website come with this feature: Start your 30-day free Snowflake trial which includes $400 worth of free usage.

Monday, November 7, 2022

Python 3.7.13 : My colab tutorials - part 027.

Today, I update my GitHub repo with python source code tested on colab google.
You can see this notebook named catafest_032.ipynb on my GitHub repo.

Saturday, October 29, 2022

News : PyTorch 1.13 new release.

We are excited to announce the release of PyTorch® 1.13 (release note)! This includes Stable versions of BetterTransformer. We deprecated CUDA 10.2 and 11.3 and completed migration of CUDA 11.6 and 11.7. Beta includes improved support for Apple M1 chips and functorch, a library that offers composable vmap (vectorization) and autodiff transforms, being included in-tree with the PyTorch release. This release is composed of over 3,749 commits and 467 contributors since 1.12.1. We want to sincerely thank our dedicated community for your contributions.
You can find more on the official website.

Friday, October 7, 2022

Python 3.10.7 : Rembg for remove background.

Rembg is a tool to remove images background and the project can be found on the GitHub webpage.
Create a python file named remove_background.py.
Install using the pip tool.
pip install rembg
Collecting rembg
  Downloading rembg-2.0.25-py3-none-any.whl (12 kB)
Add this source code and the input001.png image for procesing in the same folder with the python script.
from rembg import remove 
from PIL import Image 
input_path = 'input001.png'
output_path = 'output001.png'
input = Image.open(input_path)
output = remove(input)
output.save(output_path)
Run the python script and if you see this error:
python remove_background.py
Access denied with the following error:

        Too many users have viewed or downloaded this file recently. Please
        try accessing the file again later. If the file you are trying to
        access is particularly large or is shared with many people, it may
        take up to 24 hours to be able to view or download the file. If you
        still can't access a file after 24 hours, contact your domain
        administrator.

You may still be able to access the file from the browser:

         https://drive.google.com/uc?id=1tCU5MM1LhRgGou5OpmpjBQbSrYIUoYab
         ...
... then copy the u2net.onnx file into this path:
C:\Users\your_user\.u2net\
After I copy the file I run again the python script and this is the result.

Sunday, September 11, 2022

Python : Blockchain Programming - part 001.

This is the first tutorial in the blockchain programming series using the python programming language.
To program a blockchain, we must consider two elements: in addition to the blockchain address, it can have a programmable area and the second essential element, the interaction of the blockchain with external web areas can be programmed.
In this tutorial I will use the python web3 package, an etherium address and an online web utility called infura.io.
In the infura.io account, create a web3 project and in the dashboard - manage key you will have to add the ethereum address and use the url created to mainnet.infura.io.
I created a project in python in Fedora 37 using the conda utility and installed the web3 package.
Here is the python source code I used
from web3 import Web3
node_provider = "https://mainnet.infura.io/v3/1f2fb5d1e1be4c11acdbbb07a2e06a1c"

web3_connection = Web3(Web3.HTTPProvider(node_provider))


def is_connected():
    print(web3_connection.isConnected())

def latest_block():
    print(web3_connection.eth.block_number)

def balanceETH(ETH_address):
    balance = web3_connection.eth.get_balance(ETH_address)
    balance_for_ETH = web3_connection.fromWei(balance,'ether')
    print(balance_for_ETH)
Here is the answer to running this source code using the etherium address:
(web3_001) [mythcat@fedora PythonProjects]$ vi web3_func_001.py
(web3_001) [mythcat@fedora PythonProjects]$ python
Python 3.9.13 (main, Aug 25 2022, 23:26:10)
[GCC 11.2.0] :: Anaconda, Inc. on linux
Type "help", "copyright", "credits" or "license" for more information.
>>> from web3_func_001 import *
>>> is_connected()
True
>>> latest_block()
15516253
>>> balanceETH("0x74E55f28a8A0158b466FcB481EC7e6bE45D1DB91")
0
Since it is a rather complex field, I will come back with other tutorials when I have the necessary resources.

Monday, August 15, 2022

Blender 3D and python scripting - part 025.

In this tutorial I will show a simple python script for add a String interface to the Group Output.
You can see in the next image the result of this script.
You need to have an modifier Geometry Nodes or add new one.
This is the source script with comments for each step I used:
import bpy

#get active object - default 
obj = bpy.context.active_object

# set the default start for working with Geometry Nodes modifier
# you need to have a Geometry Nodes modifier
node_group = obj.modifiers['GeometryNodes'].node_group
nodes = node_group.nodes

#get the node named 'Group Output'
geom_out = nodes.get('Group Output')

#create a string node 
string_node = nodes.new('FunctionNodeInputString')
# set the name to 'String'
string_out = string_node.outputs['String']
# set the value to "This is a string"
string_node.string = "This is a string"

# link to the Group Output
node_group.links.new(string_out, geom_out.inputs[-1])

Sunday, August 14, 2022

Python : Install python with winget.

The winget command line tool enables users to discover, install, upgrade, remove and configure applications on Windows 10 and Windows 11 computers. This tool is the client interface to the Windows Package Manager service.
The winget can be installed on Windows 11 from the Windows Store.
More about winget command can be read on the Microsoft website.
After installation you can use the PowerShell command shell to install the python with this command:
winget install --id Python.Python.3 -e --source winget
Found Python 3 [Python.Python.3] Version 3.10.6
This application is licensed to you by its owner.
Microsoft is not responsible for, nor does it grant any licenses to, third-party packages.
Downloading https://www.python.org/ftp/python/3.10.6/python-3.10.6-amd64.exe
  ██████████████████████████████  27.5 MB / 27.5 MB
Successfully verified installer hash
Starting package install...
Successfully installed

Wednesday, August 10, 2022

Python 3.10.7 : Manim python package - part 001.

Manim is an engine for precise programmatic animations, designed for creating explanatory math videos, see the official GitHub repo.
Let's install this python package.
python.exe -m pip install manim
...
Successfully installed Pillow-9.2.0 Pygments-2.12.0 certifi-2022.6.15 charset-no
rmalizer-2.1.0 click-8.1.3 click-default-group-1.2.2 cloup-0.13.1 colour-0.1.5 c
ommonmark-0.9.1 decorator-5.1.1 glcontext-2.3.6 idna-3.3 isosurfaces-0.1.0 manim
-0.16.0.post0 manimpango-0.4.1 mapbox-earcut-0.12.11 moderngl-5.6.4 moderngl-win
dow-2.4.1 multipledispatch-0.6.0 networkx-2.8.5 pycairo-1.21.0 pydub-0.25.1 pygl
et-1.5.26 pyrr-0.10.3 requests-2.28.1 rich-12.5.1 scipy-1.9.0 screeninfo-0.8 ski
a-pathops-0.7.2 srt-3.5.2 tqdm-4.64.0 urllib3-1.26.11 watchdog-2.1.9 
You need to install the ffmepg software and add this to the environment path.
The default source code for create a circle is this:
from manim import *

# a simple python class
class DefaultClassExample(Scene):
    def construct(self):
        # add a circle 
        circle = Circle()
        # create a animation 
        self.play(Create(circle))
Use this command to create a video with this source code
manim -pql manim_001.py test
Manim Community v0.16.0.post0
...
INFO     Previewed File at: 'C:\Python310\media\videos\manim_001\480p15\DefaultClassExample.mp4'
...
This is the result of this command:

Blender 3D and python scripting - part 024.

In this tutorial I will show you how to use GeometryNodes with python script and Blender A.P.I.
You can see the result in the next image.
The Object Info node gets information from objects. This can be useful to control parameters in the geometry node tree with an external object, either directly by using its geometry, or via its transformation properties. An Object Info node can be added quickly by dragging an object into the node editor.
Another information can be found on the manual link.
In the next script you can see I created a simple BezierCurve object.
The definition named new_GeometryNodes_group is used to create two nodes GroupInit and GroupOutput.
I commente the source code to see some steps.
# import python packages
import bpy
from mathutils import Vector

# create a simpple BezierCurve and rename it with 'BezierCurveGeormetryNode'
bpy.ops.curve.primitive_bezier_curve_add()
bpy.ops.object.modifier_add(type='NODES')  

curve = bpy.context.active_object
curve.name = 'BezierCurveGeormetryNode'

# define a function for GroupInit and GroupOutput
def new_GeometryNodes_group():
    ''' Create a new empty node group that can be used
        in a GeometryNodes modifier.
    '''
    node_group = bpy.data.node_groups.new('GeometryNodes', 'GeometryNodeTree')
    inNode = node_group.nodes.new('NodeGroupInput')
    inNode.outputs.new('NodeSocketGeometry', 'Geometry')
    outNode = node_group.nodes.new('NodeGroupOutput')
    outNode.inputs.new('NodeSocketGeometry', 'Geometry')
    node_group.links.new(inNode.outputs['Geometry'], outNode.inputs['Geometry'])
    # the -3.5 is value for how far will be set the GroupInit and GroupOutput in the area of GeormetryNodes
    inNode.location = Vector((-3.5*inNode.width, 0))
    outNode.location = Vector((3.5*outNode.width, 0))
    return node_group

# the default curve modifier has no node group set, you need to set :
if curve.modifiers[-1].node_group:
    node_group = curve.modifiers[-1].node_group    
else:
    node_group = new_GeometryNodes_group()
    curve.modifiers[-1].node_group = node_group

# set default grup node as nodes
nodes = node_group.nodes

# get both nodes for each one 
group_in = nodes.get('Group Input')
group_out = nodes.get('Group Output')

# add the GeometryNodeObjectInfo to the GeometryNode area 
new_node_obj = nodes.new('GeometryNodeObjectInfo')
new_node_obj.inputs[0].default_value = bpy.data.objects["BezierCurveGeormetryNode"]

Monday, August 8, 2022

Python 3.10.4 : EbookLib python library - part 001.

EbookLib is a Python library for managing EPUB2/EPUB3 files. It’s capable of reading and writing EPUB files programmatically.
You can read more about this python library on this website.
First, I install with the pip tool:
C:\Python310>python -m pip install --upgrade pip
Requirement already satisfied: pip in c:\python310\lib\site-packages (22.1)
Collecting pip
  WARNING: Retrying (Retry(total=4, connect=None, read=None, redirect=None, stat
us=None)) after connection broken by 'NewConnectionError(': Failed to establish a n
ew connection: [Errno 11001] getaddrinfo failed')': /packages/1f/2c/d9626f045e7b
49a6225c6b09257861f24da78f4e5f23af2ddbdf852c99b8/pip-22.2.2-py3-none-any.whl
  Downloading pip-22.2.2-py3-none-any.whl (2.0 MB)
     ---------------------------------------- 2.0/2.0 MB 1.5 MB/s eta 0:00:00
Installing collected packages: pip
  Attempting uninstall: pip
    Found existing installation: pip 22.1
    Uninstalling pip-22.1:
      Successfully uninstalled pip-22.1
Successfully installed pip-22.2.2

C:\Python310>python -m pip install lxml-4.9.0-cp310-cp310-win_amd64.whl
Processing c:\python310\lxml-4.9.0-cp310-cp310-win_amd64.whl
Installing collected packages: lxml
Successfully installed lxml-4.9.0

C:\Python310>python -m pip install EbookLib --user
Collecting EbookLib
  Using cached EbookLib-0.17.1.tar.gz (111 kB)
  Preparing metadata (setup.py) ... done
Requirement already satisfied: lxml in c:\python310\lib\site-packages (from Eboo
kLib) (4.9.0)
Collecting six
  Using cached six-1.16.0-py2.py3-none-any.whl (11 kB)
Using legacy 'setup.py install' for EbookLib, since package 'wheel' is not insta
lled.
Installing collected packages: six, EbookLib
  Running setup.py install for EbookLib ... done
Successfully installed EbookLib-0.17.1 six-1.16.0
I used a the simple python script from the last tutorial to test it:
The last tutorial used the default script from the official webpage.
Compared to the default script, I made changes, the selection in the Romanian language and diacritics...
from ebooklib import epub

book = epub.EpubBook()

# set metadata
book.set_identifier('__1976')
book.set_title('')
book.set_language('en')

book.add_author('Autho: Cătălin George Feștilă')

# create chapter
cap001 = epub.EpubHtml(title='Intro', file_name='capitolul_01.xhtml', lang='ro')
cap001.content=u'<h1>Introducere</h1><p>Această carte este...</p>'

# add chapter
book.add_item(cap001)

# define Table Of Contents
book.toc = (epub.Link('capitolul_01.xhtml', 'Introducere', 'introducere'),
             (epub.Section('O carte simplă'),
             (cap001, ))
            )

# add default NCX and Nav file
book.add_item(epub.EpubNcx())
book.add_item(epub.EpubNav())

# define CSS style
style = 'BODY {color: white;}'
nav_css = epub.EpubItem(uid="style_nav", file_name="style/nav.css", media_type="text/css", content=style)

# add CSS file
book.add_item(nav_css)

# basic spine
book.spine = ['nav', cap001]

# write to the file
epub.write_epub('ro_lan_test.epub', book, {})
This is the result of the epub file:

Sunday, July 24, 2022

Python 3.11.0a7 : image conversions in Python.

Image processing is very important in development, therefore also in python.
The image processing packages used in python have undergone changes over time.
Pillow and PIL cannot co-exist in the same environment. Before installing Pillow, please uninstall PIL.
Pillow higher than version 10 no longer supports import Image. Please use from PIL import Image instead.
Pillow higher than version 2.1.0 no longer supports import _imaging. Please use from PIL.Image import core as _imaging instead.
Although the image formats are old compared to the newer ones in vector format, they are preferred depending on the field of work.
You can see all of these file image formats on the official python package.
First, the basic installation start with upgrade the pip tool:
C:\PythonProjects\ConvertImages>python -m pip install --upgrade pip
Requirement already satisfied: pip in c:\python311alpha\lib\site-packages (22.1.
2)
Collecting pip
  Downloading pip-22.2-py3-none-any.whl (2.0 MB)
     ---------------------------------------- 2.0/2.0 MB 3.3 MB/s eta 0:00:00
Installing collected packages: pip
  Attempting uninstall: pip
    Found existing installation: pip 22.1.2
    Uninstalling pip-22.1.2:
      Successfully uninstalled pip-22.1.2
Successfully installed pip-22.2
Secondary, the install of the Pillow python package:
C:\PythonProjects\ConvertImages>python  -m pip install --upgrade Pillow
Collecting Pillow
  Downloading Pillow-9.2.0-cp311-cp311-win_amd64.whl (3.3 MB)
     ---------------------------------------- 3.3/3.3 MB 4.0 MB/s eta 0:00:00
Installing collected packages: Pillow
Successfully installed Pillow-9.2.0
I have a webp image here that I have scaled to smaller sizes and that I will test its conversion from webp format to png format.
The image is named waterski2 and I'm using the 3.11.0a7 python version.
Let's see the source code:
from PIL import Image

# open the image file WEBP
image = Image.open('waterski2.webp')

# show the image 
image.show()

# convert the image to RGB color
image = image.convert('RGB')

# save PNG RGB image
image.save('waterski2_RGB_PNG.png', 'png')

# save JPG RGB image
image.save('waterski2_RGB_JPG.jpg', 'jpeg')

# open the image file JPG
image_jpg = Image.open('waterski2_RGB_JPG.jpg')

# convert the image to RGB color
image_rgb_jpg = image_jpg.convert('RGB')

# save PNG RGB image from JPG
image_rgb_jpg.save('new-image_RGB_PNG_from_JPG.png', 'png')

#same process of conversion to WEBP file type
# from png image
image = Image.open('waterski2_RGB_PNG.png')
image = image.convert('RGB')
image.save('new-image_RGB_WEBP_from_png.webp', 'webp')
# from jpg image
image = Image.open('waterski2_RGB_JPG.jpg')
image = image.convert('RGB')
image.save('new-image_RGB_WEBP_from_jpg.webp', 'webp')
Here is a screenshot with these converted images and the processed image.

Saturday, July 23, 2022

Blender 3D and python scripting - part 023.

This script will add a submenu to the main Help menu with an icon with a folder that will open the explorer from the Windows operating system.
I have not solved the tooltip of this button, it is set to show a message about opening a URL.
This is the source code:
import bpy

def menu_func(self, context):
    '''Open explorer in windows systems'''
    self.layout.operator(
            "wm.url_open", text="Open explorer", icon='FILE_FOLDER').url = "C:/"
def register():
    bpy.types.TOPBAR_MT_help.append(menu_func)

def unregister():
    bpy.types.TOPBAR_MT_help.remove(menu_func)

if __name__ == "__main__":
    register()
If you want to change the tooltip then need to create a class OpenOperator and wrapper for this operator function and set the bl_label and all you need to have it.
The menu_func will get the layout operator with all defined in the class OpenOperator and will set the tooltip with the text: Open explorer in windows systems.
See this new source code:
import bpy

def menu_func(self, context):
    self.layout.operator(
            OpenOperator.bl_idname, text="Open explorer", icon='FILE_FOLDER')

class OpenOperator(bpy.types.Operator):
    """Open explorer in windows systems"""
    bl_idname = "wm.open_explorer"
    bl_label = "Open explorer"

    def execute(self, context):
        bpy.ops.wm.url_open(url="C:/")
        return {'FINISHED'}


def register():
    bpy.utils.register_class(OpenOperator)
    bpy.types.TOPBAR_MT_help.append(menu_func)


def unregister():
    bpy.utils.unregister_class(OpenOperator)
    bpy.types.TOPBAR_MT_help.remove(menu_func)


if __name__ == "__main__":
    register()

Saturday, July 16, 2022

Python 3.7.13 : My colab tutorials - part 026.

Vosk is an offline open source speech recognition toolkit. It enables speech recognition for 20+ languages and dialects - English, Indian English, German, French, Spanish, Portuguese, Chinese, Russian, Turkish, Vietnamese, Italian, Dutch, Catalan, Arabic, Greek, Farsi, Filipino, Ukrainian, Kazakh, Swedish, Japanese, Esperanto, Hindi, Czech, Polish. More to come.
Today I tested this Python package with a video that contains sound content in the Chinese language
I created a simple interface where you can test other videos on youtube and where you can select the language and start time and duration for the detection sequence with the python vosk package.
I used the python youtube_dl package to take portions of wav sound from a youtube video.
I haven't done tests on other videos but it should work.
You can find it on this colab notebook.

Wednesday, July 13, 2022

Python 3.11.0a7 : local script for update python packages.

If you want to upgrade all local packages from a local script for pip with version greater than 10.0.1 version use a local python script with this source code:
import pkg_resources
from subprocess import call

packages = [dist.project_name for dist in pkg_resources.working_set]
call("pip install --upgrade " + ' '.join(packages), shell=True)
Run it with the python executable and you will see something like this:
C:\Python311alpha>python.exe update_python.py
...
Requirement already satisfied: pip-api in c:\python311alpha\lib\site-packages (0.0.29)
Requirement already satisfied: pypng in c:\python311alpha\lib\site-packages (0.0.21)
Requirement already satisfied: PyGetWindow in c:\python311alpha\lib\site-packages (0.0.9)
Requirement already satisfied: bs4 in c:\python311alpha\lib\site-packages (0.0.1)

Tuesday, July 12, 2022

Python 3.7.13 : My colab tutorials - part 025.

Today I tested a simple data processing example with the first image from NASA's James Webb Space Telescope
You can find this example and more on my GitHub repository for colab.
This is one of results of data processing with a simple logaritm function to see magnitude spectrum of Fourier transform X by shifting the zero-frequency map:

Thursday, July 7, 2022

Blender 3D and python scripting - part 022.

In the last tutorial, we exemplified with the default template from Blender 3D how to create a panel in the Object area.
Today I will show you how to modify this panel with some useful elements for developing an addon.
The purpose of the old tutorial on this is the differences and changes that must be made to the template source code to introduce the following functions:
    StringProperty(
    BoolProperty( 
    IntProperty(
    IntVectorProperty(
    FloatProperty(
    FloatVectorProperty(
    BoolVectorProperty(
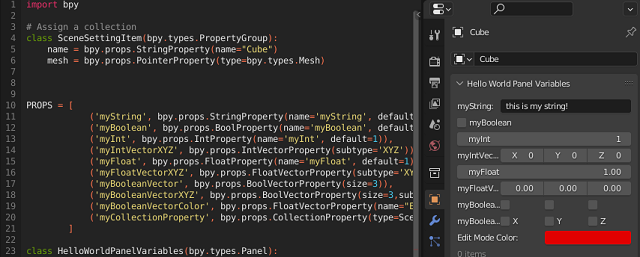
Some arguments need to be modified to have different input data, see the selection of colors in the attached image:
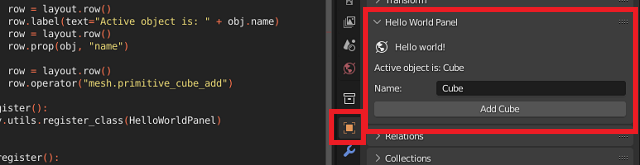
I commented on the source code areas in the template and added my changes:
The class also called SceneSettingItem and CollectionProperty is currently being tested and is not finalized to be implemented, it can be seen in panel: 0 items.
It can be seen that any defined class must be registered and unregistered
Here is the source code used to get the new screenshot changes:
import bpy

# Assign a collection
class SceneSettingItem(bpy.types.PropertyGroup):
    name = bpy.props.StringProperty(name="Cube")
    mesh = bpy.props.PointerProperty(type=bpy.types.Mesh)


PROPS = [
            ('myString', bpy.props.StringProperty(name='myString', default='this is my string!')),
            ('myBoolean', bpy.props.BoolProperty(name='myBoolean', default=False)),
            ('myInt', bpy.props.IntProperty(name='myInt', default=1)),
            ('myIntVectorXYZ', bpy.props.IntVectorProperty(subtype='XYZ')),
            ('myFloat', bpy.props.FloatProperty(name='myFloat', default=1)),
            ('myFloatVectorXYZ', bpy.props.FloatVectorProperty(subtype='XYZ')),
            ('myBooleanVector', bpy.props.BoolVectorProperty(size=3)),
            ('myBooleanVectorXYZ', bpy.props.BoolVectorProperty(size=3,subtype='XYZ')),
            ('myBooleanVectorColor', bpy.props.FloatVectorProperty(name="Edit Mode Color", subtype='COLOR',  default=(0.76, 0.0, 0.0), size=3, min=0, max=1)),
            ('myCollectionProperty', bpy.props.CollectionProperty(type=SceneSettingItem)),
        ]    

class HelloWorldPanelVariables(bpy.types.Panel):
    """Creates a Panel in the Object properties window"""
    bl_label = "Hello World Panel Variables"
    bl_idname = "OBJECT_PT_hello"
    bl_space_type = 'PROPERTIES'
    bl_region_type = 'WINDOW'
    bl_context = "object"

#    def draw(self, context):
#        layout = self.layout
#        obj = context.object
#        row = layout.row()
#        row.label(text="Hello world!", icon='WORLD_DATA')
#        row = layout.row()
#        row.label(text="Active object is: " + obj.name)
#        row = layout.row()
#        row.prop(obj, "name")
#        row = layout.row()
#        row.operator("mesh.primitive_cube_add")

    def draw(self, context):
        col = self.layout.column()
        for (prop_name, _) in PROPS:
            row = col.row()
            row.prop(context.scene, prop_name)

        
def register():
    bpy.utils.register_class(SceneSettingItem)
    bpy.utils.register_class(HelloWorldPanelVariables)
    for (prop_name, prop_value) in PROPS:
        setattr(bpy.types.Scene, prop_name, prop_value)

def unregister():
    bpy.utils.unregister_class(SceneSettingItem)
    bpy.utils.unregister_class(HelloWorldPanelVariables)    
    for (prop_name, _) in PROPS:
        delattr(bpy.types.Scene, prop_name)

if __name__ == "__main__":
    register()

Wednesday, July 6, 2022

Blender 3D and python scripting - part 021.

I will continue the series of tutorials with python and the Blender 3D software interface.
From the main menu we can get to the scripting part and here we choose Templates - Python - Ui Panel Simple.
The source code will be added to the python editor.
Save this source code with a name and load it as an addon.
After loading this source code it can be found at Properties at Object, see screenshot.
You can see the source code from the Ui Panel Simple template that I used.
import bpy

class HelloWorldPanel(bpy.types.Panel):
    """Creates a Panel in the Object properties window"""
    bl_label = "Hello World Panel"
    bl_idname = "OBJECT_PT_hello"
    bl_space_type = 'PROPERTIES'
    bl_region_type = 'WINDOW'
    bl_context = "object"

    def draw(self, context):
        layout = self.layout

        obj = context.object

        row = layout.row()
        row.label(text="Hello world!", icon='WORLD_DATA')

        row = layout.row()
        row.label(text="Active object is: " + obj.name)
        row = layout.row()
        row.prop(obj, "name")

        row = layout.row()
        row.operator("mesh.primitive_cube_add")

def register():
    bpy.utils.register_class(HelloWorldPanel)


def unregister():
    bpy.utils.unregister_class(HelloWorldPanel)

if __name__ == "__main__":
    register()