analitics

Pages

Saturday, November 10, 2018

Python Qt5 : QTabWidget example.

Today I test the QTabWidget with an simple example.
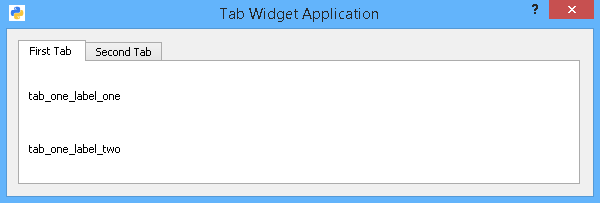
The source code uses the QTabWidget and create two Tab: FirstTab and TabTwo.
I add for each tab two labels: tab_one_label_one, tab_one_label_two,tab_two_label_one and tab_two_label_two.
For layouts, I used: vboxLayout with first_layout and second_layout.
The result of my running code is this:

The rest of the source code is simple:
import sys
from PyQt5.QtGui import QIcon
from PyQt5.QtWidgets import QDialog, QApplication, QWidget
from PyQt5.QtWidgets import QVBoxLayout, QTabWidget, QLabel

class TabDialog(QDialog):
    def __init__(self):
        super().__init__()

        self.setWindowTitle("Tab Widget Application")
        self.setWindowIcon(QIcon("icon.png"))

        tabwidget = QTabWidget()
        tabwidget.addTab(FirstTab(), "First Tab")
        tabwidget.addTab(TabTwo(), "Second Tab")

        vboxLayout = QVBoxLayout()
        vboxLayout.addWidget(tabwidget)

        self.setLayout(vboxLayout)

class FirstTab(QWidget):
    def __init__(self):
        super().__init__()
        tab_one_label_one = QLabel("tab_one_label_one")
        tab_one_label_two = QLabel("tab_one_label_two")
        
        first_layout = QVBoxLayout()
        first_layout.addWidget(tab_one_label_one)
        first_layout.addWidget(tab_one_label_two)
        self.setLayout(first_layout)

class TabTwo(QWidget):
    def __init__(self):
        super().__init__()
        tab_two_label_one = QLabel("tab_two_label_one")
        tab_two_label_two = QLabel("tab_two_label_two")
        
        second_layout = QVBoxLayout()
        second_layout.addWidget(tab_two_label_one)
        second_layout.addWidget(tab_two_label_two)
        self.setLayout(second_layout)

if __name__ == "__main__":
    app = QApplication(sys.argv)
    tabdialog = TabDialog()
    tabdialog.show()
    app.exec()

Friday, November 9, 2018

Python Qt5 : default icons with QStyle.

This is a simple example of QStyle.
Using the QStyle can solve more issues above this example.
The QStyle can solve more problems than this example.
You can change everything in PyQt5 and Qt.
The QStyle class is an abstract base class that encapsulates the look and feel of a GUI, read here.
This is the result of a source code I used to show you how can use default icons from PyQt5.

See this source code:
import sys
from PyQt5.QtCore import *
from PyQt5.QtGui import *
from PyQt5.QtWidgets import *

class Widget(QWidget):
  
    def __init__(self, parent= None):
        super(Widget, self).__init__()
        icons = [
'SP_TitleBarMinButton', 
'SP_TitleBarMenuButton', 
'SP_TitleBarMaxButton', 
'SP_TitleBarCloseButton', 
'SP_TitleBarNormalButton', 
'SP_TitleBarShadeButton', 
'SP_TitleBarUnshadeButton', 
'SP_TitleBarContextHelpButton', 
'SP_MessageBoxInformation', 
'SP_MessageBoxWarning', 
'SP_MessageBoxCritical', 
'SP_MessageBoxQuestion', 
'SP_DesktopIcon', 
'SP_TrashIcon', 
'SP_ComputerIcon', 
'SP_DriveFDIcon', 
'SP_DriveHDIcon', 
'SP_DriveCDIcon', 
'SP_DriveDVDIcon', 
'SP_DriveNetIcon', 
'SP_DirHomeIcon', 
'SP_DirOpenIcon', 
'SP_DirClosedIcon', 
'SP_DirIcon', 
'SP_DirLinkIcon', 
'SP_FileIcon', 
'SP_FileLinkIcon', 
'SP_FileDialogStart', 
'SP_FileDialogEnd', 
'SP_FileDialogToParent', 
'SP_FileDialogNewFolder', 
'SP_FileDialogDetailedView', 
'SP_FileDialogInfoView', 
'SP_FileDialogContentsView', 
'SP_FileDialogListView', 
'SP_FileDialogBack', 
'SP_DockWidgetCloseButton', 
'SP_ToolBarHorizontalExtensionButton', 
'SP_ToolBarVerticalExtensionButton', 
'SP_DialogOkButton', 
'SP_DialogCancelButton', 
'SP_DialogHelpButton', 
'SP_DialogOpenButton', 
'SP_DialogSaveButton', 
'SP_DialogCloseButton', 
'SP_DialogApplyButton', 
'SP_DialogResetButton', 
'SP_DialogDiscardButton', 
'SP_DialogYesButton', 
'SP_DialogNoButton', 
'SP_ArrowUp',  
'SP_ArrowDown', 
'SP_ArrowLeft', 
'SP_ArrowRight', 
'SP_ArrowBack', 
'SP_ArrowForward', 
'SP_CommandLink', 
'SP_VistaShield', 
'SP_BrowserReload', 
'SP_BrowserStop', 
'SP_MediaPlay', 
'SP_MediaStop', 
'SP_MediaPause', 
'SP_MediaSkipForward',
'SP_MediaSkipBackward', 
'SP_MediaSeekForward',
'SP_MediaSeekBackward', 
'SP_MediaVolume', 
'SP_MediaVolumeMuted', 
'SP_CustomBase'
            ]
        Col_size = 6
         
        layout = QGridLayout()
 
        count = 0
        for i in icons:
            select_button = QPushButton(i)
            select_button.setIcon(self.style().standardIcon(getattr(QStyle, i)))
 
            layout.addWidget(select_button, count / Col_size, count % Col_size)
            count += 1
             
        self.setLayout(layout)
         
if __name__ == '__main__':
    app = QApplication(sys.argv)
             
    dialog = Widget()
    dialog.show()
             
    app.exec_()

Thursday, November 8, 2018

Python Qt5 : QFileDialog and QTextEdit example.

This tutorial is about QFileDialog and how to use it.
First you need to create a default PyQ5 application and add your method is called by my_OpenDialog.
This will be connected to one button.
My application uses the QTextEdit to show HTML and text files.
If you try to see another file this will open badly.
I set the completeSuffix just for HTML and text.
As you know this returns the complete suffix (extension) of the file.
The content of this file is put into QTextEdit widget create and named editor_text.
This is result of using QFileDialog with python:

This is the source code with the QFileDialog example:
import sys, os
from PyQt5 import QtCore, QtWidgets

class Window(QtWidgets.QWidget):
    def __init__(self):
        super(Window, self).__init__()
        self.setWindowTitle('Text document')
        self.editor_text = QtWidgets.QTextEdit(self)

        self.button_OpenDialog = QtWidgets.QPushButton('Open', self)
        self.button_OpenDialog.clicked.connect(self.my_OpenDialog)

        layout = QtWidgets.QGridLayout(self)
        layout.addWidget(self.editor_text, 0, 0, 1, 1)
        layout.addWidget(self.button_OpenDialog, 1, 0)
        #self.handleTextChanged()

    def my_OpenDialog(self):
        path = QtWidgets.QFileDialog.getOpenFileName(
            self, 'Open file', '',
            'HTML files (*.html);;Text files (*.txt)')[0]
        if path:
            file = QtCore.QFile(path)
            if file.open(QtCore.QIODevice.ReadOnly):
                stream = QtCore.QTextStream(file)
                text = stream.readAll()
                info = QtCore.QFileInfo(path)
                if info.completeSuffix() == 'html':
                    self.editor_text.setHtml(text)
                else:
                    self.editor_text.setPlainText(text)
                file.close()

if __name__ == '__main__':
    app = QtWidgets.QApplication(sys.argv)
    window = Window()
    window.resize(640, 480)
    window.show()
    sys.exit(app.exec_())

Wednesday, November 7, 2018

Python Qt5 : QLCDNumber and QDial example.

This tutorial uses a simple example of QLCDNumber and QDial.
The steps start with create the QWidget with the QLCDNumber and QDial.
You need to set geometry for both and connect the dial with valueChanged.
Finally you need to use show to see the QWidget.
The result is show into the next screenshot:

Let see the source code:
import sys
from PyQt5.QtCore import Qt
from PyQt5.QtWidgets import (QWidget, QLCDNumber, QDial, QApplication)

class QLCDNumber_QDial(QWidget):
    def __init__(self):
        super().__init__()
        self.initUi()

    def initUi(self):
        the_lcd = QLCDNumber(self)
        the_dial = QDial(self)

        self.setGeometry(150, 100, 220, 100)
        self.setWindowTitle('QLCDNumber')

        the_lcd.setGeometry(10,10,70,70)
        the_dial.setGeometry(140,10,70,70)

        the_dial.valueChanged.connect(the_lcd.display)

        self.show()

if __name__ == '__main__':
    app = QApplication(sys.argv)
    run = QLCDNumber_QDial() 
    sys.exit(app.exec_())

Tuesday, November 6, 2018

Python Qt5 : QColorDialog example.

Today I will show you how to use the QColorDialog and clipboard with PyQt5.
You can read documentation from the official website.
This example used a tray icon with actions for each type of code color.
The code of color is put into clipboard area and print on the shell.
I use two ways to get the code of color:
  • parse the result of currentColor depends by type of color codel;
  • get the code of color by a special function from QColorDialog;
To select the color I want to use is need to use the QColorDialog:

Let's see the source code:
from PyQt5.QtGui import *
from PyQt5.QtWidgets import *

# create the application
app = QApplication([])
app.setQuitOnLastWindowClosed(False)

# get the icon file
icon = QIcon("icon.png")

# create clipboard
clipboard = QApplication.clipboard()
# create dialog color
dialog = QColorDialog()

# create functions to get parsing color
def get_color_hex():
    if dialog.exec_():
        color = dialog.currentColor()
        clipboard.setText(color.name())
        print(clipboard.text())

def get_color_rgb():
    if dialog.exec_():
        color = dialog.currentColor()
        clipboard.setText("rgb(%d, %d, %d)" % (
            color.red(), color.green(), color.blue()
        ))
        print(clipboard.text())

def get_color_hsv():
    if dialog.exec_():
        color = dialog.currentColor()
        clipboard.setText("hsv(%d, %d, %d)" % (
            color.hue(), color.saturation(), color.value()
        ))
        print(clipboard.text())
# create function to use getCmyk 
def get_color_getCmyk():
    if dialog.exec_():
        color = dialog.currentColor()
        clipboard.setText("Cmyk(%d, %d, %d, %d, %d)" % (
            color.getCmyk()
        ))
        print(clipboard.text())


# create the tray icon application
tray = QSystemTrayIcon()
tray.setIcon(icon)
tray.setVisible(True)

# create the menu and add actions
menu = QMenu()
action1 = QAction("Hex")
action1.triggered.connect(get_color_hex)
menu.addAction(action1)

action2 = QAction("RGB")
action2.triggered.connect(get_color_rgb)
menu.addAction(action2)

action3 = QAction("HSV")
action3.triggered.connect(get_color_hsv)
menu.addAction(action3)

action4 = QAction("Cmyk")
action4.triggered.connect(get_color_getCmyk)
menu.addAction(action4)

action5 =QAction("Exit")
action5.triggered.connect(exit)
menu.addAction(action5)

# add the menu to the tray icon application
tray.setContextMenu(menu)

app.exec_()

Monday, November 5, 2018

Python Qt5 : tray icon example.

This tutorial is about another tray icon application type.
The base application is the same like any application with some changes with this steps:
- QSystemTrayIcon this will start to create the application like an tray icon application;
- create one menu to show if you use the right click of mouse;
- add a menu with action items;
- add the exit action to close the tray icon application;
- you can use the action item from menu to print a message
Let's see the source code:
from PyQt5.QtGui import *
from PyQt5.QtWidgets import *
# create the application
app = QApplication([])
app.setQuitOnLastWindowClosed(False)

# create the icon
icon = QIcon("icon.png")

# create the tray icon 
tray = QSystemTrayIcon()
tray.setIcon(icon)
tray.setVisible(True)

# this will print a message 
def print_msg():
 print("This action is triggered connect!")

# create the menu for tray icon
menu = QMenu()

# add one item to menu 
action = QAction("This is menu item")
menu.addAction(action)
action.triggered.connect(print_msg)

# add exit item to menu 
exitAction = QAction("&Exit")
menu.addAction(exitAction)
exitAction.triggered.connect(exit)

# add the menu to the tray
tray.setContextMenu(menu)

# start application execution 
app.exec_()
This is result of the running source code:

Sunday, November 4, 2018

Python Qt5 : QtSql with QtOpenGL example.

Today I will show you how to deal with QtOpenGL.
Let's make a test to see what is this:
>>> import PyQt5
>>> from PyQt5.QtOpenGL import *
>>> dir(PyQt5.QtOpenGL)
['QGL', 'QGLContext', 'QGLFormat', 'QGLWidget', '__doc__', '__file__', '__loader
__', '__name__', '__package__', '__spec__']
The QtOpenGL is used to take an OpenGL content and show into the PyQt5 application.
You need to kknow how to use OpenGL API.
You can see the result of this example:

This is the source code for my example:
import sys
import math

from PyQt5.QtCore import Qt
from PyQt5.QtGui import QColor
from PyQt5.QtWidgets import QApplication, QMessageBox
from PyQt5.QtOpenGL import QGL, QGLFormat, QGLWidget

try:
    from OpenGL import GL
except ImportError:
    app = QApplication(sys.argv)
    QMessageBox.critical(None, "OpenGL samplebuffers",
            "PyOpenGL must be installed to run this example.")
    sys.exit(1)

# use to create OpenGL content 
class GLWidget(QGLWidget):
    GL_MULTISAMPLE = 0x809D
    # rotation to 0
    rot = 0.0

    def __init__(self, parent):
        super(GLWidget, self).__init__(QGLFormat(QGL.SampleBuffers), parent)
        self.list_ = []
        self.startTimer(40)
        self.setWindowTitle("OpenGL with sample buffers")

    def initializeGL(self):
        GL.glMatrixMode(GL.GL_PROJECTION)
        GL.glLoadIdentity()
        GL.glOrtho( -.5, .5, .5, -.5, -1000, 1000)
        GL.glMatrixMode(GL.GL_MODELVIEW)
        GL.glLoadIdentity()
        GL.glClearColor(1.0, 1.0, 1.0, 1.0)

        self.makeObject()

    def resizeGL(self, w, h):
        GL.glViewport(0, 0, w, h)

    def paintGL(self):
        GL.glClear(GL.GL_COLOR_BUFFER_BIT | GL.GL_DEPTH_BUFFER_BIT)

        GL.glMatrixMode(GL.GL_MODELVIEW)
        GL.glPushMatrix()
        GL.glEnable(GLWidget.GL_MULTISAMPLE)
        GL.glTranslatef( -0.25, -0.10, 0.0)
        GL.glScalef(0.75, 1.15, 0.0)
        GL.glRotatef(GLWidget.rot, 0.0, 0.0, 1.0)
        GL.glCallList(self.list_)
        GL.glPopMatrix()

        GL.glPushMatrix()
        GL.glDisable(GLWidget.GL_MULTISAMPLE)
        GL.glTranslatef(0.25, -0.10, 0.0)
        GL.glScalef(0.75, 1.15, 0.0)
        GL.glRotatef(GLWidget.rot, 0.0, 0.0, 1.0)
        GL.glCallList(self.list_)
        GL.glPopMatrix()

        GLWidget.rot += 0.2

        self.qglColor(Qt.black)
        self.renderText(-0.35, 0.4, 0.0, "Multisampling enabled")
        self.renderText(0.15, 0.4, 0.0, "Multisampling disabled")

    def timerEvent(self, event):
        self.update()
    # create one object 
    def makeObject(self):
        x1 = +0.05
        y1 = +0.25
        x2 = +0.15
        y2 = +0.21
        x3 = -0.25
        y3 = +0.2
        x4 = -0.1  
        y4 = +0.2
        x5 = +0.25 
        y5 = -0.05

        self.list_ = GL.glGenLists(1)
        GL.glNewList(self.list_, GL.GL_COMPILE)
        
        self.qglColor(Qt.blue)
        self.geometry(GL.GL_POLYGON, x1, y1, x2, y2, x3, y3, x4, y4, x5, y5)
        
        GL.glEndList()
    # create geometry of object depend of render - GL_POLYGON
    # used five points 
    def geometry(self, primitive, x1, y1, x2, y2, x3, y3, x4, y4, x5, y5):
        GL.glBegin(primitive)

        GL.glVertex2d(x1, y1)
        GL.glVertex2d(x2, y2)
        GL.glVertex2d(x3, y3)
        GL.glVertex2d(x4, y4)
        GL.glVertex2d(x5, y5)

        GL.glEnd()
# start the application 
if __name__ == '__main__':

    app = QApplication(sys.argv)

    my_format = QGLFormat.defaultFormat()
    my_format.setSampleBuffers(True)
    QGLFormat.setDefaultFormat(my_format)

    if not QGLFormat.hasOpenGL():
        QMessageBox.information(None, "OpenGL using samplebuffers",
                "This system does not support OpenGL.")
        sys.exit(0)

    widget = GLWidget(None)

    if not widget.format().sampleBuffers():
        QMessageBox.information(None, "OpenGL using samplebuffers",
                "This system does not have sample buffer support.")
        sys.exit(0)

    widget.resize(640, 480)
    widget.show()

    sys.exit(app.exec_())

Saturday, November 3, 2018

Python Qt5 : QtSql with QSQLITE example.

Today I will show you how to deal with QtSql and QSQLITE and show a table into an MDI (Multiple Document Interface) application.
First I create tree scripts named:
  • PyQt5_connection.py - create a memory database and add value into table;
  • PyQt5_view.py - create a model for the table;
  • PyQt5_show.py - show the MDI application with the model table database;
The source code is commented and is simple to understand.
Let's see this python scripts:
First is PyQt5_connection.py:
from PyQt5 import QtWidgets, QtSql
from PyQt5.QtSql import *

def createConnection():
    db = QtSql.QSqlDatabase.addDatabase("QSQLITE")
    db.setDatabaseName(":memory:")
    if not db.open():
        QtWidgets.QMessageBox.critical(None, "Cannot open memory database",
                             "Unable to establish a database connection.\n\n"
                             "Click Cancel to exit.", QtWidgets.QMessageBox.Cancel)
        return False
    query = QtSql.QSqlQuery()
    #print (os.listdir("."))
    query.exec("DROP TABLE IF EXISTS Websites")
    query.exec("CREATE TABLE Websites (ID INTEGER PRIMARY KEY NOT NULL, " +     "website VARCHAR(20))")
    query.exec("INSERT INTO Websites (website) VALUES('python-catalin.blogspot.com')")
    query.exec("INSERT INTO Websites (website) VALUES('catalin-festila.blogspot.com')")
    query.exec("INSERT INTO Websites (website) VALUES('free-tutorials.org')")
    query.exec("INSERT INTO Websites (website) VALUES('graphic-3d.blogspot.com')")
    query.exec("INSERT INTO Websites (website) VALUES('pygame-catalin.blogspot.com')")
    return True
The next is the PyQt5_view.py python script with the model of the table from database:
from PyQt5 import QtWidgets, QtSql

from PyQt5 import QtWidgets, QtSql

class WebsitesWidget(QtWidgets.QWidget):
    def __init__(self, parent=None):
        super(WebsitesWidget, self).__init__(parent)
 # this layout_box can be used if you need more widgets 
 # I used just one named WebsitesWidget
        layout_box = QtWidgets.QVBoxLayout(self)
 #
        my_view = QtWidgets.QTableView()
 # put viwe in layout_box area
        layout_box.addWidget(my_view)
 # create a table model
        my_model = QtSql.QSqlTableModel(self)
        my_model.setTable("Websites")
        my_model.select()
 #show the view with model  
        my_view.setModel(my_model)
        my_view.setItemDelegate(QtSql.QSqlRelationalDelegate(my_view))
The last python script named PyQt5_show.py will create the MDI application and will show databese table:
from PyQt5 import QtWidgets, QtSql
from PyQt5_connection import createConnection
# this will import any classes from PyQt5_view script
from PyQt5_view import WebsitesWidget

class MainWindow(QtWidgets.QMainWindow):
    def __init__(self, parent=None):
        super(MainWindow, self).__init__(parent)

        self.MDI = QtWidgets.QMdiArea()
        self.setCentralWidget(self.MDI)

        SubWindow1 = QtWidgets.QMdiSubWindow()
        SubWindow1.setWidget(WebsitesWidget())
        self.MDI.addSubWindow(SubWindow1)
        SubWindow1.show()
 # you can add more widgest 
        #SubWindow2 = QtWidgets.QMdiSubWindow()

if __name__ == '__main__':
    import sys

    app = QtWidgets.QApplication(sys.argv)

    if not createConnection():
        print("not connect")
        sys.exit(-1)
    w = MainWindow()
    w.show()
    sys.exit(app.exec_())
This is the result of the running PyQt5_show.py python script:

Thursday, November 1, 2018

Python Qt5 : QtWebEngine example.

The QtWebEngine is the new web rendering engine that is planned to replace QtWebKit in Qt.
The official website tells us:
QtWebEngineWidgets or QtWebEngine libraries, depending on application type
Let's test this web rendering engine with a simple source code:
import sys
from PyQt5.QtCore import *
from PyQt5.QtWidgets import QApplication
# use the QtWebEngineWidgets
from PyQt5.QtWebEngineWidgets import *
# start my_app
my_app = QApplication(sys.argv)
# open webpage
my_web = QWebEngineView()
my_web.load(QUrl("http://free-tutorials.org"))
my_web.show()
# sys exit function
sys.exit(my_app.exec_())
The output of this running source code.

Friday, October 26, 2018

Python Qt5 : MP3 player example.

This tutorial with PyQt5 will allow us to play an MP3 file using QtMultimedia.
I used a test.mp3 file in the same folder with my python script.
This is the source script:
import sys

from PyQt5 import QtCore, QtWidgets, QtMultimedia

if __name__ == '__main__':
    app = QtWidgets.QApplication(sys.argv)
    filename = 'test.mp3'
    fullpath = QtCore.QDir.current().absoluteFilePath(filename) 
    media = QtCore.QUrl.fromLocalFile(fullpath)
    content = QtMultimedia.QMediaContent(media)
    player = QtMultimedia.QMediaPlayer()
    player.setMedia(content)
    player.play()
    sys.exit(app.exec_())

Wednesday, October 24, 2018

Python Qt5 : Webcam example.

Today I come with another source code.
This example uses QtMultimedia to create use of the webcam.
The source code follows the steps from finding, set and use a webcam.
from PyQt5.QtGui import *
from PyQt5.QtWidgets import *
from PyQt5.QtCore import *
from PyQt5.QtMultimedia import *
from PyQt5.QtMultimediaWidgets import *

import os
import sys

class MainWindow(QMainWindow):

    def __init__(self, *args, **kwargs):
        super(MainWindow, self).__init__(*args, **kwargs)

        self.online_webcams = QCameraInfo.availableCameras()
        if not self.online_webcams:
            pass #quit
        self.exist = QCameraViewfinder()
        self.exist.show()
        self.setCentralWidget(self.exist)

        # set the default webcam.
        self.get_webcam(0)
        self.setWindowTitle("WebCam")
        self.show()

    def get_webcam(self, i):
        self.my_webcam = QCamera(self.online_webcams[i])
        self.my_webcam.setViewfinder(self.exist)
        self.my_webcam.setCaptureMode(QCamera.CaptureStillImage)
        self.my_webcam.error.connect(lambda: self.alert(self.my_webcam.errorString()))
        self.my_webcam.start()

    def alert(self, s):
        """
        This handle errors and displaying alerts.
        """
        err = QErrorMessage(self)
        err.showMessage(s)


if __name__ == '__main__':

    app = QApplication(sys.argv)
    app.setApplicationName("WebCam")

    window = MainWindow()
    app.exec_()

Tuesday, October 23, 2018

Python Qt5 : toolbar example.

This is a simple example with PyQt5 python module and python 3.6.4 version.
The example is about how to create a toolbar with PyQt5.
The base of this source code is the create a default window application.
I create a toolbar and I add an action to this toolbar.
The name of the toolbar is my_toolbar.
The action is named one_action.
This action is linked to a python function named action_one.
I add to my source code another function named alert.
This is good for debugging part to handle with errors and displaying alerts.
Let's see the source code:
from PyQt5.QtGui import *
from PyQt5.QtWidgets import *
from PyQt5.QtCore import *
import sys

class MainWindow(QMainWindow):

    def __init__(self, *args, **kwargs):
        super(MainWindow, self).__init__(*args, **kwargs)
        self.status = QStatusBar()
        self.setStatusBar(self.status)
        my_toolbar = QToolBar("toolbar")
        my_toolbar.setIconSize(QSize(48, 48))
        self.addToolBar(my_toolbar)
        
        one_action = QAction(QIcon(), "Action one", self)        
        one_action.setStatusTip("Action one on toolbar")
        one_action.triggered.connect(self.action_one)
        my_toolbar.addAction(one_action)
        
        self.setWindowTitle("Window PyQt5 - 001")
        self.show()

    def action_one(self):
        print("Action one")

    def alert(self, s):
        """
        This handle errors and displaying alerts.
        """
        err = QErrorMessage(self)
        err.showMessage(s)

if __name__ == '__main__':

    app = QApplication(sys.argv)
    app.setApplicationName("Window PyQt5 - 001")

    window = MainWindow()
    app.exec_()

Sunday, October 21, 2018

OpenGL and OpenCV with python 2.7 - part 006.

Today I deal with a simple example about how to use your webcam like a python module.
This will allow you to make your python module for your webcam.
My reason was to make a good webcam module to work with python modules like OpenCV and OpenGL and webcam devices.
The source code is simple and has just three functions: start, _update_frame and get_current_frame.
You can make more functions into this python module named webcam.
import cv2
from threading import Thread
  
class webcam:
  
    def __init__(self):
        self.video_capture = cv2.VideoCapture(0)
        self.current_frame = self.video_capture.read()[1]
          
    # create thread for capturing images
    def start(self):
        Thread(target=self._update_frame, args=()).start()
  
    def _update_frame(self):
        while(True):
            self.current_frame = self.video_capture.read()[1]
                  
    # get the current frame
    def get_current_frame(self):
        return self.current_frame
I make also a python script to test this python module:
from webcam import webcam
import cv2
 
dir(webcam)
cam = webcam()
cam.start()
 
while True:
     
    # get image from webcam
    image = cam.get_current_frame()