analitics

Pages

Sunday, June 24, 2018

Python 3.6.4 : Using python client with blogger API .

I used a new project into console cloud google.
I used the google-api-python-client from here with OAuth service.
You need to create a project and add the blogger API to use it.
For credentials, I used OAuth with the JSON file from google.
This is the source code:
#!/usr/bin/env python
# -*- coding: utf-8 -*-
from __future__ import print_function

__author__ = 'Catalin George Festila ( catafest , mythcat )'

import sys

from oauth2client import client
from googleapiclient import sample_tools


def main(argv):
  # Authenticate and construct service.
  service, flags = sample_tools.init(
      argv, 'blogger', 'v3', __doc__, __file__,
      scope='https://www.googleapis.com/auth/blogger')

  try:

      users = service.users()

      # Retrieve this user's profile information
      thisuser = users.get(userId='self').execute()
      print('This user\'s display name is: %s' % thisuser['displayName'])

      blogs = service.blogs()

      # Retrieve the list of Blogs this user has write privileges on
      thisusersblogs = blogs.listByUser(userId='self').execute()
      for blog in thisusersblogs['items']:
        print('The blog named \'%s\' is at: %s' % (blog['name'], blog['url']))

      posts = service.posts()

      # List the posts for each blog this user has
      for blog in thisusersblogs['items']:
        print('The posts for %s:' % blog['name'])
        request = posts.list(blogId=blog['id'])
        while request != None:
          posts_doc = request.execute()
          if 'items' in posts_doc and not (posts_doc['items'] is None):
            for post in posts_doc['items']:
              print('  %s (%s)' % (post['title'], post['url']))
          request = posts.list_next(request, posts_doc)

  except client.AccessTokenRefreshError:
    print ('The credentials have been revoked or expired, please re-run'
      'the application to re-authorize')

if __name__ == '__main__':
  main(sys.argv)
The content of the folder project named google_api_python.
c:\Python364\google_api_python>dir
06/24/2018  08:27 PM             1,096 blogger.dat
06/24/2018  07:49 PM             2,599 blogger.py
06/24/2018  08:24 PM               309 client_secrets.json
06/24/2018  08:26 PM                76 debug.log
               4 File(s)          4,080 bytes
               2 Dir(s)  201,382,006,784 bytes free
You need to add the client_id and client_secret from google project into file client_secrets.json.
Run the python script:
c:\Python364\google_api_python>python.exe blogger.py
The google will ask you about the authentification and will run the script:

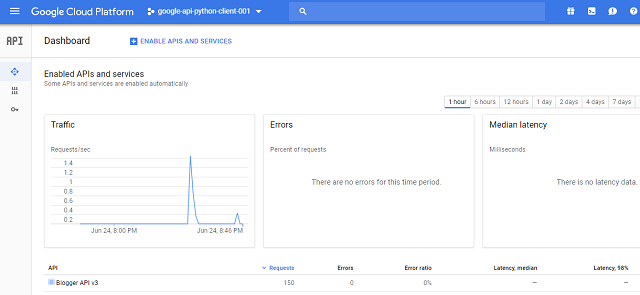
Google show us all the infos about this project into dashboard:

Wednesday, June 6, 2018

Python 3.6.4 : The qrcode python module .

This python module named qrcode is a suite of tools to Generate QR codes.
Let's start the tutorial with the install steep :
c:\Python364\Scripts>pip install qrcode[pil]
Collecting qrcode[pil]
... 
Successfully installed qrcode-6.0 
Let's see the output for dir:
>>> import qrcode
>>> from qrcode import *
>>> dir(qrcode)
['ERROR_CORRECT_H', 'ERROR_CORRECT_L', 'ERROR_CORRECT_M', 'ERROR_CORRECT_Q', 'LU
T', 'QRCode', '__builtins__', '__cached__', '__doc__', '__file__', '__loader__',
 '__name__', '__package__', '__path__', '__spec__', 'base', 'constants', 'except
ions', 'image', 'main', 'make', 'run_example', 'util']
>>> dir(qrcode.util)
['ALPHA_NUM', 'BCH_digit', 'BCH_type_info', 'BCH_type_number', 'BIT_LIMIT_TABLE'
, 'BitBuffer', 'G15', 'G15_MASK', 'G18', 'LUT', 'MODE_8BIT_BYTE', 'MODE_ALPHA_NU
M', 'MODE_KANJI', 'MODE_NUMBER', 'MODE_SIZE_LARGE', 'MODE_SIZE_MEDIUM', 'MODE_SI
ZE_SMALL', 'NUMBER_LENGTH', 'PAD0', 'PAD1', 'PATTERN_POSITION_TABLE', 'QRData',
'RE_ALPHA_NUM', '__builtins__', '__cached__', '__doc__', '__file__', '__loader__
', '__name__', '__package__', '__spec__', '_data_count', '_lost_point_level1', '
_lost_point_level2', '_lost_point_level3', '_lost_point_level4', '_optimal_split
', 'base', 'create_bytes', 'create_data', 'exceptions', 'length_in_bits', 'lost_
point', 'mask_func', 'math', 'mode_sizes_for_version', 'optimal_data_chunks', 'o
ptimal_mode', 'pattern_position', 're', 'six', 'to_bytestring', 'xrange']
>>> dir(qrcode.image)
['__builtins__', '__cached__', '__doc__', '__file__', '__loader__', '__name__',
'__package__', '__path__', '__spec__', 'base']
>>> dir(qrcode.run_example)
['__annotations__', '__call__', '__class__', '__closure__', '__code__', '__defau
lts__', '__delattr__', '__dict__', '__dir__', '__doc__', '__eq__', '__format__',
 '__ge__', '__get__', '__getattribute__', '__globals__', '__gt__', '__hash__', '
__init__', '__init_subclass__', '__kwdefaults__', '__le__', '__lt__', '__module_
_', '__name__', '__ne__', '__new__', '__qualname__', '__reduce__', '__reduce_ex_
_', '__repr__', '__setattr__', '__sizeof__', '__str__', '__subclasshook__']
>>> 
This is the test python script I used to test this python module:
import qrcode
from  qrcode import *
qr = qrcode.QRCode(
    version=1,
    error_correction=qrcode.constants.ERROR_CORRECT_L,
    box_size=10,
    border=4,
)
qr.add_data('https://python-catalin.blogspot.com/')
qr.make(fit=True)

img = qr.make_image(fill_color="black", back_color="white")
with open('my_qr_test.png', 'wb') as qrfile:
    img.save(qrfile)
This is the output of QR file:

Saturday, May 26, 2018

Blender 3D and Roblox with Python .

I spend my free time with my son playing Roblox and in the meantime, I try to introduce him to the world of computers.
However, you can download the player as a 3D object and use it as an avatar.
Here's an issue: The 3D object is hard to set with origins for animation but python and Blender 3D can easily solve this.
You can use BMesh.
As you know:
BMesh is the new Blender mesh system in 2.63, with full support for N-sided polygons instead of only triangles and quads.
The result of this download 3D object has a bad origin:

Let's see the source code:
import bpy
import bmesh
import mathutils 
from mathutils import Vector

context = bpy.context

def origin_to_bottom(obj):
    matrix_world = obj.matrix_world
    local_verts = [Vector(v[:]) for v in obj.bound_box]
    blender_mesh = blender_meshesh.new()
    blender_mesh.from_mesh(obj.data)
    x, y, z = 0, 0, 0
    l = len(local_verts)
    z = min([v.z for v in local_verts])
    local_origin = Vector((0, 0, 0))
    global_origin = matrix_world * local_origin
    for v in blender_mesh.verts:
        v.coord = v.coord - local_origin
    blender_mesh.to_mesh(obj.data)
    matrix_world.translation = global_origin

mesh_objs = [mesh_object for mesh_object in context.selected_objects if mesh_object.type == 'MESH']
bpy.ops.object.origin_set(type='ORIGIN_GEOMETRY')

for my_objects in mesh_objs:
    origin_to_bottom(my_objects)
The result is this:

Saturday, April 28, 2018

Python 3.6.4 : Testing OpenCV default Hough Line Transform.

This tutorial is about Hough Line Transform and OpenCV python module.
This can be a good example for Hough Line Transform.
See the source code:
import cv2
import numpy as np
img = cv2.imread('test_lines.jpg')
gray = cv2.cvtColor(img, cv2.COLOR_BGR2GRAY)

# filter black and gray pixels
thresh = cv2.threshold(gray, 100, 255, cv2.THRESH_BINARY_INV)[1]

# find lines
lines = cv2.HoughLinesP(thresh, 1, np.pi/180,360,18)

# output lines onto image
for line in lines:
    x1,y1,x2,y2 = line[0]
    cv2.line(img,(x1,y1),(x2,y2),(255,255,0),2)

# show image
cv2.imshow('threshold houghlines', img)
cv2.waitKey(0)
cv2.destroyAllWindows()
This is the result for test_lines.jpg .

You can test by make changes into this line of code:
lines = cv2.HoughLinesP(thresh, 1, np.pi/180,360,18)
According to documentation, the changes are influenced by the range parameters.

Friday, April 27, 2018

Python 3.6.4 : Testing the wit python module .

Today I tested the wit python module.
This python module is a Python library for Wit.ai
You can use for this issues:
  • Bots
  • Mobile apps
  • Home automation
  • Wearable devices
  • Robots
These support languages like:
Afrikaans, Albanian, Arabic, Azerbaijani, Bengali, Bosnian, Bulgarian, Burmese, Catalan, Central Khmer, Chinese, Croatian, Czech, Danish, Dutch, English, Estonian, Finnish, French, Georgian, German, Greek, Hausa, Hebrew, Hindi, Hungarian, Icelandic, Igbo, Indonesian, Inuktitut, Italian, Japanese, Kannada, Kinyarwanda, Korean, Latin, Latvian, Lithuanian, Macedonian, Malay, Maori, Mongolian, Norwegian, Persian, Polish, Portuguese, Romanian, Russian, Serbian, Slovak, Slovenian, Somali, Southern Ndebele, Southern Sotho, Spanish, Swahili, Swati, Swedish, Tagalog, Tamil, Thai, Tsonga, Tswana, Turkish, Ukrainian, Urdu, Uzbek, Venda, Vietnamese, Xhosa, Yoruba and Zulu.
About Wit is free, including for commercial use. So both private and public Wit apps are free and are governed our terms.
For this tutorial I use python 3.6.4, see :
C:\Python364>python.exe
Python 3.6.4 (v3.6.4:d48eceb, Dec 19 2017, 06:54:40) [MSC v.1900 64 bit (AMD64)]on win32
Type "help", "copyright", "credits" or "license" for more information.
The install of wit python module is simple:
C:\Python364>cd Scripts

C:\Python364\Scripts>pip install wit
Collecting wit
...
Successfully built wit
Installing collected packages: wit
Successfully installed wit-5.1.0

C:\Python364\Scripts>python
Python 3.6.4 (v3.6.4:d48eceb, Dec 19 2017, 06:54:40) [MSC v.1900 64 bit (AMD64)]
 on win32
Type "help", "copyright", "credits" or "license" for more information.
>>> from wit import Wit
>>> w=Wit('3ODKKNB---------')
>>> w.message('Python este un limbaj de programare')
{'_text': 'Python este un limbaj de programare', 'entities': {}, 'msg_id': '0pNT
QXn87P3MYvqmR'}
>>> dir(w)
['__class__', '__delattr__', '__dict__', '__dir__', '__doc__', '__eq__', '__form
at__', '__ge__', '__getattribute__', '__gt__', '__hash__', '__init__', '__init_s
ubclass__', '__le__', '__lt__', '__module__', '__ne__', '__new__', '__reduce__',
 '__reduce_ex__', '__repr__', '__setattr__', '__sizeof__', '__str__', '__subclas
shook__', '__weakref__', '_sessions', 'access_token', 'interactive', 'logger', '
message', 'speech']
>>> file = open('C:\Python364\hello_world.wav', 'rb')
>>> w.speech(file)
Traceback (most recent call last):
  File "", line 1, in 
  File "C:\Python364\lib\site-packages\wit\wit.py", line 88, in speech
    data=audio_file, headers=headers)
  File "C:\Python364\lib\site-packages\wit\wit.py", line 41, in req
    ' (' + rsp.reason + ')')
wit.wit.WitError: Wit responded with status: 400 (Bad Request)
The error has an open issue.
It does not seem to work properly.
There are some open issues for this python module.
The examples on the internet are not very concise with how to use this python module.