analitics

Pages

Wednesday, August 10, 2022

Blender 3D and python scripting - part 024.

In this tutorial I will show you how to use GeometryNodes with python script and Blender A.P.I.
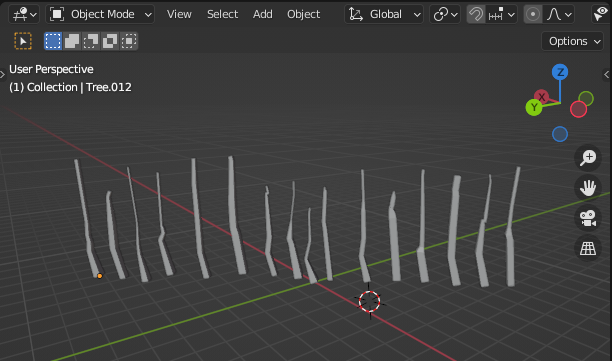
You can see the result in the next image.
The Object Info node gets information from objects. This can be useful to control parameters in the geometry node tree with an external object, either directly by using its geometry, or via its transformation properties. An Object Info node can be added quickly by dragging an object into the node editor.
Another information can be found on the manual link.
In the next script you can see I created a simple BezierCurve object.
The definition named new_GeometryNodes_group is used to create two nodes GroupInit and GroupOutput.
I commente the source code to see some steps.
# import python packages
import bpy
from mathutils import Vector

# create a simpple BezierCurve and rename it with 'BezierCurveGeormetryNode'
bpy.ops.curve.primitive_bezier_curve_add()
bpy.ops.object.modifier_add(type='NODES')  

curve = bpy.context.active_object
curve.name = 'BezierCurveGeormetryNode'

# define a function for GroupInit and GroupOutput
def new_GeometryNodes_group():
    ''' Create a new empty node group that can be used
        in a GeometryNodes modifier.
    '''
    node_group = bpy.data.node_groups.new('GeometryNodes', 'GeometryNodeTree')
    inNode = node_group.nodes.new('NodeGroupInput')
    inNode.outputs.new('NodeSocketGeometry', 'Geometry')
    outNode = node_group.nodes.new('NodeGroupOutput')
    outNode.inputs.new('NodeSocketGeometry', 'Geometry')
    node_group.links.new(inNode.outputs['Geometry'], outNode.inputs['Geometry'])
    # the -3.5 is value for how far will be set the GroupInit and GroupOutput in the area of GeormetryNodes
    inNode.location = Vector((-3.5*inNode.width, 0))
    outNode.location = Vector((3.5*outNode.width, 0))
    return node_group

# the default curve modifier has no node group set, you need to set :
if curve.modifiers[-1].node_group:
    node_group = curve.modifiers[-1].node_group    
else:
    node_group = new_GeometryNodes_group()
    curve.modifiers[-1].node_group = node_group

# set default grup node as nodes
nodes = node_group.nodes

# get both nodes for each one 
group_in = nodes.get('Group Input')
group_out = nodes.get('Group Output')

# add the GeometryNodeObjectInfo to the GeometryNode area 
new_node_obj = nodes.new('GeometryNodeObjectInfo')
new_node_obj.inputs[0].default_value = bpy.data.objects["BezierCurveGeormetryNode"]

Monday, August 8, 2022

Python 3.10.4 : EbookLib python library - part 001.

EbookLib is a Python library for managing EPUB2/EPUB3 files. It’s capable of reading and writing EPUB files programmatically.
You can read more about this python library on this website.
First, I install with the pip tool:
C:\Python310>python -m pip install --upgrade pip
Requirement already satisfied: pip in c:\python310\lib\site-packages (22.1)
Collecting pip
  WARNING: Retrying (Retry(total=4, connect=None, read=None, redirect=None, stat
us=None)) after connection broken by 'NewConnectionError(': Failed to establish a n
ew connection: [Errno 11001] getaddrinfo failed')': /packages/1f/2c/d9626f045e7b
49a6225c6b09257861f24da78f4e5f23af2ddbdf852c99b8/pip-22.2.2-py3-none-any.whl
  Downloading pip-22.2.2-py3-none-any.whl (2.0 MB)
     ---------------------------------------- 2.0/2.0 MB 1.5 MB/s eta 0:00:00
Installing collected packages: pip
  Attempting uninstall: pip
    Found existing installation: pip 22.1
    Uninstalling pip-22.1:
      Successfully uninstalled pip-22.1
Successfully installed pip-22.2.2

C:\Python310>python -m pip install lxml-4.9.0-cp310-cp310-win_amd64.whl
Processing c:\python310\lxml-4.9.0-cp310-cp310-win_amd64.whl
Installing collected packages: lxml
Successfully installed lxml-4.9.0

C:\Python310>python -m pip install EbookLib --user
Collecting EbookLib
  Using cached EbookLib-0.17.1.tar.gz (111 kB)
  Preparing metadata (setup.py) ... done
Requirement already satisfied: lxml in c:\python310\lib\site-packages (from Eboo
kLib) (4.9.0)
Collecting six
  Using cached six-1.16.0-py2.py3-none-any.whl (11 kB)
Using legacy 'setup.py install' for EbookLib, since package 'wheel' is not insta
lled.
Installing collected packages: six, EbookLib
  Running setup.py install for EbookLib ... done
Successfully installed EbookLib-0.17.1 six-1.16.0
I used a the simple python script from the last tutorial to test it:
The last tutorial used the default script from the official webpage.
Compared to the default script, I made changes, the selection in the Romanian language and diacritics...
from ebooklib import epub

book = epub.EpubBook()

# set metadata
book.set_identifier('__1976')
book.set_title('')
book.set_language('en')

book.add_author('Autho: Cătălin George Feștilă')

# create chapter
cap001 = epub.EpubHtml(title='Intro', file_name='capitolul_01.xhtml', lang='ro')
cap001.content=u'<h1>Introducere</h1><p>Această carte este...</p>'

# add chapter
book.add_item(cap001)

# define Table Of Contents
book.toc = (epub.Link('capitolul_01.xhtml', 'Introducere', 'introducere'),
             (epub.Section('O carte simplă'),
             (cap001, ))
            )

# add default NCX and Nav file
book.add_item(epub.EpubNcx())
book.add_item(epub.EpubNav())

# define CSS style
style = 'BODY {color: white;}'
nav_css = epub.EpubItem(uid="style_nav", file_name="style/nav.css", media_type="text/css", content=style)

# add CSS file
book.add_item(nav_css)

# basic spine
book.spine = ['nav', cap001]

# write to the file
epub.write_epub('ro_lan_test.epub', book, {})
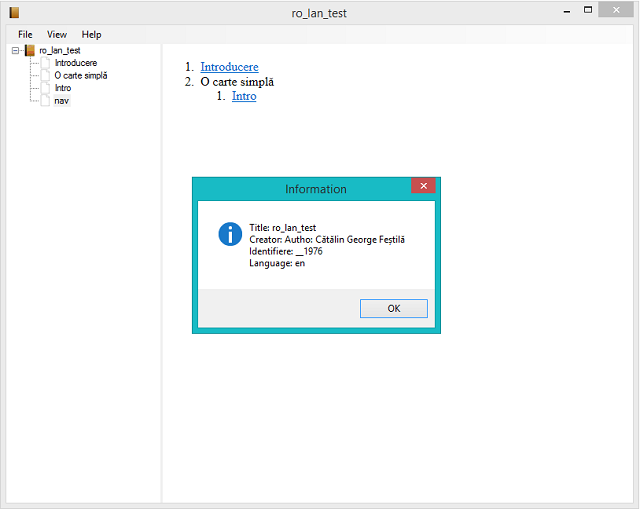
This is the result of the epub file:

Sunday, July 24, 2022

Python 3.11.0a7 : image conversions in Python.

Image processing is very important in development, therefore also in python.
The image processing packages used in python have undergone changes over time.
Pillow and PIL cannot co-exist in the same environment. Before installing Pillow, please uninstall PIL.
Pillow higher than version 10 no longer supports import Image. Please use from PIL import Image instead.
Pillow higher than version 2.1.0 no longer supports import _imaging. Please use from PIL.Image import core as _imaging instead.
Although the image formats are old compared to the newer ones in vector format, they are preferred depending on the field of work.
You can see all of these file image formats on the official python package.
First, the basic installation start with upgrade the pip tool:
C:\PythonProjects\ConvertImages>python -m pip install --upgrade pip
Requirement already satisfied: pip in c:\python311alpha\lib\site-packages (22.1.
2)
Collecting pip
  Downloading pip-22.2-py3-none-any.whl (2.0 MB)
     ---------------------------------------- 2.0/2.0 MB 3.3 MB/s eta 0:00:00
Installing collected packages: pip
  Attempting uninstall: pip
    Found existing installation: pip 22.1.2
    Uninstalling pip-22.1.2:
      Successfully uninstalled pip-22.1.2
Successfully installed pip-22.2
Secondary, the install of the Pillow python package:
C:\PythonProjects\ConvertImages>python  -m pip install --upgrade Pillow
Collecting Pillow
  Downloading Pillow-9.2.0-cp311-cp311-win_amd64.whl (3.3 MB)
     ---------------------------------------- 3.3/3.3 MB 4.0 MB/s eta 0:00:00
Installing collected packages: Pillow
Successfully installed Pillow-9.2.0
I have a webp image here that I have scaled to smaller sizes and that I will test its conversion from webp format to png format.
The image is named waterski2 and I'm using the 3.11.0a7 python version.
Let's see the source code:
from PIL import Image

# open the image file WEBP
image = Image.open('waterski2.webp')

# show the image 
image.show()

# convert the image to RGB color
image = image.convert('RGB')

# save PNG RGB image
image.save('waterski2_RGB_PNG.png', 'png')

# save JPG RGB image
image.save('waterski2_RGB_JPG.jpg', 'jpeg')

# open the image file JPG
image_jpg = Image.open('waterski2_RGB_JPG.jpg')

# convert the image to RGB color
image_rgb_jpg = image_jpg.convert('RGB')

# save PNG RGB image from JPG
image_rgb_jpg.save('new-image_RGB_PNG_from_JPG.png', 'png')

#same process of conversion to WEBP file type
# from png image
image = Image.open('waterski2_RGB_PNG.png')
image = image.convert('RGB')
image.save('new-image_RGB_WEBP_from_png.webp', 'webp')
# from jpg image
image = Image.open('waterski2_RGB_JPG.jpg')
image = image.convert('RGB')
image.save('new-image_RGB_WEBP_from_jpg.webp', 'webp')
Here is a screenshot with these converted images and the processed image.

Saturday, July 23, 2022

Blender 3D and python scripting - part 023.

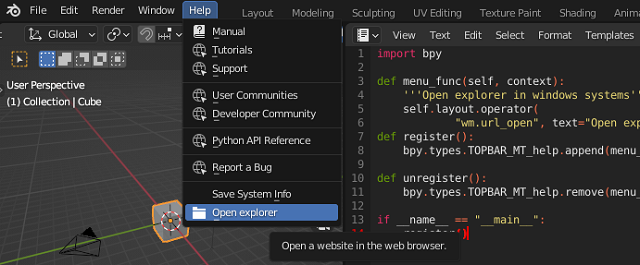
This script will add a submenu to the main Help menu with an icon with a folder that will open the explorer from the Windows operating system.
I have not solved the tooltip of this button, it is set to show a message about opening a URL.
This is the source code:
import bpy

def menu_func(self, context):
    '''Open explorer in windows systems'''
    self.layout.operator(
            "wm.url_open", text="Open explorer", icon='FILE_FOLDER').url = "C:/"
def register():
    bpy.types.TOPBAR_MT_help.append(menu_func)

def unregister():
    bpy.types.TOPBAR_MT_help.remove(menu_func)

if __name__ == "__main__":
    register()
If you want to change the tooltip then need to create a class OpenOperator and wrapper for this operator function and set the bl_label and all you need to have it.
The menu_func will get the layout operator with all defined in the class OpenOperator and will set the tooltip with the text: Open explorer in windows systems.
See this new source code:
import bpy

def menu_func(self, context):
    self.layout.operator(
            OpenOperator.bl_idname, text="Open explorer", icon='FILE_FOLDER')

class OpenOperator(bpy.types.Operator):
    """Open explorer in windows systems"""
    bl_idname = "wm.open_explorer"
    bl_label = "Open explorer"

    def execute(self, context):
        bpy.ops.wm.url_open(url="C:/")
        return {'FINISHED'}


def register():
    bpy.utils.register_class(OpenOperator)
    bpy.types.TOPBAR_MT_help.append(menu_func)


def unregister():
    bpy.utils.unregister_class(OpenOperator)
    bpy.types.TOPBAR_MT_help.remove(menu_func)


if __name__ == "__main__":
    register()

Saturday, July 16, 2022

Python 3.7.13 : My colab tutorials - part 026.

Vosk is an offline open source speech recognition toolkit. It enables speech recognition for 20+ languages and dialects - English, Indian English, German, French, Spanish, Portuguese, Chinese, Russian, Turkish, Vietnamese, Italian, Dutch, Catalan, Arabic, Greek, Farsi, Filipino, Ukrainian, Kazakh, Swedish, Japanese, Esperanto, Hindi, Czech, Polish. More to come.
Today I tested this Python package with a video that contains sound content in the Chinese language
I created a simple interface where you can test other videos on youtube and where you can select the language and start time and duration for the detection sequence with the python vosk package.
I used the python youtube_dl package to take portions of wav sound from a youtube video.
I haven't done tests on other videos but it should work.
You can find it on this colab notebook.

Wednesday, July 13, 2022

Python 3.11.0a7 : local script for update python packages.

If you want to upgrade all local packages from a local script for pip with version greater than 10.0.1 version use a local python script with this source code:
import pkg_resources
from subprocess import call

packages = [dist.project_name for dist in pkg_resources.working_set]
call("pip install --upgrade " + ' '.join(packages), shell=True)
Run it with the python executable and you will see something like this:
C:\Python311alpha>python.exe update_python.py
...
Requirement already satisfied: pip-api in c:\python311alpha\lib\site-packages (0.0.29)
Requirement already satisfied: pypng in c:\python311alpha\lib\site-packages (0.0.21)
Requirement already satisfied: PyGetWindow in c:\python311alpha\lib\site-packages (0.0.9)
Requirement already satisfied: bs4 in c:\python311alpha\lib\site-packages (0.0.1)

Tuesday, July 12, 2022

Python 3.7.13 : My colab tutorials - part 025.

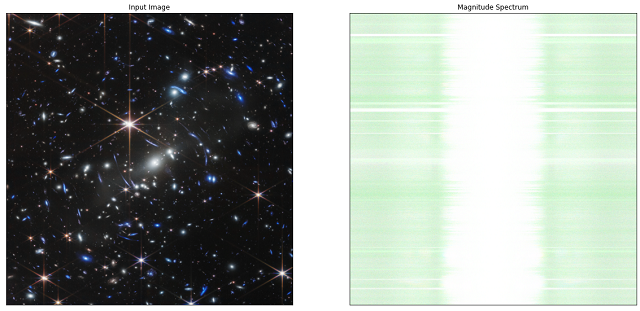
Today I tested a simple data processing example with the first image from NASA's James Webb Space Telescope
You can find this example and more on my GitHub repository for colab.
This is one of results of data processing with a simple logaritm function to see magnitude spectrum of Fourier transform X by shifting the zero-frequency map:

Thursday, July 7, 2022

Blender 3D and python scripting - part 022.

In the last tutorial, we exemplified with the default template from Blender 3D how to create a panel in the Object area.
Today I will show you how to modify this panel with some useful elements for developing an addon.
The purpose of the old tutorial on this is the differences and changes that must be made to the template source code to introduce the following functions:
    StringProperty(
    BoolProperty( 
    IntProperty(
    IntVectorProperty(
    FloatProperty(
    FloatVectorProperty(
    BoolVectorProperty(
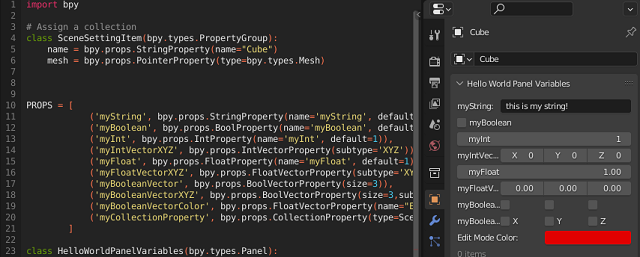
Some arguments need to be modified to have different input data, see the selection of colors in the attached image:
I commented on the source code areas in the template and added my changes:
The class also called SceneSettingItem and CollectionProperty is currently being tested and is not finalized to be implemented, it can be seen in panel: 0 items.
It can be seen that any defined class must be registered and unregistered
Here is the source code used to get the new screenshot changes:
import bpy

# Assign a collection
class SceneSettingItem(bpy.types.PropertyGroup):
    name = bpy.props.StringProperty(name="Cube")
    mesh = bpy.props.PointerProperty(type=bpy.types.Mesh)


PROPS = [
            ('myString', bpy.props.StringProperty(name='myString', default='this is my string!')),
            ('myBoolean', bpy.props.BoolProperty(name='myBoolean', default=False)),
            ('myInt', bpy.props.IntProperty(name='myInt', default=1)),
            ('myIntVectorXYZ', bpy.props.IntVectorProperty(subtype='XYZ')),
            ('myFloat', bpy.props.FloatProperty(name='myFloat', default=1)),
            ('myFloatVectorXYZ', bpy.props.FloatVectorProperty(subtype='XYZ')),
            ('myBooleanVector', bpy.props.BoolVectorProperty(size=3)),
            ('myBooleanVectorXYZ', bpy.props.BoolVectorProperty(size=3,subtype='XYZ')),
            ('myBooleanVectorColor', bpy.props.FloatVectorProperty(name="Edit Mode Color", subtype='COLOR',  default=(0.76, 0.0, 0.0), size=3, min=0, max=1)),
            ('myCollectionProperty', bpy.props.CollectionProperty(type=SceneSettingItem)),
        ]    

class HelloWorldPanelVariables(bpy.types.Panel):
    """Creates a Panel in the Object properties window"""
    bl_label = "Hello World Panel Variables"
    bl_idname = "OBJECT_PT_hello"
    bl_space_type = 'PROPERTIES'
    bl_region_type = 'WINDOW'
    bl_context = "object"

#    def draw(self, context):
#        layout = self.layout
#        obj = context.object
#        row = layout.row()
#        row.label(text="Hello world!", icon='WORLD_DATA')
#        row = layout.row()
#        row.label(text="Active object is: " + obj.name)
#        row = layout.row()
#        row.prop(obj, "name")
#        row = layout.row()
#        row.operator("mesh.primitive_cube_add")

    def draw(self, context):
        col = self.layout.column()
        for (prop_name, _) in PROPS:
            row = col.row()
            row.prop(context.scene, prop_name)

        
def register():
    bpy.utils.register_class(SceneSettingItem)
    bpy.utils.register_class(HelloWorldPanelVariables)
    for (prop_name, prop_value) in PROPS:
        setattr(bpy.types.Scene, prop_name, prop_value)

def unregister():
    bpy.utils.unregister_class(SceneSettingItem)
    bpy.utils.unregister_class(HelloWorldPanelVariables)    
    for (prop_name, _) in PROPS:
        delattr(bpy.types.Scene, prop_name)

if __name__ == "__main__":
    register()

Wednesday, July 6, 2022

Blender 3D and python scripting - part 021.

I will continue the series of tutorials with python and the Blender 3D software interface.
From the main menu we can get to the scripting part and here we choose Templates - Python - Ui Panel Simple.
The source code will be added to the python editor.
Save this source code with a name and load it as an addon.
After loading this source code it can be found at Properties at Object, see screenshot.
You can see the source code from the Ui Panel Simple template that I used.
import bpy

class HelloWorldPanel(bpy.types.Panel):
    """Creates a Panel in the Object properties window"""
    bl_label = "Hello World Panel"
    bl_idname = "OBJECT_PT_hello"
    bl_space_type = 'PROPERTIES'
    bl_region_type = 'WINDOW'
    bl_context = "object"

    def draw(self, context):
        layout = self.layout

        obj = context.object

        row = layout.row()
        row.label(text="Hello world!", icon='WORLD_DATA')

        row = layout.row()
        row.label(text="Active object is: " + obj.name)
        row = layout.row()
        row.prop(obj, "name")

        row = layout.row()
        row.operator("mesh.primitive_cube_add")

def register():
    bpy.utils.register_class(HelloWorldPanel)


def unregister():
    bpy.utils.unregister_class(HelloWorldPanel)

if __name__ == "__main__":
    register()

Saturday, July 2, 2022

Python 3.7.10 : Simple example with PyQRCode.

The pyqrcode module is a QR code generator that can automate most of the building process for creating QR codes.
The pypng python library is required to save and upload PNG images.
I had to install them both with the pip utility.
pip install pyqrcode
Collecting pyqrcode
  Using cached PyQRCode-1.2.1-py3-none-any.whl
Installing collected packages: pyqrcode
Successfully installed pyqrcode-1.2.1
WARNING: There was an error checking the latest version of pip.
...
pip install pypng
Collecting pypng
  Using cached pypng-0.0.21-py3-none-any.whl (48 kB)
Installing collected packages: pypng
Successfully installed pypng-0.0.21
WARNING: There was an error checking the latest version of pip.
Let's try some simple examples:
import pyqrcode
url = pyqrcode.create('https://ro.wikipedia.org/wiki/Utilizator:Catalin_Festila', error='H', mode='binary')
url.svg('uca-url.svg', scale=8)
url.eps('uca-url.eps', scale=2)
url.png('code.png', scale=5, module_color=[0, 0, 0, 128], background=[0, 0, 128])
url.show()
print(url.terminal(quiet_zone=1))
This is the result of this source code:

Tuesday, June 28, 2022

Python 3.7.13 : About pip-audit version 2.3.4.

More infos about this python package can be found here.
pip-audit is a tool for scanning Python environments for packages with known vulnerabilities. It uses the Python Packaging Advisory Database (https://github.com/pypa/advisory-database) via the PyPI JSON API as a source of vulnerability reports.
I tested this package feature for colab google with these python packages: unionml, pandas, sklearn and pip-audit.
You can see all vulnerabilities or you can use argument --desc for more information:
!pip-audit
- Auditing zipp (3.8.0)
Found 54 known vulnerabilities in 14 packages
Name          Version  ID                  Fix Versions
------------- -------- ------------------- ----------------------------
dask          2.12.0   PYSEC-2021-387      2021.10.0
distributed   1.25.3   GHSA-j8fq-86c5-5v2r 2021.10.0
httplib2      0.17.4   PYSEC-2020-46       0.18.0
httplib2      0.17.4   PYSEC-2021-16       0.19.0
ipython       5.5.0    PYSEC-2022-12       6.0.0rc1,7.16.3,7.31.1,8.0.1
lxml          4.2.6    PYSEC-2021-19       4.6.3
lxml          4.2.6    PYSEC-2020-62       4.6.2
lxml          4.2.6    PYSEC-2021-852      4.6.5
mpmath        1.2.1    PYSEC-2021-427
notebook      5.3.1    PYSEC-2018-18       5.7.2
notebook      5.3.1    PYSEC-2019-158      5.7.8
notebook      5.3.1    PYSEC-2018-57       5.4.1
notebook      5.3.1    PYSEC-2018-17       5.7.1
notebook      5.3.1    PYSEC-2019-159      5.7.6
notebook      5.3.1    PYSEC-2019-157      5.5.0
notebook      5.3.1    PYSEC-2020-215      6.1.5
notebook      5.3.1    PYSEC-2022-180      6.4.10
notebook      5.3.1    PYSEC-2022-212      6.4.12
notebook      5.3.1    GHSA-hwvq-6gjx-j797 5.7.11,6.4.1
notebook      5.3.1    GHSA-rv62-4pmj-xw6h 5.7.8
numpy         1.21.6   GHSA-fpfv-jqm9-f5jm 1.22
opencv-python 4.1.2.30 GHSA-8849-5h85-98qw
opencv-python 4.1.2.30 GHSA-m6vm-8g8v-xfjh
opencv-python 4.1.2.30 GHSA-q799-q27x-vp7w 4.2.0.32
pillow        7.1.2    PYSEC-2021-137      8.2.0
pillow        7.1.2    PYSEC-2021-138      8.2.0
pillow        7.1.2    PYSEC-2021-70       8.1.0
pillow        7.1.2    PYSEC-2021-331      8.3.0
pillow        7.1.2    PYSEC-2021-41       8.1.1
pillow        7.1.2    PYSEC-2021-71       8.1.0
pillow        7.1.2    PYSEC-2021-69       8.1.0
pillow        7.1.2    PYSEC-2021-38       8.1.1
pillow        7.1.2    PYSEC-2021-139      8.2.0
pillow        7.1.2    PYSEC-2021-94       8.2.0
pillow        7.1.2    PYSEC-2021-39       8.1.1
pillow        7.1.2    PYSEC-2021-36       8.1.1
pillow        7.1.2    PYSEC-2021-40       8.1.1
pillow        7.1.2    PYSEC-2021-37       8.1.1
pillow        7.1.2    PYSEC-2021-317      8.3.2
pillow        7.1.2    PYSEC-2021-35       8.1.1
pillow        7.1.2    PYSEC-2021-93       8.2.0
pillow        7.1.2    PYSEC-2021-42       8.1.1
pillow        7.1.2    PYSEC-2021-92       8.2.0
pillow        7.1.2    PYSEC-2022-10       9.0.0
pillow        7.1.2    PYSEC-2022-9        9.0.0
pillow        7.1.2    PYSEC-2022-8        9.0.0
pillow        7.1.2    PYSEC-2022-168      9.0.1
pillow        7.1.2    GHSA-jgpv-4h4c-xhw3 8.1.2
pillow        7.1.2    GHSA-4fx9-vc88-q2xc 9.0.0
psutil        5.4.8    PYSEC-2019-41       5.6.6
pygments      2.6.1    PYSEC-2021-140      2.7.4
pygments      2.6.1    PYSEC-2021-141      2.7.4
urllib3       1.25.11  PYSEC-2021-108      1.26.5
werkzeug      1.0.1    PYSEC-2022-203      2.1.1
Name                    Skip Reason
----------------------- ------------------------------------------------------------------------------------------------
dlib                    Dependency not found on PyPI and could not be audited: dlib (19.18.0+zzzcolab20220513001918)
en-core-web-sm          Dependency not found on PyPI and could not be audited: en-core-web-sm (3.3.0)
jaxlib                  Dependency not found on PyPI and could not be audited: jaxlib (0.3.7+cuda11.cudnn805)
pygobject               Dependency not found on PyPI and could not be audited: pygobject (3.26.1)
screen-resolution-extra Dependency not found on PyPI and could not be audited: screen-resolution-extra (0.0.0)
tensorflow              Dependency not found on PyPI and could not be audited: tensorflow (2.8.2+zzzcolab20220527125636)
torch                   Dependency not found on PyPI and could not be audited: torch (1.11.0+cu113)
torchaudio              Dependency not found on PyPI and could not be audited: torchaudio (0.11.0+cu113)
torchvision             Dependency not found on PyPI and could not be audited: torchvision (0.12.0+cu113)
xkit                    Dependency not found on PyPI and could not be audited: xkit (0.0.0)

Sunday, June 26, 2022

Blender 3D and python scripting - part 020.

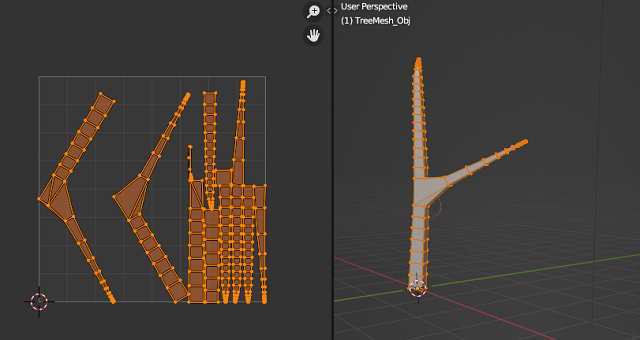
So far I have added or branched used python scripts in the blender and created a UV texture for this use UV Smart projection.
The resulting script is quite large in content.
I thought I should create an addon to use and show you how to do it.
Let's follow the basic steps when working with python scripts in Blender 3D.
  1. go to the tag named: Scripting;
  2. use main menu to create a new script from Text - New;
  3. use main menu - Template - Python - Addon Add Object;
  4. save the script with a good name, I used: addon_catafest_add_branch.py;
  5. save the blend file with a good name: I used: addon_catafest_add_branch.blend;
See this screenshot:
After these changes you can modify in the template file the parts related to the names, descriptions and other elements that will be viewed in Blender 3D
Restart the Blender 3D software, open the python script with all changes and run it.
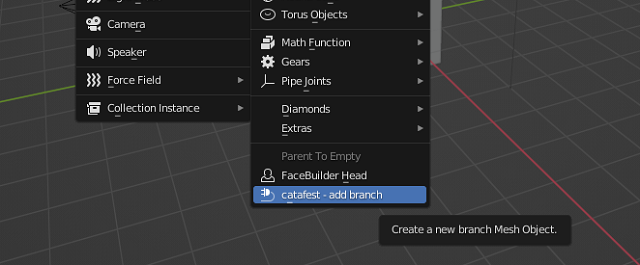
In the 3D Viewport area press the shortkeys: Shift + A and use Mesh menu to see this addon feature, see screenshot:
This is source code I used:
bl_info = {
    "name": "New branch",
    "author": "Your Name Here",
    "version": (1, 0),
    "blender": (3, 3, 0),
    "location": "View3D > Add > Mesh > New Object",
    "description": "Adds a new branch Mesh Object",
    "warning": "",
    "doc_url": "",
    "category": "Add Mesh",
}


import bpy
from bpy.types import Operator
from bpy.props import FloatVectorProperty
from bpy_extras.object_utils import AddObjectHelper, object_data_add
from mathutils import Vector


def add_object(self, context):
    scale_x = self.scale.x
    scale_y = self.scale.y

    verts = [
        Vector((-1 * scale_x, 1 * scale_y, 0)),
        Vector((1 * scale_x, 1 * scale_y, 0)),
        Vector((1 * scale_x, -1 * scale_y, 0)),
        Vector((-1 * scale_x, -1 * scale_y, 0)),
    ]

    edges = []
    faces = [[0, 1, 2, 3]]

    mesh = bpy.data.meshes.new(name="New Object Mesh")
    mesh.from_pydata(verts, edges, faces)
    # useful for development when the mesh may be invalid.
    # mesh.validate(verbose=True)
    object_data_add(context, mesh, operator=self)


class OBJECT_OT_add_object(Operator, AddObjectHelper):
    """Create a new branch Mesh Object"""
    bl_idname = "mesh.add_object"
    bl_label = "Add Mesh Object"
    bl_options = {'REGISTER', 'UNDO'}

    scale: FloatVectorProperty(
        name="scale",
        default=(1.0, 1.0, 1.0),
        subtype='TRANSLATION',
        description="scaling",
    )

    def execute(self, context):

        add_object(self, context)

        return {'FINISHED'}


# Registration

def add_object_button(self, context):
    self.layout.operator(
        OBJECT_OT_add_object.bl_idname,
        text="catafest - add branch",
        icon='PLUGIN')


# This allows you to right click on a button and link to documentation
def add_object_manual_map():
    url_manual_prefix = "https://docs.blender.org/manual/en/latest/"
    url_manual_mapping = (
        ("bpy.ops.mesh.add_object", "scene_layout/object/types.html"),
    )
    return url_manual_prefix, url_manual_mapping


def register():
    bpy.utils.register_class(OBJECT_OT_add_object)
    bpy.utils.register_manual_map(add_object_manual_map)
    bpy.types.VIEW3D_MT_mesh_add.append(add_object_button)


def unregister():
    bpy.utils.unregister_class(OBJECT_OT_add_object)
    bpy.utils.unregister_manual_map(add_object_manual_map)
    bpy.types.VIEW3D_MT_mesh_add.remove(add_object_button)


if __name__ == "__main__":
    register()

Saturday, June 18, 2022

Blender 3D and python scripting - part 019.

Today I'm going to show you how to have a UV map for the entire mesh of the object created with the smart projection mode.
It's the same when you create a UV map using UV Mapping - Smart UV Project in the UV Editing view.
In principle, everything created in the Blender 3D interface has an equivalent in the A.P.I. of the 3D Blender.
You can see a screenshot with this script:
Here you see the source code that includes this option.
import bpy
import random

# import bmesh 
import bmesh

MinNubmer = -10
MaxNumber = 10

# Clean up the area , uncoment the next two row to keep
# branch after running the script
#bpy.ops.object.select_all(action="SELECT")
#bpy.ops.object.delete()

# Number of branches
branch = 4
# Create the verts array
verts = [(0,0,0)]
# Create the edges array
edges = [(0,0)]
# Create the faces array
faces = []

# define random number for X and Y axis 
def RN():
    return  random.randint(MinNubmer, MaxNumber) / 20 

# define random number for positive Z axis
def RNZ():
    return  random.randint(10, 50) / 10  

# create a list of branch thicknesses
rand_list = []

name_branch = "TreeMesh"
# define createBranch 

def createBranch(branch, name_branch):
    # Create the mesh for branch 
    mesh = bpy.data.meshes.new(name_branch) 
    for i in range(1,branch):
        rand_list.append(RNZ()/30)
        # sort all reverse by thicknesses
        rand_list.sort(reverse=True)

    # generate vertices list for drawing the branch
    for i in range(1,branch):
        verts.append((rand_list[i-1] +0.1,rand_list[i-1]+0.1,RNZ()))
        edges.append((i-1,i))
    
    # sort the list of vertices by last number witch is Z axis 
    verts.sort(key=lambda x: x[2])
    # create branch update and validate, see documentation
    mesh.from_pydata(verts, edges, faces) 
    mesh.update()
    mesh.validate()
    # Create object to hold the mesh branch with the new name for object
    obj = bpy.data.objects.new(name_branch+'_Obj', mesh)
    return obj

# create a new branch     
def createNewBranch(obj_branch, n):
    bpy.ops.object.mode_set(mode="EDIT", toggle=False)
    me = obj_branch.data
    bm = bmesh.from_edit_mesh(me)
    bm.select_mode = {'VERT'}

    for i,v in enumerate(bm.verts):
        # select only by the index of list 
        if i == n:
            v.select = ( v.co.x > 0.0 )
            v2 = v    
        else: 
            v.select = False
    # flush and update view 
    v1 = bm.verts.new( (RN()+(v.co.x) + 1.0 , RN()+(v.co.y) + 1.0 , (v.co.z) - (v.co.z)/3) )
    #v1 = bm.verts.new(1, 1, 3)
    bm.edges.new((v1, v2))
    rand_list.append(0.01)
    rand_list.sort(reverse=True)
    # update 
    bm.select_flush_mode()   
    me.update()
    #mesh.validate()
    #bmesh.update_edit_mesh(obj_branch.data)
    

# use the createBranch
obj_branch = createBranch(branch, name_branch)


## now set up shape key in Blender
#mesh=obj_branch.data
#sk_basis = obj_branch.shape_key_add(name='Basis',from_mix=False)
#sk_basis.interpolation = 'KEY_LINEAR'
## must set relative to false here
#obj_branch.data.shape_keys.use_relative = False

## create new shape key
#sk = obj_branch.shape_key_add(name='Deform',from_mix=False)
#sk.interpolation = 'KEY_LINEAR'
#sk.slider_min = 0
#sk.slider_max = 2

# ... and add it to the scene
scene = bpy.context.scene
scene.collection.objects.link(obj_branch)

# this will fix the error ...  mode_set_poll()
bpy.context.view_layer.objects.active = obj_branch  

createNewBranch(obj_branch, 1)

# print tool for developing area 
def print_python_console(data):
    for window in bpy.context.window_manager.windows:
        screen = window.screen
        for area in screen.areas:
            if area.type == 'CONSOLE':
                override = {'window': window, 'screen': screen, 'area': area}
                bpy.ops.console.scrollback_append(override, text=str(data), type="OUTPUT")

# used to see the size of radius skin for each vertices
print_python_console(rand_list)

# fix error :  skin modifier is locked when using edit mode.
bpy.ops.object.mode_set(mode="OBJECT", toggle=False)
# add the skin modifier - NOT FIXED FOR THE LAST BRANC ADDED
obj_branch.modifiers.new(name="SK", type="SKIN")
bpy.context.view_layer.objects.active = obj_branch  
# get the skin vertices layers
skin_vertices = obj_branch.data.skin_vertices
# get the layer
skin_layer = skin_vertices[0]
for i in range(1,branch+1):
    # assigns radius for each vertice to sized the branch 
    skin_layer.data[i-1].radius = (rand_list[i-1], rand_list[i-1]) 
    #Indices 0 and 1 are the vertex indices
    skin_layer.data[i].radius = (rand_list[i-1],rand_list[i-1])

# this will apply the modifier named 'SK'
bpy.ops.object.modifier_apply( modifier = 'SK' )
#
bpy.ops.object.mode_set(mode="EDIT", toggle=True)
bpy.ops.object.skin_root_mark()

bpy.ops.object.mode_set(mode="OBJECT", toggle=True)
# set modes for user 

mesh = bpy.data.meshes.new(name_branch+'_Obj') 
mesh.update()
mesh.validate()

import math 

def get_dimension(normal):
    x_abs = math.fabs(normal[0])
    y_abs = math.fabs(normal[1])
    z_abs = math.fabs(normal[2])
    if z_abs >= x_abs and z_abs >= y_abs:
        return 2
    elif x_abs >= y_abs:
        return 0
    else:
        return 1

texture_scale = 1.0
bpy.ops.object.mode_set(mode="EDIT", toggle=True)  
bpy.ops.mesh.select_all(action='SELECT')  
me = obj_branch.data
bm = bmesh.from_edit_mesh(me)

bpy.ops.uv.sphere_project()

uv_layer = bm.loops.layers.uv.verify()

# adjust uv coordinates
for face in bm.faces:
    for l in face.loops:
        luv = l[uv_layer]
        # select UV vertex if these are in certain range
        if 0 <= luv.uv.x <= 1 and 0 <= luv.uv.y <= 1:
            luv.select = True
            luv = l[uv_layer]
            luv.uv = l.vert.co.yz * texture_scale
            luv.uv = l.vert.co.xz * texture_scale
            luv.uv = l.vert.co.xy * texture_scale
                
bmesh.update_edit_mesh(me) 
me.update()  

bpy.ops.object.mode_set(mode='EDIT')
bpy.ops.mesh.select_all(action='SELECT')
bpy.ops.uv.smart_project(angle_limit=1.15192, island_margin=0, area_weight=0, correct_aspect=True, scale_to_bounds=False)
# use this for cylinder project for UV map 
#bpy.ops.uv.cylinder_project(direction='ALIGN_TO_OBJECT',
#align='POLAR_ZX',
#radius=1.0,
#correct_aspect=True,
#clip_to_bounds=False,
#scale_to_bounds=True)


bmesh.update_edit_mesh(me)
bpy.ops.object.mode_set(mode="OBJECT", toggle=True)

Thursday, June 16, 2022

Blender 3D and python scripting - part 018.

In this tutorial I will show you how to create a UV map.
I searched the web and the documentation briefly and I didn't find anything very concrete, but here I created a functional example.
The example contains a function that calculates dimensions, which are then processed and added to the UV Editing workspace.
This is what the source code added to the initial script tested looks like:
mesh.validate()

import math 

def get_dimension(normal):
    x_abs = math.fabs(normal[0])
    y_abs = math.fabs(normal[1])
    z_abs = math.fabs(normal[2])
    if z_abs >= x_abs and z_abs >= y_abs:
        return 2
    elif x_abs >= y_abs:
        return 0
    else:
        return 1

texture_scale = 1.0
bpy.ops.object.mode_set(mode="EDIT", toggle=True)    
me = obj_branch.data
bm = bmesh.from_edit_mesh(me)

uv_layer = bm.loops.layers.uv.verify()


for f in bm.faces:
    largest_index = get_dimension(f.normal)
    for l in f.loops:
        luv = l[uv_layer]
        luv.uv = l.vert.co.yz * texture_scale
        luv.uv = l.vert.co.xz * texture_scale
        luv.uv = l.vert.co.xy * texture_scale


me.update()
Here is a screenshot of the result, you can see that it only shows the node, you can select for all nodes to see a final result.

Tuesday, June 14, 2022

Blender 3D and python scripting - part 017.

In this tutorial I will show you how you can apply an modifier in Blender 3D using the python script.
First, you need to comment these source code rows in order to allow to apply the modifier.
## now set up shape key in Blender
#mesh=obj_branch.data
#sk_basis = obj_branch.shape_key_add(name='Basis',from_mix=False)
#sk_basis.interpolation = 'KEY_LINEAR'
## must set relative to false here
#obj_branch.data.shape_keys.use_relative = False

## create new shape key
#sk = obj_branch.shape_key_add(name='Deform',from_mix=False)
#sk.interpolation = 'KEY_LINEAR'
#sk.slider_min = 0
#sk.slider_max = 2
You cannot aply an modifier if you have skape keys.
To apply an modifyer you can use this line of source code:
# this will apply the modifier named 'SK'
bpy.ops.object.modifier_apply( modifier = 'SK' )
If you go to the UV Editing area you will see the modifier is apply and you can create an UV map.

Monday, June 13, 2022

Blender 3D and python scripting - part 016.

On this day, I will digress from the series of tutorials started and presented and show you how to install other python packages in Blender 3D.
Go to the bin folder where the python is install, see my path of Blender 3D.
C:\blender-3.3.0-alpha+master.add1da52ad78-windows.amd64-release\3.3\python\bin
Use these commands in to window command shell to install OpenCv python module.
python.exe -m ensurepip
python.exe -m pip install --upgrade pip
python.exe -m pip install opencv-python 
python.exe -m pip install opencv-contrib-python
Run in the blender script area these commands, in order to see if this python package working.
import cv2
cv2.version
You can create a simple script and test it, see the next example:
import numpy as np
import cv2
  
# Creating a black image with 3 channels
# RGB and unsigned int datatype
img = np.zeros((400, 400, 3), dtype = "uint8")
  
# Creating line
cv2.line(img, (21, 167), (100, 99), (0, 0, 255), 8)
  
cv2.imshow('dark', img)
  
# Allows us to see image
# until closed forcefully
cv2.waitKey(0)
cv2.destroyAllWindows()
You can see a screenshot with this python script:

Sunday, June 12, 2022

Blender 3D and python scripting - part 015.

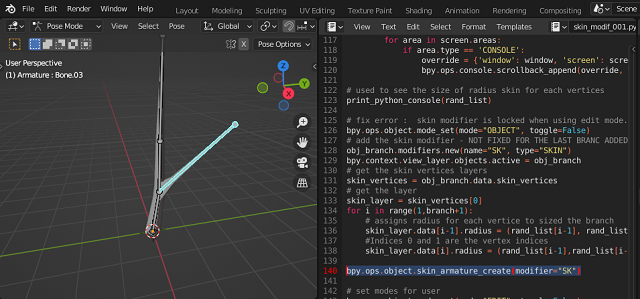
The tutorial for today is about adding armature to the skin, and has a single line of source code:
bpy.ops.object.skin_armature_create(modifier="SK")
This will add an armature with bones for each edge based on the skin modifier.
See the result of this ...
The full source code is this:
import bpy
import random

# import bmesh 
import bmesh

MinNubmer = -10
MaxNumber = 10

# Clean up the area , uncoment the next two row to keep
# branch after running the script
#bpy.ops.object.select_all(action="SELECT")
#bpy.ops.object.delete()

# Number of branches
branch = 4
# Create the verts array
verts = [(0,0,0)]
# Create the edges array
edges = [(0,0)]
# Create the faces array
faces = []

# define random number for X and Y axis 
def RN():
    return  random.randint(MinNubmer, MaxNumber) / 20 

# define random number for positive Z axis
def RNZ():
    return  random.randint(10, 50) / 10  

# create a list of branch thicknesses
rand_list = []

name_branch = "TreeMesh"
# define createBranch 

def createBranch(branch, name_branch):
    # Create the mesh for branch 
    mesh = bpy.data.meshes.new(name_branch) 
    for i in range(1,branch):
        rand_list.append(RNZ()/30)
        # sort all reverse by thicknesses
        rand_list.sort(reverse=True)

    # generate vertices list for drawing the branch
    for i in range(1,branch):
        verts.append((rand_list[i-1] +0.1,rand_list[i-1]+0.1,RNZ()))
        edges.append((i-1,i))

    # sort the list of vertices by last number witch is Z axis 
    verts.sort(key=lambda x: x[2])
    # create branch update and validate, see documentation
    mesh.from_pydata(verts, edges, faces) 
    mesh.update()
    mesh.validate()
    # Create object to hold the mesh branch with the new name for object
    obj = bpy.data.objects.new(name_branch+'_Obj', mesh)
    return obj

# create a new branch     
def createNewBranch(obj_branch, n):
    bpy.ops.object.mode_set(mode="EDIT", toggle=False)
    me = obj_branch.data
    bm = bmesh.from_edit_mesh(me)
    bm.select_mode = {'VERT'}

    for i,v in enumerate(bm.verts):
        # select only by the index of list 
        if i == n:
            v.select = ( v.co.x > 0.0 )
            v2 = v    
        else: 
            v.select = False
    # flush and update view 
    v1 = bm.verts.new( (RN()+(v.co.x) + 1.0 , RN()+(v.co.y) + 1.0 , (v.co.z) - (v.co.z)/3) )
    #v1 = bm.verts.new(1, 1, 3)
    bm.edges.new((v1, v2))
    rand_list.append(0.01)
    rand_list.sort(reverse=True)
    # update 
    bm.select_flush_mode()   
    me.update()
    #mesh.validate()
    #bmesh.update_edit_mesh(obj_branch.data)

# use the createBranch
obj_branch = createBranch(branch, name_branch)


# now set up shape key in Blender
mesh=obj_branch.data
sk_basis = obj_branch.shape_key_add(name='Basis',from_mix=False)
sk_basis.interpolation = 'KEY_LINEAR'
# must set relative to false here
obj_branch.data.shape_keys.use_relative = False

# create new shape key
sk = obj_branch.shape_key_add(name='Deform',from_mix=False)
sk.interpolation = 'KEY_LINEAR'
sk.slider_min = 0
sk.slider_max = 2

# ... and add it to the scene
scene = bpy.context.scene
scene.collection.objects.link(obj_branch)

# this will fix the error ...  mode_set_poll()
bpy.context.view_layer.objects.active = obj_branch  

createNewBranch(obj_branch, 1)

# print tool for developing area 
def print_python_console(data):
    for window in bpy.context.window_manager.windows:
        screen = window.screen
        for area in screen.areas:
            if area.type == 'CONSOLE':
                override = {'window': window, 'screen': screen, 'area': area}
                bpy.ops.console.scrollback_append(override, text=str(data), type="OUTPUT")

# used to see the size of radius skin for each vertices
print_python_console(rand_list)

# fix error :  skin modifier is locked when using edit mode.
bpy.ops.object.mode_set(mode="OBJECT", toggle=False)
# add the skin modifier
obj_branch.modifiers.new(name="SK", type="SKIN")
bpy.context.view_layer.objects.active = obj_branch  
# get the skin vertices layers
skin_vertices = obj_branch.data.skin_vertices
# get the layer
skin_layer = skin_vertices[0]
for i in range(1,branch+1):
    # assigns radius for each vertice to sized the branch 
    skin_layer.data[i-1].radius = (rand_list[i-1], rand_list[i-1]) 
    #Indices 0 and 1 are the vertex indices
    skin_layer.data[i].radius = (rand_list[i-1],rand_list[i-1])

bpy.ops.object.skin_armature_create(modifier="SK")

# set modes for user 
bpy.ops.object.mode_set(mode="EDIT", toggle=False)
bpy.ops.object.skin_root_mark()
bpy.ops.object.mode_set(mode="OBJECT", toggle=False)

Saturday, June 11, 2022

Blender 3D and python scripting - part 014.

In this tutorial I will show you how can add a shape key to the branch using this source code:
# now set up shape key in Blender
mesh=obj_branch.data
sk_basis = obj_branch.shape_key_add(name='Basis',from_mix=False)
sk_basis.interpolation = 'KEY_LINEAR'
# must set relative to false here
obj_branch.data.shape_keys.use_relative = False

# create new shape key
sk = obj_branch.shape_key_add(name='Deform',from_mix=False)
sk.interpolation = 'KEY_LINEAR'
sk.slider_min = 0
sk.slider_max = 2

# ... and add it to the scene

Tuesday, June 7, 2022

Blender 3D and python scripting - part 013.

In today's tutorial I will present the source code with some minor fixes and an early way to fix the skin for the added branch.
Minor fixes are related to some errors in creating and passing data - I added comments.
It is interesting to see how I created and modified the source code step by step because it cannot be moved from one area to another because it is restrictive to the way it works in Blender 3D.
If I had used classes, this would not have been understood.
There are also minor technical details related to the skin, the random function for the thickness of the branches ...
For a source code written on the fly and without a pseudocode defined at the beginning I could say that the transitions between the source code between the tutorials is quite legible.
Here is a screenshot with some skin generated examples for the second branch for vertex position one.
This is the source basket used to create the new branch.
import bpy
import random

# import bmesh 
import bmesh

MinNubmer = -10
MaxNumber = 10

# Clean up the area , uncoment the next two row to keep
# branch after running the script
#bpy.ops.object.select_all(action="SELECT")
#bpy.ops.object.delete()

# Number of branches
branch = 4
# Create the verts array
verts = [(0,0,0)]
# Create the edges array
edges = [(0,0)]
# Create the faces array
faces = []

# define random number for X and Y axis 
def RN():
    return  random.randint(MinNubmer, MaxNumber) / 20 

# define random number for positive Z axis
def RNZ():
    return  random.randint(10, 50) / 10  

# create a list of branch thicknesses
rand_list = []

name_branch = "TreeMesh"
# define createBranch 

def createBranch(branch, name_branch):
    # Create the mesh for branch 
    mesh = bpy.data.meshes.new(name_branch) 
    for i in range(1,branch):
        rand_list.append(RNZ()/30)
        # sort all reverse by thicknesses
        rand_list.sort(reverse=True)

    # generate vertices list for drawing the branch
    for i in range(1,branch):
        verts.append((rand_list[i-1] +0.1,rand_list[i-1]+0.1,RNZ()))
        edges.append((i-1,i))
    
    # sort the list of vertices by last number witch is Z axis 
    verts.sort(key=lambda x: x[2])
    # create branch update and validate, see documentation
    mesh.from_pydata(verts, edges, faces) 
    mesh.update()
    mesh.validate()
    # Create object to hold the mesh branch with the new name for object
    obj = bpy.data.objects.new(name_branch+'_Obj', mesh)
    return obj

# create a new branch     
def createNewBranch(obj_branch, n):
    bpy.ops.object.mode_set(mode="EDIT", toggle=False)
    me = obj_branch.data
    bm = bmesh.from_edit_mesh(me)
    bm.select_mode = {'VERT'}

    for i,v in enumerate(bm.verts):
        # select only by the index of list 
        if i == n:
            v.select = ( v.co.x > 0.0 )
            v2 = v    
        else: 
            v.select = False
    # flush and update view 
    v1 = bm.verts.new( (RN()+(v.co.x) + 1.0 , RN()+(v.co.y) + 1.0 , (v.co.z) - (v.co.z)/3) )
    #v1 = bm.verts.new(1, 1, 3)
    bm.edges.new((v1, v2))
    rand_list.append(0.01)
    rand_list.sort(reverse=True)
    # update 
    bm.select_flush_mode()   
    me.update()
    #mesh.validate()
    #bmesh.update_edit_mesh(obj_branch.data)

# use the createBranch
obj_branch = createBranch(branch, name_branch)

# ... and add it to the scene
scene = bpy.context.scene
scene.collection.objects.link(obj_branch)

# this will fix the error ...  mode_set_poll()
bpy.context.view_layer.objects.active = obj_branch  

createNewBranch(obj_branch, 1)

# print tool for developing area 
def print_python_console(data):
    for window in bpy.context.window_manager.windows:
        screen = window.screen
        for area in screen.areas:
            if area.type == 'CONSOLE':
                override = {'window': window, 'screen': screen, 'area': area}
                bpy.ops.console.scrollback_append(override, text=str(data), type="OUTPUT")

# used to see the size of radius skin for each vertices
print_python_console(rand_list)

# fix error :  skin modifier is locked when using edit mode.
bpy.ops.object.mode_set(mode="OBJECT", toggle=False)
# add the skin modifier - NOT FIXED FOR THE LAST BRANC ADDED
obj_branch.modifiers.new(name="SK", type="SKIN")
bpy.context.view_layer.objects.active = obj_branch  
# get the skin vertices layers
skin_vertices = obj_branch.data.skin_vertices
# get the layer
skin_layer = skin_vertices[0]
for i in range(1,branch+1):
    # assigns radius for each vertice to sized the branch 
    skin_layer.data[i-1].radius = (rand_list[i-1], rand_list[i-1]) 
    #Indices 0 and 1 are the vertex indices
    skin_layer.data[i].radius = (rand_list[i-1],rand_list[i-1])

# set modes for user 
bpy.ops.object.mode_set(mode="EDIT", toggle=False)
bpy.ops.object.skin_root_mark()
bpy.ops.object.mode_set(mode="OBJECT", toggle=False)

Sunday, June 5, 2022

Blender 3D and python scripting - part 012.

In this tutorial I will show you how you can add an extra branch to the existing one.
The source code was structured a bit with two createBranch and createNewBranch functions.
However, it is still in a raw structured format because such source code is aimed at using classes.
I did not solve the new branch size for the added vertex.
In the function that creates the new branch, the second parameter receives a number that represents the vertex from where the new edge will be created.
createNewBranch(obj_branch, 1)
In the source code we have the variable branch = 4, because the number of vertices starts in the list from 0 then argument 1 immediately means the next vertex from the first one in the list.
A random peak with close values ​​is generated and an edge is added to link it to the previously selected one.
Here is the source code that adds a new branch.
import bpy
import random

# import bmesh 
import bmesh

MinNubmer = -10
MaxNumber = 10

# Clean up the area , uncoment the next two row to keep
# branch after running the script
bpy.ops.object.select_all(action="SELECT")
bpy.ops.object.delete()

# Number of branches
branch = 4
# Create the verts array
verts = [(0,0,0)]
# Create the edges array
edges = [(0,0)]
# Create the faces array
faces = []

# define random number for X and Y axis 
def RN():
    return  random.randint(MinNubmer, MaxNumber) / 20 

# define random number for positive Z axis
def RNZ():
    return  random.randint(10, 50) / 10  

# create a list of branch thicknesses
rand_list = []

name_branch = "TreeMesh"
# define createBranch 
def createBranch(branch, name_branch):
    # Create the mesh for branch 
    mesh = bpy.data.meshes.new(name_branch) 
    for i in range(1,branch):
        rand_list.append(RNZ()/30)
        # sort all reverse by thicknesses
        rand_list.sort(reverse=True)

    # generate vertices list for drawing the branch
    for i in range(1,branch):
        rand_list.append(RN())
        verts.append((rand_list[i-1] +0.1,rand_list[i-1]+0.1,RNZ()))
        edges.append((i-1,i))
    
    # sort the list of vertices by last number witch is Z axis 
    verts.sort(key=lambda x: x[2])
    # create branch update and validate, see documentation
    mesh.from_pydata(verts, edges, faces) 
    mesh.update()
    mesh.validate()
    # Create object to hold the mesh branch with the new name for object
    obj = bpy.data.objects.new(name_branch+'_Obj', mesh)
    return obj

# use the createBranch
obj_branch = createBranch(branch, name_branch)

# ... and add it to the scene
scene = bpy.context.scene
scene.collection.objects.link(obj_branch)

# create a new branch     
def createNewBranch(obj_branch, n):
    bpy.ops.object.mode_set(mode="EDIT", toggle=False)
    me = obj_branch.data
    bm = bmesh.from_edit_mesh(me)
    bm.select_mode = {'VERT'}

    for i,v in enumerate(bm.verts):
        # select only by the index of list 
        if i == n:
            v.select = ( v.co.x > 0.0 )
            v2 = v    
        else: 
            v.select = False
    # flush and update view 
    v1 = bm.verts.new( (RN()+(v.co.x) + 0.1 , RN()+(v.co.y) + 0.1 , (v.co.z) - (v.co.z)/3) )
    #v1 = bm.verts.new(1, 1, 3)
    bm.edges.new((v1, v2))
    # update 
    bm.select_flush_mode()   
    me.update()
    #bmesh.update_edit_mesh(obj_branch.data)

# add the skin modifier - NOT FIXED FOR THE LAST BRANC ADDED
obj_branch.modifiers.new(name="SK", type="SKIN")
bpy.context.view_layer.objects.active = obj_branch  
# get the skin vertices layers
skin_vertices = obj_branch.data.skin_vertices
# get the layer
skin_layer = skin_vertices[0]

for i in range(0,branch):
    # assigns radius for each vertice to sized the branch 
    skin_layer.data[i-1].radius = (rand_list[i-1], rand_list[i-1]) 
    #Indices 0 and 1 are the vertex indices
    skin_layer.data[i].radius = (rand_list[i-1],rand_list[i-1])

# set modes for user 
bpy.ops.object.mode_set(mode="EDIT", toggle=False)
bpy.ops.object.skin_root_mark()

createNewBranch(obj_branch, 1)

bpy.ops.object.mode_set(mode="OBJECT", toggle=False)

Saturday, June 4, 2022

Blender 3D and python scripting - part 011.

Today I show you how to create a branch using the Blender 3D A.P.I. together with the python programming language.
The source code seems complicated but if you follow the attached comments then you will understand how it works.
It contains two parts, one for creating the coordinates on the initial position of the branch (0,0,0) and one for creating the skin with different thicknesses.
Of note is the sorting of lists generated in the python language to get a nice increase as well as gradual thicknesses.
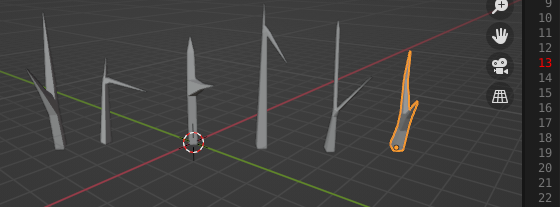
I've used the script several times to show you in the screenshot below some branches created with it.
Here is the source code used.
import bpy
import random
MinNubmer = -10
MaxNumber = 10

# Clean up the area , uncoment the next two row to keep
# branch after running the script
#bpy.ops.object.select_all(action="SELECT")
#bpy.ops.object.delete()

# Number of branches
branch = 6
# Create the verts array
verts = [(0,0,0)]
# Create the edges array
edges = [(0,0)]
# Create the faces array
faces = []

# Create the mesh for branch 
mesh = bpy.data.meshes.new("TreeMesh") 

# define random number for X and Y axis 
def RN():
    return  random.randint(MinNubmer, MaxNumber) / 20 

# define random number for positive Z axis
def RNZ():
    return  random.randint(10, 50) / 10  

# create a list of branch thicknesses
rand_list =[]
for i in range(1,branch):
    rand_list.append(RNZ()/30)
    # sort all reverse by thicknesses
    rand_list.sort(reverse=True)

# generate vertices list for drawing the branch
for i in range(1,branch):
    rand_list.append(RN())
    verts.append((rand_list[i-1] +0.1,rand_list[i-1]+0.1,RNZ()))
    edges.append((i-1,i))

# sort the list of vertices by last number witch is Z axis 
verts.sort(key=lambda x: x[2])

# create branch update and validate, see documentation
mesh.from_pydata(verts, edges, faces) 
mesh.update()
mesh.validate()

# Create object to hold the mesh branch 
obj = bpy.data.objects.new('Tree', mesh)

# ... and add it to the scene
scene = bpy.context.scene
scene.collection.objects.link(obj)

# add the skin modifier
obj.modifiers.new(name="SK", type="SKIN")
bpy.context.view_layer.objects.active = obj  
# get the skin vertices layers
skin_vertices = obj.data.skin_vertices
# get the layer
skin_layer = skin_vertices[0]

for i in range(1,branch):
    # assigns radius for each vertice to sized the branch 
    skin_layer.data[i-1].radius = (rand_list[i-1], rand_list[i-1]) #Indices 0 and 1 are the vertex indices
    skin_layer.data[i].radius = (rand_list[i-1],rand_list[i-1])

# set modes for user 
bpy.ops.object.mode_set(mode="EDIT", toggle=False)
bpy.ops.object.skin_root_mark()
bpy.ops.object.mode_set(mode="OBJECT", toggle=False)

Thursday, June 2, 2022

Blender 3D and python scripting - part 010.

In this tutorial, I will use the source code from the previous tutorial and with the selected mesh I will resize and translate it on an axis then I will select the newly selected mesh and I will rotate it to obtain a roof shape.
This is the source code I used:
bpy.ops.object.mode_set(mode = 'EDIT') 

# let set the object mode 
bpy.ops.object.mode_set(mode="OBJECT")
# resize the selected areas 
bpy.ops.transform.resize(value=(1, 2, 1))
# translate 
bpy.ops.transform.translate(value=(0, 0.25, 0.31))

# rotate selected only if not is the initial mesh 
for ob in bpy.context.selected_objects:
    if ob.name != 'Plane-Y+Z':
        ob.rotation_euler[0] = pi/-4
        ob.convert_space(from_space='LOCAL', to_space='WORLD')

# define the new camera named NewCamera
See the result of this source code:

Wednesday, June 1, 2022

Blender 3D and python scripting - part 009.

In this tutorial I will show you a source code in python that allows the selection of vertices by a coordinate, and separates this selection into a new object according to the faces.
The source code is presented below and is commented on accordingly to understand how it works.
bpy.ops.object.mode_set(mode="EDIT")
bpy.ops.mesh.subdivide(number_cuts=3)
bpy.ops.object.mode_set(mode="OBJECT")

# add this source code     
bpy.ops.object.mode_set(mode = 'EDIT') 
# need to use bmesh
import bmesh
# select the plane and get data mesh 
plane_obj = bpy.data.objects['Plane-Y+Z']
plane_mesh = plane_obj.data
bm = bmesh.from_edit_mesh(plane_mesh)

# select vertices by points 
for v in bm.verts:
    v.select_set(v.co.y < 0.5)
#get mode 
bm.select_mode = {'VERT', 'EDGE', 'FACE'}
# this will update the selection 
bm.select_flush_mode()
# select by FACE   
bpy.context.tool_settings.mesh_select_mode = (False, False, True)
# separate selection by face
bpy.ops.mesh.separate(type='SELECTED')
# select by EDGE
bpy.context.tool_settings.mesh_select_mode = (True, False, False)

# define the new camera named NewCamera

Python 3.7.13 : My colab tutorials - part 024.

In this colab notebook I test how to install pytorch and torchvision python packages on colab notebook and save the model to Google drive.
I tried to save the model.ptl file but I got a network error and uploaded the file to googe drive and then downloaded it.
You can see the full source code on this GitHub repo.

Monday, May 30, 2022

Blender 3D and python scripting - part 008.

In this tutorial I will show you how to use the subdivision operation using the python language and A.P.I from the Blender 3D software.
To use the subdivision operation you must have an active object and be in edit mode.
This is the source code used for this operation with tree cuts for subdivision operation.
bpy.ops.object.mode_set(mode="EDIT")
bpy.ops.mesh.subdivide(number_cuts=3)
bpy.ops.object.mode_set(mode="OBJECT")
You can see in the screenshot below where I added this source code in the old script used in the last tutorial and how the subdivision operation was performed.

Thursday, May 26, 2022

Blender 3D and python scripting - part 007.

In this tutorial I will show you how you create and use lights.
I used the same old source sode from the last tutorial.
Depending on the type of light created, their properties may change. Changing the on-fly light type cannot be done by a simple source code. Obviously you can recreate a new type of light with the new type you want.
This source code I added after this line of source code: scene = bpy.context.scene
# this create a light by type ['POINT', 'SUN', 'SPOT', 'HEMI', 'AREA']
light_data = bpy.data.lights.new('light', type='POINT')
# set light object 
light = bpy.data.objects.new('light', light_data)
# link light to collections
bpy.context.collection.objects.link(light)

light.location[0] = -1
light.location[1] = 3
light.location[2] = 3

light.data.color = (1.0, 0.0, 0.0)
light.data.energy=200.0
light.data.specular_factor = 0.5
# if you use another type like 'SUN' 
# then you can change properties like: angle 
#light.data.angle = pi * 10.0 / 180.0 

# get the name of the object light 
lamp = bpy.data.lights[light.name]

Wednesday, May 25, 2022

Blender 3D and python scripting - part 006.

In this tutorial I will show you how to use the camera and render an image.
I kept the source code from the old tutorial 005 and made the following changes:
I defined the global PI constant because I used it outside the definition.
import bpy

#define the pi global 
pi = 3.1415926
I added to the old source code the part of adding camera, translation, rotation, rendering settings and rendering an image called box_640_480.png in the 3D folder on the local disk.
You can see in the example below the added source code:
# define the new camera named NewCamera
camera_data = bpy.data.cameras.new(name='NewCamera')
# set camera_data to object 
camera_object = bpy.data.objects.new('ObjectCamera', camera_data)
# link camera object to scene
bpy.context.scene.collection.objects.link(camera_object)
# set active camera in the current scene by object
bpy.context.scene.camera = bpy.data.objects['ObjectCamera']
# set location 
camera_object.location = [0,-5,1]
# set rotation mode
camera_object.rotation_mode = 'XYZ'
# set the rotate the camerea using rotation_euler
bpy.data.objects[camera_object.name_full].rotation_euler = (90*(pi/180),0,0)

scene = bpy.context.scene

#these settings will set the render output
bpy.context.scene.cycles.samples = 1
scene.render.resolution_x = 640
scene.render.resolution_y = 480
scene.render.resolution_percentage = 100
scene.render.use_border = False
scene.render.image_settings.file_format='PNG'
scene.render.filepath='C:/3D/box_640_480.png'
bpy.ops.render.render(write_still=1)

Tuesday, May 24, 2022

Blender 3D and python scripting - part 005.

In this tutorial I will recreate the same box but with a more complex source code.
In the previous tutorial I used the same source code several times...
    obj = bpy.ops.mesh.primitive_plane_add(size=2, 
    calc_uvs=True, 
    enter_editmode=False, 
    align='CURSOR', 
    location=location, 
    rotation=(0, 0, 0), 
    scale=(0,0,0)
    )
    
    # rename the object
    bpy.context.object.name = obj_name
    # return the object reference
    return bpy.context.object
It is easier to understand the steps taken and then move on to optimizing them in complex forms.
Obviously a presentation of the source code in this tutorial will show you the differences.
I will add that the source code does not include scalar transformations and is limited to a box with size 1.
import bpy

def create_plane_XYZ(loc, obj_name):
    #define the pi 
    pi = 3.1415926
    # this is a definition like a tuple
    rot = (0,0,0)
    # need to convert it to a list in order to add new values
    rot_list = list(rot)
    # this ang variable will rotate obj to the 90-degree angle 
    ang = -90*(pi/180)
    ang_inc = 45*(pi/180)
    if loc[0] < 0:
        rot_list[1]=ang

    if loc[0] > 0: 
        rot_list[1]=ang

    if loc[1] < 0:
        rot_list[0]=ang
        
    if loc[1] > 0: 
        rot_list[0]=ang
    # this check if the two value from position of plane is not zero
    if loc[1] != loc[2] != 0: 
        rot_list[0]=ang_inc
    # this convert a list back to tuple 
    rot=tuple(rot_list)
    # this create the plane 
    obj = bpy.ops.mesh.primitive_plane_add(size=2, 
    calc_uvs=True, 
    enter_editmode=False, 
    align='CURSOR', 
    location=loc, 
    rotation= rot, 
    scale=(0,0,0)
    )
    # rename the object
    bpy.context.object.name = obj_name
    # return the object reference
    return bpy.context.object

# this will create a plane on X and translate with -1 on Y 
planeX001 = create_plane_XYZ((0,-1,0), "Plane-X")
# this will create a plane on X and translate with 1 on Y 
planeX002 = create_plane_XYZ((0,1,0), "Plane+X")
# this will create a plane on Y and translate with -1 on X 
planeY001 = create_plane_XYZ((-1,0,0), "Plane-Y")
# this will create a plane on X and translate with 1 on Y 
planeY002 = create_plane_XYZ((1,0,0), "Plane+Y")
# this will create a plane with 45 degree because two value on tuple is not zero
planeZ001 = create_plane_XYZ((0,-0.25,1.66), "Plane-Y+Z")

Monday, May 23, 2022

Blender 3D and python scripting - part 004.

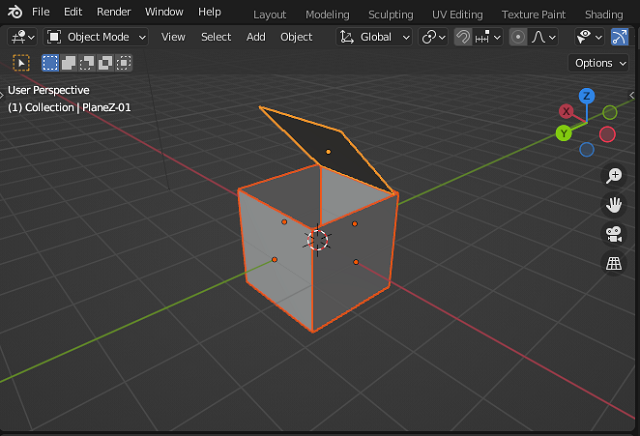
In this tutorial, I will show you how to create a box from planes, see the screenshot:
You can see I used the math python package and I created rotation by radians and rotation object for three custom planes.
This is the source code:
import bpy

import math

def DegToRad(angle):
    """convert to radians"""
    return angle*(math.pi/180)


def RotOBJ(name, angles):
    """rotate obj to the specified angles"""
    rotation = [DegToRad(angle) for angle in angles]
    bpy.data.objects[name].rotation_euler = rotation
    
def create_plane_X(location, obj_name):

    obj = bpy.ops.mesh.primitive_plane_add(size=2, 
    calc_uvs=True, 
    enter_editmode=False, 
    align='CURSOR', 
    location=location, 
    rotation=(0, 0, 0), 
    scale=(0,0,0)
    )
    
    # rename the object
    bpy.context.object.name = obj_name
    # return the object reference
    return bpy.context.object

def create_plane_Y(location, obj_name):

    obj = bpy.ops.mesh.primitive_plane_add(size=2, 
    calc_uvs=True, 
    enter_editmode=False, 
    align='CURSOR', 
    location=location, 
    rotation=(0, 0, 0), 
    scale=(0,0,0)
    )
    
    # rename the object
    bpy.context.object.name = obj_name
    # return the object reference
    return bpy.context.object

def create_plane_Z(location, obj_name):

    obj = bpy.ops.mesh.primitive_plane_add(size=2, 
    calc_uvs=True, 
    enter_editmode=False, 
    align='CURSOR', 
    location=location, 
    rotation=(0, 0, 0), 
    scale=(0,0,0)
    )
    
    # rename the object
    bpy.context.object.name = obj_name
    # return the object reference
    return bpy.context.object

n = 1

planeX001 = create_plane_X((0,-1,0), "PlaneX-{:02d}".format(n))
RotOBJ(planeX001.name, [-90, 0, 0])
planeX002 = create_plane_X((0,1,0), "PlaneX-{:02d}".format(n))
RotOBJ(planeX002.name, [-90, -0, 0])

planeY001 = create_plane_Y((-1,0,0), "PlaneY-{:02d}".format(n))
RotOBJ(planeY001.name, [0, -90, 0])
planeY002 = create_plane_Y((1,0,0), "PlaneY-{:02d}".format(n))
RotOBJ(planeY002.name, [0, -90, 0])

planeZ001 = create_plane_Z((0,-0.25,1.66), "PlaneZ-{:02d}".format(n))
RotOBJ(planeZ001.name, [45, 0, 0])

Sunday, May 22, 2022

Blender 3D and python scripting - part 003.

In the first tutorial I presented a simple script and in this one I improved it with a way to create lines with a number of points, to use pressurization and coloring according to these points.
I added comments in the source code to make it easier to understand.
Here is the result obtained for nineteen points:
This is the source code:
import bpy 
import random

#this is a for lines with N poins 
N = 19 

# this is default python script from the first tutorial
gpencil_data = bpy.data.grease_pencils.new("GPencil")
gpencil = bpy.data.objects.new(gpencil_data.name, gpencil_data)
bpy.context.collection.objects.link(gpencil)

gp_layer = gpencil_data.layers.new("lines")

gp_frame = gp_layer.frames.new(bpy.context.scene.frame_current)

gp_stroke = gp_frame.strokes.new()

gp_stroke.points.add(count=N)

# let's create a new material for pencil stroke 
gp_material_001 = bpy.data.materials.new(name="Grease pencil material 001")

# if you want to use Nodes 
gp_material_001.use_nodes = True

#this will add a diffuse color for this material 
gp_material_001.diffuse_color = (0.0, 0.0, 0.0, 1)

# create a new material for this grease pencil
bpy.data.materials.create_gpencil_data(gp_material_001)
# add the material to the grese pencil defined like gpencil 
gpencil.data.materials.append(gp_material_001)

for i in range (N):
    rand1 = random.randint(-3, 3)
    rand2 = random.randint(-3, 3)
    rand_size = random.randint(70, 76)
    gp_stroke.line_width = rand_size
    gp_stroke.points[i].co = (rand1,rand2,rand1)
    gp_stroke.points[i].co = (rand2,rand1,rand2)

    #this will create a random pressure 
    rand_pressure = random.randint(-3, 3) * 3
    #create random color for Red Green and Blue 
    rand_color_R = random.randint(0, 1)
    rand_color_G = random.randint(0, 1)
    rand_color_B = random.randint(0, 1)
    # set the pressure 
    gp_stroke.points[i].pressure = rand_pressure
    # set the color RGB with transparency 1
    gp_stroke.points[i].vertex_color = (rand_color_R,rand_color_G,rand_color_B, 1) 

Thursday, May 19, 2022

Blender 3D and python scripting - part 002.

In today's tutorial I will show you how to create a sphere and how to add a material to it.
The source code is very simple with two functions one is for the sphere and the second one is the material of this, see:
import bpy

def create_sphere(radius, distance_to_center, obj_name):

    obj = bpy.ops.mesh.primitive_uv_sphere_add(
        radius=radius,
        location=(distance_to_center, 0, 0),
        scale=(1, 1, 1)
    )
    # rename the object
    bpy.context.object.name = obj_name
    # return the object reference
    return bpy.context.object


def create_emission_shader(color, strength, mat_name):
    # create a new material shader
    mat = bpy.data.materials.new(mat_name)
    # enable the node-graph edition mode
    mat.use_nodes = True
    
    # clear all starter nodes
    nodes = mat.node_tree.nodes
    nodes.clear()

    # add the Emission node
    node_emission = nodes.new(type="ShaderNodeEmission")
    # (input[0] is the color)
    node_emission.inputs[0].default_value = color
    # (input[1] is the strength)
    node_emission.inputs[1].default_value = strength
    
    # add the Output node
    node_output = nodes.new(type="ShaderNodeOutputMaterial")
    
    # link the two nodes
    links = mat.node_tree.links
    link = links.new(node_emission.outputs[0], node_output.inputs[0])

    # return the material reference
    return mat

n = 1
r = 1.0
d = 1.5

sphere001 = create_sphere(r, d, "Sphere-{:02d}".format(n))

sphere001.data.materials.append(
    create_emission_shader(
        (1, 1, 1, 1), 100, "SphereMat001"
    )
)

Wednesday, May 18, 2022

Blender 3D and python scripting - part 001.

Today I started a series of tutorials on python scripting and Blender 3D.
The first tutorial is how to draw using the Blender 3D features with the grease pencil utility using the Python scripting language.
Open Blender 3D in the scripting section and enter the source code below.
import bpy 
import random
rand1 = random.randint(-3, 3)
rand2 = random.randint(-3, 3)
rand_size = random.randint(70, 76)

gpencil_data = bpy.data.grease_pencils.new("GPencil")
gpencil = bpy.data.objects.new(gpencil_data.name, gpencil_data)
bpy.context.collection.objects.link(gpencil)

gp_layer = gpencil_data.layers.new("lines")

gp_frame = gp_layer.frames.new(bpy.context.scene.frame_current)

gp_stroke = gp_frame.strokes.new()
gp_stroke.line_width = rand_size

gp_stroke.points.add(count=4)

gp_stroke.points[0].co = (rand1,rand2,rand1)
gp_stroke.points[1].co = (rand2,rand1,rand2)
Run the script several times to see the effect produced.
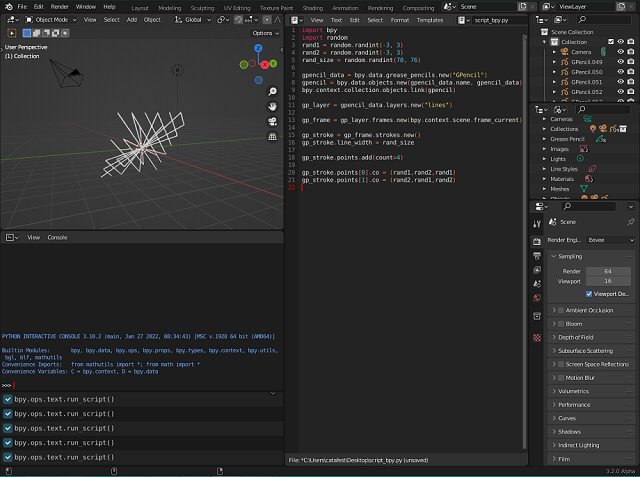
Here is the result of running this script:

Saturday, May 7, 2022

Python : Use django-allauth on heruko - part 001.

Today I am going to show you how to implement a google authentication using Django on the Heroku server.
The tutorial is almost complete. This introductory part is not finalized on the display side of the style and some elements ...
This python module is needed to run the web service.
pip install gunicorn
Collecting gunicorn
  Downloading gunicorn-20.1.0-py3-none-any.whl (79 kB)
     ---------------------------------------- 79.5/79.5 KB 184.8 kB/s eta 0:00:00
Requirement already satisfied: setuptools>=3.0 in c:\python311alpha\lib\site-packages (from gunicorn) (58.1.0)
Installing collected packages: gunicorn
Successfully installed gunicorn-20.1.0
Create and activate a virtual environment:
python -m venv venv
venv\Scripts\activate
The next commands will be on the (venv)
Let's install the Django
(venv) python -m pip install django
Installing collected packages: tzdata, sqlparse, asgiref, django
Successfully installed asgiref-3.5.1 django-4.0.4 sqlparse-0.4.2 tzdata-2022.1
One way is to use this command to start the project
(venv) django-admin startproject herokuweb
I used it in this way, see the dot symbol:
(venv) django-admin startproject herokuweb . 
The next command will start an application
(venv) python manage.py startapp catafest
This python module needs to use google authentification:
(venv) pip install django-allauth
...
Successfully built django-allauth cffi
Installing collected packages: certifi, urllib3, tzdata, sqlparse, pyjwt, pycpar
ser, oauthlib, idna, defusedxml, charset-normalizer, asgiref, requests, python3-
openid, Django, cffi, requests-oauthlib, cryptography, django-allauth
Successfully installed Django-4.0.4 asgiref-3.5.1 certifi-2021.10.8 cffi-1.15.0
charset-normalizer-2.0.12 cryptography-37.0.2 defusedxml-0.7.1 django-allauth-0.
50.0 idna-3.3 oauthlib-3.2.0 pycparser-2.21 pyjwt-2.3.0 python3-openid-3.2.0 req
uests-2.27.1 requests-oauthlib-1.3.1 sqlparse-0.4.2 tzdata-2022.1 urllib3-1.26.9
Let's make changes in the settings.py file
INSTALLED_APPS = [
    'django.contrib.admin',
    'django.contrib.auth',
    'django.contrib.contenttypes',
    'django.contrib.sessions',
    'django.contrib.messages',
    'django.contrib.staticfiles',
    'django.contrib.sites',
    'catafest',
    'allauth',
    'allauth.account',
    'allauth.socialaccount',
    'allauth.socialaccount.providers.google',
]
...
AUTHENTIFICATION_BACKENDS = [
    'django.contrib.auth.backends.ModelBackend',
    'allauth.account.auth_backends.AuthenticationBackend',
]
...
STATIC_URL = '/static/'
SITE_ID = 1
LOGIN_REDIRECT_URL = '/'
SOCIALACCOUNT_PROVIDERS = {
'google': {
    'SCOPE': [
'profile',
'email',
    ],
'AUTH_PARAMS': {
    'access_type': 'online',
}
    }
}
Use Django features ...
python manage.py makemigrations
No changes detected
...
python manage.py migrate
...
  Applying sites.0002_alter_domain_unique... OK
  Applying socialaccount.0001_initial... OK
  Applying socialaccount.0002_token_max_lengths... OK
  Applying socialaccount.0003_extra_data_default_dict... OK
Create one superuser:
python manage.py createsuperuser
Username (leave blank to use 'catafest'):
Email address: catafest@yahoo.com
Password:
Password (again):
This password is too short. It must contain at least 8 characters.
This password is too common.
Bypass password validation and create user anyway? [y/N]: y
Superuser created successfully.
Create templates, catafest folders
Add the index.html file on the catafest folder
Make changes in url.py in the heroku web folder project:
from django.contrib import admin
    from django.urls import path, include
    from django.views.generic import TemplateView
    
    urlpatterns = [
        path('', TemplateView.as_view(template_name="catafest/index.html")),
        path('admin/', admin.site.urls),
        path('accounts/', include('allauth.urls')),
    ]
In the settings.py add templates feature make this change:
import os
...
'DIRS': [os.path.join(BASE_DIR, 'templates')],
Open a google console application and set Credentials to OAuth client ID for the web.
Follow the basic steps like for any basic project
I set for my project: Authorized JavaScript origins: https://catafest.herokuapp.com
... and: Authorized redirect URIs: https://catafest.herokuapp.com/accounts/google/login/callback
Finally, you need to have these: The 'OAuth client created' with 'Your Client ID' and 'Your Client Secret' .
You can test your Django project with this command:
python manage.py runserver
Open the admin area http://127.0.0.1:8000/admin/socialaccount/socialapp/ and add a social application
These commands will log in to the Heroku browser webpage and will create the application:
heroku login
 »   Warning: heroku update available from 7.53.0 to 7.60.2.
...
heroku create catafest
 »   Warning: heroku update available from 7.53.0 to 7.60.2.
Creating ⬢ catafest... done
https://catafest.herokuapp.com/ | https://git.heroku.com/catafest.git
Then create requirements.txt and fill it with this command:
pip freeze > requirements.txt
make this change in settings.py :

...
ALLOWED_HOSTS = ['.herokuapp.com','127.0.0.1']
...
STATIC_ROOT = os.path.join(BASE_DIR,"staticfiles")
...
Upload changes with these commands:
git add .
git commit -am "add requirements.txt and changes STATIC_ROOT"
git push heroku master
Enumerating objects: 39, done.
Counting objects: 100% (39/39), done.
...
To https://git.heroku.com/catafest.git
 * [new branch]      master -> master
Open the online Heroku application, and see all errors with the command: heroku logs --tail
This error is normal because is not set in one web service:
... at=error code=H14 desc="No web processes running" method=GET path="/" host
Create Procfile file in the web001 folder and fill it with:
Add this to the file:
web: gunicorn catafest.wsgi
Add changes and make changes all with these commands:
git add .
git commit -am "add Procfile"
Push to the Django application on the Heroku server:
git push heroku master
Enumerating objects: 6, done.
Counting objects: 100% (6/6), done.
Delta compression using up to 2 threads
...
You can test the result on my heroku application , see also this google gign in link.

Wednesday, May 4, 2022

Python 3.11.0a7 : Django-hypergen on Fedora 36 distro.

You can write server-rendered reactive HTML live views for Django in pure python, see the GitHub webpage.
I tested with python version 3.11.0a7 and Django version 4.0.4 on Fedora 36 Linux distro.
I started with the cloning process of the GitHub project and I set a virtual environment:
[mythcat@fedora ~]$ git clone http://github.com/runekaagaard/django-hypergen.git
Cloning into 'django-hypergen'
...
[mythcat@fedora ~]$ cd django-hypergen/
[mythcat@fedora django-hypergen]$ virtualenv -p python3.11 venv
created virtual environment
... 
[mythcat@fedora django-hypergen]$ source venv/bin/activate
I install the requirements from the project:
(venv) [mythcat@fedora django-hypergen]$
(venv) [mythcat@fedora django-hypergen]$ pip install -r requirements.txt
...Successfully installed Django-4.0.4 asgiref-3.5.1 attrs-21.4.0 beautifulsoup4-4.9.3 
iniconfig-1.1.1 packaging-21.3 pluggy-1.0.0 py-1.11.0 pyparsing-3.0.8 pyperclip-1.8.1 
pyrsistent-0.16.1 pytest-7.1.2 pyyaml-6.0 six-1.16.0 soupsieve-2.3.2.post1 sqlparse-0.4.2 
tomli-2.0.1 yapf-0.32.0WARNING: You are using pip version 21.3.1; 
however, version 22.0.4 is available.
You should consider upgrading via the '/home/mythcat/django-hypergen/venv/bin/python -m pip install --upgrade pip' command.
This gives some errors ...
(venv) [mythcat@fedora django-hypergen]$ pip install -r examples/requirements.txt
...Successfully built pyprof2calltreeFailed to build cymem numpy
ERROR: Could not build wheels for cymem, numpy, which is required to install pyproject.toml-based projects 
The last step is the migrate project and test the example
(venv) [mythcat@fedora django-hypergen]$ 
(venv) [mythcat@fedora django-hypergen]$ cd examples/
(venv) [mythcat@fedora examples]$ python manage.py migrate
... 
(venv) [mythcat@fedora examples]$ python manage.py runserver
Watching for file changes with ...
Starting development server at http://127.0.0.1:8000/
... and the result can be seen in this screenshot:

Wednesday, April 27, 2022

News : Python 3.11 alpha.

This is an old news because on the date Wednesday, April 6, 2022 the alpha version of the well-known python programming language was released.
The last Python 3.11 alpha (3.11.0a7) is available on this webpage.
I install and works good.
C:\Python311alpha>python.exe
Python 3.11.0a7 (main, Apr  5 2022, 21:27:39) [MSC v.1929 64 bit (AMD64)] on win32
Type "help", "copyright", "credits" or "license" for more information.
Here are the new features and changes so far:
PEP 657 -- Include Fine-Grained Error Locations in Tracebacks
PEP 654 -- Exception Groups and except*
PEP 673 -- Self Type
PEP 646-- Variadic Generics
PEP 680-- tomllib: Support for Parsing TOML in the Standard Library
PEP 675-- Arbitrary Literal String Type
PEP 655-- Marking individual TypedDict items as required or potentially-missing
bpo-46752-- Introduce task groups to asyncio
The Faster Cpython Project is already yielding some exciting results: 
this version of CPython 3.11 is ~ 19% faster on the geometric mean of the PyPerformance benchmarks, compared to 3.10.0.
It seems that the new changes are very different from the old versions and some are even effective.