C:\Python27\Scripts>pip install pip-review
C:\Python27\Scripts>pip-review.exe --auto --verbose
Checking for updates of ......pip-review.exe --auto --verbose
Everything up-to-dateC:\Python27\Scripts>pip install pip-review
C:\Python27\Scripts>pip-review.exe --auto --verbose
Checking for updates of ......pip-review.exe --auto --verbose
Everything up-to-dateC:\WINDOWS\system32>cd ..
C:\Windows>cd ..
C:\>cd Python27\Scripts
C:\Python27\Scripts>pip install pycrypto
Requirement already satisfied: pycrypto in c:\python27\lib\site-packagesC:\Python27>python.exe
Python 2.7.13 (v2.7.13:a06454b1afa1, Dec 17 2016, 20:42:59) [MSC v.1500 32 bit (Intel)] on win32
Type "help", "copyright", "credits" or "license" for more information.
>>> import Crypto
>>> dir(Crypto)
['__all__', '__builtins__', '__doc__', '__file__', '__name__', '__package__', '__path__',
'__revision__', '__version__', 'version_info']
>>> help(Crypto)
Help on package Crypto:
NAME
Crypto - Python Cryptography Toolkit
FILE
c:\python27\lib\site-packages\crypto\__init__.py
DESCRIPTION
A collection of cryptographic modules implementing various algorithms
and protocols.
Subpackages:
Crypto.Cipher
Secret-key (AES, DES, ARC4) and public-key encryption (RSA PKCS#1) algorithms Crypto.Hash
Hashing algorithms (MD5, SHA, HMAC)
Crypto.Protocol
Cryptographic protocols (Chaffing, all-or-nothing transform, key derivation
functions). This package does not contain any network protocols.
Crypto.PublicKey
Public-key encryption and signature algorithms (RSA, DSA)
Crypto.Signature
Public-key signature algorithms (RSA PKCS#1)
Crypto.Util
Various useful modules and functions (long-to-string conversion, random number
generation, number theoretic functions)
PACKAGE CONTENTS
Cipher (package)
Hash (package)
Protocol (package)
PublicKey (package)
Random (package)
SelfTest (package)
Signature (package)
Util (package)
pct_warnings
DATA
__all__ = ['Cipher', 'Hash', 'Protocol', 'PublicKey', 'Util', 'Signatu...
__revision__ = '$Id$'
__version__ = '2.6.1'
VERSION
2.6.1from Crypto.Cipher import AES
from Crypto import Random
def encrypt(key32,message):
cipher=AES.new(key32,AES.MODE_CFB,iv)
msg=cipher.encrypt(message)
print(msg)
return msg
def decrypt(key32,msg):
dec=AES.new(key32,AES.MODE_CFB,iv)
return dec.decrypt(msg).decode('ascii')
if __name__=='__main__':
global iv
iv=Random.new().read(AES.block_size)
key='free-tutorials.org'
key32 = "".join([ ' ' if i >= len(key) else key[i] for i in range(32) ])
message='another website with free tutorials'
enc =encrypt(key32, message)
print enc
print(decrypt(key32,enc))from Crypto.Cipher import AES
from Crypto import Random
key = b'Sixteen byte key'
iv = Random.new().read(AES.block_size)
cipher = AES.new(key, AES.MODE_CFB, iv)
msg = iv + cipher.encrypt(b'Attack at dawn')>>> print key
Sixteen byte key
>>> print iv
ÔÄ▀DÒ ÕØ} m║dÕ╚\
>>> print cipher.encrypt(b'Attack at dawn')
åÌ£┴\u\ÍÈSÕ╦╔.>>> from Crypto.Hash import MD5
>>> MD5.new('free text').hexdigest()
'be9420c1596a781119c53a9933a8234f'>>> from Crypto.PublicKey import RSA
>>> from Crypto import Random
>>> rng = Random.new().read
>>> RSAkey = RSA.generate(1024, rng)
>>> public_key = RSAkey.publickey()
>>> print public_key
<_rsaobj e="" n="" x3650b98="">
>>> enc_data = public_key.encrypt('test data', 32)[0]
>>> print enc_data
H +îÕÊ ÙH:?ª2S½Fã0á! f¬ = ·+,Í0r³┐o·¼ÉlWy¿6ôên(£jê¿ ╦çª|*°q Ò4ì┌çÏD¦¿╝û╠╠MY¶ïzµ>©a}hRô ]í;
_[v¸¤u:2¦y¾/ ²4R╩HvéÌ'÷Ç)KT:P _<! D
>>> dec_data = RSAkey.decrypt(enc_data)
>>> print dec_data
test data pip install --upgrade google-cloud-visionC:\Python27\Scripts>pip install --upgrade --trusted-host pypi.python.org google-cloud-vision
Collecting google-cloud-vision
Downloading google_cloud_vision-0.24.0-py2.py3-none-any.whl (68kB)
100% |################################| 71kB 270kB/s
Collecting google-cloud-core<0 .25dev="">=0.24.0 (from google-cloud-vision)
Downloading google_cloud_core-0.24.1-py2.py3-none-any.whl (52kB)
100% |################################| 61kB 1.6MB/s
...
Installing collected packages: appdirs, setuptools, protobuf, httplib2, rsa, pyasn1-modules,
cachetools, google-auth, google-auth-httplib2, googleapis-common-protos, google-cloud-core,
pyreadline, dill, futures, grpcio, oauth2client, ply, google-gax, proto-google-cloud-vision-v1,
gapic-google-cloud-vision-v1, google-cloud-vision, pyparsing
Found existing installation: appdirs 1.4.0
Uninstalling appdirs-1.4.0:
Successfully uninstalled appdirs-1.4.0
Rolling back uninstall of appdirs
Exception:
Traceback (most recent call last):
File "c:\python27\lib\site-packages\pip\basecommand.py", line 215, in main
status = self.run(options, args)
...
with open(path, 'rb') as stream:
IOError: [Errno 2] No such file or directory: 'c:\\python27\\lib\\site-packages\\
appdirs-1.4.0.dist-info\\METADATA'C:\Python27\Scripts>pip install --upgrade --trusted-host pypi.python.org google-cloud-vision
Collecting google-cloud-vision
Downloading google_cloud_vision-0.24.0-py2.py3-none-any.whl (68kB)
100% |################################| 71kB 597kB/s
Collecting google-cloud-core<0 .25dev="">=0.24.0 (from google-cloud-vision)
...
Downloading futures-3.1.1-py2-none-any.whl
Collecting pyparsing (from packaging>=16.8->setuptools->protobuf>=3.0.0->google-cloud-core<0 .25dev="">=0.24.0->google-cloud-vision)
Downloading pyparsing-2.2.0-py2.py3-none-any.whl (56kB)
100% |################################| 61kB 4.7MB/s
Installing collected packages: appdirs, setuptools, protobuf, httplib2, rsa, pyasn1-modules,
cachetools, google-auth, google-auth-httplib2, googleapis-common-protos, google-cloud-core,
oauth2client, ply, pyreadline, dill, futures, grpcio, google-gax, proto-google-cloud-vision-v1,
gapic-google-cloud-vision-v1, google-cloud-vision, pyparsing
Found existing installation: appdirs 1.4.0
Uninstalling appdirs-1.4.0:
Successfully uninstalled appdirs-1.4.0
Found existing installation: setuptools 34.0.2
Uninstalling setuptools-34.0.2:
Successfully uninstalled setuptools-34.0.2
Found existing installation: httplib2 0.9.2
Uninstalling httplib2-0.9.2:
Successfully uninstalled httplib2-0.9.2
Found existing installation: pyparsing 2.1.10
Uninstalling pyparsing-2.1.10:
Successfully uninstalled pyparsing-2.1.10
Successfully installed appdirs-1.4.3 cachetools-2.0.0 dill-0.2.6 futures-3.1.1
gapic-google-cloud-vision-v1-0.90.3 google-auth-1.0.0 google-auth-httplib2-0.0.2
google-cloud-core-0.24.1 google-cloud-vision-0.24.0 google-gax-0.15.8 googleapis-common-protos-1.5.2
grpcio-1.3.0 httplib2-0.10.3 oauth2client-3.0.0 ply-3.8 proto-google-cloud-vision-v1-0.90.3
protobuf-3.2.0 pyasn1-modules-0.0.8 pyparsing-2.2.0 pyreadline-2.1 rsa-3.4.2 setuptools-35.0.2[root@localhost mythcat]# pip install --upgrade google-cloud-vision --ignore-installed
WARNING: Running pip install with root privileges is generally not a good idea.
Try `pip install --user` instead.
Collecting google-cloud-vision
Using cached google_cloud_vision-0.24.0-py2.py3-none-any.whl
...
google-auth-httplib2, google-cloud-core, google-cloud-vision
Running setup.py install for dill ... done
Running setup.py install for future ... done
Running setup.py install for googleapis-common-protos ... done
Running setup.py install for ply ... done
Running setup.py install for google-gax ... done
Running setup.py install for httplib2 ... done
Running setup.py install for oauth2client ... done
Running setup.py install for proto-google-cloud-vision-v1 ... done
Running setup.py install for gapic-google-cloud-vision-v1 ... done
Successfully installed appdirs-1.4.3 cachetools-2.0.0 dill-0.2.6 enum34-1.1.6
future-0.16.0 futures-3.1.1 gapic-google-cloud-vision-v1-0.90.3 google-auth-1.0.0
google-auth-httplib2-0.0.2 google-cloud-core-0.24.1 google-cloud-vision-0.24.0
google-gax-0.15.9 googleapis-common-protos-1.5.2 grpcio-1.3.0 httplib2-0.10.3
oauth2client-3.0.0 packaging-16.8 ply-3.8 proto-google-cloud-vision-v1-0.90.3
protobuf-3.2.0 pyasn1-0.2.3 pyasn1-modules-0.0.8 pyparsing-2.2.0 rsa-3.4.2
setuptools-35.0.2 six-1.10.0C:\Python27\Scripts>pip install --trusted-host pypi.python.org nltk
Collecting nltk
Downloading nltk-3.2.2.tar.gz (1.2MB)
100% |################################| 1.2MB 2.6MB/s
Requirement already satisfied: six in c:\python27\lib\site-packages (from nltk)
Building wheels for collected packages: nltk
...
Successfully built nltk
Installing collected packages: nltk
Successfully installed nltk-3.2.2C:\Python27>python
Python 2.7.13 (v2.7.13:a06454b1afa1, Dec 17 2016, 20:42:59) [MSC v.1500 32 bit (Intel)] on win32
Type "help", "copyright", "credits" or "license" for more information.
>>> import nltk
>>> nltk.download()
showing info https://raw.githubusercontent.com/nltk/nltk_data/gh-pages/index.xml
True[root@localhost mythcat]# pip install nltk
WARNING: Running pip install with root privileges is generally not a good idea.
Try `pip install --user` instead.
Collecting nltk
Retrying (Retry(total=4, connect=None, read=None, redirect=None)) after connection broken
by 'ProtocolError('Connection aborted.', error(104, 'Connection reset by peer'))': /simple/nltk/
Downloading nltk-3.2.2.tar.gz (1.2MB)
100% |████████████████████████████████| 1.2MB 1.1MB/s
Requirement already satisfied: six in /usr/lib/python2.7/site-packages (from nltk)
Installing collected packages: nltk
Running setup.py install for nltk ... done
Successfully installed nltk-3.2.2[mythcat@localhost ~]$ python
Python 2.7.13 (default, Feb 21 2017, 12:00:39)
[GCC 7.0.1 20170219 (Red Hat 7.0.1-0.9)] on linux2
Type "help", "copyright", "credits" or "license" for more information.
>>> import nltk
>>> nltk.download()
NLTK Downloader
---------------------------------------------------------------------------
d) Download l) List u) Update c) Config h) Help q) Quit
---------------------------------------------------------------------------
Downloader> d
Download which package (l=list; x=cancel)?
Identifier> l
Packages:
[ ] abc................. Australian Broadcasting Commission 2006
[ ] alpino.............. Alpino Dutch Treebank
...
Collections:
[ ] all-corpora......... All the corpora
[ ] all................. All packages
[ ] book................ Everything used in the NLTK Book
([*] marks installed packages)
Download which package (l=list; x=cancel)?
Identifier> all
Downloading collection u'all'
|
| Downloading package abc to /home/mythcat/nltk_data...
| Unzipping corpora/abc.zip.
| Downloading package alpino to /home/mythcat/nltk_data...
| Unzipping corpora/alpino.zip.
| Downloading package biocreative_ppi to
...
>>> from nltk.book import *
*** Introductory Examples for the NLTK Book ***
Loading text1, ..., text9 and sent1, ..., sent9
Type the name of the text or sentence to view it.
Type: 'texts()' or 'sents()' to list the materials.
text1: Moby Dick by Herman Melville 1851
text2: Sense and Sensibility by Jane Austen 1811
text3: The Book of Genesis
text4: Inaugural Address Corpus
text5: Chat Corpus
text6: Monty Python and the Holy Grail
text7: Wall Street Journal
text8: Personals Corpus
text9: The Man Who Was Thursday by G . K . Chesterton 1908
>>> ... #function count the word in the Text
>>> print text1.count("white")
191
# function concordance view shows us every occurrence of a given word, together with some context.
>>> print text3.concordance("white")
Displaying 5 of 5 matches:
potted , and every one that had some white in it , and all the brown among the
hazel and chesnut tree ; and pilled white strakes in them , and made the white
white strakes in them , and made the white appear which was in the rods . And h
y dream , and , behold , I had three white baskets on my he And in the uppermos
all be red with wine , and his teeth white with milk . Zebulun shall dwell at t
None
#function similar to the name of the text
>>> print text3.similar("white")
None
>>> print text3.similar("got")
named set arrayed bound brought see embraced kissed slew unto curse
built shewed laid digged sent gave offer offered blessed
None
#contexts are shared by two or more words
>>> text3.common_contexts(["white","blue"])
(u'The following word(s) were not found:', u'white blue')
>>> text3.common_contexts(["man","men"])
old_of the_and the_said the_that the_took young_and the_sC:\>cd Python27
C:\Python27>cd Scripts
C:\Python27\Scripts>pip install twilio
Collecting twilio
Downloading twilio-5.6.0.tar.gz (194kB)
100% |################################| 194kB 588kB/s
Collecting httplib2>=0.7 (from twilio)
Downloading httplib2-0.9.2.zip (210kB)
100% |################################| 215kB 519kB/s
Requirement already satisfied: six in c:\python27\lib\site-packages (from twilio)
Requirement already satisfied: pytz in c:\python27\lib\site-packages (from twilio)
Installing collected packages: httplib2, twilio
Running setup.py install for httplib2 ... done
Running setup.py install for twilio ... done
Successfully installed httplib2-0.9.2 twilio-5.6.0C:\Python27>python.exe
Python 2.7.12 (v2.7.12:d33e0cf91556, Jun 27 2016, 15:19:22) [MSC v.1500 32 bit (Intel)] on win32
Type "help", "copyright", "credits" or "license" for more information.
>>> import twilio
>>> from twilio import *
>>> dir(twilio)
['TwilioException', 'TwilioRestException', 'TwimlException', '__builtins__', '__doc__', '__file__', '__name__', '__package__', '__path__', '__version__', '__version_info__', 'compat', 'exceptions', 'rest', 'sys', 'u', 'version']
>>> dir(twilio.rest)
['TwilioIpMessagingClient', 'TwilioLookupsClient', 'TwilioPricingClient', 'TwilioRestClient', 'TwilioTaskRouterClient', 'TwilioTrunkingClient', '__builtins__', '__doc__', '__file__', '__name__', '__package__', '__path__', '_hush_pyflakes', 'base', 'client', 'exceptions', 'ip_messaging', 'lookups', 'pricing', 'resources', 'set_twilio_proxy', 'task_router', 'trunking'][root@localhost mythcat]# pip2.7 install twilio
Collecting twilio
Downloading twilio-5.7.0.tar.gz (168kB)
100% |████████████████████████████████| 174kB 1.8MB/s
Requirement already satisfied: httplib2>=0.7 in /usr/lib/python2.7/site-packages (from twilio)
Requirement already satisfied: six in /usr/lib/python2.7/site-packages (from twilio)
Requirement already satisfied: pytz in /usr/lib/python2.7/site-packages (from twilio)
Installing collected packages: twilio
Running setup.py install for twilio ... done
Successfully installed twilio-5.7.0
# /usr/bin/env python
# Download the twilio-python library from http://twilio.com/docs/libraries
from twilio.rest import Client

# Find these values at https://twilio.com/user/account
account_sid = "AC61b32be301f49f78f0ab3d69c4d335f6"
auth_token = "c8f37b65755900faa4fe7bbe1f948adb"
client = Client(account_sid, auth_token)

message = client.api.account.messages.create(to="+contry_allow_SMS",
                                             from_="++contry_allow_SMS",
                                             body="Hello python this is a twilio sms test")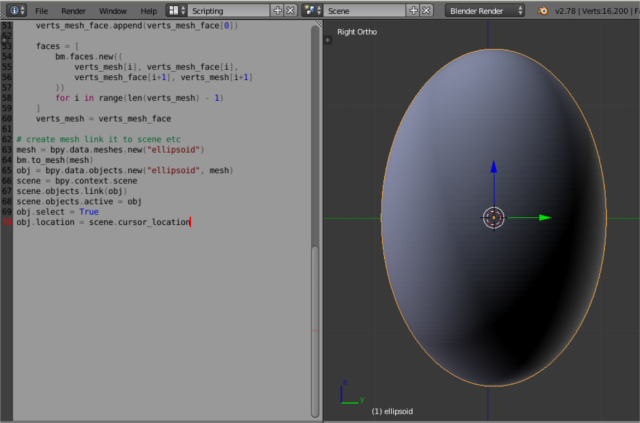
import bpy
import bmesh
from math import degrees, radians, sin, cos, tan
from mathutils import Vector


class CoordsPoints:
    @property
    def xyz(self):
        theta = self.theta
        phi = self.phi
        x = sin(theta) * sin(phi)
        y = cos(theta) * sin(phi)
        z = cos(phi)
        R = self.R
        return R * Vector((x,y,z))

    def __init__(self, R, theta, phi):
        self.R = R
        self.theta = theta
        self.phi = phi
        #self.xyz = self.point(theta, phi)

    def __repr__(self):
        return "Coords(%.4f, %.4f)" % (degrees(self.theta),
                                               degrees(self.phi))
# define the ellipsoid method.
def ellipsoid(a, b, c):
    def ellipsoid(v):
        x = a * (v.x)
        y = b * (v.y)
        z = c * (v.z)
        return Vector((x, y, z))
    return ellipsoid

# make the ellipsoid bmesh
bm = bmesh.new()

# TODO come up with a nicer way to do this.
rings = [[CoordsPoints(1, radians(theta), radians(phi))
                 for theta in range (0, 360, 2)]
                 for phi in range(0, 180, 2)]

h = ellipsoid(1.0, 1.0, 1.5)

verts_mesh = [bm.verts.new(h(p.xyz)) for p in rings[0]]
verts_mesh.append(verts_mesh[0])
for ring in range(1, len(rings)):

    verts_mesh_face = [bm.verts.new(h(p.xyz)) for p in rings[ring]]
    verts_mesh_face.append(verts_mesh_face[0])

    faces = [
        bm.faces.new((
            verts_mesh[i], verts_mesh_face[i],
            verts_mesh_face[i+1], verts_mesh[i+1]
        ))
        for i in range(len(verts_mesh) - 1)
    ]
    verts_mesh = verts_mesh_face

# create mesh link it to scene
mesh = bpy.data.meshes.new("ellipsoid")
bm.to_mesh(mesh)
obj = bpy.data.objects.new("ellipsoid", mesh)
scene = bpy.context.scene
scene.objects.link(obj)
scene.objects.active = obj
obj.select = True
obj.location = scene.cursor_location[root@localhost mythcat]# pip install scapy
Collecting scapy
Downloading scapy-2.3.3.tgz (1.4MB)
100% |████████████████████████████████| 1.4MB 904kB/s
Building wheels for collected packages: scapy
Running setup.py bdist_wheel for scapy ... done
Stored in directory: /root/.cache/pip/wheels/bd/cf/...
Installing collected packages: scapy
Successfully installed scapy-2.3.3from scapy.all import *
dstip=raw_input("enter the ip address \n")
icmp=ICMP()
icmp.type=8
icmp.code=0
ip=IP()
ip.dst=dstip
p=sr1(ip/icmp,timeout=5, verbose=0)
if(p):
print "Layer 3 is up"
else:
print "Layer 3 status is down"from scapy.all import *
def arp_display(pkt):
if pkt[ARP].op == 1:
return "Request: " + pkt[ARP].psrc + " is asking about " + pkt[ARP].pdst
if pkt[ARP].op == 2:
return "*Response: " + pkt[ARP].hwsrc + " has address " + pkt[ARP].psrc
print sniff(prn=arp_display, filter="arp", store=0, count=10)from xml.etree import ElementTree
import sys
file_opml = sys.argv[1]
def extract_rss_urls_from_opml(filename):
urls = []
with open(filename, 'rt') as f:
tree = ElementTree.parse(f)
for node in tree.findall('.//outline'):
url = node.attrib.get('xmlUrl')
if url:
urls.append(url)
return urls
urls = extract_rss_urls_from_opml(file_opml)
print urls [root@localhost mythcat]# pip install pyowm
Collecting pyowm
Downloading pyowm-2.6.1.tar.gz (3.6MB)
100% |████████████████████████████████| 3.7MB 388kB/s
Building wheels for collected packages: pyowm
Running setup.py bdist_wheel for pyowm ... done
Stored in directory: /root/.cache/pip/wheels/9a/91/17/bb120c765f08df77645cf70a16aa372d5a297f4ae2be749e81
Successfully built pyowm
Installing collected packages: pyowm
Successfully installed pyowm-2.6.1
#/usr/bin/env python
#" -*- coding: utf-8 -*-
import pyowm

print " Have a account to openweathermap.org and use with api key free or pro"
print " owm = pyowm.OWM(API_key='your-API-key', subscription_type='pro')"

owm = pyowm.OWM("327407589df060c7f825b63ec1d9a096")
forecast = owm.daily_forecast("Falticeni,ro")
tomorrow = pyowm.timeutils.tomorrow()
forecast.will_be_sunny_at(tomorrow)

observation = owm.weather_at_place('Falticeni,ro')
w = observation.get_weather()
print (w)
print " Weather details"
print " =============== "

print " Get cloud coverage"
print w.get_clouds()
print " ----------------"
print " Get rain volume"
print w.get_rain()
print " ----------------"
print " Get snow volume"
print w.get_snow()

print " Get wind degree and speed"
print w.get_wind()
print " ----------------"
print " Get humidity percentage"
print w.get_humidity()
print " ----------------"
print " Get atmospheric pressure"
print w.get_pressure()
print " ----------------"
print " Get temperature in Kelvin degs"
print w.get_temperature()
print " ----------------"
print " Get temperature in Celsius degs"
print w.get_temperature(unit='celsius')
print " ----------------"
print " Get temperature in Fahrenheit degs"
print w.get_temperature('fahrenheit')
print " ----------------"
print " Get weather short status"
print w.get_status()
print " ----------------"
print " Get detailed weather status"
print w.get_detailed_status()
print " ----------------"
print " Get OWM weather condition code"
print w.get_weather_code()
print " ----------------"
print " Get weather-related icon name"
print w.get_weather_icon_name()
print " ----------------"
print " Sunrise time (ISO 8601)"
print w.get_sunrise_time('iso')
print " Sunrise time (GMT UNIXtime)"
print w.get_sunrise_time()
print " ----------------"
print " Sunset time (ISO 8601)"
print w.get_sunset_time('iso')
print " Sunset time (GMT UNIXtime)"
print w.get_sunset_time()
print " ----------------"
print " Search current weather observations in the surroundings of"
print " Latitude and longitude coordinates for Fălticeni, Romania:"
observation_list = owm.weather_around_coords(47.46, 26.30) [root@localhost mythcat]# python openweather.py
Have a account to openweathermap.org and use with api key free or pro
owm = pyowm.OWM(API_key='your-API-key', subscription_type='pro')
Weather details
===============
Get cloud coverage
20
----------------
Get rain volume
{}
----------------
Get snow volume
{}
Get wind degree and speed
{u'speed': 5.7, u'deg': 340}
----------------
Get humidity percentage
82
----------------
Get atmospheric pressure
{'press': 1021, 'sea_level': None}
----------------
Get temperature in Kelvin degs
{'temp_max': 287.15, 'temp_kf': None, 'temp': 287.15, 'temp_min': 287.15}
----------------
Get temperature in Celsius degs
{'temp_max': 14.0, 'temp_kf': None, 'temp': 14.0, 'temp_min': 14.0}
----------------
Get temperature in Fahrenheit degs
{'temp_max': 57.2, 'temp_kf': None, 'temp': 57.2, 'temp_min': 57.2}
----------------
Get weather short status
Clouds
----------------
Get detailed weather status
few clouds
----------------
Get OWM weather condition code
801
----------------
Get weather-related icon name
02d
----------------
Sunrise time (ISO 8601)
2017-03-24 04:08:33+00
Sunrise time (GMT UNIXtime)
1490328513
----------------
Sunset time (ISO 8601)
2017-03-24 16:33:59+00
Sunset time (GMT UNIXtime)
1490373239
----------------
Search current weather observations in the surroundings of
Latitude and longitude coordinates for Fălticeni, Romania:
import tensorflow as tf
tf.scalar_summary = tf.summary.scalar
tf.merge_all_summaries = tf.summary.merge_all
tf.train.SummaryWriter = tf.summary.FileWriterC:\Python35>cd Scripts
C:\Python35\Scripts>pip3 install --upgrade tensorflow
Collecting tensorflow
Downloading tensorflow-1.0.1-cp35-cp35m-win_amd64.whl (14.7MB)
100% |################################| 14.7MB 43kB/s
...
Successfully installed appdirs-1.4.3 numpy-1.12.0 packaging-16.8
protobuf-3.2.0 pyparsing-2.2.0 setuptools-34.3.2 six-1.10.0
tensorflow-1.0.1 wheel-0.29.0C:\Python35\Scripts>pip3 install --upgrade tensorflow-gpu
Collecting tensorflow-gpu
Downloading tensorflow_gpu-1.0.1-cp35-cp35m-win_amd64.whl (43.1MB)
100% |################################| 43.1MB 11kB/
...
Installing collected packages: tensorflow-gpu
Successfully installed tensorflow-gpu-1.0.1Creating TensorFlow device (/gpu:0) -> (device: 0, name: GeForce GT 740M, pci bus id: 0000:01:00.0)
[root@localhost build]# pip install tensorflow
Collecting tensorflow
  Downloading tensorflow-1.0.1-cp27-cp27mu-manylinux1_x86_64.whl (44.1MB)
    100% |████████████████████████████████| 44.1MB 30kB/s
Collecting mock>=2.0.0 (from tensorflow)
  Downloading mock-2.0.0-py2.py3-none-any.whl (56kB)
    100% |████████████████████████████████| 61kB 341kB/s
Requirement already satisfied: six>=1.10.0 in /usr/lib/python2.7/site-packages (from tensorflow)
Requirement already satisfied: numpy>=1.11.0 in /usr/lib64/python2.7/site-packages (from tensorflow)
Collecting protobuf>=3.1.0 (from tensorflow)
  Downloading protobuf-3.2.0-cp27-cp27mu-manylinux1_x86_64.whl (5.6MB)
    100% |████████████████████████████████| 5.6MB 172kB/s
Collecting wheel (from tensorflow)
  Downloading wheel-0.29.0-py2.py3-none-any.whl (66kB)
    100% |████████████████████████████████| 71kB 532kB/s
Collecting funcsigs>=1; python_version < "3.3" (from mock>=2.0.0->tensorflow)
  Downloading funcsigs-1.0.2-py2.py3-none-any.whl
Collecting pbr>=0.11 (from mock>=2.0.0->tensorflow)
  Downloading pbr-2.0.0-py2.py3-none-any.whl (98kB)
    100% |████████████████████████████████| 102kB 518kB/s
Requirement already satisfied: setuptools in /usr/lib/python2.7/site-packages (from protobuf>=3.1.0->tensorflow)
Installing collected packages: funcsigs, pbr, mock, protobuf, wheel, tensorflow
Successfully installed funcsigs-1.0.2 mock-2.0.0 pbr-2.0.0 protobuf-3.2.0 tensorflow-1.0.1 wheel-0.29.0[root@localhost build]# pip install --upgrade tensorflow-gpu
Collecting tensorflow-gpu
Downloading tensorflow_gpu-1.0.1-cp27-cp27mu-manylinux1_x86_64.whl (94.8MB)
100% |████████████████████████████████| 94.8MB 15kB/s
Requirement already up-to-date: mock>=2.0.0 in /usr/lib/python2.7/site-packages (from tensorflow-gpu)
Requirement already up-to-date: six>=1.10.0 in /usr/lib/python2.7/site-packages (from tensorflow-gpu)
Collecting numpy>=1.11.0 (from tensorflow-gpu)
Downloading numpy-1.12.0-cp27-cp27mu-manylinux1_x86_64.whl (16.5MB)
100% |████████████████████████████████| 16.5MB 83kB/s
Requirement already up-to-date: protobuf>=3.1.0 in /usr/lib64/python2.7/site-packages (from tensorflow-gpu)
Requirement already up-to-date: wheel in /usr/lib/python2.7/site-packages (from tensorflow-gpu)
Requirement already up-to-date: funcsigs>=1; python_version < "3.3" in /usr/lib/python2.7/site-packages (from mock>=2.0.0->tensorflow-gpu)
Requirement already up-to-date: pbr>=0.11 in /usr/lib/python2.7/site-packages (from mock>=2.0.0->tensorflow-gpu)
Collecting setuptools (from protobuf>=3.1.0->tensorflow-gpu)
Downloading setuptools-34.3.1-py2.py3-none-any.whl (389kB)
100% |████████████████████████████████| 399kB 637kB/s
Collecting appdirs>=1.4.0 (from setuptools->protobuf>=3.1.0->tensorflow-gpu)
Downloading appdirs-1.4.3-py2.py3-none-any.whl
Collecting packaging>=16.8 (from setuptools->protobuf>=3.1.0->tensorflow-gpu)
Downloading packaging-16.8-py2.py3-none-any.whl
Collecting pyparsing (from packaging>=16.8->setuptools->protobuf>=3.1.0->tensorflow-gpu)
Downloading pyparsing-2.2.0-py2.py3-none-any.whl (56kB)
100% |████████████████████████████████| 61kB 577kB/s
Installing collected packages: numpy, tensorflow-gpu, appdirs, pyparsing, packaging, setuptools
Found existing installation: numpy 1.11.2
Uninstalling numpy-1.11.2:
Successfully uninstalled numpy-1.11.2
Found existing installation: setuptools 25.1.1
Uninstalling setuptools-25.1.1:
Successfully uninstalled setuptools-25.1.1
Successfully installed appdirs-1.4.3 numpy-1.12.0 packaging-16.8 pyparsing-2.2.0 setuptools-34.3.1 tensorflow-gpu-1.0.1
    _mod = imp.load_module('_pywrap_tensorflow', fp, pathname, description)
ImportError: libcudart.so.8.0: cannot open shared object file: No such file or directory


Failed to load the native TensorFlow runtime.

See https://github.com/tensorflow/tensorflow/blob/master/tensorflow/g3doc/get_started/os_setup.md#import_error

for some common reasons and solutions.  Include the entire stack trace
above this error message when asking for help.[root@localhost ~]# export TF_BINARY_URL=https://storage.googleapis.com/tensorflow/linux/cpu/tensorflow-0.11.0rc0-cp27-none-linux_x86_64.whl
[root@localhost ~]# pip install --upgrade $TF_BINARY_URL
Collecting tensorflow==0.11.0rc0 from https://storage.googleapis.com/tensorflow/linux/cpu/tensorflow-0.11.0rc0-cp27-none-linux_x86_64.whl
Downloading https://storage.googleapis.com/tensorflow/linux/cpu/tensorflow-0.11.0rc0-cp27-none-linux_x86_64.whl (39.7MB)
100% |████████████████████████████████| 39.8MB 37kB/s
Requirement already up-to-date: mock>=2.0.0 in /usr/lib/python2.7/site-packages (from tensorflow==0.11.0rc0)
Requirement already up-to-date: six>=1.10.0 in /usr/lib/python2.7/site-packages (from tensorflow==0.11.0rc0)
Requirement already up-to-date: numpy>=1.11.0 in /usr/lib64/python2.7/site-packages (from tensorflow==0.11.0rc0)
Collecting protobuf==3.0.0 (from tensorflow==0.11.0rc0)
Downloading protobuf-3.0.0-cp27-cp27mu-manylinux1_x86_64.whl (5.2MB)
100% |████████████████████████████████| 5.2MB 206kB/s
Requirement already up-to-date: wheel in /usr/lib/python2.7/site-packages (from tensorflow==0.11.0rc0)
Requirement already up-to-date: funcsigs>=1; python_version < "3.3" in /usr/lib/python2.7/site-packages (from mock>=2.0.0->tensorflow==0.11.0rc0)
Requirement already up-to-date: pbr>=0.11 in /usr/lib/python2.7/site-packages (from mock>=2.0.0->tensorflow==0.11.0rc0)
Requirement already up-to-date: setuptools in /usr/lib/python2.7/site-packages (from protobuf==3.0.0->tensorflow==0.11.0rc0)
Requirement already up-to-date: appdirs>=1.4.0 in /usr/lib/python2.7/site-packages (from setuptools->protobuf==3.0.0->tensorflow==0.11.0rc0)
Requirement already up-to-date: packaging>=16.8 in /usr/lib/python2.7/site-packages (from setuptools->protobuf==3.0.0->tensorflow==0.11.0rc0)
Requirement already up-to-date: pyparsing in /usr/lib/python2.7/site-packages (from packaging>=16.8->setuptools->protobuf==3.0.0->tensorflow==0.11.0rc0)
Installing collected packages: protobuf, tensorflow
Found existing installation: protobuf 3.2.0
Uninstalling protobuf-3.2.0:
Successfully uninstalled protobuf-3.2.0
Found existing installation: tensorflow 1.0.1
Uninstalling tensorflow-1.0.1:
Successfully uninstalled tensorflow-1.0.1
Successfully installed protobuf-3.0.0 tensorflow-0.11.0rc0
import tensorflow as tf
hello = tf.constant('Hello, TensorFlow!')
sess = tf.Session()
print(sess.run(hello))

Hello, TensorFlow!| Module | Functionality |
| pattern.web | Asynchronous requests, web services, web crawler, HTML DOM parser. |
| pattern.db | Wrappers for databases (MySQL, SQLite) and CSV-files. |
| pattern.text | Base classes for parsers, parse trees and sentiment analysis. |
| pattern.search | Pattern matching algorithm for parsed text (syntax & semantics). |
| pattern.vector | Vector space model, clustering, classification. |
| pattern.graph | Graph analysis & visualization. |
[root@localhost ~]# pip install pattern
Collecting pattern
  Downloading pattern-2.6.zip (24.6MB)
    100% |████████████████████████████████| 24.6MB 61kB/s
Installing collected packages: pattern
  Running setup.py install for pattern ... done
Successfully installed pattern-2.6| Variable | Meaning | Example |
| a | array, all | a = [normalize(w) for w in words] |
| b | boolean | while b is False: |
| d | distance, document | d = distance(v1, v2) |
| e | element | e = html.find('#nav') |
| f | file, filter, function | f = open('data.csv', 'r') |
| i | index | for i in range(len(matrix)): |
| j | index | for j in range(len(matrix[i])): |
| k | key | for k in vector.keys(): |
| n | list length | n = len(a) |
| p | parser, pattern | p = pattern.search.compile('NN') |
| q | query | for r in twitter.search(q): |
| r | result, row | for r in csv('data.csv): |
| s | string | s = s.decode('utf-8').strip() |
| t | time | t = time.time() - t0 |
| v | value, vector | for k, v in vector.items(): |
| w | word | for i, w in enumerate(sentence.words): |
| x | horizontal position | node.x = 0 |
| y | vertical position | node.y = 0 |
| Language | Code | Speakers | Example countries |
| Spanish | es | 350M | Argentina (40), Colombia (40), Mexico (100), Spain (45) |
| English | en | 340M | Canada (30), United Kingdom (60), United States (300) |
| German | de | 100M | Austria (10), Germany (80), Switzerland (7) |
| French | fr | 70M | France (65), Côte d'Ivoire (20) |
| Italian | it | 60M | Italy (60) |
| Dutch | nl | 27M | The Netherlands (25), Belgium (6), Suriname (1) |
import pattern.en
import pattern.es
import pattern.du
import pattern.defrom pattern.web import Wikipedia
from pattern.web import Yahoo
from pattern.web import Twitter
from pattern.web import Facebook
from pattern.web import Flickr
from pattern.web import GMAIL
from pattern.web import GOOGLEimport pattern
from pattern.db import Database, field, pk, STRING, BOOLEAN, DATE, NOW
db = Database('people')
db.create('area_people',fields=(
pk(),
field('name', STRING(80), index=True),
field('type', STRING(20)),
field('date_birth', DATE, default=None),
field('date_created', DATE, default=NOW)
))
db.area_people.append(name=u'George', type='male')
1
print db.area_people.rows()[0]
(1, u'George', u'male', None, Date('2017-03-06 22:38:13'))
[root@localhost lucru]# pip install datetime
Collecting datetime
Downloading DateTime-4.1.1.zip (66kB)
100% |████████████████████████████████| 71kB 703kB/s
Collecting zope.interface (from datetime)
Downloading zope.interface-4.3.3.tar.gz (150kB)
100% |████████████████████████████████| 153kB 2.2MB/s
Collecting pytz (from datetime)
Downloading pytz-2016.10-py2.py3-none-any.whl (483kB)
100% |████████████████████████████████| 491kB 2.4MB/s
Requirement already satisfied: setuptools in /usr/lib/python2.7/site-packages (from zope.interface->datetime)
Installing collected packages: zope.interface, pytz, datetime
Running setup.py install for zope.interface ... done
Running setup.py install for datetime ... done
Successfully installed datetime-4.1.1 pytz-2016.10 zope.interface-4.3.3parser.add_argument('date', type=lambda s: datetime.datetime.strptime(s, '%Y-%m-%d'))datetime.datetime.strptime(new_value, '%Y-%m-%d %H:%M:%S')-timedelta(days=1)print date.today()today=date.today()
today.strftime("%A %d. %B %Y")
'Sunday 05. March 2017'
from datetime import datetime
now_epoch = (datetime.utcnow() - datetime(1970, 1, 1)).total_seconds()
datetime.utcfromtimestamp(now_epoch)
datetime.datetime(2017, 3, 4, 22, 35, 13, 463409)
datetime.fromtimestamp(now_epoch)
datetime.datetime(2017, 3, 5, 0, 35, 13, 463409)
import pytz
datetime.fromtimestamp(now_epoch, pytz.utc)
datetime.datetime(2017, 3, 4, 22, 35, 13, 463409, tzinfo=)
#wget -N -q http://geolite.maxmind.com/download/geoip/database/GeoLiteCity.dat.gz
import pygeoip
gip = pygeoip.GeoIP('GeoLiteCity.dat')
rec = gip.record_by_addr('___________________')
for key,val in rec.items():
print "%s: %s" %(key,val)[root@localhost mythcat]# dnf install opencv-python.x86_64
Last metadata expiration check: 0:21:12 ago on Sat Feb 25 23:26:59 2017.
Dependencies resolved.
================================================================================
Package Arch Version Repository Size
================================================================================
Installing:
opencv x86_64 3.1.0-8.fc25 fedora 1.8 M
opencv-python x86_64 3.1.0-8.fc25 fedora 376 k
python2-nose noarch 1.3.7-11.fc25 updates 266 k
python2-numpy x86_64 1:1.11.2-1.fc25 fedora 3.2 M
Transaction Summary
================================================================================
Install 4 Packages
Total download size: 5.6 M
Installed size: 29 M
Is this ok [y/N]: y
Downloading Packages:
(1/4): opencv-python-3.1.0-8.fc25.x86_64.rpm 855 kB/s | 376 kB 00:00
(2/4): opencv-3.1.0-8.fc25.x86_64.rpm 1.9 MB/s | 1.8 MB 00:00
(3/4): python2-nose-1.3.7-11.fc25.noarch.rpm 543 kB/s | 266 kB 00:00
(4/4): python2-numpy-1.11.2-1.fc25.x86_64.rpm 2.8 MB/s | 3.2 MB 00:01
--------------------------------------------------------------------------------
Total 1.8 MB/s | 5.6 MB 00:03
Running transaction check
Transaction check succeeded.
Running transaction test
Transaction test succeeded.
Running transaction
Installing : python2-nose-1.3.7-11.fc25.noarch 1/4
Installing : python2-numpy-1:1.11.2-1.fc25.x86_64 2/4
Installing : opencv-3.1.0-8.fc25.x86_64 3/4
Installing : opencv-python-3.1.0-8.fc25.x86_64 4/4
Verifying : opencv-python-3.1.0-8.fc25.x86_64 1/4
Verifying : opencv-3.1.0-8.fc25.x86_64 2/4
Verifying : python2-numpy-1:1.11.2-1.fc25.x86_64 3/4
Verifying : python2-nose-1.3.7-11.fc25.noarch 4/4
Installed:
opencv.x86_64 3.1.0-8.fc25 opencv-python.x86_64 3.1.0-8.fc25
python2-nose.noarch 1.3.7-11.fc25 python2-numpy.x86_64 1:1.11.2-1.fc25
Complete!
[root@localhost mythcat]# import numpy as np
import cv2
cap = cv2.VideoCapture('candle')
# params for ShiTomasi corner detection
feature_params = dict( maxCorners = 77,
qualityLevel = 0.3,
minDistance = 7,
blockSize = 7 )
# Parameters for lucas kanade optical flow
lk_params = dict( winSize = (17,17),
maxLevel = 1,
criteria = (cv2.TERM_CRITERIA_EPS | cv2.TERM_CRITERIA_COUNT, 10, 0.03))
# Create some random colors
color = np.random.randint(0,255,(100,3))
# Take first frame and find corners in it
ret, old_frame = cap.read()
old_gray = cv2.cvtColor(old_frame, cv2.COLOR_BGR2GRAY)
p0 = cv2.goodFeaturesToTrack(old_gray, mask = None, **feature_params)
# Create a mask image for drawing purposes
mask = np.zeros_like(old_frame)
while(1):
ret,frame = cap.read()
frame_gray = cv2.cvtColor(frame, cv2.COLOR_BGR2GRAY)
# calculate optical flow
p1, st, err = cv2.calcOpticalFlowPyrLK(old_gray, frame_gray, p0, None, **lk_params)
# Select good points
good_new = p1[st==1]
good_old = p0[st==1]
# draw the tracks
for i,(new,old) in enumerate(zip(good_new,good_old)):
a,b = new.ravel()
c,d = old.ravel()
mask = cv2.line(mask, (a,b),(c,d), color[i].tolist(), 2)
frame = cv2.circle(frame,(a,b),5,color[i].tolist(),-1)
img = cv2.add(frame,mask)
cv2.imshow('frame',img)
k = cv2.waitKey(30) & 0xff
if k == 27:
break
# Now update the previous frame and previous points
old_gray = frame_gray.copy()
p0 = good_new.reshape(-1,1,2)
cv2.destroyAllWindows()
cap.release()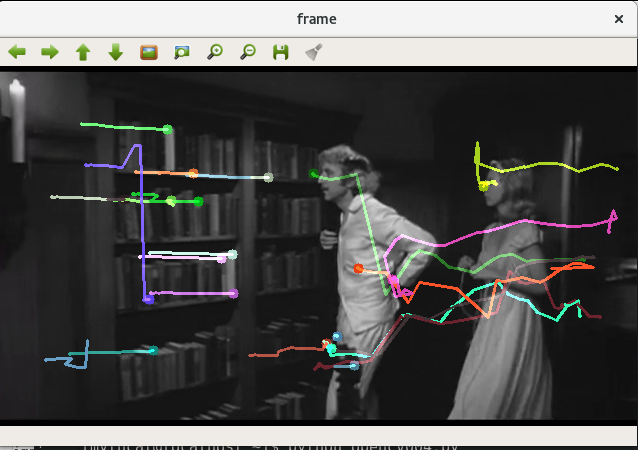
import urllib
opener = urllib.FancyURLopener({})
f = opener.open("http://www.ra___aer.ro/")
d=f.read()
fo = open('workfile.txt', 'w')
fo.write(d)
fo.close()
[root@localhost mythcat]# pip install twill

Collecting twill

Downloading twill-1.8.0.tar.gz (176kB)

100% |████████████████████████████████| 184kB 2.5MB/s

Installing collected packages: twill

Running setup.py install for twill ... done

Successfully installed twill-1.8.0
[mythcat@localhost ~]$ python
Python 2.7.13 (default, Jan 12 2017, 17:59:37)
[GCC 6.3.1 20161221 (Red Hat 6.3.1-1)] on linux2
Type "help", "copyright", "credits" or "license" for more information.
>>> from twill import get_browser
>>> b = get_browser()
>>>
>>> from twill.commands import *
>>> go("http://www.python.org/")
==> at https://www.python.org/
u'https://www.python.org/'
>>> b.showforms()

Form #1
## ## __Name__________________ __Type___ __ID________ __Value__________________
1     q                        search    id-searc ...
>>> import twill.shell
>>> twill.shell.main()

 -= Welcome to twill! =-

current page: https://www.python.org/widgets
>> ?

Undocumented commands:
======================
add_auth             fa           info             save_html           title
add_extra_header     find         load_cookies     setglobal           url
agent                follow       notfind          setlocal
back                 formaction   redirect_error   show
clear_cookies        formclear    redirect_output  show_cookies
clear_extra_headers  formfile     reload           show_extra_headers
code                 formvalue    reset_browser    showforms
config               fv           reset_error      showhistory
debug                get_browser  reset_output     showlinks
echo                 getinput     run              sleep
exit                 getpassword  runfile          submit
extend_with          go           save_cookies     tidy_ok

current page: https://www.python.org/widgets
>>
import math
import operator
from math import *
import PIL

from PIL import Image
h1 = Image.open("image1.png").histogram()
h2 = Image.open("image2.png").histogram()

rms = math.sqrt(reduce(operator.add,
        map(lambda a,b: (a-b)**2, h1, h2))/len(h1))
print rms
 operator.lt(a, b)

operator.le(a, b)

operator.eq(a, b)

operator.ne(a, b)

operator.ge(a, b)

operator.gt(a, b)

operator.__lt__(a, b)

operator.__le__(a, b)

operator.__eq__(a, b)

operator.__ne__(a, b)

operator.__ge__(a, b)

operator.__gt__(a, b)
>>> # Elementwise multiplication

>>> map(mul, [0, 1, 2, 3], [10, 20, 30, 40])

[0, 20, 60, 120]


>>> # Dot product

>>> sum(map(mul, [0, 1, 2, 3], [10, 20, 30, 40]))

200
C:\>cd Python27


C:\Python27>cd Scripts


C:\Python27\Scripts>pip install kivy

Collecting kivy

Downloading Kivy-1.9.1-cp27-none-win32.whl (7.4MB)

100% |################################| 7.4MB 50kB/s

Collecting Kivy-Garden>=0.1.4 (from kivy)

Downloading kivy-garden-0.1.4.tar.gz

Requirement already satisfied: requests in c:\python27\lib\site-packages (from Kivy-Garden>=0.1.4->kivy)

Installing collected packages: Kivy-Garden, kivy

Running setup.py install for Kivy-Garden ... done

Successfully installed Kivy-Garden-0.1.4 kivy-1.9.1
python -m pip install --upgrade docutils pygments pypiwin32 kivy.deps.sdl2 kivy.deps.glew kivy.deps.gstreamer --extra-index-url https://kivy.org/downloads/packages/simple/ python -m pip install --upgrade pip wheel setuptoolspip list outdatedpip freeze > requirements.txt && pip install --upgrade -r requirements.txt && del requirements.txtC:\Python27>python share\kivy-examples\demo\showcase\main.pyfrom kivy.app import App
from kivy.uix.button import Button
class TestApp(App):
def build(self):
return Button(text='Hello World')
TestApp().run()C:\Python27\Scripts>pip install Arch
Collecting Arch
Downloading arch-4.0.tar.gz (107kB)
100% |################################| 112kB 390kB/s
Requirement already satisfied: matplotlib>=1.4 in c:\python27\lib\site-packages (from Arch)
Requirement already satisfied: scipy>=0.15 in c:\python27\lib\site-packages (from Arch)
Collecting patsy>=0.2 (from Arch)
Downloading patsy-0.4.1-py2.py3-none-any.whl (233kB)
100% |################################| 235kB 906kB/s
Collecting statsmodels>=0.6 (from Arch)
Downloading statsmodels-0.6.1.tar.gz (7.0MB)
100% |################################| 7.0MB 85kB/s
Collecting pandas>=0.16 (from Arch)
Downloading pandas-0.19.2-cp27-cp27m-win32.whl (6.8MB)
100% |################################| 6.8MB 81kB/s
Requirement already satisfied: numpy>=1.6 in c:\python27\lib\site-packages (from matplotlib>=1.4->Arch)
Requirement already satisfied: python-dateutil in c:\python27\lib\site-packages (from matplotlib>=1.4->Arch)
Requirement already satisfied: cycler in c:\python27\lib\site-packages (from matplotlib>=1.4->Arch)
Requirement already satisfied: pyparsing!=2.0.4,!=2.1.2,>=1.5.6 in c:\python27\lib\site-packages (from matplotlib>=1.4->Arch)
Requirement already satisfied: pytz in c:\python27\lib\site-packages (from matplotlib>=1.4->Arch)
Requirement already satisfied: six in c:\python27\lib\site-packages (from patsy>=0.2->Arch)
Installing collected packages: patsy, pandas, statsmodels, Arch
Running setup.py install for statsmodels ... done
Running setup.py install for Arch ... done
Successfully installed Arch-4.0 pandas-0.19.2 patsy-0.4.1 statsmodels-0.6.1C:\WINDOWS\system32>cd C:\Python27
C:\Python27>cd Scripts
C:\Python27\Scripts>pip install Theano
Collecting Theano
Using cached Theano-0.8.2.tar.gz
Requirement already satisfied: numpy>=1.7.1 in c:\python27\lib\site-packages (from Theano)
Requirement already satisfied: scipy>=0.11 in c:\python27\lib\site-packages (from Theano)
Requirement already satisfied: six>=1.9.0 in c:\python27\lib\site-packages (from Theano)
Installing collected packages: Theano
Running setup.py install for Theano ... done
Successfully installed Theano-0.8.2
import theano

WARNING (theano.configdefaults): g++ not detected ! Theano will be unable to execute optimized C-implementations (for both CPU and GPU) and will default to Python implementations. Performance will be severely degraded. To remove this warning, set Theano flags cxx to an empty string.results = api.GetSearch(raw_query="q=from%3Asomething"results = api.GetSearch(raw_query="q=&geocode=lat,long,10km")C:\>cd Python27
C:\Python27>cd Scripts
C:\Python27\Scripts>pip install python-twitter
Collecting python-twitter
Downloading python_twitter-3.2-py2-none-any.whl (71kB)
100% |################################| 81kB 292kB/s
Requirement already satisfied: requests in c:\python27\lib\site-packages (from python-twitter)
Requirement already satisfied: requests-oauthlib in c:\python27\lib\site-packages (from python-twitter)
Collecting future (from python-twitter)
Downloading future-0.16.0.tar.gz (824kB)
100% |################################| 829kB 485kB/s
Requirement already satisfied: oauthlib>=0.6.2 in c:\python27\lib\site-packages
(from requests-oauthlib->python-twitter)
Installing collected packages: future, python-twitter
Running setup.py install for future ... done
Successfully installed future-0.16.0 python-twitter-3.2import os
import json
import twitter
from twitter import *
CONSUMER_KEY=""
CONSUMER_SECRET=""
ACCESS_TOKEN=""
ACCESS_TOKEN_SECRET=""
api = Api(CONSUMER_KEY,
CONSUMER_SECRET,
ACCESS_TOKEN,
ACCESS_TOKEN_SECRET)
def main():
with open('output.txt', 'a') as f:
for line in api.GetStreamFilter(track='something', languages=LANGUAGES):
print line
results = api.GetSearch(raw_query="q=from%3Asomething")
print results
if __name__ == '__main__':
main()
C:\>cd Python27

C:\Python27>cd Scripts

C:\Python27\Scripts>pip install tweepy

Collecting tweepy

Downloading tweepy-3.5.0-py2.py3-none-any.whl

Collecting requests>=2.4.3 (from tweepy)

Downloading requests-2.12.3-py2.py3-none-any.whl (575kB)

100% |################################| 583kB 556kB/s

Collecting requests-oauthlib>=0.4.1 (from tweepy)

Downloading requests_oauthlib-0.7.0-py2.py3-none-any.whl

Requirement already satisfied: six>=1.7.3 in c:\python27\lib\site-packages (from

tweepy)

Collecting oauthlib>=0.6.2 (from requests-oauthlib>=0.4.1->tweepy)

Downloading oauthlib-2.0.1.tar.gz (122kB)

100% |################################| 133kB 506kB/s

Installing collected packages: requests, oauthlib, requests-oauthlib, tweepy

Running setup.py install for oauthlib ... done

Successfully installed oauthlib-2.0.1 requests-2.12.3 requests-oauthlib-0.7.0 tweepy-3.5.0import tweepy
from tweepy.streaming import StreamListener
from tweepy import OAuthHandler
from tweepy import Stream
consumer_key=""
consumer_secret=""
access_token=""
access_token_secret=""
auth = tweepy.OAuthHandler(consumer_key, consumer_secret)
auth.set_access_token(access_token, access_token_secret)
api = tweepy.API(auth)
print(api.me().name)
class StdOutListener(StreamListener):
""" A listener handles tweets that are received from the stream.
This is a basic listener that just prints received tweets to stdout.
"""
def on_data(self, data):
print(data)
return True
def on_error(self, status):
print(status)
if __name__ == '__main__':
lista = StdOutListener()
auth = OAuthHandler(consumer_key, consumer_secret)
auth.set_access_token(access_token, access_token_secret)
stream = Stream(auth, lista)
stream.filter(track=['internet'])
api.update_status(status='I using OAuth authentication via Tweepy!')C:\Python27\Scripts>pip install matplotlib
Collecting matplotlib
Downloading matplotlib-1.5.3-cp27-cp27m-win32.whl (6.0MB)
100% |################################| 6.0MB 98kB/s
Requirement already satisfied: numpy>=1.6 in c:\python27\lib\site-packages (from
matplotlib)
Collecting python-dateutil (from matplotlib)
Downloading python_dateutil-2.6.0-py2.py3-none-any.whl (194kB)
100% |################################| 194kB 1.4MB/s
Collecting cycler (from matplotlib)
Downloading cycler-0.10.0-py2.py3-none-any.whl
Collecting pyparsing!=2.0.4,!=2.1.2,>=1.5.6 (from matplotlib)
Downloading pyparsing-2.1.10-py2.py3-none-any.whl (56kB)
100% |################################| 61kB 2.0MB/s
Collecting pytz (from matplotlib)
Downloading pytz-2016.10-py2.py3-none-any.whl (483kB)
100% |################################| 491kB 656kB/s
Collecting six>=1.5 (from python-dateutil->matplotlib)
Downloading six-1.10.0-py2.py3-none-any.whl
Installing collected packages: six, python-dateutil, cycler, pyparsing, pytz, ma
tplotlib
Successfully installed cycler-0.10.0 matplotlib-1.5.3 pyparsing-2.1.10 python-da
teutil-2.6.0 pytz-2016.10 six-1.10.0C:\Python27\Scripts>pip install scipy-0.18.1-cp27-cp27m-win32.whl
Processing c:\python27\scripts\scipy-0.18.1-cp27-cp27m-win32.whl
Installing collected packages: scipy
Successfully installed scipy-0.18.1pip install morseC:\Python27\Scripts>pip install "numpy-1.12.0b1+mkl-cp27-cp27m-win32.whl"
Processing c:\python27\scripts\numpy-1.12.0b1+mkl-cp27-cp27m-win32.whl
Installing collected packages: numpy
Found existing installation: numpy 1.11.2
Uninstalling numpy-1.11.2:
Successfully uninstalled numpy-1.11.2
Successfully installed numpy-1.12.0b1+mklC:\Python27>python
Python 2.7.12 (v2.7.12:d33e0cf91556, Jun 27 2016, 15:19:22) [MSC v.1500 32 bit (
Intel)] on win32
Type "help", "copyright", "credits" or "license" for more information.
>>> import morse
>>> dir(morse)
['__builtins__', '__doc__', '__file__', '__name__', '__package__', 'lookup', 'st
ring_to_morse']
>>> dir(morse.lookup)
['__class__', '__cmp__', '__contains__', '__delattr__', '__delitem__', '__doc__'
, '__eq__', '__format__', '__ge__', '__getattribute__', '__getitem__', '__gt__',
'__hash__', '__init__', '__iter__', '__le__', '__len__', '__lt__', '__ne__', '_
_new__', '__reduce__', '__reduce_ex__', '__repr__', '__setattr__', '__setitem__'
, '__sizeof__', '__str__', '__subclasshook__', 'clear', 'copy', 'fromkeys', 'get
', 'has_key', 'items', 'iteritems', 'iterkeys', 'itervalues', 'keys', 'pop', 'po
pitem', 'setdefault', 'update', 'values', 'viewitems', 'viewkeys', 'viewvalues']
>>> print morse.lookup.keys()
['"', '$', '&', '(', ',', '.', '0', '2', '4', '6', '8', ':', '@', 'B', 'D', 'F',
'H', 'J', 'L', 'N', 'P', 'R', 'T', 'V', 'X', 'Z', '!', "'", ')', '+', '-', '/',
'1', '3', '5', '7', '9', ';', '=', '?', 'A', 'C', 'E', 'G', 'I', 'K', 'M', 'O',
'Q', 'S', 'U', 'W', 'Y', '_']
>>> print morse.lookup.items()
[('"', '.-..-.'), ('$', '...-..-'), ('&', '.-...'), ('(', '-.--.'), (',', '--..-
-'), ('.', '.-.-.-'), ('0', '-----'), ('2', '..---'), ('4', '....-'), ('6', '-..
..'), ('8', '---..'), (':', '---...'), ('@', '.--.-.'), ('B', '-...'), ('D', '-.
.'), ('F', '..-.'), ('H', '....'), ('J', '.---'), ('L', '.-..'), ('N', '-.'), ('
P', '.--.'), ('R', '.-.'), ('T', '-'), ('V', '...-'), ('X', '-..-'), ('Z', '--..
'), ('!', '-.-.--'), ("'", '.----.'), (')', '-.--.-'), ('+', '.-.-.'), ('-', '-.
...-'), ('/', '-..-.'), ('1', '.----'), ('3', '...--'), ('5', '.....'), ('7', '-
-...'), ('9', '----.'), (';', '-.-.-.'), ('=', '-...-'), ('?', '..--..'), ('A',
'.-'), ('C', '-.-.'), ('E', '.'), ('G', '--.'), ('I', '..'), ('K', '-.-'), ('M',
'--'), ('O', '---'), ('Q', '--.-'), ('S', '...'), ('U', '..-'), ('W', '.--'), (
'Y', '-.--'), ('_', '..--.-')]