analitics

Pages

Sunday, July 7, 2024

Python 3.12.1 : testing with ollama - part 001.

You need to download the ollama from the official website.
This allow you to use commands on the console: ollama --help into new command shell.
Use the pip tool to install ollma python package:
pip install ollama
Collecting ollama
  Downloading ollama-0.2.1-py3-none-any.whl.metadata (4.2 kB)
...
Installing collected packages: httpx, ollama
  Attempting uninstall: httpx
    Found existing installation: httpx 0.26.0
    Uninstalling httpx-0.26.0:
      Successfully uninstalled httpx-0.26.0
Successfully installed httpx-0.27.0 ollama-0.2.1
This command will install llama3
ollama run llama3
Let's see a basic python script with mistral model:
import ollama
from rich.console import Console
console = Console()
print(ollama.pull("mistral"))
#with console.pager(styles=True):
#	console.print(ollama.show("mistral"))
with console.pager(styles=True):
	console.print(ollama.list())
Another python script with llama3 model:
import ollama

stream = ollama.chat(
    model='llama3',
    messages=[{'role': 'user', 'content': 'Tell me the sizes of Earth?'}],
    stream=True,
)

for chunk in stream:
  print(chunk['message']['content'], end='', flush=True)
The result is this:
What a great question!

The size of Earth can be measured in various ways, depending on what aspect you're interested in. Here are some common sizes and dimensions of our planet ...

Python 3.12.1 : Check proxies on network.

Simple example about how to check proxies in network ...
import socket

# Get IP 
hostname = socket.gethostname()
workstation_ip = socket.gethostbyname(hostname)
#print("workstation_ip : ", workstation_ip )

# Put your IP's proxies from network
proxy_ips = ["192.168.1.1", "192.168.1.2", "192.168.1.3"]

# check IP proxy
if workstation_ip in proxy_ips:
    print("Is a proxy on network")
else:
    print("Not network proxy")
pip install sockschain
Collecting sockschain
  Downloading sockschain-1.0.0-py3-none-any.whl.metadata (10 kB)
...
Installing collected packages: sockschain
Successfully installed sockschain-1.0.0
Example with sockschain python module:
import socket
import sockschain as socks

# Enable debugging
def DEBUG(msg):
  print (msg)

socks.DEBUG = DEBUG
# This would have set proxies using the standard environment variables:
socks.usesystemdefaults()

# Configure a default chain
chain = [
  'tor://localhost:9050/', # First hop is Tor,
  'tor://localhost:8080/', # 8080 port,
  'ssl://proxy.example.com:8443/', # SSL to proxy.example.com
  'http://user:pass@proxy.example.com/' # ... try auth to an HTTP proxy
]
socks.setdefaultproxy() # Clear the default chain
for hop in chain:
   socks.adddefaultproxy(*socks.parseproxy(hop))

# Configure alternate routes (no proxy for localhost)
socks.setproxy('localhost', socks.PROXY_TYPE_NONE)
socks.setproxy('127.0.0.1', socks.PROXY_TYPE_NONE)
... the result is:
python socket_web.py Routes are: {'localhost': [(0, None, None, True, None, None, None)]} Routes are: {'localhost': [(0, None, None, True, None, None, None)], 'localhost.localdomain': [(0, None, None, True, None, None, None)]} Routes are: {'localhost': [(0, None, None, True, None, None, None)], 'localhost.localdomain': [(0, None, None, True, None, None, None)], '127.0.0.1': [(0, None, None, True, None, None, None)]} Routes are: {'localhost': [(0, None, None, True, None, None, None)], 'localhost.localdomain': [(0, None, None, True, None, None, None)], '127.0.0.1': [(0, None, None, True, None, None, None)], '': [(0, None, None, True, None, None, None)]} Routes are: {'localhost': [(0, None, None, True, None, None, None)], 'localhost.localdomain': [(0, None, None, True, None, None, None)], '127.0.0.1': [(0, None, None, True, None, None, None)], '': [(0, None, None, True, None, None, None)], '*': [(7, 'localhost', 9050, True, None, None, None)]} Routes are: {'localhost': [(0, None, None, True, None, None, None)], 'localhost.localdomain': [(0, None, None, True, None, None, None)], '127.0.0.1': [(0, None, None, True, None, None, None)], '': [(0, None, None, True, None, None, None)], '*': [(7, 'localhost', 9050, True, None, None, None), (7, 'localhost', 8080, True, None, None, None)]} Routes are: {'localhost': [(0, None, None, True, None, None, None)], 'localhost.localdomain': [(0, None, None, True, None, None, None)], '127.0.0.1': [(0, None, None, True, None, None, None)], '': [(0, None, None, True, None, None, None)], '*': [(7, 'localhost', 9050, True, None, None, None), (7, 'localhost', 8080, True, None, None, None), (4, 'proxy.example.com', 8443, True, None, None, ['proxy.example.com'])]} Routes are: {'localhost': [(0, None, None, True, None, None, None)], 'localhost.localdomain': [(0, None, None, True, None, None, None)], '127.0.0.1': [(0, None, None, True, None, None, None)], '': [(0, None, None, True, None, None, None)], '*': [(7, 'localhost', 9050, True, None, None, None), (7, 'localhost', 8080, True, None, None, None), (4, 'proxy.example.com', 8443, True, None, None, ['proxy.example.com']), (3, 'proxy.example.com', 8080, False, 'user', 'pass', None)]} Routes are: {'localhost': [(0, None, None, True, None, None, None)], 'localhost.localdomain': [(0, None, None, True, None, None, None)], '127.0.0.1': [(0, None, None, True, None, None, None)], '': [(0, None, None, True, None, None, None)], '*': [(7, 'localhost', 9050, True, None, None, None), (7, 'localhost', 8080, True, None, None, None), (4, 'proxy.example.com', 8443, True, None, None, ['proxy.example.com']), (3, 'proxy.example.com', 8080, False, 'user', 'pass', None)]} Routes are: {'localhost': [(0, None, None, True, None, None, None)], 'localhost.localdomain': [(0, None, None, True, None, None, None)], '127.0.0.1': [(0, None, None, True, None, None, None)], '': [(0, None, None, True, None, None, None)], '*': [(7, 'localhost', 9050, True, None, None, None), (7, 'localhost', 8080, True, None, None, None), (4, 'proxy.example.com', 8443, True, None, None, ['proxy.example.com']), (3, 'proxy.example.com', 8080, False, 'user', 'pass', None)]}

Tuesday, July 2, 2024

Python 3.12.1 : Ursina python game engine - part 002 .

This is the second tutorial with ursina, because now I use Python version 3.12.1 and Ursina comes with version 7.0.0 .
The install is easy with the pip tool.
pip install ursina
Collecting ursina
...
Installing collected packages: panda3d, screeninfo, panda3d-simplepbr, panda3d-gltf, ursina
Successfully installed panda3d-1.10.14 panda3d-gltf-1.2.0 panda3d-simplepbr-0.12.0 screeninfo-0.8.1 ursina-7.0.0
About Ursina you can read more on the official website.
Platforms:
  • Windows
  • Linux
  • Mac (not officially supported, but will most likely work)
I tested with samples from the GitHub project and works well.
from ursina import *

app = Ursina(size=(1280,720))

physics_entities = []
class PhysicsEntity(Entity):
    def __init__(self, model='cube', collider='box', **kwargs):
        super().__init__(model=model, collider=collider, **kwargs)
        physics_entities.append(self)

    def update(self):
        if self.intersects():
            self.stop()
            return

        self.velocity = lerp(self.velocity, Vec3(0), time.dt)
        self.velocity += Vec3(0,-1,0) * time.dt * 5
        self.position += (self.velocity + Vec3(0,-4,0)) * time.dt


    def stop(self):
        self.velocity = Vec3(0,0,0)
        if self in physics_entities:
            physics_entities.remove(self)

    def on_destroy(self):
        self.stop()


    def throw(self, direction, force):
        pass

from ursina.shaders import lit_with_shadows_shader
Entity.default_shader = lit_with_shadows_shader
DirectionalLight().look_at(Vec3(1,-1,-1))

ground = Entity(model='plane', scale=32, texture='white_cube', texture_scale=Vec2(32), collider='box')

from ursina.prefabs.first_person_controller import FirstPersonController
player = FirstPersonController()

def input(key):
    if key == 'left mouse down':
        e = PhysicsEntity(model='cube', color=color.azure, velocity=Vec3(0), position=player.position+Vec3(0,1.5,0)+player.forward, collider='sphere')
        e.velocity = (camera.forward + Vec3(0,.5,0)) * 10
        # physics_entities.append(e)

Sky()
app.run()

Tuesday, June 25, 2024

Blender 3D and python scripting - part 028.

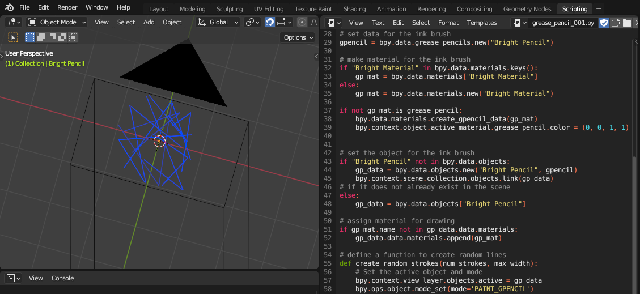
A simple script for Blender 4.0.0 version with Bright Pencil material, see the output image:
This is the source code:
import bpy
import random

# fix an active object before changing mode
if bpy.context.view_layer.objects.active is None:
    # If there is no active object, set the first object in the scene as active
    if len(bpy.context.scene.objects) > 0:
        bpy.context.view_layer.objects.active = bpy.context.scene.objects[0]
    else:
        print("There are no objects in the scene to set as active.")

# set the mode
bpy.ops.object.mode_set(mode='OBJECT')

# set camera from the scene
cam_ob = bpy.context.scene.camera

# if is a camera in the scene and set it as active object
if cam_ob is None:
    print("There is no camera in the scene.")
elif cam_ob.type == 'CAMERA':
    # Set the camera as active object
    bpy.context.view_layer.objects.active = cam_ob
    print("The camera has been set as active object.")
else:
    print(f"The object {cam_ob.type} is set as a camera, but it is not of type 'CAMERA'.")

# set data for the ink brush
gpencil = bpy.data.grease_pencils.new("Bright Pencil")

# make material for the ink brush
if "Bright Material" in bpy.data.materials.keys():
    gp_mat = bpy.data.materials["Bright Material"]
else:
    gp_mat = bpy.data.materials.new("Bright Material")

if not gp_mat.is_grease_pencil:
    bpy.data.materials.create_gpencil_data(gp_mat)
    bpy.context.object.active_material.grease_pencil.color = (0, 0, 1, 1)


# set the object for the ink brush 
if "Bright Pencil" not in bpy.data.objects:
    gp_data = bpy.data.objects.new("Bright Pencil", gpencil)
    bpy.context.scene.collection.objects.link(gp_data)
# if it does not already exist in the scene
else:
    gp_data = bpy.data.objects["Bright Pencil"]

# assign material for drawing 
if gp_mat.name not in gp_data.data.materials:
    gp_data.data.materials.append(gp_mat)

# define a function to create random lines
def create_random_strokes(num_strokes, max_width):
    # Set the active object and mode
    bpy.context.view_layer.objects.active = gp_data
    bpy.ops.object.mode_set(mode='PAINT_GPENCIL')

    # get or create layer and set it as active
    if gpencil.layers and gpencil.layers.active:
        layer = gpencil.layers.active
    else:
        layer = gpencil.layers.new('my_test_layer', set_active=True)
    # set layer as active
    gpencil.layers.active = layer

    # get or create frame and set it as active using change_frame() method
    if layer.frames and layer.active_frame:
        frame = layer.active_frame
    else:
        frame = layer.frames.new(1)

    for _ in range(num_strokes):
        stroke = frame.strokes.new()
        stroke.line_width = int(random.uniform(1.0, max_width))
        stroke.points.add(count=3)
        for point in stroke.points:
            point.co = (random.uniform(-1.0, 1.0), random.uniform(-1.0, 1.0), 0.0)

# this function with desired parameters
create_random_strokes(num_strokes=10, max_width=16.0)

# return to original mode
bpy.ops.object.mode_set(mode='OBJECT')

Wednesday, June 5, 2024

News : JAX in 100 Seconds by Fireship!

JAX is a Python library similar to NumPy for scientific computing and linear algebra, but designed to run on accelerators like Cuda-based GPUs and Google's TPUs.

Blender 3D and python scripting - part 027.

Is more easy to create your player character based on the armature.
The next step is to add more animation and export to your game engine ...
Based on this issue - blender.stackexchange website, I tested to today and works very well:
Let's see the source code:
import bpy
import mathutils 
from mathutils import Vector 
from math import *

class ArmatureMenu(bpy.types.Menu):
    bl_label = "Mesh 2 Armature Menu"
    bl_idname = "OBJECT_MT_Mesh_From_Armature"

    def draw(self, context):
        layout = self.layout
        layout.operator("wm.mesh_from_armature", text="Pyramid").mesh_type = 'Pyramid' # from here
        layout.operator("wm.mesh_from_armature", text="Tapered").mesh_type = 'Tapered' # from here
        layout.operator("wm.mesh_from_armature", text="Box").mesh_type = 'Box' # from here

def CreateMesh(self, meshType):

    obj = bpy.context.active_object

    if obj == None:
        self.report({"ERROR"}, "No selection" )
    elif obj.type != 'ARMATURE':
        self.report({"ERROR"}, "Armature expected" )
    else:
        processArmature( bpy.context, obj, meshType = meshType )

#Create the base object from the armature
def meshFromArmature( arm ):
    name = arm.name + "_mesh"
    meshData = bpy.data.meshes.new( name + "Data" )
    meshObj = bpy.data.objects.new( name, meshData )
    meshObj.matrix_world = arm.matrix_world.copy()
    return meshObj

#Create the bone geometry (vertices and faces)
def boneGeometry( l1, l2, x, z, baseSize, l1Size, l2Size, base, meshType ):
    
    if meshType == 'Tapered':
        print(meshType)
        x1 = x * baseSize * l1Size 
        z1 = z * baseSize * l1Size

        x2 = x * baseSize * l2Size 
        z2 = z * baseSize * l2Size
    elif meshType == 'Box':
        print(meshType)
        lSize = (l1Size + l2Size) / 2
        x1 = x * baseSize * lSize 
        z1 = z * baseSize * lSize

        x2 = x * baseSize * lSize 
        z2 = z * baseSize * lSize

    else: # default to Pyramid
        print(meshType)
        x1 = x * baseSize * l1Size 
        z1 = z * baseSize * l1Size

        x2 = Vector( (0, 0, 0) )
        z2 = Vector( (0, 0, 0) )

    verts = [
        l1 - x1 + z1,
        l1 + x1 + z1,
        l1 - x1 - z1,
        l1 + x1 - z1,
        l2 - x2 + z2,
        l2 + x2 + z2,
        l2 - x2 - z2,
        l2 + x2 - z2
        ] 

    faces = [
        (base+3, base+1, base+0, base+2),
        (base+6, base+4, base+5, base+7),
        (base+4, base+0, base+1, base+5),
        (base+7, base+3, base+2, base+6),
        (base+5, base+1, base+3, base+7),
        (base+6, base+2, base+0, base+4)
        ]

    return verts, faces

#Process the armature, goes through its bones and creates the mesh
def processArmature(context, arm, genVertexGroups = True, meshType = 'Pyramid'):
    print("processing armature {0} {1}".format(arm.name, meshType) )

    #Creates the mesh object
    meshObj = meshFromArmature( arm )
    context.collection.objects.link( meshObj )

    verts = []
    edges = []
    faces = []
    vertexGroups = {}

    bpy.ops.object.mode_set(mode='EDIT')

    try:
        #Goes through each bone
        for editBone in [b for b in arm.data.edit_bones if b.use_deform]:
            boneName = editBone.name
            # print( boneName )
            poseBone = arm.pose.bones[boneName]

            #Gets edit bone informations
            editBoneHead = editBone.head
            editBoneTail = editBone.tail
            editBoneVector = editBoneTail - editBoneHead
            editBoneSize = editBoneVector.dot( editBoneVector )
            editBoneRoll = editBone.roll
            editBoneX = editBone.x_axis
            editBoneZ = editBone.z_axis
            editBoneHeadRadius = editBone.head_radius
            editBoneTailRadius = editBone.tail_radius

            #Creates the mesh data for the bone
            baseIndex = len(verts)
            baseSize = sqrt( editBoneSize )
            newVerts, newFaces = boneGeometry( editBoneHead, editBoneTail, editBoneX, editBoneZ, baseSize, editBoneHeadRadius, editBoneTailRadius, baseIndex, meshType )

            verts.extend( newVerts )
            faces.extend( newFaces )

            #Creates the weights for the vertex groups
            vertexGroups[boneName] = [(x, 1.0) for x in range(baseIndex, len(verts))]

        #Assigns the geometry to the mesh
        meshObj.data.from_pydata(verts, edges, faces)

    except:
        bpy.ops.object.mode_set(mode='OBJECT')
    else:
        bpy.ops.object.mode_set(mode='OBJECT')

    #Assigns the vertex groups
    if genVertexGroups:
        for name, vertexGroup in vertexGroups.items():
            groupObject = meshObj.vertex_groups.new(name=name)
            for (index, weight) in vertexGroup:
                groupObject.add([index], weight, 'REPLACE')

    #Creates the armature modifier
    modifier = meshObj.modifiers.new('ArmatureMod', 'ARMATURE')
    modifier.object = arm
    modifier.use_bone_envelopes = False
    modifier.use_vertex_groups = True

    meshObj.data.update()

    return meshObj

class MeshFromArmatureOperator(bpy.types.Operator):
    bl_idname = "wm.mesh_from_armature"
    bl_label  = "MeshFromArmatureOperator"

    mesh_type : bpy.props.StringProperty(name="mesh_type")

    def execute(self, context):
        print('The mesh type is', self.mesh_type)
        CreateMesh(self, self.mesh_type)
        return {'FINISHED'}

def register():
    bpy.utils.register_class( ArmatureMenu )
    bpy.utils.register_class( MeshFromArmatureOperator )


def unregister():
    bpy.utils.unregister_class( ArmatureMenu )
    bpy.utils.unregister_class( MeshFromArmatureOperator )


if __name__ == "__main__":
    register()

    # The menu can also be called from scripts
    bpy.ops.wm.call_menu(name='OBJECT_MT_Mesh_From_Armature')
The result of this running script using a mixamo animation is this:

Monday, May 27, 2024

Python 3.10.7 : Krita and python - part 001.

Here is a Python script for Krita that will help you read the Python functions of a document.
Open a new document, create a python script, and add the source code. Use the main menu Tools - Scripts - Ten Scripts to choose the place where the script exists and the combination of keys for execution.
This is the source code:
from PyQt5.QtWidgets import QWidget, QVBoxLayout, QTreeWidget, QTreeWidgetItem, QTextEdit
from krita import *

class LayerContentDialog(QWidget):
    def __init__(self, content):
        super().__init__()
        self.setWindowTitle("Conținutul preluat cu dir():")
        self.setGeometry(100, 100, 800, 600)

        main_layout = QVBoxLayout()

        tree_widget = QTreeWidget()
        tree_widget.setHeaderLabels(["Nume", "Tip"])
        self.add_items_recursive(tree_widget, content)
        main_layout.addWidget(tree_widget)

        close_button = QPushButton("Închide")
        close_button.clicked.connect(self.close)
        main_layout.addWidget(close_button)

        self.setLayout(main_layout)

    def add_items_recursive(self, tree_widget, items, parent_item=None):
        for item in items:
            if isinstance(item, str):
                if parent_item:
                    item_widget = QTreeWidgetItem(parent_item, [item, type(getattr(doc, item)).__name__])
                    help_text = "\n".join(dir(getattr(doc, item)))
                    item_widget.addChild(QTreeWidgetItem([help_text]))
                else:
                    item_widget = QTreeWidgetItem(tree_widget, [item, type(getattr(doc, item)).__name__])
                    help_text = "\n".join(dir(getattr(doc, item)))
                    item_widget.addChild(QTreeWidgetItem([help_text]))
            elif isinstance(item, type):
                parent = QTreeWidgetItem(tree_widget, [item.__name__, "Modul"])
                self.add_items_recursive(tree_widget, dir(item), parent)

doc = Krita.instance().activeDocument()
layerContents = dir(doc)

dialog = LayerContentDialog(layerContents)
dialog.show()
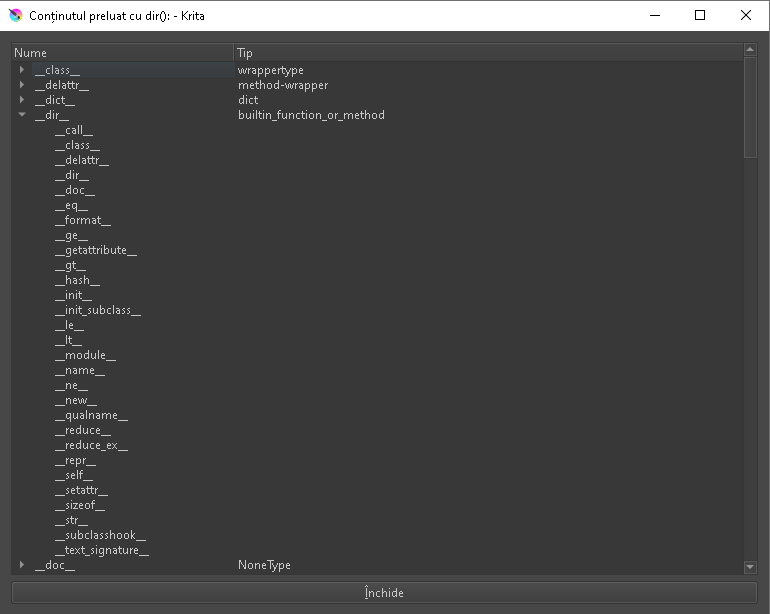
The result for this script is this:
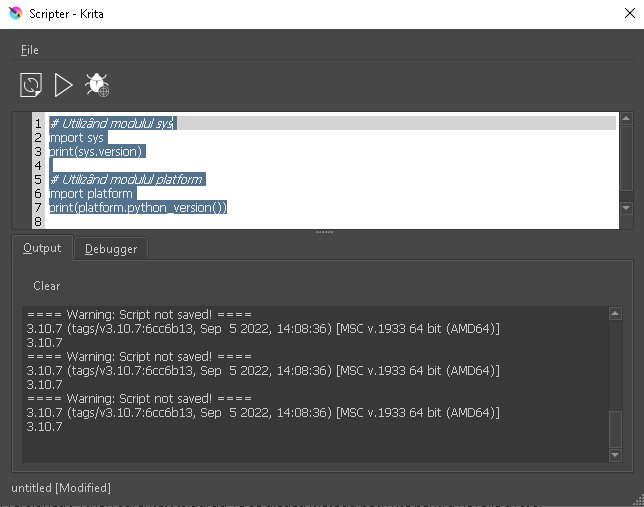
You can use the main menu Tools - Scripts - Scripter to write, test, save, and run the source code.

Sunday, April 28, 2024

News : New Django Builder online tool.

Django builder is free to use, and a personal project worked on in my spare time.
Any donations are very much appreciated.
If you want to, feel free to donate using the BitCoin address or PayPal link below.
Here is a new online tool that allows you to create projects with the Django framework and manage them more easily. It comes with different versions of Django, you can include channels and HTMX.
I don't see a command line to manage the project...

Saturday, April 20, 2024

Python 3.12.1 : Using the subprocess python module - part 001.

The subprocess module allows you to spawn new processes, connect to their input/output/error pipes, and obtain their return codes. This module intends to replace several older modules and functions:
See the official webpage for Python verison 3.12.3 same like version 3.12.1 I used.
Let's see two examples with this python module:
First script will get output of net users command and will parse all into a list:
import subprocess

def find_users():
    try:
        result = subprocess.run(["net", "users"], capture_output=True, text=True)
        users = result.stdout.splitlines()      
        # define list content         
        user_list = []
        for line in users[4:-2]:  # inser only some rows 
            #print(line) #only users        
            user = line.split()
            user_list += user
        # print the right result
        print(user_list)
    except Exception as e:
        print(f"Error : {str(e)}")

# run find_users
find_users()
The result is this:
python test_001.py
['Administrator', 'catafest', 'DefaultAccount', 'Guest', 'WDAGUtilityAccount']
This source code will show data from tasklist and will print result of this ... :
import subprocess

def find_processes():
    try:
        result = subprocess.run(['tasklist', '/v'], capture_output=True, text=True)
        output_lines = result.stdout.splitlines()

        for line in output_lines[3:]:
            columns = line.split()
            #print(columns)
            #if len(columns) >= 8 and columns[9] == 'N/A':
            if len(columns) >= 8 and columns[0] == 'tasklist.exe':
                print(line)
    except Exception as e:
        print(f"A apărut o eroare la găsirea proceselor suspendate: {str(e)}")

find_processes()
The result will be like this:
python test_pid_003.py
tasklist.exe 8348 Console 1 10,304 K Unknown DESKTOP-mycomputer 0:00:00 N/A

Friday, April 19, 2024

Python 3.10.12 : Colab quantum circuits with qiskit - part 046.

I've added another introductory example to my GitHub repository with Google Colab notebooks on how to use quantum circuits with the Python package called qiskit and the IBM Quantum Platform.
I used the IBM Quantum Platform and it provides an A.P.I symbol so that it can be used with the source code.
You can find this notebook at this catafest_061.ipynb repo file.

Thursday, April 18, 2024

Python 3.12.3 : python and Federated Message Bus in Fedora Linux Distro.

A few days ago I tested this functionality named Federated Message Bus of the Linux distribution called Fedora.
Federated Message Bus is a library built on ZeroMQ using the PyZMQ Python bindings. fedmsg aims to make it easy to connect services together using ZeroMQ publishers and subscribers.
You can use this python package named fedmsg to use this functionality ...
This is the source code :
import fedmsg
from fedmsg import *

import os
# Set the routing_nitpicky flag to True
os.environ['FEDMSG_ROUTING_NITPICKY'] = 'True'


config = fedmsg.config.load_config([],None)
config['mute'] = True
config['timeout'] = 0

for name, endpoint, topic, msg in fedmsg.tail_messages(**config):
    print ("name ", name)
This is the result :
[mythcat@fedora FedoraMessaging]$ python fedmsg_001.py
No routing policy defined for "org.fedoraproject.prod.copr.build.start" but routing_nitpicky is False so the message is being treated as authorized.
name  fedora-infrastructure
No routing policy defined for "org.fedoraproject.prod.copr.chroot.start" but routing_nitpicky is False so the message is being treated as authorized.
name  fedora-infrastructure
No routing policy defined for "org.fedoraproject.prod.github.check_run" but routing_nitpicky is False so the message is being treated as authorized.
name  fedora-infrastructure
No routing policy defined for "org.fedoraproject.prod.github.pull_request_review" but routing_nitpicky is False so the message is being treated as authorized.
name  fedora-infrastructure
No routing policy defined for "org.fedoraproject.prod.github.pull_request_review_comment" but routing_nitpicky is False so the message is being treated as authorized.
name  fedora-infrastructure ... 

Tuesday, April 16, 2024

Python 3.12.1 : aiohttp python package - part 001.

This python package named aiohttp provides asynchronous HTTP client and server functionality.
You can find more about this pytho package on the GitHub repo and the official page.
The last time I wrote about this python package was on Thursday, July 9, 2020 in this source code tutorial titled Python 3.8.3 : About aiohttp python package.
A few days ago I tested two python scripts that use this python packet.
One script makes a benchmark and the other uses cookie technology as a test.
Here is the script that makes the benchmark...
import timeit
from http import cookies

from yarl import URL

from aiohttp import CookieJar

def filter_large_cookie_jar():
    """Filter out large cookies from the cookie jar."""
    jar = CookieJar()
    c = cookies.SimpleCookie()
    domain_url = URL("http://maxagetest.com/")
    other_url = URL("http://otherurl.com/")

    for i in range(5000):
        cookie_name = f"max-age-cookie{i}"
        c[cookie_name] = "any"
        c[cookie_name]["max-age"] = 60
        c[cookie_name]["domain"] = "maxagetest.com"
    jar.update_cookies(c, domain_url)
    assert len(jar) == 5000
    assert len(jar.filter_cookies(domain_url)) == 5000
    assert len(jar.filter_cookies(other_url)) == 0

    filter_domain = timeit.timeit(lambda: jar.filter_cookies(domain_url), number=1000)
    filter_other_domain = timeit.timeit(
        lambda: jar.filter_cookies(other_url), number=1000
    )
    print(f"filter_domain: {filter_domain}")
    print(f"filter_other_domain: {filter_other_domain}")

filter_large_cookie_jar()
Here is the result obtained...
python test_bench_001.py
filter_domain: 59.85247729999901
filter_other_domain: 0.042927300000883406
Is more easier to understand code on how to use a cookie with this Python package using the httpbin website.
httpbin.org is a simple HTTP request and response service. It provides an easy way to test and inspect various aspects of HTTP communication.
Let's see the source code:
import asyncio
import aiohttp

async def main():
    urls = [
        'http://httpbin.org/cookies/set?test=ok',
    ]

    async with aiohttp.ClientSession(cookie_jar=aiohttp.CookieJar()) as s:
        for url in urls:
            async with s.get(url) as r:
                print('JSON:', await r.json())

        cookies = s.cookie_jar.filter_cookies('http://httpbin.org')
        for key, cookie in cookies.items():
            print(f'Key: "{cookie.key}", Value: "{cookie.value}"')

if __name__ == '__main__':
    loop = asyncio.new_event_loop()
    asyncio.set_event_loop(loop)
    try:
        asyncio.run(main())
    except KeyboardInterrupt:
        pass
The result of this running is this ...
python test_cookie_001.py
JSON: {'cookies': {'test': 'ok'}}
Key: "test", Value: "ok"

Friday, April 12, 2024

Python 3.12.1 : NiceGUI - UI framework over internet.

NiceGUI is an easy-to-use, Python-based UI framework, which shows up in your web browser. You can create buttons, dialogs, Markdown, 3D scenes, plots and much more.
The project can be found on this GitHub repo.
pip install nicegui
Collecting nicegui
  Downloading nicegui-1.4.21-py3-none-any.whl.metadata (9.4 kB)
...
Successfully installed aiofiles-23.2.1 aiohttp-3.9.4 aiosignal-1.3.1 bidict-0.23.1 docutils-0.19 fastapi-0.109.2 
frozenlist-1.4.1 httptools-0.6.1 ifaddr-0.2.0 markdown2-2.4.13 multidict-6.0.5 nicegui-1.4.21 orjson-3.10.0 
pscript-0.7.7 python-engineio-4.9.0 python-multipart-0.0.9 python-socketio-5.11.2 simple-websocket-1.0.0 
starlette-0.36.3 uvicorn-0.29.0 vbuild-0.8.2 watchfiles-0.21.0 websockets-12.0 yarl-1.9.4
The default demo example from the official webpage works fine.
This is the source code I used.
from nicegui import ui
from nicegui.events import ValueChangeEventArguments

def show(event: ValueChangeEventArguments):
    name = type(event.sender).__name__
    ui.notify(f'{name}: {event.value}')

ui.button('Button', on_click=lambda: ui.notify('Click'))
with ui.row():
    ui.checkbox('Checkbox', on_change=show)
    ui.switch('Switch', on_change=show)
ui.radio(['A', 'B', 'C'], value='A', on_change=show).props('inline')
with ui.row():
    ui.input('Text input', on_change=show)
    ui.select(['One', 'Two'], value='One', on_change=show)
ui.link('And many more...', '/documentation').classes('mt-8')

ui.run()
I run with the python and you can see is visible in many places:
python test_001.py
NiceGUI ready to go on http://localhost:8080, http://x.x.x.x:8080, and http://x.x.x.x:8080
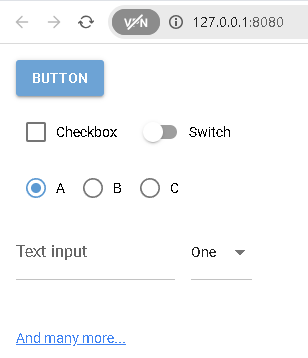
The result is this:
You can find a lot of examples on the official GitHub repo.