analitics

Pages

Thursday, April 18, 2024

Python 3.12.3 : python and Federated Message Bus in Fedora Linux Distro.

A few days ago I tested this functionality named Federated Message Bus of the Linux distribution called Fedora.
Federated Message Bus is a library built on ZeroMQ using the PyZMQ Python bindings. fedmsg aims to make it easy to connect services together using ZeroMQ publishers and subscribers.
You can use this python package named fedmsg to use this functionality ...
This is the source code :
import fedmsg
from fedmsg import *

import os
# Set the routing_nitpicky flag to True
os.environ['FEDMSG_ROUTING_NITPICKY'] = 'True'


config = fedmsg.config.load_config([],None)
config['mute'] = True
config['timeout'] = 0

for name, endpoint, topic, msg in fedmsg.tail_messages(**config):
    print ("name ", name)
This is the result :
[mythcat@fedora FedoraMessaging]$ python fedmsg_001.py
No routing policy defined for "org.fedoraproject.prod.copr.build.start" but routing_nitpicky is False so the message is being treated as authorized.
name  fedora-infrastructure
No routing policy defined for "org.fedoraproject.prod.copr.chroot.start" but routing_nitpicky is False so the message is being treated as authorized.
name  fedora-infrastructure
No routing policy defined for "org.fedoraproject.prod.github.check_run" but routing_nitpicky is False so the message is being treated as authorized.
name  fedora-infrastructure
No routing policy defined for "org.fedoraproject.prod.github.pull_request_review" but routing_nitpicky is False so the message is being treated as authorized.
name  fedora-infrastructure
No routing policy defined for "org.fedoraproject.prod.github.pull_request_review_comment" but routing_nitpicky is False so the message is being treated as authorized.
name  fedora-infrastructure ... 
Tuesday, April 16, 2024

Python 3.12.1 : aiohttp python package - part 001.

This python package named aiohttp provides asynchronous HTTP client and server functionality.
You can find more about this pytho package on the GitHub repo and the official page.
The last time I wrote about this python package was on Thursday, July 9, 2020 in this source code tutorial titled Python 3.8.3 : About aiohttp python package.
A few days ago I tested two python scripts that use this python packet.
One script makes a benchmark and the other uses cookie technology as a test.
Here is the script that makes the benchmark...
import timeit
from http import cookies

from yarl import URL

from aiohttp import CookieJar

def filter_large_cookie_jar():
    """Filter out large cookies from the cookie jar."""
    jar = CookieJar()
    c = cookies.SimpleCookie()
    domain_url = URL("http://maxagetest.com/")
    other_url = URL("http://otherurl.com/")

    for i in range(5000):
        cookie_name = f"max-age-cookie{i}"
        c[cookie_name] = "any"
        c[cookie_name]["max-age"] = 60
        c[cookie_name]["domain"] = "maxagetest.com"
    jar.update_cookies(c, domain_url)
    assert len(jar) == 5000
    assert len(jar.filter_cookies(domain_url)) == 5000
    assert len(jar.filter_cookies(other_url)) == 0

    filter_domain = timeit.timeit(lambda: jar.filter_cookies(domain_url), number=1000)
    filter_other_domain = timeit.timeit(
        lambda: jar.filter_cookies(other_url), number=1000
    )
    print(f"filter_domain: {filter_domain}")
    print(f"filter_other_domain: {filter_other_domain}")

filter_large_cookie_jar()
Here is the result obtained...
python test_bench_001.py
filter_domain: 59.85247729999901
filter_other_domain: 0.042927300000883406
Is more easier to understand code on how to use a cookie with this Python package using the httpbin website.
httpbin.org is a simple HTTP request and response service. It provides an easy way to test and inspect various aspects of HTTP communication.
Let's see the source code:
import asyncio
import aiohttp

async def main():
    urls = [
        'http://httpbin.org/cookies/set?test=ok',
    ]

    async with aiohttp.ClientSession(cookie_jar=aiohttp.CookieJar()) as s:
        for url in urls:
            async with s.get(url) as r:
                print('JSON:', await r.json())

        cookies = s.cookie_jar.filter_cookies('http://httpbin.org')
        for key, cookie in cookies.items():
            print(f'Key: "{cookie.key}", Value: "{cookie.value}"')

if __name__ == '__main__':
    loop = asyncio.new_event_loop()
    asyncio.set_event_loop(loop)
    try:
        asyncio.run(main())
    except KeyboardInterrupt:
        pass
The result of this running is this ...
python test_cookie_001.py
JSON: {'cookies': {'test': 'ok'}}
Key: "test", Value: "ok"

Friday, April 12, 2024

Python 3.12.1 : NiceGUI - UI framework over internet.

NiceGUI is an easy-to-use, Python-based UI framework, which shows up in your web browser. You can create buttons, dialogs, Markdown, 3D scenes, plots and much more.
The project can be found on this GitHub repo.
pip install nicegui
Collecting nicegui
  Downloading nicegui-1.4.21-py3-none-any.whl.metadata (9.4 kB)
...
Successfully installed aiofiles-23.2.1 aiohttp-3.9.4 aiosignal-1.3.1 bidict-0.23.1 docutils-0.19 fastapi-0.109.2 
frozenlist-1.4.1 httptools-0.6.1 ifaddr-0.2.0 markdown2-2.4.13 multidict-6.0.5 nicegui-1.4.21 orjson-3.10.0 
pscript-0.7.7 python-engineio-4.9.0 python-multipart-0.0.9 python-socketio-5.11.2 simple-websocket-1.0.0 
starlette-0.36.3 uvicorn-0.29.0 vbuild-0.8.2 watchfiles-0.21.0 websockets-12.0 yarl-1.9.4
The default demo example from the official webpage works fine.
This is the source code I used.
from nicegui import ui
from nicegui.events import ValueChangeEventArguments

def show(event: ValueChangeEventArguments):
    name = type(event.sender).__name__
    ui.notify(f'{name}: {event.value}')

ui.button('Button', on_click=lambda: ui.notify('Click'))
with ui.row():
    ui.checkbox('Checkbox', on_change=show)
    ui.switch('Switch', on_change=show)
ui.radio(['A', 'B', 'C'], value='A', on_change=show).props('inline')
with ui.row():
    ui.input('Text input', on_change=show)
    ui.select(['One', 'Two'], value='One', on_change=show)
ui.link('And many more...', '/documentation').classes('mt-8')

ui.run()
I run with the python and you can see is visible in many places:
python test_001.py
NiceGUI ready to go on http://localhost:8080, http://x.x.x.x:8080, and http://x.x.x.x:8080
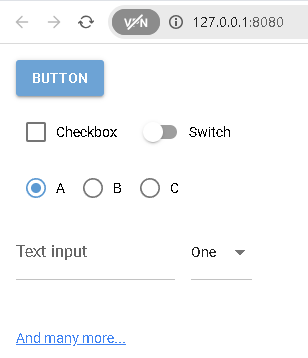
The result is this:
You can find a lot of examples on the official GitHub repo.

Thursday, April 4, 2024

News : SciPy 1.13.0 new release.

SciPy 1.13.0 is the culmination of 3 months of hard work. This out-of-band release aims to support NumPy 2.0.0, and is backwards compatible to NumPy 1.22.4. The version of OpenBLAS used to build the PyPI wheels has been increased to 0.3.26.dev.
This release requires Python 3.9+ and NumPy 1.22.4 or greater.
For running on PyPy, PyPy3 6.0+ is required.
This release can be found on the official GitHub repo.
python -m pip install --upgrade pip
Requirement already satisfied: pip in c:\python312\lib\site-packages (24.0)
...
python -m pip install --upgrade matplotlib
Collecting matplotlib
  Downloading matplotlib-3.8.4-cp312-cp312-win_amd64.whl.metadata (5.9 kB)
...
Successfully installed contourpy-1.2.1 cycler-0.12.1 fonttools-4.50.0 kiwisolver-1.4.5 matplotlib-3.8.4
...
python -m pip install --upgrade scipy
Collecting scipy
  Downloading scipy-1.13.0-cp312-cp312-win_amd64.whl.metadata (60 kB)
...
Successfully installed scipy-1.13.0
I tested the interpolate.Akima1DInterpolator changes with the default python script and works well:
import numpy as np
from scipy.interpolate import Akima1DInterpolator

import matplotlib.pyplot as plt
fig, ax = plt.subplots()

x = np.linspace(1, 7, 7)
y = np.array([-1, -1, -1, 0, 1, 1, 1])
xs = np.linspace(min(x), max(x), num=100)
y_akima = Akima1DInterpolator(x, y, method="akima")(xs)
y_makima = Akima1DInterpolator(x, y, method="makima")(xs)


ax.plot(x, y, "o", label="data")
ax.plot(xs, y_akima, label="akima")
ax.plot(xs, y_makima, label="makima")

ax.set_title('Fruit supply by kind and color')
ax.legend(title='Fruit color')

plt.show()
about Akima piecewise cubic Hermite interpolation.
Akima interpolator Fit piecewise cubic polynomials, given vectors x and y. The interpolation method by Akima uses a continuously differentiable sub-spline built from piecewise cubic polynomials. The resultant curve passes through the given data points and will appear smooth and natural.
The result of this source code is this:

Python 3.12.2 : Python and the Fedora Messaging Infrastructure - part 001.

I tried using the Fedora Messaging online tool with the python package of the same name on Python version 3.12.2.
You can find the documentation on the official page./div>
I created a working folder called FedoraMessaging:
[mythcat@fedora PythonProjects]$ mkdir FedoraMessaging
[mythcat@fedora PythonProjects]$ cd FedoraMessaging
You need to install the fedora-messaging and rabbitmq-server packages.
[root@fedora FedoraMessaging]# dnf5 install fedora-messaging
Updating and loading repositories:
Repositories loaded.
Package                             Arch    Version                       Repository         Size
Installing:                                                                                      
 fedora-messaging                   noarch  3.5.0-1.fc41                  rawhide        38.6 KiB
...
[root@fedora FedoraMessaging]# dnf install rabbitmq-server
At some point it will ask for a reboot.
You need to install the python package named fedora-messaging.
[root@fedora FedoraMessaging]# pip install --user fedora-messaging
Collecting fedora-messaging
...
Installing collected packages: pytz, incremental, wrapt, tomli, rpds-py, pyasn1, pika, hyperlink, constantly, attrs, 
referencing, pyasn1-modules, automat, twisted, jsonschema-specifications, service-identity, jsonschema, crochet, 
fedora-messaging
Successfully installed attrs-23.2.0 automat-22.10.0 constantly-23.10.4 crochet-2.1.1 fedora-messaging-3.5.0 
hyperlink-21.0.0 incremental-22.10.0 jsonschema-4.21.1 jsonschema-specifications-2023.12.1 pika-1.3.2 pyasn1-0.6.0 
pyasn1-modules-0.4.0 pytz-2024.1 referencing-0.34.0 rpds-py-0.18.0 service-identity-24.1.0 tomli-2.0.1 twisted-24.3.0 
wrapt-1.16.0
You need to start the broker:
[mythcat@fedora FedoraMessaging]$ sudo systemctl start rabbitmq-server
I used the source code from the documentation to test its functionality with a python script named hello_test.py.
from fedora_messaging import api, config

config.conf.setup_logging()
api.consume(lambda message: print(message))

from fedora_messaging import api, config

config.conf.setup_logging()
api.publish(api.Message(topic="hello by mythcat", body={"Hello": "world!"}))
I ran it and got this response:
[mythcat@fedora FedoraMessaging]$ python hello_test.py
[fedora_messaging.message INFO] Registering the 'base.message' key as the '<class 'fedora_messaging.message.Message'>' 
class in the Message class registry
[fedora_messaging.twisted.protocol INFO] Waiting for 0 consumer(s) to finish processing before halting
[fedora_messaging.twisted.protocol INFO] Finished canceling 0 consumers
[fedora_messaging.twisted.protocol INFO] Disconnect requested, but AMQP connection already gone
I created another python script named my_consumer.py, to check if this works:
from fedora_messaging import api, config
# Setup logging
config.conf.setup_logging()
# Define the callback function to process messages
def process_message(message):
    # Check if the message topic matches "hello by mythcat"
    if message.topic == "hello by mythcat":
        print(f"Received message: {message.body}")
    else:
        print(f"Ignoring message with topic: {message.topic}")
# Consume messages
api.consume(process_message)
I ran it and got this response:
[mythcat@fedora FedoraMessaging]$ python my_consumer.py
[fedora_messaging.twisted.protocol INFO] Successfully registered AMQP consumer Consumer(queue=amq.gen-9lKk7sGeYY5I40bdc5VrzQ,
callback=<function process_message at 0x7fdb0f5da160>)
[fedora_messaging.message INFO] Registering the 'base.message' key as the '<class 'fedora_messaging.message.Message'>'
class in the Message class registry
[fedora_messaging.twisted.consumer INFO] Consuming message from topic hello by mythcat 
(message id 800a1540-1e91-4b4a-a125-15e33eebb699)
Received message: {'Hello': 'world!'}
[fedora_messaging.twisted.consumer INFO] Successfully consumed message from topic hello by mythcat 
(message id 800a1540-1e91-4b4a-a125-15e33eebb699)
It can be seen that the answer is received and displayed correctly.

Sunday, March 31, 2024

Python 3.12.1 : About multiprocessing performance.

Today I test a simple python script for Pool and ThreadPool python classes from multiprocessing python module.
The main goal was to test Python’s multiprocessing performance with my computer.
NumPy releases the GIL for many of its operations, which means you can use multiple CPU cores even with threads.
Processing large amounts of data with Pandas can be difficult, and with Polars dataframe library is a potential solution.
Sciagraph gives you both performance profiling and peak memory profiling information.
Let's teste only these class:
The multiprocessing.pool.Pool class provides a process pool in Python.
The multiprocessing.pool.ThreadPool class in Python provides a pool of reusable threads for executing spontaneous tasks.
This is the python script:
from time import time
import multiprocessing as mp
from multiprocessing.pool import ThreadPool
import numpy as np
import pickle

def main():
    arr = np.ones((1024, 1024, 1024), dtype=np.uint8)
    expected_sum = np.sum(arr)

    with ThreadPool(1) as threadpool:
        start = time()
        assert (
            threadpool.apply(np.sum, (arr,)) == expected_sum
        )
        print("Thread pool:", time() - start)

    with mp.get_context("spawn").Pool(1) as process_pool:
        start = time()
        assert (
            process_pool.apply(np.sum, (arr,))
            == expected_sum
        )
        print("Process pool:", time() - start)

if __name__ == "__main__":
    main()
This is the result:
python thread_process_pool_001.py
Thread pool: 1.6689703464508057
Process pool: 11.644825458526611

Wednesday, March 27, 2024

Python 2.7.12 : Django running on glitch website.

Django was design and developed by Lawrence journal world in 2003 and publicly released under BSD license in July 2005. Currently, DSF (Django Software Foundation) maintains its development and release cycle.
Django was released on 21, July 2005. Its current stable version is 2.2.5 which was released April 1, 2019.
It is maintained by the Django Software Foundation
Some time ago, the website bug allowed the use of Python language.
Today I looked at the core project in Django, fixed it and added a test user called test with the password password_test
You can test in the admin area.
I did not add new functionalities and pages because I wanted it to be a default start project.
Here's how I set permissions for this test user.

Tuesday, March 26, 2024

Python 3.12.1 : Read EXIF data with PIL.

This is a simple source code I created to read EXIF date from a photo.
import sys
import PIL
import PIL.Image as PILimage
from PIL import ImageDraw, ImageFont, ImageEnhance
from PIL.ExifTags import TAGS, GPSTAGS

class EXIF(object):
    def __init__(self, img):
        self.img = img
        self.exif_data = self.get_exif_data()
        self.lat = self.get_lat()
        self.lon = self.get_lon()
        self.date =self.get_date_time()
        super(Worker, self).__init__()

    @staticmethod
    def get_if_exist(data, key):
        if key in data:
            return data[key]
        return None

    def get_exif_data(self):
        """Returns a dictionary from the exif data of an PIL Image item. Also
        converts the GPS Tags"""
        exif_data = {}
        info = self.img._getexif()
        if info:
            for tag, value in info.items():
                decoded = TAGS.get(tag, tag)
                if decoded == "GPSInfo":
                    gps_data = {}
                    for t in value:
                        sub_decoded = GPSTAGS.get(t, t)
                        gps_data[sub_decoded] = value[t]

                    exif_data[decoded] = gps_data
                else:
                    exif_data[decoded] = value
        print('exif_data ===')
        print(exif_data)
        print('exif_data ===')
        return exif_data

if __name__ == '__main__':
    try:
        img = PILimage.open(sys.argv[1])
        image = EXIF(img)

    except Exception as e:
        print(e)
The result of running source code is this:
python detect_exif_data_001.py paint.jpg
exif_data ===
{'ResolutionUnit': 2, 'ExifOffset': 196, 'Make': 'Canon', 'Model': '', 'Orientation': 1, 
'DateTime': '2012:08:19 13:20:09', 'YCbCrPositioning': 1, 'XResolution': 180.0, 'YResolution': 180.0, 
'ExifVersion': b'0220', 'ComponentsConfiguration': b'\x01\x02\x03\x00', 'CompressedBitsPerPixel': 5.0, 
'DateTimeOriginal': '2012:08:19 13:20:09', 'DateTimeDigitized': '2012:08:19 13:20:09', 'ShutterSpeedValue': 4.3125,
'ApertureValue': 2.75, 'ExposureBiasValue': 0.0, 'MaxApertureValue': 2.75, 'MeteringMode': 5, 'Flash': 16, 
'FocalLength': 5.8, 'UserComment':
...
 'ColorSpace': 1, 'ExifImageWidth': 3072, 'FocalPlaneXResolution': 13653.333333333334, 'ExifImageHeight': 1728,
 'FocalPlaneYResolution': 10224.852071005917, 'FocalPlaneResolutionUnit': 2, 'SensingMethod': 2, 'FileSource': b'\x03',
 'ExposureTime': 0.05, 'ExifInteroperabilityOffset': 3334, 'FNumber': 2.6, 'CustomRendered': 0, 'ISOSpeedRatings': 80,
 'ExposureMode': 0, 'FlashPixVersion': b'0100', 'WhiteBalance': 0, 'DigitalZoomRatio': 1.0, 'SceneCaptureType': 1,
 'MakerNote' ...

Sunday, March 24, 2024

Python 3.12.1 : PrettyTable

A simple Python library for easily displaying tabular data in a visually appealing ASCII table format, see this webpage.
Let's install with pip tool:
pip install prettytable
Collecting prettytable
...
Successfully installed prettytable-3.10.0 wcwidth-0.2.13
Let's test with the default example:
from prettytable import PrettyTable
table = PrettyTable()
table.field_names = ["City name", "Area", "Population", "Annual Rainfall"]
table.add_row(["Adelaide", 1295, 1158259, 600.5])
table.add_row(["Brisbane", 5905, 1857594, 1146.4])
table.add_row(["Darwin", 112, 120900, 1714.7])
table.add_row(["Hobart", 1357, 205556, 619.5])
table.add_row(["Sydney", 2058, 4336374, 1214.8])
table.add_row(["Melbourne", 1566, 3806092, 646.9])
table.add_row(["Perth", 5386, 1554769, 869.4])
print(table)
The result is this:
python test_001.py
+-----------+------+------------+-----------------+
| City name | Area | Population | Annual Rainfall |
+-----------+------+------------+-----------------+
|  Adelaide | 1295 |  1158259   |      600.5      |
|  Brisbane | 5905 |  1857594   |      1146.4     |
|   Darwin  | 112  |   120900   |      1714.7     |
|   Hobart  | 1357 |   205556   |      619.5      |
|   Sydney  | 2058 |  4336374   |      1214.8     |
| Melbourne | 1566 |  3806092   |      646.9      |
|   Perth   | 5386 |  1554769   |      869.4      |
+-----------+------+------------+-----------------+
Let's test with sqlite3 feature:
import sqlite3
from prettytable import from_db_cursor

try:
    # Connect to the database
    connection = sqlite3.connect("file_paths.db")
    cursor = connection.cursor()

    # Get the list of table names
    cursor.execute("SELECT name FROM sqlite_master WHERE type='table'")
    table_names = cursor.fetchall()
    # Print the table names
    for table in table_names:
        print(table[0])
        query = str('SELECT * FROM ' + table[0])
        cursor.execute(query)
        table_names = cursor.fetchall()
        print(table_names)
except sqlite3.Error as e:
    print(f"Error: {e}")

finally:
    # Close the connection
    connection.close()
The result for my sqlite3 file named file_paths.db and database named files is this:
files
[(1, 'C:/BACKUP/3D\\001.blend'), (2, 'C:/BACKUP/3D\\002.blend'), (3, 'C:/BACKUP/3D\\003.blend'), 
(4, 'C:/BACKUP/3D\\default_camera.blend')]
The result is according with the data from sqlite3 table.

Sunday, March 10, 2024

Python 3.12.1 : From script to executable with pyinstaller.

Using scripts in or out of the environment is useful and accessible. Another version is to create an executable, but it will no longer allow the same access to the source code resource and the executable will not be very buildable.
It is debatable, especially for those who do not trust the compiled language.
Today, I use a Python packet called aaa that allows, through other options, the creation of an executable.
I installed this Python packet with the pip utility.
pip install PyInstaller
The source code I used is a simple example that displays some text.
import time 
print("Welcome catafest !")
time.sleep(100)
To convert the Python program file into a single standalone executable, I used this command:
pyinstaller --onefile --console exec_001.py
9538 INFO: PyInstaller: 6.5.0, contrib hooks: 2024.3
9539 INFO: Python: 3.12.1
9636 INFO: Platform: Windows-10-10.0.19045-SP0
9638 INFO: wrote C:\PythonProjects\executable_001\exec_001.spec
9711 INFO: Extending PYTHONPATH with paths
['C:\\PythonProjects\\executable_001']
18951 INFO: checking Analysis
18999 INFO: Building because C:\PythonProjects\executable_001\exec_001.py changed
18999 INFO: Initializing module dependency graph...
19031 INFO: Caching module graph hooks...
19392 INFO: Analyzing base_library.zip ...
26750 INFO: Loading module hook 'hook-encodings.py' from 'C:\\Python312\\Lib\\site-packages\\PyInstaller\\hooks'...
35164 INFO: Loading module hook 'hook-pickle.py' from 'C:\\Python312\\Lib\\site-packages\\PyInstaller\\hooks'...
40857 INFO: Loading module hook 'hook-heapq.py' from 'C:\\Python312\\Lib\\site-packages\\PyInstaller\\hooks'...
44873 INFO: Caching module dependency graph...
45194 INFO: Running Analysis Analysis-00.toc
45194 INFO: Looking for Python shared library...
45217 INFO: Using Python shared library: C:\Python312\python312.dll
45217 INFO: Analyzing C:\PythonProjects\executable_001\exec_001.py
45223 INFO: Processing module hooks...
45240 INFO: Performing binary vs. data reclassification (2 entries)
45243 INFO: Looking for ctypes DLLs
45259 INFO: Analyzing run-time hooks ...
45264 INFO: Including run-time hook 'C:\\Python312\\Lib\\site-packages\\PyInstaller\\hooks\\rthooks\\pyi_rth_inspect.py'
45326 INFO: Looking for dynamic libraries
45708 INFO: Extra DLL search directories (AddDllDirectory): []
45709 INFO: Extra DLL search directories (PATH): []
46487 INFO: Warnings written to C:\PythonProjects\executable_001\build\exec_001\warn-exec_001.txt
46534 INFO: Graph cross-reference written to C:\PythonProjects\executable_001\build\exec_001\xref-exec_001.html
46696 INFO: checking PYZ
46797 INFO: checking PKG
46962 INFO: Building because C:\PythonProjects\executable_001\exec_001.py changed
46962 INFO: Building PKG (CArchive) exec_001.pkg
52220 INFO: Building PKG (CArchive) exec_001.pkg completed successfully.
52222 INFO: Bootloader C:\Python312\Lib\site-packages\PyInstaller\bootloader\Windows-64bit-intel\run.exe
52222 INFO: checking EXE
52225 INFO: Building EXE because EXE-00.toc is non existent
52225 INFO: Building EXE from EXE-00.toc
52251 INFO: Copying bootloader EXE to C:\PythonProjects\executable_001\dist\exec_001.exe
52334 INFO: Copying icon to EXE
52383 INFO: Copying 0 resources to EXE
52383 INFO: Embedding manifest in EXE
52416 INFO: Appending PKG archive to EXE
52457 INFO: Fixing EXE headers
52738 INFO: Building EXE from EXE-00.toc completed successfully.

Saturday, March 9, 2024

News : All Books Bundle from Michael Driscoll

  • Get a copy of all my self-published Python eBooks :
  • Python 101 - 2nd Edition
  • Python 201: Intermediate Python
  • ReportLab: PDF Processing with Python
  • Jupyter Notebook 101
  • Creating GUI Applications with Python
  • Pillow: Image Processing with Python
  • Automating Excel with Python
  • The Python Quiz Book

News : Website for Python users.

Here is a site called clcoding.com for those who use the python language with many simple examples and even a test fairy: python coding challenge day.

Thursday, March 7, 2024

Python 3.12.1 : flaskcode - an web based code editor.

This is an web based code editor on python flask framework.
Let's install with pip tool:
pip install flaskcode
Collecting flaskcode
  Downloading flaskcode-0.0.8.tar.gz (14.5 MB)
...
Installing collected packages: flaskcode
Successfully installed flaskcode-0.0.8
The flaskcode can be integrated in to your own Flask app by configuring and registering flaskcode.blueprint with your app:
from flask import Flask
import flaskcode

app = Flask(__name__)
app.config.from_object(flaskcode.default_config)
app.config['FLASKCODE_RESOURCE_BASEPATH'] = '/path/to/resource/folder'
app.register_blueprint(flaskcode.blueprint, url_prefix='/flaskcode')

@app.route('/')
def hello():
    return "Hello World!"

if __name__ == '__main__':
    app.run()
You can run easy this online tool on web browser with this command:
flaskcode
FlaskCode CLI: C:\PythonProjects

 * Serving Flask app 'flaskcode.cli'
 * Debug mode: off
WARNING: This is a development server. Do not use it in a production deployment. Use a production WSGI server instead.
 * Running on http://127.0.0.1:5001
Press CTRL+C to quit