analitics

Pages

Saturday, February 24, 2024

Python 3.12.1 : The kaitai python module and IDE online tool.

Kaitai Struct is a declarative language used to describe various binary data structures, laid out in files or in memory: i.e. binary file formats, network stream packet formats, etc.
The main idea is that a particular format is described in Kaitai Struct language (.ksy file) and then can be compiled with ksc into source files in one of the supported programming languages. These modules will include a generated code for a parser that can read the described data structure from a file or stream and give access to it in a nice, easy-to-comprehend API.
Let's install the Python module:
python3 -m pip install --upgrade kaitaistruct
Python was not found; run without arguments to install from the Microsoft Store, or disable this shortcut from Settings > Manage App Execution Aliases.

C:\PythonProjects\kaitai_001>python -m pip install --upgrade kaitaistruct
Collecting kaitaistruct
  Downloading kaitaistruct-0.10-py2.py3-none-any.whl.metadata (2.5 kB)
Downloading kaitaistruct-0.10-py2.py3-none-any.whl (7.0 kB)
Installing collected packages: kaitaistruct
Successfully installed kaitaistruct-0.10
The Kaitai compiler can be downloaded from the official website.
After installation, you can use the compiler ...
kaitai-struct-compiler.bat --version
kaitai-struct-compiler 0.10
...
kaitai-struct-compiler.bat --help
kaitai-struct-compiler 0.10
Usage: kaitai-struct-compiler [options] ...

  ...                source files (.ksy)
  -t, --target   target languages (graphviz, csharp, rust, all, perl, java, go, cpp_stl, php, lua, python, nim, html, ruby, construct, javascript)
  -d, --outdir 
                           output directory (filenames will be auto-generated); on Unix-like shells, the short form `-d` requires arguments to be preceded by `--`
  -I, --import-path ;;...
                           .ksy library search path(s) for imports (see also KSPATH env variable)
  --cpp-namespace 
                           C++ namespace (C++ only, default: none)
  --cpp-standard 
                           C++ standard to target (C++ only, supported: 98, 11, default: 98)
  --go-package    Go package (Go only, default: none)
  --java-package 
                           Java package (Java only, default: root package)
  --java-from-file-class 
                           Java class to be invoked in fromFile() helper (default: io.kaitai.struct.ByteBufferKaitaiStream)
  --dotnet-namespace 
                           .NET Namespace (.NET only, default: Kaitai)
  --php-namespace 
                           PHP Namespace (PHP only, default: root package)
  --python-package 
                           Python package (Python only, default: root package)
  --nim-module     Path of Nim runtime module (Nim only, default: kaitai_struct_nim_runtime)
  --nim-opaque     Directory of opaque Nim modules (Nim only, default: directory of generated module)
  --opaque-types    opaque types allowed, default: false
  --ksc-exceptions         ksc throws exceptions instead of human-readable error messages
  --ksc-json-output        output compilation results as JSON to stdout
  --verbose         verbose output
  --no-auto-read           disable auto-running `_read` in constructor
  --read-pos               `_read` remembers attribute positions in stream
  --debug                  same as --no-auto-read --read-pos (useful for visualization tools)
  --help                   display this help and exit
  --version                output version information and exit
Steps to use this tool with Python. You need to use a defined kaitai file format for your file type - for example, gif file format, compile this kaitai then you can use it in this manner:
from kaitaistruct import __version__ as ks_version, KaitaiStruct, KaitaiStream, BytesIO
import mmap
print('kaitai version : ', ks_version)
f = open("python_giphy.gif", "rb")
with mmap.mmap(f.fileno(), 0, access=mmap.ACCESS_READ) as buf:
    stream = KaitaiStream(BytesIO(buf))
    obj1 = print(stream)
    obj2 = print(stream)
    obj3 = print(stream)
stream.close()
I only test a little but is a great tool.
Kaitai Struct is free and open-source software, licensed under the following terms: Compiler and visualizer — GPLv3+ and these Runtime libraries:
  • C++/STL — MIT
  • C# — MIT
  • Go — MIT
  • Java — MIT
  • JavaScript — Apache v2
  • Lua — MIT
  • Nim — MIT
  • Perl — MIT
  • PHP — MIT
  • Python — MIT
  • Ruby — MIT
  • Rust — MIT
  • Swift — MIT
    Is easier to understand if you use the IDE on the web. On the left side you can see a cloud icon for upload, first, select the kaitai GIF type from formats/image/gif.ksy from web IDE, then select a GIF file from your computer and upload.
    The default IDE looks like this:

    Friday, February 23, 2024

    Saturday, February 17, 2024

    Python 3.10.12 : Few example for CUDA and NVCC - part 044.

    NVCC use CUDA C/C++ source code and allows developers to write high-performance GPU-accelerated applications by leveraging the power of NVIDIA GPUs for parallel processing tasks.
    Today I test some simple examples with this tool on Google Colab using the nvcc4jupyter python package.
    You need to install it with the pip and know how to use the CUDA C/C++ source code, or use the basic example from documentation.
    pip install nvcc4jupyter
    I change some source code because is need to install this library and I don't have time to learn and test.
    But this will allow me to test better, because on my desktop I don't have a good hardware.
    This is the source I change and I cut the source code linked on error_handling.h.
    This is the changed source code , you can see more on my GitHub repo for Google Colab ! !
    #include 
    //#include "error_handling.h"
    
    const int DSIZE = 4096;
    const int block_size = 256;
    
    // vector add kernel: C = A + B
    __global__ void vadd(const float *A, const float *B, float *C, int ds){
        int idx = threadIdx.x + blockIdx.x * blockDim.x;
        if (idx < ds) {
            C[idx] = A[idx] + B[idx];
        }
    }
    
    int main(){
        float *h_A, *h_B, *h_C, *d_A, *d_B, *d_C;
    
        // allocate space for vectors in host memory
        h_A = new float[DSIZE];
        h_B = new float[DSIZE];
        h_C = new float[DSIZE];
    
        // initialize vectors in host memory to random values (except for the
        // result vector whose values do not matter as they will be overwritten)
        for (int i = 0; i < DSIZE; i++) {
            h_A[i] = rand()/(float)RAND_MAX;
            h_B[i] = rand()/(float)RAND_MAX;
        }
    
        // allocate space for vectors in device memory
        cudaMalloc(&d_A, DSIZE*sizeof(float));
        cudaMalloc(&d_B, DSIZE*sizeof(float));
        cudaMalloc(&d_C, DSIZE*sizeof(float));
        //cudaCheckErrors("cudaMalloc failure"); // error checking
    
        // copy vectors A and B from host to device:
        cudaMemcpy(d_A, h_A, DSIZE*sizeof(float), cudaMemcpyHostToDevice);
        cudaMemcpy(d_B, h_B, DSIZE*sizeof(float), cudaMemcpyHostToDevice);
        //cudaCheckErrors("cudaMemcpy H2D failure");
    
        // launch the vector adding kernel
        vadd<<<(DSIZE+block_size-1)/block_size, block_size>>>(d_A, d_B, d_C, DSIZE);
        //cudaCheckErrors("kernel launch failure");
    
        // wait for the kernel to finish execution
        cudaDeviceSynchronize();
        //cudaCheckErrors("kernel execution failure");
    
        cudaMemcpy(h_C, d_C, DSIZE*sizeof(float), cudaMemcpyDeviceToHost);
        //cudaCheckErrors("cudaMemcpy D2H failure");
    
        printf("A[0] = %f\n", h_A[0]);
        printf("B[0] = %f\n", h_B[0]);
        printf("C[0] = %f\n", h_C[0]);
        return 0;
    }
    This is result ...
    A[0] = 0.840188
    B[0] = 0.394383
    C[0] = 0.000000

    Wednesday, February 7, 2024

    Python 3.12.1 : Simple view for sqlite table with PyQt6.

    This is the source code that show you how to use QSqlDatabase, QSqlQuery, QSqlTableModel:
    import sys
    from PyQt6.QtWidgets import QApplication, QMainWindow, QTableView
    from PyQt6.QtSql import QSqlDatabase, QSqlQuery, QSqlTableModel
    
    class MainWindow(QMainWindow):
        def __init__(self):
            super().__init__()
    
            # Initialize the database
            self.init_db()
    
            # Set up the GUI
            self.table_view = QTableView(self)
            self.setCentralWidget(self.table_view)
    
            # Set up the model and connect it to the database
            self.model = QSqlTableModel(self)
            self.model.setTable('files')
            self.model.select()
            self.table_view.setModel(self.model)
    
        def init_db(self):
            # Connect to the database
            db = QSqlDatabase.addDatabase('QSQLITE')
            db.setDatabaseName('file_paths.db')
            if not db.open():
                print('Could not open database')
                sys.exit(1)
    
        def create_table(self):
            # Create the 'files' table if it doesn't exist
            query = QSqlQuery()
            query.exec('CREATE TABLE IF NOT EXISTS files (id INTEGER PRIMARY KEY, path TEXT)')
    
    if __name__ == '__main__':
        app = QApplication(sys.argv)
        window = MainWindow()
        window.show()
        sys.exit(app.exec())
    

    Monday, February 5, 2024

    Python 3.12.1 : Simple browser with PyQt6-WebEngine.

    This is a source code for a minimal browser with PyQt6 and PyQt6-WebEngine.
    You need to install it with the pip tool:
    pip install PyQt6 PyQt6-WebEngine
    You can update the pip tool with
    python.exe -m pip install --upgrade pip
    Create a python script use the source code and run it.
    Let's see the source code:
    import sys
    from PyQt6.QtCore import QUrl
    from PyQt6.QtGui import QKeySequence, QAction
    from PyQt6.QtWidgets import QApplication, QMainWindow, QLineEdit, QToolBar
    from PyQt6.QtWebEngineWidgets import QWebEngineView
     
    class MainWindow(QMainWindow):
        def __init__(self):
            super().__init__()
             
            # Create a web view
            self.web_view = QWebEngineView()
            self.web_view.setUrl(QUrl("127.0.0.1"))
            self.setCentralWidget(self.web_view)
     
            # Create a toolbar
            toolbar = QToolBar()
            self.addToolBar(toolbar)
             
            # Add a back action to the toolbar
            back_action = QAction("Back", self)
            back_action.setShortcut(QKeySequence("Back"))
            back_action.triggered.connect(self.web_view.back)
            toolbar.addAction(back_action)
             
            # Add a forward action to the toolbar
            forward_action = QAction("Forward", self)
            forward_action.setShortcut(QKeySequence("Forward"))
            forward_action.triggered.connect(self.web_view.forward)
            toolbar.addAction(forward_action)
             
            # Add a reload action to the toolbar
            reload_action = QAction("Reload", self)
            reload_action.setShortcut(QKeySequence("Refresh"))
            reload_action.triggered.connect(self.web_view.reload)
            toolbar.addAction(reload_action)
             
            # Add a search bar to the toolbar
            self.search_bar = QLineEdit()
            self.search_bar.returnPressed.connect(self.load_url)
            toolbar.addWidget(self.search_bar)
             
             
        def load_url(self):
            url = self.search_bar.text()
            if not url.startswith("http"):
                url = "https://" + url
            self.web_view.load(QUrl(url))
             
    if __name__ == "__main__":
        app = QApplication(sys.argv)
        window = MainWindow()
        window.show()
        app.exec()

    Tuesday, January 16, 2024

    News : How to use ShellExecuteA with Python programming language.

    I just discovery this option to use ShellExecuteA in Python.
    Let's see some example:
    import ctypes
    import sys
    
    def is_admin():
        try:
            return ctypes.windll.shell32.IsUserAnAdmin()
        except:
            return False
    
    if not is_admin():
        ctypes.windll.shell32.ShellExecuteW(None, "runas", sys.executable, __file__, None, 1)
    ... and another example:
    import sys
    import ctypes
    
    #fix unicode access
    import sys
    if sys.version_info[0] >= 3:
        unicode = str
    
    def run_as_admin(argv=None, debug=False):
        shell32 = ctypes.windll.shell32
        if argv is None and shell32.IsUserAnAdmin():
            return True    
        if argv is None:
            argv = sys.argv
        if hasattr(sys, '_MEIPASS'):
            # Support pyinstaller wrapped program.
            arguments = map(unicode, argv[1:])
        else:
            arguments = map(unicode, argv)
        argument_line = u' '.join(arguments)
        executable = unicode(sys.executable)
        if debug:
            print('Command line: ', executable, argument_line)
        ret = shell32.ShellExecuteW(None, u"runas", executable, argument_line, None, 1)
        if int(ret) <= 32:
            return False
        return None  
    
    if __name__ == '__main__':
        ret = run_as_admin()
        if ret is True:
            print ('I have admin privilege.')
            input('Press ENTER to exit.')
        elif ret is None:
            print('I am elevating to admin privilege.')
            input('Press ENTER to exit.')
        else:
            print('Error(ret=%d): cannot elevate privilege.' % (ret, ))

    Thursday, January 11, 2024

    News : NVIDIA Kaolin library provides a PyTorch API.

    NVIDIA Kaolin library provides a PyTorch API for working with a variety of 3D representations and includes a growing collection of GPU-optimized operations such as modular differentiable rendering, fast conversions between representations, data loading, 3D checkpoints, differentiable camera API, differentiable lighting with spherical harmonics and spherical gaussians, powerful quadtree acceleration structure called Structured Point Clouds, interactive 3D visualizer for jupyter notebooks, convenient batched mesh container and more ... from GitHub repo - kaolin.
    See this example from NVIDIA:
    NVIDIA Kaolin library has introduced the SurfaceMesh class to make it easier to track attributes such as faces, vertices, normals, face_normals, and others associated with surface meshes.

    Monday, January 8, 2024

    Python 3.12.1 : Create a simple color palette.

    Today I tested a simple source code for a color palette created with PIL python package.
    This is the result:
    Let's see the source code:
    from PIL import Image, ImageDraw
    
    # 640x640 pixeli with 10x10 squares 64x64 
    img = Image.new('RGB', (640, 640))
    draw = ImageDraw.Draw(img)
    
    # color list
    colors = []
    # for 100 colors you need to set steps with 62,62,64 
    # or you can change 64,62,62 some little changes 
    for r in range(0, 256, 62):
        for g in range(0, 256, 62):
            for b in range(0, 256, 64):
                colors.append((r, g, b))
    
    # show result of colors and size up 100 items 
    print(colors)
    print(len(colors))
    
    # create 10x10 colors and fill the image 
    for i in range(10):
        for j in range(10):
            x0 = j * 64
            y0 = i * 64
            x1 = x0 + 64
            y1 = y0 + 64
            color = colors[i*10 + j]  # Selectarea culorii din lista
            draw.rectangle([x0, y0, x1, y1], fill=color)
    
    # save teh image
    img.save('rgb_color_matrix.png')

    Saturday, January 6, 2024

    Python 3.10.12 : LaTeX on colab notebook - part 043.

    Today I tested with a simple LaTeX examples in the Colab notebook.
    If you open my notebook colab then you will see some issues and how can be fixed.
    You can find this on my notebook - catafest_056.ipynb on colab repo.

    Friday, January 5, 2024

    Python 3.12.1 : How to read all CLSID with winreg.

    The winreg python module can be found default into python instalation.
    This is the source code I used to list all of CLSID:
    import winreg
    
    # Open the CLSID key under HKEY_CLASSES_ROOT
    clsid_key = winreg.OpenKey(winreg.HKEY_CLASSES_ROOT, "CLSID")
    
    # Iterate through all the subkeys
    for i in range(winreg.QueryInfoKey(clsid_key)[0]):
        # Get the name of the subkey
        subkey_name = winreg.EnumKey(clsid_key, i)
        # Open the subkey
        subkey = winreg.OpenKey(clsid_key, subkey_name, 0, winreg.KEY_READ)
        try:
            # Read the default value of the subkey
            value, type = winreg.QueryValueEx(subkey, "")
            # Print the subkey name and the value
            print(subkey_name, value)
        except:
            # Skip the subkeys that cannot be read
            pass
        # Close the subkey
        winreg.CloseKey(subkey)
    
    # Close the CLSID key
    winreg.CloseKey(clsid_key)
    ... and this source code comes with an text file output:
    import winreg
    
    # Open the CLSID key under HKEY_CLASSES_ROOT
    clsid_key = winreg.OpenKey(winreg.HKEY_CLASSES_ROOT, "CLSID")
    
    # Open the file for writing
    with open("clsid_info.txt", "w") as f:
        # Iterate through all the subkeys
        for i in range(winreg.QueryInfoKey(clsid_key)[0]):
            # Get the name of the subkey
            subkey_name = winreg.EnumKey(clsid_key, i)
            # Open the subkey
            subkey = winreg.OpenKey(clsid_key, subkey_name, 0, winreg.KEY_READ)
            try:
                # Read the default value of the subkey
                value, type = winreg.QueryValueEx(subkey, "")
                # Write the subkey name and the value to the file
                f.write(subkey_name + " " + value + "\n")
            except:
                # Skip the subkeys that cannot be read
                pass
            # Close the subkey
            winreg.CloseKey(subkey)
    
    # Close the CLSID key
    winreg.CloseKey(clsid_key)

    Friday, December 22, 2023

    Python : MLOps with neptune.ai .

    I just started testing with neptune.ai.
    Neptune is the MLOps stack component for experiment tracking. It offers a single place to log, compare, store, and collaborate on experiments and models.
    MLOps or ML Ops is a paradigm that aims to deploy and maintain machine learning models in production reliably and efficiently.
    MLOps is practiced between Data Scientists, DevOps, and Machine Learning engineers to transition the algorithm to production systems.
    MLOps aims to facilitate the creation of machine learning products by leveraging these principles: CI/CD automation, workflow orchestration, reproducibility; versioning of data, model, and code; collaboration; continuous ML training and evaluation; ML metadata tracking and logging; continuous monitoring; and feedback loops.
    You will understand these features of MLOps if you look at these practical examples.
    Neptune uses a token:
    Your Neptune API token is like a password to the application. By saving your token as an environment variable, you avoid putting it in your source code, which is more convenient and secure.
    When I started I tested with this default project:
    example-project-tensorflow-keras
    Another good feature is the working team, by adding collaborators in the People section of your workspace settings.
    • For a free account you can have these options:
    • 5 users
    • 1 active project
    • Unlimited archived projects
    • Unlimited experiments
    • Unlimited model versions
    • Unlimited logging hours
    • Artifacts tracking
    • Service accounts for CI/CD pipelines
    • 200 GB storage
    Let's see the default source code shared by neptune.ai for that default project:
    import glob
    import hashlib
    
    import matplotlib.pyplot as plt
    import neptune.new as neptune
    import numpy as np
    import pandas as pd
    import tensorflow as tf
    from neptune.new.integrations.tensorflow_keras import NeptuneCallback
    from scikitplot.metrics import plot_roc, plot_precision_recall
    
    # Select project
    run = neptune.init(project='common/example-project-tensorflow-keras',
                       tags=['keras', 'fashion-mnist'],
                       name='keras-training')
    
    # Prepare params
    parameters = {'dense_units': 128,
                  'activation': 'relu',
                  'dropout': 0.23,
                  'learning_rate': 0.15,
                  'batch_size': 64,
                  'n_epochs': 30}
    
    run['model/params'] = parameters
    
    # Prepare dataset
    (x_train, y_train), (x_test, y_test) = tf.keras.datasets.fashion_mnist.load_data()
    x_train = x_train / 255.0
    x_test = x_test / 255.0
    
    class_names = ['T-shirt/top', 'Trouser', 'Pullover', 'Dress', 'Coat',
                   'Sandal', 'Shirt', 'Sneaker', 'Bag', 'Ankle boot']
    
    # Log data version
    run['data/version/x_train'] = hashlib.md5(x_train).hexdigest()
    run['data/version/y_train'] = hashlib.md5(y_train).hexdigest()
    run['data/version/x_test'] = hashlib.md5(x_test).hexdigest()
    run['data/version/y_test'] = hashlib.md5(y_test).hexdigest()
    run['data/class_names'] = class_names
    
    # Log example images
    for j, class_name in enumerate(class_names):
        plt.figure(figsize=(10, 10))
        label_ = np.where(y_train == j)
        for i in range(9):
            plt.subplot(3, 3, i + 1)
            plt.xticks([])
            plt.yticks([])
            plt.grid(False)
            plt.imshow(x_train[label_[0][i]], cmap=plt.cm.binary)
            plt.xlabel(class_names[j])
        run['data/train_sample'].log(neptune.types.File.as_image(plt.gcf()))
        plt.close('all')
    
    # Prepare model
    model = tf.keras.Sequential([
        tf.keras.layers.Flatten(input_shape=(28, 28)),
        tf.keras.layers.Dense(parameters['dense_units'], activation=parameters['activation']),
        tf.keras.layers.Dropout(parameters['dropout']),
        tf.keras.layers.Dense(parameters['dense_units'], activation=parameters['activation']),
        tf.keras.layers.Dropout(parameters['dropout']),
        tf.keras.layers.Dense(10, activation='softmax')
    ])
    optimizer = tf.keras.optimizers.SGD(learning_rate=parameters['learning_rate'])
    model.compile(optimizer=optimizer,
                  loss='sparse_categorical_crossentropy',
                  metrics=['accuracy'])
    
    # Log model summary
    model.summary(print_fn=lambda x: run['model/summary'].log(x))
    
    # Train model
    neptune_cbk = NeptuneCallback(run=run, base_namespace='metrics')
    
    model.fit(x_train, y_train,
              batch_size=parameters['batch_size'],
              epochs=parameters['n_epochs'],
              validation_split=0.2,
              callbacks=[neptune_cbk])
    
    # Log model weights
    model.save('trained_model')
    run['model/weights/saved_model'].upload('trained_model/saved_model.pb')
    for name in glob.glob('trained_model/variables/*'):
        run[name].upload(name)
    
    # Evaluate model
    eval_metrics = model.evaluate(x_test, y_test, verbose=0)
    for j, metric in enumerate(eval_metrics):
        run['test/scores/{}'.format(model.metrics_names[j])] = metric
    
    # Log predictions as table
    y_pred_proba = model.predict(x_test)
    y_pred = np.argmax(y_pred_proba, axis=1)
    y_pred = y_pred
    df = pd.DataFrame(data={'y_test': y_test, 'y_pred': y_pred, 'y_pred_probability': y_pred_proba.max(axis=1)})
    run['test/predictions'] = neptune.types.File.as_html(df)
    
    # Log model performance visualizations
    fig, ax = plt.subplots()
    plot_roc(y_test, y_pred_proba, ax=ax)
    run['charts/ROC'] = neptune.types.File.as_image(fig)
    
    fig, ax = plt.subplots()
    plot_precision_recall(y_test, y_pred_proba, ax=ax)
    run['charts/precision-recall'] = neptune.types.File.as_image(fig)
    plt.close('all')
    
    run.wait()
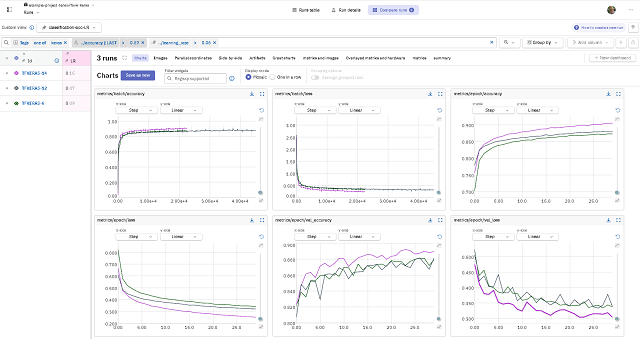
    This screenshot shows the web interface for neptune.ai:

    Sunday, December 10, 2023

    Python 3.10.12 : Simple examples with some Python modules - part 042.

    I added some simple examples in my repo on GitHub where I have notebooks from Google Colab.
    Python usage is limited to this type of interface with Python version stability rules.
    You can see the Python version that Colab is using with this command in the code area:
    !python
    Python 3.10.12 (main, Nov 20 2023, 15:14:05) [GCC 11.4.0] on linux
    Type "help", "copyright", "credits" or "license" for more information.
    These are the Python packages I used: cartopy, matplotlib, numpy, geemap, earthengine-api, rasterio.
    Of these examples, some require some Google configuration, others require knowledge of topography ... or are very simple to use with a dedicated module as we have visualized more special types of image files.
    See there an example with the cartopy python package :
    import matplotlib.pyplot as plt
    
    import cartopy.crs as ccrs
    from cartopy.io import shapereader
    from cartopy.mpl.gridliner import LONGITUDE_FORMATTER, LATITUDE_FORMATTER
    
    import cartopy.io.img_tiles as cimgt
    
    extent = [15, 25, 55, 35]
    
    request = cimgt.OSM()
    
    fig = plt.figure(figsize=(9, 13))
    ax = plt.axes(projection=request.crs)
    gl = ax.gridlines(draw_labels=True, alpha=0.2)
    gl.top_labels = gl.right_labels = False
    gl.xformatter = LONGITUDE_FORMATTER
    gl.yformatter = LATITUDE_FORMATTER
    
    ax.set_extent(extent)
    
    ax.add_image(request, 11)
    
    plt.show()

    Thursday, December 7, 2023

    Python 3.13.0a1 : Testing with scapy - part 001.

    Scapy is a powerful interactive packet manipulation library written in Python. Scapy is able to forge or decode packets of a wide number of protocols, send them on the wire, capture them, match requests and replies, and much more. see the official website.
    You need to install NPCap.
    Beacon frames are transmitted periodically, they serve to announce the presence of a wireless LAN and to synchronise the members of the service set.
    In IBSS network beacon generation is distributed among the stations.
    Beacon frames are transmitted by the access point (AP) in an infrastructure basic service set (BSS).
    Beacon frames include information about the access point and supported data rates and what encryption is being used.
    These are received by your device’s wireless network interface and interpreted by your operating system to build the list of available networks.
    The beacon variable indicates the capabilities of our access point.
    Let's see the source code:
    C:\PythonProjects\scapy_001>pip install scapy
    Collecting scapy
      Downloading scapy-2.5.0.tar.gz (1.3 MB)
         ---------------------------------------- 1.3/1.3 MB 3.5 MB/s eta 0:00:00
      Installing build dependencies ... done
    ...
    Successfully built scapy
    Installing collected packages: scapy
    Successfully installed scapy-2.5.0
    The source code is simple:
    from scapy.all import Dot11,Dot11Beacon,Dot11Elt,RadioTap,sendp,hexdump
    
    netSSID = 'testSSID'       #Network name here
    iface = 'Realtek PCIe GbE Family Controller'         #Interface name here
    
    dot11 = Dot11(type=0, subtype=8, addr1='ff:ff:ff:ff:ff:ff',
    addr2='22:22:22:22:22:22', addr3='33:33:33:33:33:33')
    beacon = Dot11Beacon(cap='ESS+privacy')
    essid = Dot11Elt(ID='SSID',info=netSSID, len=len(netSSID))
    rsn = Dot11Elt(ID='RSNinfo', info=(
    '\x01\x00'                 #RSN Version 1
    '\x00\x0f\xac\x02'         #Group Cipher Suite : 00-0f-ac TKIP
    '\x02\x00'                 #2 Pairwise Cipher Suites (next two lines)
    '\x00\x0f\xac\x04'         #AES Cipher
    '\x00\x0f\xac\x02'         #TKIP Cipher
    '\x01\x00'                 #1 Authentication Key Managment Suite (line below)
    '\x00\x0f\xac\x02'         #Pre-Shared Key
    '\x00\x00'))               #RSN Capabilities (no extra capabilities)
    
    frame = RadioTap()/dot11/beacon/essid/rsn
    
    frame.show()
    print("\nHexdump of frame:")
    hexdump(frame)
    input("\nPress enter to start\n")
    
    sendp(frame, iface=iface, inter=0.100, loop=1)
    Let's run this source code:
    python scapy_network_001.py
    ###[ RadioTap ]###
      version   = 0
      pad       = 0
      len       = None
      present   = None
      notdecoded= ''
    ###[ 802.11 ]###
         subtype   = Beacon
         type      = Management
         proto     = 0
         FCfield   =
         ID        = 0
         addr1     = ff:ff:ff:ff:ff:ff (RA=DA)
         addr2     = 22:22:22:22:22:22 (TA=SA)
         addr3     = 33:33:33:33:33:33 (BSSID/STA)
         SC        = 0
    ###[ 802.11 Beacon ]###
            timestamp = 0
            beacon_interval= 100
            cap       = ESS+privpython scapy_network_001.py
    ###[ RadioTap ]### tion Element ]###
      version   = 0      = SSID
      pad       = 0      = 8
      len       = None   = 'testSSID'
      present   = Noneation Element ]###
      notdecoded= ''     = RSN
    ###[ 802.11 ]###     = None
         subtype   = Beacon'\x01\x00\x00\x0f¬\x02\x02\x00\x00\x0f¬\x04\x00\x0f¬\x02\x01\x00\x00\x
         type      = Management
         proto     = 0
         FCfield   =
         ID        = 0
         addr1     = ff:ff:ff:ff:ff:ff (RA=DA)FF FF FF FF  ................
         addr2     = 22:22:22:22:22:22 (TA=SA)33 33 00 00  ..""""""333333..
         addr3     = 33:33:33:33:33:33 (BSSID/STA)8 74 65  ........d.....te
         SC        = 049 44 30 1C 01 00 00 0F C2 AC 02 02  stSSID0.........
    ###[ 802.11 Beacon ]### 00 0F C2 AC 02 01 00 00 0F C2  ................
            timestamp = 0                                  ....
            beacon_interval= 100
            cap       = ESS+privacy
    ###[ 802.11 Information Element ]###
               ID        = SSID..................................................................
               len       = 8.....................................................................
               info      = 'testSSID'
    ###[ 802.11 Information Element ]###
               ID        = RSN
               len       = None>
               info      = '\x01\x00\x00\x0f¬\x02\x02\x00\x00\x0f¬\x04\x00\x0f¬\x02\x01\x00\x00\x0f¬\x02\x00\x00'
    
    
    Hexdump of frame:
    0000  00 00 08 00 00 00 00 00 80 00 00 00 FF FF FF FF  ................
    0010  FF FF 22 22 22 22 22 22 33 33 33 33 33 33 00 00  ..""""""333333..
    0020  00 00 00 00 00 00 00 00 64 00 11 00 00 08 74 65  ........d.....te
    0030  73 74 53 53 49 44 30 1C 01 00 00 0F C2 AC 02 02  stSSID0.........
    0040  00 00 0F C2 AC 04 00 0F C2 AC 02 01 00 00 0F C2  ................
    0050  AC 02 00 00                                      ....
    
    Press enter to start
    
    .................................................................
    Sent 130 packets.