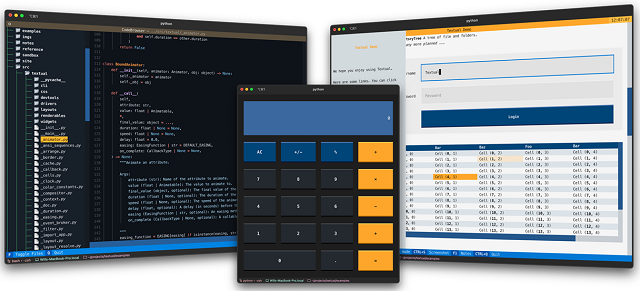
Textual is a Rapid Application Development framework for Python.
Build sophisticated user interfaces with a simple Python API. Run your apps in the terminal and (coming soon) a web browser!

Is a blog about python programming language. You can see my work with python programming language, tutorials and news.

import numpy as np
import tensorflow as tf
import keras
from keras import layers
units = 64
tf.keras.layers.GRU(
    units,
    activation="tanh",
    recurrent_activation="sigmoid",
    use_bias=True,
    kernel_initializer="glorot_uniform",
    recurrent_initializer="orthogonal",
    bias_initializer="zeros",
    kernel_regularizer=None,
    recurrent_regularizer=None,
    bias_regularizer=None,
    activity_regularizer=None,
    kernel_constraint=None,
    recurrent_constraint=None,
    bias_constraint=None,
    dropout=0.0,
    recurrent_dropout=0.0,
    return_sequences=False,
    return_state=False,
    go_backwards=False,
    stateful=False,
    unroll=False,
    time_major=False,
    reset_after=True,
)
inputs = tf.random.normal([32, 10, 8])
gru = tf.keras.layers.GRU(4)
output = gru(inputs)
print(output.shape)

gru = tf.keras.layers.GRU(4, return_sequences=True, return_state=True)
whole_sequence_output, final_state = gru(inputs)
print(whole_sequence_output.shape)
print(final_state.shape)WARNING: The following packages were previously imported in this runtime:
[numpy]
You must restart the runtime in order to use newly installed versions.# This is formatted as CUDA code
__global__ void cuda_hello(){
printf("Hello World from GPU!\n");
}
int main() {
cuda_hello<<<1,1>>>();
return 0;
}%%sh
echo "List all running VM processes."
ps -ef
echo "Done"ERROR: Could not install packages due to an OSError: [WinError 5] Access is denied: 'C:\\Python311\\share'
Consider using the `--user` option or check the permissions.pip install -r requirements.txt --userimport sys
from PyQt6.QtWidgets import QApplication, QMainWindow, QWidget, QVBoxLayout, QHBoxLayout, QLineEdit, QPushButton, QProgressBar, QDialog, QComboBox, QLabel, QMessageBox
from PyQt6.QtGui import QIcon, QPixmap
from pytube import YouTube
from PyQt6.QtCore import Qt
from PyQt6.QtWidgets import QDialogButtonBox
class FormatChecker:
def __init__(self, url):
self.url = url
def check_formats(self):
try:
yt = YouTube(self.url)
formats = []
streams = yt.streams.filter(only_video=True)
for stream in streams:
if stream.url:
format_info = {
'resolution': stream.resolution,
'file_extension': stream.mime_type.split("/")[-1]
}
formats.append(format_info)
print(" format_info ",format_info)
return formats
except Exception as e:
print("Error:", str(e))
return []
class FormatInfo:
def __init__(self, resolution, file_formats):
self.resolution = resolution
self.file_formats = file_formats
class ResolutionDialog(QDialog):
def __init__(self, formats, parent=None):
super().__init__(parent)
self.setWindowTitle("Select Resolution and File Format")
self.formats = formats
layout = QVBoxLayout(self)
self.resolution_combo = QComboBox(self)
for format_info in formats:
resolution = format_info.resolution
self.resolution_combo.addItem(resolution)
layout.addWidget(self.resolution_combo)
self.file_format_combo = QComboBox(self)
self.update_file_formats(self.resolution_combo.currentText())
layout.addWidget(self.file_format_combo)
button_box = QDialogButtonBox(QDialogButtonBox.StandardButton.Ok | QDialogButtonBox.StandardButton.Cancel)
button_box.accepted.connect(self.accept)
button_box.rejected.connect(self.reject)
layout.addWidget(button_box)
self.resolution_combo.currentIndexChanged.connect(self.on_resolution_changed)
def update_file_formats(self, resolution):
self.file_format_combo.clear()
for format_info in self.formats:
if format_info.resolution == resolution:
file_formats = format_info.file_formats
self.file_format_combo.addItems(file_formats)
def selected_resolution(self):
return self.resolution_combo.currentText()
def selected_file_format(self):
return self.file_format_combo.currentText()
def on_resolution_changed(self, index):
resolution = self.resolution_combo.currentText()
self.update_file_formats(resolution)
class MainWindow(QMainWindow):
def __init__(self):
super().__init__()
self.setWindowTitle("YouTube Downloader - selected - only_video =True")
self.setFixedWidth(640)
central_widget = QWidget(self)
self.setCentralWidget(central_widget)
layout = QVBoxLayout(central_widget)
self.url_edit = QLineEdit()
layout.addWidget(self.url_edit)
download_button = QPushButton("Download")
download_button.clicked.connect(self.show_resolution_dialog)
layout.addWidget(download_button)
progress_layout = QHBoxLayout()
layout.addLayout(progress_layout)
self.progress_bar = QProgressBar()
self.progress_bar.setTextVisible(True)
progress_layout.addWidget(self.progress_bar)
self.progress_icon_label = QLabel(self)
pixmap = QPixmap("youtube.png") # Înlocuiți "path_to_icon.png" cu calea către iconul dorit
self.progress_icon_label.setPixmap(pixmap)
progress_layout.addWidget(self.progress_icon_label)
def show_resolution_dialog(self):
url = self.url_edit.text()
if url:
format_checker = FormatChecker(url)
formats = format_checker.check_formats()
format_infos = []
for format in formats:
resolution = format['resolution']
file_extension = format['file_extension']
format_info = next((info for info in format_infos if info.resolution == resolution), None)
if format_info:
format_info.file_formats.append(file_extension)
else:
format_info = FormatInfo(resolution, [file_extension])
format_infos.append(format_info)
dialog = ResolutionDialog(format_infos, self)
if dialog.exec() == QDialog.DialogCode.Accepted:
resolution = dialog.selected_resolution()
file_format = dialog.selected_file_format()
self.download_video(url, resolution, file_format)
else:
print("Please enter a valid YouTube URL.")
def download_video(self, url, resolution, file_format):
try:
yt = YouTube(url)
stream = yt.streams.filter(only_video=True, resolution=resolution, mime_type="video/" + file_format).first()
if stream:
stream.download()
print("Download completed!")
QMessageBox.question(self, "Download Completed", "The video has been downloaded successfully.", QMessageBox.StandardButton.Ok)
else:
print("Error: The selected video format is not available for download.")
QMessageBox.question(self, "Download Error", "The selected video format is not available for download.", QMessageBox.StandardButton.Ok)
except Exception as e:
print("Error:", str(e))
QMessageBox.question(self, "Download Error", "An error occurred during the download.", QMessageBox.StandardButton.Ok)
def main():
app = QApplication(sys.argv)
window = MainWindow()
window.show()
sys.exit(app.exec())
if __name__ == "__main__":
main()
C:\PythonProjects>mkdir exo-lang_001

C:\PythonProjects>cd exo-lang_001

C:\PythonProjects\exo-lang_001>pip install exo-lang --user
Collecting exo-lang
  Downloading exo_lang-0.0.2-py3-none-any.whl (142 kB)
  ...
Successfully installed PySMT-0.9.5 asdl-0.1.5 asdl-adt-0.1.0 astor-0.8.1 exo-lang-0.0.2 tomli-2.0.1
yapf-0.33.0 z3-solver-4.12.2.0C:\PythonProjects\exo-lang_001>pip install virtualenv --user
...
C:\PythonProjects\exo-lang_001>python -m venv venv
C:\PythonProjects\exo-lang_001>venv\Scripts\activate.bat
(venv) C:\PythonProjects\exo-lang_001>python -m pip install -U setuptools wheel
Successfully installed setuptools-67.8.0 wheel-0.40.0
[notice] A new release of pip available: 22.3 -> 23.1.2
[notice] To update, run: python.exe -m pip install --upgrade pip
(venv) C:\PythonProjects\exo-lang_001>python.exe -m pip install --upgrade pip
Requirement already satisfied: pip in c:\pythonprojects\exo-lang_001\venv\lib\site-packages (22.3)
Collecting pip
Using cached pip-23.1.2-py3-none-any.whl (2.1 MB)
...
Successfully installed pip-23.1.2
(venv) C:\PythonProjects\exo-lang_001>python -m pip install exo-lang
...
Installing collected packages: z3-solver, PySMT, asdl, tomli, numpy, attrs, astor, yapf, asdl-adt, exo-lang
Successfully installed PySMT-0.9.5 asdl-0.1.5 asdl-adt-0.1.0 astor-0.8.1 attrs-23.1.0 exo-lang-0.0.2 numpy-1.24.3
tomli-2.0.1 yapf-0.33.0 z3-solver-4.12.2.0
(venv) C:\PythonProjects\exo-lang_001>notepad example.py
# example.py
from __future__ import annotations
from exo import *

@proc
def example_sgemm(
    M: size,
    N: size,
    K: size,
    C: f32[M, N] @ DRAM,
    A: f32[M, K] @ DRAM,
    B: f32[K, N] @ DRAM,
):
    for i in seq(0, M):
        for j in seq(0, N):
            for k in seq(0, K):
C[i, j] += A[i, k] * B[k, j](venv) C:\PythonProjects\exo-lang_001>cd out
(venv) C:\PythonProjects\exo-lang_001\out>dir
...
example.c example.hpip install jupyterlabjupyter lab