The winget command line tool enables users to discover, install, upgrade, remove and configure applications on Windows 10 and Windows 11 computers. This tool is the client interface to the Windows Package Manager service.
The winget can be installed on Windows 11 from the Windows Store.


More about winget command can be read on the Microsoft website.
After installation you can use the PowerShell command shell to install the python with this command:
winget install --id Python.Python.3 -e --source winget
Found Python 3 [Python.Python.3] Version 3.10.6
This application is licensed to you by its owner.
Microsoft is not responsible for, nor does it grant any licenses to, third-party packages.
Downloading https://www.python.org/ftp/python/3.10.6/python-3.10.6-amd64.exe
  ██████████████████████████████  27.5 MB / 27.5 MB
Successfully verified installer hash
Starting package install...
Successfully installedWednesday, August 10, 2022
Python 3.10.7 : Manim python package - part 001.
Manim is an engine for precise programmatic animations, designed for creating explanatory math videos, see the official GitHub repo.
Let's install this python package.
python.exe -m pip install manim
...
Successfully installed Pillow-9.2.0 Pygments-2.12.0 certifi-2022.6.15 charset-no
rmalizer-2.1.0 click-8.1.3 click-default-group-1.2.2 cloup-0.13.1 colour-0.1.5 c
ommonmark-0.9.1 decorator-5.1.1 glcontext-2.3.6 idna-3.3 isosurfaces-0.1.0 manim
-0.16.0.post0 manimpango-0.4.1 mapbox-earcut-0.12.11 moderngl-5.6.4 moderngl-win
dow-2.4.1 multipledispatch-0.6.0 networkx-2.8.5 pycairo-1.21.0 pydub-0.25.1 pygl
et-1.5.26 pyrr-0.10.3 requests-2.28.1 rich-12.5.1 scipy-1.9.0 screeninfo-0.8 ski
a-pathops-0.7.2 srt-3.5.2 tqdm-4.64.0 urllib3-1.26.11 watchdog-2.1.9
You need to install the ffmepg software and add this to the environment path.
The default source code for create a circle is this:
from manim import *

# a simple python class
class DefaultClassExample(Scene):
    def construct(self):
        # add a circle
        circle = Circle()
        # create a animation
        self.play(Create(circle))
Use this command to create a video with this source code
manim -pql manim_001.py test
Manim Community v0.16.0.post0
...
INFO     Previewed File at: 'C:\Python310\media\videos\manim_001\480p15\DefaultClassExample.mp4'
...
This is the result of this command:
Blender 3D and python scripting - part 024.
In this tutorial I will show you how to use GeometryNodes with python script and Blender A.P.I.
You can see the result in the next image.

The Object Info node gets information from objects. This can be useful to control parameters in the geometry node tree with an external object, either directly by using its geometry, or via its transformation properties.
An Object Info node can be added quickly by dragging an object into the node editor.
Another information can be found on the manual link.
In the next script you can see I created a simple BezierCurve object.
The definition named new_GeometryNodes_group is used to create two nodes GroupInit and GroupOutput.
I commente the source code to see some steps.
# import python packages
import bpy
from mathutils import Vector

# create a simpple BezierCurve and rename it with 'BezierCurveGeormetryNode'
bpy.ops.curve.primitive_bezier_curve_add()
bpy.ops.object.modifier_add(type='NODES')

curve = bpy.context.active_object
curve.name = 'BezierCurveGeormetryNode'

# define a function for GroupInit and GroupOutput
def new_GeometryNodes_group():
    ''' Create a new empty node group that can be used
        in a GeometryNodes modifier.
    '''
    node_group = bpy.data.node_groups.new('GeometryNodes', 'GeometryNodeTree')
    inNode = node_group.nodes.new('NodeGroupInput')
    inNode.outputs.new('NodeSocketGeometry', 'Geometry')
    outNode = node_group.nodes.new('NodeGroupOutput')
    outNode.inputs.new('NodeSocketGeometry', 'Geometry')
    node_group.links.new(inNode.outputs['Geometry'], outNode.inputs['Geometry'])
    # the -3.5 is value for how far will be set the GroupInit and GroupOutput in the area of GeormetryNodes
    inNode.location = Vector((-3.5*inNode.width, 0))
    outNode.location = Vector((3.5*outNode.width, 0))
    return node_group

# the default curve modifier has no node group set, you need to set :
if curve.modifiers[-1].node_group:
    node_group = curve.modifiers[-1].node_group
else:
    node_group = new_GeometryNodes_group()
    curve.modifiers[-1].node_group = node_group

# set default grup node as nodes
nodes = node_group.nodes

# get both nodes for each one
group_in = nodes.get('Group Input')
group_out = nodes.get('Group Output')

# add the GeometryNodeObjectInfo to the GeometryNode area
new_node_obj = nodes.new('GeometryNodeObjectInfo')
new_node_obj.inputs[0].default_value = bpy.data.objects["BezierCurveGeormetryNode"]Monday, August 8, 2022
Python 3.10.4 : EbookLib python library - part 001.
EbookLib is a Python library for managing EPUB2/EPUB3 files. It’s capable of reading and writing EPUB files programmatically.
You can read more about this python library on this website.
First, I install with the pip tool:
C:\Python310>python -m pip install --upgrade pip
Requirement already satisfied: pip in c:\python310\lib\site-packages (22.1)
Collecting pip
  WARNING: Retrying (Retry(total=4, connect=None, read=None, redirect=None, stat
us=None)) after connection broken by 'NewConnectionError(': Failed to establish a n
ew connection: [Errno 11001] getaddrinfo failed')': /packages/1f/2c/d9626f045e7b
49a6225c6b09257861f24da78f4e5f23af2ddbdf852c99b8/pip-22.2.2-py3-none-any.whl
  Downloading pip-22.2.2-py3-none-any.whl (2.0 MB)
     ---------------------------------------- 2.0/2.0 MB 1.5 MB/s eta 0:00:00
Installing collected packages: pip
  Attempting uninstall: pip
    Found existing installation: pip 22.1
    Uninstalling pip-22.1:
      Successfully uninstalled pip-22.1
Successfully installed pip-22.2.2

C:\Python310>python -m pip install lxml-4.9.0-cp310-cp310-win_amd64.whl
Processing c:\python310\lxml-4.9.0-cp310-cp310-win_amd64.whl
Installing collected packages: lxml
Successfully installed lxml-4.9.0

C:\Python310>python -m pip install EbookLib --user
Collecting EbookLib
  Using cached EbookLib-0.17.1.tar.gz (111 kB)
  Preparing metadata (setup.py) ... done
Requirement already satisfied: lxml in c:\python310\lib\site-packages (from Eboo
kLib) (4.9.0)
Collecting six
  Using cached six-1.16.0-py2.py3-none-any.whl (11 kB)
Using legacy 'setup.py install' for EbookLib, since package 'wheel' is not insta
lled.
Installing collected packages: six, EbookLib
  Running setup.py install for EbookLib ... done
Successfully installed EbookLib-0.17.1 six-1.16.0
I used a the simple python script from the last tutorial to test it:
The last tutorial used the default script from the official webpage.
Compared to the default script, I made changes, the selection in the Romanian language and diacritics...
from ebooklib import epub

book = epub.EpubBook()

# set metadata
book.set_identifier('__1976')
book.set_title('')
book.set_language('en')

book.add_author('Autho: Cătălin George Feștilă')

# create chapter
cap001 = epub.EpubHtml(title='Intro', file_name='capitolul_01.xhtml', lang='ro')
cap001.content=u'<h1>Introducere</h1><p>Această carte este...</p>'

# add chapter
book.add_item(cap001)

# define Table Of Contents
book.toc = (epub.Link('capitolul_01.xhtml', 'Introducere', 'introducere'),
             (epub.Section('O carte simplă'),
             (cap001, ))
            )

# add default NCX and Nav file
book.add_item(epub.EpubNcx())
book.add_item(epub.EpubNav())

# define CSS style
style = 'BODY {color: white;}'
nav_css = epub.EpubItem(uid="style_nav", file_name="style/nav.css", media_type="text/css", content=style)

# add CSS file
book.add_item(nav_css)

# basic spine
book.spine = ['nav', cap001]

# write to the file
epub.write_epub('ro_lan_test.epub', book, {})
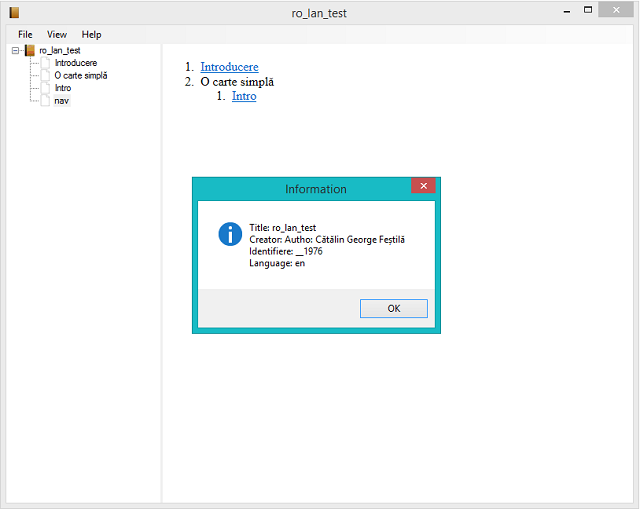
This is the result of the epub file:

Sunday, July 24, 2022
Python 3.11.0a7 : image conversions in Python.
Image processing is very important in development, therefore also in python.
The image processing packages used in python have undergone changes over time.
Pillow and PIL cannot co-exist in the same environment. Before installing Pillow, please uninstall PIL.
Pillow higher than version 10 no longer supports import Image. Please use from PIL import Image instead.
Pillow higher than version 2.1.0 no longer supports import _imaging. Please use from PIL.Image import core as _imaging instead.
Although the image formats are old compared to the newer ones in vector format, they are preferred depending on the field of work.
You can see all of these file image formats on the official python package.
First, the basic installation start with upgrade the pip tool:
C:\PythonProjects\ConvertImages>python -m pip install --upgrade pip
Requirement already satisfied: pip in c:\python311alpha\lib\site-packages (22.1.
2)
Collecting pip
  Downloading pip-22.2-py3-none-any.whl (2.0 MB)
     ---------------------------------------- 2.0/2.0 MB 3.3 MB/s eta 0:00:00
Installing collected packages: pip
  Attempting uninstall: pip
    Found existing installation: pip 22.1.2
    Uninstalling pip-22.1.2:
      Successfully uninstalled pip-22.1.2
Successfully installed pip-22.2
Secondary, the install of the Pillow python package:
C:\PythonProjects\ConvertImages>python  -m pip install --upgrade Pillow
Collecting Pillow
  Downloading Pillow-9.2.0-cp311-cp311-win_amd64.whl (3.3 MB)
     ---------------------------------------- 3.3/3.3 MB 4.0 MB/s eta 0:00:00
Installing collected packages: Pillow
Successfully installed Pillow-9.2.0
I have a webp image here that I have scaled to smaller sizes and that I will test its conversion from webp format to png format.
The image is named waterski2 and I'm using the 3.11.0a7 python version.
Let's see the source code:
from PIL import Image

# open the image file WEBP
image = Image.open('waterski2.webp')

# show the image
image.show()

# convert the image to RGB color
image = image.convert('RGB')

# save PNG RGB image
image.save('waterski2_RGB_PNG.png', 'png')

# save JPG RGB image
image.save('waterski2_RGB_JPG.jpg', 'jpeg')

# open the image file JPG
image_jpg = Image.open('waterski2_RGB_JPG.jpg')

# convert the image to RGB color
image_rgb_jpg = image_jpg.convert('RGB')

# save PNG RGB image from JPG
image_rgb_jpg.save('new-image_RGB_PNG_from_JPG.png', 'png')

#same process of conversion to WEBP file type
# from png image
image = Image.open('waterski2_RGB_PNG.png')
image = image.convert('RGB')
image.save('new-image_RGB_WEBP_from_png.webp', 'webp')
# from jpg image
image = Image.open('waterski2_RGB_JPG.jpg')
image = image.convert('RGB')
image.save('new-image_RGB_WEBP_from_jpg.webp', 'webp')
Here is a screenshot with these converted images and the processed image.

Saturday, July 23, 2022
Blender 3D and python scripting - part 023.
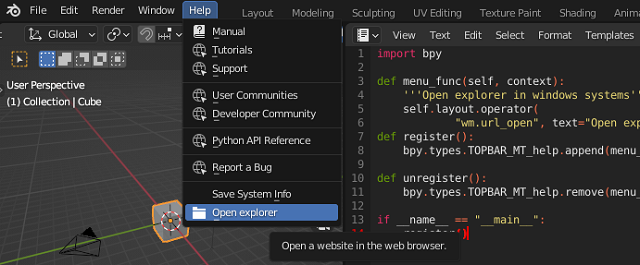
This script will add a submenu to the main Help menu with an icon with a folder that will open the explorer from the Windows operating system.
I have not solved the tooltip of this button, it is set to show a message about opening a URL.

This is the source code:
import bpy

def menu_func(self, context):
    '''Open explorer in windows systems'''
    self.layout.operator(
            "wm.url_open", text="Open explorer", icon='FILE_FOLDER').url = "C:/"
def register():
    bpy.types.TOPBAR_MT_help.append(menu_func)

def unregister():
    bpy.types.TOPBAR_MT_help.remove(menu_func)

if __name__ == "__main__":
    register()
If you want to change the tooltip then need to create a class OpenOperator and wrapper for this operator function and set the bl_label and all you need to have it.
The menu_func will get the layout operator with all defined in the class OpenOperator and will set the tooltip with the text: Open explorer in windows systems.
See this new source code:
import bpy

def menu_func(self, context):
    self.layout.operator(
            OpenOperator.bl_idname, text="Open explorer", icon='FILE_FOLDER')

class OpenOperator(bpy.types.Operator):
    """Open explorer in windows systems"""
    bl_idname = "wm.open_explorer"
    bl_label = "Open explorer"

    def execute(self, context):
        bpy.ops.wm.url_open(url="C:/")
        return {'FINISHED'}


def register():
    bpy.utils.register_class(OpenOperator)
    bpy.types.TOPBAR_MT_help.append(menu_func)


def unregister():
    bpy.utils.unregister_class(OpenOperator)
    bpy.types.TOPBAR_MT_help.remove(menu_func)


if __name__ == "__main__":
register()Saturday, July 16, 2022
Python 3.7.13 : My colab tutorials - part 026.
Vosk is an offline open source speech recognition toolkit. It enables speech recognition for 20+ languages and dialects - English, Indian English, German, French, Spanish, Portuguese, Chinese, Russian, Turkish, Vietnamese, Italian, Dutch, Catalan, Arabic, Greek, Farsi, Filipino, Ukrainian, Kazakh, Swedish, Japanese, Esperanto, Hindi, Czech, Polish. More to come.
Today I tested this Python package with a video that contains sound content
in the Chinese language
I created a simple interface where you can test other videos on youtube and where you can select the language and start time and duration for the detection sequence with the python vosk package.
I used the python youtube_dl package to take portions of wav sound from a youtube video.
I haven't done tests on other videos but it should work.
You can find it on this colab notebook.
Wednesday, July 13, 2022
Python 3.11.0a7 : local script for update python packages.
If you want to upgrade all local packages from a local script for pip with version greater than 10.0.1 version use a local python script with this source code:
import pkg_resources
from subprocess import call

packages = [dist.project_name for dist in pkg_resources.working_set]
call("pip install --upgrade " + ' '.join(packages), shell=True)
Run it with the python executable and you will see something like this:
C:\Python311alpha>python.exe update_python.py
...
Requirement already satisfied: pip-api in c:\python311alpha\lib\site-packages (0.0.29)
Requirement already satisfied: pypng in c:\python311alpha\lib\site-packages (0.0.21)
Requirement already satisfied: PyGetWindow in c:\python311alpha\lib\site-packages (0.0.9)
Requirement already satisfied: bs4 in c:\python311alpha\lib\site-packages (0.0.1)Tuesday, July 12, 2022
Python 3.7.13 : My colab tutorials - part 025.
Today I tested a simple data processing example with the first image from NASA's James Webb Space Telescope
You can find this example and more on my GitHub repository for colab.
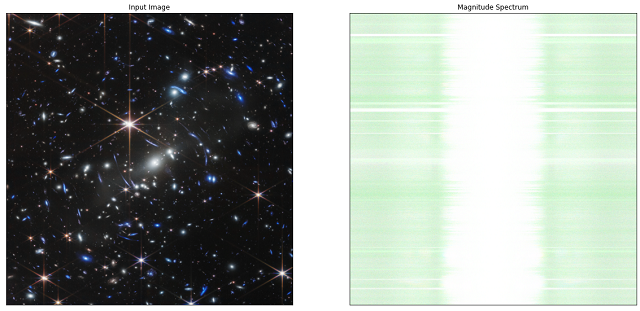
This is one of results of data processing with a simple logaritm function to see magnitude spectrum of Fourier transform X by shifting the zero-frequency map:

Thursday, July 7, 2022
Blender 3D and python scripting - part 022.
In the last tutorial, we exemplified with the default template from Blender 3D how to create a panel in the Object area.
Today I will show you how to modify this panel with some useful elements for developing an addon.
The purpose of the old tutorial on this is the differences and changes that must be made to the template source code to introduce the following functions:
    StringProperty(
    BoolProperty(
    IntProperty(
    IntVectorProperty(
    FloatProperty(
    FloatVectorProperty(
    BoolVectorProperty(
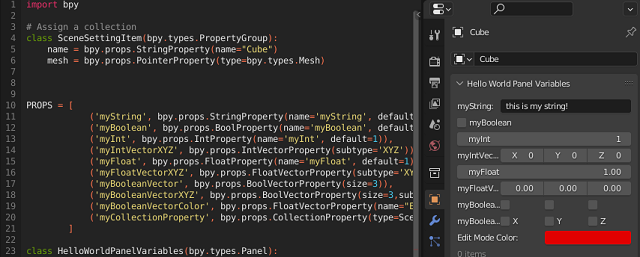
Some arguments need to be modified to have different input data, see the selection of colors in the attached image:

I commented on the source code areas in the template and added my changes:
The class also called SceneSettingItem and CollectionProperty is currently being tested and is not finalized to be implemented, it can be seen in panel: 0 items.
It can be seen that any defined class must be registered and unregistered
Here is the source code used to get the new screenshot changes:
import bpy

# Assign a collection
class SceneSettingItem(bpy.types.PropertyGroup):
    name = bpy.props.StringProperty(name="Cube")
    mesh = bpy.props.PointerProperty(type=bpy.types.Mesh)


PROPS = [
            ('myString', bpy.props.StringProperty(name='myString', default='this is my string!')),
            ('myBoolean', bpy.props.BoolProperty(name='myBoolean', default=False)),
            ('myInt', bpy.props.IntProperty(name='myInt', default=1)),
            ('myIntVectorXYZ', bpy.props.IntVectorProperty(subtype='XYZ')),
            ('myFloat', bpy.props.FloatProperty(name='myFloat', default=1)),
            ('myFloatVectorXYZ', bpy.props.FloatVectorProperty(subtype='XYZ')),
            ('myBooleanVector', bpy.props.BoolVectorProperty(size=3)),
            ('myBooleanVectorXYZ', bpy.props.BoolVectorProperty(size=3,subtype='XYZ')),
            ('myBooleanVectorColor', bpy.props.FloatVectorProperty(name="Edit Mode Color", subtype='COLOR',  default=(0.76, 0.0, 0.0), size=3, min=0, max=1)),
            ('myCollectionProperty', bpy.props.CollectionProperty(type=SceneSettingItem)),
        ]

class HelloWorldPanelVariables(bpy.types.Panel):
    """Creates a Panel in the Object properties window"""
    bl_label = "Hello World Panel Variables"
    bl_idname = "OBJECT_PT_hello"
    bl_space_type = 'PROPERTIES'
    bl_region_type = 'WINDOW'
    bl_context = "object"

#    def draw(self, context):
#        layout = self.layout
#        obj = context.object
#        row = layout.row()
#        row.label(text="Hello world!", icon='WORLD_DATA')
#        row = layout.row()
#        row.label(text="Active object is: " + obj.name)
#        row = layout.row()
#        row.prop(obj, "name")
#        row = layout.row()
#        row.operator("mesh.primitive_cube_add")

    def draw(self, context):
        col = self.layout.column()
        for (prop_name, _) in PROPS:
            row = col.row()
            row.prop(context.scene, prop_name)


def register():
    bpy.utils.register_class(SceneSettingItem)
    bpy.utils.register_class(HelloWorldPanelVariables)
    for (prop_name, prop_value) in PROPS:
        setattr(bpy.types.Scene, prop_name, prop_value)

def unregister():
    bpy.utils.unregister_class(SceneSettingItem)
    bpy.utils.unregister_class(HelloWorldPanelVariables)
    for (prop_name, _) in PROPS:
        delattr(bpy.types.Scene, prop_name)

if __name__ == "__main__":
    register()
Wednesday, July 6, 2022
Blender 3D and python scripting - part 021.
I will continue the series of tutorials with python and the Blender 3D software interface.
From the main menu we can get to the scripting part and here we choose Templates - Python - Ui Panel Simple.
The source code will be added to the python editor.
Save this source code with a name and load it as an addon.
After loading this source code it can be found at Properties at Object, see screenshot.

You can see the source code from the Ui Panel Simple template that I used.
import bpy

class HelloWorldPanel(bpy.types.Panel):
    """Creates a Panel in the Object properties window"""
    bl_label = "Hello World Panel"
    bl_idname = "OBJECT_PT_hello"
    bl_space_type = 'PROPERTIES'
    bl_region_type = 'WINDOW'
    bl_context = "object"

    def draw(self, context):
        layout = self.layout

        obj = context.object

        row = layout.row()
        row.label(text="Hello world!", icon='WORLD_DATA')

        row = layout.row()
        row.label(text="Active object is: " + obj.name)
        row = layout.row()
        row.prop(obj, "name")

        row = layout.row()
        row.operator("mesh.primitive_cube_add")

def register():
    bpy.utils.register_class(HelloWorldPanel)


def unregister():
    bpy.utils.unregister_class(HelloWorldPanel)

if __name__ == "__main__":
register()Saturday, July 2, 2022
Python 3.7.10 : Simple example with PyQRCode.
The pyqrcode module is a QR code generator that can automate most of the building process for creating QR codes.
The pypng python library is required to save and upload PNG images.
I had to install them both with the pip utility.
pip install pyqrcode Collecting pyqrcode Using cached PyQRCode-1.2.1-py3-none-any.whl Installing collected packages: pyqrcode Successfully installed pyqrcode-1.2.1 WARNING: There was an error checking the latest version of pip. ... pip install pypng Collecting pypng Using cached pypng-0.0.21-py3-none-any.whl (48 kB) Installing collected packages: pypng Successfully installed pypng-0.0.21 WARNING: There was an error checking the latest version of pip.Let's try some simple examples:import pyqrcode url = pyqrcode.create('https://ro.wikipedia.org/wiki/Utilizator:Catalin_Festila', error='H', mode='binary') url.svg('uca-url.svg', scale=8) url.eps('uca-url.eps', scale=2) url.png('code.png', scale=5, module_color=[0, 0, 0, 128], background=[0, 0, 128]) url.show() print(url.terminal(quiet_zone=1))This is the result of this source code:
Tuesday, June 28, 2022
Python 3.7.13 : About pip-audit version 2.3.4.
More infos about this python package can be found here.
pip-audit is a tool for scanning Python environments for packages with known vulnerabilities. It uses the Python Packaging Advisory Database (https://github.com/pypa/advisory-database) via the PyPI JSON API as a source of vulnerability reports.
I tested this package feature for colab google with these python packages: unionml, pandas, sklearn and pip-audit.
You can see all vulnerabilities or you can use argument --desc for more information:
!pip-audit
- Auditing zipp (3.8.0)
Found 54 known vulnerabilities in 14 packages
Name          Version  ID                  Fix Versions
------------- -------- ------------------- ----------------------------
dask          2.12.0   PYSEC-2021-387      2021.10.0
distributed   1.25.3   GHSA-j8fq-86c5-5v2r 2021.10.0
httplib2      0.17.4   PYSEC-2020-46       0.18.0
httplib2      0.17.4   PYSEC-2021-16       0.19.0
ipython       5.5.0    PYSEC-2022-12       6.0.0rc1,7.16.3,7.31.1,8.0.1
lxml          4.2.6    PYSEC-2021-19       4.6.3
lxml          4.2.6    PYSEC-2020-62       4.6.2
lxml          4.2.6    PYSEC-2021-852      4.6.5
mpmath        1.2.1    PYSEC-2021-427
notebook      5.3.1    PYSEC-2018-18       5.7.2
notebook      5.3.1    PYSEC-2019-158      5.7.8
notebook      5.3.1    PYSEC-2018-57       5.4.1
notebook      5.3.1    PYSEC-2018-17       5.7.1
notebook      5.3.1    PYSEC-2019-159      5.7.6
notebook      5.3.1    PYSEC-2019-157      5.5.0
notebook      5.3.1    PYSEC-2020-215      6.1.5
notebook      5.3.1    PYSEC-2022-180      6.4.10
notebook      5.3.1    PYSEC-2022-212      6.4.12
notebook      5.3.1    GHSA-hwvq-6gjx-j797 5.7.11,6.4.1
notebook      5.3.1    GHSA-rv62-4pmj-xw6h 5.7.8
numpy         1.21.6   GHSA-fpfv-jqm9-f5jm 1.22
opencv-python 4.1.2.30 GHSA-8849-5h85-98qw
opencv-python 4.1.2.30 GHSA-m6vm-8g8v-xfjh
opencv-python 4.1.2.30 GHSA-q799-q27x-vp7w 4.2.0.32
pillow        7.1.2    PYSEC-2021-137      8.2.0
pillow        7.1.2    PYSEC-2021-138      8.2.0
pillow        7.1.2    PYSEC-2021-70       8.1.0
pillow        7.1.2    PYSEC-2021-331      8.3.0
pillow        7.1.2    PYSEC-2021-41       8.1.1
pillow        7.1.2    PYSEC-2021-71       8.1.0
pillow        7.1.2    PYSEC-2021-69       8.1.0
pillow        7.1.2    PYSEC-2021-38       8.1.1
pillow        7.1.2    PYSEC-2021-139      8.2.0
pillow        7.1.2    PYSEC-2021-94       8.2.0
pillow        7.1.2    PYSEC-2021-39       8.1.1
pillow        7.1.2    PYSEC-2021-36       8.1.1
pillow        7.1.2    PYSEC-2021-40       8.1.1
pillow        7.1.2    PYSEC-2021-37       8.1.1
pillow        7.1.2    PYSEC-2021-317      8.3.2
pillow        7.1.2    PYSEC-2021-35       8.1.1
pillow        7.1.2    PYSEC-2021-93       8.2.0
pillow        7.1.2    PYSEC-2021-42       8.1.1
pillow        7.1.2    PYSEC-2021-92       8.2.0
pillow        7.1.2    PYSEC-2022-10       9.0.0
pillow        7.1.2    PYSEC-2022-9        9.0.0
pillow        7.1.2    PYSEC-2022-8        9.0.0
pillow        7.1.2    PYSEC-2022-168      9.0.1
pillow        7.1.2    GHSA-jgpv-4h4c-xhw3 8.1.2
pillow        7.1.2    GHSA-4fx9-vc88-q2xc 9.0.0
psutil        5.4.8    PYSEC-2019-41       5.6.6
pygments      2.6.1    PYSEC-2021-140      2.7.4
pygments      2.6.1    PYSEC-2021-141      2.7.4
urllib3       1.25.11  PYSEC-2021-108      1.26.5
werkzeug      1.0.1    PYSEC-2022-203      2.1.1
Name                    Skip Reason
----------------------- ------------------------------------------------------------------------------------------------
dlib                    Dependency not found on PyPI and could not be audited: dlib (19.18.0+zzzcolab20220513001918)
en-core-web-sm          Dependency not found on PyPI and could not be audited: en-core-web-sm (3.3.0)
jaxlib                  Dependency not found on PyPI and could not be audited: jaxlib (0.3.7+cuda11.cudnn805)
pygobject               Dependency not found on PyPI and could not be audited: pygobject (3.26.1)
screen-resolution-extra Dependency not found on PyPI and could not be audited: screen-resolution-extra (0.0.0)
tensorflow              Dependency not found on PyPI and could not be audited: tensorflow (2.8.2+zzzcolab20220527125636)
torch                   Dependency not found on PyPI and could not be audited: torch (1.11.0+cu113)
torchaudio              Dependency not found on PyPI and could not be audited: torchaudio (0.11.0+cu113)
torchvision             Dependency not found on PyPI and could not be audited: torchvision (0.12.0+cu113)
xkit                    Dependency not found on PyPI and could not be audited: xkit (0.0.0)