analitics

Pages

Friday, January 12, 2018

Python 2.7 : Python and BigQuery service object.

Here's another tutorial about python and google. I thought it would be useful for the beginning of 2018.
The Google team tell us:

What is BigQuery?

Storing and querying massive datasets can be time consuming and expensive without the right hardware and infrastructure. Google BigQuery is an enterprise data warehouse that solves this problem by enabling super-fast SQL queries using the processing power of Google's infrastructure. Simply move your data into BigQuery and let us handle the hard work. You can control access to both the project and your data based on your business needs, such as giving others the ability to view or query your data.


This tutorial it follows more precisely the steps from here.
First of all, you must create an authentication file by using the Create service account from your Google project.
Go to Google Console, navigate to the Create service account key page.
From the Service account drop-down, select the New service account.
Input a name into the form field.
From the Role drop-down, select Project and Owner.
The result is a JSON file type (this is for authenticating with google) download it renames and put into your project folder.
Like into the next image:
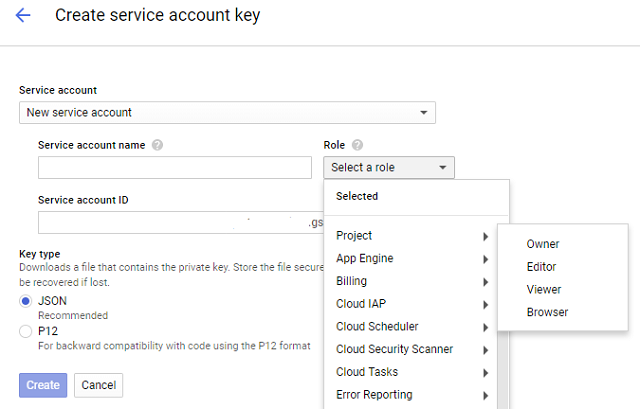
Now, select from the left area the Library does add the BigQuery API, try this link.
Search for BigQuery API and then use the button ENABLE to use it.
The next step is to install these python modules: pyopenssl and google-cloud-bigquery.
C:\Python27\Scripts>pip install -U pyopenssl
C:\Python27\Scripts>pip install --upgrade google-cloud-bigquery
Add this JSON file to windows path from my test folder:
set GOOGLE_APPLICATION_CREDENTIALS=C:\test\python_doc.json
Because my JSON file is named python_doc.json then this is the name I will use with my python script.
Let's see the script:
import google
from google.cloud import bigquery

def query_shakespeare():
    client = bigquery.Client()
    client = client.from_service_account_json('python_doc.json')
    query_job = client.query("""
        #standardSQL
        SELECT corpus AS title, COUNT(*) AS unique_words
        FROM `bigquery-public-data.samples.shakespeare`
        GROUP BY title
        ORDER BY unique_words DESC
        LIMIT 10""")

    results = query_job.result()  # Waits for job to complete.

    for row in results:
        print("{}: {}".format(row.title, row.unique_words))

if __name__ == '__main__':
    query_shakespeare()
The result is:
C:\Python27>python.exe goo_test_bquerry.py
hamlet: 5318
kinghenryv: 5104
cymbeline: 4875
troilusandcressida: 4795
kinglear: 4784
kingrichardiii: 4713
2kinghenryvi: 4683
coriolanus: 4653
2kinghenryiv: 4605
antonyandcleopatra: 4582
NOTE: Take care of the JSON file because it gives access to your google account and tries to use the restrictions according to the application's requirements.

Thursday, January 4, 2018

Python 2.7 : InsecurePlatformWarning error.

This is not a common error and can be solve it easy like any python issue.
The result of this error can be shown like into the next example:
c:\python27\lib\site-packages\pip\_vendor\requests\packages\urllib3\util\ssl_.py:318: 
SNIMissingWarning: An HTTPS request has been made, but the SNI (Subject Name Indication) extension 
to TLS is not available on this platform. This may cause the server to present an incorrect TLS 
certificate, which can cause validation failures. You can upgrade to a newer version of Python to
 solve this. For more information, see https://urllib3.readthedocs.io/en/latest/security.html
#snimissingwarning.
  SNIMissingWarning
c:\python27\lib\site-packages\pip\_vendor\requests\packages\urllib3\util\ssl_.py:122: 
InsecurePlatformWarning: A true SSLContext object is not available. This prevents urllib3 from
 configuring SSL appropriately and may cause certain SSL connections to fail. You can upgrade 
to a newer version of Python to solve this. For more information, see https://urllib3.readthe
docs.io/en/latest/security.html#insecureplatformwarning.
  InsecurePlatformWarning
The simple way to test this python error is to install these python modules:
pip install urllib3 
pip install requests
This last python module named requests to come with:
Successfully installed certifi-2017.11.5 chardet-3.0.4 idna-2.6 requests-2.18.4
What is this python module named requests?
Is a security the requests python module inject pyopenssl into urllib3
.
C:\Python27>python
Python 2.7 (r27:82525, Jul  4 2010, 07:43:08) [MSC v.1500 64 bit (AMD64)] on win32
Type "help", "copyright", "credits" or "license" for more information.
>>> help()

Welcome to Python 2.7!  This is the online help utility.

If this is your first time using Python, you should definitely check out
the tutorial on the Internet at http://docs.python.org/tutorial/.

Enter the name of any module, keyword, or topic to get help on writing
Python programs and using Python modules.  To quit this help utility and
return to the interpreter, just type "quit".

To get a list of available modules, keywords, or topics, type "modules",
"keywords", or "topics".  Each module also comes with a one-line summary
of what it does; to list the modules whose summaries contain a given word
such as "spam", type "modules spam".

help> modules requests

Here is a list of matching modules.  Enter any module name to get more help.

pip._vendor.cachecontrol.controller - The httplib2 algorithms ported for use with requests.
pip._vendor.requests - Requests HTTP library
pip._vendor.requests.adapters - requests.adapters
pip._vendor.requests.api - requests.api
pip._vendor.requests.auth - requests.auth
pip._vendor.requests.certs - requests.certs
pip._vendor.requests.compat - requests.compat
pip._vendor.requests.cookies - requests.cookies
pip._vendor.requests.exceptions - requests.exceptions
pip._vendor.requests.hooks - requests.hooks
pip._vendor.requests.models - requests.models
pip._vendor.requests.packages
pip._vendor.requests.packages.chardet
pip._vendor.requests.packages.chardet.big5freq
pip._vendor.requests.packages.chardet.big5prober
pip._vendor.requests.packages.chardet.chardetect - Script which takes one or more file paths 
and reports on their detected
pip._vendor.requests.packages.chardet.chardistribution
pip._vendor.requests.packages.chardet.charsetgroupprober
pip._vendor.requests.packages.chardet.charsetprober
pip._vendor.requests.packages.chardet.codingstatemachine
pip._vendor.requests.packages.chardet.compat
pip._vendor.requests.packages.chardet.constants
pip._vendor.requests.packages.chardet.cp949prober
pip._vendor.requests.packages.chardet.escprober
pip._vendor.requests.packages.chardet.escsm
pip._vendor.requests.packages.chardet.eucjpprober
pip._vendor.requests.packages.chardet.euckrfreq
pip._vendor.requests.packages.chardet.euckrprober
pip._vendor.requests.packages.chardet.euctwfreq
pip._vendor.requests.packages.chardet.euctwprober
pip._vendor.requests.packages.chardet.gb2312freq
pip._vendor.requests.packages.chardet.gb2312prober
pip._vendor.requests.packages.chardet.hebrewprober
pip._vendor.requests.packages.chardet.jisfreq
pip._vendor.requests.packages.chardet.jpcntx
pip._vendor.requests.packages.chardet.langbulgarianmodel
pip._vendor.requests.packages.chardet.langcyrillicmodel
pip._vendor.requests.packages.chardet.langgreekmodel
pip._vendor.requests.packages.chardet.langhebrewmodel
pip._vendor.requests.packages.chardet.langhungarianmodel
pip._vendor.requests.packages.chardet.langthaimodel
pip._vendor.requests.packages.chardet.latin1prober
pip._vendor.requests.packages.chardet.mbcharsetprober
pip._vendor.requests.packages.chardet.mbcsgroupprober
pip._vendor.requests.packages.chardet.mbcssm
pip._vendor.requests.packages.chardet.sbcharsetprober
pip._vendor.requests.packages.chardet.sbcsgroupprober
pip._vendor.requests.packages.chardet.sjisprober
pip._vendor.requests.packages.chardet.universaldetector
pip._vendor.requests.packages.chardet.utf8prober
pip._vendor.requests.packages.urllib3 - urllib3 - Thread-safe connection pooling and re-using.
pip._vendor.requests.packages.urllib3._collections
pip._vendor.requests.packages.urllib3.connection
pip._vendor.requests.packages.urllib3.connectionpool
pip._vendor.requests.packages.urllib3.contrib
pip._vendor.requests.packages.urllib3.contrib.appengine
pip._vendor.requests.packages.urllib3.contrib.ntlmpool - NTLM authenticating pool, 
contributed by erikcederstran
pip._vendor.requests.packages.urllib3.contrib.pyopenssl
pip._vendor.requests.packages.urllib3.contrib.socks - SOCKS support for urllib3
pip._vendor.requests.packages.urllib3.exceptions
pip._vendor.requests.packages.urllib3.fields
pip._vendor.requests.packages.urllib3.filepost
pip._vendor.requests.packages.urllib3.packages
pip._vendor.requests.packages.urllib3.packages.ordered_dict
pip._vendor.requests.packages.urllib3.packages.six - Utilities for writing code that runs on 
Python 2 and 3
pip._vendor.requests.packages.urllib3.packages.ssl_match_hostname
pip._vendor.requests.packages.urllib3.packages.ssl_match_hostname._implementation - The match_hostname() 
function from Python 3.3.3, essential when using SSL.
pip._vendor.requests.packages.urllib3.poolmanager
pip._vendor.requests.packages.urllib3.request
pip._vendor.requests.packages.urllib3.response
pip._vendor.requests.packages.urllib3.util
pip._vendor.requests.packages.urllib3.util.connection
pip._vendor.requests.packages.urllib3.util.request
pip._vendor.requests.packages.urllib3.util.response
pip._vendor.requests.packages.urllib3.util.retry
pip._vendor.requests.packages.urllib3.util.ssl_
pip._vendor.requests.packages.urllib3.util.timeout
pip._vendor.requests.packages.urllib3.util.url
pip._vendor.requests.sessions - requests.session
pip._vendor.requests.status_codes
pip._vendor.requests.structures - requests.structures
pip._vendor.requests.utils - requests.utils
requests - Requests HTTP Library
requests.__version__
requests._internal_utils - requests._internal_utils
requests.adapters - requests.adapters
requests.api - requests.api
requests.auth - requests.auth
requests.certs - requests.certs
requests.compat - requests.compat
requests.cookies - requests.cookies
requests.exceptions - requests.exceptions
requests.help - Module containing bug report helper(s).
requests.hooks - requests.hooks
requests.models - requests.models
requests.packages
requests.sessions - requests.session
requests.status_codes
requests.structures - requests.structures
requests.utils - requests.utils
help>
You are now leaving help and returning to the Python interpreter.
If you want to ask for help on a particular object directly from the
interpreter, you can type "help(object)".  Executing "help('string')"
has the same effect as typing a particular string at the help> prompt.
>>>
...

Wednesday, January 3, 2018

The ebooklib python module .

Happy new year 2018!
The official webpage of this python module comes with this intro:
EbookLib is a Python library for managing EPUB2/EPUB3 and Kindle files. It's capable of reading and writing EPUB files programmatically (Kindle support is under development).
First the installation of this python module named ebooklib.
C:\>cd Python27

C:\Python27>cd Script
The system cannot find the path specified.

C:\Python27>cd Scripts

C:\Python27\Scripts>pip install ebooklib
Collecting ebooklib
  Downloading EbookLib-0.16.tar.gz
Requirement already satisfied: lxml in c:\python27\lib\site-packages (from ebooklib)
Requirement already satisfied: six in c:\python27\lib\site-packages (from ebooklib)
Installing collected packages: ebooklib
  Running setup.py install for ebooklib ... done
Successfully installed ebooklib-0.16
If you don't see the Scripts folder into your Python27 folder you need to install pip tool.
Just download the get-pip.py script into your Python27 folder and run it with python.
Let's test some default example:
C:\Python27>python.exe get-pip.py
The next step is to test a simple example:
from ebooklib import epub

book = epub.EpubBook()

# set metadata
book.set_identifier('id123456')
book.set_title('Sample book')
book.set_language('en')

book.add_author('Author Python')
book.add_author('catafest', file_as='', role='writer', uid='author')

# create chapter
c1 = epub.EpubHtml(title='Intro', file_name='chap_01.xhtml', lang='hr')
c1.content=u'Intro heading.Python is a interpreted high-level programming language ...'

# add chapter
book.add_item(c1)

# define Table Of Contents
book.toc = (epub.Link('chap_01.xhtml', 'Introduction', 'intro'),
(epub.Section('Simple book'),
(c1, ))
)

# add default NCX and Nav file
book.add_item(epub.EpubNcx())
book.add_item(epub.EpubNav())

# define CSS style
style = 'BODY {color: white;}'
nav_css = epub.EpubItem(uid="style_nav", file_name="style/nav.css", media_type="text/css", content=style)

# add CSS file
book.add_item(nav_css)

# basic spine
book.spine = ['nav', c1]

# write to the file
epub.write_epub('test.epub', book, {})
You can update and make more good your epub book with HTML5 tags.
I used this example with headings and paragraph to change the text, see the result:

Tuesday, December 26, 2017

The development with python-instagram - python 3.6.3 .

Today I will show you how to deal with Instagram API using python-instagram python module.
The version of the python I used is this version: Python 3.6.3 |Anaconda custom (64-bit)| (default, Oct 15 2017, 03:27:45) [MSC v.1900 64 bit (AMD64)] on win32
This is the python install of PyCharm IDE - Miniconda3 on my Windows 10 account.
The first step is the install module with the pip tool:
pip install python-instagram
Collecting python-instagram
  Downloading python-instagram-1.3.2.tar.gz
Collecting simplejson (from python-instagram)
  Downloading simplejson-3.13.2-cp36-cp36m-win_amd64.whl (70kB)
    100% |████████████████████████████████| 71kB 816kB/s
Collecting httplib2 (from python-instagram)
  Downloading httplib2-0.10.3.tar.gz (204kB)
    100% |████████████████████████████████| 204kB 1.1MB/s
Requirement already satisfied: six in c:\users\catafest\miniconda3\lib\site-packages (from python-instagram)
Building wheels for collected packages: python-instagram, httplib2
...
Successfully built python-instagram httplib2
Installing collected packages: simplejson, httplib2, python-instagram
Successfully installed httplib2-0.10.3 python-instagram-1.3.2 simplejson-3.13.2
The next step is to take your Client Secret and Client ID from your Instagram account:
The next step is to set your Instagram API:

You can try some example from here.
I just got this error :...instagram.bind.InstagramAPIError: (400) OAuthAccessTokenException-The access_token provided is invalid.
I think the problem is Instagram because I search on the internet and many people come with this issue.
The team development of Instagram tell us to set some Permission:
All permissions require approval to be used out of Sandbox. Make sure to review our Platform Policies before submitting your app for review. To learn more about the review process, please read the Permissions Review documentation.
I try to use this but is not very clear for me.

Tuesday, December 5, 2017

Fix PyCharm error install python module from conda .

Today I fix an error about PyCharm and conda.
As you know :
Conda is an open source package management system and environmental management system that runs on Windows, macOS and Linux.
Also, Conda quickly installs, runs and updates packages dependency and environment management for any language—Python, R, Ruby, Lua, Scala, Java, JavaScript, C/ C++, FORTRAN.
This error is from PyCharm install python modules using error check from PyCharm (Alt+Enter keys):

The result of this install come with this error from conda :

Close your PyCharm and use this command into your shell-like administrator:

C:\WINDOWS\system32>conda config --show
C:\WINDOWS\system32>conda config --set force True
C:\WINDOWS\system32>conda update conda
C:\WINDOWS\system32>conda install conda anaconda
Fetching package metadata .............
Solving package specifications: .

# All requested packages already installed.
# packages in environment at C:\Users\catafest\Miniconda3:
#
anaconda                  5.0.1            py36h8316230_2
conda                     4.3.30           py36h7e176b0_0
C:\WINDOWS\system32>conda update --prefix C:\Users\catafest\Miniconda3 anaconda
Fetching package metadata .............
Solving package specifications: .

Package plan for installation in environment C:\Users\catafest\Miniconda3:

The following packages will be UPDATED:

    conda-env: 2.6.0-0 --> 2.6.0-h36134e3_1
Proceed ([y]/n)? y

conda-env-2.6. 100% |###############################| Time: 0:00:00 163.59 kB/s
This command installs anaconda and updates it using my account catafest .
Start the I.D.E. PyCharm and after indexing all you can try to fix the python install module (Alt+Enter keys).
If the python modules are not into conda repo from PyCharm then you can use this command:
C:\WINDOWS\system32>conda install -c conda-forge opencv
Fetching package metadata ...............
Solving package specifications: .

# All requested packages already installed.
# packages in environment at C:\Users\catafest\Miniconda3:
#
opencv                    3.3.0                  py36_202    conda-forge
In this example I used OpenCV python module named into python script like cv2, see the next image:


Saturday, November 11, 2017

Using kivy python module with PyCharm IDE.

First, you need to download the last version of PyCharm IDE.
My PyCharm IDE put the python version 3 into a folder named Miniconda3.
I use the command shell to go to Scripts and I used pip to install the kivy python module, see:
Scripts>pip install kivy
Collecting kivy
  Downloading Kivy-1.10.0-cp36-cp36m-win_amd64.whl (3.5MB)
    100% |████████████████████████████████| 3.5MB 380kB/s
Collecting pygments (from kivy)
  Downloading Pygments-2.2.0-py2.py3-none-any.whl (841kB)
    100% |████████████████████████████████| 849kB 1.3MB/s
Collecting Kivy-Garden>=0.1.4 (from kivy)
  Downloading kivy-garden-0.1.4.tar.gz
Collecting docutils (from kivy)
  Downloading docutils-0.14-py3-none-any.whl (543kB)
    100% |████████████████████████████████| 552kB 1.8MB/s
Requirement already satisfied: requests 
...
Building wheels for collected packages: Kivy-Garden
...
Successfully built Kivy-Garden
Installing collected packages: pygments, Kivy-Garden, docutils, kivy
Successfully installed Kivy-Garden-0.1.4 docutils-0.14 kivy-1.10.0 pygments-2.2.0
I got one error about SDL and I put the SDL 2.0 into my windows system 32 folders.
The next step is to try to use this steps from the official website into the Scripts folder from Miniconda3.
python -m pip install --upgrade pip wheel setuptools
python -m pip install docutils pygments pypiwin32 kivy.deps.sdl2 kivy.deps.glew
python -m pip install kivy.deps.gstreamer
python -m pip install kivy.deps.angle
python -m pip install kivy
I make one project into my PyCharm editor and I use the default script:
from kivy.app import App
from kivy.uix.button import Button

class TestApp(App):
    def build(self):
        return Button(text='Hello World')

TestApp().run()
The result can be see into the next image:

Sunday, October 22, 2017

The Google Cloud Pub/Sub python module.

This is a test of google feature from cloud.google.com/pubsub web page.
The Google development team tell us about this service:
The Google Cloud Pub/Sub service allows applications to exchange messages reliably, quickly, and asynchronously. To accomplish this, a producer of data publishes a message to a Cloud Pub/Subtopic. A subscriber client then creates a subscription to that topic and consumes messages from the subscription. Cloud Pub/Sub persists messages that could not be delivered reliably for up to seven days. This page shows you how to get started publishing messages with Cloud Pub/Sub using client libraries.
The simple idea about this is:
Publisher applications can send messages to a topic, and other applications can subscribe to that topic to receive the messages.
I start with the installation of the python module using python version 2.7 and pip tool.
C:\Python27>cd Scripts

C:\Python27\Scripts>pip install --upgrade google-cloud-pubsub
Collecting google-cloud-pubsub
  Downloading google_cloud_pubsub-0.28.4-py2.py3-none-any.whl (79kB)
    100% |################################| 81kB 300kB/s
...
Successfully installed google-cloud-pubsub-0.28.4 grpc-google-iam-v1-0.11.4 ply-3.8 
psutil-5.4.0 pyasn1-modules-0.1.5 setuptools-36.6.0
The next steps come with some settings on google console, see this google page.
The default settings can be started and set with this command: gcloud init .
You need to edit this settings and app.yaml at ~/src/.../appengine/flexible/pubsub$ nano app.yaml.
After that, you set all of this using the command gcloud app deploy you can see the output at https://[YOUR_PROJECT_ID].appspot.com.
The main goal of this tutorial was to start and run the Google Cloud Pub/Sub service with python and this has been achieved.

Tuesday, October 10, 2017

The online editor for python and google .

This is a good online editor for python and google.
Like any online editor, some python modules are not available for online security reasons.
I do not know what python modules are implemented in this online editor.
I tested just sys and math python modules.
The Google Apps come with this tool integration like application for Google drive:
Edit your python file directly in your browser:
- Save it to Google Drive integrated with Google Drive
- Test it in your browser with Skulpt
- Use autocompletion code (CTRL+SPACE)
- No registration required and totally free
- Export your file
- Work offline
New python libraries partially supported: numpy, matplotlib.

Sunday, October 1, 2017

The capstone python module - disassembly framework.

The official python module comes with this info about this python module:
Capstone is a disassembly framework with the target of becoming the ultimate
the disasm engine for binary analysis and reversing in the security community.

Created by Nguyen Anh Quynh, then developed and maintained by a small community,
Capstone offers some unparalleled features:

- Support multiple hardware architectures: ARM, ARM64 (ARMv8), Mips, PPC & X86.

- Having clean/simple/lightweight/intuitive architecture-neutral API.

- Provide details on disassembled instruction (called “decomposer” by others).

- Provide semantics of the disassembled instruction, such as list of implicit
registers read & written.

- Implemented in pure C language, with lightweight wrappers for C++, Python,
Ruby, OCaml, C#, Java and Go available.

- Native support for Windows & *nix platforms (with OSX, Linux, *BSD & Solaris
have been confirmed).

- Thread-safe by design.

- Distributed under the open source BSD license.

Today I tested this python module with python version 2.7.
First I need to use a build of this python module from the official website.
I used binaries 32 bits like my python 2.7 and I tested with pip 2.7:
C:\Python27\Scripts>pip install capstone
Requirement already satisfied: capstone in c:\python27\lib\site-packages
Let's make a simple test with this python module:

C:\Python27>python.exe
Python 2.7.13 (v2.7.13:a06454b1afa1, Dec 17 2016, 20:42:59) [MSC v.1500 32 bit (Intel)] on win32
Type "help", "copyright", "credits" or "license" for more information.
>>> from capstone import (
...     Cs,
...     CS_ARCH_X86,
...     CS_MODE_32,
...     CS_OPT_SYNTAX_ATT,
... )
>>> mode=Cs(CS_ARCH_X86, CS_MODE_32)
>>> mode.syntax = CS_OPT_SYNTAX_ATT
>>> def D_ASM(code):
...     for address, size, mnemonic, op_str in mode.disasm_lite(code, offset=0x08048060):
...         print("0x{0:x}\t{1:d}\t{2:s}\t{3:s}".format(address, size,mnemonic, op_str))
...
>>> D_ASM(b"\xe1\x0b\x40\xb9\x20\x04\x81\xda\x20\x08\x02\x8b")
0x8048060       2       loope   0x804806d
0x8048062       1       incl    %eax
0x8048063       5       movl    $0xda810420, %ecx
0x8048068       2       andb    %cl, (%eax)
It seems to work very well.


Friday, September 22, 2017

The python-vlc python module.

The python module for vlc is named python-vlc.
This python module let you test libvlc API like the VLC video player.
You can install it easily with pip python tool.
C:\Python27\Scripts>pip2.7.exe install python-vlc
Collecting python-vlc
  Downloading python-vlc-1.1.2.tar.gz (201kB)
    100% |################################| 204kB 628kB/s
Installing collected packages: python-vlc
  Running setup.py install for python-vlc ... done
Successfully installed python-vlc-1.1.2
Let's see a simple example with this python module:
import os
import sys
import vlc
import pygame
 
def call_vlc(self, player):
 
    player.get_fps()
    player.get_time()
 
if len( sys.argv )< 2 or len( sys.argv )> 3:
        print 'Help: python vlc_001.py your_video.mp4'
else:
    pygame.init()
    screen = pygame.display.set_mode((800,600),pygame.RESIZABLE)
    pygame.display.get_wm_info()
    pygame.display.get_driver()

 
    # get path to movie specified as command line argument
    movie = os.path.expanduser(sys.argv[1])
    # see if movie is accessible
    if not os.access(movie, os.R_OK):
        print('Error: %s wrong read file: ' % movie)
        sys.exit(1)
 
    # make instane of VLC and create reference to movie.
    vlcInstance = vlc.Instance()
    media = vlcInstance.media_new(movie)
 
    # make new instance of vlc player
    player = vlcInstance.media_player_new()
 
    # start with a callback
    em = player.event_manager()
    em.event_attach(vlc.EventType.MediaPlayerTimeChanged, \
        call_vlc, player)
 
    # set pygame window id to vlc player
    win_id = pygame.display.get_wm_info()['window']
    if sys.platform == "win32": # for Windows
        player.set_hwnd(win_id)
 
    # load movie into vlc player instance
    player.set_media(media)
 
    # quit pygame mixer to allow vlc full access to audio device
    pygame.mixer.quit()
 
    # start movie play
    player.play()
 
    while player.get_state() != vlc.State.Ended:
        for event in pygame.event.get():
            if event.type == pygame.QUIT:
                sys.exit(2)
The base of this python script is to make an instance of vlc and put into the pygame display.
Another simple example:
C:\Python27>python.exe
Python 2.7.13 (v2.7.13:a06454b1afa1, Dec 17 2016, 20:42:59) [MSC v.1500 32 bit (Intel)] on win32
Type "help", "copyright", "credits" or "license" for more information.
>>> import vlc
>>> inst = vlc.Instance()
Warning: option --plugin-path no longer exists.
>>> med = inst.media_new('rain.mp4')
>>> p = med.player_new_from_media()
>>> p.play()
0
>>>

Tuesday, September 19, 2017

The numba python module - part 002 .

Today I tested how fast is jit from numba python and fibonacci math function.
You will see strange output I got for some values.
First example:
import numba
from numba import jit
from timeit import default_timer as timer

def fibonacci(n):
    a, b = 1, 1
    for i in range(n):
        a, b = a+b, a
    return a
fibonacci_jit = jit(fibonacci)

start = timer()
fibonacci(100)
duration = timer() - start

startnext = timer()
fibonacci_jit(100)
durationnext = timer() - startnext

print(duration, durationnext)
The result of this run is:
C:\Python27>python numba_test_003.py
(0.00018731270733896962, 0.167499256682878)

C:\Python27>python numba_test_003.py
(1.6357787798437412e-05, 0.1683614083221368)

C:\Python27>python numba_test_003.py
(2.245186560569841e-05, 0.1758382003097716)

C:\Python27>python numba_test_003.py
(2.3093347480146938e-05, 0.16714964906130353)

C:\Python27>python numba_test_003.py
(1.5395564986764625e-05, 0.17471143739730277)

C:\Python27>python numba_test_003.py
(1.5074824049540363e-05, 0.1847134227837042)
As you can see the fibonacci function is not very fast.
The jit - just-in-time compile is very fast.
Let's see if the python source code may slow down.
Let's see the new source code with jit will not work well:
import numba
from numba import jit
from timeit import default_timer as timer

def fibonacci(n):
    a, b = 1, 1
    for i in range(n):
        a, b = a+b, a
    return a
fibonacci_jit = jit(fibonacci)

start = timer()
print fibonacci(100)
duration = timer() - start

startnext = timer()
print fibonacci_jit(100)
durationnext = timer() - startnext

print(duration, durationnext)
The result is this:
C:\Python27>python numba_test_003.py
927372692193078999176
1445263496
(0.0002334994022992635, 0.17628787910376)

C:\Python27>python numba_test_003.py
927372692193078999176
1445263496
(0.0006886307922204926, 0.17579169287387408)

C:\Python27>python numba_test_003.py
927372692193078999176
1445263496
(0.0008105123483657127, 0.18209553525407973)

C:\Python27>python numba_test_003.py
927372692193078999176
1445263496
(0.00025466830415606486, 0.17186550306131188)

C:\Python27>python numba_test_003.py
927372692193078999176
1445263496
(0.0007348174871807866, 0.17523103771560608)
The result for value 100 is not the same: 927372692193078999176 and 1445263496.
The first problem is:
The problem is that numba can't intuit the type of lookup. If you put a print nb.typeof(lookup) in your method, you'll see that numba is treating it as an object, which is slow.
The second problem is the output but can be from the same reason.
I test with value 5 and the result is :
C:\Python27>python numba_test_003.py
13
13
13
13
(0.0007258367409385072, 0.17057997338491704)

C:\Python27>python numba_test_003.py
13
13
(0.00033709872502270044, 0.17213235952108247)

C:\Python27>python numba_test_003.py
13
13
(0.0004836773333341886, 0.17184433415945508)

C:\Python27>python numba_test_003.py
13
13
(0.0006854233828482501, 0.17381272129120037)

Monday, September 18, 2017

The numba python module - part 001 .

Today I tested the numba python module.
This python module allows us to speed up applications with high-performance functions written directly in Python.
The numba python module works by generating optimized machine code using the LLVM compiler infrastructure at import time, runtime, or statically.
The code can be just-in-time compiled to native machine instructions, similar in performance to C, C++ and Fortran.
For the installation I used the pip tool:
C:\Python27>cd Scripts

C:\Python27\Scripts>pip install numba
Collecting numba
  Downloading numba-0.35.0-cp27-cp27m-win32.whl (1.4MB)
    100% |################################| 1.4MB 497kB/s
...
Installing collected packages: singledispatch, funcsigs, llvmlite, numba
Successfully installed funcsigs-1.0.2 llvmlite-0.20.0 numba-0.35.0 singledispatch-3.4.0.3

C:\Python27\Scripts>pip install numpy
Requirement already satisfied: numpy in c:\python27\lib\site-packages
The example test from official website working well:
The example source code is:
from numba import jit
from numpy import arange

# jit decorator tells Numba to compile this function.
# The argument types will be inferred by Numba when function is called.
@jit
def sum2d(arr):
    M, N = arr.shape
    result = 0.0
    for i in range(M):
        for j in range(N):
            result += arr[i,j]
    return result

a = arange(9).reshape(3,3)
print(sum2d(a))
The result of this run python script is:
C:\Python27>python.exe numba_test_001.py
36.0
Another example using just-in-time compile is used with Numba’s jit function:
import numba
from numba import jit

def fibonacci(n):
    a, b = 1, 1
    for i in range(n):
        a, b = a+b, a
    return a

print fibonacci(10)

fibonacci_jit = jit(fibonacci)
print fibonacci_jit(14)
Also, you can use jit is as a decorator:
@jit
def fibonacci_jit(n):
    a, b = 1, 1
    for i in range(n):
        a, b = a+b, a

    return a
Numba is a complex python module because use compiling.
First, compiling takes time, but will work especially for small functions.
The Numba python module tries to do its best by caching compilation as much as possible though.
Another note: not all code is compiled equally.

YARA another python module - part 002 .

This is another part of YARA python tutorial and the goal of this part is to install the Yara modules.
This is another python module about Yara named yara-python from VirusTotal.
The last tutorial uses the Yara python module.
The YARA modules provide extending features to allow us to define data structures and functions which can be used in your rules to express more complex conditions.
You can also write your own modules.
Some known modules used by YARA are:
  • PE
  • ELF
  • Cuckoo
  • Magic
  • Hash
  • Math
First, you need to install or reinstall YARA to the last version:
>>> yara.__version__
'3.6.3'
The Cuckoo module enables you to create YARA rules based on behavioral information generated by a Cuckoo sandbox.
C:\Python27\Scripts>pip install yara-python
Collecting yara-python
  Downloading yara_python-3.6.3-cp27-cp27m-win32.whl (606kB)
    100% |################################| 614kB 1.3MB/s
Installing collected packages: yara-python
Successfully installed yara-python-3.6.3
pip install cuckoo
Collecting cuckoo
  Downloading Cuckoo-2.0.4.4.tar.gz (3.1MB)
    100% |################################| 3.1MB 255kB/s
...
Successfully installed Mako-1.0.7 alembic-0.8.8 androguard-3.0.1 beautifulsoup4-4.5.3 
capstone-windows-3.0.4 chardet-2.3.0 click-6.6 colorama-0.3.7 cuckoo-2.0.4.4 django-1.8.4 
django-extensions-1.6.7 dpkt-1.8.7 ecdsa-0.13 egghatch-0.2.1 elasticsearch-5.3.0 
flask-sqlalchemy-2.1 httpreplay-0.2.1 jsbeautifier-1.6.2 jsonschema-2.6.0 olefile-0.43 
oletools-0.42 peepdf-0.3.6 pefile2-1.2.11 pillow-3.2.0 pyelftools-0.24 pymisp-2.4.54 
pymongo-3.0.3 python-dateutil-2.4.2 python-editor-1.0.3 python-magic-0.4.12 pythonaes-1.0 
requests-2.13.0 sflock-0.2.16 sqlalchemy-1.0.8 tlslite-ng-0.6.0 unicorn-1.0.1 wakeonlan-0.2.2
Let's test this python module:
>>> import cuckoo
>>> from cuckoo import *
>>> dir(cuckoo)
['__builtins__', '__doc__', '__file__', '__name__', '__package__', '__path__', '__version__',
 'auxiliary', 'common', 'compat', 'core', 'machinery', 'misc', 'plugins', 'processing', 
'reporting', 'signatures', 'web']
Let's test some yara modules:
>>> import yara
>>> rule = yara.compile(source='import \"pe\"')
>>> rule = yara.compile(source='import \"elf\"')
>>> rule = yara.compile(source='import \"cuckoo\"')
>>> rule = yara.compile(source='import \"math\"')
I could not use the YARA modules: hash and magic.
I will solve this problem in the future.
You can also write your own modules ( see this webpage ).