analitics

Pages

Wednesday, July 19, 2017

PyCharm an integrated development environment.

The development team comes with this integrated development environment (I.D.E.) named: PyCharm.
They tell us about this integrated development environment:
Python IDE with a complete set of tools for productive development with Python programming language. In addition, the IDE provides high-class capabilities for professional Web development with Django framework and Google App Engine. It has powerful coding assistance, navigation, a lot of refactoring features, tight integration with various Version Control Systems, Unit testing, powerful all-singing all-dancing Debugger, and entire customization. PyCharm is developer driven IDE. It was developed with the aim of providing you almost everything you need for your comfortable and productive development!
I usually use it and from my point of view, it is very quick to learn and use.
Also, some features like Servers come is supported in the Professional edition only.
The menu is easy to remember and the project settings come automatically.
You can start from the main menu: File - New Project...
A little more complicated element is putting new scripts into the project File - New.
The python file can be added and the type of python version can by editing the configuration menu: Run - Edit Configurations...
The editor comes with unindent and convert fro tabs and spaces.
This I.D.E. comes with common version control operations integrations, like:
  • CVS Reference
  • Git Reference
  • Mercurial Reference
  • Perforce Reference
  • Subversion Reference
Also, some official tutorials can also be found on the official website.
You can read more about this software here.

The JetBrainsTV is the official youtube channel of this I.D.E.

Monday, July 10, 2017

Python tutor - web tool for python programming.

The website comes with this intro about this web tool.
Python Tutor, created by Philip Guo, helps people overcome a fundamental barrier to learning programming: understanding what happens as the computer runs each line of source code.
Using this tool, you can write Python, Java, JavaScript, TypeScript, Ruby, C, and C++ code in your web browser and visualize what the computer is doing step-by-step as it runs your code.
Over 3.5 million people in over 180 countries have used Python Tutor to visualize over 30 million pieces of code, often as a supplement to textbooks, lectures, and online tutorials.

I tested and worked very well.
You can use python programming language 2.7 and 3.6 versions.
No need to import python modules, you will get an error.
Just programming on the fly to test and see the result.
The website comes with some example to see how to deal with this tool.
Let's see some examples:

example with factorial :

# dumb recursive factorial
def fact(n):
    if (n <= 1):
        return 1
    else:
        return n * fact(n - 1)

print(fact(6))

example with for - else:

# find primes using a for-else construct
for n in range(2, 10):
    x_range = range(2, n)
    for x in x_range:
        if n % x == 0:
            break
    else:
        # loop fell through without finding a factor
        print(n)

example with inputs:

prefix = "Hello "

n1 = raw_input("Enter your name")

n2 = raw_input("Enter another name")

res = prefix + n1 + " and " + n2
print(res)

Run your script just press: Visualize Execution or Live Programming Mode buttons and the will run step by step with:
First, Back, Forward and Last.
One good feature of this tool - with a single line of JavaScript code, you can embed a Python Tutor visualization within any webpage.
Another good feature is COLLABORATE to learn together - this allow us to give and get direction with real-time python programming.
Can be a good tool for python chat users.
Let's show you a screenshot to see how this tool working with python scripting.

Sunday, July 9, 2017

The speech python module.

About this python module can be read here.
It's a little undocumented and I have not found tutorials about this python module but I tested with a simple example.
I'm sure he can do more than I tried with my example.
First, the install of this python module:
C:\Python27\Scripts>pip install speech
Collecting speech
  Downloading speech-0.5.2.tar.gz
Installing collected packages: speech
  Running setup.py install for speech ... done
Successfully installed speech-0.5.2
Let's see more about this python module:
>>> dir(speech)
['Listener', '_ListenerBase', '_ListenerCallback', '__builtins__', '__doc__', '__file__', '__name__', '__package__'
, '_constants', '_ensure_event_thread', '_eventthread', '_handlerqueue', '_listeners', '_recognizer', 
'_startlistening', '_voice', 'gencache', 'input', 'islistening', 'listenfor', 'listenforanything', 'pythoncom',
 'say', 'stoplistening', 'thread', 'time', 'win32com']>>> help(speech)
Help on module speech:

NAME
    speech - speech recognition and voice synthesis module.

FILE
    c:\python27\lib\site-packages\speech.py

DESCRIPTION
    Please let me know if you like or use this module -- it would make my day!

    speech.py: Copyright 2008 Michael Gundlach  (gundlach at gmail)
    License: Apache 2.0 (http://www.apache.org/licenses/LICENSE-2.0)

    For this module to work, you'll need pywin32 (http://tinyurl.com/5ezco9
    for Python 2.5 or http://tinyurl.com/5uzpox for Python 2.4) and
    the Microsoft Speech kit (http://tinyurl.com/zflb).


    Classes:
        Listener: represents a command to execute when phrases are heard.

    Functions:
        say(phrase): Say the given phrase out loud.
        input(prompt, phraselist): Block until input heard, then return text.
        stoplistening(): Like calling stoplistening() on all Listeners.
        islistening(): True if any Listener is listening.
        listenforanything(callback): Run a callback when any text is heard.
        listenfor(phraselist, callback): Run a callback when certain text is heard.
Let's make a simple example with one script that tells us something:
>>> speech.say('Hello Catalin George')
The result of this line of code will be heard into your audio device like Hello Catalin George.

Saturday, July 8, 2017

Python Qt4 - part 006.

Today I will deal with QFileDialog widget.
You can read the more about this widget here.
This allows us to open a dialog to load a resource - a file.
The example comes with the base PyQt4 application window with a my_example dialog from fileDialogSample python class.
Into this python class, I have some variable for the file: file_name, data and my_file_open.
The my_text_edit for text area and my_button to open the QFileDialog.
Also, the vbox variable to put all on QVBoxLayout from the application.
Let's see the example:
import sys
from PyQt4 import QtGui
from PyQt4 import QtCore

class fileDialogSample(QtGui.QWidget):
    def __init__(self):
        QtGui.QWidget.__init__(self)

        #make text area and button
        self.my_text_edit = QtGui.QTextEdit()
        self.my_button = QtGui.QPushButton('Select File', self)

        #open the showDialog
        self.my_button.clicked.connect(self.showDialog)

        #put all into application area
        vbox = QtGui.QVBoxLayout()
        vbox.addWidget(self.my_text_edit)
        vbox.addWidget(self.my_button)
        self.setLayout(vbox)

        #set title and geometry of application
        self.setWindowTitle('File Dialog example')
        self.setGeometry(50, 50, 300, 300)

    #make a function with seeting for my QFileDialog
    def showDialog(self):
        file_name = QtGui.QFileDialog.getOpenFileName(self, 'Open file', 'C://')
        my_file_open = open(file_name)
        data = my_file_open.read()
        self.my_text_edit.setText(data)
        my_file_open.close()

#run the application 
app = QtGui.QApplication(sys.argv)
my_dialog = fileDialogSample()
my_dialog.show()
sys.exit(app.exec_())
Now, just press the Select File button, take a text file and open it.

Friday, July 7, 2017

Python Qt4 - part 005.

Another example with PyQt4 that allow seeing images over the internet.
Here's another simple example with PyQt4 that allows you to view images on the internet.
You can use any image on the internet to display with this python script.
This example is done in two steps:
  • take a single image from the internet - httplib python module;
  • displaying - PyQt4 python module
from PyQt4 import QtGui
import sys
import httplib

def getTempPNG():
   conn = httplib.HTTPConnection("www.meteoromania.ro")
   conn.request("GET", "/sateliti/img/id814/id814_2017070718.png")
   return conn.getresponse().read()

def main():
   app = QtGui.QApplication(sys.argv)
   png = getTempPNG()
   pixmap = QtGui.QPixmap()
   pixmap.loadFromData(png)
   label = QtGui.QLabel()
   label.setPixmap(pixmap)
   label.setWindowTitle('METEOSAT-10 Thermal Infrared Channel 10.8 micrometers Glowing temperature')
   label.show()
   app.exec_()

if __name__ == '__main__':
   main()
The result can be seen in this screenshot:

Python Qt4 - part 004.

Another tutorial about PyQt4 with QLCDNumber widget displays a number with LCD-like digits.
This tutorial will show you how to deal with this widget.
First, you need to know more about QLCDNumber, so take a look here.
The first example is very simple and will show just one digit, see:
import sys
from PyQt4.QtCore import *
from PyQt4.QtGui import *

class Digit(QWidget):

    def __init__(self, parent=None):
        QWidget.__init__(self, parent)
        self.setWindowTitle("One digit")
        lcd = QLCDNumber(self)

app = QApplication(sys.argv)
ls = Digit()
ls.show()
sys.exit(app.exec_())
Now, the next step is to send data to this digit.
One good example is with one slider.
The position of the slider will be send to the QLCDNumber.
How can do that? Will need a vbox to put the QLCDNumber and the slider and then using signal and slot.
Let's see the example:
import sys
from PyQt4.QtCore import *
from PyQt4.QtGui import *
class Digit(QWidget):

    def __init__(self, parent=None):
        QWidget.__init__(self, parent)
        #make widgets
        self.setWindowTitle("One digit with slider")
        lcd = QLCDNumber(self)
        slider = QSlider(Qt.Horizontal, self)
        #set layout variable vbox
        vbox = QVBoxLayout()
        #add widgests
        vbox.addWidget(lcd)
        vbox.addWidget(slider)
        #set the vbox to layout
        self.setLayout(vbox)
        #create signal to slot
        self.connect(slider, SIGNAL("valueChanged(int)"),lcd, SLOT("display(int)"))
        self.resize(200, 170)
if __name__ == '__main__':
    app = QApplication(sys.argv)
    ls = Digit()
    ls.show()
    sys.exit(app.exec_())
In the source code in the example, you can see the comments that mark the steps of creating and executing the python script.
Let's try another example with a digital clock:
import sys
from PyQt4 import QtCore, QtGui

class digital_clock(QtGui.QLCDNumber):
    def __init__(self, parent=None):
        super(digital_clock, self).__init__(parent)
        self.setSegmentStyle(QtGui.QLCDNumber.Filled)
        #the defaul is 5 , change to 8 for seconds
        self.setDigitCount(5)
        self.setWindowTitle("Digital Clock")
        self.resize(200, 70)
        timer = QtCore.QTimer(self)
        timer.timeout.connect(self.showTime)
        timer.start(1000)
        self.showTime()

    def showTime(self):
        time = QtCore.QTime.currentTime()
        text = time.toString('hh:mm')
        #if you setDigitsCount to 8
        #uncomment the next line of code
        #text = time.toString('hh:mm:ss')
        if (time.second() % 2) == 0:
            text = text[:2] + ' ' + text[3:]
        self.display(text)

if __name__ == '__main__':
    app = QtGui.QApplication(sys.argv)
    clock = digital_clock()
    clock.show()
    sys.exit(app.exec_())
If you want to see seconds, then you need to set the digit count of the LCD to 8 ( it's 5 by default) of setDigitCount.
Also you need to uncomment this line of code: text = time.toString('hh:mm:ss') and comment the old one.
You can solve multiple issues with this widget, like: stopwatch, timer, clock down timer ...

Thursday, July 6, 2017

Python Qt4 - part 003.

Today I've taken a simple example with PyQt4 compared to the other tutorials we have done so far.
The main reason was to understand and use PyQt4 to display an important message.
To make this example I have set the following steps for my python program.
  • importing python modules
  • creating the application in PyQt4 as a tray icon class
  • establishing an exit from the application
  • setting up a message to display
  • display the message over a period of time
  • closing the application
  • running the python application
Let's see my source code of my python application:
#! /usr/bin/env python
import sys
from PyQt4 import QtGui, QtCore

class SystemTrayIcon(QtGui.QSystemTrayIcon):
    def __init__(self, parent=None):
        QtGui.QSystemTrayIcon.__init__(self, parent)
        self.setIcon(QtGui.QIcon("mess.svg"))
        menu = QtGui.QMenu(parent)
        exitAction = menu.addAction("Exit")
        self.setContextMenu(menu)
        QtCore.QObject.connect(exitAction,QtCore.SIGNAL('triggered()'), self.exit)

    def click_trap(self, value):
        if value == self.Trigger: #left click!
            self.left_menu.exec_(QtGui.QCursor.pos())

    def welcome(self):
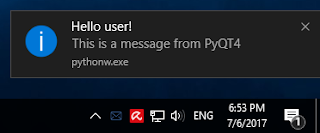
        self.showMessage("Hello user!", "This is a message from PyQT4")

    def show(self):
        QtGui.QSystemTrayIcon.show(self)
        QtCore.QTimer.singleShot(600, self.welcome)

    def exit(self):
        QtCore.QCoreApplication.exit()

def main():
    app = QtGui.QApplication([])
    tray = SystemTrayIcon()
    tray.show()
    app.exec_()

if __name__ == '__main__':
    main()
I used PyQt4 python module to make the application and sys python module for exit from application.
About running application: the main function will run the application.
The python class SystemTrayIcon will work only if we used QApplication to make like any application.
This is the reason I used the variable app.
The tray variable is used to run it like tray icon application.
Into the SystemTrayIcon class, I put some functions to help me with my issue.
Under __init__ I used all settings for my tray icon application: the icon, the exit menu, signal for the exit.
The next functions come with:
  • click_trap - take the click of the user ;
  • welcome - make a message to display;
  • show - display the welcome message;
  • exit - exit from the application
The result of my python script is this message:

About the showMessage then this helps you:

QSystemTrayIcon.showMessage (self, QString title, QString msg, MessageIcon icon = QSystemTrayIcon.Information, int msecs = 10000)

Shows a balloon message for the entry with the given title, message and icon for the time specified in millisecondsTimeoutHint. title and message must be plain text strings.
The message can be clicked by the user; the messageClicked() signal will be emitted when this occurs.
Note that the display of messages is dependent on the system configuration and user preferences and that messages may not appear at all. Hence, it should not be relied upon as the sole means for providing critical information.
On Windows, the millisecondsTimeoutHint is usually ignored by the system when the application has focus.
On Mac OS X, the Growl notification system must be installed for this function to display messages.
This function was introduced in Qt 4.3.

Tuesday, July 4, 2017

The pdb python interactive debugging - part 001.

This is a short intro tutorial on python debugger to summarize this topic related to Python.
According to the development team, this python module called pdb has the following objectives:
The module pdb defines an interactive source code debugger for Python programs. It supports setting (conditional) breakpoints and single stepping at the source line level, inspection of stack frames, source code listing, and evaluation of arbitrary Python code in the context of any stack frame. It also supports post-mortem debugging and can be called under program control.

Let's start it with some example:
C:\Python27>python
Python 2.7.13 (v2.7.13:a06454b1afa1, Dec 17 2016, 20:42:59) [MSC v.1500 32 bit (Intel)] on win32
Type "help", "copyright", "credits" or "license" for more information.
>>> import pdb
>>> pdb.pm()
Traceback (most recent call last):
  File "", line 1, in 
  File "C:\Python27\lib\pdb.py", line 1270, in pm
    post_mortem(sys.last_traceback)
AttributeError: 'module' object has no attribute 'last_traceback'
>>> import os
>>> pdb.pm()
> c:\python27\lib\pdb.py(1270)pm()
-> post_mortem(sys.last_traceback)
(Pdb) ?

Documented commands (type help ):
========================================
EOF    bt         cont      enable  jump  pp       run      unt
a      c          continue  exit    l     q        s        until
alias  cl         d         h       list  quit     step     up
args   clear      debug     help    n     r        tbreak   w
b      commands   disable   ignore  next  restart  u        whatis
break  condition  down      j       p     return   unalias  where

Miscellaneous help topics:
==========================
exec  pdb

Undocumented commands:
======================
retval  rv
As you can see, this module will work correctly with just another python module. In the example presented above is the os python module.
With the argument? we can see the commands that we can execute.
Let's see the list command ( l ):
(Pdb) l
1265        p = Pdb()
1266        p.reset()
1267        p.interaction(None, t)
1268
1269    def pm():
1270 ->     post_mortem(sys.last_traceback)
1271
1272
1273    # Main program for testing
1274
1275    TESTCMD = 'import x; x.main()'
You can see the pm function loaded by pdb python module.
Post-mortem debugging is a method that requires an environment that provides dynamic execution of code.
One of the greatest benefits of post-mortem debugging is that you can use it directly after something has gone wrong.
You can move between frames within the current call stack using up and down.
This moves towards older frames on the stack.
The debugger prints the current location with where, see example:
(Pdb) where
  (1)()
> c:\python27\lib\pdb.py(1270)pm()
-> post_mortem(sys.last_traceback)
To execute the current line and then stop at the next execution point use step.
The until command can be used to step past the end of a loop.
Use break command used for setting breakpoints, example: (Pdb) break 4.
Turning off a breakpoint with disabling tells the debugger not to stop when that line is reached, example: (Pdb) disable 1.
Also, we can have the other breakpoints like conditional breakpoints and temporary breakpoint.
Use clear to delete a breakpoint entirely.
Changing execution flow with the jump command lets you alter the flow of your program.
The jump can be ahead and back and moves the point of execution past the location without evaluating any of the statements in between.
We can also have illegal jumps in and out of certain flow control statements prevented by the debugger.
When the debugger reaches the end of your program, it automatically starts it over.
With run command, the program can be restarted.
We can avoid typing complex commands repeatedly by using alias and unalias to define the shortcuts.
The pdb python module lets you save configuration using text files read and interpreted on startup.

Friday, June 30, 2017

Blender 3D - bpy and scripting - part 001.

The tutorial for today is bpy python module used by Blender 3D software for scripting.
The last Application Programming Interface (A.P.I.) for Blender 3D can be found here.
You need to take a look at the link to see the base of this python module.
The example I will start today is a python script that helps me to deal with Blender 3D.
First I put the script named catafest.py into Blender 3D path: C:\Program Files\Blender Foundation\Blender\2.78\python\lib.
The reason is to be load by Blender 3D application.
Let's start with the script:
First, you need to import the Blender 3D python module named bpy.
This allows us to deal with Blender 3D using python and Application Programming Interface (A.P.I.).
The script is an example not a lib script for Blender 3D.
The goal of this script is to show how to deal with python scripting into Blender 3D.
If you want to make a lib for the Blender 3D then you need to read about Python’s standard library - here.
My script just creates materials. To do that I used functions to make materials - mat, set the material to the object - set_mat and the run function to see how is working.
Let's see the python script:
import bpy

def mat(name,df_col,df_sh,df_int,sp_col,sp_sh,sp_int,alp,amb):
    mat = bpy.data.materials.new(name)
    mat.diffuse_color = df_col
    mat.diffuse_shader = df_sh
    mat.diffuse_intensity = df_int
    mat.specular_color = sp_col
    mat.specular_shader = sp_sh
    mat.specular_intensity = sp_int
    mat.alpha = alp
    mat.ambient = amb
    return mat

def set_mat(ob, mat):
    me = ob.data
    me.materials.append(mat)

def run(origin):
    # create two materials
    red = mat('Red', (1,0,0),'LAMBERT',1.0,(1,1,1),'COOKTORR',0.5, 1,1)
    blue = mat('Green', (0,1,0),'LAMBERT',1.0,(0,0.5,0.5),'COOKTORR',0.5, 1, 0.5)

    # create red cube
    bpy.ops.mesh.primitive_cube_add(location=origin)
    set_mat(bpy.context.object, red)
    # create a green torus
    bpy.ops.mesh.primitive_torus_add(location=origin)
    bpy.ops.transform.translate(value=(1,0,0))
    set_mat(bpy.context.object, blue)

if __name__ == "__main__":
    run((0,0,0))
To run this script put the script into the lib path of Blender 3D software.
Open the Blender 3D and go to the scripting area:

Now about the source code of this script.
As you know the Blender 3D interface let you add and change objects and materials.
Each material comes with a name, colors with a diffuse and specular property, alpha color, ambient color, etc. see the documentation.
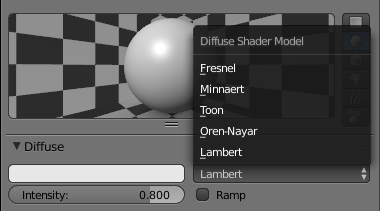
Some values come like strings and can get it from Blender 3D interface, see:
diffuse_shader 
and the
specular_shader
.
The set_mat function just load one object using: me = ob.data
Then put the material to object using append function.
The run function is used to show the result with how to make materials, create objects with this materials.
I run into Blender 3D - Console area:
YTHON INTERACTIVE CONSOLE 3.5.2 (default, Dec  1 2016, 20:58:16) [MSC v.1800 64 bit (AMD64)]

Command History:     Up/Down Arrow
Cursor:              Left/Right Home/End
Remove:              Backspace/Delete
Execute:             Enter
Autocomplete:        Ctrl-Space
Zoom:                Ctrl +/-, Ctrl-Wheel
Builtin Modules:     bpy, bpy.data, bpy.ops, bpy.props, bpy.types, bpy.context, bpy.utils, bgl, blf, mathutils
Convenience Imports: from mathutils import *; from math import *
Convenience Variables: C = bpy.context, D = bpy.data

>>> import catafest 
>>> dir(catafest)
['__builtins__', '__cached__', '__doc__', '__file__', '__loader__', '__name__', '__package__', '__spec__',
 'bpy', 'mat', 'run', 'set_mat']

>>> catafest.run((0,0,0))
This is the result of the script:


Wednesday, June 28, 2017

The Google API Client Library python module.

This python module named Google API Client Library for Python is a client library for accessing the Plus, Moderator, and many other Google APIs, according to the official link.
C:\Python27\Scripts>pip install --upgrade google-api-python-client
Collecting google-api-python-client
  Downloading google_api_python_client-1.6.2-py2.py3-none-any.whl (52kB)
    100% |################################| 61kB 426kB/s
...
Successfully installed google-api-python-client-1.6.2 ...
The example I used is this:
from oauth2client.client import flow_from_clientsecrets
import httplib2
import apiclient
from apiclient.discovery import build
from oauth2client.file import Storage
import webbrowser

def get_credentials():
    scope = 'https://www.googleapis.com/auth/blogger'
    flow = flow_from_clientsecrets(
        'client_id.json', scope,
        redirect_uri='urn:ietf:wg:oauth:2.0:oob')
    storage = Storage('credentials.dat')
    credentials = storage.get()

    if  not credentials or credentials.invalid:
        auth_uri = flow.step1_get_authorize_url()
        webbrowser.open(auth_uri)
        auth_code = raw_input('Enter the auth code: ')
        credentials = flow.step2_exchange(auth_code)
        storage.put(credentials)
    return credentials

def get_service():
    """Returns an authorised blogger api service."""
    credentials = get_credentials()
    http = httplib2.Http()
    http = credentials.authorize(http)
    service = apiclient.discovery.build('blogger', 'v3', http=http)
    return service

if __name__ == '__main__':
    served = get_service()
    print dir(served.blogs)
    users = served.users()

    # Retrieve this user's profile information
    thisuser = users.get(userId='self').execute()
    print('This user\'s display name is: %s' % thisuser['displayName'].encode('utf-8'))

    blogs = served.blogs()

    # Retrieve the list of Blogs this user has write privileges on
    thisusersblogs = blogs.listByUser(userId='self').execute()
    for blog in thisusersblogs['items']:
        print('The blog named \'%s\' is at: %s' % (blog['name'], blog['url']))
The result of this script is this:
C:\Python27>python.exe google_001.py
['__call__', '__class__', '__cmp__', '__delattr__', '__doc__', '__format__', '__func__', 
'__get__', '__getattribute__', '__hash__', '__init__', '__is_resource__', '__new__', 
'__reduce__', '__reduce_ex__', '__repr__', '__self__', '__setattr__', '__sizeof__', 
'__str__', '__subclasshook__', 'im_class', 'im_func', 'im_self']
This user's display name is: Cătălin George Feștilă
The blog named 'python-catalin' is at: http://python-catalin.blogspot.com/
The blog named 'graphics' is at: http://graphic-3d.blogspot.com/
The blog named 'About me and my life ...' is at: http://catalin-festila.blogspot.com/
The blog named 'pygame-catalin' is at: http://pygame-catalin.blogspot.com/
About google settings then you need to have a google account to use Google’s API.
The first step for accessing the Google Developer’s Console.
Then navigate to the Developer Console’s projects page and create a new project for our application by clicking the Create project button and then enable blogger API.
Enter your projects name and hit create.
Click the Go to Credentials button with these settings like in the next image:

Download this credential information in JSON format, in this case, is the client_id.json file.
When you run for the first time this script you will see an open HTML page with your auth code.
The script example named google_001.py will come with this message:
C:\Python27>python.exe google_001.py
C:\Python27\lib\site-packages\oauth2client\_helpers.py:255: UserWarning: Cannot access credentials.dat: No such file or directory
  warnings.warn(_MISSING_FILE_MESSAGE.format(filename))
Enter the auth code:
Put this auth code and allow the script using the open page and your google account using Allow button.
Now you can run the example.


The pyquery python module.

This tutorial is about pyquery python module and python 2.7.13 version.
First I used pip command to install it.
C:\Python27>cd Scripts

C:\Python27\Scripts>pip install pyquery
Collecting pyquery
  Downloading pyquery-1.2.17-py2.py3-none-any.whl
Requirement already satisfied: lxml>=2.1 in c:\python27\lib\site-packages (from pyquery)
Requirement already satisfied: cssselect>0.7.9 in c:\python27\lib\site-packages (from pyquery)
Installing collected packages: pyquery
Successfully installed pyquery-1.2.17
I try to install with pip and python 3.4 version but I got errors.
The development team tells us about this python module:
pyquery allows you to make jquery queries on xml documents. The API is as much as possible the similar to jquery. pyquery uses lxml for fast xml and html manipulation.
Let's try a simple example of this python module.
The base of this example is found links by HTML tag.
from pyquery import PyQuery
 
seeds = [
    'https://twitter.com',
    'http://google.com'
]
 
crawl_frontiers = []
 
def start_crawler():
    crawl_frontiers = crawler_seeds()
 
    print(crawl_frontiers)
 
def crawler_seeds():
    frontiers = []
    for index, seed in enumerate(seeds):
        frontier = {index: read_links(seed)}
        frontiers.append(frontier)
 
    return frontiers
 
def read_links(seed):
    crawler = PyQuery(seed)
    return [crawler(tag_a).attr("href") for tag_a in crawler("a")]
 
start_crawler()
The read_links function takes links from seeds array.
To do that, I need to read the links and put in into another array crawl_frontiers.
The frontiers array is used just for crawler process.
Also, this simple example allows you to understand better the arrays.
You can read more about this python module here.

Saturday, June 17, 2017

Translate with goslate python module .

This python module comes with many features and this is the main reason I make this tutorial.
We can read about this python module here.
Google has updated its translation service recently with a ticket mechanism to prevent simple crawler program like goslate from accessing.
Though a more sophisticated crawler may still work technically, however it would have crossed the fine line between using the service and breaking the service. goslate will not be updated to break google’s ticket mechanism. Free lunch is over. Thanks for using.


Let's install this python module with python 2.7 version and pip:

C:\Python27>cd Scripts

C:\Python27\Scripts>pip install goslate
Collecting goslate
  Downloading goslate-1.5.1.tar.gz
Requirement already satisfied: futures in c:\python27\lib\site-packages (from goslate)
Installing collected packages: goslate
  Running setup.py install for goslate ... done
Successfully installed goslate-1.5.1
Let's test a simple example from English to Romanian:
C:\Python27>python.exe
Python 2.7.13 (v2.7.13:a06454b1afa1, Dec 17 2016, 20:42:59) [MSC v.1500 32 bit (Intel)] on win32
Type "help", "copyright", "credits" or "license" for more information.
>>> import goslate
>>> gs = goslate.Goslate()
>>> print(gs.translate('I\'m not here','ro'))
Eu nu sunt aici
Using detail dictionary explanation for a single word/phrase:
>>> gs.lookup_dictionary('internet', 'ro')
[[[u'Internet', u'internet', None, None, 2]], [[u'noun', [u'Internet'], [[u'Internet', 
[u'Internet'], None, 0.43686765]], u'Internet', 1]], u'en', None, None, None, 0.73151749,
 None, [[u'en'], None, [0.73151749], [u'en']]]
In my opinion, I have no idea what they might use, perhaps in chat applications, specific translations, and text detection.

Friday, June 16, 2017

Python Qt4 - part 002.

This tutorial covers only part of the practice of using G.U.I. (graphical user interface) elements in PyQt4.
First of all, I will start with the theory and then I will simply exemplify how these work.
There are three basic elements called: Event, Signal, and Slot.
Since all GUI applications are driven by events, we will have several elements interconnected with signals and slots.
What do we need to know?
Events are generated mainly by the user of an application into the event processing system.
The event processing system in PyQt4 is built with the signal and slot mechanism.
The event processing system is an event model with three participants:
  • event source 
  • event object 
  • event target 
Signals and slots are used for communication between objects.
A signal is emitted when something of potential interest happens.
If a signal is connected to a slot then the slot is called when the signal is emitted.
Rules of signals and slots:
  • A signal may be connected to many slots.
  • A signal may also be connected to another signal.
  • Signal arguments may be any Python type.
  • A slot may be connected to many signals.
  • Connections may be direct (ie. synchronous) or queued (ie. asynchronous).
  • Connections may be made across threads.
  • Signals may be disconnected.
A signal (specifically an unbound signal) is an attribute of a class that is a subclass of QObject.
Signals are connected to slots using the connect() method of a bound signal.
Signals are disconnected from slots using the disconnect() method of a bound signal.
Signals are emitted from using the emit() method of a bound signal.
Example of a signal used into the myclassapp PyQt4 application:
I create a new signal called closeApp.
closeApp = QtCore.pyqtSignal()
This signal is emitted during a mouse press event.
def mousePressEvent(self, event):
    self.myclassapp.closeApp.emit()
The signal is connected to the close() slot of the QtGui.QMainWindow.
self.myclassapp.closeApp.connect(self.close)
I did not show the entire example here because the reason was to show the direct connection between the signal, the event and the slot.
The events are functions or methods are executed in response to user’s actions like clicking on a button, selecting an item from a collection or a mouse click etc.
Another simple example with o application with two buttons:
import sys
from PyQt4.QtCore import *
from PyQt4.QtGui import *

def window():
   app = QApplication(sys.argv)
   win = QDialog()
   mybutton1= QPushButton(win)
   mybutton1.setText("Button1")
   mybutton1.move(50,20)
   mybutton1.clicked.connect(mybutton1_clicked)

   mybutton2= QPushButton(win)
   mybutton2.setText("Button2")
   mybutton2.move(50,50)
   QObject.connect(mybutton2,SIGNAL("clicked()"),mybutton2_clicked)

   win.setGeometry(100,100,200,100)
   win.setWindowTitle("PyQt Event Signal Slot")
   win.show()
   sys.exit(app.exec_())

def mybutton1_clicked():
   print "Button 1 clicked"

def mybutton2_clicked():
   print "Button 2 clicked"

if __name__ == '__main__':
   window()
The result of clicking on these buttons is something like that:
Button 2 clicked
Button 2 clicked
Button 1 clicked
Button 1 clicked
Button 1 clicked
Button 2 clicked
Button 1 clicked
Button 2 clicked
All widgets used to build the G.U.I. (graphical user interface) act as the source of such events, see the mybutton1 source code part.
Now about this part of the source code, I just used to exemplify how the signals are connected to the slots:
QObject.connect(mybutton2,SIGNAL("clicked()"),mybutton2_clicked)
So each PyQt widget (which is derived from QObject class) is designed to emit a signal in response to one or more events.
The signal on its own does not perform any action. Instead, it is connected to a slot. The slot can be any callable Python function.
And this part of the source code is exemplified with mybutton2.
Signals are complex due to their use (how they are used).
More theory about the signals.
To send a signal across threads we have to use the Qt.QueuedConnection parameter.
There is also a special form of a PyQt4 signal known as a short-circuit signal.
The short-circuit signals implicitly declare each argument as being of type PyQt_PyObject.
Short-circuit signals do not have a list of arguments or the surrounding parentheses.
Short-circuit signals may only be connected to slots that have been implemented in Python.
They cannot be connected to Qt slots or the Python callables that wrap Qt slots.
The older style of connecting signals and slots will continue to be supported throughout the life of PyQt4.