analitics

Pages

Saturday, March 4, 2017

Working with datetime python module.

This module is very good and I worked with this issue by using MySQL and python.
The version of python I used is 2.7 under Fedora distro.
You can take a look at the official page.
I use the pip and not the DNF fedora Linux tool.
 
[root@localhost lucru]# pip install datetime
Collecting datetime
Downloading DateTime-4.1.1.zip (66kB)
100% |████████████████████████████████| 71kB 703kB/s 
Collecting zope.interface (from datetime)
Downloading zope.interface-4.3.3.tar.gz (150kB)
100% |████████████████████████████████| 153kB 2.2MB/s 
Collecting pytz (from datetime)
Downloading pytz-2016.10-py2.py3-none-any.whl (483kB)
100% |████████████████████████████████| 491kB 2.4MB/s 
Requirement already satisfied: setuptools in /usr/lib/python2.7/site-packages (from zope.interface->datetime)
Installing collected packages: zope.interface, pytz, datetime
Running setup.py install for zope.interface ... done
Running setup.py install for datetime ... done
Successfully installed datetime-4.1.1 pytz-2016.10 zope.interface-4.3.3

I solve this problem:
  • conversion using the lambda function
    parser.add_argument('date', type=lambda s: datetime.datetime.strptime(s, '%Y-%m-%d'))
  • solve last day
    datetime.datetime.strptime(new_value, '%Y-%m-%d %H:%M:%S')-timedelta(days=1)
  • print the today date
    print date.today()
  • show date using an explicit format string
    today=date.today()
    today.strftime("%A %d. %B %Y")
    'Sunday 05. March 2017'
    
  • using epoch issue [1]
    from datetime import datetime
    now_epoch = (datetime.utcnow() - datetime(1970, 1, 1)).total_seconds()
    datetime.utcfromtimestamp(now_epoch)
    datetime.datetime(2017, 3, 4, 22, 35, 13, 463409)
    datetime.fromtimestamp(now_epoch)
    datetime.datetime(2017, 3, 5, 0, 35, 13, 463409)
    import pytz
    datetime.fromtimestamp(now_epoch, pytz.utc)
    datetime.datetime(2017, 3, 4, 22, 35, 13, 463409, tzinfo=)
    
[1] The Unix epoch is the time 00:00:00 UTC on 1 January 1970. There is a problem with this definition, in that UTC did not exist in its current form until 1972;

Using pygeoip and maxmin database.


I try to locate one IP using the databases from maxmind website and is not good for me.
The database records show me the output from country area.
I read the docs from here.
This is the python script I used:
#wget -N -q http://geolite.maxmind.com/download/geoip/database/GeoLiteCity.dat.gz
import pygeoip 
gip = pygeoip.GeoIP('GeoLiteCity.dat')
rec = gip.record_by_addr('___________________')
for key,val in rec.items():
    print "%s: %s" %(key,val)

Saturday, February 25, 2017

Linux: OpenCV and using Lucas-Kanade Optical Flow function.

Fist I install OpenCV python module and I try using with Fedora 25.
I used python 2.7 version.
[root@localhost mythcat]# dnf install opencv-python.x86_64 
Last metadata expiration check: 0:21:12 ago on Sat Feb 25 23:26:59 2017.
Dependencies resolved.
================================================================================
 Package              Arch          Version                Repository      Size
================================================================================
Installing:
 opencv               x86_64        3.1.0-8.fc25           fedora         1.8 M
 opencv-python        x86_64        3.1.0-8.fc25           fedora         376 k
 python2-nose         noarch        1.3.7-11.fc25          updates        266 k
 python2-numpy        x86_64        1:1.11.2-1.fc25        fedora         3.2 M

Transaction Summary
================================================================================
Install  4 Packages

Total download size: 5.6 M
Installed size: 29 M
Is this ok [y/N]: y
Downloading Packages:
(1/4): opencv-python-3.1.0-8.fc25.x86_64.rpm    855 kB/s | 376 kB     00:00    
(2/4): opencv-3.1.0-8.fc25.x86_64.rpm           1.9 MB/s | 1.8 MB     00:00    
(3/4): python2-nose-1.3.7-11.fc25.noarch.rpm    543 kB/s | 266 kB     00:00    
(4/4): python2-numpy-1.11.2-1.fc25.x86_64.rpm   2.8 MB/s | 3.2 MB     00:01    
--------------------------------------------------------------------------------
Total                                           1.8 MB/s | 5.6 MB     00:03     
Running transaction check
Transaction check succeeded.
Running transaction test
Transaction test succeeded.
Running transaction
  Installing  : python2-nose-1.3.7-11.fc25.noarch                           1/4 
  Installing  : python2-numpy-1:1.11.2-1.fc25.x86_64                        2/4 
  Installing  : opencv-3.1.0-8.fc25.x86_64                                  3/4 
  Installing  : opencv-python-3.1.0-8.fc25.x86_64                           4/4 
  Verifying   : opencv-python-3.1.0-8.fc25.x86_64                           1/4 
  Verifying   : opencv-3.1.0-8.fc25.x86_64                                  2/4 
  Verifying   : python2-numpy-1:1.11.2-1.fc25.x86_64                        3/4 
  Verifying   : python2-nose-1.3.7-11.fc25.noarch                           4/4 

Installed:
  opencv.x86_64 3.1.0-8.fc25            opencv-python.x86_64 3.1.0-8.fc25       
  python2-nose.noarch 1.3.7-11.fc25     python2-numpy.x86_64 1:1.11.2-1.fc25    

Complete!
[root@localhost mythcat]# 
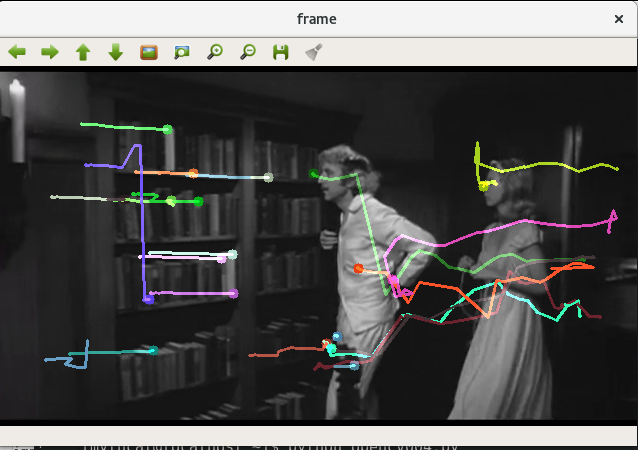
This is my test script with opencv to detect flow using Lucas-Kanade Optical Flow function.
This tracks some points in a black and white video.
First you need:
- one black and white video;
- not mp4 file type file;
- the color args need to be under 4 ( see is 3);
- I used this video:
I used cv2.goodFeaturesToTrack().
We take the first frame, detect some Shi-Tomasi corner points in it, then we iteratively track those points using Lucas-Kanade optical flow.
The function cv2.calcOpticalFlowPyrLK() we pass the previous frame, previous points and next frame.
The returns next points along with some status numbers which has a value of 1 if next point is found, else zero.
That iteratively pass these next points as previous points in next step.
See the code below:
import numpy as np
import cv2

cap = cv2.VideoCapture('candle')

# params for ShiTomasi corner detection
feature_params = dict( maxCorners = 77,
                       qualityLevel = 0.3,
                       minDistance = 7,
                       blockSize = 7 )

# Parameters for lucas kanade optical flow
lk_params = dict( winSize  = (17,17),
                  maxLevel = 1,
                  criteria = (cv2.TERM_CRITERIA_EPS | cv2.TERM_CRITERIA_COUNT, 10, 0.03))

# Create some random colors
color = np.random.randint(0,255,(100,3))

# Take first frame and find corners in it
ret, old_frame = cap.read()
old_gray = cv2.cvtColor(old_frame, cv2.COLOR_BGR2GRAY)
p0 = cv2.goodFeaturesToTrack(old_gray, mask = None, **feature_params)

# Create a mask image for drawing purposes
mask = np.zeros_like(old_frame)

while(1):
    ret,frame = cap.read()
    frame_gray = cv2.cvtColor(frame, cv2.COLOR_BGR2GRAY)

    # calculate optical flow
    p1, st, err = cv2.calcOpticalFlowPyrLK(old_gray, frame_gray, p0, None, **lk_params)

    # Select good points
    good_new = p1[st==1]
    good_old = p0[st==1]

    # draw the tracks
    for i,(new,old) in enumerate(zip(good_new,good_old)):
        a,b = new.ravel()
        c,d = old.ravel()
        mask = cv2.line(mask, (a,b),(c,d), color[i].tolist(), 2)
        frame = cv2.circle(frame,(a,b),5,color[i].tolist(),-1)
    img = cv2.add(frame,mask)

    cv2.imshow('frame',img)
    k = cv2.waitKey(30) & 0xff
    if k == 27:
        break

    # Now update the previous frame and previous points
    old_gray = frame_gray.copy()
    p0 = good_new.reshape(-1,1,2)

cv2.destroyAllWindows()
cap.release()
The output of this file is:
Thursday, February 23, 2017

The bad and good urllib.

This is a simple python script:
import urllib
opener = urllib.FancyURLopener({})
f = opener.open("http://www.ra___aer.ro/")
d=f.read()
fo = open('workfile.txt', 'w')
fo.write(d)
fo.close()
The really bad news comes from here:
http://blog.blindspotsecurity.com/2017/02/advisory-javapython-ftp-injections.html

Wednesday, February 22, 2017

The twill python module with Fedora 25.

Today I tested the twill python module with python 2.7 and Fedora 25.
This is: a scripting system for automating Web browsing. Useful for testing Web pages or grabbing data from password-protected sites automatically.
To install this python module I used pip command:
[root@localhost mythcat]# pip install twill
Collecting twill
Downloading twill-1.8.0.tar.gz (176kB)
100% |████████████████████████████████| 184kB 2.5MB/s
Installing collected packages: twill
Running setup.py install for twill ... done
Successfully installed twill-1.8.0

Let's try some tests:
[mythcat@localhost ~]$ python
Python 2.7.13 (default, Jan 12 2017, 17:59:37) 
[GCC 6.3.1 20161221 (Red Hat 6.3.1-1)] on linux2
Type "help", "copyright", "credits" or "license" for more information.
>>> from twill import get_browser
>>> b = get_browser()
>>> 
>>> from twill.commands import *
>>> go("http://www.python.org/")
==> at https://www.python.org/
u'https://www.python.org/'
>>> b.showforms()

Form #1
## ## __Name__________________ __Type___ __ID________ __Value__________________
1     q                        search    id-searc ...   
To talk to the Web browser directly, call the get_browser function.
You can see most of the twill commands by using:
>>> import twill.shell
>>> twill.shell.main()

 -= Welcome to twill! =-

current page: https://www.python.org/widgets
>> ?

Undocumented commands:
======================
add_auth             fa           info             save_html           title
add_extra_header     find         load_cookies     setglobal           url  
agent                follow       notfind          setlocal          
back                 formaction   redirect_error   show              
clear_cookies        formclear    redirect_output  show_cookies      
clear_extra_headers  formfile     reload           show_extra_headers
code                 formvalue    reset_browser    showforms         
config               fv           reset_error      showhistory       
debug                get_browser  reset_output     showlinks         
echo                 getinput     run              sleep             
exit                 getpassword  runfile          submit            
extend_with          go           save_cookies     tidy_ok           

current page: https://www.python.org/widgets
>> 
Basic is used by setlocal to fill website forms and the go function.
Ban can be very good for some tasks.
The twill python module also provides a simple wrapper for mechanizing functionality with the API is still unstable.

Thursday, February 16, 2017

Compare two images: the histogram method.

This is a very simple example about how to compare the histograms of both images and print the inconsistencies are bound to arise.
The example come with alternative solution: Histogram method.
The script was run under Fedora 25.
If the images are the same the result will be 0.0.
For testing I change the image2.png by make a line into this with a coverage of 10%.
The result of the script was:
1116.63243729
The images come with this dimensions: 738 x 502 px.
import math
import operator
from math import *
import PIL

from PIL import Image
h1 = Image.open("image1.png").histogram()
h2 = Image.open("image2.png").histogram()

rms = math.sqrt(reduce(operator.add,
        map(lambda a,b: (a-b)**2, h1, h2))/len(h1))
print rms
About the operator module exports a set of efficient functions corresponding to the intrinsic operators of Python.
Example:
operator.lt(a, b)
operator.le(a, b)
operator.eq(a, b)
operator.ne(a, b)
operator.ge(a, b)
operator.gt(a, b)
operator.__lt__(a, b)
operator.__le__(a, b)
operator.__eq__(a, b)
operator.__ne__(a, b)
operator.__ge__(a, b)
operator.__gt__(a, b)

This is like math operators:
lt(a, b) is equivalent to a < b
le(a, b) is equivalent to a <= b
Another example:
>>> # Elementwise multiplication
>>> map(mul, [0, 1, 2, 3], [10, 20, 30, 40])
[0, 20, 60, 120]

>>> # Dot product
>>> sum(map(mul, [0, 1, 2, 3], [10, 20, 30, 40]))
200

Thursday, January 26, 2017

The kivy pyhon module for android.

First you need to install kivy python module.
The kivy python module
C:\>cd Python27

C:\Python27>cd Scripts

C:\Python27\Scripts>pip install kivy
Collecting kivy
Downloading Kivy-1.9.1-cp27-none-win32.whl (7.4MB)
100% |################################| 7.4MB 50kB/s
Collecting Kivy-Garden>=0.1.4 (from kivy)
Downloading kivy-garden-0.1.4.tar.gz
Requirement already satisfied: requests in c:\python27\lib\site-packages (from Kivy-Garden>=0.1.4->kivy)
Installing collected packages: Kivy-Garden, kivy
Running setup.py install for Kivy-Garden ... done
Successfully installed Kivy-Garden-0.1.4 kivy-1.9.1

Use this to add new pthon modules:
python -m pip install --upgrade docutils pygments pypiwin32 kivy.deps.sdl2 kivy.deps.glew kivy.deps.gstreamer --extra-index-url https://kivy.org/downloads/packages/simple/
If the python kivy.deps.gstreamer don't working then is not problem will try without this python module.
To see outdated python modules , use this commnds:
python -m pip install --upgrade pip wheel setuptools
pip list outdated
Let's upgrade all of python modules with this:
pip freeze > requirements.txt && pip install --upgrade -r requirements.txt && del requirements.txt
Another way to install this python module can be found here.
The demo can be star with this comman line:
C:\Python27>python share\kivy-examples\demo\showcase\main.py
You can also test one simple python script:
from kivy.app import App
from kivy.uix.button import Button

class TestApp(App):
def build(self):
return Button(text='Hello World')

TestApp().run()

To use with android operating system then test Buildozer.
This tool supports packaging for Android via the python-for-android project, and for iOS via the kivy-ios project. Support for other operating systems is intended in the future.

Friday, December 30, 2016

The python arch module for financial econometrics.

This python module arch: is a work-in-progress for ARCH and other tools for financial econometrics, written in Python (and Cython).
The arch python module come with tools for:
  •    Univariate volatility models
  •    Bootstrapping
  •    Multiple comparison procedures
  •    Unit root tests
You can read and see many examples here.
Let's start with instalation into my python 2.7.12 version.
First you need to install this python module with pip tool:
C:\Python27\Scripts>pip install Arch
Collecting Arch
Downloading arch-4.0.tar.gz (107kB)
100% |################################| 112kB 390kB/s
Requirement already satisfied: matplotlib>=1.4 in c:\python27\lib\site-packages (from Arch)
Requirement already satisfied: scipy>=0.15 in c:\python27\lib\site-packages (from Arch)
Collecting patsy>=0.2 (from Arch)
Downloading patsy-0.4.1-py2.py3-none-any.whl (233kB)
100% |################################| 235kB 906kB/s
Collecting statsmodels>=0.6 (from Arch)
Downloading statsmodels-0.6.1.tar.gz (7.0MB)
100% |################################| 7.0MB 85kB/s
Collecting pandas>=0.16 (from Arch)
Downloading pandas-0.19.2-cp27-cp27m-win32.whl (6.8MB)
100% |################################| 6.8MB 81kB/s
Requirement already satisfied: numpy>=1.6 in c:\python27\lib\site-packages (from matplotlib>=1.4->Arch)
Requirement already satisfied: python-dateutil in c:\python27\lib\site-packages (from matplotlib>=1.4->Arch)
Requirement already satisfied: cycler in c:\python27\lib\site-packages (from matplotlib>=1.4->Arch)
Requirement already satisfied: pyparsing!=2.0.4,!=2.1.2,>=1.5.6 in c:\python27\lib\site-packages (from matplotlib>=1.4->Arch)
Requirement already satisfied: pytz in c:\python27\lib\site-packages (from matplotlib>=1.4->Arch)
Requirement already satisfied: six in c:\python27\lib\site-packages (from patsy>=0.2->Arch)
Installing collected packages: patsy, pandas, statsmodels, Arch
Running setup.py install for statsmodels ... done
Running setup.py install for Arch ... done
Successfully installed Arch-4.0 pandas-0.19.2 patsy-0.4.1 statsmodels-0.6.1

This python module is very mathematical and technical so I'll refer you to a few examples.
Can be used in statistical research and econometrics, or the application of mathematics, statistics, and computer science to economic data. 

Sunday, December 18, 2016

NVIDIA python module Theano.

I try to use python module Theano.
First I install this python module.
C:\WINDOWS\system32>cd C:\Python27

C:\Python27>cd Scripts

C:\Python27\Scripts>pip install Theano
Collecting Theano
Using cached Theano-0.8.2.tar.gz
Requirement already satisfied: numpy>=1.7.1 in c:\python27\lib\site-packages (from Theano)
Requirement already satisfied: scipy>=0.11 in c:\python27\lib\site-packages (from Theano)
Requirement already satisfied: six>=1.9.0 in c:\python27\lib\site-packages (from Theano)
Installing collected packages: Theano
Running setup.py install for Theano ... done
Successfully installed Theano-0.8.2

When I try to used I got this error:
import theano
WARNING (theano.configdefaults): g++ not detected ! Theano will be unable to execute optimized C-implementations (for both CPU and GPU) and will default to Python implementations. Performance will be severely degraded. To remove this warning, set Theano flags cxx to an empty string.

I try to fix that error, but I don't find any solution.
This python module work. I tested with examples from NVIDIA, see:

Thursday, December 15, 2016

Use the twitter python module - part 002.

Using the twitter python module named python-twitter you can search twitter query into the local area.
The default tutorial is here.
The source code to change is that line:
results = api.GetSearch(raw_query="q=from%3Asomething"
with:
results = api.GetSearch(raw_query="q=&geocode=lat,long,10km")
Also, you need to put your lat and long and the area sized.
The good point of this you will be able to spell time with twitter posts.

Wednesday, December 14, 2016

Use the twitter python module - part 001.

About this python module python-twitter you can read here.

C:\>cd Python27
C:\Python27>cd Scripts
C:\Python27\Scripts>pip install python-twitter
Collecting python-twitter
Downloading python_twitter-3.2-py2-none-any.whl (71kB)
100% |################################| 81kB 292kB/s
Requirement already satisfied: requests in c:\python27\lib\site-packages (from python-twitter)
Requirement already satisfied: requests-oauthlib in c:\python27\lib\site-packages (from python-twitter)
Collecting future (from python-twitter)
Downloading future-0.16.0.tar.gz (824kB)
100% |################################| 829kB 485kB/s
Requirement already satisfied: oauthlib>=0.6.2 in c:\python27\lib\site-packages
(from requests-oauthlib->python-twitter)
Installing collected packages: future, python-twitter
Running setup.py install for future ... done
Successfully installed future-0.16.0 python-twitter-3.2


Let's see one simple example with one authentication key and token and one query:

import os
import json
import twitter
from twitter import *
CONSUMER_KEY=""
CONSUMER_SECRET=""

ACCESS_TOKEN=""
ACCESS_TOKEN_SECRET=""

api = Api(CONSUMER_KEY,
          CONSUMER_SECRET,
          ACCESS_TOKEN,
          ACCESS_TOKEN_SECRET)
def main():
    with open('output.txt', 'a') as f:
        for line in api.GetStreamFilter(track='something', languages=LANGUAGES):
            print line
    results = api.GetSearch(raw_query="q=from%3Asomething")
    print results
if __name__ == '__main__':
    main()

Monday, December 12, 2016

Use the tweepy to deal with twitter api - part 001.

I will show you how to install the python module named tweepy  and how to make authentication into twitter webpage.
This will install the tweepy python module.
C:\>cd Python27
C:\Python27>cd Scripts
C:\Python27\Scripts>pip install tweepy
Collecting tweepy
Downloading tweepy-3.5.0-py2.py3-none-any.whl
Collecting requests>=2.4.3 (from tweepy)
Downloading requests-2.12.3-py2.py3-none-any.whl (575kB)
100% |################################| 583kB 556kB/s
Collecting requests-oauthlib>=0.4.1 (from tweepy)
Downloading requests_oauthlib-0.7.0-py2.py3-none-any.whl
Requirement already satisfied: six>=1.7.3 in c:\python27\lib\site-packages (from
tweepy)
Collecting oauthlib>=0.6.2 (from requests-oauthlib>=0.4.1->tweepy)
Downloading oauthlib-2.0.1.tar.gz (122kB)
100% |################################| 133kB 506kB/s
Installing collected packages: requests, oauthlib, requests-oauthlib, tweepy
Running setup.py install for oauthlib ... done
Successfully installed oauthlib-2.0.1 requests-2.12.3 requests-oauthlib-0.7.0 tweepy-3.5.0

To deal with twitter api then you need to create a new application into this webpage.
This webpage will give for authentication your date to connect to twitter:
Application Settings
consumer_key=""
consumer_secret=""

Your Access Token
access_token=""
access_token_secret=""

Let's start with a simple example, by using your application settings and access token:
import tweepy
from tweepy.streaming import StreamListener
from tweepy import OAuthHandler
from tweepy import Stream

consumer_key=""
consumer_secret=""

access_token=""
access_token_secret=""

auth = tweepy.OAuthHandler(consumer_key, consumer_secret)
auth.set_access_token(access_token, access_token_secret)

api = tweepy.API(auth)

print(api.me().name)

class StdOutListener(StreamListener):
""" A listener handles tweets that are received from the stream.
This is a basic listener that just prints received tweets to stdout.
"""
def on_data(self, data):
print(data)
return True

def on_error(self, status):
print(status)

if __name__ == '__main__':
lista = StdOutListener()
auth = OAuthHandler(consumer_key, consumer_secret)
auth.set_access_token(access_token, access_token_secret)

stream = Stream(auth, lista)
stream.filter(track=['internet'])

Using python shell to run this script will show all about 'internet'.
The output will come into raw format.
Let's try another example to update your status with this message:
I using OAuth authentication via Tweepy!
Just add this into my code before class definition:
api.update_status(status='I using OAuth authentication via Tweepy!')
You can rad more about streaming by reading this docs.
For example, I used track from here.


Sunday, December 11, 2016

The morse python module with pip installation versus precompiled archive wheel.

Today I try to deal with morse python module and it took me a while to install python modules because of their dependencies.
I started with the pip install of morse module but I got dependency errors in python modules
Because I try to fix this issue the result of this tutorial is more about how to install some python module: matplotlib, scipy, numpy, mkl and morse.
The all installation process will help you to understand how can be fix some pip installation versus precompiled archive wheel.
C:\Python27\Scripts>pip install matplotlib
Collecting matplotlib
  Downloading matplotlib-1.5.3-cp27-cp27m-win32.whl (6.0MB)
    100% |################################| 6.0MB 98kB/s
Requirement already satisfied: numpy>=1.6 in c:\python27\lib\site-packages (from
 matplotlib)
Collecting python-dateutil (from matplotlib)
  Downloading python_dateutil-2.6.0-py2.py3-none-any.whl (194kB)
    100% |################################| 194kB 1.4MB/s
Collecting cycler (from matplotlib)
  Downloading cycler-0.10.0-py2.py3-none-any.whl
Collecting pyparsing!=2.0.4,!=2.1.2,>=1.5.6 (from matplotlib)
  Downloading pyparsing-2.1.10-py2.py3-none-any.whl (56kB)
    100% |################################| 61kB 2.0MB/s
Collecting pytz (from matplotlib)
  Downloading pytz-2016.10-py2.py3-none-any.whl (483kB)
    100% |################################| 491kB 656kB/s
Collecting six>=1.5 (from python-dateutil->matplotlib)
  Downloading six-1.10.0-py2.py3-none-any.whl
Installing collected packages: six, python-dateutil, cycler, pyparsing, pytz, ma
tplotlib
Successfully installed cycler-0.10.0 matplotlib-1.5.3 pyparsing-2.1.10 python-da
teutil-2.6.0 pytz-2016.10 six-1.10.0

Download SciPy wheel file from here.
Install this file with:
C:\Python27\Scripts>pip install scipy-0.18.1-cp27-cp27m-win32.whl
Processing c:\python27\scripts\scipy-0.18.1-cp27-cp27m-win32.whl
Installing collected packages: scipy
Successfully installed scipy-0.18.1

Now you can install morse pyhon module.
pip install morse
If you installed the numpy by pip, but the scipy was installed by precompiled archive then expects numpy+mkl.
So to fix that issue, I download the numpy-1.12.0b1+mkl-cp27-cp27m-win32.whl file and install this with pip:
C:\Python27\Scripts>pip install "numpy-1.12.0b1+mkl-cp27-cp27m-win32.whl"
Processing c:\python27\scripts\numpy-1.12.0b1+mkl-cp27-cp27m-win32.whl
Installing collected packages: numpy
Found existing installation: numpy 1.11.2
Uninstalling numpy-1.11.2:
Successfully uninstalled numpy-1.11.2
Successfully installed numpy-1.12.0b1+mkl

Let's test the morse python module.
C:\Python27>python
Python 2.7.12 (v2.7.12:d33e0cf91556, Jun 27 2016, 15:19:22) [MSC v.1500 32 bit (
Intel)] on win32
Type "help", "copyright", "credits" or "license" for more information.
>>> import morse
>>> dir(morse)
['__builtins__', '__doc__', '__file__', '__name__', '__package__', 'lookup', 'st
ring_to_morse']
>>> dir(morse.lookup)
['__class__', '__cmp__', '__contains__', '__delattr__', '__delitem__', '__doc__'
, '__eq__', '__format__', '__ge__', '__getattribute__', '__getitem__', '__gt__',
'__hash__', '__init__', '__iter__', '__le__', '__len__', '__lt__', '__ne__', '_
_new__', '__reduce__', '__reduce_ex__', '__repr__', '__setattr__', '__setitem__'
, '__sizeof__', '__str__', '__subclasshook__', 'clear', 'copy', 'fromkeys', 'get
', 'has_key', 'items', 'iteritems', 'iterkeys', 'itervalues', 'keys', 'pop', 'po
pitem', 'setdefault', 'update', 'values', 'viewitems', 'viewkeys', 'viewvalues']
>>> print morse.lookup.keys()
['"', '$', '&', '(', ',', '.', '0', '2', '4', '6', '8', ':', '@', 'B', 'D', 'F',
'H', 'J', 'L', 'N', 'P', 'R', 'T', 'V', 'X', 'Z', '!', "'", ')', '+', '-', '/',
'1', '3', '5', '7', '9', ';', '=', '?', 'A', 'C', 'E', 'G', 'I', 'K', 'M', 'O',
'Q', 'S', 'U', 'W', 'Y', '_']
>>> print morse.lookup.items()
[('"', '.-..-.'), ('$', '...-..-'), ('&', '.-...'), ('(', '-.--.'), (',', '--..-
-'), ('.', '.-.-.-'), ('0', '-----'), ('2', '..---'), ('4', '....-'), ('6', '-..
..'), ('8', '---..'), (':', '---...'), ('@', '.--.-.'), ('B', '-...'), ('D', '-.
.'), ('F', '..-.'), ('H', '....'), ('J', '.---'), ('L', '.-..'), ('N', '-.'), ('
P', '.--.'), ('R', '.-.'), ('T', '-'), ('V', '...-'), ('X', '-..-'), ('Z', '--..
'), ('!', '-.-.--'), ("'", '.----.'), (')', '-.--.-'), ('+', '.-.-.'), ('-', '-.
...-'), ('/', '-..-.'), ('1', '.----'), ('3', '...--'), ('5', '.....'), ('7', '-
-...'), ('9', '----.'), (';', '-.-.-.'), ('=', '-...-'), ('?', '..--..'), ('A',
'.-'), ('C', '-.-.'), ('E', '.'), ('G', '--.'), ('I', '..'), ('K', '-.-'), ('M',
'--'), ('O', '---'), ('Q', '--.-'), ('S', '...'), ('U', '..-'), ('W', '.--'), (
'Y', '-.--'), ('_', '..--.-')]

You can see the python morse module is working well.