You can download your free ebook from O'Reilly.
The Functional Programming in Python by David Mertz - publisher: O'Reilly - released: June 2015.
David Mertz is a director of the Python Software Foundation, and chair
of its Trademarks and Outreach & Education Committees. He wrote the
columns Charming Python and XML Matters for IBM developerWorks and the Addison-Wesley book Text Processing in Python. David has spoken at multiple OSCON and PyCon events.
This is the download link.
Is a blog about python programming language. You can see my work with python programming language, tutorials and news.
Saturday, March 19, 2016
Thursday, February 4, 2016
Testing PyQt4 under Python 3.5.1.
Today I working well with python 3.5.1.
Most of my source code was wrote with python 2.7 and the next step was to using pip3.5 to update and upgrade some python modules.
I try to install PyQt4 with pip3.5 - not working.
So I used the old way: whl file from here.
That was good, most of the scripts was running.
The main problem was OpenGL and that will make errors when you try to use QtOpenGL.
The result of this seam to me the python 3.5.1 it's now without OpenGL features.
The most short source code into Python 3.5.1 .
Just type this :
That will open your browser with one comics from xkcd website.
The antigravity module was added to Python 3.5.1. I'm not sure but seam working also with python 2.7 version.
import antigravity That will open your browser with one comics from xkcd website.
The antigravity module was added to Python 3.5.1. I'm not sure but seam working also with python 2.7 version.
Saturday, January 23, 2016
wmi python module - part 002.
According to MSDN Microsoft the Win32_Process WMI class represents a process on an operating system.
We can see all of the inherited properties of processes:
We can see all of the inherited properties of processes:
class Win32_Process : CIM_Process
{
  string   Caption;
  string   CommandLine;
  string   CreationClassName;
  datetime CreationDate;
  string   CSCreationClassName;
  string   CSName;
  string   Description;
  string   ExecutablePath;
  uint16   ExecutionState;
  string   Handle;
  uint32   HandleCount;
  datetime InstallDate;
  uint64   KernelModeTime;
  uint32   MaximumWorkingSetSize;
  uint32   MinimumWorkingSetSize;
  string   Name;
  string   OSCreationClassName;
  string   OSName;
  uint64   OtherOperationCount;
  uint64   OtherTransferCount;
  uint32   PageFaults;
  uint32   PageFileUsage;
  uint32   ParentProcessId;
  uint32   PeakPageFileUsage;
  uint64   PeakVirtualSize;
  uint32   PeakWorkingSetSize;
  uint32   Priority = NULL;
  uint64   PrivatePageCount;
  uint32   ProcessId;
  uint32   QuotaNonPagedPoolUsage;
  uint32   QuotaPagedPoolUsage;
  uint32   QuotaPeakNonPagedPoolUsage;
  uint32   QuotaPeakPagedPoolUsage;
  uint64   ReadOperationCount;
  uint64   ReadTransferCount;
  uint32   SessionId;
  string   Status;
  datetime TerminationDate;
  uint32   ThreadCount;
  uint64   UserModeTime;
  uint64   VirtualSize;
  string   WindowsVersion;
  uint64   WorkingSetSize;
  uint64   WriteOperationCount;
  uint64   WriteTransferCount;
}; import wmi
c = wmi.WMI()
for process in c.Win32_Process ():
name = process.Properties_("Name").Value
pid = process.Properties_('ProcessID').Value
parent = process.Properties_('ParentProcessId')
termination = process.Properties_('TerminationDate')
print (name,' = pid -',pid,'+', parent,'|termination_date-',termination) firefox.exe = pid - 13788 + 2564 |termination_date- None
explorer.exe = pid - 1048 + 772 |termination_date- None
sublime_text.exe = pid - 11404 + 2564 |termination_date- None
plugin_host.exe = pid - 7432 + 11404 |termination_date- None
cmd.exe = pid - 9568 + 2564 |termination_date- None
conhost.exe = pid - 14124 + 9568 |termination_date- None
conhost.exe = pid - 9700 + 11208 |termination_date- None
Taskmgr.exe = pid - 9424 + 13404 |termination_date- None
WmiPrvSE.exe = pid - 9764 + 772 |termination_date- None
SpfService64.exe = pid - 11908 + 684 |termination_date- None
python.exe = pid - 1308 + 9568 |termination_date- None
Posted by
Cătălin George Feștilă
Labels:
2016,
module,
python,
python 3,
python modules,
Spyder,
tutorial,
tutorials,
wmi
Friday, January 22, 2016
wmi python module - part 001.
Named WMI from Windows Management Instrumentation, this python module allow you to use Microsoft’s implementation of Web-Based Enterprise Management ( WBEM ).
Is a set of extensions to the Windows Driver Model AND that provides an operating system interface.
allows you to scripting languages like VBScript to manage Microsoft Windows personal computers and servers, both locally and remotely.
You cand read about this python module here.
Let try first example :
Now let's see another example can used by you with wmi python module.
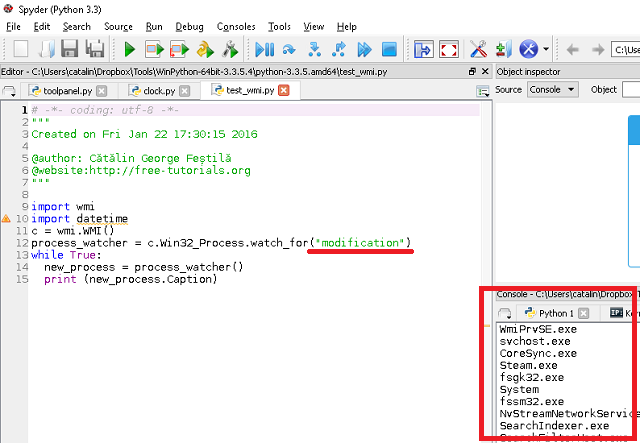
This example let you see your processes.
I used the python version 3.3.5 and Spyder ( Scientific PYthon Development EnviRonment ) to test the script.
You can change .watch_for method args with: creation, deletion, modification or operation.
Is a set of extensions to the Windows Driver Model AND that provides an operating system interface.
allows you to scripting languages like VBScript to manage Microsoft Windows personal computers and servers, both locally and remotely.
You cand read about this python module here.
C:\Python34\Scripts>pip install  wmi
...
Installing collected packages: wmi
Running setup.py install for wmi
warning: install_data: setup script did not provide a directory for 'readme.
txt' -- installing right in 'C:\Python34'
...
Successfully installed wmi
Cleaning up...
Let try first example :
C:\Python34>python
Python 3.4.1 (v3.4.1:c0e311e010fc, May 18 2014, 10:45:13) [MSC v.1600 64 bit (AM
D64)] on win32
Type "help", "copyright", "credits" or "license" for more information.
>>> import wmi
>>> remote_process = wmi.WMI (computer="home").new ("Win32_Process")
>>> for i in wmi.WMI ().Win32_OperatingSystem ():
...     print (i.Caption)
...
Microsoft Windows 10 Home
Now let's see another example can used by you with wmi python module.
This example let you see your processes.
import wmi
import datetime
c = wmi.WMI()
process_watcher = c.Win32_Process.watch_for("modification")
while True:
  new_process = process_watcher()
  print (new_process.Caption)
I used the python version 3.3.5 and Spyder ( Scientific PYthon Development EnviRonment ) to test the script.
You can change .watch_for method args with: creation, deletion, modification or operation.

Posted by
Cătălin George Feștilă
Labels:
2016,
module,
python,
python 3,
python modules,
Spyder,
tutorial,
tutorials,
wmi
Saturday, November 28, 2015
The svgwrite python module - part 001.
The svgwrite python module is a tool by Manfred Moitzi.
To install this python module use Python 3.4 version.
Then you need to install svgwrite with pip3.4:
See this simple example:
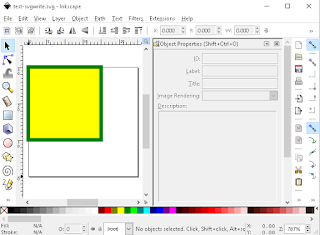
If you use the dir() then you can see more about this python module:
To install this python module use Python 3.4 version.
Then you need to install svgwrite with pip3.4:
C:\Python34\Scripts>pip3.4.exe install svgwrite
Collecting svgwrite
  Downloading svgwrite-1.1.6.tar.gz (109kB)
100% |################################| 110kB 354kB/s See this simple example:
import svgwrite
from svgwrite import *
#this will work with svgwrite
svg_doc = svgwrite.Drawing(filename = "test-svgwrite.svg",\
                                size = ("30px", "30px"))\
svg_doc.add(svg_doc.rect(insert = (0, 0),\
                                   size = ("20px", "20px"),\
                                   stroke_width = "1",\
                                   stroke = "green",\
                                   fill = "rgb(255,255,0)"))\
print(svg_doc.tostring())
svg_doc.save() 
If you use the dir() then you can see more about this python module:
>>> dir(svgwrite)
['AUTHOR_EMAIL', 'AUTHOR_NAME', 'CYEAR', 'Drawing', 'Hz', 'Unit', 'VERSION', '__
builtins__', '__cached__', '__doc__', '__file__', '__loader__', '__name__', '__p
ackage__', '__path__', '__spec__', 'animate', 'base', 'cm', 'container', 'data',
 'deg', 'drawing', 'elementfactory', 'em', 'etree', 'ex', 'filters', 'grad', 'gr
adients', 'image', 'inch', 'kHz', 'masking', 'mixins', 'mm', 'params', 'path', '
pattern', 'pc', 'percent', 'pt', 'px', 'rad', 'rgb', 'shapes', 'text', 'utils',
'validator2', 'version'] svg_doc.add(svg_document.text("This add new svg text",\
insert = (10, 10)))
Posted by
Cătălin George Feștilă
Labels:
2015,
python 3,
python modules,
svgwrite,
tutorial,
tutorials
Sunday, November 22, 2015
The new Python 2.7.11rc1.
The next release in the 2.7.x series is now available with the version 2.7.11.rc.1 .
This can be download it from here.
Come with source release, installer for Windows, Mac OS X 10.6 and later.
I don't use linux instalation, just on Windows 10 - 64 MSI installer.
The changes of this version can be see here.
First I saw this python version will change my old python 2.7 version.
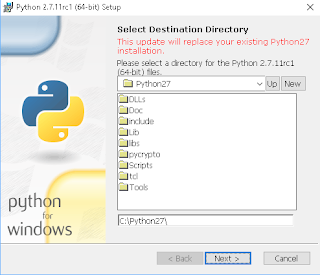
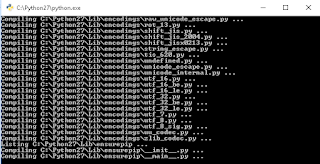
Also I check to compile all python scripts and module.
With installed Python 2.7 I check if is all ok.
I think the python has some problems with keep and clean correct modules under pip.
Also I guest can be done with few rows of python scripts but also this can be done by default by python installation.
This can be download it from here.
Come with source release, installer for Windows, Mac OS X 10.6 and later.
I don't use linux instalation, just on Windows 10 - 64 MSI installer.
The changes of this version can be see here.
First I saw this python version will change my old python 2.7 version.

Also I check to compile all python scripts and module.
With installed Python 2.7 I check if is all ok.

C:\Python27>python.exe
Python 2.7.11rc1 (v2.7.11rc1:82dd9545bd93, Nov 21 2015, 23:25:27) [MSC v.1500 64
 bit (AMD64)] on win32
Type "help", "copyright", "credits" or "license" for more information.
>>> No handlers could be found for logger "OpenGL.Tk"
ImportError: numpy.core.multiarray failed to import
BaseHTTPServer audioop imaplib scrap
Bastion base imghdr select
BeautifulSoup base64 imp sets
BeautifulSoupTests bdb importlib setuptools
CGIHTTPServer binascii imputil sgmllib
Canvas binhex inspect sha
ConfigParser bisect io shellescape
Cookie bs4 itertools shelve
Dialog bsddb joystick shelve_test
DocXMLRPCServer bufferproxy json shlex
FileDialog bz2 key shutil
FixTk cPickle keyword signal
HTMLParser cProfile lib2to3 simplejson
MimeWriter cStringIO linecache site
Naked cached_property locale six
OpenGL calendar locals smtpd
PIL camera logging smtplib
PySide cdrom mac_scrap sndarray
Queue cgi macosx sndhdr
ScrolledText cgitb macpath socket
SimpleDialog chunk macurl2path sprite
SimpleHTTPServer cmath mailbox sqlite3
SimpleXMLRPCServer cmd mailcap sre
SocketServer code markupbase sre_compile
StringIO codecs marshal sre_constants
Tix codeop mask sre_parse
Tkconstants collections math ssl
Tkdnd color md5 stat
Tkinter colorama mhlib statvfs
UserDict colordict midi string
UserList colorsys mimetools stringold
UserString commands mimetypes stringprep
_LWPCookieJar compat mimify strop
_MozillaCookieJar compileall mixer struct
__builtin__ compiler mixer_music subprocess
__future__ constants mmap sunau
_abcoll contextlib modulefinder sunaudio
_arraysurfarray cookielib mouse surface
_ast copy movie surfarray
_bisect copy_reg msilib surflock
_bsddb crypto msvcrt symbol
_camera csv multifile symtable
_camera_opencv_highgui ctypes multiprocessing sys
_camera_vidcapture curses mutex sysconfig
_codecs cursors netrc sysfont
_codecs_cn cv new tabnanny
_codecs_hk cv2 newbuffer tarfile
_codecs_iso2022 datetime nmovie telnetlib
_codecs_jp dateutil nntplib tempfile
_codecs_kr dbhash nt test
_codecs_tw decimal ntpath test27
_collections decorator nturl2path test_crypto_python
_csv difflib numbers tests
_ctypes dircache numpy textwrap
_ctypes_test dis oauth2client this
_dummybackend display opcode thread
_elementtree distutils operator threading
_freetype docs optparse threads
_functools doctest os time
_hashlib draw os2emxpath timeit
_heapq dumbdbm overlay tkColorChooser
_hotshot dummy_thread parser tkCommonDialog
_io dummy_threading pdb tkFileDialog
_json easy_install pickle tkFont
_locale ecdsa pickletools tkMessageBox
_lsprof email pip tkSimpleDialog
_markerlib encodings pipes toaiff
_md5 ensurepip pixelarray token
_msi errno pixelcopy tokenize
_multibytecodec event pkg_resources trace
_multiprocessing examples pkgdata traceback
_numericsndarray exceptions pkgutil transform
_numericsurfarray extraction platform ttk
_numpysndarray fastevent plistlib tty
_numpysurfarray filecmp popen2 turtle
_osx_support fileinput poplib types
_pyio fnmatch posixfile unicodedata
_pytest font posixpath unittest
_random formatter pprint uritemplate
_sha fpformat profile url-scrap
_sha256 fractions pstats urllib
_sha512 freetype pty urllib2
_socket ftfont py urllib3
_sqlite3 ftplib py_compile urlparse
_sre functools pyasn1 urwid
_ssl future_builtins pyasn1_modules user
_strptime gc pyclbr uu
_struct genericpath pycuda uuid
_subprocess get-pip pydoc version
_symtable getopt pydoc_data vidcap
_testcapi getpass pyexpat virtualenv
_threading_local gettext pygame virtualenv_support
_tkinter gfxdraw pypm warnings
_vlcbackend glob pysideuic wave
_warnings googleapiclient pytest weakref
_weakref gp2x pytools webbrowser
_weakrefset gzip pytz wheel
_winreg hashlib quopri whichdb
abc heapq random winsound
aifc hmac re wsgiref
antigravity hotshot rect xdrlib
anydbm html5lib repr xlsxwriter
apiclient htmlentitydefs requests xml
appdirs htmllib rexec xmllib
argparse httplib rfc822 xmlrpclib
array httplib2 rlcompleter xxsubtype
ast idlelib robotparser yaml
asynchat ihooks rsa yt
asyncore image runpy zipfile
atexit imageext rwobject zipimport
audiodev imageop sched zlib
Enter any module name to get more help. Or, type "modules spam" to search
for modules whose descriptions contain the word "spam". C:\Python27\Scripts>C:\Python27\python.exe
Python 2.7.11rc1 (v2.7.11rc1:82dd9545bd93, Nov 21 2015, 23:25:27) [MSC v.1500 64
bit (AMD64)] on win32
Type "help", "copyright", "credits" or "license" for more information.
>>> import pip
>>> from subprocess import call
>>>
>>> for dist in pip.get_installed_distributions():
... call("pip2.7.exe install --upgrade " + dist.project_name, shell=True)
...
Requirement already up-to-date: appdirs in c:\python27\lib\site-packages
0
Requirement already up-to-date: BeautifulSoup in c:\python27\lib\site-packages
0
Collecting beautifulsoup4
Downloading beautifulsoup4-4.4.1-py2-none-any.whl (81kB)
100% |################################| 81kB 327kB/s
Installing collected packages: beautifulsoup4
Found existing installation: beautifulsoup4 4.3.2
Uninstalling beautifulsoup4-4.3.2:
Successfully uninstalled beautifulsoup4-4.3.2
Successfully installed beautifulsoup4-4.4.1
0
Failed building wheel for pycuda I think the python has some problems with keep and clean correct modules under pip.
Also I guest can be done with few rows of python scripts but also this can be done by default by python installation.
Sunday, November 8, 2015
WinPython - news and old stuff.
First good news: the team tells us about the WinPython will come with new release of WinPython.
This will be 3.4.3.7 version of WinPython and this will be great for most of users.
I love this portable python because first is easy to use and can easy test my python scripts.
One goal of this portable python it's the demos. I found some great demos with PyQt4 and networkx.
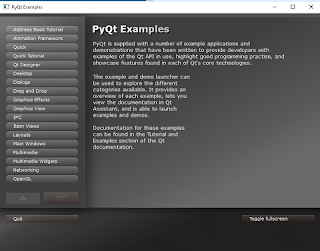
Also you can use Spyder to make your python scripts.
It's a free open-source development environment for the Python programming language.
This visual interface similar to MATLAB where you can run commands, edit and debug programs, check the values of variables and the definitions of functions, etc.
If you just getting started with Python then just take a look at google.com/edu/python.
The WinPython Control Panel allows to register your WinPython distribution to Windows with Advanced - Register distribution ...:
...and this allow you to:
This allow you to:
The Jupyter Notebook is a web application that allows you to create and share documents that contain live code, equations, visualizations and explanatory text. Uses include: data cleaning and transformation, numerical simulation, statistical modeling, machine learning and much more.
This will be 3.4.3.7 version of WinPython and this will be great for most of users.
I love this portable python because first is easy to use and can easy test my python scripts.
One goal of this portable python it's the demos. I found some great demos with PyQt4 and networkx.

Also you can use Spyder to make your python scripts.
It's a free open-source development environment for the Python programming language.
This visual interface similar to MATLAB where you can run commands, edit and debug programs, check the values of variables and the definitions of functions, etc.
If you just getting started with Python then just take a look at google.com/edu/python.
The WinPython Control Panel allows to register your WinPython distribution to Windows with Advanced - Register distribution ...:
...and this allow you to:
- associate file extensions .py, .pyc and .pyo to Python interpreter
- register Python icons in Windows explorer
- add context menu entries Edit with IDLE and Edit with Spyder for .py files
- register WinPython as a standard Python distribution in the registry (the same way as the standard Python Windows installers will do)
This allow you to:
The Jupyter Notebook is a web application that allows you to create and share documents that contain live code, equations, visualizations and explanatory text. Uses include: data cleaning and transformation, numerical simulation, statistical modeling, machine learning and much more.
Sunday, August 23, 2015
Testing the SymPy python module with Python 3.4.1 .
SymPy is a Python library for symbolic mathematics.
This module is a computer algebra system (CAS) written in the Python programming language.
A large can be found on this blog aggregator at planet.sympy.org.
First, You need to install it using pip3.4.
The most common printers available in SymPy are:
This module is a computer algebra system (CAS) written in the Python programming language.
A large can be found on this blog aggregator at planet.sympy.org.
First, You need to install it using pip3.4.
C:\Python34\Scripts>pip3.4.exe install sympy
Collecting sympy
  Downloading sympy-0.7.6.tar.gz (6.4MB)
    100% |################################| 6.4MB 35kB/s
Building wheels for collected packages: sympy
...
Successfully built sympy
Installing collected packages: sympy
Successfully installed sympy-0.7.6The most common printers available in SymPy are:
- str
- repr
- ASCII pretty printer
- Unicode pretty printer
- LaTeX
- MathML
- Dot
C:\Python34>python
Python 3.4.1 (v3.4.1:c0e311e010fc, May 18 2014, 10:45:13) [MSC v.1600 64 bit (AMD64)] on win32
Type "help", "copyright", "credits" or "license" for more information.
>>> from sympy import *
>>> x,y,z = symbols('x y z')
>>> Integral(sqrt(1+1/x),x)
Integral(sqrt(1 + 1/x), x)
>>> init_session(quiet=True)
Python console for SymPy 0.7.6 (Python 3.4.1-64-bit) (ground types: python)

>>> Integral(sqrt(1+1/x),x)
  /
 |
 |     _______
 |    /     1
 |   /  1 + -  dx
 | \/       x
 |
/
>>> >>> x, y, z = symbols('x, y, z')
>>> init_session(quiet=True)
Python console for SymPy 0.7.6 (Python 3.4.1-64-bit) (ground types: python)
>>> mat = Matrix([x*y, 1,0,3,-2, sin(z)])
>>> mat
[ x*y ]
[ ]
[ 1 ]
[ ]
[ 0 ]
[ ]
[ 3 ]
[ ]
[ -2 ]
[ ]
[sin(z)]
>>> >>> solve(x*x+x+2)
___ ___
1 \/ 7 *I 1 \/ 7 *I
[- - - -------, - - + -------]
2 2 2 2
>>> solve(Eq(x*x+x+2))
___ ___
1 \/ 7 *I 1 \/ 7 *I
[- - - -------, - - + -------]
2 2 2 2
>>> solve(Eq(x*x+2*x+4))
___ ___
[-1 - \/ 3 *I, -1 + \/ 3 *I]
>>> solve(x*x+2*x+4)
___ ___
[-1 - \/ 3 *I, -1 + \/ 3 *I]
>>> Pillow python module with Python 3.4.1 .
This simple tutorial about PIL and Pillow python modules can show you how to install the Pillow python module.
I used pip3.4 and python 3.4.1 version.
Some problems about how to write your source code can be found : porting pil to pillow.
I used pip3.4 and python 3.4.1 version.
Some problems about how to write your source code can be found : porting pil to pillow.
Saturday, August 22, 2015
Simple tutorial about haralyzer python module.
This is a simple usage of haralyzer python module.
This tutorial I make can be found : the-haralyzer-python-module.
This tutorial I make can be found : the-haralyzer-python-module.
Posted by
Cătălin George Feștilă
Labels:
2015,
module,
modules,
python 3,
python modules,
tutorial,
tutorials
Thursday, May 7, 2015
The numpy - install over python 3.4 version.
The last version 1.9.2 of python module can solve instalation over python from sourceforge.net -projects.
This link from Numerical Python module come with exe file over python versions: 3.4 , 3.3 and 2.7.
I test the 3.4 version - 32 bits but I got this great error:
Also the pip3.4 don't want to install the numpy python module just if you use this link.
You can do this with :
This link from Numerical Python module come with exe file over python versions: 3.4 , 3.3 and 2.7.
I test the 3.4 version - 32 bits but I got this great error:
>>> import numpy
Traceback (most recent call last):
File "", line 1, in
File "C:\Python34\lib\site-packages\numpy\__init__.py", line 170, in
from . import add_newdocs
File "C:\Python34\lib\site-packages\numpy\add_newdocs.py", line 13, in
from numpy.lib import add_newdoc
File "C:\Python34\lib\site-packages\numpy\lib\__init__.py", line 8, in
from .type_check import *
File "C:\Python34\lib\site-packages\numpy\lib\type_check.py", line 11, in
import numpy.core.numeric as _nx
File "C:\Python34\lib\site-packages\numpy\core\__init__.py", line 6, in
from . import multiarray
ImportError: DLL load failed: %1 is not a valid Win32 application. Also the pip3.4 don't want to install the numpy python module just if you use this link.
You can do this with :
C:\Python34\Scripts>pip3.4.exe install --upgrade wheel
Requirement already up-to-date: wheel in c:\python34\lib\site-packages
C:\Python34\Scripts>pip3.4.exe install "C:\Users\...\Downloads\numpy-1.9.2+m
kl-cp34-none-win_amd64.whl"
After that you can import the numpy module
Posted by
Cătălin George Feștilă
Labels:
2015,
error,
Numeric,
numpy,
python 3,
python modules,
tutorial,
tutorials
PySide - Introduction - part 002.
First, PySide itself is licensed under LGPLv2.1, most of the examples are licensed under GPLv2.
After importing PySide then you can see all PySide python submodule:
Let's how can do it:
QtCore - core non-GUI functionality;
QtGui - extends QtCore with GUI functionality;
QtNetwork - offers classes that allow you to write TCP/IP clients and servers;
QtOpenGL - offers classes that make it easy to use OpenGL in Qt applications;
QtScript - provides classes for making Qt applications scriptable;
QtSql - helps you provide seamless database integration to your Qt applications;
QtSvg - provides classes for displaying the contents of SVG files;
QtWebkit - provides a Web browser engine;
The QtTest submodule can be used to test your PySide script code.
The structure PySide application can be see under my first tutorial.
About this PySide application most of this can be created with classes
To make one GUI ( ) just import QtGUI with your class ...
This source code can be used also you can get some errors:
You can searching and used all your widgets.
For example :
You can set this title bellow show method , with :
First I used this class named Example with this methods:
The main reason I used this it's :
-super() method lets you avoid referring to the base class explicitly and let you to use multiple inheritance.
The main function come with some source code:
Make the application :
After importing PySide then you can see all PySide python submodule:
>>> import PySide
>>> from PySide import *
>>> dir(PySide)
['QtCore', 'QtGui', 'QtNetwork', 'QtOpenGL', 'QtScript', 'QtSql', 'QtSvg', 'QtTe
st', 'QtWebKit', '__all__', '__builtins__', '__doc__', '__file__', '__name__', '
__package__', '__path__', '__version__', '__version_info__', '_setupQtDirectorie
s', '_utils'] Let's how can do it:
# prints PySide version
>>> print PySide.__version__
1.2.2
# gets a tuple with each version component
>>> print PySide.__version_info__
(1, 2, 2, 'final', 0)
# prints the Qt version used to compile PySide
>>> print PySide.QtCore.__version__
4.8.5
# gets a tuple with each version components of Qt used to compile PySide
>>> print PySide.QtCore.__version_info__
(4, 8, 5) QtCore - core non-GUI functionality;
QtGui - extends QtCore with GUI functionality;
QtNetwork - offers classes that allow you to write TCP/IP clients and servers;
QtOpenGL - offers classes that make it easy to use OpenGL in Qt applications;
QtScript - provides classes for making Qt applications scriptable;
QtSql - helps you provide seamless database integration to your Qt applications;
QtSvg - provides classes for displaying the contents of SVG files;
QtWebkit - provides a Web browser engine;
The QtTest submodule can be used to test your PySide script code.
The structure PySide application can be see under my first tutorial.
About this PySide application most of this can be created with classes
To make one GUI ( ) just import QtGUI with your class ...
This source code can be used also you can get some errors:
>>> import sys
...
>>> from PySide import QtGui
...
>>> app = QtGui.QApplication(sys.argv)
You can searching and used all your widgets.
For example :
>>> import sys
>>> import PySide
>>> from PySide import *
>>> myapp = QtGui.QApplication(sys.argv)
>>> mywidgets = QtGui.QWidget()
>>> mywidgets.show() You can set this title bellow show method , with :
mywidgets.setWindowTitle('my app title ') First I used this class named Example with this methods:
class Example(QtGui.QWidget):
...
#defaul init class method
__init__(self)
...
#make and show the window application
initUI(self)
...
#my method to put the window to the desktop screen
center(self)
...
#method to deal with events and also close the application
closeEvent(self, event)
... The main reason I used this it's :
-super() method lets you avoid referring to the base class explicitly and let you to use multiple inheritance.
The main function come with some source code:
Make the application :
app = QtGui.QApplication(sys.argv) ex = Example()
Subscribe to:
Comments (Atom)