This simple tutorial about PIL and Pillow python modules can show you how to install the Pillow python module.
I used pip3.4 and python 3.4.1 version.
Some problems about how to write your source code can be found : porting pil to pillow.
Is a blog about python programming language. You can see my work with python programming language, tutorials and news.
Sunday, August 23, 2015
Saturday, August 22, 2015
Simple tutorial about haralyzer python module.
This is a simple usage of haralyzer python module.
This tutorial I make can be found : the-haralyzer-python-module.
This tutorial I make can be found : the-haralyzer-python-module.
Posted by
Cătălin George Feștilă
Labels:
2015,
module,
modules,
python 3,
python modules,
tutorial,
tutorials
Thursday, May 7, 2015
The numpy - install over python 3.4 version.
The last version 1.9.2 of python module can solve instalation over python from sourceforge.net -projects.
This link from Numerical Python module come with exe file over python versions: 3.4 , 3.3 and 2.7.
I test the 3.4 version - 32 bits but I got this great error:
Also the pip3.4 don't want to install the numpy python module just if you use this link.
You can do this with :
This link from Numerical Python module come with exe file over python versions: 3.4 , 3.3 and 2.7.
I test the 3.4 version - 32 bits but I got this great error:
>>> import numpy
Traceback (most recent call last):
File "", line 1, in
File "C:\Python34\lib\site-packages\numpy\__init__.py", line 170, in
from . import add_newdocs
File "C:\Python34\lib\site-packages\numpy\add_newdocs.py", line 13, in
from numpy.lib import add_newdoc
File "C:\Python34\lib\site-packages\numpy\lib\__init__.py", line 8, in
from .type_check import *
File "C:\Python34\lib\site-packages\numpy\lib\type_check.py", line 11, in
import numpy.core.numeric as _nx
File "C:\Python34\lib\site-packages\numpy\core\__init__.py", line 6, in
from . import multiarray
ImportError: DLL load failed: %1 is not a valid Win32 application. Also the pip3.4 don't want to install the numpy python module just if you use this link.
You can do this with :
C:\Python34\Scripts>pip3.4.exe install --upgrade wheel
Requirement already up-to-date: wheel in c:\python34\lib\site-packages
C:\Python34\Scripts>pip3.4.exe install "C:\Users\...\Downloads\numpy-1.9.2+m
kl-cp34-none-win_amd64.whl"
After that you can import the numpy module
Posted by
Cătălin George Feștilă
Labels:
2015,
error,
Numeric,
numpy,
python 3,
python modules,
tutorial,
tutorials
PySide - Introduction - part 002.
First, PySide itself is licensed under LGPLv2.1, most of the examples are licensed under GPLv2.
After importing PySide then you can see all PySide python submodule:
Let's how can do it:
QtCore - core non-GUI functionality;
QtGui - extends QtCore with GUI functionality;
QtNetwork - offers classes that allow you to write TCP/IP clients and servers;
QtOpenGL - offers classes that make it easy to use OpenGL in Qt applications;
QtScript - provides classes for making Qt applications scriptable;
QtSql - helps you provide seamless database integration to your Qt applications;
QtSvg - provides classes for displaying the contents of SVG files;
QtWebkit - provides a Web browser engine;
The QtTest submodule can be used to test your PySide script code.
The structure PySide application can be see under my first tutorial.
About this PySide application most of this can be created with classes
To make one GUI ( ) just import QtGUI with your class ...
This source code can be used also you can get some errors:
You can searching and used all your widgets.
For example :
You can set this title bellow show method , with :
First I used this class named Example with this methods:
The main reason I used this it's :
-super() method lets you avoid referring to the base class explicitly and let you to use multiple inheritance.
The main function come with some source code:
Make the application :
After importing PySide then you can see all PySide python submodule:
>>> import PySide
>>> from PySide import *
>>> dir(PySide)
['QtCore', 'QtGui', 'QtNetwork', 'QtOpenGL', 'QtScript', 'QtSql', 'QtSvg', 'QtTe
st', 'QtWebKit', '__all__', '__builtins__', '__doc__', '__file__', '__name__', '
__package__', '__path__', '__version__', '__version_info__', '_setupQtDirectorie
s', '_utils'] Let's how can do it:
# prints PySide version
>>> print PySide.__version__
1.2.2
# gets a tuple with each version component
>>> print PySide.__version_info__
(1, 2, 2, 'final', 0)
# prints the Qt version used to compile PySide
>>> print PySide.QtCore.__version__
4.8.5
# gets a tuple with each version components of Qt used to compile PySide
>>> print PySide.QtCore.__version_info__
(4, 8, 5) QtCore - core non-GUI functionality;
QtGui - extends QtCore with GUI functionality;
QtNetwork - offers classes that allow you to write TCP/IP clients and servers;
QtOpenGL - offers classes that make it easy to use OpenGL in Qt applications;
QtScript - provides classes for making Qt applications scriptable;
QtSql - helps you provide seamless database integration to your Qt applications;
QtSvg - provides classes for displaying the contents of SVG files;
QtWebkit - provides a Web browser engine;
The QtTest submodule can be used to test your PySide script code.
The structure PySide application can be see under my first tutorial.
About this PySide application most of this can be created with classes
To make one GUI ( ) just import QtGUI with your class ...
This source code can be used also you can get some errors:
>>> import sys
...
>>> from PySide import QtGui
...
>>> app = QtGui.QApplication(sys.argv)
You can searching and used all your widgets.
For example :
>>> import sys
>>> import PySide
>>> from PySide import *
>>> myapp = QtGui.QApplication(sys.argv)
>>> mywidgets = QtGui.QWidget()
>>> mywidgets.show() You can set this title bellow show method , with :
mywidgets.setWindowTitle('my app title ') First I used this class named Example with this methods:
class Example(QtGui.QWidget):
...
#defaul init class method
__init__(self)
...
#make and show the window application
initUI(self)
...
#my method to put the window to the desktop screen
center(self)
...
#method to deal with events and also close the application
closeEvent(self, event)
... The main reason I used this it's :
-super() method lets you avoid referring to the base class explicitly and let you to use multiple inheritance.
The main function come with some source code:
Make the application :
app = QtGui.QApplication(sys.argv) ex = Example() Saturday, May 2, 2015
New tutorials about PySide .
I make one new tutorial about PySide. I started with one simple tutorial with two simple examples.
I hope this help you.
You can read more about this
I hope this help you.
You can read more about this
Friday, April 24, 2015
The new release Python 3.5.0a4 - tutorial.
I install the Windows amd64 web-based installer. This allow me to use the windows gui to make all settings.
You also need some administrator privileges for C Runtime ...
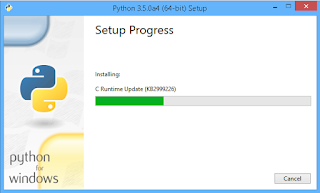
Some notes about this installation process:
The Python35 have python.exe, see:
You can run some demos with this \Python35>python.exe Tools\demo\.
The all download files come with this options:
Gzipped source tarball Source release 34667f07604352a4a1ef4651dcb7f870 19874914 SIG
XZ compressed source tarball Source release dd8d2dcb8c8b301d57228be896317612 14704088 SIG
Mac OS X 32-bit i386/PPC installer Mac OS X for Mac OS X 10.5 and later c648d4f3f02ce06d839e2b754e8382bc 25250926 SIG
Mac OS X 64-bit/32-bit installer Mac OS X for Mac OS X 10.6 and later d7321ddabc46927fd619a694c0d87086 23587943 SIG
Windows amd64 embeddable installer Windows b2c3001cd03d478293680f88beaf5218 6660944 SIG
Windows amd64 web-based installer Windows b2c3001cd03d478293680f88beaf5218 912024 SIG
Windows amd executable installer Windows 5ca6f1dcc56c66065d874420ae95ea23 29316824 SIG
Windows help file Windows d5434e2cf712ebdf11ede3b6cdb43a64 7581518 SIG
Windows x86 embeddable installer Windows 32f1d62bc4cad46e5bf3444d648e53f0 6068184 SIG
Windows x86 executable installer Windows a220359f4f6cefcc316504cccd3dc0fb 28459976 SIG
Windows x86 web-based installer Windows dd6712fe691f4212fb9e516541103721 886400 SIG
See more about this new release here.
You can see also the new beta python module with all issues.
You also need some administrator privileges for C Runtime ...

Some notes about this installation process:
- If you have previously installed Python 3.5.0a1, you may need to manually uninstall it.
- If installing Python 3.5.0a4 as a non-privileged user, you may need to escalate to administrator privileges to install an update to your C runtime libraries.
- Python 3.5 now has an embeddable installer designed to be run as part of a larger application's installer for apps using or extending Python.There is now a third type of Windows installer for Python 3.5.
The Python35 have python.exe, see:
Python 3.5.0a4 (v3.5.0a4:413e0e0004f4, Apr 19 2015, 18:01:47) [MSC v.1900 64 bit
 (AMD64)] on win32
Type "help", "copyright", "credits" or "license" for more information.
>>> __future__ abc hmac select
_ast aifc html selectors
_bisect antigravity http setuptools
_bootlocale argparse idlelib shelve
_bz2 array imaplib shlex
_codecs ast imghdr shutil
_codecs_cn asynchat imp signal
_codecs_hk asyncio importlib site
_codecs_iso2022 asyncore inspect smtpd
_codecs_jp atexit io smtplib
_codecs_kr audioop ipaddress sndhdr
_codecs_tw base64 itertools socket
_collections bdb json socketserver
_collections_abc binascii keyword sqlite3
_compat_pickle binhex lib2to3 sre_compile
_compression bisect linecache sre_constant
_csv builtins locale sre_parse
_ctypes bz2 logging ssl
_ctypes_test cProfile lzma stat
_datetime calendar macpath statistics
_decimal cgi macurl2path string
_dummy_thread cgitb mailbox stringprep
_elementtree chunk mailcap struct
_functools cmath marshal subprocess
_hashlib cmd math sunau
_heapq code mimetypes symbol
_imp codecs mmap symtable
_io codeop modulefinder sys
_json collections msilib sysconfig
_locale colorsys msvcrt tabnanny
_lsprof compileall multiprocessing tarfile
_lzma concurrent netrc telnetlib
_markerlib configparser nntplib tempfile
_markupbase contextlib nt test
_md5 copy ntpath textwrap
_msi copyreg nturl2path this
_multibytecodec crypt numbers threading
_multiprocessing csv opcode time
_opcode ctypes operator timeit
_operator curses optparse tkinter
_osx_support datetime os token
_overlapped dbm parser tokenize
_pickle decimal pathlib trace
_pydecimal difflib pdb traceback
_pyio dis pickle tracemalloc
_random distutils pickletools tty
_sha1 doctest pip turtle
_sha256 dummy_threading pipes turtledemo
_sha512 easy_install pkg_resources types
_signal email pkgutil unicodedata
_sitebuiltins encodings platform unittest
_socket ensurepip plistlib urllib
_sqlite3 enum poplib uu
_sre errno posixpath uuid
_ssl faulthandler pprint venv
_stat filecmp profile warnings
_string fileinput pstats wave
_strptime fnmatch pty weakref
_struct formatter py_compile webbrowser
_symtable fractions pyclbr winreg
_testbuffer ftplib pydoc winsound
_testcapi functools pydoc_data wsgiref
_testimportmultiple gc pyexpat xdrlib
_thread genericpath queue xml
_threading_local getopt quopri xmlrpc
_tkinter getpass random xxsubtype
_tracemalloc gettext re zipapp
_warnings glob reprlib zipfile
_weakref gzip rlcompleter zipimport
_weakrefset hashlib runpy zlib
_winapi heapq sched You can run some demos with this \Python35>python.exe Tools\demo\.
The all download files come with this options:
Gzipped source tarball Source release 34667f07604352a4a1ef4651dcb7f870 19874914 SIG
XZ compressed source tarball Source release dd8d2dcb8c8b301d57228be896317612 14704088 SIG
Mac OS X 32-bit i386/PPC installer Mac OS X for Mac OS X 10.5 and later c648d4f3f02ce06d839e2b754e8382bc 25250926 SIG
Mac OS X 64-bit/32-bit installer Mac OS X for Mac OS X 10.6 and later d7321ddabc46927fd619a694c0d87086 23587943 SIG
Windows amd64 embeddable installer Windows b2c3001cd03d478293680f88beaf5218 6660944 SIG
Windows amd64 web-based installer Windows b2c3001cd03d478293680f88beaf5218 912024 SIG
Windows amd executable installer Windows 5ca6f1dcc56c66065d874420ae95ea23 29316824 SIG
Windows help file Windows d5434e2cf712ebdf11ede3b6cdb43a64 7581518 SIG
Windows x86 embeddable installer Windows 32f1d62bc4cad46e5bf3444d648e53f0 6068184 SIG
Windows x86 executable installer Windows a220359f4f6cefcc316504cccd3dc0fb 28459976 SIG
Windows x86 web-based installer Windows dd6712fe691f4212fb9e516541103721 886400 SIG
See more about this new release here.
You can see also the new beta python module with all issues.
Posted by
Cătălin George Feștilă
Labels:
2015,
2015 news,
modules,
python 3,
python modules,
tutorial,
tutorials
Sunday, April 19, 2015
Upgrading all packages with pip using python script.
Can be done under Windows OS with this python script :
If you use Linux OS shell then you can use this :
C:\Python27>python.exe
Python 2.7.6 (default, Nov 10 2013, 19:24:24) [MSC v.1500 64 bit (AMD64)] on win
32
Type "help", "copyright", "credits" or "license" for more information.
>>> import pip
>>> from subprocess import call
>>>
>>> for dist in pip.get_installed_distributions():
...     call("pip install --upgrade " + dist.project_name, shell=True)
...
You are using pip version 6.0.8, however version 6.1.1 is available.
You should consider upgrading via the 'pip install --upgrade pip' command.
Requirement already up-to-date: appdirs in c:\python34\lib\site-packages
0
You are using pip version 6.0.8, however version 6.1.1 is available.
You should consider upgrading via the 'pip install --upgrade pip' command.
Collecting beautifulsoup4
  Using cached beautifulsoup4-4.3.2.tar.gz
... If you use Linux OS shell then you can use this :
pip freeze --local | grep -v '^\-e' | cut -d = -f 1 | xargs -n1 pip install -U
Posted by
Cătălin George Feștilă
Labels:
2015,
pip,
pip2.7,
python,
python modules,
tutorial,
tutorials
Saturday, April 18, 2015
pip-Win the new GUI for python pip.
The pip-Win is a Python Package manager that is easy to install and let you to automatically installs python module using pip and virtualenv on Windows.
Features
Also pip-Win is made available under the GNU Lesser General Public Licence.
You can try it from here.
Features
- switch from one python interpreter (i.e. version) to another (including py and pypy)
- see all installed packages, and whether they are up-to-date
- install or upgrade a package, or upgrade pip itself
- create and delete virtual environments, and switch between them
- run the IDLE or another python script, with the selected interpreter
Also pip-Win is made available under the GNU Lesser General Public Licence.
You can try it from here.
Friday, March 27, 2015
Using facepy to deal with facebook .
This python module allow you to get some data from facebook using Facebook’s Graph API.
The development team tell us:
Facepy can do more than reading your latest posts and posting photographs of parrots, but you’ll have to read the documentation to find out how.
You can use pip to install this module ( pip2.7 or pip3.4):
Now you can test this with this simple script:
The development team tell us:
Facepy can do more than reading your latest posts and posting photographs of parrots, but you’ll have to read the documentation to find out how.
You can use pip to install this module ( pip2.7 or pip3.4):
pip install facepy
The python script is simple :
...\Python34>cd Scripts
Scripts>pip3.4.exe install facepyNow you can test this with this simple script:
C:\Python34>python.exe
Python 3.4.1 (v3.4.1:c0e311e010fc, May 18 2014, 10:45:13) [MSC v.1600 64 bit (AM
D64)] on win32
Type "help", "copyright", "credits" or "license" for more information.
>>> import facepy
>>> from facepy import *
>>> from facepy import GraphAPI
>>> graph = GraphAPI('.....my...token.....'
)
>>> graph.get('me')
{'gender': .....................................
......................'}
Posted by
Cătălin George Feștilă
Labels:
2015,
facebook,
facepy,
Graph API,
python 3,
python modules,
tutorial,
tutorials
Friday, February 27, 2015
News: Python 3.4.3 is out.
Python 3.4.3 was released on February 25th, 2015 with many bugfixes and other small improvements.
More about that and can be found here.
This are the new library modules from this new release :
More about that and can be found here.
This are the new library modules from this new release :
- asyncio: New provisional API for asynchronous IO (PEP 3156).
- ensurepip: Bootstrapping the pip installer (PEP 453).
- enum: Support for enumeration types (PEP 435).
- pathlib: Object-oriented filesystem paths (PEP 428).
- selectors: High-level and efficient I/O multiplexing, built upon the select module primitives (part of PEP 3156).
- statistics: A basic numerically stable statistics library (PEP 450).
- tracemalloc: Trace Python memory allocations (PEP 454).
Saturday, February 7, 2015
Install PyOpenGL with pip with wheel and WHL file .
This is a old tutorial I wrote about how to install python on windows 8.1 with distribute, pip, virtualenv and virtualenvwrapper-powershell.
Now I will show you how to deal with WHL files and pip wheel.
First you need to install pip under your python folder.
I used in this case Python 2.7 version.
The WHL file and wheel is a ZIP-format archive with a specially formatted filename and the .whl extension.
You can use this :
For example, just use next command to install OpenGL python module.
I download it from pygame website, from here. Download your version of WHL file ( amd64 is for CPU 64 bits) and your python version (cpxx). Now use this command:
Now I will show you how to deal with WHL files and pip wheel.
First you need to install pip under your python folder.
I used in this case Python 2.7 version.
The WHL file and wheel is a ZIP-format archive with a specially formatted filename and the .whl extension.
You can use this :
C:\Python27\Scripts>pip2.7 install wheel
Collecting wheel
  Downloading wheel-0.24.0-py2.py3-none-any.whl (63kB)
    100% |################################| 65kB 682kB/s ta 0:00:011
Installing collected packages: wheel

Successfully installed wheel-0.24.0

C:\Python27\Scripts>pip2.7 install --upgrade pip
Collecting pip from https://pypi.python.org/packages/py2.py3/p/pip/pip-6.0.8-py2
.py3-none-any.whl#md5=41e73fae2c86ba2270ff51c1d86f7e09
  Downloading pip-6.0.8-py2.py3-none-any.whl (1.3MB)
100% |################################| 1.3MB 952kB/s ta 0:00:01 For example, just use next command to install OpenGL python module.
C:\Python27\Scripts>pip2.7 install PyOpenGL
Collecting PyOpenGL
  Downloading PyOpenGL-3.1.0.tar.gz (1.2MB)
    100% |################################| 1.2MB 2.2MB/s ta 0:00:01
Installing collected packages: PyOpenGL
  Running setup.py install for PyOpenGL
Successfully installed PyOpenGL-3.1.0 I download it from pygame website, from here. Download your version of WHL file ( amd64 is for CPU 64 bits) and your python version (cpxx). Now use this command:
Sunday, January 4, 2015
News: FOSDEM 2015 and python room.
FOSDEM is a free event that offers open source communities a place to meet, share ideas and collaborate. It is renowned for being highly developer-oriented and brings together 5000+ geeks from all over the world.
You can find a schedule of python room here.
The FOSDEM 2015 will take place at ULB Campus Solbosch on Saturday 31 January and Sunday 1 February 2015 - Brussels.
Also no registration necessary on this event , according to FOSDEM website.
You can find a schedule of python room here.
The FOSDEM 2015 will take place at ULB Campus Solbosch on Saturday 31 January and Sunday 1 February 2015 - Brussels.
Also no registration necessary on this event , according to FOSDEM website.
Friday, January 2, 2015
Python and last version of Notepad++ 6.7.3
The last version of Notepad++ has released at 2015-01-01.
It comes with many features and fix also some bugs:
First I download it from here.
I install it and I set it to working.
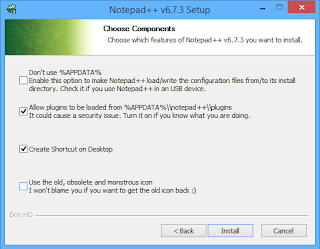
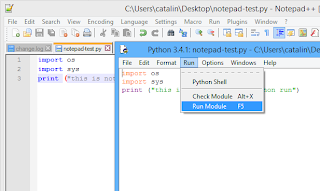
I wrote a simple python 3.4 script and then I press F5 key - Run from Notepad++.
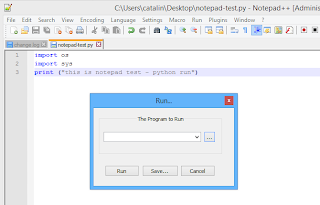
I put this in this window to run it python 3.4 : C:\Python34\Lib\idlelib\idle.bat "$(FULL_CURRENT_PATH)"
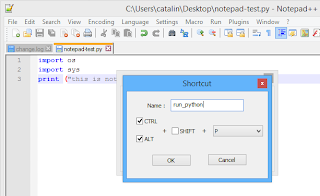
Also I press save button and select Ctr+Alt+P to run the scripts with hotkeys. This can be see it under Run menu.
When I press it then a python window with your script will show us and just you need is to press F5 key to run it.
It comes with many features and fix also some bugs:
- Syntax Highlighting and Syntax Folding;
- User Defined Syntax Highlighting and Folding;
- PCRE (Perl Compatible Regular Expression) Search/Replace;
- GUI entirely customizable: minimalist, tab with close button, multi-line tab, vertical tab and vertical document list;
- Document Map;
- Auto-completion: Word completion, Function completion and Function parameters hint;
- Multi-Document (Tab interface);
- Multi-View;
- WYSIWYG (Printing);
- Zoom in and zoom out: Ctr key + Mouse Wheel ;
- Multi-Language environment supported;
- Bookmark;
- Macro recording and playback;
- Launch with different arguments;
First I download it from here.
I install it and I set it to working.

I wrote a simple python 3.4 script and then I press F5 key - Run from Notepad++.
import os
import sys
print ("this is notepad test - python run") 
I put this in this window to run it python 3.4 : C:\Python34\Lib\idlelib\idle.bat "$(FULL_CURRENT_PATH)"

Also I press save button and select Ctr+Alt+P to run the scripts with hotkeys. This can be see it under Run menu.
When I press it then a python window with your script will show us and just you need is to press F5 key to run it.

Subscribe to:
Comments (Atom)
