analitics

Pages

Showing posts with label PyQt5. Show all posts

Monday, June 17, 2019

Python Qt5 : the most simple QTreeWidget - part 002.

This tutorial uses PyQt5 and Python version 3.7.3.
Let's install the PyQt5 python module with the pip tool:
C:\Python373\Scripts>pip install PyQt5
Collecting PyQt5
...
Successfully installed PyQt5-5.12.2 PyQt5-sip-4.19.17
Let's see one simple example with comments about how to use QTreeWidget.
import sys
from PyQt5.QtWidgets import QTreeWidget, QTreeWidgetItem, QApplication, QWidget

if __name__ == '__main__':
    # create a empty my_app application
    my_app = ''
    # test this my_app to create instance
    if QApplication.instance() != None:
        my_app = QApplication.instance()
    else:
        my_app = QApplication(sys.argv)
    # create a QTreeWidgetItem with tree columns
    my_tree= QTreeWidgetItem(["Column A", "Column B", "Column C"])
    # add date using a for loop 
    for i in range(6):
        list_item_row = QTreeWidgetItem(["Child A-" + str(i), "Child B-" + str(i), "Child C-" + str(i)])
        my_tree.addChild(list_item_row)
    # create my_widget widget
    my_widget = QWidget()
    my_widget.resize(640, 180)
    # create a QTreeWidget named my_tree_widget 
    my_tree_widget = QTreeWidget(my_widget)
    # set the size
    my_tree_widget.resize(640, 180)
    # set the number of columns 
    my_tree_widget.setColumnCount(3)
    # add labels for each column 
    my_tree_widget.setHeaderLabels(["Column A label", "Column B label", "Column C label"])
    # add my_tree using addTopLevelItem
    my_tree_widget.addTopLevelItem(my_tree)
    # show the widget
    my_widget.show()
    # the exit of my_app
    sys.exit(my_app.exec_())
This is another simple example written in a simple way to show how versatile are Python and PyQt5.
import sys
from PyQt5.QtWidgets import *
from PyQt5.QtWidgets import QApplication, QWidget, QVBoxLayout, QTreeWidget, QTreeWidgetItem
 
my_app = QApplication(sys.argv)
my_window = QWidget()
my_layout = QVBoxLayout(my_window)
 
my_tree = QTreeWidget()
my_tree.setHeaderLabels(['Name', 'Cost ($)'])
my_item_root = QTreeWidgetItem(my_tree, ['Romania', '238,397 kmp'])
my_item_raw = QTreeWidgetItem(my_item_root, ['Black Sea', '436,402 kmp'])
 
my_layout.addWidget(my_tree)
my_window.show()
sys.exit(my_app.exec_())
If you like my simple tutorials then you subscribe or you can search my other web sites too.

Monday, December 24, 2018

Python Qt5 : the most simple QTreeWidget - part 001.

The QTreeWidget is more complex in order to accomplish a simple development issue.
Today, I will show you how is the first step to start it.
This simple example will follow these goals:
  • create a simple QTreeWidget;
  • use the most simple way to do that;
  • do not use the class object;
  • show files and folders;
The example do not have any feature for and show my C drive:
  • filter, sort and drag and drop;
The result of this example:

Friday, December 21, 2018

Python Qt5 : simple draw with QPainter.

Using the QPainter is more complex than a simple example.
I try to create a simple example in order to have a good look at how can be used.
The main goal was to understand how can have the basic elements of QPainter.
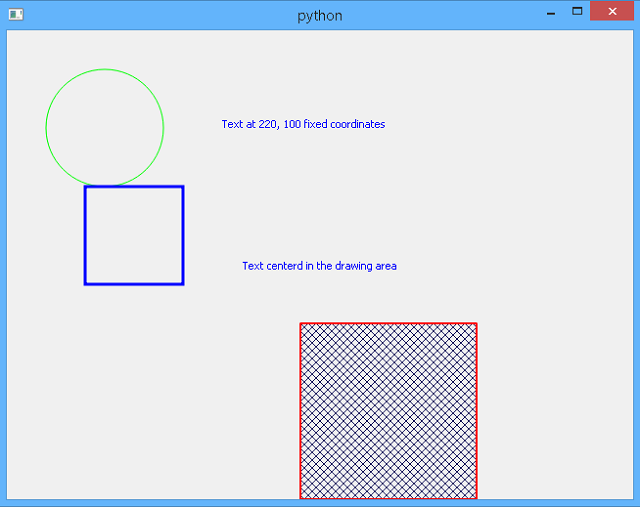
The result of my example is this:

Here is my example with all commented lines for a good approach:
import sys 
from PyQt5 import QtGui, QtWidgets 
from PyQt5.QtGui import QPainter, QBrush, QColor
from PyQt5.QtCore import Qt, QPoint 
class My_QPainter(QtWidgets.QWidget): 
    def paintEvent(self, event): 
        # create custom QPainter
        my_painter = QtGui.QPainter() 
        # start and set my_painter
        my_painter.begin(self) 
        my_painter.setRenderHint(my_painter.TextAntialiasing, True)
        my_painter.setRenderHint(my_painter.Antialiasing, True)
        #set color for pen by RGB
        my_painter.setPen(QtGui.QColor(0,0,255)) 
        # draw a text on fixed coordinates
        my_painter.drawText(220,100, "Text at 220, 100 fixed coordinates") 
        # draw a text in the centre of my_painter   
        my_painter.drawText(event.rect(), Qt.AlignCenter, "Text centerd in the drawing area") 
        #set color for pen by Qt color  
        my_painter.setPen(QtGui.QPen(Qt.green, 1)) 
        # draw a ellipse
        my_painter.drawEllipse(QPoint(100,100),60,60) 
        # set color for pen by property
        my_painter.setPen(QtGui.QPen(Qt.blue, 3, join = Qt.MiterJoin)) 
        # draw a rectangle
        my_painter.drawRect(80,160,100,100) 
        # set color for pen by Qt color 
        my_painter.setPen(QtGui.QPen(Qt.red, 2))
        # set brush 
        my_brush = QBrush(QColor(33, 33, 100, 255), Qt.DiagCrossPattern)
        my_painter.setBrush(my_brush)
        # draw a rectangle and fill with the brush 
        my_painter.drawRect(300, 300,180, 180)
        my_painter.end() 
# create application  
app = QtWidgets.QApplication(sys.argv) 
# create the window application from class
window = My_QPainter() 
# show the window
window.show() 
# default exit 
sys.exit(app.exec_())

Tuesday, December 18, 2018

Python Qt5 : complex QML file.

Today, I will show you how to have a more complex custom application with PyQt5 and QML file.
You need to create into your python folder a new folder named QMLCustom.
Into this file create two python files named: __init__.py and QMLCustom.py.
The __init__ will be an empty file.
Into your python folder installation (where you create the QMLCustom folder), create a new QML_custom.qml file.
The QML_custom.qml file will have this:
import QtQuick 2.0
import SDK 1.0
import QtQuick.Layouts 1.1

Rectangle {
    id: appwnd
    visible: true
    width: 640
    height: 480

    property int columns : 2
    property int rows : 2

    Rectangle {
        anchors.fill: parent
        color: "#00f"
    }

    GridView {
        id: grid
        anchors.fill: parent
        cellWidth: Math.max(width/2, height/2);
        cellHeight: Math.max(width/2, height/2)
        model: dashModel
        delegate : Rectangle {
            Layout.alignment: Layout.Center
            width: grid.cellWidth
            height: grid.cellHeight
            color: "#0ff"
            border.color: "#fff"
            border.width: 10

            Text {
                id: name
                anchors.horizontalCenter: parent.horizontalCenter
                anchors.bottom: parent.bottom
                anchors.leftMargin:15
                anchors.topMargin: 15
                width: parent.width 
                height: parent.height
                textFont {
                    family: "Halvetica"
                    italic: false
                    pointSize:20
                }
                suffixText: suffix
            }

        }
        onWidthChanged: {
            grid.cellWidth = grid.width/appwnd.columns;
        }

        onHeightChanged: {
            grid.cellHeight = grid.height/appwnd.rows
        }
    }

    ListModel {
        id: dashModel
        ListElement {
            tagName: "Text"
            suffix: "First text"
        }
        ListElement {
            tagName: "Text"
            suffix: "Next text"
        }         
    }
} 
If you read this you will see the qml type file has two imports and a text.
The imports are used to load it and the text file is used to describe what we need.
In this case is created a Rectangle, GridView and one ListModel with two ListElement.
All of this part will be a link to the QMLCustom.py file.
For example: follow the suffixText from qml file suffixText: suffix into QMLCustom.py file (decorator def suffixText(self, text)).
Into the QMLCustom folder you need to fill the QMLCustom.py with this:
import PyQt5
from PyQt5.QtCore import *
from PyQt5.QtGui import *
from PyQt5.QtWidgets import *
from PyQt5.QtCore import pyqtProperty, pyqtSignal, pyqtSlot
from PyQt5.QtQuick import QQuickPaintedItem, QQuickItem
from PyQt5.QtGui import QPainter
from PyQt5 import QtCore

class QMLCustom(QQuickPaintedItem):
    #
    class DialType():
        FullDial = 0
        MinToMax = 1
        NoDial = 2
    #
    sizeChanged = pyqtSignal()
    valueChanged = pyqtSignal()
    #
    backgroundColorChanged = pyqtSignal()
    #
    textColorChanged = pyqtSignal()
    suffixTextChanged = pyqtSignal()
    showTextChanged = pyqtSignal()
    textFontChanged = pyqtSignal()

    def __init__(self, parent=None):
        super(QMLCustom, self).__init__(parent)

        self.setWidth(100)
        self.setHeight(100)
        self.setSmooth(True)
        self.setAntialiasing(True)

        self._Size = 100
        self._DialWidth = 15
        self._SuffixText = ""
        self._BackgroundColor = Qt.transparent
        self._TextColor = QColor(0, 0, 0)
        self._ShowText = True
        self._TextFont = QFont()

    def paint(self, painter):
        painter.save()

        size = min(self.width(), self.height())       
        self.setWidth(size)
        self.setHeight(size)
        rect = QRectF(0, 0, self.width(), self.height()) 
        painter.setRenderHint(QPainter.Antialiasing)
        
        painter.restore()

        painter.save()
        painter.setFont(self._TextFont)
        offset = self._DialWidth / 2
        if self._ShowText:
            painter.drawText(rect.adjusted(offset, offset, -offset, -offset), Qt.AlignCenter, self._SuffixText)
        else:
            painter.drawText(rect.adjusted(offset, offset, -offset, -offset), Qt.AlignCenter, self._SuffixText)
        painter.restore()

    @QtCore.pyqtProperty(str, notify=sizeChanged)
    def size(self):
        return self._Size

    @size.setter
    def size(self, size):
        if self._Size == size:
            return
        self._Size = size
        self.sizeChanged.emit()

    @QtCore.pyqtProperty(float, notify=valueChanged)
    def value(self):
        return self._Value

    @value.setter
    def value(self, value):
        if self._Value == value:
            return
        self._Value = value
        self.valueChanged.emit()


    @QtCore.pyqtProperty(QColor, notify=backgroundColorChanged)
    def backgroundColor(self):
        return self._BackgroundColor

    @backgroundColor.setter
    def backgroundColor(self, color):
        if self._BackgroundColor == color:
            return
        self._BackgroundColor = color
        self.backgroundColorChanged.emit()


    @QtCore.pyqtProperty(QColor, notify=textColorChanged)
    def textColor(self):
        return self._TextColor

    @textColor.setter
    def textColor(self, color):
        if self._TextColor == color:
            return
        self._TextColor = color
        self.textColorChanged.emit()  

    @QtCore.pyqtProperty(str, notify=suffixTextChanged)
    def suffixText(self):
        return self._SuffixText

    @suffixText.setter
    def suffixText(self, text):
        if self._SuffixText == text:
            return
        self._SuffixText = text
        self.suffixTextChanged.emit()

    @QtCore.pyqtProperty(str, notify=showTextChanged)
    def showText(self):
        return self._ShowText

    @showText.setter
    def showText(self, show):
        if self._ShowText == show:
            return
        self._ShowText = show


    @QtCore.pyqtProperty(QFont, notify=textFontChanged)
    def textFont(self):
        return self._TextFont

    @textFont.setter
    def textFont(self, font):
        if self._TextFont == font:
            return
        self._TextFont = font
        self.textFontChanged.emit()
This is a base python module that allows you to use the qml file and show it into your application.
The QMLCustom.py use a class (with pyqtSignal and paint to link all data with decorators) to be used into your application.
This can be a little difficult to follow but if you deal with a tool like QtCreator editor you will understand how this integrated GUI layout and forms designer with this script.
The last part is more simple and is the application.
This script uses both the custom python module QMLCustom and the qml file.
Create a python file into your folder python installation fill with the next script and run it:
import sys
import os
import subprocess

from QMLCustom.QMLCustom import QMLCustom

from PyQt5.QtCore import QUrl, Qt, QObject, pyqtSignal, pyqtSlot
from PyQt5.QtGui import QGuiApplication, QCursor
from PyQt5.QtQuick import QQuickView
from PyQt5.QtQml import qmlRegisterType
from OpenGL import GLU

class App(QGuiApplication):
 def __init__(self, argv):
  super(App, self).__init__(argv)

if __name__ == '__main__':
 try:
  app = App(sys.argv)
  
  qmlRegisterType(QMLCustom, "SDK", 1,0, "Text")

  view = QQuickView()
  ctxt = view.rootContext()
  view.setSource(QUrl("QML_custom.qml"))
  view.show()
  ret = app.exec_()

 except Exception as e:
  print (e)
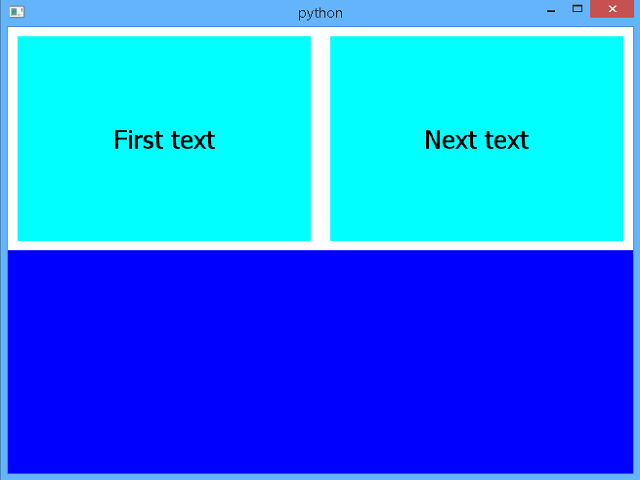
The result is this:

Python Qt5 : application with QML file.

The PyQt5 includes QML as a means of declaratively describing a user interface and is possible to write complete standalone QML applications.
Using QML file is different from the versions PyQt5 and old PyQt4.
Using this type of application can let you solve custom and style application.
I create a simple example but can create your python module with a class with new type of style.
This can be used with qmlRegisterType for your new python class type.
Let's see the example:
The main python file:
from PyQt5.QtNetwork import *
from PyQt5.QtQml import *
from PyQt5.QtWidgets import *
from PyQt5.QtCore import *

class MainWin(object):
    def __init__(self):
        self.eng = QQmlApplicationEngine()
        self.eng.load('win.qml')
        win = self.eng.rootObjects()[0]   
        win.show()

if __name__ == '__main__':
    import sys
    App = QApplication(sys.argv)
    Win = MainWin()
    sys.exit(App.exec_())
The QML file:
import QtQuick 2.2
import QtQuick.Controls 1.0
ApplicationWindow {
    id: main
    width: 640
    height: 480
    color: 'blue'
 }
The result is a blue window.

Friday, December 7, 2018

Python Qt5 : simple checkbox example.

Today we created a simple tutorial about QCheckBox and QLabel.
The purpose of this tutorial is to use QCheckBox in a GUI interface.
When we check QCheckBox, this will change the text from a QLabel.
The variables used by QCheckBox are my_checkbox and my_label for QLabel.
The result of my source code is this:

Let's see the source code:
# -*- coding: utf-8 -*-
"""
@author: catafest
"""
import sys
from PyQt5.QtCore import Qt
from PyQt5.QtWidgets import QWidget, QCheckBox, QLabel, QApplication

class MyCheckBox(QWidget):
 def __init__(self):
  super().__init__()
 
  my_checkbox = QCheckBox("Check this , see result", self)
  my_checkbox.move(50,60)
  my_checkbox.stateChanged.connect(self.change_my_option)
  

  self.my_label = QLabel("You can visit free-tutorial.org ", self)
  self.my_label.move(50,30)

  #self.my_label.setAlignment(Qt.AlignCenter)
  
  self.setGeometry(420,420,640,100)
  self.setWindowTitle("free-tutorials.org PyQt5 ChecBox ")


 def change_my_option(self, state):
  if state  == Qt.Checked:
   self.my_label.setText("Thank's by free-tutorial.org")
  else:
   self.my_label.setText("You can visit free-tutorial.org")
   
if __name__ == '__main__':
 app = QApplication(sys.argv)
 win = MyCheckBox()
 win.show()
 sys.exit(app.exec_())

Thursday, November 29, 2018

Python Qt5 : submenu example.

Using my old example I will create a submenu with PyQt5.
First, you need to know the submenu works like the menu.
Let's see the result:

The source code is very simple:
# -*- coding: utf-8 -*-
"""
@author: catafest
"""
import sys
from PyQt5.QtWidgets import QMainWindow, QAction, qApp, QApplication, QDesktopWidget, QMenu
from PyQt5.QtGui import QIcon

class Example(QMainWindow):
    #init the example class to draw the window application    
    def __init__(self):
        super().__init__()    
        self.initUI()
    #create the def center to select the center of the screen         
    def center(self):
        # geometry of the main window
        qr = self.frameGeometry()
        # center point of screen
        cp = QDesktopWidget().availableGeometry().center()
        # move rectangle's center point to screen's center point
        qr.moveCenter(cp)
        # top left of rectangle becomes top left of window centering it
        self.move(qr.topLeft())
    #create the init UI to draw the application
    def initUI(self):               
        #create the action for the exit application with shortcut and icon
        #you can add new action for File menu and any actions you need
        exitAct = QAction(QIcon('exit.png'), '&Exit', self)        
        exitAct.setShortcut('Ctrl+Q')
        exitAct.setStatusTip('Exit application')
        exitAct.triggered.connect(qApp.quit)
        #create the status bar for menu 
        self.statusBar()
        #create the menu with the text File , add the exit action 
        #you can add many items on menu with actions for each item
        menubar = self.menuBar()
        fileMenu = menubar.addMenu('&File')
        fileMenu.addAction(exitAct)
        
        # add submenu to menu 
        submenu = QMenu('Submenu',self)

        # some dummy actions
        submenu.addAction('Submenu 1')
        submenu.addAction('Submenu 2')
           
        # add to the top menu
        menubar.addMenu(submenu)
        #resize the window application 
        self.resize(640, 480)
        #draw on center of the screen 
        self.center()
        #add title on windows application 
        self.setWindowTitle('Simple menu')
        #show the application
        self.show()
        #close the UI class
        
if __name__ == '__main__':
    #create the application 
    app = QApplication(sys.argv)
    #use the UI with new  class
    ex = Example()
    #run the UI 
    sys.exit(app.exec_())

Friday, November 16, 2018

Python Qt5 : setStyleSheet example.

Today I will show you how to style the PyQt5 widgets and create a good looking application interface.
The main goal of this tutorial is to see where you can use the style issue.
I used just one edit and one button to have a simple example.
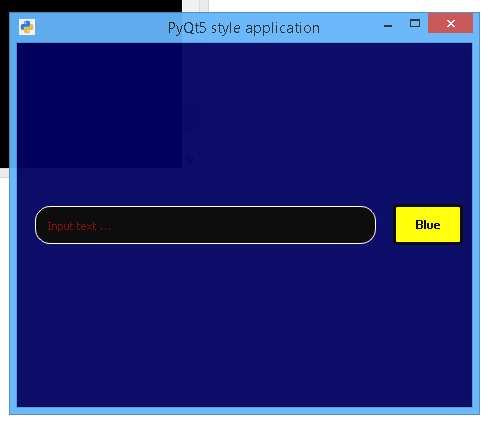
The result of my example is this:

The example start with a simple application with QPushButton, QLineEdit.
Is more simple to use a class for the button because we need to create a different style for each action: enterEvent or leaveEvent and so on.
You can see I used QFont to change the font from button.
This class is named Push_button and will be used like any QPushButton from default PyQt5 examples.
We can do this for any widget and change it with setStyleSheet.
Another part of the code is for QLineEdit.
This can be changed easily with setStyleSheet, first with the default of this and make other changes when you need.
The source code has an QGridLayout to help us to align the widgets.
Let's see the source code:
from PyQt5 import QtWidgets, QtGui, QtCore
from PyQt5.QtCore import pyqtSignal

font_button = QtGui.QFont()
font_button.setFamily("Corbel")
font_button.setPointSize(10)
font_button.setWeight(100)

class Push_button(QtWidgets.QPushButton):
    
    def __init__(self, parent=None):
        super(Push_button, self).__init__(parent)
        self.setMouseTracking(True)
        self.setStyleSheet("margin: 1px; padding: 10px; \
      background-color: \
                           rgba(255,255,0,255); \
                           color: rgba(0,0,0,255); \
                           border-style: solid; \
                           border-radius: 4px; border-width: 3px; \
                           border-color: rgba(0,0,0,255);")

    def enterEvent(self, event):
        if self.isEnabled() is True:
            self.setStyleSheet("margin: 10px; padding: 10px; \
          background-color: \
                               rgba(255,255,0,255); \
                               color: rgba(0,0,10,255); \
                               border-style: solid; \
                               border-radius: 8px; \
                               border-width: 1px; \
                               border-color: \
                               rgba(0,0,100,255);")
        if self.isEnabled() is False:
            self.setStyleSheet("margin: 10px; padding: 10px; \
          background-color: \
                               rgba(255,255,0,255); \
                               color: rgba(0,0,10,255); \
                               border-style: solid; \
                               border-radius: 8px; \
                               border-width: 1px; \
                               border-color: \
                               rgba(0,0,100,255);")

    def leaveEvent(self, event):
        self.setStyleSheet("margin: 10px; padding: 10px; \
                           background-color: rgba(0,0,0,100); \
                           color: rgba(0,0,255,255); \
                           border-style: solid; \
                           border-radius: 8px; border-width: 1px; \
                           border-color: rgba(0,50,100,255);")


class QthreadApp(QtWidgets.QWidget):
    sig = pyqtSignal(str)
    def __init__(self, parent=None):
        QtWidgets.QWidget.__init__(self, parent)
        self.setWindowTitle("PyQt5 style application")
        self.setWindowIcon(QtGui.QIcon("icon.png"))
        self.setMinimumWidth(resolution.width() / 3)
        self.setMinimumHeight(resolution.height() / 2)
        self.setStyleSheet("QWidget { \
                           background-color: rgba(0,0,100,250);} \
                           QScrollBar:horizontal {width: 1px; \
                           height: 1px; \
                           background-color: rgba(0,100,255,0);} \
                           QScrollBar:vertical {width: 1px; \
                           height: 10px; \
                           background-color: rgba(0,41,59,255);}")
        self.linef = QtWidgets.QLineEdit(self)
        self.linef.setPlaceholderText("Input text ...")
        self.linef.setStyleSheet("margin: 10px; padding: 10px; \
                                 background-color: \
                                 rgba(0,0,0,255);\
                                 color: rgba(255,0,0,255); \
                                 border-style: solid; \
                                 border-radius: 15px; \
                                 border-width: 1px; \
                                 border-color: \
                                 rgba(255,255,255,255);")
        self.my_button = Push_button(self)
        self.my_button.setText("Blue")
        self.my_button.setFixedWidth(72)
        self.my_button.setFont(font_button)
        self.my_grid = QtWidgets.QGridLayout()
        self.my_grid.addWidget(self.linef, 0, 0, 1, 220)
        self.my_grid.addWidget(self.my_button, 0, 220, 1, 1)
        self.my_grid.setContentsMargins(8, 8, 8, 8)
        self.setLayout(self.my_grid)

if __name__ == "__main__":
    import sys
    app = QtWidgets.QApplication(sys.argv)
    desktop = QtWidgets.QApplication.desktop()
    resolution = desktop.availableGeometry()
    myapp = QthreadApp()
    myapp.setWindowOpacity(0.95)
    myapp.show()
    myapp.move(resolution.center() - myapp.rect().center())
    sys.exit(app.exec_())
else:
    desktop = QtWidgets.QApplication.desktop()
    resolution = desktop.availableGeometry()

Monday, November 12, 2018

Python Qt5 : QCalendarWidget example.

This tutorial is about QCalendarWidget.
Use a default application and add this widget.
You can change and get the date from the widget calendar like any widget.
The result of this source code is this result:

This is the source code for QCalendarWidget example:
import sys
from PyQt5 import *
from PyQt5.QtWidgets import QApplication, QCalendarWidget, QWidget, QLabel
from PyQt5.QtCore import *
from PyQt5.QtGui import *

class Example(QWidget):
   def __init__(self):
      super(Example, self).__init__()
      self.initUI()
   def initUI(self):
      my_calendar = QCalendarWidget(self)
      my_calendar.setGridVisible(True)
      my_calendar.move(10, 20)
      my_calendar.clicked[QDate].connect(self.show_date)
      self.my_label = QLabel(self)
      date = my_calendar.selectedDate()
      self.my_label.setText(date.toString())
      self.my_label.move(10, 220)
      self.setGeometry(100,100,320,270)
      self.setWindowTitle('Calendar')
      self.show()
   def show_date(self, date):
      self.my_label.setText(date.toString())

def main():
   app = QApplication(sys.argv)
   ex = Example()
   sys.exit(app.exec_())
if __name__ == '__main__':
   main()

Saturday, November 10, 2018

Python Qt5 : QTabWidget example.

Today I test the QTabWidget with an simple example.
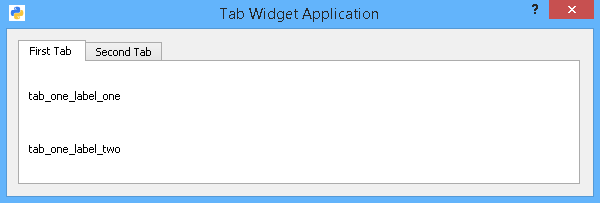
The source code uses the QTabWidget and create two Tab: FirstTab and TabTwo.
I add for each tab two labels: tab_one_label_one, tab_one_label_two,tab_two_label_one and tab_two_label_two.
For layouts, I used: vboxLayout with first_layout and second_layout.
The result of my running code is this:

The rest of the source code is simple:
import sys
from PyQt5.QtGui import QIcon
from PyQt5.QtWidgets import QDialog, QApplication, QWidget
from PyQt5.QtWidgets import QVBoxLayout, QTabWidget, QLabel

class TabDialog(QDialog):
    def __init__(self):
        super().__init__()

        self.setWindowTitle("Tab Widget Application")
        self.setWindowIcon(QIcon("icon.png"))

        tabwidget = QTabWidget()
        tabwidget.addTab(FirstTab(), "First Tab")
        tabwidget.addTab(TabTwo(), "Second Tab")

        vboxLayout = QVBoxLayout()
        vboxLayout.addWidget(tabwidget)

        self.setLayout(vboxLayout)

class FirstTab(QWidget):
    def __init__(self):
        super().__init__()
        tab_one_label_one = QLabel("tab_one_label_one")
        tab_one_label_two = QLabel("tab_one_label_two")
        
        first_layout = QVBoxLayout()
        first_layout.addWidget(tab_one_label_one)
        first_layout.addWidget(tab_one_label_two)
        self.setLayout(first_layout)

class TabTwo(QWidget):
    def __init__(self):
        super().__init__()
        tab_two_label_one = QLabel("tab_two_label_one")
        tab_two_label_two = QLabel("tab_two_label_two")
        
        second_layout = QVBoxLayout()
        second_layout.addWidget(tab_two_label_one)
        second_layout.addWidget(tab_two_label_two)
        self.setLayout(second_layout)

if __name__ == "__main__":
    app = QApplication(sys.argv)
    tabdialog = TabDialog()
    tabdialog.show()
    app.exec()

Friday, November 9, 2018

Python Qt5 : default icons with QStyle.

This is a simple example of QStyle.
Using the QStyle can solve more issues above this example.
The QStyle can solve more problems than this example.
You can change everything in PyQt5 and Qt.
The QStyle class is an abstract base class that encapsulates the look and feel of a GUI, read here.
This is the result of a source code I used to show you how can use default icons from PyQt5.

See this source code:
import sys
from PyQt5.QtCore import *
from PyQt5.QtGui import *
from PyQt5.QtWidgets import *

class Widget(QWidget):
  
    def __init__(self, parent= None):
        super(Widget, self).__init__()
        icons = [
'SP_TitleBarMinButton', 
'SP_TitleBarMenuButton', 
'SP_TitleBarMaxButton', 
'SP_TitleBarCloseButton', 
'SP_TitleBarNormalButton', 
'SP_TitleBarShadeButton', 
'SP_TitleBarUnshadeButton', 
'SP_TitleBarContextHelpButton', 
'SP_MessageBoxInformation', 
'SP_MessageBoxWarning', 
'SP_MessageBoxCritical', 
'SP_MessageBoxQuestion', 
'SP_DesktopIcon', 
'SP_TrashIcon', 
'SP_ComputerIcon', 
'SP_DriveFDIcon', 
'SP_DriveHDIcon', 
'SP_DriveCDIcon', 
'SP_DriveDVDIcon', 
'SP_DriveNetIcon', 
'SP_DirHomeIcon', 
'SP_DirOpenIcon', 
'SP_DirClosedIcon', 
'SP_DirIcon', 
'SP_DirLinkIcon', 
'SP_FileIcon', 
'SP_FileLinkIcon', 
'SP_FileDialogStart', 
'SP_FileDialogEnd', 
'SP_FileDialogToParent', 
'SP_FileDialogNewFolder', 
'SP_FileDialogDetailedView', 
'SP_FileDialogInfoView', 
'SP_FileDialogContentsView', 
'SP_FileDialogListView', 
'SP_FileDialogBack', 
'SP_DockWidgetCloseButton', 
'SP_ToolBarHorizontalExtensionButton', 
'SP_ToolBarVerticalExtensionButton', 
'SP_DialogOkButton', 
'SP_DialogCancelButton', 
'SP_DialogHelpButton', 
'SP_DialogOpenButton', 
'SP_DialogSaveButton', 
'SP_DialogCloseButton', 
'SP_DialogApplyButton', 
'SP_DialogResetButton', 
'SP_DialogDiscardButton', 
'SP_DialogYesButton', 
'SP_DialogNoButton', 
'SP_ArrowUp',  
'SP_ArrowDown', 
'SP_ArrowLeft', 
'SP_ArrowRight', 
'SP_ArrowBack', 
'SP_ArrowForward', 
'SP_CommandLink', 
'SP_VistaShield', 
'SP_BrowserReload', 
'SP_BrowserStop', 
'SP_MediaPlay', 
'SP_MediaStop', 
'SP_MediaPause', 
'SP_MediaSkipForward',
'SP_MediaSkipBackward', 
'SP_MediaSeekForward',
'SP_MediaSeekBackward', 
'SP_MediaVolume', 
'SP_MediaVolumeMuted', 
'SP_CustomBase'
            ]
        Col_size = 6
         
        layout = QGridLayout()
 
        count = 0
        for i in icons:
            select_button = QPushButton(i)
            select_button.setIcon(self.style().standardIcon(getattr(QStyle, i)))
 
            layout.addWidget(select_button, count / Col_size, count % Col_size)
            count += 1
             
        self.setLayout(layout)
         
if __name__ == '__main__':
    app = QApplication(sys.argv)
             
    dialog = Widget()
    dialog.show()
             
    app.exec_()

Thursday, November 8, 2018

Python Qt5 : QFileDialog and QTextEdit example.

This tutorial is about QFileDialog and how to use it.
First you need to create a default PyQ5 application and add your method is called by my_OpenDialog.
This will be connected to one button.
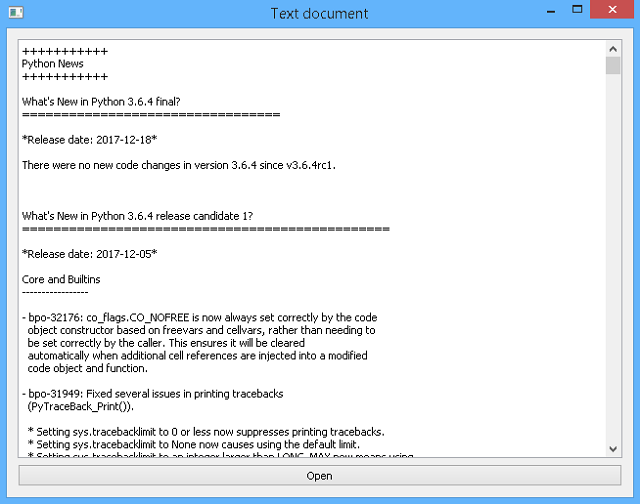
My application uses the QTextEdit to show HTML and text files.
If you try to see another file this will open badly.
I set the completeSuffix just for HTML and text.
As you know this returns the complete suffix (extension) of the file.
The content of this file is put into QTextEdit widget create and named editor_text.
This is result of using QFileDialog with python:

This is the source code with the QFileDialog example:
import sys, os
from PyQt5 import QtCore, QtWidgets

class Window(QtWidgets.QWidget):
    def __init__(self):
        super(Window, self).__init__()
        self.setWindowTitle('Text document')
        self.editor_text = QtWidgets.QTextEdit(self)

        self.button_OpenDialog = QtWidgets.QPushButton('Open', self)
        self.button_OpenDialog.clicked.connect(self.my_OpenDialog)

        layout = QtWidgets.QGridLayout(self)
        layout.addWidget(self.editor_text, 0, 0, 1, 1)
        layout.addWidget(self.button_OpenDialog, 1, 0)
        #self.handleTextChanged()

    def my_OpenDialog(self):
        path = QtWidgets.QFileDialog.getOpenFileName(
            self, 'Open file', '',
            'HTML files (*.html);;Text files (*.txt)')[0]
        if path:
            file = QtCore.QFile(path)
            if file.open(QtCore.QIODevice.ReadOnly):
                stream = QtCore.QTextStream(file)
                text = stream.readAll()
                info = QtCore.QFileInfo(path)
                if info.completeSuffix() == 'html':
                    self.editor_text.setHtml(text)
                else:
                    self.editor_text.setPlainText(text)
                file.close()

if __name__ == '__main__':
    app = QtWidgets.QApplication(sys.argv)
    window = Window()
    window.resize(640, 480)
    window.show()
    sys.exit(app.exec_())

Wednesday, November 7, 2018

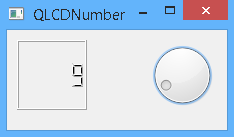
Python Qt5 : QLCDNumber and QDial example.

This tutorial uses a simple example of QLCDNumber and QDial.
The steps start with create the QWidget with the QLCDNumber and QDial.
You need to set geometry for both and connect the dial with valueChanged.
Finally you need to use show to see the QWidget.
The result is show into the next screenshot:

Let see the source code:
import sys
from PyQt5.QtCore import Qt
from PyQt5.QtWidgets import (QWidget, QLCDNumber, QDial, QApplication)

class QLCDNumber_QDial(QWidget):
    def __init__(self):
        super().__init__()
        self.initUi()

    def initUi(self):
        the_lcd = QLCDNumber(self)
        the_dial = QDial(self)

        self.setGeometry(150, 100, 220, 100)
        self.setWindowTitle('QLCDNumber')

        the_lcd.setGeometry(10,10,70,70)
        the_dial.setGeometry(140,10,70,70)

        the_dial.valueChanged.connect(the_lcd.display)

        self.show()

if __name__ == '__main__':
    app = QApplication(sys.argv)
    run = QLCDNumber_QDial() 
    sys.exit(app.exec_())

Tuesday, November 6, 2018

Python Qt5 : QColorDialog example.

Today I will show you how to use the QColorDialog and clipboard with PyQt5.
You can read documentation from the official website.
This example used a tray icon with actions for each type of code color.
The code of color is put into clipboard area and print on the shell.
I use two ways to get the code of color:
  • parse the result of currentColor depends by type of color codel;
  • get the code of color by a special function from QColorDialog;
To select the color I want to use is need to use the QColorDialog:

Let's see the source code:
from PyQt5.QtGui import *
from PyQt5.QtWidgets import *

# create the application
app = QApplication([])
app.setQuitOnLastWindowClosed(False)

# get the icon file
icon = QIcon("icon.png")

# create clipboard
clipboard = QApplication.clipboard()
# create dialog color
dialog = QColorDialog()

# create functions to get parsing color
def get_color_hex():
    if dialog.exec_():
        color = dialog.currentColor()
        clipboard.setText(color.name())
        print(clipboard.text())

def get_color_rgb():
    if dialog.exec_():
        color = dialog.currentColor()
        clipboard.setText("rgb(%d, %d, %d)" % (
            color.red(), color.green(), color.blue()
        ))
        print(clipboard.text())

def get_color_hsv():
    if dialog.exec_():
        color = dialog.currentColor()
        clipboard.setText("hsv(%d, %d, %d)" % (
            color.hue(), color.saturation(), color.value()
        ))
        print(clipboard.text())
# create function to use getCmyk 
def get_color_getCmyk():
    if dialog.exec_():
        color = dialog.currentColor()
        clipboard.setText("Cmyk(%d, %d, %d, %d, %d)" % (
            color.getCmyk()
        ))
        print(clipboard.text())


# create the tray icon application
tray = QSystemTrayIcon()
tray.setIcon(icon)
tray.setVisible(True)

# create the menu and add actions
menu = QMenu()
action1 = QAction("Hex")
action1.triggered.connect(get_color_hex)
menu.addAction(action1)

action2 = QAction("RGB")
action2.triggered.connect(get_color_rgb)
menu.addAction(action2)

action3 = QAction("HSV")
action3.triggered.connect(get_color_hsv)
menu.addAction(action3)

action4 = QAction("Cmyk")
action4.triggered.connect(get_color_getCmyk)
menu.addAction(action4)

action5 =QAction("Exit")
action5.triggered.connect(exit)
menu.addAction(action5)

# add the menu to the tray icon application
tray.setContextMenu(menu)

app.exec_()

Monday, November 5, 2018

Python Qt5 : tray icon example.

This tutorial is about another tray icon application type.
The base application is the same like any application with some changes with this steps:
- QSystemTrayIcon this will start to create the application like an tray icon application;
- create one menu to show if you use the right click of mouse;
- add a menu with action items;
- add the exit action to close the tray icon application;
- you can use the action item from menu to print a message
Let's see the source code:
from PyQt5.QtGui import *
from PyQt5.QtWidgets import *
# create the application
app = QApplication([])
app.setQuitOnLastWindowClosed(False)

# create the icon
icon = QIcon("icon.png")

# create the tray icon 
tray = QSystemTrayIcon()
tray.setIcon(icon)
tray.setVisible(True)

# this will print a message 
def print_msg():
 print("This action is triggered connect!")

# create the menu for tray icon
menu = QMenu()

# add one item to menu 
action = QAction("This is menu item")
menu.addAction(action)
action.triggered.connect(print_msg)

# add exit item to menu 
exitAction = QAction("&Exit")
menu.addAction(exitAction)
exitAction.triggered.connect(exit)

# add the menu to the tray
tray.setContextMenu(menu)

# start application execution 
app.exec_()
This is result of the running source code:

Sunday, November 4, 2018

Python Qt5 : QtSql with QtOpenGL example.

Today I will show you how to deal with QtOpenGL.
Let's make a test to see what is this:
>>> import PyQt5
>>> from PyQt5.QtOpenGL import *
>>> dir(PyQt5.QtOpenGL)
['QGL', 'QGLContext', 'QGLFormat', 'QGLWidget', '__doc__', '__file__', '__loader
__', '__name__', '__package__', '__spec__']
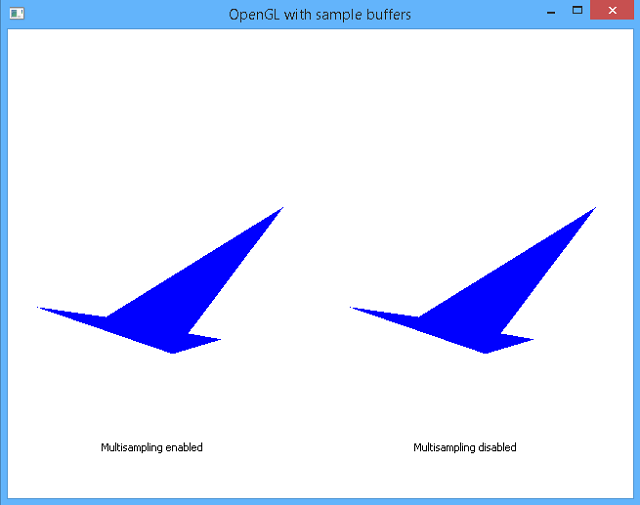
The QtOpenGL is used to take an OpenGL content and show into the PyQt5 application.
You need to kknow how to use OpenGL API.
You can see the result of this example:

This is the source code for my example:
import sys
import math

from PyQt5.QtCore import Qt
from PyQt5.QtGui import QColor
from PyQt5.QtWidgets import QApplication, QMessageBox
from PyQt5.QtOpenGL import QGL, QGLFormat, QGLWidget

try:
    from OpenGL import GL
except ImportError:
    app = QApplication(sys.argv)
    QMessageBox.critical(None, "OpenGL samplebuffers",
            "PyOpenGL must be installed to run this example.")
    sys.exit(1)

# use to create OpenGL content 
class GLWidget(QGLWidget):
    GL_MULTISAMPLE = 0x809D
    # rotation to 0
    rot = 0.0

    def __init__(self, parent):
        super(GLWidget, self).__init__(QGLFormat(QGL.SampleBuffers), parent)
        self.list_ = []
        self.startTimer(40)
        self.setWindowTitle("OpenGL with sample buffers")

    def initializeGL(self):
        GL.glMatrixMode(GL.GL_PROJECTION)
        GL.glLoadIdentity()
        GL.glOrtho( -.5, .5, .5, -.5, -1000, 1000)
        GL.glMatrixMode(GL.GL_MODELVIEW)
        GL.glLoadIdentity()
        GL.glClearColor(1.0, 1.0, 1.0, 1.0)

        self.makeObject()

    def resizeGL(self, w, h):
        GL.glViewport(0, 0, w, h)

    def paintGL(self):
        GL.glClear(GL.GL_COLOR_BUFFER_BIT | GL.GL_DEPTH_BUFFER_BIT)

        GL.glMatrixMode(GL.GL_MODELVIEW)
        GL.glPushMatrix()
        GL.glEnable(GLWidget.GL_MULTISAMPLE)
        GL.glTranslatef( -0.25, -0.10, 0.0)
        GL.glScalef(0.75, 1.15, 0.0)
        GL.glRotatef(GLWidget.rot, 0.0, 0.0, 1.0)
        GL.glCallList(self.list_)
        GL.glPopMatrix()

        GL.glPushMatrix()
        GL.glDisable(GLWidget.GL_MULTISAMPLE)
        GL.glTranslatef(0.25, -0.10, 0.0)
        GL.glScalef(0.75, 1.15, 0.0)
        GL.glRotatef(GLWidget.rot, 0.0, 0.0, 1.0)
        GL.glCallList(self.list_)
        GL.glPopMatrix()

        GLWidget.rot += 0.2

        self.qglColor(Qt.black)
        self.renderText(-0.35, 0.4, 0.0, "Multisampling enabled")
        self.renderText(0.15, 0.4, 0.0, "Multisampling disabled")

    def timerEvent(self, event):
        self.update()
    # create one object 
    def makeObject(self):
        x1 = +0.05
        y1 = +0.25
        x2 = +0.15
        y2 = +0.21
        x3 = -0.25
        y3 = +0.2
        x4 = -0.1  
        y4 = +0.2
        x5 = +0.25 
        y5 = -0.05

        self.list_ = GL.glGenLists(1)
        GL.glNewList(self.list_, GL.GL_COMPILE)
        
        self.qglColor(Qt.blue)
        self.geometry(GL.GL_POLYGON, x1, y1, x2, y2, x3, y3, x4, y4, x5, y5)
        
        GL.glEndList()
    # create geometry of object depend of render - GL_POLYGON
    # used five points 
    def geometry(self, primitive, x1, y1, x2, y2, x3, y3, x4, y4, x5, y5):
        GL.glBegin(primitive)

        GL.glVertex2d(x1, y1)
        GL.glVertex2d(x2, y2)
        GL.glVertex2d(x3, y3)
        GL.glVertex2d(x4, y4)
        GL.glVertex2d(x5, y5)

        GL.glEnd()
# start the application 
if __name__ == '__main__':

    app = QApplication(sys.argv)

    my_format = QGLFormat.defaultFormat()
    my_format.setSampleBuffers(True)
    QGLFormat.setDefaultFormat(my_format)

    if not QGLFormat.hasOpenGL():
        QMessageBox.information(None, "OpenGL using samplebuffers",
                "This system does not support OpenGL.")
        sys.exit(0)

    widget = GLWidget(None)

    if not widget.format().sampleBuffers():
        QMessageBox.information(None, "OpenGL using samplebuffers",
                "This system does not have sample buffer support.")
        sys.exit(0)

    widget.resize(640, 480)
    widget.show()

    sys.exit(app.exec_())

Saturday, November 3, 2018

Python Qt5 : QtSql with QSQLITE example.

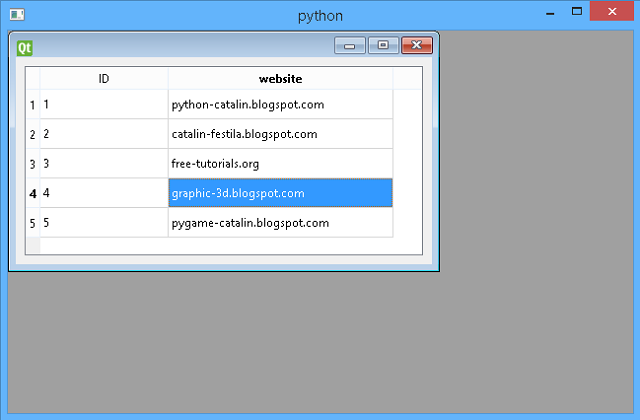
Today I will show you how to deal with QtSql and QSQLITE and show a table into an MDI (Multiple Document Interface) application.
First I create tree scripts named:
  • PyQt5_connection.py - create a memory database and add value into table;
  • PyQt5_view.py - create a model for the table;
  • PyQt5_show.py - show the MDI application with the model table database;
The source code is commented and is simple to understand.
Let's see this python scripts:
First is PyQt5_connection.py:
from PyQt5 import QtWidgets, QtSql
from PyQt5.QtSql import *

def createConnection():
    db = QtSql.QSqlDatabase.addDatabase("QSQLITE")
    db.setDatabaseName(":memory:")
    if not db.open():
        QtWidgets.QMessageBox.critical(None, "Cannot open memory database",
                             "Unable to establish a database connection.\n\n"
                             "Click Cancel to exit.", QtWidgets.QMessageBox.Cancel)
        return False
    query = QtSql.QSqlQuery()
    #print (os.listdir("."))
    query.exec("DROP TABLE IF EXISTS Websites")
    query.exec("CREATE TABLE Websites (ID INTEGER PRIMARY KEY NOT NULL, " +     "website VARCHAR(20))")
    query.exec("INSERT INTO Websites (website) VALUES('python-catalin.blogspot.com')")
    query.exec("INSERT INTO Websites (website) VALUES('catalin-festila.blogspot.com')")
    query.exec("INSERT INTO Websites (website) VALUES('free-tutorials.org')")
    query.exec("INSERT INTO Websites (website) VALUES('graphic-3d.blogspot.com')")
    query.exec("INSERT INTO Websites (website) VALUES('pygame-catalin.blogspot.com')")
    return True
The next is the PyQt5_view.py python script with the model of the table from database:
from PyQt5 import QtWidgets, QtSql

from PyQt5 import QtWidgets, QtSql

class WebsitesWidget(QtWidgets.QWidget):
    def __init__(self, parent=None):
        super(WebsitesWidget, self).__init__(parent)
 # this layout_box can be used if you need more widgets 
 # I used just one named WebsitesWidget
        layout_box = QtWidgets.QVBoxLayout(self)
 #
        my_view = QtWidgets.QTableView()
 # put viwe in layout_box area
        layout_box.addWidget(my_view)
 # create a table model
        my_model = QtSql.QSqlTableModel(self)
        my_model.setTable("Websites")
        my_model.select()
 #show the view with model  
        my_view.setModel(my_model)
        my_view.setItemDelegate(QtSql.QSqlRelationalDelegate(my_view))
The last python script named PyQt5_show.py will create the MDI application and will show databese table:
from PyQt5 import QtWidgets, QtSql
from PyQt5_connection import createConnection
# this will import any classes from PyQt5_view script
from PyQt5_view import WebsitesWidget

class MainWindow(QtWidgets.QMainWindow):
    def __init__(self, parent=None):
        super(MainWindow, self).__init__(parent)

        self.MDI = QtWidgets.QMdiArea()
        self.setCentralWidget(self.MDI)

        SubWindow1 = QtWidgets.QMdiSubWindow()
        SubWindow1.setWidget(WebsitesWidget())
        self.MDI.addSubWindow(SubWindow1)
        SubWindow1.show()
 # you can add more widgest 
        #SubWindow2 = QtWidgets.QMdiSubWindow()

if __name__ == '__main__':
    import sys

    app = QtWidgets.QApplication(sys.argv)

    if not createConnection():
        print("not connect")
        sys.exit(-1)
    w = MainWindow()
    w.show()
    sys.exit(app.exec_())
This is the result of the running PyQt5_show.py python script:

Thursday, November 1, 2018

Python Qt5 : QtWebEngine example.

The QtWebEngine is the new web rendering engine that is planned to replace QtWebKit in Qt.
The official website tells us:
QtWebEngineWidgets or QtWebEngine libraries, depending on application type
Let's test this web rendering engine with a simple source code:
import sys
from PyQt5.QtCore import *
from PyQt5.QtWidgets import QApplication
# use the QtWebEngineWidgets
from PyQt5.QtWebEngineWidgets import *
# start my_app
my_app = QApplication(sys.argv)
# open webpage
my_web = QWebEngineView()
my_web.load(QUrl("http://free-tutorials.org"))
my_web.show()
# sys exit function
sys.exit(my_app.exec_())
The output of this running source code.

Friday, October 26, 2018

Python Qt5 : MP3 player example.

This tutorial with PyQt5 will allow us to play an MP3 file using QtMultimedia.
I used a test.mp3 file in the same folder with my python script.
This is the source script:
import sys

from PyQt5 import QtCore, QtWidgets, QtMultimedia

if __name__ == '__main__':
    app = QtWidgets.QApplication(sys.argv)
    filename = 'test.mp3'
    fullpath = QtCore.QDir.current().absoluteFilePath(filename) 
    media = QtCore.QUrl.fromLocalFile(fullpath)
    content = QtMultimedia.QMediaContent(media)
    player = QtMultimedia.QMediaPlayer()
    player.setMedia(content)
    player.play()
    sys.exit(app.exec_())

Wednesday, October 24, 2018

Python Qt5 : Webcam example.

Today I come with another source code.
This example uses QtMultimedia to create use of the webcam.
The source code follows the steps from finding, set and use a webcam.
from PyQt5.QtGui import *
from PyQt5.QtWidgets import *
from PyQt5.QtCore import *
from PyQt5.QtMultimedia import *
from PyQt5.QtMultimediaWidgets import *

import os
import sys

class MainWindow(QMainWindow):

    def __init__(self, *args, **kwargs):
        super(MainWindow, self).__init__(*args, **kwargs)

        self.online_webcams = QCameraInfo.availableCameras()
        if not self.online_webcams:
            pass #quit
        self.exist = QCameraViewfinder()
        self.exist.show()
        self.setCentralWidget(self.exist)

        # set the default webcam.
        self.get_webcam(0)
        self.setWindowTitle("WebCam")
        self.show()

    def get_webcam(self, i):
        self.my_webcam = QCamera(self.online_webcams[i])
        self.my_webcam.setViewfinder(self.exist)
        self.my_webcam.setCaptureMode(QCamera.CaptureStillImage)
        self.my_webcam.error.connect(lambda: self.alert(self.my_webcam.errorString()))
        self.my_webcam.start()

    def alert(self, s):
        """
        This handle errors and displaying alerts.
        """
        err = QErrorMessage(self)
        err.showMessage(s)


if __name__ == '__main__':

    app = QApplication(sys.argv)
    app.setApplicationName("WebCam")

    window = MainWindow()
    app.exec_()