analitics

Pages

Monday, January 2, 2023

Python Qt6 : Show any CSV file with QTableWidget.

In this tutorial, I will show you how easy it is to work with PyQt6 and QTableWidget to display any CSV file.
The source code lines are already commented to understand how this source code works.
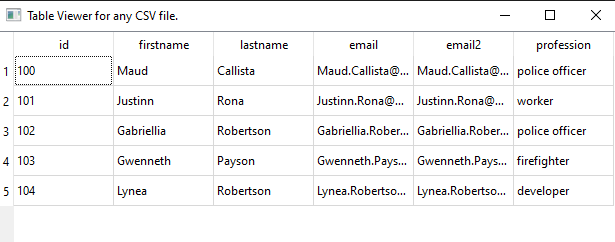
This is the content of the csv file named my.csv:
id,firstname,lastname,email,email2,profession
100,Maud,Callista,Maud.Callista@yopmail.com,Maud.Callista@gmail.com,police officer
101,Justinn,Rona,Justinn.Rona@yopmail.com,Justinn.Rona@gmail.com,worker
102,Gabriellia,Robertson,Gabriellia.Robertson@yopmail.com,Gabriellia.Robertson@gmail.com,police officer
103,Gwenneth,Payson,Gwenneth.Payson@yopmail.com,Gwenneth.Payson@gmail.com,firefighter
104,Lynea,Robertson,Lynea.Robertson@yopmail.com,Lynea.Robertson@gmail.com,developer
This is the source I used:
import sys
import csv
from PyQt6.QtWidgets import QApplication, QMainWindow, QTableWidget, QTableWidgetItem
from PyQt6.QtCore import Qt

# the main window class
class MainWindow(QMainWindow):
    # the init definition of the class
    def __init__(self):
        super().__init__()

        # the window title
        self.setWindowTitle('Table Viewer for any CSV file.')

        # this create the table widget
        self.table = QTableWidget(self)

        # the table dimensions is set default
        self.table.setColumnCount(0)
        self.table.setRowCount(0)

        # this read the CSV file named my.csv
        with open('my.csv', 'r') as file:
            # use the reader for file 
            reader = csv.reader(file)
            # this get the column labels from the first row
            headers = next(reader)
            # this set the number of columns based on the number of headers
            self.table.setColumnCount(len(headers))
            # this set the horizontal header labels
            self.table.setHorizontalHeaderLabels(headers)
            # for each row iterate the rows in the CSV file
            for row in reader:
                # add a row to the table
                row_index = self.table.rowCount()
                self.table.insertRow(row_index)
                # add data to cells 
                for col_index, cell in enumerate(row):
                    self.table.setItem(row_index, col_index, QTableWidgetItem(cell))
        
        # setting for the table as the central widget
        self.setCentralWidget(self.table)

# this run the application
if __name__ == '__main__':
    app = QApplication(sys.argv)
    window = MainWindow()
    window.show()
    sys.exit(app.exec())
Here is what the result of running the source code:

Wednesday, December 28, 2022

Python 3.10.2 : Copernicus A.P.I. and python sentinelsat python package - part 001.

Last night I worked a bit with python and tested on the online tool from Copernicus.
Copernicus is the European Union's Earth observation programme, which analyzes our planet and its environment for the benefit of all European citizens.
If you want to test it with python or another A.P>I. you need to create an user and a apassword.This is the source code I used with S:
from sentinelsat import SentinelAPI, read_geojson, geojson_to_wkt
from datetime import date
# Connect to the Sentinel API
api = SentinelAPI('___', '___', 'https://scihub.copernicus.eu/dhus')
#
api.download('___from_copernicus_website___')
# Search for Sentinel-2 images covering a specific area
footprint = geojson_to_wkt(read_geojson('area_of_interest.geojson'))

products = api.query(footprint,
                     date=('20211201', '20211205'),
                     platformname='Sentinel-1')
# convert to Pandas DataFrame
products_df = api.to_dataframe(products)
print(products_df)
# sort and limit to first 5 sorted products
products_df_sorted = products_df.sort_values(['link'], ascending=[True])
products_df_sorted = products_df_sorted.head(5)

# download sorted and reduced products
api.download_all(products_df_sorted.index)
You need a JSOn file to select the area of interest:
After I run this python script, the result is this:
python test001.py
                                                                                  title  ... productconsolidation
8f12995e-8f4b-4634-91bb-4971a1bdd0c3  S1B_IW_SLC__1SDV_20211201T160049_20211201T1601...  ...                  NaN
c62ceac6-c9ac-409d-bea9-d1bc23b1b183  S1B_IW_GRDH_1SDV_20211201T160050_20211201T1601...  ...                  NaN
2d1319c5-60af-468b-904a-5dfbdd5f205c  S1B_IW_RAW__0SDV_20211201T160046_20211201T1601...  ...                SLICE

[3 rows x 36 columns]
Downloading S1B_IW_GRDH_1SDV_20211201T160050_20211201T160115_029834_038FB2_A390.zip: 100%|█| 929M/929M [02:44<00:00, 5.
Downloading products:  33%|██████████████████▋                                     | 1/3 [02:58<05:57, 178.58s/product]
Downloading S1B_IW_RAW__0SDV_20211201T160046_20211201T160119_029834_038FB2_D35D.zip:  83%|▊| 1.31G/1.58G [03:21<00:26,
Downloading S1B_IW_SLC__1SDV_20211201T160049_20211201T160116_029834_038FB2_AC13.zip:  31%|▎| 1.33G/4.35G [03:18<04:16,
...
The copernicus online map can be seen in the next inage:

News : Inkscape team hiring python developer.

For the Inkscape project and its users, interoperability with other software packages, both free and commercial, is of high importance. The PLC has decided to hire a developer for the equivalent of 1.5 months (part-time schedule available) to implement importing functionality of a file format for which Inkscape yet lacks proper support. An extension of the project to up to 3 months (with additional compensation) may be granted depending on the success of the first half ...
You can find more information on the official website.

Saturday, December 24, 2022

Python 3.8.16 : My colab tutorials - part 028.

Today I added a new example to my GitHub repo on colab with a simple example of how to search for images using Google's custom search A.P.I. You can find this example on my Github webpage example.

Monday, December 19, 2022

Python 3.10.2 : MoviePy - part 001.

MoviePy is a Python module for video editing, which can be used for basic operations (like cuts, concatenations, title insertions), video compositing (a.k.a. non-linear editing), video processing, or to create advanced effects. It can read and write the most common video formats, including GIF.
You can read more about this python package on this webpage.
I install this python package with the pip3 tool:
pip3 install MoviePy --user
I have an AVI file type created with the Blender 3D software, named anime_effect_001.avi, you can find it on my youtube channel.
I used this source code to convert it into an mp4 file type:
import moviepy.editor as moviepy
clip = moviepy.VideoFileClip("anime_effect_001.avi")
clip.write_videofile("MP4_anime_effect_001.mp4")
I run with this command:
python moviepy_001.py
Moviepy - Building video MP4_anime_effect_001.mp4.
Moviepy - Writing video MP4_anime_effect_001.mp4
...
Moviepy - Done !
Moviepy - video ready MP4_anime_effect_001.mp4
I play the MP4 file with the VLC video player and works great.

Saturday, December 17, 2022

Python 3.10.2 : Suite for Computer-Assisted Music in Python known as SCAMP.

SCAMP is an computer-assisted composition framework in Python designed to act as a hub, flexibly connecting the composer-programmer to a wide variety of resources for playback and notation. SCAMP allows the user to manage the flow of musical time, play notes either using FluidSynth or via MIDI or OSC messages to an external synthesizer, and ultimately quantize and export the result to music notation in the form of MusicXML or Lilypond. Overall, the framework aims to address pervasive technical challenges while imposing as little as possible on the aesthetic choices of the composer-programmer.
Let's install with pip3 python tool in Windows O.S..
pip3 install --user scamp
I created a python script named music001_test001.py with this source code:
from scamp import *
import random

s = Session()

guitar = s.new_part("Guitar")

text = "this is a test text"

for char in text:
    if char == " ":
        wait(0.2)
    elif char.isalnum():
        for x in range (0,10):
            guitar.play_note(ord(char) - random.randrange(50, 75), random.randint(0,5), random.random()/5)
    else:
        wait(0.2)
        guitar.play_note(ord(char), 0.8, 0.06)
        wait(0.2)
The source code is easy to understand. I use random to play into for loop.
I play these with preset Jazz Guitar for Guitar.
I could say that the result is quite good for the random function.
In my internet searches, I also found a rather interesting PDF file about this Python module and other enhancements. You can find it here.

Monday, December 12, 2022

OpenAI knows how to write source code for Blender 3D.

I tested the new OpenAI chat from with this question:
Please write a 3d blender script in Python that moves a camera around an object 360 degrees facing it.

import bpy

# Set the object that the camera will orbit around
target_object = bpy.data.objects["MyObject"]

# Set the starting position for the camera
camera = bpy.data.objects["Camera"]
camera.location = (0, 0, 5)

# Set the number of degrees to rotate the camera around the object
degrees = 360

# Set the distance that the camera should be from the object
distance = 5

# Set the speed at which the camera should orbit
speed = 1

# Set the direction in which the camera should orbit (1 for clockwise, -1 for counter-clockwise)
direction = 1

# Calculate the number of frames needed for the camera to orbit
# around the object by the desired number of degrees
num_frames = degrees / speed

# Set the camera to track the object
bpy.ops.object.select_all(action="DESELECT")
camera.select_set(True)
bpy.context.view_layer.objects.active = camera
bpy.ops.object.track_set(type="TRACKTO")

# Animate the camera orbiting around the object
for frame in range(0, num_frames):
    # Set the current frame
    bpy.context.scene.frame_set(frame)

    # Calculate the new position for the camera based on its distance from the object
    x = distance * math.sin(math.radians(frame*speed*direction))
    y = distance * math.cos(math.radians(frame*speed*direction))
    camera.location = (x,y,0)
I tested with the latest version of Blender 3D and it works well with some small changes it can be improved.
This error for this script:
Python: Traceback (most recent call last):
...
TypeError: 'float' object cannot be interpreted as an integer
If you ask more than once you will get different source code and I encountered a network error.
I tried several times and the network error did not let me take the more complex and complete source code.

Python 3.10.2 : Quickstart with streamlit python package.

In today's tutorial, I will give you a brief introduction to the streamlit packet.
Streamlit turns data scripts into shareable web apps in minutes. All in pure Python. No front‑end experience required.
Let's install with the pip tool:
pip install streamlit
After installation, I tested their example with the following command:
python -m streamlit hello
The result in the browser will be this:
You can create a working folder to add a python file called myapp001.py with the following continue:
import streamlit as st 

st.write("""
#testing streamlit
""")
To run this python file with streamlit use the following command:
python -m streamlit run myapp001.py

  Welcome to Streamlit!

  If you’d like to receive helpful onboarding emails, news, offers, promotions,
  and the occasional swag, please enter your email address below. Otherwise,
  leave this field blank.

  Email:  catafest@yahoo.com

  You can find our privacy policy at https://streamlit.io/privacy-policy

  Summary:
  - This open source library collects usage statistics.
  - We cannot see and do not store information contained inside Streamlit apps,
    such as text, charts, images, etc.
  - Telemetry data is stored in servers in the United States.
  - If you'd like to opt out, add the following to %userprofile%/.streamlit/config.toml,
    creating that file if necessary:

    [browser]
    gatherUsageStats = false


  You can now view your Streamlit app in your browser.
...

Sunday, December 11, 2022

Python 3.10.2 : Quickstart OpenAI example.

Since it's Christmas time, here's a short introduction to OpenAI and python. An example is from the official page.
OpenAI has trained cutting-edge language models that are very good at understanding and generating text. Our API provides access to these models and can be used to solve virtually any task that involves processing language. In this quickstart tutorial, you’ll build a simple sample application. Along the way, you’ll learn key concepts and techniques that are fundamental to using the API for any task, including: Content generation Summarization Classification, categorization, and sentiment analysis Data extraction Translation Many more!
Because I run this example in Windows 10 operating system, you need to step over some commands from the official webpage. For example, this is a Linux command:
. venv/bin/activate
Create a token into an OpenAI account to use it, then use these commands:
git clone https://github.com/openai/openai-quickstart-python.git
cd openai-quickstart-python
pip install Flask
pip install -r requirements.txt --user
Change the app.py source code with your token, like this:
openai.api_key = "your_token"
Run the application with this command:
python -m flask run
The result in the command prompt area is this:
 * Restarting with stat
 * Debugger is active!
 * Debugger PIN: 102-938-829
 * Running on http://127.0.0.1:5000/ (Press CTRL+C to quit)
127.0.0.1 - - [11/Dec/2022 16:13:06] "POST / HTTP/1.1" 302 -
127.0.0.1 - - [11/Dec/2022 16:13:06] "GET /?result=+The+Flash%2C+Speedy%2C+Sonic+the+Hedgehog HTTP/1.1" 200 -
127.0.0.1 - - [11/Dec/2022 16:13:06] "GET /static/main.css HTTP/1.1" 304 -
127.0.0.1 - - [11/Dec/2022 16:13:06] "GET /static/dog.png HTTP/1.1" 304 -
127.0.0.1 - - [11/Dec/2022 16:13:11] "POST / HTTP/1.1" 302 -
127.0.0.1 - - [11/Dec/2022 16:13:11] "GET /?result=+Speedy%2C+The+Flash%2C+Sonic HTTP/1.1" 200 -
127.0.0.1 - - [11/Dec/2022 16:13:12] "GET /static/main.css HTTP/1.1" 304 -
127.0.0.1 - - [11/Dec/2022 16:13:12] "GET /static/dog.png HTTP/1.1" 304 -
This is the result of the running source code:

Tuesday, November 8, 2022

News : Snowpark for Python.

Snowpark for Python, now generally available, empowers the growing Python community of data scientists, data engineers, and developers to build secure and scalable data pipelines and machine learning (ML) workflows directly within Snowflake—taking advantage of Snowflake’s performance, elasticity, and security benefits, which are critical for production workloads., read more on this news on the official blog.
The official website come with this feature: Start your 30-day free Snowflake trial which includes $400 worth of free usage.

Monday, November 7, 2022

Python 3.7.13 : My colab tutorials - part 027.

Today, I update my GitHub repo with python source code tested on colab google.
You can see this notebook named catafest_032.ipynb on my GitHub repo.

Saturday, October 29, 2022

News : PyTorch 1.13 new release.

We are excited to announce the release of PyTorch® 1.13 (release note)! This includes Stable versions of BetterTransformer. We deprecated CUDA 10.2 and 11.3 and completed migration of CUDA 11.6 and 11.7. Beta includes improved support for Apple M1 chips and functorch, a library that offers composable vmap (vectorization) and autodiff transforms, being included in-tree with the PyTorch release. This release is composed of over 3,749 commits and 467 contributors since 1.12.1. We want to sincerely thank our dedicated community for your contributions.
You can find more on the official website.

Friday, October 7, 2022

Python 3.10.7 : Rembg for remove background.

Rembg is a tool to remove images background and the project can be found on the GitHub webpage.
Create a python file named remove_background.py.
Install using the pip tool.
pip install rembg
Collecting rembg
  Downloading rembg-2.0.25-py3-none-any.whl (12 kB)
Add this source code and the input001.png image for procesing in the same folder with the python script.
from rembg import remove 
from PIL import Image 
input_path = 'input001.png'
output_path = 'output001.png'
input = Image.open(input_path)
output = remove(input)
output.save(output_path)
Run the python script and if you see this error:
python remove_background.py
Access denied with the following error:

        Too many users have viewed or downloaded this file recently. Please
        try accessing the file again later. If the file you are trying to
        access is particularly large or is shared with many people, it may
        take up to 24 hours to be able to view or download the file. If you
        still can't access a file after 24 hours, contact your domain
        administrator.

You may still be able to access the file from the browser:

         https://drive.google.com/uc?id=1tCU5MM1LhRgGou5OpmpjBQbSrYIUoYab
         ...
... then copy the u2net.onnx file into this path:
C:\Users\your_user\.u2net\
After I copy the file I run again the python script and this is the result.