analitics

Pages

Friday, December 7, 2018

Python Qt5 : simple checkbox example.

Today we created a simple tutorial about QCheckBox and QLabel.
The purpose of this tutorial is to use QCheckBox in a GUI interface.
When we check QCheckBox, this will change the text from a QLabel.
The variables used by QCheckBox are my_checkbox and my_label for QLabel.
The result of my source code is this:

Let's see the source code:
# -*- coding: utf-8 -*-
"""
@author: catafest
"""
import sys
from PyQt5.QtCore import Qt
from PyQt5.QtWidgets import QWidget, QCheckBox, QLabel, QApplication

class MyCheckBox(QWidget):
 def __init__(self):
  super().__init__()
 
  my_checkbox = QCheckBox("Check this , see result", self)
  my_checkbox.move(50,60)
  my_checkbox.stateChanged.connect(self.change_my_option)
  

  self.my_label = QLabel("You can visit free-tutorial.org ", self)
  self.my_label.move(50,30)

  #self.my_label.setAlignment(Qt.AlignCenter)
  
  self.setGeometry(420,420,640,100)
  self.setWindowTitle("free-tutorials.org PyQt5 ChecBox ")


 def change_my_option(self, state):
  if state  == Qt.Checked:
   self.my_label.setText("Thank's by free-tutorial.org")
  else:
   self.my_label.setText("You can visit free-tutorial.org")
   
if __name__ == '__main__':
 app = QApplication(sys.argv)
 win = MyCheckBox()
 win.show()
 sys.exit(app.exec_())

Wednesday, December 5, 2018

PySide2 and PyQt versions.

A short intro about this python module named PySide2 can be found on the Wikipedia webpage.
The purpose of this tutorial is to introduce concepts about licenses and develop python programs using ergonomic design interfaces with PySide2 and PyQt versions.

PySide2 is a Python binding of the cross-platform GUI toolkit Qt, currently developed by The Qt Company under the Qt for Python project. It is one of the alternatives to the standard library package Tkinter.
...
PySide was released under the LGPL in August 2009 by Nokia,[1] the former owners of the Qt toolkit, after Nokia failed to reach an agreement with PyQt developers Riverbank Computing[7] to change its licensing terms to include LGPL as an alternative license.
...


Now about the LGPL software license:

The GNU Lesser General Public License (LGPL) is a free software license published by the Free Software Foundation (FSF). The license allows developers and companies to use and integrate software released under the LGPL into their own (even proprietary) software without being required by the terms of a strong copyleft license to release the source code of their own components.

I wrote in the past about PySide and you can find on this blog or on my website.
Let's start installing Python using pip3.6.
C:\Python364>cd Scripts

C:\Python364\Scripts>pip3.6.exe install PySide2
Collecting PySide2
  Downloading https://files.pythonhosted.org/packages/10/ba/7448ec862655c356ade2
2351ed46c9260773186c37ba0d8ceea1ef8c7515/PySide2-5.11.2-5.11.2-cp35.cp36.cp37-no
ne-win_amd64.whl (128.7MB)
    100% |████████████████████████████████| 128.7MB 44kB/s
Installing collected packages: PySide2
Successfully installed PySide2-5.11.2
The PySide2 python module is another way to connect Qt with Python modules.
You can take a look at this python module at Qt website .
The source code is more simple but this can put the development in trouble if you try to follow the PyQt way.
Let's see a simple example. I create the main window for this example.

The layout of this window named main_layout is split into two: secondary_splitter_1 and secondary_splitter_2.
Into this, I add for each area the defined class named SecondaryWindow.
The four variables for this SecondaryWindow class are named like secondary_window_1, secondary_window_2, secondary_window_3 and secondary_window_4.
Interface programming with PySide2 and PyQt keeps a classic form of statements and then structured implementations. It seems simpler to create interfaces with PySide, but the development and community interest seems to be attracted to PyQt.
In both cases, the programming speed in the python programming language is required.
Error management is simpler and more limited in PySide2. I have noticed PyQt essential changes in developing even more advanced versions (see PyQt4 and PyQt5).
Let's see the source code:
import sys
from PySide2 import QtGui, QtCore, QtWidgets
from PySide2.QtGui import *
from PySide2.QtCore import *
from PySide2.QtWidgets import *

class SecondaryWindow(QtWidgets.QWidget):

    def __init__(self, label, parent=None):
        super(SecondaryWindow, self).__init__(parent)

        self.label = QtWidgets.QLabel(label, parent=self)
        self.label.setAlignment(QtCore.Qt.AlignCenter)
        self.label.setStyleSheet("QLabel {font-size:18px;color:blue}")

        self.main_layout = QtWidgets.QVBoxLayout()
        self.main_layout.addWidget(self.label)
        self.setLayout(self.main_layout)

class MainWindow(QtWidgets.QWidget):

    def __init__(self, parent=None):
        super(MainWindow, self).__init__(parent)

        self.secondary_window_1 = SecondaryWindow("1", parent=self)
        self.secondary_window_2 = SecondaryWindow("2", parent=self)
        self.secondary_window_3 = SecondaryWindow("3", parent=self)
        self.secondary_window_4 = SecondaryWindow("4", parent=self)

        self.secondary_splitter_1 = QtWidgets.QSplitter(QtCore.Qt.Horizontal, parent=self)
        self.secondary_splitter_1.addWidget(self.secondary_window_1)
        self.secondary_splitter_1.addWidget(self.secondary_window_2)

        self.secondary_splitter_2 = QtWidgets.QSplitter(QtCore.Qt.Horizontal, parent=self)
        self.secondary_splitter_2.addWidget(self.secondary_window_3)
        self.secondary_splitter_2.addWidget(self.secondary_window_4)

        self.main_splitter = QtWidgets.QSplitter(QtCore.Qt.Vertical, parent=self)
        self.main_splitter.addWidget(self.secondary_splitter_1)
        self.main_splitter.addWidget(self.secondary_splitter_2)

        self.main_layout = QtWidgets.QVBoxLayout()
        self.main_layout.addWidget(self.main_splitter)
        self.setLayout(self.main_layout)

        self.setWindowTitle("PySide2 example")
        self.resize(220, 220)

if __name__ == "__main__":
    app = QApplication(sys.argv)
    main_window = MainWindow()
    main_window.show()
    sys.exit(app.exec_())

Thursday, November 29, 2018

Python Qt5 : submenu example.

Using my old example I will create a submenu with PyQt5.
First, you need to know the submenu works like the menu.
Let's see the result:

The source code is very simple:
# -*- coding: utf-8 -*-
"""
@author: catafest
"""
import sys
from PyQt5.QtWidgets import QMainWindow, QAction, qApp, QApplication, QDesktopWidget, QMenu
from PyQt5.QtGui import QIcon

class Example(QMainWindow):
    #init the example class to draw the window application    
    def __init__(self):
        super().__init__()    
        self.initUI()
    #create the def center to select the center of the screen         
    def center(self):
        # geometry of the main window
        qr = self.frameGeometry()
        # center point of screen
        cp = QDesktopWidget().availableGeometry().center()
        # move rectangle's center point to screen's center point
        qr.moveCenter(cp)
        # top left of rectangle becomes top left of window centering it
        self.move(qr.topLeft())
    #create the init UI to draw the application
    def initUI(self):               
        #create the action for the exit application with shortcut and icon
        #you can add new action for File menu and any actions you need
        exitAct = QAction(QIcon('exit.png'), '&Exit', self)        
        exitAct.setShortcut('Ctrl+Q')
        exitAct.setStatusTip('Exit application')
        exitAct.triggered.connect(qApp.quit)
        #create the status bar for menu 
        self.statusBar()
        #create the menu with the text File , add the exit action 
        #you can add many items on menu with actions for each item
        menubar = self.menuBar()
        fileMenu = menubar.addMenu('&File')
        fileMenu.addAction(exitAct)
        
        # add submenu to menu 
        submenu = QMenu('Submenu',self)

        # some dummy actions
        submenu.addAction('Submenu 1')
        submenu.addAction('Submenu 2')
           
        # add to the top menu
        menubar.addMenu(submenu)
        #resize the window application 
        self.resize(640, 480)
        #draw on center of the screen 
        self.center()
        #add title on windows application 
        self.setWindowTitle('Simple menu')
        #show the application
        self.show()
        #close the UI class
        
if __name__ == '__main__':
    #create the application 
    app = QApplication(sys.argv)
    #use the UI with new  class
    ex = Example()
    #run the UI 
    sys.exit(app.exec_())

Monday, November 19, 2018

Using Google Classroom API with python.

Today I read and test Google API with the Python programming language.
You can find a good example here.
The example shows how to read with Google Classroom API, v1.
This example can be used as a default example if you want to use googlescopes.
The Google documentation tells us:
This document lists the OAuth 2.0 scopes that you might need to request to access Google APIs, depending on the level of access you need. Sensitive scopes require review by Google and have a sensitive indicator on the Google Cloud Platform (GCP) Console's OAuth consent screen configuration page. Many scopes overlap, so it's best to use a scope that isn't sensitive. For information about each method's scope requirements, see the individual API documentation.
The script use credentials.json file created by the Google project in the folder with the python script.
The script creates automatically when the authorization flow completes a token.json file.
The control of the project can be used with the Google Cloud Console.
The result of the example script can be seen in the next image:

Friday, November 16, 2018

Python Qt5 : setStyleSheet example.

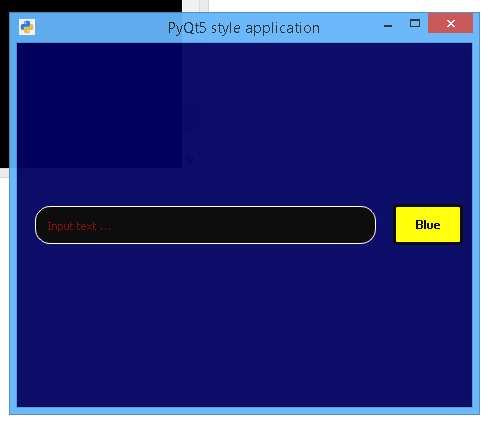
Today I will show you how to style the PyQt5 widgets and create a good looking application interface.
The main goal of this tutorial is to see where you can use the style issue.
I used just one edit and one button to have a simple example.
The result of my example is this:

The example start with a simple application with QPushButton, QLineEdit.
Is more simple to use a class for the button because we need to create a different style for each action: enterEvent or leaveEvent and so on.
You can see I used QFont to change the font from button.
This class is named Push_button and will be used like any QPushButton from default PyQt5 examples.
We can do this for any widget and change it with setStyleSheet.
Another part of the code is for QLineEdit.
This can be changed easily with setStyleSheet, first with the default of this and make other changes when you need.
The source code has an QGridLayout to help us to align the widgets.
Let's see the source code:
from PyQt5 import QtWidgets, QtGui, QtCore
from PyQt5.QtCore import pyqtSignal

font_button = QtGui.QFont()
font_button.setFamily("Corbel")
font_button.setPointSize(10)
font_button.setWeight(100)

class Push_button(QtWidgets.QPushButton):
    
    def __init__(self, parent=None):
        super(Push_button, self).__init__(parent)
        self.setMouseTracking(True)
        self.setStyleSheet("margin: 1px; padding: 10px; \
      background-color: \
                           rgba(255,255,0,255); \
                           color: rgba(0,0,0,255); \
                           border-style: solid; \
                           border-radius: 4px; border-width: 3px; \
                           border-color: rgba(0,0,0,255);")

    def enterEvent(self, event):
        if self.isEnabled() is True:
            self.setStyleSheet("margin: 10px; padding: 10px; \
          background-color: \
                               rgba(255,255,0,255); \
                               color: rgba(0,0,10,255); \
                               border-style: solid; \
                               border-radius: 8px; \
                               border-width: 1px; \
                               border-color: \
                               rgba(0,0,100,255);")
        if self.isEnabled() is False:
            self.setStyleSheet("margin: 10px; padding: 10px; \
          background-color: \
                               rgba(255,255,0,255); \
                               color: rgba(0,0,10,255); \
                               border-style: solid; \
                               border-radius: 8px; \
                               border-width: 1px; \
                               border-color: \
                               rgba(0,0,100,255);")

    def leaveEvent(self, event):
        self.setStyleSheet("margin: 10px; padding: 10px; \
                           background-color: rgba(0,0,0,100); \
                           color: rgba(0,0,255,255); \
                           border-style: solid; \
                           border-radius: 8px; border-width: 1px; \
                           border-color: rgba(0,50,100,255);")


class QthreadApp(QtWidgets.QWidget):
    sig = pyqtSignal(str)
    def __init__(self, parent=None):
        QtWidgets.QWidget.__init__(self, parent)
        self.setWindowTitle("PyQt5 style application")
        self.setWindowIcon(QtGui.QIcon("icon.png"))
        self.setMinimumWidth(resolution.width() / 3)
        self.setMinimumHeight(resolution.height() / 2)
        self.setStyleSheet("QWidget { \
                           background-color: rgba(0,0,100,250);} \
                           QScrollBar:horizontal {width: 1px; \
                           height: 1px; \
                           background-color: rgba(0,100,255,0);} \
                           QScrollBar:vertical {width: 1px; \
                           height: 10px; \
                           background-color: rgba(0,41,59,255);}")
        self.linef = QtWidgets.QLineEdit(self)
        self.linef.setPlaceholderText("Input text ...")
        self.linef.setStyleSheet("margin: 10px; padding: 10px; \
                                 background-color: \
                                 rgba(0,0,0,255);\
                                 color: rgba(255,0,0,255); \
                                 border-style: solid; \
                                 border-radius: 15px; \
                                 border-width: 1px; \
                                 border-color: \
                                 rgba(255,255,255,255);")
        self.my_button = Push_button(self)
        self.my_button.setText("Blue")
        self.my_button.setFixedWidth(72)
        self.my_button.setFont(font_button)
        self.my_grid = QtWidgets.QGridLayout()
        self.my_grid.addWidget(self.linef, 0, 0, 1, 220)
        self.my_grid.addWidget(self.my_button, 0, 220, 1, 1)
        self.my_grid.setContentsMargins(8, 8, 8, 8)
        self.setLayout(self.my_grid)

if __name__ == "__main__":
    import sys
    app = QtWidgets.QApplication(sys.argv)
    desktop = QtWidgets.QApplication.desktop()
    resolution = desktop.availableGeometry()
    myapp = QthreadApp()
    myapp.setWindowOpacity(0.95)
    myapp.show()
    myapp.move(resolution.center() - myapp.rect().center())
    sys.exit(app.exec_())
else:
    desktop = QtWidgets.QApplication.desktop()
    resolution = desktop.availableGeometry()

Monday, November 12, 2018

Python Qt5 : QCalendarWidget example.

This tutorial is about QCalendarWidget.
Use a default application and add this widget.
You can change and get the date from the widget calendar like any widget.
The result of this source code is this result:

This is the source code for QCalendarWidget example:
import sys
from PyQt5 import *
from PyQt5.QtWidgets import QApplication, QCalendarWidget, QWidget, QLabel
from PyQt5.QtCore import *
from PyQt5.QtGui import *

class Example(QWidget):
   def __init__(self):
      super(Example, self).__init__()
      self.initUI()
   def initUI(self):
      my_calendar = QCalendarWidget(self)
      my_calendar.setGridVisible(True)
      my_calendar.move(10, 20)
      my_calendar.clicked[QDate].connect(self.show_date)
      self.my_label = QLabel(self)
      date = my_calendar.selectedDate()
      self.my_label.setText(date.toString())
      self.my_label.move(10, 220)
      self.setGeometry(100,100,320,270)
      self.setWindowTitle('Calendar')
      self.show()
   def show_date(self, date):
      self.my_label.setText(date.toString())

def main():
   app = QApplication(sys.argv)
   ex = Example()
   sys.exit(app.exec_())
if __name__ == '__main__':
   main()

Saturday, November 10, 2018

Python Qt5 : QTabWidget example.

Today I test the QTabWidget with an simple example.
The source code uses the QTabWidget and create two Tab: FirstTab and TabTwo.
I add for each tab two labels: tab_one_label_one, tab_one_label_two,tab_two_label_one and tab_two_label_two.
For layouts, I used: vboxLayout with first_layout and second_layout.
The result of my running code is this:

The rest of the source code is simple:
import sys
from PyQt5.QtGui import QIcon
from PyQt5.QtWidgets import QDialog, QApplication, QWidget
from PyQt5.QtWidgets import QVBoxLayout, QTabWidget, QLabel

class TabDialog(QDialog):
    def __init__(self):
        super().__init__()

        self.setWindowTitle("Tab Widget Application")
        self.setWindowIcon(QIcon("icon.png"))

        tabwidget = QTabWidget()
        tabwidget.addTab(FirstTab(), "First Tab")
        tabwidget.addTab(TabTwo(), "Second Tab")

        vboxLayout = QVBoxLayout()
        vboxLayout.addWidget(tabwidget)

        self.setLayout(vboxLayout)

class FirstTab(QWidget):
    def __init__(self):
        super().__init__()
        tab_one_label_one = QLabel("tab_one_label_one")
        tab_one_label_two = QLabel("tab_one_label_two")
        
        first_layout = QVBoxLayout()
        first_layout.addWidget(tab_one_label_one)
        first_layout.addWidget(tab_one_label_two)
        self.setLayout(first_layout)

class TabTwo(QWidget):
    def __init__(self):
        super().__init__()
        tab_two_label_one = QLabel("tab_two_label_one")
        tab_two_label_two = QLabel("tab_two_label_two")
        
        second_layout = QVBoxLayout()
        second_layout.addWidget(tab_two_label_one)
        second_layout.addWidget(tab_two_label_two)
        self.setLayout(second_layout)

if __name__ == "__main__":
    app = QApplication(sys.argv)
    tabdialog = TabDialog()
    tabdialog.show()
    app.exec()

Friday, November 9, 2018

Python Qt5 : default icons with QStyle.

This is a simple example of QStyle.
Using the QStyle can solve more issues above this example.
The QStyle can solve more problems than this example.
You can change everything in PyQt5 and Qt.
The QStyle class is an abstract base class that encapsulates the look and feel of a GUI, read here.
This is the result of a source code I used to show you how can use default icons from PyQt5.

See this source code:
import sys
from PyQt5.QtCore import *
from PyQt5.QtGui import *
from PyQt5.QtWidgets import *

class Widget(QWidget):
  
    def __init__(self, parent= None):
        super(Widget, self).__init__()
        icons = [
'SP_TitleBarMinButton', 
'SP_TitleBarMenuButton', 
'SP_TitleBarMaxButton', 
'SP_TitleBarCloseButton', 
'SP_TitleBarNormalButton', 
'SP_TitleBarShadeButton', 
'SP_TitleBarUnshadeButton', 
'SP_TitleBarContextHelpButton', 
'SP_MessageBoxInformation', 
'SP_MessageBoxWarning', 
'SP_MessageBoxCritical', 
'SP_MessageBoxQuestion', 
'SP_DesktopIcon', 
'SP_TrashIcon', 
'SP_ComputerIcon', 
'SP_DriveFDIcon', 
'SP_DriveHDIcon', 
'SP_DriveCDIcon', 
'SP_DriveDVDIcon', 
'SP_DriveNetIcon', 
'SP_DirHomeIcon', 
'SP_DirOpenIcon', 
'SP_DirClosedIcon', 
'SP_DirIcon', 
'SP_DirLinkIcon', 
'SP_FileIcon', 
'SP_FileLinkIcon', 
'SP_FileDialogStart', 
'SP_FileDialogEnd', 
'SP_FileDialogToParent', 
'SP_FileDialogNewFolder', 
'SP_FileDialogDetailedView', 
'SP_FileDialogInfoView', 
'SP_FileDialogContentsView', 
'SP_FileDialogListView', 
'SP_FileDialogBack', 
'SP_DockWidgetCloseButton', 
'SP_ToolBarHorizontalExtensionButton', 
'SP_ToolBarVerticalExtensionButton', 
'SP_DialogOkButton', 
'SP_DialogCancelButton', 
'SP_DialogHelpButton', 
'SP_DialogOpenButton', 
'SP_DialogSaveButton', 
'SP_DialogCloseButton', 
'SP_DialogApplyButton', 
'SP_DialogResetButton', 
'SP_DialogDiscardButton', 
'SP_DialogYesButton', 
'SP_DialogNoButton', 
'SP_ArrowUp',  
'SP_ArrowDown', 
'SP_ArrowLeft', 
'SP_ArrowRight', 
'SP_ArrowBack', 
'SP_ArrowForward', 
'SP_CommandLink', 
'SP_VistaShield', 
'SP_BrowserReload', 
'SP_BrowserStop', 
'SP_MediaPlay', 
'SP_MediaStop', 
'SP_MediaPause', 
'SP_MediaSkipForward',
'SP_MediaSkipBackward', 
'SP_MediaSeekForward',
'SP_MediaSeekBackward', 
'SP_MediaVolume', 
'SP_MediaVolumeMuted', 
'SP_CustomBase'
            ]
        Col_size = 6
         
        layout = QGridLayout()
 
        count = 0
        for i in icons:
            select_button = QPushButton(i)
            select_button.setIcon(self.style().standardIcon(getattr(QStyle, i)))
 
            layout.addWidget(select_button, count / Col_size, count % Col_size)
            count += 1
             
        self.setLayout(layout)
         
if __name__ == '__main__':
    app = QApplication(sys.argv)
             
    dialog = Widget()
    dialog.show()
             
    app.exec_()

Thursday, November 8, 2018

Python Qt5 : QFileDialog and QTextEdit example.

This tutorial is about QFileDialog and how to use it.
First you need to create a default PyQ5 application and add your method is called by my_OpenDialog.
This will be connected to one button.
My application uses the QTextEdit to show HTML and text files.
If you try to see another file this will open badly.
I set the completeSuffix just for HTML and text.
As you know this returns the complete suffix (extension) of the file.
The content of this file is put into QTextEdit widget create and named editor_text.
This is result of using QFileDialog with python:

This is the source code with the QFileDialog example:
import sys, os
from PyQt5 import QtCore, QtWidgets

class Window(QtWidgets.QWidget):
    def __init__(self):
        super(Window, self).__init__()
        self.setWindowTitle('Text document')
        self.editor_text = QtWidgets.QTextEdit(self)

        self.button_OpenDialog = QtWidgets.QPushButton('Open', self)
        self.button_OpenDialog.clicked.connect(self.my_OpenDialog)

        layout = QtWidgets.QGridLayout(self)
        layout.addWidget(self.editor_text, 0, 0, 1, 1)
        layout.addWidget(self.button_OpenDialog, 1, 0)
        #self.handleTextChanged()

    def my_OpenDialog(self):
        path = QtWidgets.QFileDialog.getOpenFileName(
            self, 'Open file', '',
            'HTML files (*.html);;Text files (*.txt)')[0]
        if path:
            file = QtCore.QFile(path)
            if file.open(QtCore.QIODevice.ReadOnly):
                stream = QtCore.QTextStream(file)
                text = stream.readAll()
                info = QtCore.QFileInfo(path)
                if info.completeSuffix() == 'html':
                    self.editor_text.setHtml(text)
                else:
                    self.editor_text.setPlainText(text)
                file.close()

if __name__ == '__main__':
    app = QtWidgets.QApplication(sys.argv)
    window = Window()
    window.resize(640, 480)
    window.show()
    sys.exit(app.exec_())

Wednesday, November 7, 2018

Python Qt5 : QLCDNumber and QDial example.

This tutorial uses a simple example of QLCDNumber and QDial.
The steps start with create the QWidget with the QLCDNumber and QDial.
You need to set geometry for both and connect the dial with valueChanged.
Finally you need to use show to see the QWidget.
The result is show into the next screenshot:

Let see the source code:
import sys
from PyQt5.QtCore import Qt
from PyQt5.QtWidgets import (QWidget, QLCDNumber, QDial, QApplication)

class QLCDNumber_QDial(QWidget):
    def __init__(self):
        super().__init__()
        self.initUi()

    def initUi(self):
        the_lcd = QLCDNumber(self)
        the_dial = QDial(self)

        self.setGeometry(150, 100, 220, 100)
        self.setWindowTitle('QLCDNumber')

        the_lcd.setGeometry(10,10,70,70)
        the_dial.setGeometry(140,10,70,70)

        the_dial.valueChanged.connect(the_lcd.display)

        self.show()

if __name__ == '__main__':
    app = QApplication(sys.argv)
    run = QLCDNumber_QDial() 
    sys.exit(app.exec_())

Tuesday, November 6, 2018

Python Qt5 : QColorDialog example.

Today I will show you how to use the QColorDialog and clipboard with PyQt5.
You can read documentation from the official website.
This example used a tray icon with actions for each type of code color.
The code of color is put into clipboard area and print on the shell.
I use two ways to get the code of color:
  • parse the result of currentColor depends by type of color codel;
  • get the code of color by a special function from QColorDialog;
To select the color I want to use is need to use the QColorDialog:

Let's see the source code:
from PyQt5.QtGui import *
from PyQt5.QtWidgets import *

# create the application
app = QApplication([])
app.setQuitOnLastWindowClosed(False)

# get the icon file
icon = QIcon("icon.png")

# create clipboard
clipboard = QApplication.clipboard()
# create dialog color
dialog = QColorDialog()

# create functions to get parsing color
def get_color_hex():
    if dialog.exec_():
        color = dialog.currentColor()
        clipboard.setText(color.name())
        print(clipboard.text())

def get_color_rgb():
    if dialog.exec_():
        color = dialog.currentColor()
        clipboard.setText("rgb(%d, %d, %d)" % (
            color.red(), color.green(), color.blue()
        ))
        print(clipboard.text())

def get_color_hsv():
    if dialog.exec_():
        color = dialog.currentColor()
        clipboard.setText("hsv(%d, %d, %d)" % (
            color.hue(), color.saturation(), color.value()
        ))
        print(clipboard.text())
# create function to use getCmyk 
def get_color_getCmyk():
    if dialog.exec_():
        color = dialog.currentColor()
        clipboard.setText("Cmyk(%d, %d, %d, %d, %d)" % (
            color.getCmyk()
        ))
        print(clipboard.text())


# create the tray icon application
tray = QSystemTrayIcon()
tray.setIcon(icon)
tray.setVisible(True)

# create the menu and add actions
menu = QMenu()
action1 = QAction("Hex")
action1.triggered.connect(get_color_hex)
menu.addAction(action1)

action2 = QAction("RGB")
action2.triggered.connect(get_color_rgb)
menu.addAction(action2)

action3 = QAction("HSV")
action3.triggered.connect(get_color_hsv)
menu.addAction(action3)

action4 = QAction("Cmyk")
action4.triggered.connect(get_color_getCmyk)
menu.addAction(action4)

action5 =QAction("Exit")
action5.triggered.connect(exit)
menu.addAction(action5)

# add the menu to the tray icon application
tray.setContextMenu(menu)

app.exec_()

Monday, November 5, 2018

Python Qt5 : tray icon example.

This tutorial is about another tray icon application type.
The base application is the same like any application with some changes with this steps:
- QSystemTrayIcon this will start to create the application like an tray icon application;
- create one menu to show if you use the right click of mouse;
- add a menu with action items;
- add the exit action to close the tray icon application;
- you can use the action item from menu to print a message
Let's see the source code:
from PyQt5.QtGui import *
from PyQt5.QtWidgets import *
# create the application
app = QApplication([])
app.setQuitOnLastWindowClosed(False)

# create the icon
icon = QIcon("icon.png")

# create the tray icon 
tray = QSystemTrayIcon()
tray.setIcon(icon)
tray.setVisible(True)

# this will print a message 
def print_msg():
 print("This action is triggered connect!")

# create the menu for tray icon
menu = QMenu()

# add one item to menu 
action = QAction("This is menu item")
menu.addAction(action)
action.triggered.connect(print_msg)

# add exit item to menu 
exitAction = QAction("&Exit")
menu.addAction(exitAction)
exitAction.triggered.connect(exit)

# add the menu to the tray
tray.setContextMenu(menu)

# start application execution 
app.exec_()
This is result of the running source code:

Sunday, November 4, 2018

Python Qt5 : QtSql with QtOpenGL example.

Today I will show you how to deal with QtOpenGL.
Let's make a test to see what is this:
>>> import PyQt5
>>> from PyQt5.QtOpenGL import *
>>> dir(PyQt5.QtOpenGL)
['QGL', 'QGLContext', 'QGLFormat', 'QGLWidget', '__doc__', '__file__', '__loader
__', '__name__', '__package__', '__spec__']
The QtOpenGL is used to take an OpenGL content and show into the PyQt5 application.
You need to kknow how to use OpenGL API.
You can see the result of this example:

This is the source code for my example:
import sys
import math

from PyQt5.QtCore import Qt
from PyQt5.QtGui import QColor
from PyQt5.QtWidgets import QApplication, QMessageBox
from PyQt5.QtOpenGL import QGL, QGLFormat, QGLWidget

try:
    from OpenGL import GL
except ImportError:
    app = QApplication(sys.argv)
    QMessageBox.critical(None, "OpenGL samplebuffers",
            "PyOpenGL must be installed to run this example.")
    sys.exit(1)

# use to create OpenGL content 
class GLWidget(QGLWidget):
    GL_MULTISAMPLE = 0x809D
    # rotation to 0
    rot = 0.0

    def __init__(self, parent):
        super(GLWidget, self).__init__(QGLFormat(QGL.SampleBuffers), parent)
        self.list_ = []
        self.startTimer(40)
        self.setWindowTitle("OpenGL with sample buffers")

    def initializeGL(self):
        GL.glMatrixMode(GL.GL_PROJECTION)
        GL.glLoadIdentity()
        GL.glOrtho( -.5, .5, .5, -.5, -1000, 1000)
        GL.glMatrixMode(GL.GL_MODELVIEW)
        GL.glLoadIdentity()
        GL.glClearColor(1.0, 1.0, 1.0, 1.0)

        self.makeObject()

    def resizeGL(self, w, h):
        GL.glViewport(0, 0, w, h)

    def paintGL(self):
        GL.glClear(GL.GL_COLOR_BUFFER_BIT | GL.GL_DEPTH_BUFFER_BIT)

        GL.glMatrixMode(GL.GL_MODELVIEW)
        GL.glPushMatrix()
        GL.glEnable(GLWidget.GL_MULTISAMPLE)
        GL.glTranslatef( -0.25, -0.10, 0.0)
        GL.glScalef(0.75, 1.15, 0.0)
        GL.glRotatef(GLWidget.rot, 0.0, 0.0, 1.0)
        GL.glCallList(self.list_)
        GL.glPopMatrix()

        GL.glPushMatrix()
        GL.glDisable(GLWidget.GL_MULTISAMPLE)
        GL.glTranslatef(0.25, -0.10, 0.0)
        GL.glScalef(0.75, 1.15, 0.0)
        GL.glRotatef(GLWidget.rot, 0.0, 0.0, 1.0)
        GL.glCallList(self.list_)
        GL.glPopMatrix()

        GLWidget.rot += 0.2

        self.qglColor(Qt.black)
        self.renderText(-0.35, 0.4, 0.0, "Multisampling enabled")
        self.renderText(0.15, 0.4, 0.0, "Multisampling disabled")

    def timerEvent(self, event):
        self.update()
    # create one object 
    def makeObject(self):
        x1 = +0.05
        y1 = +0.25
        x2 = +0.15
        y2 = +0.21
        x3 = -0.25
        y3 = +0.2
        x4 = -0.1  
        y4 = +0.2
        x5 = +0.25 
        y5 = -0.05

        self.list_ = GL.glGenLists(1)
        GL.glNewList(self.list_, GL.GL_COMPILE)
        
        self.qglColor(Qt.blue)
        self.geometry(GL.GL_POLYGON, x1, y1, x2, y2, x3, y3, x4, y4, x5, y5)
        
        GL.glEndList()
    # create geometry of object depend of render - GL_POLYGON
    # used five points 
    def geometry(self, primitive, x1, y1, x2, y2, x3, y3, x4, y4, x5, y5):
        GL.glBegin(primitive)

        GL.glVertex2d(x1, y1)
        GL.glVertex2d(x2, y2)
        GL.glVertex2d(x3, y3)
        GL.glVertex2d(x4, y4)
        GL.glVertex2d(x5, y5)

        GL.glEnd()
# start the application 
if __name__ == '__main__':

    app = QApplication(sys.argv)

    my_format = QGLFormat.defaultFormat()
    my_format.setSampleBuffers(True)
    QGLFormat.setDefaultFormat(my_format)

    if not QGLFormat.hasOpenGL():
        QMessageBox.information(None, "OpenGL using samplebuffers",
                "This system does not support OpenGL.")
        sys.exit(0)

    widget = GLWidget(None)

    if not widget.format().sampleBuffers():
        QMessageBox.information(None, "OpenGL using samplebuffers",
                "This system does not have sample buffer support.")
        sys.exit(0)

    widget.resize(640, 480)
    widget.show()

    sys.exit(app.exec_())