analitics

Pages

Monday, January 8, 2024

Python 3.12.1 : Create a simple color palette.

Today I tested a simple source code for a color palette created with PIL python package.
This is the result:
Let's see the source code:
from PIL import Image, ImageDraw

# 640x640 pixeli with 10x10 squares 64x64 
img = Image.new('RGB', (640, 640))
draw = ImageDraw.Draw(img)

# color list
colors = []
# for 100 colors you need to set steps with 62,62,64 
# or you can change 64,62,62 some little changes 
for r in range(0, 256, 62):
    for g in range(0, 256, 62):
        for b in range(0, 256, 64):
            colors.append((r, g, b))

# show result of colors and size up 100 items 
print(colors)
print(len(colors))

# create 10x10 colors and fill the image 
for i in range(10):
    for j in range(10):
        x0 = j * 64
        y0 = i * 64
        x1 = x0 + 64
        y1 = y0 + 64
        color = colors[i*10 + j]  # Selectarea culorii din lista
        draw.rectangle([x0, y0, x1, y1], fill=color)

# save teh image
img.save('rgb_color_matrix.png')

Saturday, January 6, 2024

Python 3.10.12 : LaTeX on colab notebook - part 043.

Today I tested with a simple LaTeX examples in the Colab notebook.
If you open my notebook colab then you will see some issues and how can be fixed.
You can find this on my notebook - catafest_056.ipynb on colab repo.

Friday, January 5, 2024

Python 3.12.1 : How to read all CLSID with winreg.

The winreg python module can be found default into python instalation.
This is the source code I used to list all of CLSID:
import winreg

# Open the CLSID key under HKEY_CLASSES_ROOT
clsid_key = winreg.OpenKey(winreg.HKEY_CLASSES_ROOT, "CLSID")

# Iterate through all the subkeys
for i in range(winreg.QueryInfoKey(clsid_key)[0]):
    # Get the name of the subkey
    subkey_name = winreg.EnumKey(clsid_key, i)
    # Open the subkey
    subkey = winreg.OpenKey(clsid_key, subkey_name, 0, winreg.KEY_READ)
    try:
        # Read the default value of the subkey
        value, type = winreg.QueryValueEx(subkey, "")
        # Print the subkey name and the value
        print(subkey_name, value)
    except:
        # Skip the subkeys that cannot be read
        pass
    # Close the subkey
    winreg.CloseKey(subkey)

# Close the CLSID key
winreg.CloseKey(clsid_key)
... and this source code comes with an text file output:
import winreg

# Open the CLSID key under HKEY_CLASSES_ROOT
clsid_key = winreg.OpenKey(winreg.HKEY_CLASSES_ROOT, "CLSID")

# Open the file for writing
with open("clsid_info.txt", "w") as f:
    # Iterate through all the subkeys
    for i in range(winreg.QueryInfoKey(clsid_key)[0]):
        # Get the name of the subkey
        subkey_name = winreg.EnumKey(clsid_key, i)
        # Open the subkey
        subkey = winreg.OpenKey(clsid_key, subkey_name, 0, winreg.KEY_READ)
        try:
            # Read the default value of the subkey
            value, type = winreg.QueryValueEx(subkey, "")
            # Write the subkey name and the value to the file
            f.write(subkey_name + " " + value + "\n")
        except:
            # Skip the subkeys that cannot be read
            pass
        # Close the subkey
        winreg.CloseKey(subkey)

# Close the CLSID key
winreg.CloseKey(clsid_key)

Friday, December 22, 2023

Python : MLOps with neptune.ai .

I just started testing with neptune.ai.
Neptune is the MLOps stack component for experiment tracking. It offers a single place to log, compare, store, and collaborate on experiments and models.
MLOps or ML Ops is a paradigm that aims to deploy and maintain machine learning models in production reliably and efficiently.
MLOps is practiced between Data Scientists, DevOps, and Machine Learning engineers to transition the algorithm to production systems.
MLOps aims to facilitate the creation of machine learning products by leveraging these principles: CI/CD automation, workflow orchestration, reproducibility; versioning of data, model, and code; collaboration; continuous ML training and evaluation; ML metadata tracking and logging; continuous monitoring; and feedback loops.
You will understand these features of MLOps if you look at these practical examples.
Neptune uses a token:
Your Neptune API token is like a password to the application. By saving your token as an environment variable, you avoid putting it in your source code, which is more convenient and secure.
When I started I tested with this default project:
example-project-tensorflow-keras
Another good feature is the working team, by adding collaborators in the People section of your workspace settings.
  • For a free account you can have these options:
  • 5 users
  • 1 active project
  • Unlimited archived projects
  • Unlimited experiments
  • Unlimited model versions
  • Unlimited logging hours
  • Artifacts tracking
  • Service accounts for CI/CD pipelines
  • 200 GB storage
Let's see the default source code shared by neptune.ai for that default project:
import glob
import hashlib

import matplotlib.pyplot as plt
import neptune.new as neptune
import numpy as np
import pandas as pd
import tensorflow as tf
from neptune.new.integrations.tensorflow_keras import NeptuneCallback
from scikitplot.metrics import plot_roc, plot_precision_recall

# Select project
run = neptune.init(project='common/example-project-tensorflow-keras',
                   tags=['keras', 'fashion-mnist'],
                   name='keras-training')

# Prepare params
parameters = {'dense_units': 128,
              'activation': 'relu',
              'dropout': 0.23,
              'learning_rate': 0.15,
              'batch_size': 64,
              'n_epochs': 30}

run['model/params'] = parameters

# Prepare dataset
(x_train, y_train), (x_test, y_test) = tf.keras.datasets.fashion_mnist.load_data()
x_train = x_train / 255.0
x_test = x_test / 255.0

class_names = ['T-shirt/top', 'Trouser', 'Pullover', 'Dress', 'Coat',
               'Sandal', 'Shirt', 'Sneaker', 'Bag', 'Ankle boot']

# Log data version
run['data/version/x_train'] = hashlib.md5(x_train).hexdigest()
run['data/version/y_train'] = hashlib.md5(y_train).hexdigest()
run['data/version/x_test'] = hashlib.md5(x_test).hexdigest()
run['data/version/y_test'] = hashlib.md5(y_test).hexdigest()
run['data/class_names'] = class_names

# Log example images
for j, class_name in enumerate(class_names):
    plt.figure(figsize=(10, 10))
    label_ = np.where(y_train == j)
    for i in range(9):
        plt.subplot(3, 3, i + 1)
        plt.xticks([])
        plt.yticks([])
        plt.grid(False)
        plt.imshow(x_train[label_[0][i]], cmap=plt.cm.binary)
        plt.xlabel(class_names[j])
    run['data/train_sample'].log(neptune.types.File.as_image(plt.gcf()))
    plt.close('all')

# Prepare model
model = tf.keras.Sequential([
    tf.keras.layers.Flatten(input_shape=(28, 28)),
    tf.keras.layers.Dense(parameters['dense_units'], activation=parameters['activation']),
    tf.keras.layers.Dropout(parameters['dropout']),
    tf.keras.layers.Dense(parameters['dense_units'], activation=parameters['activation']),
    tf.keras.layers.Dropout(parameters['dropout']),
    tf.keras.layers.Dense(10, activation='softmax')
])
optimizer = tf.keras.optimizers.SGD(learning_rate=parameters['learning_rate'])
model.compile(optimizer=optimizer,
              loss='sparse_categorical_crossentropy',
              metrics=['accuracy'])

# Log model summary
model.summary(print_fn=lambda x: run['model/summary'].log(x))

# Train model
neptune_cbk = NeptuneCallback(run=run, base_namespace='metrics')

model.fit(x_train, y_train,
          batch_size=parameters['batch_size'],
          epochs=parameters['n_epochs'],
          validation_split=0.2,
          callbacks=[neptune_cbk])

# Log model weights
model.save('trained_model')
run['model/weights/saved_model'].upload('trained_model/saved_model.pb')
for name in glob.glob('trained_model/variables/*'):
    run[name].upload(name)

# Evaluate model
eval_metrics = model.evaluate(x_test, y_test, verbose=0)
for j, metric in enumerate(eval_metrics):
    run['test/scores/{}'.format(model.metrics_names[j])] = metric

# Log predictions as table
y_pred_proba = model.predict(x_test)
y_pred = np.argmax(y_pred_proba, axis=1)
y_pred = y_pred
df = pd.DataFrame(data={'y_test': y_test, 'y_pred': y_pred, 'y_pred_probability': y_pred_proba.max(axis=1)})
run['test/predictions'] = neptune.types.File.as_html(df)

# Log model performance visualizations
fig, ax = plt.subplots()
plot_roc(y_test, y_pred_proba, ax=ax)
run['charts/ROC'] = neptune.types.File.as_image(fig)

fig, ax = plt.subplots()
plot_precision_recall(y_test, y_pred_proba, ax=ax)
run['charts/precision-recall'] = neptune.types.File.as_image(fig)
plt.close('all')

run.wait()
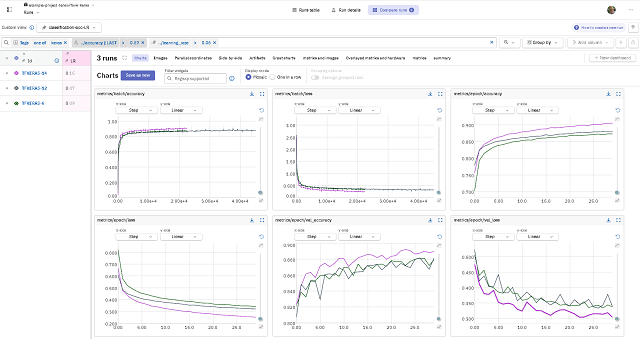
This screenshot shows the web interface for neptune.ai:

Sunday, December 10, 2023

Python 3.10.12 : Simple examples with some Python modules - part 042.

I added some simple examples in my repo on GitHub where I have notebooks from Google Colab.
Python usage is limited to this type of interface with Python version stability rules.
You can see the Python version that Colab is using with this command in the code area:
!python
Python 3.10.12 (main, Nov 20 2023, 15:14:05) [GCC 11.4.0] on linux
Type "help", "copyright", "credits" or "license" for more information.
These are the Python packages I used: cartopy, matplotlib, numpy, geemap, earthengine-api, rasterio.
Of these examples, some require some Google configuration, others require knowledge of topography ... or are very simple to use with a dedicated module as we have visualized more special types of image files.
See there an example with the cartopy python package :
import matplotlib.pyplot as plt

import cartopy.crs as ccrs
from cartopy.io import shapereader
from cartopy.mpl.gridliner import LONGITUDE_FORMATTER, LATITUDE_FORMATTER

import cartopy.io.img_tiles as cimgt

extent = [15, 25, 55, 35]

request = cimgt.OSM()

fig = plt.figure(figsize=(9, 13))
ax = plt.axes(projection=request.crs)
gl = ax.gridlines(draw_labels=True, alpha=0.2)
gl.top_labels = gl.right_labels = False
gl.xformatter = LONGITUDE_FORMATTER
gl.yformatter = LATITUDE_FORMATTER

ax.set_extent(extent)

ax.add_image(request, 11)

plt.show()

Thursday, December 7, 2023

Python 3.13.0a1 : Testing with scapy - part 001.

Scapy is a powerful interactive packet manipulation library written in Python. Scapy is able to forge or decode packets of a wide number of protocols, send them on the wire, capture them, match requests and replies, and much more. see the official website.
You need to install NPCap.
Beacon frames are transmitted periodically, they serve to announce the presence of a wireless LAN and to synchronise the members of the service set.
In IBSS network beacon generation is distributed among the stations.
Beacon frames are transmitted by the access point (AP) in an infrastructure basic service set (BSS).
Beacon frames include information about the access point and supported data rates and what encryption is being used.
These are received by your device’s wireless network interface and interpreted by your operating system to build the list of available networks.
The beacon variable indicates the capabilities of our access point.
Let's see the source code:
C:\PythonProjects\scapy_001>pip install scapy
Collecting scapy
  Downloading scapy-2.5.0.tar.gz (1.3 MB)
     ---------------------------------------- 1.3/1.3 MB 3.5 MB/s eta 0:00:00
  Installing build dependencies ... done
...
Successfully built scapy
Installing collected packages: scapy
Successfully installed scapy-2.5.0
The source code is simple:
from scapy.all import Dot11,Dot11Beacon,Dot11Elt,RadioTap,sendp,hexdump

netSSID = 'testSSID'       #Network name here
iface = 'Realtek PCIe GbE Family Controller'         #Interface name here

dot11 = Dot11(type=0, subtype=8, addr1='ff:ff:ff:ff:ff:ff',
addr2='22:22:22:22:22:22', addr3='33:33:33:33:33:33')
beacon = Dot11Beacon(cap='ESS+privacy')
essid = Dot11Elt(ID='SSID',info=netSSID, len=len(netSSID))
rsn = Dot11Elt(ID='RSNinfo', info=(
'\x01\x00'                 #RSN Version 1
'\x00\x0f\xac\x02'         #Group Cipher Suite : 00-0f-ac TKIP
'\x02\x00'                 #2 Pairwise Cipher Suites (next two lines)
'\x00\x0f\xac\x04'         #AES Cipher
'\x00\x0f\xac\x02'         #TKIP Cipher
'\x01\x00'                 #1 Authentication Key Managment Suite (line below)
'\x00\x0f\xac\x02'         #Pre-Shared Key
'\x00\x00'))               #RSN Capabilities (no extra capabilities)

frame = RadioTap()/dot11/beacon/essid/rsn

frame.show()
print("\nHexdump of frame:")
hexdump(frame)
input("\nPress enter to start\n")

sendp(frame, iface=iface, inter=0.100, loop=1)
Let's run this source code:
python scapy_network_001.py
###[ RadioTap ]###
  version   = 0
  pad       = 0
  len       = None
  present   = None
  notdecoded= ''
###[ 802.11 ]###
     subtype   = Beacon
     type      = Management
     proto     = 0
     FCfield   =
     ID        = 0
     addr1     = ff:ff:ff:ff:ff:ff (RA=DA)
     addr2     = 22:22:22:22:22:22 (TA=SA)
     addr3     = 33:33:33:33:33:33 (BSSID/STA)
     SC        = 0
###[ 802.11 Beacon ]###
        timestamp = 0
        beacon_interval= 100
        cap       = ESS+privpython scapy_network_001.py
###[ RadioTap ]### tion Element ]###
  version   = 0      = SSID
  pad       = 0      = 8
  len       = None   = 'testSSID'
  present   = Noneation Element ]###
  notdecoded= ''     = RSN
###[ 802.11 ]###     = None
     subtype   = Beacon'\x01\x00\x00\x0f¬\x02\x02\x00\x00\x0f¬\x04\x00\x0f¬\x02\x01\x00\x00\x
     type      = Management
     proto     = 0
     FCfield   =
     ID        = 0
     addr1     = ff:ff:ff:ff:ff:ff (RA=DA)FF FF FF FF  ................
     addr2     = 22:22:22:22:22:22 (TA=SA)33 33 00 00  ..""""""333333..
     addr3     = 33:33:33:33:33:33 (BSSID/STA)8 74 65  ........d.....te
     SC        = 049 44 30 1C 01 00 00 0F C2 AC 02 02  stSSID0.........
###[ 802.11 Beacon ]### 00 0F C2 AC 02 01 00 00 0F C2  ................
        timestamp = 0                                  ....
        beacon_interval= 100
        cap       = ESS+privacy
###[ 802.11 Information Element ]###
           ID        = SSID..................................................................
           len       = 8.....................................................................
           info      = 'testSSID'
###[ 802.11 Information Element ]###
           ID        = RSN
           len       = None>
           info      = '\x01\x00\x00\x0f¬\x02\x02\x00\x00\x0f¬\x04\x00\x0f¬\x02\x01\x00\x00\x0f¬\x02\x00\x00'


Hexdump of frame:
0000  00 00 08 00 00 00 00 00 80 00 00 00 FF FF FF FF  ................
0010  FF FF 22 22 22 22 22 22 33 33 33 33 33 33 00 00  ..""""""333333..
0020  00 00 00 00 00 00 00 00 64 00 11 00 00 08 74 65  ........d.....te
0030  73 74 53 53 49 44 30 1C 01 00 00 0F C2 AC 02 02  stSSID0.........
0040  00 00 0F C2 AC 04 00 0F C2 AC 02 01 00 00 0F C2  ................
0050  AC 02 00 00                                      ....

Press enter to start

.................................................................
Sent 130 packets.

Wednesday, December 6, 2023

Python 3.10.12 : Simple example with SymPy - part 041.

SymPy is a Python library for symbolic mathematics. If you are new to SymPy, start with the introductory tutorial.
You can find a simple example with a partial differentiation on my GitHub colab repo.

Monday, November 27, 2023

Python 3.10.12 : My colab get images from imdb.com by the name - part 040.

Transformers provides thousands of pretrained models to perform tasks on different modalities such as text, vision, and audio.
You find more on my Colab Github repo.

Python 3.13.0a1 : How to use PyOTP for Microsoft Authenticator.

PyOTP is a Python library for generating and verifying one-time passwords. It can be used to implement two-factor (2FA) or multi-factor (MFA) authentication methods in web applications and in other systems that require users to log in.
Read more on this official webpage.
Install with pip tool and use this source code:
import pyotp

# Generare secret pentru utilizator
secret = pyotp.random_base32()

# Generare URL pentru codul QR
uri = pyotp.totp.TOTP(secret).provisioning_uri(name="UtilizatorExemplu", issuer_name="NumeServer")

# Exemplu de folosire a URI-ului într-o aplicație web sau pentru a genera un cod QR
print("Scanati urmatorul QR code in aplicatia Microsoft Authenticator:")
print(uri)
I run the python script:
python test_001.py
Scanati urmatorul QR code in aplicatia Microsoft Authenticator:
otpauth://totp/NumeServer:UtilizatorExemplu?secret=SPZICPQHAMWOIYCAZEHXZTPQDXEXZSWL&issuer=NumeServer
I used the uri output with one online tool to generate this QR image code and I tested with the aplication.
The account is added with NumeServer and UtilizatorExemplu.

Python 3.10.12 : My colab get images from imdb.com by the name - part 039.

You can use gspread and google-auth to get data from a spreadsheet from google drive and use it.
The colab notebook can be found on my colab repo on Github.
from google.colab import auth
auth.authenticate_user()

import gspread
from google.auth import default
creds, _ = default()

gc = gspread.authorize(creds)

# Open the spreadsheet by name
spreadsheet = gc.open('fiecare_saptamana')

# Choose a worksheet from the spreadsheet
worksheet = spreadsheet.get_worksheet(0)  # 0 represents the index of the first worksheet

# Get and print the data
data = worksheet.get_all_values()

#uncoment this line to print data sau add more source code to parse data
#print(data)

#the result will be 
#[['noreply@projects.blender.org', '437', 'notifications@github.com',  ...

Thursday, November 16, 2023

Python processing LiDAR data with Ouster SDK.

Lidar sensors for high-resolution, long range use in autonomous vehicles, robotics, mapping. Low-cost & reliable for any use case. Shipping today. See more on the official website.
You can download sample LiDAR data and test and use the Ouster Python SDK from the Ouster website.
The documentation for this python package can be found on this website.
See a simple demo on this youtube video named: 0 to SLAM in 60 Seconds.

Monday, November 13, 2023

PyScript - online tool .

PyScript is a platform for Python in the browser.
PyScript brings together two of the most vibrant technical ecosystems on the planet. If the web and Python had a baby, you'd get PyScript.
PyScript works because modern browsers support WebAssembly (abbreviated to WASM) - an instruction set for a virtual machine with an open specification and near native performance. PyScript takes versions of the Python interpreter compiled to WASM, and makes them easy to use inside the browser.
You can read more on the official webpage.
You can see my project tested with source code from a basic GitHub example.

Sunday, November 12, 2023

Python 3.13.0a1 : Testing basic instalation.

Today I tested a prerelease version of Python which is version python-3.13.0a1-amd64, the maintenance status is prerelease, the first release was 2024-10-01, the end of support is 2029-10, and the release schedule is PEP 719.
I got this version of python from the official python page.
The checksum for the downloaded file is from the same page and I checked with the WinMD5Free tool.
WinMD5Free is a tiny and fast utility to compute MD5 hash value for files. It works with Microsoft Windows 98, 2000, XP, Vista, and Windows 7/8/10/11.
The installation is simple, theoretically you don't have to make changes, you can only select a custom folder.
Open a command line and type the python command to see the installed version.
python
Python 3.13.0a1 (tags/v3.13.0a1:ad056f0, Oct 13 2023, 09:51:17) [MSC v.1935 64 bit (AMD64)] on win32
Type "help", "copyright", "credits" or "license" for more information.
>>>
In the command line opened by python with >>>, I tested the old specific commands:
>>> help()

Welcome to Python 3.13's help utility!

If this is your first time using Python, you should definitely check out
the tutorial on the internet at https://docs.python.org/3.13/tutorial/.

Enter the name of any module, keyword, or topic to get help on writing
Python programs and using Python modules.  To quit this help utility and
return to the interpreter, just type "quit".

To get a list of available modules, keywords, symbols, or topics, type
"modules", "keywords", "symbols", or "topics".  Each module also comes
with a one-line summary of what it does; to list the modules whose name
or summary contain a given string such as "spam", type "modules spam".

help> modules

Please wait a moment while I gather a list of all available modules...

test_sqlite3: testing with SQLite version 3.43.1
__future__          _testcapi           fractions           runpy
__hello__           _testclinic         ftplib              sched
__phello__          _testclinic_limited functools           secrets
_abc                _testconsole        gc                  select
_aix_support        _testimportmultiple genericpath         selectors
_ast                _testinternalcapi   getopt              shelve
_asyncio            _testmultiphase     getpass             shlex
_bisect             _testsinglephase    gettext             shutil
_blake2             _thread             glob                signal
_bz2                _threading_local    graphlib            site
_codecs             _tkinter            gzip                smtplib
_codecs_cn          _tokenize           hashlib             socket
_codecs_hk          _tracemalloc        heapq               socketserver
_codecs_iso2022     _typing             hmac                sqlite3
_codecs_jp          _uuid               html                sre_compile
_codecs_kr          _warnings           http                sre_constants
_codecs_tw          _weakref            idlelib             sre_parse
_collections        _weakrefset         imaplib             ssl
_collections_abc    _winapi             importlib           stat
_compat_pickle      _wmi                inspect             statistics
_compression        _xxinterpchannels   io                  string
_contextvars        _xxsubinterpreters  ipaddress           stringprep
_csv                _zoneinfo           itertools           struct
_ctypes             abc                 json                subprocess
_ctypes_test        antigravity         keyword             symtable
_datetime           argparse            linecache           sys
_decimal            array               locale              sysconfig
_elementtree        ast                 logging             tabnanny
_functools          asyncio             lzma                tarfile
_hashlib            atexit              mailbox             tempfile
_heapq              base64              marshal             test
_imp                bdb                 math                textwrap
_io                 binascii            mimetypes           this
_json               bisect              mmap                threading
_locale             builtins            modulefinder        time
_lsprof             bz2                 msvcrt              timeit
_lzma               cProfile            multiprocessing     tkinter
_markupbase         calendar            netrc               token
_md5                cmath               nt                  tokenize
_multibytecodec     cmd                 ntpath              tomllib
_multiprocessing    code                nturl2path          trace
_opcode             codecs              numbers             traceback
_opcode_metadata    codeop              opcode              tracemalloc
_operator           collections         operator            tty
_osx_support        colorsys            optparse            turtle
_overlapped         compileall          os                  turtledemo
_pickle             concurrent          pathlib             types
_py_abc             configparser        pdb                 typing
_pydatetime         contextlib          pickle              unicodedata
_pydecimal          contextvars         pickletools         unittest
_pyio               copy                pip                 urllib
_pylong             copyreg             pkgutil             uuid
_queue              csv                 platform            venv
_random             ctypes              plistlib            warnings
_sha1               curses              poplib              wave
_sha2               dataclasses         posixpath           weakref
_sha3               datetime            pprint              webbrowser
_signal             dbm                 profile             winreg
_sitebuiltins       decimal             pstats              winsound
_socket             difflib             pty                 wsgiref
_sqlite3            dis                 py_compile          xml
_sre                doctest             pyclbr              xmlrpc
_ssl                email               pydoc               xxsubtype
_stat               encodings           pydoc_data          zipapp
_statistics         ensurepip           pyexpat             zipfile
_string             enum                queue               zipimport
_strptime           errno               quopri              zlib
_struct             faulthandler        random              zoneinfo
_symtable           filecmp             re
_sysconfig          fileinput           reprlib
_testbuffer         fnmatch             rlcompleter

Enter any module name to get more help.  Or, type "modules spam" to search
for modules whose name or summary contain the string "spam".
help> ^Z
>>>
I tried to use quit and exit to return to the interactive Python shell but these not work. I need to use Ctr +Z.
Just for testing, I installed some Python modules, my recommendation is to use a virtualenv for each project.
For update I used:
python.exe -m pip install --upgrade pip