CodeSkulptor uses Skulpt to provide a browser-based coding environment and can be tested on the official website.
You can see an online default example with simplegui python package on that website with online editor.

pip3 install --upgrade --force-reinstall PyQt6
...
ERROR: Could not install packages due to an OSError: [WinError 2] The system cannot find the file specified:
...pylupdate6.exe
...pylupdate6.exe.deleteme'pip3 install --upgrade --force-reinstall PyQt6
Collecting PyQt6
...
Successfully installed PyQt6-6.4.1 PyQt6-Qt6-6.4.2 PyQt6-sip-13.4.1pip install --force-reinstall --no-cache-dir>>> import PyQt6
>>> from PyQt6.QtCore import QUrl
Traceback (most recent call last):
...
ImportError: DLL load failed while importing QtCore: The specified module could not be found.pip3 install PyQt6 --user --ignore-installed
Collecting PyQt6
...
Installing collected packages: PyQt6-Qt6, PyQt6-sip, PyQt6
WARNING: The scripts pylupdate6.exe and pyuic6.exe are installed in
...
which is not on PATH.
Consider adding this directory to PATH or, if you prefer to suppress this warning, use --no-warn-script-location.
Successfully installed PyQt6-6.4.0 PyQt6-Qt6-6.4.2 PyQt6-sip-13.4.0
>>> from PyQt6 import *
>>> dir(PyQt6)
['__builtins__', '__cached__', '__doc__', '__file__', '__loader__', '__name__', '__package__', '__path__', '__spec__']>>> import PyQt6
>>> from PyQt6 import QtCore
>>> dir(PyQt6)
['QtCore', '__builtins__', '__cached__', '__doc__', '__file__', '__loader__', '__name__', '__package__', '__path__', '__spec__', 'sip']
>>> from PyQt6.QtCore import QUrlpip3 install openai --userimport os
import openai
openai.api_key = "your_API_OpenAI_key"
response = openai.Completion.create(
model="text-davinci-003",
prompt="What is the python programmin language?",
temperature=0.7,
max_tokens=100,
top_p=1,
frequency_penalty=0,
presence_penalty=0
)
print(response)python openai001.py
{
"choices": [
{
"finish_reason": "stop",
"index": 0,
"logprobs": null,
"text": "\n\nPython is a high-level, interpreted, general-purpose programming language.
It was created by Guido van Rossum and first released in 1991. Python has a wide variety of
uses and is a popular language for data science, web development, automation, and artificial
intelligence. It is also a popular language for scripting and general-purpose programming."
}
],
"created": 1674588982,
"id": "cmpl-6cJNeACMtayBlExV1GJpilde0KcBN",
"model": "text-davinci-003",
"object": "text_completion",
"usage": {
"completion_tokens": 71,
"prompt_tokens": 8,
"total_tokens": 79
}
}
py --version
Python 3.11.0py -0
-V:3.11 * Python 3.11 (64-bit)
-V:3.10 Python 3.10 (64-bit)
-V:3.9 Python 3.9 (64-bit)
-V:3.7 Python 3.7 (64-bit)>py -3.10
Python 3.10.7 (tags/v3.10.7:6cc6b13, Sep 5 2022, 14:08:36) [MSC v.1933 64 bit (AMD64)] on win32
Type "help", "copyright", "credits" or "license" for more information.
>>> exit()py -3.10 scripting001.pypython -m pip uninstall quaternionpython -m pip install --upgrade --no-deps --force-reinstall numpy-quaternionimport numpy as np
import quaternion
# define a quaternion with real part a and imaginary parts bi, cj, dk
a = 1
b = 2
c = 3
d = 4
q = np.quaternion(a, b, c, d)
# define a quaternion using euler angles
x = 1.0
y = 2.0
z = 3.0
q2 = quaternion.from_euler_angles(x, y, z)
# define a vector to rotate
v = [1, 0, 0]
# perform the rotation using quaternion multiplication
# quaternion multiplication is not commutative, the order matters
# because this line of source code will not work: rotated_v = q2 * v * q2.conj()
rotated_v = (q2 * quaternion.quaternion(0, *v)) * q2.conj()
print(rotated_v)quaternion(0, 0.103846565151668, 0.422918571742548, 0.900197629735517)import ephem
import matplotlib.pyplot as plt
# create an observer
obs = ephem.Observer()
# set the observer's location
obs.lat = '47.27' # latitude
obs.lon = '26.18' # longitude
obs.elevation = 307 # elevation (meters)
# set the date and time of the observation
obs.date = '2022/05/15 12:00:00' # date and time
# if you want you can use now() for real time data
# create the bodies
mercury = ephem.Mercury(obs)
venus = ephem.Venus(obs)
mars = ephem.Mars(obs)
jupiter = ephem.Jupiter(obs)
saturn = ephem.Saturn(obs)
uranus = ephem.Uranus(obs)
neptune = ephem.Neptune(obs)
pluto = ephem.Pluto(obs)
moon = ephem.Moon(obs)
# compute the position of each planet and the moon
mercury.compute(obs)
venus.compute(obs)
mars.compute(obs)
jupiter.compute(obs)
saturn.compute(obs)
uranus.compute(obs)
neptune.compute(obs)
pluto.compute(obs)
moon.compute(obs)
# extract ra and dec coordinates of each body
ra = [mercury.ra, venus.ra, mars.ra, jupiter.ra, saturn.ra, uranus.ra, neptune.ra, pluto.ra,moon.ra]
dec = [mercury.dec, venus.dec, mars.dec, jupiter.dec, saturn.dec, uranus.dec, neptune.dec, pluto.dec,moon.dec]
# convert ra,dec from radians to degrees
ra = [r*180/ephem.pi for r in ra]
dec = [d*180/ephem.pi for d in dec]
print(ra,dec)
# create a scatter plot of the positions
plt.scatter(ra, dec)
# add labels for each planet
plt.annotate('Mercury', (ra[0], dec[0]))
plt.annotate('Venus', (ra[1], dec[1]))
plt.annotate('Mars', (ra[2], dec[2]))
plt.annotate('Jupiter', (ra[3], dec[3]))
plt.annotate('Saturn', (ra[4], dec[4]))
plt.annotate('Uranus', (ra[5], dec[5]))
plt.annotate('Neptune', (ra[6], dec[6]))
plt.annotate('Pluto', (ra[7], dec[7]))
plt.annotate('Moon', (ra[8], dec[8]))
plt.xlabel("RA [degrees]")
plt.ylabel("Dec [degrees]")
# show the plot
plt.show()
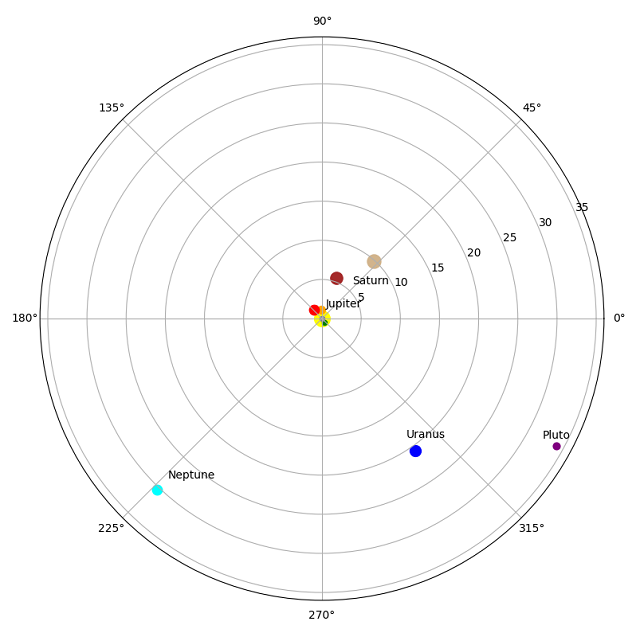
# Set the figure size
plt.figure(figsize=(10, 10))
# Define the polar axis
ax = plt.subplot(111, projection='polar')
# Set the axis limits
ax.set_ylim(0, 36)
# Plot the Sun at the center
plt.scatter(0, 0, s=200, color='yellow')
mercury_distance = mercury.earth_distance
venus_distance= venus.earth_distance
mars_distance= mars.earth_distance
jupiter_distance= jupiter.earth_distance
saturn_distance= saturn.earth_distance
uranus_distance= uranus.earth_distance
neptune_distance= neptune.earth_distance
pluto_distance= pluto.earth_distance
moon_distance= moon.earth_distance
print(mercury_distance)
distance = [mercury_distance,venus_distance,mars_distance,jupiter_distance,saturn_distance,uranus_distance,neptune_distance,pluto_distance,moon_distance]
# Plot the planets
plt.scatter(ra[0], distance[0], s=20, color='green')
plt.scatter(ra[1], distance[1], s=50, color='orange')
plt.scatter(ra[2], distance[2], s=80, color='red')
plt.scatter(ra[3], distance[3], s=120, color='brown')
plt.scatter(ra[4], distance[4], s=150, color='tan')
plt.scatter(ra[5], distance[5], s=100, color='blue')
plt.scatter(ra[6], distance[6], s=80, color='cyan')
plt.scatter(ra[7], distance[7], s=40, color='purple')
plt.scatter(ra[8], distance[8], s=20, color='gray')
# add the labels for each planet
plt.annotate('Mercury',(ra[0], distance[0]),xytext=(ra[0], distance[0] - 2))
plt.annotate('Venus',(ra[1], distance[1]),xytext=(ra[1], distance[1] - 2))
plt.annotate('Mars',(ra[2], distance[2]),xytext=(ra[2], distance[2] - 2))
plt.annotate('Jupiter',(ra[3], distance[3]),xytext=(ra[3], distance[3] - 4))
plt.annotate('Saturn',(ra[4], distance[4]),xytext=(ra[4], distance[4] - 4))
plt.annotate('Uranus',(ra[5], distance[5]),xytext=(ra[5], distance[5] - 2))
plt.annotate('Neptune',(ra[6], distance[6]),xytext=(ra[6], distance[6] - 2))
plt.annotate('Pluto',(ra[7], distance[7]),xytext=(ra[7], distance[7] - 2))
plt.annotate('Moon',(ra[8], distance[8]),xytext=(ra[8], distance[8] - 2))
# Show the plot
plt.show()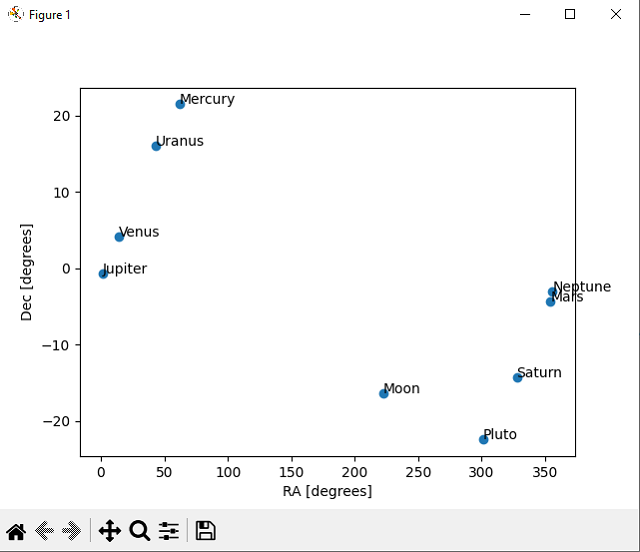
import ephem

# create an observer
obs = ephem.Observer()

# set the observer's location
obs.lat = '47.27' # latitude
obs.lon = '26.18' # longitude
obs.elevation = 307 # elevation (meters)

# set the date and time of the observation
obs.date = '2022/05/15 12:00:00' # date and time

# create the bodies
mercury = ephem.Mercury(obs)
venus = ephem.Venus(obs)
mars = ephem.Mars(obs)
jupiter = ephem.Jupiter(obs)
saturn = ephem.Saturn(obs)
uranus = ephem.Uranus(obs)
neptune = ephem.Neptune(obs)
pluto = ephem.Pluto(obs)
moon = ephem.Moon(obs)

# print the constellation
print("Mercury:", ephem.constellation(mercury))
print("Venus:", ephem.constellation(venus))
print("Mars:", ephem.constellation(mars))
print("Jupiter:", ephem.constellation(jupiter))
print("Saturn:", ephem.constellation(saturn))
print("Uranus:", ephem.constellation(uranus))
print("Neptune:", ephem.constellation(neptune))
print("Pluto:", ephem.constellation(pluto))
print("Moon:", ephem.constellation(moon))python constelation001.py
Mercury: ('Tau', 'Taurus')
Venus: ('Psc', 'Pisces')
Mars: ('Aqr', 'Aquarius')
Jupiter: ('Psc', 'Pisces')
Saturn: ('Cap', 'Capricornus')
Uranus: ('Ari', 'Aries')
Neptune: ('Psc', 'Pisces')
Pluto: ('Sgr', 'Sagittarius')
Moon: ('Lib', 'Libra')pip install pyephem --user
Requirement already satisfied: pyephem in
... site-packages (9.99)
Requirement already satisfied: ephem in
...
site-packages (from pyephem) (4.1.4)import ephem
# create a list with planets objects from ephem
planets = [ephem.Mercury(), ephem.Venus(), ephem.Mars(), ephem.Jupiter(), ephem.Saturn(), ephem.Uranus(), ephem.Neptune(), ephem.Moon()]
start_date = ephem.Date("2023/01/01")
end_date = ephem.Date("2023/12/31")
date = start_date
# create matrix to store planet names and conjunction dates
matrix = [[None for _ in range(len(planets) + 1)] for _ in range(len(planets))]
# create list to store planet names
planet_names = [planet.name for planet in planets]
# list all planets names as first row in matrix
matrix.insert(0, [""] + planet_names)
while date < end_date:
for i, planet1 in enumerate(planets):
for j, planet2 in enumerate(planets):
if i < j:
planet1.compute(date)
planet2.compute(date)
sep = ephem.separation(planet1, planet2) # calculate the angular distance
# compare the separation, if less than 0.01 degree then it's a conjunction
if sep < 1.0:
date_formatted = date.datetime().strftime("%d %B %Y")
matrix[i+1][j+1] = date_formatted
break
date = ephem.Date(date + 1)
# print a matrix with date is separation from 1 degree between planets on rows and column
for row in matrix:
print(row)['', 'Mercury', 'Venus', 'Mars', 'Jupiter', 'Saturn', 'Uranus', 'Neptune', 'Moon']
[None, None, '30 December 2023', '14 December 2023', '20 June 2023', None, None, None, None]
[None, None, None, '30 December 2023', '15 March 2023', '06 January 2023', None, None, '12 October 2023']
[None, None, None, None, None, None, '24 April 2023', None, '16 December 2023']
[None, None, None, None, None, '05 June 2023', '30 December 2023', None, None]
[None, None, None, None, None, None, None, '30 December 2023', None]
[None, None, None, None, None, None, None, '30 December 2023', None]
[None, None, None, None, None, None, None, None, '23 December 2023']
[None, None, None, None, None, None, None, None, None]pip install "sunpy[all] -U" import sunpy
print(sunpy.__version__)
3.1.8from matplotlib import pyplot as plt
import sunpy.map
import sunpy.data.sample
sunpyAIA = sunpy.map.Map(sunpy.data.sample.AIA_171_IMAGE)
sunpyAIA.plot()
plt.colorbar()
plt.show()
#!/usr/bin/env python3
import os
print(os.sys.path)
from scapy.all import *

def mysniff(interface):
    sniff(iface=interface, store=False, prn=process_sniffed_packet)

def process_sniffed_packet(packet):
    pyperclip.copy(str(packet))
    print(packet)

mysniff("Realtek PCIe GbE Family Controller")...
WARNING: WinPcap is now deprecated (not maintained). Please use Npcap instead
Ether / IP / TCP 104.244.42.2:https > 192.168.0.143:55478 PA / Raw
Ether / IP / TCP 192.168.0.143:55478 > 104.244.42.2:https PA / Raw
Ether / IP / TCP 192.168.0.143:55478 > 104.244.42.2:https PA / Raw
Ether / IP / TCP 104.244.42.2:https > 192.168.0.143:55478 A / Padding
Ether / IP / TCP 104.244.42.2:https > 192.168.0.143:55478 A / Padding
Ether / ARP who has 192.168.0.1 says 192.168.0.206 / Padding
...