analitics

Pages

Wednesday, May 25, 2022

Blender 3D and python scripting - part 006.

In this tutorial I will show you how to use the camera and render an image.
I kept the source code from the old tutorial 005 and made the following changes:
I defined the global PI constant because I used it outside the definition.
import bpy

#define the pi global 
pi = 3.1415926
I added to the old source code the part of adding camera, translation, rotation, rendering settings and rendering an image called box_640_480.png in the 3D folder on the local disk.
You can see in the example below the added source code:
# define the new camera named NewCamera
camera_data = bpy.data.cameras.new(name='NewCamera')
# set camera_data to object 
camera_object = bpy.data.objects.new('ObjectCamera', camera_data)
# link camera object to scene
bpy.context.scene.collection.objects.link(camera_object)
# set active camera in the current scene by object
bpy.context.scene.camera = bpy.data.objects['ObjectCamera']
# set location 
camera_object.location = [0,-5,1]
# set rotation mode
camera_object.rotation_mode = 'XYZ'
# set the rotate the camerea using rotation_euler
bpy.data.objects[camera_object.name_full].rotation_euler = (90*(pi/180),0,0)

scene = bpy.context.scene

#these settings will set the render output
bpy.context.scene.cycles.samples = 1
scene.render.resolution_x = 640
scene.render.resolution_y = 480
scene.render.resolution_percentage = 100
scene.render.use_border = False
scene.render.image_settings.file_format='PNG'
scene.render.filepath='C:/3D/box_640_480.png'
bpy.ops.render.render(write_still=1)

Tuesday, May 24, 2022

Blender 3D and python scripting - part 005.

In this tutorial I will recreate the same box but with a more complex source code.
In the previous tutorial I used the same source code several times...
    obj = bpy.ops.mesh.primitive_plane_add(size=2, 
    calc_uvs=True, 
    enter_editmode=False, 
    align='CURSOR', 
    location=location, 
    rotation=(0, 0, 0), 
    scale=(0,0,0)
    )
    
    # rename the object
    bpy.context.object.name = obj_name
    # return the object reference
    return bpy.context.object
It is easier to understand the steps taken and then move on to optimizing them in complex forms.
Obviously a presentation of the source code in this tutorial will show you the differences.
I will add that the source code does not include scalar transformations and is limited to a box with size 1.
import bpy

def create_plane_XYZ(loc, obj_name):
    #define the pi 
    pi = 3.1415926
    # this is a definition like a tuple
    rot = (0,0,0)
    # need to convert it to a list in order to add new values
    rot_list = list(rot)
    # this ang variable will rotate obj to the 90-degree angle 
    ang = -90*(pi/180)
    ang_inc = 45*(pi/180)
    if loc[0] < 0:
        rot_list[1]=ang

    if loc[0] > 0: 
        rot_list[1]=ang

    if loc[1] < 0:
        rot_list[0]=ang
        
    if loc[1] > 0: 
        rot_list[0]=ang
    # this check if the two value from position of plane is not zero
    if loc[1] != loc[2] != 0: 
        rot_list[0]=ang_inc
    # this convert a list back to tuple 
    rot=tuple(rot_list)
    # this create the plane 
    obj = bpy.ops.mesh.primitive_plane_add(size=2, 
    calc_uvs=True, 
    enter_editmode=False, 
    align='CURSOR', 
    location=loc, 
    rotation= rot, 
    scale=(0,0,0)
    )
    # rename the object
    bpy.context.object.name = obj_name
    # return the object reference
    return bpy.context.object

# this will create a plane on X and translate with -1 on Y 
planeX001 = create_plane_XYZ((0,-1,0), "Plane-X")
# this will create a plane on X and translate with 1 on Y 
planeX002 = create_plane_XYZ((0,1,0), "Plane+X")
# this will create a plane on Y and translate with -1 on X 
planeY001 = create_plane_XYZ((-1,0,0), "Plane-Y")
# this will create a plane on X and translate with 1 on Y 
planeY002 = create_plane_XYZ((1,0,0), "Plane+Y")
# this will create a plane with 45 degree because two value on tuple is not zero
planeZ001 = create_plane_XYZ((0,-0.25,1.66), "Plane-Y+Z")

Monday, May 23, 2022

Blender 3D and python scripting - part 004.

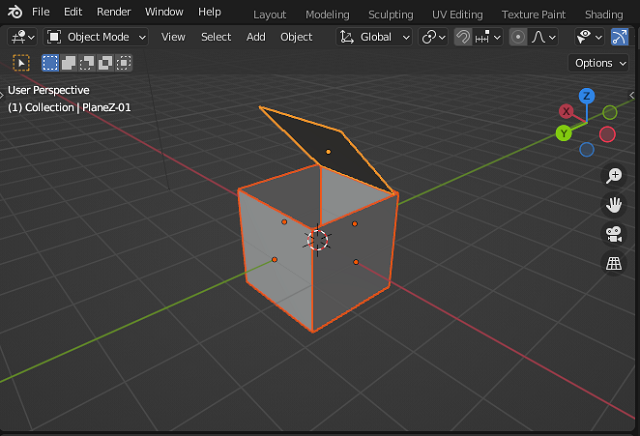
In this tutorial, I will show you how to create a box from planes, see the screenshot:
You can see I used the math python package and I created rotation by radians and rotation object for three custom planes.
This is the source code:
import bpy

import math

def DegToRad(angle):
    """convert to radians"""
    return angle*(math.pi/180)


def RotOBJ(name, angles):
    """rotate obj to the specified angles"""
    rotation = [DegToRad(angle) for angle in angles]
    bpy.data.objects[name].rotation_euler = rotation
    
def create_plane_X(location, obj_name):

    obj = bpy.ops.mesh.primitive_plane_add(size=2, 
    calc_uvs=True, 
    enter_editmode=False, 
    align='CURSOR', 
    location=location, 
    rotation=(0, 0, 0), 
    scale=(0,0,0)
    )
    
    # rename the object
    bpy.context.object.name = obj_name
    # return the object reference
    return bpy.context.object

def create_plane_Y(location, obj_name):

    obj = bpy.ops.mesh.primitive_plane_add(size=2, 
    calc_uvs=True, 
    enter_editmode=False, 
    align='CURSOR', 
    location=location, 
    rotation=(0, 0, 0), 
    scale=(0,0,0)
    )
    
    # rename the object
    bpy.context.object.name = obj_name
    # return the object reference
    return bpy.context.object

def create_plane_Z(location, obj_name):

    obj = bpy.ops.mesh.primitive_plane_add(size=2, 
    calc_uvs=True, 
    enter_editmode=False, 
    align='CURSOR', 
    location=location, 
    rotation=(0, 0, 0), 
    scale=(0,0,0)
    )
    
    # rename the object
    bpy.context.object.name = obj_name
    # return the object reference
    return bpy.context.object

n = 1

planeX001 = create_plane_X((0,-1,0), "PlaneX-{:02d}".format(n))
RotOBJ(planeX001.name, [-90, 0, 0])
planeX002 = create_plane_X((0,1,0), "PlaneX-{:02d}".format(n))
RotOBJ(planeX002.name, [-90, -0, 0])

planeY001 = create_plane_Y((-1,0,0), "PlaneY-{:02d}".format(n))
RotOBJ(planeY001.name, [0, -90, 0])
planeY002 = create_plane_Y((1,0,0), "PlaneY-{:02d}".format(n))
RotOBJ(planeY002.name, [0, -90, 0])

planeZ001 = create_plane_Z((0,-0.25,1.66), "PlaneZ-{:02d}".format(n))
RotOBJ(planeZ001.name, [45, 0, 0])

Sunday, May 22, 2022

Blender 3D and python scripting - part 003.

In the first tutorial I presented a simple script and in this one I improved it with a way to create lines with a number of points, to use pressurization and coloring according to these points.
I added comments in the source code to make it easier to understand.
Here is the result obtained for nineteen points:
This is the source code:
import bpy 
import random

#this is a for lines with N poins 
N = 19 

# this is default python script from the first tutorial
gpencil_data = bpy.data.grease_pencils.new("GPencil")
gpencil = bpy.data.objects.new(gpencil_data.name, gpencil_data)
bpy.context.collection.objects.link(gpencil)

gp_layer = gpencil_data.layers.new("lines")

gp_frame = gp_layer.frames.new(bpy.context.scene.frame_current)

gp_stroke = gp_frame.strokes.new()

gp_stroke.points.add(count=N)

# let's create a new material for pencil stroke 
gp_material_001 = bpy.data.materials.new(name="Grease pencil material 001")

# if you want to use Nodes 
gp_material_001.use_nodes = True

#this will add a diffuse color for this material 
gp_material_001.diffuse_color = (0.0, 0.0, 0.0, 1)

# create a new material for this grease pencil
bpy.data.materials.create_gpencil_data(gp_material_001)
# add the material to the grese pencil defined like gpencil 
gpencil.data.materials.append(gp_material_001)

for i in range (N):
    rand1 = random.randint(-3, 3)
    rand2 = random.randint(-3, 3)
    rand_size = random.randint(70, 76)
    gp_stroke.line_width = rand_size
    gp_stroke.points[i].co = (rand1,rand2,rand1)
    gp_stroke.points[i].co = (rand2,rand1,rand2)

    #this will create a random pressure 
    rand_pressure = random.randint(-3, 3) * 3
    #create random color for Red Green and Blue 
    rand_color_R = random.randint(0, 1)
    rand_color_G = random.randint(0, 1)
    rand_color_B = random.randint(0, 1)
    # set the pressure 
    gp_stroke.points[i].pressure = rand_pressure
    # set the color RGB with transparency 1
    gp_stroke.points[i].vertex_color = (rand_color_R,rand_color_G,rand_color_B, 1) 

Thursday, May 19, 2022

Blender 3D and python scripting - part 002.

In today's tutorial I will show you how to create a sphere and how to add a material to it.
The source code is very simple with two functions one is for the sphere and the second one is the material of this, see:
import bpy

def create_sphere(radius, distance_to_center, obj_name):

    obj = bpy.ops.mesh.primitive_uv_sphere_add(
        radius=radius,
        location=(distance_to_center, 0, 0),
        scale=(1, 1, 1)
    )
    # rename the object
    bpy.context.object.name = obj_name
    # return the object reference
    return bpy.context.object


def create_emission_shader(color, strength, mat_name):
    # create a new material shader
    mat = bpy.data.materials.new(mat_name)
    # enable the node-graph edition mode
    mat.use_nodes = True
    
    # clear all starter nodes
    nodes = mat.node_tree.nodes
    nodes.clear()

    # add the Emission node
    node_emission = nodes.new(type="ShaderNodeEmission")
    # (input[0] is the color)
    node_emission.inputs[0].default_value = color
    # (input[1] is the strength)
    node_emission.inputs[1].default_value = strength
    
    # add the Output node
    node_output = nodes.new(type="ShaderNodeOutputMaterial")
    
    # link the two nodes
    links = mat.node_tree.links
    link = links.new(node_emission.outputs[0], node_output.inputs[0])

    # return the material reference
    return mat

n = 1
r = 1.0
d = 1.5

sphere001 = create_sphere(r, d, "Sphere-{:02d}".format(n))

sphere001.data.materials.append(
    create_emission_shader(
        (1, 1, 1, 1), 100, "SphereMat001"
    )
)

Wednesday, May 18, 2022

Blender 3D and python scripting - part 001.

Today I started a series of tutorials on python scripting and Blender 3D.
The first tutorial is how to draw using the Blender 3D features with the grease pencil utility using the Python scripting language.
Open Blender 3D in the scripting section and enter the source code below.
import bpy 
import random
rand1 = random.randint(-3, 3)
rand2 = random.randint(-3, 3)
rand_size = random.randint(70, 76)

gpencil_data = bpy.data.grease_pencils.new("GPencil")
gpencil = bpy.data.objects.new(gpencil_data.name, gpencil_data)
bpy.context.collection.objects.link(gpencil)

gp_layer = gpencil_data.layers.new("lines")

gp_frame = gp_layer.frames.new(bpy.context.scene.frame_current)

gp_stroke = gp_frame.strokes.new()
gp_stroke.line_width = rand_size

gp_stroke.points.add(count=4)

gp_stroke.points[0].co = (rand1,rand2,rand1)
gp_stroke.points[1].co = (rand2,rand1,rand2)
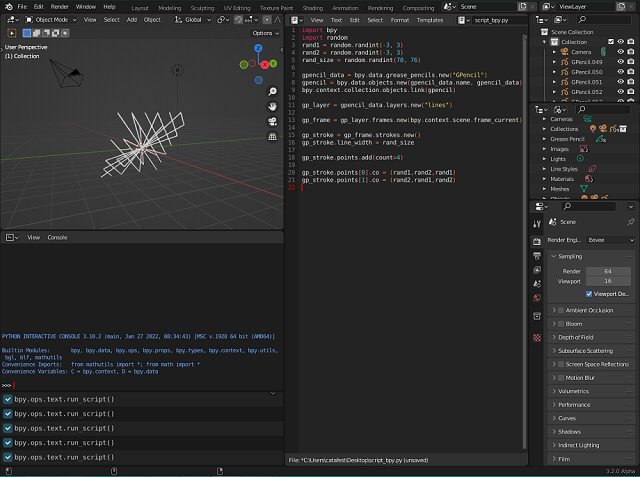
Run the script several times to see the effect produced.
Here is the result of running this script:

Saturday, May 7, 2022

Python : Use django-allauth on heruko - part 001.

Today I am going to show you how to implement a google authentication using Django on the Heroku server.
The tutorial is almost complete. This introductory part is not finalized on the display side of the style and some elements ...
This python module is needed to run the web service.
pip install gunicorn
Collecting gunicorn
  Downloading gunicorn-20.1.0-py3-none-any.whl (79 kB)
     ---------------------------------------- 79.5/79.5 KB 184.8 kB/s eta 0:00:00
Requirement already satisfied: setuptools>=3.0 in c:\python311alpha\lib\site-packages (from gunicorn) (58.1.0)
Installing collected packages: gunicorn
Successfully installed gunicorn-20.1.0
Create and activate a virtual environment:
python -m venv venv
venv\Scripts\activate
The next commands will be on the (venv)
Let's install the Django
(venv) python -m pip install django
Installing collected packages: tzdata, sqlparse, asgiref, django
Successfully installed asgiref-3.5.1 django-4.0.4 sqlparse-0.4.2 tzdata-2022.1
One way is to use this command to start the project
(venv) django-admin startproject herokuweb
I used it in this way, see the dot symbol:
(venv) django-admin startproject herokuweb . 
The next command will start an application
(venv) python manage.py startapp catafest
This python module needs to use google authentification:
(venv) pip install django-allauth
...
Successfully built django-allauth cffi
Installing collected packages: certifi, urllib3, tzdata, sqlparse, pyjwt, pycpar
ser, oauthlib, idna, defusedxml, charset-normalizer, asgiref, requests, python3-
openid, Django, cffi, requests-oauthlib, cryptography, django-allauth
Successfully installed Django-4.0.4 asgiref-3.5.1 certifi-2021.10.8 cffi-1.15.0
charset-normalizer-2.0.12 cryptography-37.0.2 defusedxml-0.7.1 django-allauth-0.
50.0 idna-3.3 oauthlib-3.2.0 pycparser-2.21 pyjwt-2.3.0 python3-openid-3.2.0 req
uests-2.27.1 requests-oauthlib-1.3.1 sqlparse-0.4.2 tzdata-2022.1 urllib3-1.26.9
Let's make changes in the settings.py file
INSTALLED_APPS = [
    'django.contrib.admin',
    'django.contrib.auth',
    'django.contrib.contenttypes',
    'django.contrib.sessions',
    'django.contrib.messages',
    'django.contrib.staticfiles',
    'django.contrib.sites',
    'catafest',
    'allauth',
    'allauth.account',
    'allauth.socialaccount',
    'allauth.socialaccount.providers.google',
]
...
AUTHENTIFICATION_BACKENDS = [
    'django.contrib.auth.backends.ModelBackend',
    'allauth.account.auth_backends.AuthenticationBackend',
]
...
STATIC_URL = '/static/'
SITE_ID = 1
LOGIN_REDIRECT_URL = '/'
SOCIALACCOUNT_PROVIDERS = {
'google': {
    'SCOPE': [
'profile',
'email',
    ],
'AUTH_PARAMS': {
    'access_type': 'online',
}
    }
}
Use Django features ...
python manage.py makemigrations
No changes detected
...
python manage.py migrate
...
  Applying sites.0002_alter_domain_unique... OK
  Applying socialaccount.0001_initial... OK
  Applying socialaccount.0002_token_max_lengths... OK
  Applying socialaccount.0003_extra_data_default_dict... OK
Create one superuser:
python manage.py createsuperuser
Username (leave blank to use 'catafest'):
Email address: catafest@yahoo.com
Password:
Password (again):
This password is too short. It must contain at least 8 characters.
This password is too common.
Bypass password validation and create user anyway? [y/N]: y
Superuser created successfully.
Create templates, catafest folders
Add the index.html file on the catafest folder
Make changes in url.py in the heroku web folder project:
from django.contrib import admin
    from django.urls import path, include
    from django.views.generic import TemplateView
    
    urlpatterns = [
        path('', TemplateView.as_view(template_name="catafest/index.html")),
        path('admin/', admin.site.urls),
        path('accounts/', include('allauth.urls')),
    ]
In the settings.py add templates feature make this change:
import os
...
'DIRS': [os.path.join(BASE_DIR, 'templates')],
Open a google console application and set Credentials to OAuth client ID for the web.
Follow the basic steps like for any basic project
I set for my project: Authorized JavaScript origins: https://catafest.herokuapp.com
... and: Authorized redirect URIs: https://catafest.herokuapp.com/accounts/google/login/callback
Finally, you need to have these: The 'OAuth client created' with 'Your Client ID' and 'Your Client Secret' .
You can test your Django project with this command:
python manage.py runserver
Open the admin area http://127.0.0.1:8000/admin/socialaccount/socialapp/ and add a social application
These commands will log in to the Heroku browser webpage and will create the application:
heroku login
 »   Warning: heroku update available from 7.53.0 to 7.60.2.
...
heroku create catafest
 »   Warning: heroku update available from 7.53.0 to 7.60.2.
Creating ⬢ catafest... done
https://catafest.herokuapp.com/ | https://git.heroku.com/catafest.git
Then create requirements.txt and fill it with this command:
pip freeze > requirements.txt
make this change in settings.py :

...
ALLOWED_HOSTS = ['.herokuapp.com','127.0.0.1']
...
STATIC_ROOT = os.path.join(BASE_DIR,"staticfiles")
...
Upload changes with these commands:
git add .
git commit -am "add requirements.txt and changes STATIC_ROOT"
git push heroku master
Enumerating objects: 39, done.
Counting objects: 100% (39/39), done.
...
To https://git.heroku.com/catafest.git
 * [new branch]      master -> master
Open the online Heroku application, and see all errors with the command: heroku logs --tail
This error is normal because is not set in one web service:
... at=error code=H14 desc="No web processes running" method=GET path="/" host
Create Procfile file in the web001 folder and fill it with:
Add this to the file:
web: gunicorn catafest.wsgi
Add changes and make changes all with these commands:
git add .
git commit -am "add Procfile"
Push to the Django application on the Heroku server:
git push heroku master
Enumerating objects: 6, done.
Counting objects: 100% (6/6), done.
Delta compression using up to 2 threads
...
You can test the result on my heroku application , see also this google gign in link.

Wednesday, May 4, 2022

Python 3.11.0a7 : Django-hypergen on Fedora 36 distro.

You can write server-rendered reactive HTML live views for Django in pure python, see the GitHub webpage.
I tested with python version 3.11.0a7 and Django version 4.0.4 on Fedora 36 Linux distro.
I started with the cloning process of the GitHub project and I set a virtual environment:
[mythcat@fedora ~]$ git clone http://github.com/runekaagaard/django-hypergen.git
Cloning into 'django-hypergen'
...
[mythcat@fedora ~]$ cd django-hypergen/
[mythcat@fedora django-hypergen]$ virtualenv -p python3.11 venv
created virtual environment
... 
[mythcat@fedora django-hypergen]$ source venv/bin/activate
I install the requirements from the project:
(venv) [mythcat@fedora django-hypergen]$
(venv) [mythcat@fedora django-hypergen]$ pip install -r requirements.txt
...Successfully installed Django-4.0.4 asgiref-3.5.1 attrs-21.4.0 beautifulsoup4-4.9.3 
iniconfig-1.1.1 packaging-21.3 pluggy-1.0.0 py-1.11.0 pyparsing-3.0.8 pyperclip-1.8.1 
pyrsistent-0.16.1 pytest-7.1.2 pyyaml-6.0 six-1.16.0 soupsieve-2.3.2.post1 sqlparse-0.4.2 
tomli-2.0.1 yapf-0.32.0WARNING: You are using pip version 21.3.1; 
however, version 22.0.4 is available.
You should consider upgrading via the '/home/mythcat/django-hypergen/venv/bin/python -m pip install --upgrade pip' command.
This gives some errors ...
(venv) [mythcat@fedora django-hypergen]$ pip install -r examples/requirements.txt
...Successfully built pyprof2calltreeFailed to build cymem numpy
ERROR: Could not build wheels for cymem, numpy, which is required to install pyproject.toml-based projects 
The last step is the migrate project and test the example
(venv) [mythcat@fedora django-hypergen]$ 
(venv) [mythcat@fedora django-hypergen]$ cd examples/
(venv) [mythcat@fedora examples]$ python manage.py migrate
... 
(venv) [mythcat@fedora examples]$ python manage.py runserver
Watching for file changes with ...
Starting development server at http://127.0.0.1:8000/
... and the result can be seen in this screenshot:

Wednesday, April 27, 2022

News : Python 3.11 alpha.

This is an old news because on the date Wednesday, April 6, 2022 the alpha version of the well-known python programming language was released.
The last Python 3.11 alpha (3.11.0a7) is available on this webpage.
I install and works good.
C:\Python311alpha>python.exe
Python 3.11.0a7 (main, Apr  5 2022, 21:27:39) [MSC v.1929 64 bit (AMD64)] on win32
Type "help", "copyright", "credits" or "license" for more information.
Here are the new features and changes so far:
PEP 657 -- Include Fine-Grained Error Locations in Tracebacks
PEP 654 -- Exception Groups and except*
PEP 673 -- Self Type
PEP 646-- Variadic Generics
PEP 680-- tomllib: Support for Parsing TOML in the Standard Library
PEP 675-- Arbitrary Literal String Type
PEP 655-- Marking individual TypedDict items as required or potentially-missing
bpo-46752-- Introduce task groups to asyncio
The Faster Cpython Project is already yielding some exciting results: 
this version of CPython 3.11 is ~ 19% faster on the geometric mean of the PyPerformance benchmarks, compared to 3.10.0.
It seems that the new changes are very different from the old versions and some are even effective.

Monday, April 11, 2022

Python 3.7.8 : Gym toolkit - part 001.

Today I tested the gym python package and both version of python: 3.7.8 and 3.10.4.
Gym is a toolkit for developing and comparing reinforcement learning algorithms. It supports teaching agents everything from walking to playing games like Pong or Pinball.
pip install gym
...
Successfully installed cloudpickle-2.0.0 gym-0.23.1 gym-notices-0.0.6 importlib-
metadata-4.11.3 numpy-1.21.5 typing-extensions-4.1.1 zipp-3.8.0
C:\Python378>pip install Pygame
...
Successfully installed Pygame-2.1.2
C:\Python378>python.exe
Python 3.7.8 (tags/v3.7.8:4b47a5b6ba, Jun 28 2020, 08:53:46) [MSC v.1916 64 bit
(AMD64)] on win32
Type "help", "copyright", "credits" or "license" for more information.
>>> import gym
You can see the gym python package is loaded.
Let's test the default python source code from the official webpage:
import gym
env = gym.make("CartPole-v1")
observation = env.reset()
for _ in range(1000):
  env.render()
  action = env.action_space.sample() # your agent here (this takes random actions)
  observation, reward, done, info = env.step(action)

  if done:
    observation = env.reset()
env.close()
I created a file name gym001.py and I run it with python.exe.
The result is a window like on the official webpage.
I tested with python version 3.10.4 with same example and works well:
C:\Python310>python.exe -m pip install gym
...
Installing collected packages: gym-notices, numpy, cloudpickle, gym
Successfully installed cloudpickle-2.0.0 gym-0.23.1 gym-notices-0.0.6 numpy-1.22.3
C:\Python310>python.exe -m pip install pygame
...
Successfully installed pygame-2.1.2
C:\Python310>python.exe gym001.py
...

Sunday, April 10, 2022

Python : PyFlow is visual scripting framework for python.

PyFlow is a general purpose visual scripting framework for python.
I install python version 3.7.8 and these python modules: PyQt5 and PySide.
pip install git+https://github.com/wonderworks-software/PyFlow.git@release
...
Requirement already satisfied: Qt.py in c:\python378\lib\site-packages (from PyF
low==2.0.1) (1.3.6)
Requirement already satisfied: blinker in c:\python378\lib\site-packages (from P
yFlow==2.0.1) (1.4)
Requirement already satisfied: nine in c:\python378\lib\site-packages (from PyFl
ow==2.0.1) (1.1.0)
Requirement already satisfied: docutils in c:\python378\lib\site-packages (from
PyFlow==2.0.1) (0.18.1)

C:\Python378>PyFlow
This is the default window for the PyFlow, see the next screenshot image:
One good feature of the PyFlow is the integration, you can see one example with DeepAi from Brandon Gilles, see this video example:

Saturday, April 9, 2022

Python : Starting learn with futurecoder online tool.

This website with online tool can be a good start for test and learn python language programming.
They come with this intro:
This is a 100% free and interactive course for people to teach themselves programming in Python, especially complete beginners at programming. It is carefully designed to reduce frustration and guide the user while still ensuring that they learn how to solve problems. The goal is for as many people as possible to learn programming.
You can try it out here: https://futurecoder.io .
Please consider contributing or donating!
You can see in the next video tutorial how this works:

Sunday, March 13, 2022

Python : Issues with python install - part 001.

I use python as an additional programming language for useful little things, testing for tutorials, and because I use the Blender 3D program.
This involves using it in Visual Code and command line with various versions of python that require separate installations.
Although the development team of the python program makes major changes to maintain and improve these separate installations on various versions, especially on the Windows operating system, they put their management in trouble.
There are plenty of examples on the web with questions and answers.
Here's a simple one, if you run the python command line and the Windows store opens then some settings are not set correctly
Use the Start button and on the Windows search bar to find Manage application run aliases.
There should be two python aliases, deselect them, this will allow the usual python aliases python and python3.
This deselect will delete two files on this folder:
cd %localappdata%\Microsoft\WindowsApps

C:\Users\YOUR_USER\AppData\Local\Microsoft\WindowsApps>dir python*
If you select these the file will be in that folder.
To solve this issue you need to deselect all python or remove the python files from the folder: \YOUR_USER\AppData\Local\Microsoft\WindowsApps.
After that, you need to go on Add or remove programs windows settings area from your operating system and repair select your python install press Modify button and select: Add python to environment variables.
This will fix the path for your python installation.
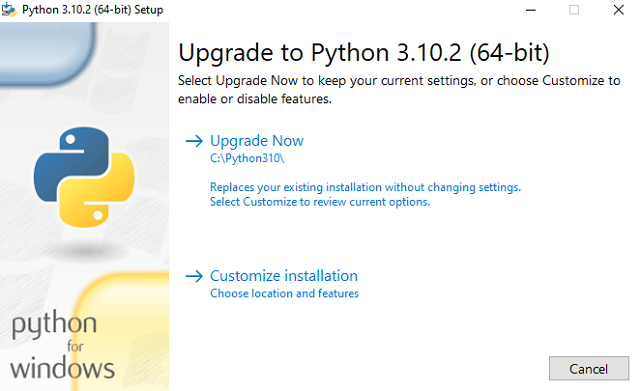
Now the python 3.10.2 installer come with one update feature, see the next screenshot:
If I run the python command python --version to see my python install on folder C:\Python310, the result is this: Python 3.10.2.
When you enter the python command, it searches the directories listed in your path environment variables page from top to bottom.
Will be great if these python installations will be managed, updated, and fixed properly by the installer, I see something similar in the Unity 3D Hub.
Let's see another example that shows us why it needs well-managed software for python versions.
If you try to install gravityai python package then you can do it easy on colab google with python version 3.7.12.
The bad part comes when you can try to use this version with a simple python windows installer because not all Windows executable installers are available for this python version.
This research needs time and finally, I found a good python version 3.7.9 for this package.
First I got this error:
C:\Python379>python.exe -m pip install --upgrade pip
Requirement already satisfied: pip in c:\users\
...
ERROR: Exception:
...
ValueError: Unable to find resource t64.exe in package pip._vendor.distlib
WARNING: You are using pip version 21.1.3; however, version 22.0.4 is available.
You should consider upgrading via the 'C:\Python379\python.exe -m pip install --upgrade pip' command.
I uninstall the setuptools with this command because python is set to the old install python 3.10.2 and give that error:
python -m pip uninstall pip setuptools
Found existing installation: pip 21.1.3
Uninstalling pip-21.1.3:
...
Uninstalling setuptools-57.2.0:
I upgrade with the pip tool my new python version 3.7.9 version.
python.exe -m pip install --upgrade pip
Requirement already satisfied: pip in c:\python379\lib\site-packages (22.0.4)
The last step is to use python.exe not the python command from my Python379 folder to install the gravityai python package.
C:\Python379>python.exe -m pip install gravityai
Collecting gravityai
  Using cached gravityai-0.1.3.post1.tar.gz (6.5 kB)
  Preparing metadata (setup.py) ... done
Collecting pathlib~=1.0.1
  Using cached pathlib-1.0.1.tar.gz (49 kB)
  Preparing metadata (setup.py) ... done
Collecting websockets~=9.1
  Downloading websockets-9.1-cp37-cp37m-win_amd64.whl (90 kB)
     ---------------------------------------- 90.2/90.2 KB 850.2 kB/s eta 0:00:00
Collecting asyncio~=3.4.3
  Downloading asyncio-3.4.3-py3-none-any.whl (101 kB)
     ---------------------------------------- 101.8/101.8 KB 1.2 MB/s eta 0:00:00
...
Successfully built gravityai pathlib
Installing collected packages: pathlib, asyncio, websockets, gravityai
Successfully installed asyncio-3.4.3 gravityai-0.1.3.post1 pathlib-1.0.1 websockets-9.1
Now I can use this package with python and python.exe commands in the Python379 folder.
Another useful command to have a good image of the install for pip tool is this:
python -m pip install --no-cache-dir  --force-reinstall -Iv gravityai
...
full command: 'C:\Python310\python.exe' -c '
...
exec(compile(setup_py_code, filename, "exec"))
This full output will give you information about the steps for installing the package, in this case, the uninstall and install the setuptools.
This option for the install process is --ignore-installed and let you install a new version of the package and keep the old one, see example command for gravityai package.
pip install gravityai --ignore-installed