analitics

Pages

Tuesday, February 1, 2022

Python 3.10.0 : How to using wheels.

Wheels are the last component of the Python ecosystem that helps to make package installs easy.
Wheel and Egg are both packaging formats.
The Egg format was introduced by setuptools in 2004, whereas the Wheel format was introduced by PEP 427 in 2012.
You can use it easy with these commands:
C:\Python310>python.exe -m pip install wheel
Collecting wheel
  Downloading wheel-0.37.1-py2.py3-none-any.whl (35 kB)
Installing collected packages: wheel
  WARNING: The script wheel.exe is installed in 'C:\Python310\Scripts' which is not on PATH.
  Consider adding this directory to PATH or, if you prefer to suppress this warning, use --no-warn-script-location.
Successfully installed wheel-0.37.1

C:\Python310>python.exe -m pip install --upgrade pip setuptools wheel
Requirement already satisfied: pip in c:\python310\lib\site-packages (21.3.1)
Collecting pip
  Downloading pip-22.0.2-py3-none-any.whl (2.1 MB)
     |████████████████████████████████| 2.1 MB 2.2 MB/s
Requirement already satisfied: setuptools in c:\python310\lib\site-packages (57.4.0)
Collecting setuptools
  Downloading setuptools-60.6.0-py3-none-any.whl (953 kB)
     |████████████████████████████████| 953 kB 6.8 MB/s
Requirement already satisfied: wheel in c:\python310\lib\site-packages (0.37.1)
Installing collected packages: setuptools, pip
  Attempting uninstall: setuptools
    Found existing installation: setuptools 57.4.0
    Uninstalling setuptools-57.4.0:
      Successfully uninstalled setuptools-57.4.0
  Attempting uninstall: pip
    Found existing installation: pip 21.3.1
    Uninstalling pip-21.3.1:
      Successfully uninstalled pip-21.3.1
  WARNING: The scripts pip.exe, pip3.10.exe and pip3.exe are installed in 'C:\Python310\Scripts' which is not on PATH.
  Consider adding this directory to PATH or, if you prefer to suppress this warning, use --no-warn-script-location.
Successfully installed pip-22.0.2 setuptools-60.6.0

Friday, January 14, 2022

Python 3.10.1 : Django and channels on Fedora distro - sync and async features.

A consumer is a subclass of either channels.consumer.AsyncConsumer or channels.consumer.SyncConsumer.
Consumers do a couple of things in particular: 
  • Structures your code as a series of functions to be called whenever an event happens, rather than making you write an event loop. 
  • Allow you to write synchronous or async code and deals with handoffs and threading for you.
This is another tutorial about Django and channels, you can see the first one.
For testing area you need the postman tool and I install and used with snap tool.
[root@fedora mythcat]# dnf install snapd
Last metadata expiration check: 0:40:03 ago on Fri 14 Jan 2022 03:38:55 PM EET.
...
[root@fedora mythcat]# ln -s /var/lib/snapd/snap /snap
[root@fedora mythcat]# snap install postman
2022-01-14T16:22:15+02:00 INFO Waiting for automatic snapd restart...
postman (v9/stable) 9.8.3 from Postman, Inc. (postman-inc✓) installed
[mythcat@fedora ~]$ snap run postman
Let's go on the project folder:
[mythcat@fedora ~]$ cd djangotest001/
[mythcat@fedora djangotest001]$ cd website001/
In this folder I have two folders: appsite001 and website001.
In the appsite001 I add these scripts.
I create a new python script named consumers.py with this source code:
from channels.consumer import SyncConsumer, AsyncConsumer
from channels.exceptions import StopConsumer

class MySyncConsumer(SyncConsumer):
    def websocket_connect(self,event):
        print('Websocket Connected ...')
        self.send({
        'type':'websocket.accept',
        })
    def websocket_receive(self, event):
        print('Messaged Received ...')
        print(event['text'])
        self.send({
        'type':'websocket.send',
        'text':'Message sent to client'
        })
    def websocket_diconnect(self, event):
        print('Websocket Disconnected ...')
        raise StopConsumer
        
class MyAsyncConsumer(AsyncConsumer):
    async def websocket_connect(self,event):
        print('Websocket Connected ...')
    async def websocket_receive(self, event):
        print('Messaged Received ...')
    async def websocket_diconnect(self, event):
        print('Websocket Disconnected ...')
I created routing.py python script with this source code:
from django.urls import path
from . import consumers

websocket_urlpatterns = [
    path('ws/sc/',consumers.MySyncConsumer.as_asgi()),
    ]
In the website001 I change this script named asgi.py.
import os

from django.core.asgi import get_asgi_application

from channels.routing import ProtocolTypeRouter, URLRouter

import appsite001.routing

os.environ.setdefault('DJANGO_SETTINGS_MODULE', 'website001.settings')

application = ProtocolTypeRouter({
    'http':get_asgi_application(),
    'websocket':URLRouter(
        appsite001.routing.websocket_urlpatterns
    )
})
Run the Django project with :
[mythcat@fedora website001]$ python manage.py runserver
Watching for file changes with StatReloader
Performing system checks...

System check identified no issues (0 silenced).
January 14, 2022 - 15:32:29
Django version 4.0.1, using settings 'website001.settings'
Starting ASGI/Channels version 3.0.4 development server at http://127.0.0.1:8000/
Quit the server with CONTROL-C.
WebSocket HANDSHAKING /ws/sc/ [127.0.0.1:33944]
Websocket Connected ...
WebSocket CONNECT /ws/sc/ [127.0.0.1:33944]
Messaged Received ...
This is a message from mythcat
...
Use postman tool with websocket to send this message to Django project:
This is a message from mythcat
You can see how this works:

Tuesday, January 11, 2022

News : Python as the programming language of 2021.

The TIOBE index is based on the number of search results for a programming language across popular search engines, which is pretty limited.
They say:
Python has won the prestigious TIOBE Programming Language of the Year award. Congratulations! This is the second time in a row. The award is given to the programming language that has gained the highest increase in ratings in one year. C# was on its way to get the title for the first time in history, but Python surpassed C# in the last month.

Saturday, January 8, 2022

Python 3.10.1 : Django and channels on Fedora distro.

Today I tested the Django version 4.0.1 with channels features on Fedora 35.
For the channels package, I used the pip tool and I install the version
The python package channels come with features like:
Channels augments Django to bring WebSocket, long-poll HTTP, task offloading, and other async support to your code, using familiar Django design patterns and a flexible underlying framework that lets you not only customize behaviors but also write support for your own protocols and needs. see the GitHub website.
Let's install the Django package
[mythcat@fedora ~]$ pip3 install django --user
Requirement already satisfied: django in /usr/local/lib/python3.10/site-packages (4.0.1)
Requirement already satisfied: sqlparse>=0.2.2 in /usr/local/lib/python3.10/site-packages (from django) (0.4.2)
Requirement already satisfied: asgiref<4>=3.4.1 in ./.local/lib/python3.10/site-packages (from django) (3.4.1)
The next step is to create the project named website001:
[mythcat@fedora ~]$ mkdir djangotest001
[mythcat@fedora ~]$ cd djangotest001/
[mythcat@fedora djangotest001]$ django-admin startproject website001
[mythcat@fedora djangotest001]$ cd website001/
[mythcat@fedora website001]$ python3 manage.py runserver
Watching for file changes with StatReloader
Performing system checks...

System check identified no issues (0 silenced).

You have 18 unapplied migration(s). Your project may not work properly until you apply the migrations for app(s): admin, auth, contenttypes, sessions.
Run 'python manage.py migrate' to apply them.
January 08, 2022 - 13:26:21
Django version 4.0.1, using settings 'website001.settings'
Starting development server at http://127.0.0.1:8000/
Quit the server with CONTROL-C.
...
Let's create the application named appsite001:
[mythcat@fedora website001]$ django-admin startapp  appsite001
[mythcat@fedora website001]$ ls
appsite001  db.sqlite3  manage.py  website00
The apps.py file is this:
[mythcat@fedora website001]$ cat  appsite001/apps.py 
from django.apps import AppConfig

class Appsite001Config(AppConfig):
    default_auto_field = 'django.db.models.BigAutoField'
    name = 'appsite001'
Let's add this on the settings.py file config:
[mythcat@fedora website001]$ vi website001/settings.py
    
# Application definition

INSTALLED_APPS = [
    'django.contrib.admin',
    'django.contrib.auth',
    'django.contrib.contenttypes',
    'django.contrib.sessions',
    'django.contrib.messages',
    'django.contrib.staticfiles',
    'appsite001',
]
Use the migrate feature to fix all:
[mythcat@fedora website001]$ python manage.py migrate
Operations to perform:
  Apply all migrations: admin, auth, contenttypes, sessions
Running migrations:
  Applying contenttypes.0001_initial... OK
  Applying auth.0001_initial... OK
  Applying admin.0001_initial... OK
  Applying admin.0002_logentry_remove_auto_add... OK
  Applying admin.0003_logentry_add_action_flag_choices... OK
  Applying contenttypes.0002_remove_content_type_name... OK
  Applying auth.0002_alter_permission_name_max_length... OK
  Applying auth.0003_alter_user_email_max_length... OK
  Applying auth.0004_alter_user_username_opts... OK
  Applying auth.0005_alter_user_last_login_null... OK
  Applying auth.0006_require_contenttypes_0002... OK
  Applying auth.0007_alter_validators_add_error_messages... OK
  Applying auth.0008_alter_user_username_max_length... OK
  Applying auth.0009_alter_user_last_name_max_length... OK
  Applying auth.0010_alter_group_name_max_length... OK
  Applying auth.0011_update_proxy_permissions... OK
  Applying auth.0012_alter_user_first_name_max_length... OK
  Applying sessions.0001_initial... OK
Create the superuser named admin with password admin and set the email address:
[mythcat@fedora website001]$ python manage.py createsuperuser
Username (leave blank to use 'mythcat'): admin
Email address: admin@server.com
Password: 
Password (again): 
The password is too similar to the username.
This password is too short. It must contain at least 8 characters.
This password is too common.
Bypass password validation and create user anyway? [y/N]: y
Superuser created successfully.

http://127.0.0.1:8000/admin/
...
Let's install the channels package for the Django project:
[mythcat@fedora website001]$ pip install channels
...
Successfully installed Automat-20.2.0 autobahn-21.11.1 channels-3.0.4 constantly-15.1.0 
daphne-3.0.2 hyperlink-21.0.0 incremental-21.3.0 pyasn1-0.4.8 pyasn1-modules-0.2.8 
service-identity-21.1.0 twisted-21.7.0 txaio-21.2.1 zope.interface-5.4.0
Add this package into the settinngs.py config file:
[mythcat@fedora website001]$ vi website001/settings.py
INSTALLED_APPS = [
    'channels',
    'django.contrib.admin',
    'django.contrib.auth',
    'django.contrib.contenttypes',
    'django.contrib.sessions',
    'django.contrib.messages',
    'django.contrib.staticfiles',
    'appsite001',
]
...
#WSGI_APPLICATION = 'website001.wsgi.application'
ASGI_APPLICATION = 'website001.asgi.application'
...
Make these changes to switch from wsgi to asgi features for channels package:
[mythcat@fedora website001]$ cp website001/wsgi.py website001/asgi.py 
[mythcat@fedora website001]$ vi website001/asgi.py 
import os

from django.core.asgi import get_asgi_application
from channels.routing import ProtocolTypeRouter
os.environ.setdefault('DJANGO_SETTINGS_MODULE', 'website001.settings')

application = ProtocolTypeRouter({
    'http':get_asgi_application(),
})
I tested on the admin area how the settings for this packet will work:
[mythcat@fedora website001]$ python3 manage.py runserver
Watching for file changes with StatReloader
Performing system checks...

System check identified no issues (0 silenced).
January 08, 2022 - 14:20:53
Django version 4.0.1, using settings 'website001.settings'
Starting ASGI/Channels version 3.0.4 development server at http://127.0.0.1:8000/
Quit the server with CONTROL-C.
...
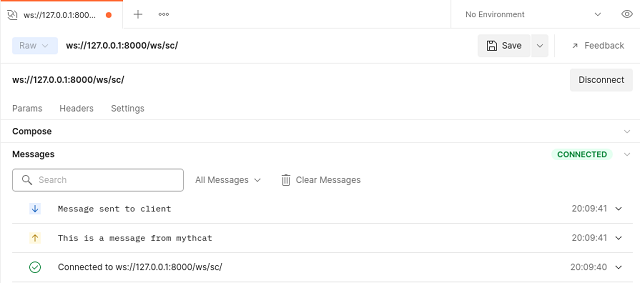
The result shows that it works:
The next theoretical steps would be to determine how the channels package will work and routing for access to appsite001.

Monday, January 3, 2022

Python Qt6 : The basic differences between PyQt5 and PyQt6.

Python Qt6 known as PyQt6 is a binding of the cross-platform GUI toolkit Qt, implemented as a Python plug-in with Qt 6 the latest version of Qt.
The PyQt6 first stable release was on 6 January 2021, developed by Riverbank Computing Ltd and the last release was on 2 December 2021 with the version PyQt v6.2.2.
This release is license GPL or commercial on Python 3 platform.
Let's see some differences between PyQt5 and PyQt6.
The .exec() method is used in Qt to start the event loop of your QApplication or dialog boxes. In Python 2.7 exec was a keyword and Python 3 removed the exec keyword.
The first difference as a result of PyQt6 .exec() calls are named just as in Qt.
If you read the documentation from the official webpage, then in your PyQt6 source code you need to use these changes:
QEvent.Type.MouseButtonPress
...
Qt.MouseButtons.RightButton
...
Both PyQt5 and PyQt6, although seemingly easy to use for complex applications, will require extra effort.

Sunday, December 26, 2021

Python 3.7.11 : My colab tutorials - part 022.

Here is another notebook with two python scripts.
You may be wondering why I add them here and the index of 022 blog posts does not match the 026 index of those on the GitHub website.
The answer is simple: here I post them when I have time for evaluation and there they are added when they are created and tested.
The posts here are for a share of those who want to learn simple python programming to solve common issues by anyone with minimal school knowledge and for supporting the python programming community.
In this notebook you will find a script that uses a python packet that does a simple search using Google and one that does an image search.

Tuesday, December 7, 2021

Python Qt5 : Simple browser with QWebEngineView.

This is a simple example with PyQt5 and QWebEngineView.
You can see this example and use it from my GitHub account.

Monday, December 6, 2021

Python Qt5 : QtWebEngineWidgets and button.

In this tutorial I will show you how to add a simple button to the application build with QtWebEngineWidgets using the addWidget to a QVBoxLayout with a lay variable.
The button named PyQt5 nothing button is not connected.
Let's see this default example:
import sys

from PyQt5.QtCore import QUrl
from PyQt5.QtWidgets import QApplication, QPushButton, QMainWindow, QVBoxLayout, QWidget
from PyQt5.QtWebEngineWidgets import QWebEnginePage, QWebEngineSettings, QWebEngineView

class Widget(QWidget):
    def __init__(self, parent=None):
        super().__init__(parent)
        self.view = QWebEngineView()
        lay = QVBoxLayout(self)
        lay.addWidget(self.view)
        self.resize(640, 480)

class WebEnginePage(QWebEnginePage):
    def createWindow(self, _type):
        w = Widget()
        w.show()
        return w.view.page()

class MainWindow(QMainWindow):
    def __init__(self, parent=None):
        super(MainWindow, self).__init__(parent=None)

        self.setWindowTitle("PyQt5 ... another example !!")
        central_widget = QWidget()
        self.setCentralWidget(central_widget)
        
        button = QPushButton('PyQt5 nothing button', self)
        button.setToolTip('This is an example button')

        self.webview = QWebEngineView()
        self.page = WebEnginePage()
        self.webview.setPage(self.page)
        self.webview.settings().setAttribute(
            QWebEngineSettings.FullScreenSupportEnabled, True
        )

        self.webview.load(
            QUrl("https://www.youtube.com/watch?v=BVT3acNFzqc?rel=0&showinfo=0")
        )

        lay = QVBoxLayout(central_widget)
        lay.addWidget(button)
        lay.addWidget(self.webview)

def main():
    app = QApplication(sys.argv)
    window = MainWindow()
    window.show()
    app.exec_()

if __name__ == "__main__":
    main()

Saturday, December 4, 2021

Python 3.6.9 : Unarchive a RAR file with UnRAR and python.

In this tutorial, I will show you how can unrar a RAR archive with and without a password.
First, go to this website and install the UnRAR.dll file.
After you install into default path: C:\Program Files (x86)\UnrarDLL you need to create and set a new environment variable named UNRAR_LIB_PATH.
You need to select the 32 or 64 paths to this environment variable, and this depends on the test archive.
Because I create a RAR archive with x64 version I used this path for the environment variable: C:\Program Files (x86)\UnrarDLL\x64\UnRAR64.dll.
The first test archive I created was named TestRAR.rar and I used a password 111 with encryption.
The second one is named TestRAR001.rar and has no password.
Let's install the unrar python module with the pip tool.
pip install unrar
Requirement already satisfied: unrar in c:\python39\lib\site-packages (0.4)
Let's see the source code in python version 3.6.9
from unrar import rarfile

print("-----------------")
#archiveRARFile = r"C:\\PythonProjects\\RARArchive\\TestRAR.rar"
archiveRARFile = r"C:\\PythonProjects\\RARArchive\\TestRAR001.rar"
extractPath = r"C:\\PythonProjects\\RARArchive"

files = []
#with rarfile.RarFile(archiveRARFile,"r","111") as rarFile:
with rarfile.RarFile(archiveRARFile,"r","") as rarFile:
    files = rarFile.namelist()
    rarFile.extractall(extractPath)

print("files ",files)

for file in files:
    pathFile = fr"{extractPath}+{file}"
    with open(file,"r") as f:
        data = f.readlines()
        for line in data:
            line = line.strip()
            print(line)
You can see I commented two rows for each archive in order to test each one:
After I tested, this is the result of each test and both work great.
C:\PythonProjects\RARArchive>python unrarFile.py
-----------------
files  ['TestRAR.txt']
This is a test for RAR archive.

C:\PythonProjects\RARArchive>python unrarFile.py
-----------------
files  ['TestRAR.txt']
This is a test for RAR archive.

Thursday, November 25, 2021

Python Qt5 : QtWebEngineWidgets and YouTube Video.

In this tutorial I will show you how to play a video from Youtube using PyQt5 and this standard URL type:
http://www.youtube.com/watch_popup?v=VIDEOID
I used this version of python, version 3.9.6.
python
Python 3.9.6 (tags/v3.9.6:db3ff76, Jun 28 2021, 15:26:21) [MSC v.1929 64 bit (AMD64)] on win32
Type "help", "copyright", "credits" or "license" for more information.
...
The source code is simple:
import time

import sys

from PyQt5.QtCore import QUrl
from PyQt5.QtWebEngineWidgets import QWebEngineView, QWebEngineProfile
from PyQt5.QtWebEngineWidgets import QWebEnginePage, QWebEngineSettings
from PyQt5.QtWidgets import QApplication

if __name__ == '__main__':


    app = QApplication(sys.argv)

    webview = QWebEngineView()
    profile = QWebEngineProfile("my_profile", webview)
    profile.defaultProfile().setPersistentCookiesPolicy(QWebEngineProfile.ForcePersistentCookies)
    webpage = QWebEnginePage(profile, webview)
    webpage.settings().setAttribute(QWebEngineSettings.PlaybackRequiresUserGesture, False)

    webview.setPage(webpage)
    webview.load(QUrl("http://www.youtube.com/watch_popup?v=aw4ZDQsFxv0"))
    webview.show()

    sys.exit(app.exec_())
The song is: SO EMOTIONAL- Olivia Rodrigo - Traitor | Allie Sherlock cover, see it on youtube.

Wednesday, November 17, 2021

Python 3.7.11 : My colab tutorials - part 021.

This is a simple notebook tutorial about how can test and get info from GPU on colab online tool.
This tutorial can be found on my GitHub account.

Tuesday, November 16, 2021

Python 3.7.11 : My colab tutorials - part 020.

The tutorial I created is a test and use of the Selenium WebDriver python package for to automate web browser interaction from Python.
This tutorial can be found on my GitHub account.

Friday, November 5, 2021

Python Qt5 : Drag and drop examples - part 001.

This tutorial si about drag and drop with PyQt5 and Python 3.9.6.
The drag and drop feature is very intuitive for the user.
The widgets should respond to the drag and drop events in order to store the data dragged into them. 
  • DragEnterEvent provides an event which is sent to the target widget as dragging action enters it.
  • DragMoveEvent is used when the drag and drop action is in progress.
  • DragLeaveEvent is generated as the drag and drop action leaves the widget.
  • DropEvent, on the other hand, occurs when the drop is completed. The event’s proposed action can be accepted or rejected conditionally.
Let's see two example, first is a drag and drop for one button:
#!/usr/bin/python
import sys
from PyQt5.QtCore import Qt, QMimeData
from PyQt5.QtGui import QDrag
from PyQt5.QtWidgets import QPushButton, QWidget, QApplication

class Button(QPushButton):

    def __init__(self, title, parent):
        super().__init__(title, parent)

    def mouseMoveEvent(self, e):

        if e.buttons() != Qt.RightButton:
            return

        mimeData = QMimeData()

        drag = QDrag(self)
        drag.setMimeData(mimeData)
        drag.setHotSpot(e.pos() - self.rect().topLeft())
        dropAction = drag.exec_(Qt.MoveAction)

    def mousePressEvent(self, e):
        super().mousePressEvent(e)
        if e.button() == Qt.LeftButton:
            print('press')


class Example(QWidget):

    def __init__(self):
        super().__init__()

        self.initUI()

    def initUI(self):

        self.setAcceptDrops(True)

        self.button = Button('Button', self)
        self.button.move(100, 65)

        self.setWindowTitle('Drag and drop with mouse - right click to move Button!')
        self.setGeometry(300, 300, 550, 450)

    def dragEnterEvent(self, e):
        e.accept()

    def dropEvent(self, e):
        position = e.pos()
        self.button.move(position)

        e.setDropAction(Qt.MoveAction)
        e.accept()

def main():
    
    app = QApplication(sys.argv)
    ex = Example()
    ex.show()
    app.exec_()

if __name__ == '__main__':
    main()
... this source code is for a drag and drop for a image file:
import sys, os
from PyQt5.QtWidgets import QApplication, QWidget, QLabel, QVBoxLayout
from PyQt5.QtCore import Qt
from PyQt5.QtGui import QPixmap


class ImageLabel(QLabel):
    def __init__(self):
        super().__init__()

        self.setAlignment(Qt.AlignCenter)
        self.setText('\n\n Drop Image Here \n\n')
        self.setStyleSheet('''
            QLabel{
                border: 3px dashed #bbb
            }
        ''')

    def setPixmap(self, image):
        super().setPixmap(image)

class AppDemo(QWidget):
    def __init__(self):
        super().__init__()
        
        self.setWindowTitle('Drag and drop one image to this window!')
        self.setGeometry(300, 300, 550, 450)

        self.setAcceptDrops(True)

        mainLayout = QVBoxLayout()

        self.photoViewer = ImageLabel()
        mainLayout.addWidget(self.photoViewer)

        self.setLayout(mainLayout)

    def dragEnterEvent(self, event):
        if event.mimeData().hasImage:
            event.accept()
        else:
            event.ignore()

    def dragMoveEvent(self, event):
        if event.mimeData().hasImage:
            event.accept()
        else:
            event.ignore()

    def dropEvent(self, event):
        if event.mimeData().hasImage:
            event.setDropAction(Qt.CopyAction)
            file_path = event.mimeData().urls()[0].toLocalFile()
            self.set_image(file_path)

            event.accept()
        else:
            event.ignore()

    def set_image(self, file_path):
        self.photoViewer.setPixmap(QPixmap(file_path))

app = QApplication(sys.argv)
demo = AppDemo()
demo.show()
sys.exit(app.exec_())