I studied a little on the internet.
The last aspect was related to centroids.
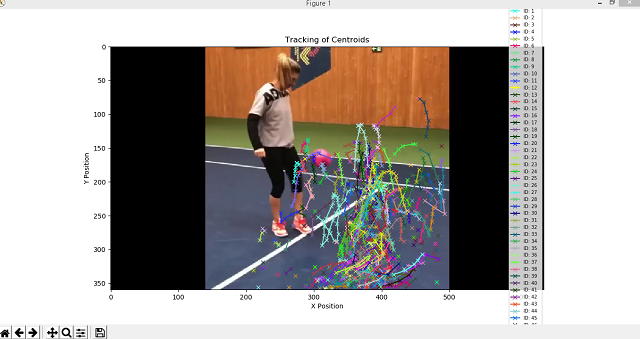
An example I studied before TV news was from this webpage.
About centroid you can read here.
The result of the source code from a video with Simona Halep.
import QtQuick 2.0
import SDK 1.0
import QtQuick.Layouts 1.1

Rectangle {
    id: appwnd
    visible: true
    width: 640
    height: 480

    property int columns : 2
    property int rows : 2

    Rectangle {
        anchors.fill: parent
        color: "#00f"
    }

    GridView {
        id: grid
        anchors.fill: parent
        cellWidth: Math.max(width/2, height/2);
        cellHeight: Math.max(width/2, height/2)
        model: dashModel
        delegate : Rectangle {
            Layout.alignment: Layout.Center
            width: grid.cellWidth
            height: grid.cellHeight
            color: "#0ff"
            border.color: "#fff"
            border.width: 10

            Text {
                id: name
                anchors.horizontalCenter: parent.horizontalCenter
                anchors.bottom: parent.bottom
                anchors.leftMargin:15
                anchors.topMargin: 15
                width: parent.width
                height: parent.height
                textFont {
                    family: "Halvetica"
                    italic: false
                    pointSize:20
                }
                suffixText: suffix
            }

        }
        onWidthChanged: {
            grid.cellWidth = grid.width/appwnd.columns;
        }

        onHeightChanged: {
            grid.cellHeight = grid.height/appwnd.rows
        }
    }

    ListModel {
        id: dashModel
        ListElement {
            tagName: "Text"
            suffix: "First text"
        }
        ListElement {
            tagName: "Text"
            suffix: "Next text"
        }
    }
} import PyQt5
from PyQt5.QtCore import *
from PyQt5.QtGui import *
from PyQt5.QtWidgets import *
from PyQt5.QtCore import pyqtProperty, pyqtSignal, pyqtSlot
from PyQt5.QtQuick import QQuickPaintedItem, QQuickItem
from PyQt5.QtGui import QPainter
from PyQt5 import QtCore
class QMLCustom(QQuickPaintedItem):
#
class DialType():
FullDial = 0
MinToMax = 1
NoDial = 2
#
sizeChanged = pyqtSignal()
valueChanged = pyqtSignal()
#
backgroundColorChanged = pyqtSignal()
#
textColorChanged = pyqtSignal()
suffixTextChanged = pyqtSignal()
showTextChanged = pyqtSignal()
textFontChanged = pyqtSignal()
def __init__(self, parent=None):
super(QMLCustom, self).__init__(parent)
self.setWidth(100)
self.setHeight(100)
self.setSmooth(True)
self.setAntialiasing(True)
self._Size = 100
self._DialWidth = 15
self._SuffixText = ""
self._BackgroundColor = Qt.transparent
self._TextColor = QColor(0, 0, 0)
self._ShowText = True
self._TextFont = QFont()
def paint(self, painter):
painter.save()
size = min(self.width(), self.height())
self.setWidth(size)
self.setHeight(size)
rect = QRectF(0, 0, self.width(), self.height())
painter.setRenderHint(QPainter.Antialiasing)
painter.restore()
painter.save()
painter.setFont(self._TextFont)
offset = self._DialWidth / 2
if self._ShowText:
painter.drawText(rect.adjusted(offset, offset, -offset, -offset), Qt.AlignCenter, self._SuffixText)
else:
painter.drawText(rect.adjusted(offset, offset, -offset, -offset), Qt.AlignCenter, self._SuffixText)
painter.restore()
@QtCore.pyqtProperty(str, notify=sizeChanged)
def size(self):
return self._Size
@size.setter
def size(self, size):
if self._Size == size:
return
self._Size = size
self.sizeChanged.emit()
@QtCore.pyqtProperty(float, notify=valueChanged)
def value(self):
return self._Value
@value.setter
def value(self, value):
if self._Value == value:
return
self._Value = value
self.valueChanged.emit()
@QtCore.pyqtProperty(QColor, notify=backgroundColorChanged)
def backgroundColor(self):
return self._BackgroundColor
@backgroundColor.setter
def backgroundColor(self, color):
if self._BackgroundColor == color:
return
self._BackgroundColor = color
self.backgroundColorChanged.emit()
@QtCore.pyqtProperty(QColor, notify=textColorChanged)
def textColor(self):
return self._TextColor
@textColor.setter
def textColor(self, color):
if self._TextColor == color:
return
self._TextColor = color
self.textColorChanged.emit()
@QtCore.pyqtProperty(str, notify=suffixTextChanged)
def suffixText(self):
return self._SuffixText
@suffixText.setter
def suffixText(self, text):
if self._SuffixText == text:
return
self._SuffixText = text
self.suffixTextChanged.emit()
@QtCore.pyqtProperty(str, notify=showTextChanged)
def showText(self):
return self._ShowText
@showText.setter
def showText(self, show):
if self._ShowText == show:
return
self._ShowText = show
@QtCore.pyqtProperty(QFont, notify=textFontChanged)
def textFont(self):
return self._TextFont
@textFont.setter
def textFont(self, font):
if self._TextFont == font:
return
self._TextFont = font
self.textFontChanged.emit()
import sys
import os
import subprocess

from QMLCustom.QMLCustom import QMLCustom

from PyQt5.QtCore import QUrl, Qt, QObject, pyqtSignal, pyqtSlot
from PyQt5.QtGui import QGuiApplication, QCursor
from PyQt5.QtQuick import QQuickView
from PyQt5.QtQml import qmlRegisterType
from OpenGL import GLU

class App(QGuiApplication):
 def __init__(self, argv):
  super(App, self).__init__(argv)

if __name__ == '__main__':
 try:
  app = App(sys.argv)

  qmlRegisterType(QMLCustom, "SDK", 1,0, "Text")

  view = QQuickView()
  ctxt = view.rootContext()
  view.setSource(QUrl("QML_custom.qml"))
  view.show()
  ret = app.exec_()

 except Exception as e:
  print (e)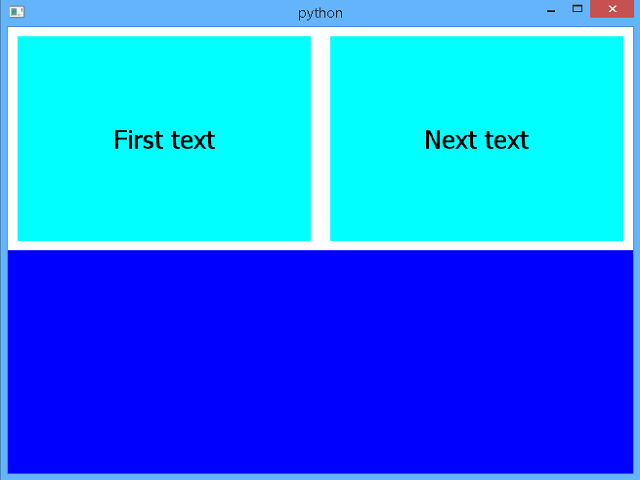
from PyQt5.QtNetwork import *
from PyQt5.QtQml import *
from PyQt5.QtWidgets import *
from PyQt5.QtCore import *

class MainWin(object):
    def __init__(self):
        self.eng = QQmlApplicationEngine()
        self.eng.load('win.qml')
        win = self.eng.rootObjects()[0]
        win.show()

if __name__ == '__main__':
    import sys
    App = QApplication(sys.argv)
    Win = MainWin()
sys.exit(App.exec_())import QtQuick 2.2
import QtQuick.Controls 1.0
ApplicationWindow {
id: main
width: 640
height: 480
color: 'blue'
}C:\Python364>python.exe
Python 3.6.4 (v3.6.4:d48eceb, Dec 19 2017, 06:54:40) [MSC v.1900 64 bit (AMD64)]
on win32
Type "help", "copyright", "credits" or "license" for more information.
>>> import torchvision
>>> import torchvision.transforms as transforms
>>> transform = transforms.Compose(
... [transforms.ToTensor(),
... transforms.Normalize((0.5, 0.5, 0.5), (0.5, 0.5, 0.5))])
>>> trainset = torchvision.datasets.CIFAR10(root='./data', train=True,download=T
rue, transform=transform)
Downloading https://www.cs.toronto.edu/~kriz/cifar-10-python.tar.gz to ./data\ci
far-10-python.tar.gz>>> import torch
>>> trainloader = torch.utils.data.DataLoader(trainset, batch_size=4,shuffle=Tru
e, num_workers=2)>>> print(trainset)
Dataset CIFAR10
Number of datapoints: 50000
Split: train
Root Location: ./data
Transforms (if any): Compose(
ToTensor()
Normalize(mean=(0.5, 0.5, 0.5), std=(0.5, 0.5, 0.5)
)
)
Target Transforms (if any): None
>>> print(dir(trainset))
['__add__', '__class__', '__delattr__', '__dict__', '__dir__', '__doc__', '__eq_
_', '__format__', '__ge__', '__getattribute__', '__getitem__', '__gt__', '__hash
__', '__init__', '__init_subclass__', '__le__', '__len__', '__lt__', '__module__
', '__ne__', '__new__', '__reduce__', '__reduce_ex__', '__repr__', '__setattr__'
, '__sizeof__', '__str__', '__subclasshook__', '__weakref__', '_check_integrity'
, 'base_folder', 'download', 'filename', 'root', 'target_transform', 'test_list'
, 'tgz_md5', 'train', 'train_data', 'train_labels', 'train_list', 'transform', '
url']>>> print(trainloader)
>>> print(dir(trainloader))
['_DataLoader__initialized', '__class__', '__delattr__', '__dict__', '__dir__',
'__doc__', '__eq__', '__format__', '__ge__', '__getattribute__', '__gt__', '__ha
sh__', '__init__', '__init_subclass__', '__iter__', '__le__', '__len__', '__lt__
', '__module__', '__ne__', '__new__', '__reduce__', '__reduce_ex__', '__repr__',
'__setattr__', '__sizeof__', '__str__', '__subclasshook__', '__weakref__', 'bat
ch_sampler', 'batch_size', 'collate_fn', 'dataset', 'drop_last', 'num_workers',
'pin_memory', 'sampler', 'timeout', 'worker_init_fn']
>>> file.writelines(paragraphs)
Traceback (most recent call last):
  File "", line 1, in
TypeError: a bytes-like object is required, not 'str'
>>> file.writelines(paragraphs.decode('utf-8'))
Traceback (most recent call last):
  File "", line 1, in
AttributeError: 'list' object has no attribute 'decode' >>> type(paragraphs)>>> file = open("out.txt","wb")
>>> file.writelines([word.encode('utf-8') for word in paragraphs])import torch
dtype = torch.float
device = torch.device("cpu")
batch,input,hidden,output = 2,10,2,5
x = torch.randn(batch,input,device=device,dtype=dtype)
y = torch.randn(hidden,output,device=device,dtype=dtype)
w1 = torch.randn(input,hidden,device=device,dtype=dtype)
w2 = torch.randn(hidden,output,device=device,dtype=dtype)
l_r = 1e-6
for t in range(5):
h = x.mm(w1)
h_r = h.clamp(min=0)
y_p = h_r.mm(w2)
loss = (y_p - y).pow(2).sum().item()
print("t=",t,"loss=",loss,"\n")
g_y_p = 2.0 * (y_p -y)
g_w2 = h_r.t().mm(g_y_p)
g_h_r = g_y_p.mm(w2.t())
g_h = g_h_r.clone()
g_h[h<0 -="l_r" 0="" g_w1="" g_w2="" n="" print="" w1=",w1," w2=",w2,"> ...
t= 4 loss= 25.40263557434082
w1= tensor([[ 1.5933, 0.3818],
[-1.0043, -1.3362],
[ 0.5841, -1.9811],
[ 2.3483, 0.5748],
[ 0.5904, -0.2521],
[-0.6612, 2.7945],
[ 0.4841, -0.5894],
[-1.4434, -0.1421],
[-1.2712, -1.4269],
[ 0.7929, 0.2040]]) w2= tensor([[ 1.7389, 0.4337, 0.4557, 1.3704, 0
.3819],
[ 0.2937, 0.0212, -0.4604, -1.0564, -1.5403]])C:\Python364\Scripts>pip3 install https://download.pytorch.org/whl/cpu/torch-1.0
.0-cp36-cp36m-win_amd64.whl
Collecting torch==1.0.0 from https://download.pytorch.org/whl/cpu/torch-1.0.0-cp
36-cp36m-win_amd64.whl
Downloading https://download.pytorch.org/whl/cpu/torch-1.0.0-cp36-cp36m-win_am
d64.whl (71.0MB)
100% |████████████████████████████████| 71.0MB 100kB/s
Installing collected packages: torch
Found existing installation: torch 0.4.1
Uninstalling torch-0.4.1:
Successfully uninstalled torch-0.4.1
Successfully installed torch-1.0.0
C:\Python364\Scripts>pip3 install torchvision>>> import torch
>>> torch.cuda.is_available()
False>>> x = torch.rand(76, 79)
>>> x.size()
torch.Size([76, 79])
>>> print(x)
tensor([[0.1981, 0.3841, 0.9276, ..., 0.3753, 0.7137, 0.7702],
[0.8202, 0.9564, 0.5590, ..., 0.0914, 0.4983, 0.7163],
[0.0864, 0.4588, 0.0669, ..., 0.3939, 0.0318, 0.8650],
...,
[0.9028, 0.8431, 0.8592, ..., 0.3825, 0.2537, 0.7901],
[0.2055, 0.3003, 0.8085, ..., 0.0724, 0.9226, 0.9559],
[0.3671, 0.1178, 0.3837, ..., 0.7181, 0.5704, 0.9268]])
>>> torch.tensor([[1., -1.], [1., -1.]])
tensor([[ 1., -1.],
[ 1., -1.]])
>>> torch.zeros([1, 4], dtype=torch.int32)
tensor([[0, 0, 0, 0]], dtype=torch.int32)
>>> torch.zeros([2, 4], dtype=torch.int32)
tensor([[0, 0, 0, 0],
[0, 0, 0, 0]], dtype=torch.int32)
>>> torch.zeros([3, 4], dtype=torch.int32)
tensor([[0, 0, 0, 0],
[0, 0, 0, 0],
[0, 0, 0, 0]], dtype=torch.int32)

# -*- coding: utf-8 -*-
"""
@author: catafest
"""
import sys
from PyQt5.QtCore import Qt
from PyQt5.QtWidgets import QWidget, QCheckBox, QLabel, QApplication

class MyCheckBox(QWidget):
 def __init__(self):
  super().__init__()

  my_checkbox = QCheckBox("Check this , see result", self)
  my_checkbox.move(50,60)
  my_checkbox.stateChanged.connect(self.change_my_option)


  self.my_label = QLabel("You can visit free-tutorial.org ", self)
  self.my_label.move(50,30)

  #self.my_label.setAlignment(Qt.AlignCenter)

  self.setGeometry(420,420,640,100)
  self.setWindowTitle("free-tutorials.org PyQt5 ChecBox ")


 def change_my_option(self, state):
  if state  == Qt.Checked:
   self.my_label.setText("Thank's by free-tutorial.org")
  else:
   self.my_label.setText("You can visit free-tutorial.org")

if __name__ == '__main__':
 app = QApplication(sys.argv)
 win = MyCheckBox()
 win.show()
sys.exit(app.exec_())C:\Python364>cd Scripts
C:\Python364\Scripts>pip3.6.exe install PySide2
Collecting PySide2
Downloading https://files.pythonhosted.org/packages/10/ba/7448ec862655c356ade2
2351ed46c9260773186c37ba0d8ceea1ef8c7515/PySide2-5.11.2-5.11.2-cp35.cp36.cp37-no
ne-win_amd64.whl (128.7MB)
100% |████████████████████████████████| 128.7MB 44kB/s
Installing collected packages: PySide2
Successfully installed PySide2-5.11.2
import sys
from PySide2 import QtGui, QtCore, QtWidgets
from PySide2.QtGui import *
from PySide2.QtCore import *
from PySide2.QtWidgets import *

class SecondaryWindow(QtWidgets.QWidget):

    def __init__(self, label, parent=None):
        super(SecondaryWindow, self).__init__(parent)

        self.label = QtWidgets.QLabel(label, parent=self)
        self.label.setAlignment(QtCore.Qt.AlignCenter)
        self.label.setStyleSheet("QLabel {font-size:18px;color:blue}")

        self.main_layout = QtWidgets.QVBoxLayout()
        self.main_layout.addWidget(self.label)
        self.setLayout(self.main_layout)

class MainWindow(QtWidgets.QWidget):

    def __init__(self, parent=None):
        super(MainWindow, self).__init__(parent)

        self.secondary_window_1 = SecondaryWindow("1", parent=self)
        self.secondary_window_2 = SecondaryWindow("2", parent=self)
        self.secondary_window_3 = SecondaryWindow("3", parent=self)
        self.secondary_window_4 = SecondaryWindow("4", parent=self)

        self.secondary_splitter_1 = QtWidgets.QSplitter(QtCore.Qt.Horizontal, parent=self)
        self.secondary_splitter_1.addWidget(self.secondary_window_1)
        self.secondary_splitter_1.addWidget(self.secondary_window_2)

        self.secondary_splitter_2 = QtWidgets.QSplitter(QtCore.Qt.Horizontal, parent=self)
        self.secondary_splitter_2.addWidget(self.secondary_window_3)
        self.secondary_splitter_2.addWidget(self.secondary_window_4)

        self.main_splitter = QtWidgets.QSplitter(QtCore.Qt.Vertical, parent=self)
        self.main_splitter.addWidget(self.secondary_splitter_1)
        self.main_splitter.addWidget(self.secondary_splitter_2)

        self.main_layout = QtWidgets.QVBoxLayout()
        self.main_layout.addWidget(self.main_splitter)
        self.setLayout(self.main_layout)

        self.setWindowTitle("PySide2 example")
        self.resize(220, 220)

if __name__ == "__main__":
    app = QApplication(sys.argv)
    main_window = MainWindow()
    main_window.show()
    sys.exit(app.exec_())
# -*- coding: utf-8 -*-
"""
@author: catafest
"""
import sys
from PyQt5.QtWidgets import QMainWindow, QAction, qApp, QApplication, QDesktopWidget, QMenu
from PyQt5.QtGui import QIcon

class Example(QMainWindow):
    #init the example class to draw the window application
    def __init__(self):
        super().__init__()
        self.initUI()
    #create the def center to select the center of the screen
    def center(self):
        # geometry of the main window
        qr = self.frameGeometry()
        # center point of screen
        cp = QDesktopWidget().availableGeometry().center()
        # move rectangle's center point to screen's center point
        qr.moveCenter(cp)
        # top left of rectangle becomes top left of window centering it
        self.move(qr.topLeft())
    #create the init UI to draw the application
    def initUI(self):
        #create the action for the exit application with shortcut and icon
        #you can add new action for File menu and any actions you need
        exitAct = QAction(QIcon('exit.png'), '&Exit', self)
        exitAct.setShortcut('Ctrl+Q')
        exitAct.setStatusTip('Exit application')
        exitAct.triggered.connect(qApp.quit)
        #create the status bar for menu
        self.statusBar()
        #create the menu with the text File , add the exit action
        #you can add many items on menu with actions for each item
        menubar = self.menuBar()
        fileMenu = menubar.addMenu('&File')
        fileMenu.addAction(exitAct)

        # add submenu to menu
        submenu = QMenu('Submenu',self)

        # some dummy actions
        submenu.addAction('Submenu 1')
        submenu.addAction('Submenu 2')

        # add to the top menu
        menubar.addMenu(submenu)
        #resize the window application
        self.resize(640, 480)
        #draw on center of the screen
        self.center()
        #add title on windows application
        self.setWindowTitle('Simple menu')
        #show the application
        self.show()
        #close the UI class

if __name__ == '__main__':
    #create the application
    app = QApplication(sys.argv)
    #use the UI with new  class
    ex = Example()
    #run the UI
    sys.exit(app.exec_())
from PyQt5 import QtWidgets, QtGui, QtCore
from PyQt5.QtCore import pyqtSignal
font_button = QtGui.QFont()
font_button.setFamily("Corbel")
font_button.setPointSize(10)
font_button.setWeight(100)
class Push_button(QtWidgets.QPushButton):
def __init__(self, parent=None):
super(Push_button, self).__init__(parent)
self.setMouseTracking(True)
self.setStyleSheet("margin: 1px; padding: 10px; \
background-color: \
rgba(255,255,0,255); \
color: rgba(0,0,0,255); \
border-style: solid; \
border-radius: 4px; border-width: 3px; \
border-color: rgba(0,0,0,255);")
def enterEvent(self, event):
if self.isEnabled() is True:
self.setStyleSheet("margin: 10px; padding: 10px; \
background-color: \
rgba(255,255,0,255); \
color: rgba(0,0,10,255); \
border-style: solid; \
border-radius: 8px; \
border-width: 1px; \
border-color: \
rgba(0,0,100,255);")
if self.isEnabled() is False:
self.setStyleSheet("margin: 10px; padding: 10px; \
background-color: \
rgba(255,255,0,255); \
color: rgba(0,0,10,255); \
border-style: solid; \
border-radius: 8px; \
border-width: 1px; \
border-color: \
rgba(0,0,100,255);")
def leaveEvent(self, event):
self.setStyleSheet("margin: 10px; padding: 10px; \
background-color: rgba(0,0,0,100); \
color: rgba(0,0,255,255); \
border-style: solid; \
border-radius: 8px; border-width: 1px; \
border-color: rgba(0,50,100,255);")
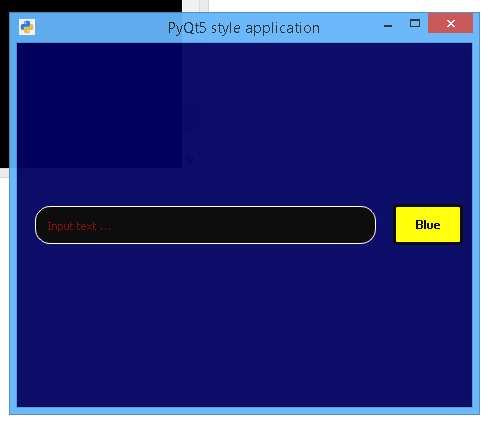
class QthreadApp(QtWidgets.QWidget):
sig = pyqtSignal(str)
def __init__(self, parent=None):
QtWidgets.QWidget.__init__(self, parent)
self.setWindowTitle("PyQt5 style application")
self.setWindowIcon(QtGui.QIcon("icon.png"))
self.setMinimumWidth(resolution.width() / 3)
self.setMinimumHeight(resolution.height() / 2)
self.setStyleSheet("QWidget { \
background-color: rgba(0,0,100,250);} \
QScrollBar:horizontal {width: 1px; \
height: 1px; \
background-color: rgba(0,100,255,0);} \
QScrollBar:vertical {width: 1px; \
height: 10px; \
background-color: rgba(0,41,59,255);}")
self.linef = QtWidgets.QLineEdit(self)
self.linef.setPlaceholderText("Input text ...")
self.linef.setStyleSheet("margin: 10px; padding: 10px; \
background-color: \
rgba(0,0,0,255);\
color: rgba(255,0,0,255); \
border-style: solid; \
border-radius: 15px; \
border-width: 1px; \
border-color: \
rgba(255,255,255,255);")
self.my_button = Push_button(self)
self.my_button.setText("Blue")
self.my_button.setFixedWidth(72)
self.my_button.setFont(font_button)
self.my_grid = QtWidgets.QGridLayout()
self.my_grid.addWidget(self.linef, 0, 0, 1, 220)
self.my_grid.addWidget(self.my_button, 0, 220, 1, 1)
self.my_grid.setContentsMargins(8, 8, 8, 8)
self.setLayout(self.my_grid)
if __name__ == "__main__":
import sys
app = QtWidgets.QApplication(sys.argv)
desktop = QtWidgets.QApplication.desktop()
resolution = desktop.availableGeometry()
myapp = QthreadApp()
myapp.setWindowOpacity(0.95)
myapp.show()
myapp.move(resolution.center() - myapp.rect().center())
sys.exit(app.exec_())
else:
desktop = QtWidgets.QApplication.desktop()
resolution = desktop.availableGeometry()
import sys
from PyQt5 import *
from PyQt5.QtWidgets import QApplication, QCalendarWidget, QWidget, QLabel
from PyQt5.QtCore import *
from PyQt5.QtGui import *

class Example(QWidget):
   def __init__(self):
      super(Example, self).__init__()
      self.initUI()
   def initUI(self):
      my_calendar = QCalendarWidget(self)
      my_calendar.setGridVisible(True)
      my_calendar.move(10, 20)
      my_calendar.clicked[QDate].connect(self.show_date)
      self.my_label = QLabel(self)
      date = my_calendar.selectedDate()
      self.my_label.setText(date.toString())
      self.my_label.move(10, 220)
      self.setGeometry(100,100,320,270)
      self.setWindowTitle('Calendar')
      self.show()
   def show_date(self, date):
      self.my_label.setText(date.toString())

def main():
   app = QApplication(sys.argv)
   ex = Example()
   sys.exit(app.exec_())
if __name__ == '__main__':
   main()