analitics

Pages

Thursday, November 1, 2018

Python Qt5 : QtWebEngine example.

The QtWebEngine is the new web rendering engine that is planned to replace QtWebKit in Qt.
The official website tells us:
QtWebEngineWidgets or QtWebEngine libraries, depending on application type
Let's test this web rendering engine with a simple source code:
import sys
from PyQt5.QtCore import *
from PyQt5.QtWidgets import QApplication
# use the QtWebEngineWidgets
from PyQt5.QtWebEngineWidgets import *
# start my_app
my_app = QApplication(sys.argv)
# open webpage
my_web = QWebEngineView()
my_web.load(QUrl("http://free-tutorials.org"))
my_web.show()
# sys exit function
sys.exit(my_app.exec_())
The output of this running source code.

Friday, October 26, 2018

Python Qt5 : MP3 player example.

This tutorial with PyQt5 will allow us to play an MP3 file using QtMultimedia.
I used a test.mp3 file in the same folder with my python script.
This is the source script:
import sys

from PyQt5 import QtCore, QtWidgets, QtMultimedia

if __name__ == '__main__':
    app = QtWidgets.QApplication(sys.argv)
    filename = 'test.mp3'
    fullpath = QtCore.QDir.current().absoluteFilePath(filename) 
    media = QtCore.QUrl.fromLocalFile(fullpath)
    content = QtMultimedia.QMediaContent(media)
    player = QtMultimedia.QMediaPlayer()
    player.setMedia(content)
    player.play()
    sys.exit(app.exec_())

Wednesday, October 24, 2018

Python Qt5 : Webcam example.

Today I come with another source code.
This example uses QtMultimedia to create use of the webcam.
The source code follows the steps from finding, set and use a webcam.
from PyQt5.QtGui import *
from PyQt5.QtWidgets import *
from PyQt5.QtCore import *
from PyQt5.QtMultimedia import *
from PyQt5.QtMultimediaWidgets import *

import os
import sys

class MainWindow(QMainWindow):

    def __init__(self, *args, **kwargs):
        super(MainWindow, self).__init__(*args, **kwargs)

        self.online_webcams = QCameraInfo.availableCameras()
        if not self.online_webcams:
            pass #quit
        self.exist = QCameraViewfinder()
        self.exist.show()
        self.setCentralWidget(self.exist)

        # set the default webcam.
        self.get_webcam(0)
        self.setWindowTitle("WebCam")
        self.show()

    def get_webcam(self, i):
        self.my_webcam = QCamera(self.online_webcams[i])
        self.my_webcam.setViewfinder(self.exist)
        self.my_webcam.setCaptureMode(QCamera.CaptureStillImage)
        self.my_webcam.error.connect(lambda: self.alert(self.my_webcam.errorString()))
        self.my_webcam.start()

    def alert(self, s):
        """
        This handle errors and displaying alerts.
        """
        err = QErrorMessage(self)
        err.showMessage(s)


if __name__ == '__main__':

    app = QApplication(sys.argv)
    app.setApplicationName("WebCam")

    window = MainWindow()
    app.exec_()

Tuesday, October 23, 2018

Python Qt5 : toolbar example.

This is a simple example with PyQt5 python module and python 3.6.4 version.
The example is about how to create a toolbar with PyQt5.
The base of this source code is the create a default window application.
I create a toolbar and I add an action to this toolbar.
The name of the toolbar is my_toolbar.
The action is named one_action.
This action is linked to a python function named action_one.
I add to my source code another function named alert.
This is good for debugging part to handle with errors and displaying alerts.
Let's see the source code:
from PyQt5.QtGui import *
from PyQt5.QtWidgets import *
from PyQt5.QtCore import *
import sys

class MainWindow(QMainWindow):

    def __init__(self, *args, **kwargs):
        super(MainWindow, self).__init__(*args, **kwargs)
        self.status = QStatusBar()
        self.setStatusBar(self.status)
        my_toolbar = QToolBar("toolbar")
        my_toolbar.setIconSize(QSize(48, 48))
        self.addToolBar(my_toolbar)
        
        one_action = QAction(QIcon(), "Action one", self)        
        one_action.setStatusTip("Action one on toolbar")
        one_action.triggered.connect(self.action_one)
        my_toolbar.addAction(one_action)
        
        self.setWindowTitle("Window PyQt5 - 001")
        self.show()

    def action_one(self):
        print("Action one")

    def alert(self, s):
        """
        This handle errors and displaying alerts.
        """
        err = QErrorMessage(self)
        err.showMessage(s)

if __name__ == '__main__':

    app = QApplication(sys.argv)
    app.setApplicationName("Window PyQt5 - 001")

    window = MainWindow()
    app.exec_()

Sunday, October 21, 2018

OpenGL and OpenCV with python 2.7 - part 006.

Today I deal with a simple example about how to use your webcam like a python module.
This will allow you to make your python module for your webcam.
My reason was to make a good webcam module to work with python modules like OpenCV and OpenGL and webcam devices.
The source code is simple and has just three functions: start, _update_frame and get_current_frame.
You can make more functions into this python module named webcam.
import cv2
from threading import Thread
  
class webcam:
  
    def __init__(self):
        self.video_capture = cv2.VideoCapture(0)
        self.current_frame = self.video_capture.read()[1]
          
    # create thread for capturing images
    def start(self):
        Thread(target=self._update_frame, args=()).start()
  
    def _update_frame(self):
        while(True):
            self.current_frame = self.video_capture.read()[1]
                  
    # get the current frame
    def get_current_frame(self):
        return self.current_frame
I make also a python script to test this python module:
from webcam import webcam
import cv2
 
dir(webcam)
cam = webcam()
cam.start()
 
while True:
     
    # get image from webcam
    image = cam.get_current_frame()

The shutil python module.

The shutil module helps you to accomplish tasks, such as: copying, moving, or removing directory trees.
This python script creates a zip file in the current directory containing all contents of dir and then clears dir.

import shutil
from os import makedirs

def zip(out_fileName, dir):
shutil.make_archive(str(out_fileName), 'zip', dir)
shutil.rmtree(dir)
makedirs(dir[:-1])

The scapy python module - part 002.

This is another python tutorial about scapy python module.
The last was made on Linux and now I used Windows 10 OS.
Let's install this python module with python version 2.7.13 and pip.
C:\>cd Python27

C:\Python27>cd Scripts

C:\Python27\Scripts>pip install scapy
Collecting scapy
  Downloading scapy-2.3.3.tgz (1.4MB)
    100% |################################| 1.4MB 736kB/s
  In the tar file c:\users\mythcat\appdata\local\temp\pip-26vi9x-unpack\scapy-2.3.3.tgz 
the member scapy-2.3.3/README is invalid: unable to resolve link inside archive
Installing collected packages: scapy
  Running setup.py install for scapy ... done
Successfully installed scapy-2.3.3
The next step is to deal with
C:\Python27\Scripts>python
Python 2.7.13 (v2.7.13:a06454b1afa1, Dec 17 2016, 20:42:59) [MSC v.1500 32 bit (Intel)] on win32
Type "help", "copyright", "credits" or "license" for more information.
>>> import scapy
>>> from scapy import *
>>> dir(scapy)
['VERSION', '_SCAPY_PKG_DIR', '__builtins__', '__doc__', '__file__', '__name__', '__package__',
 '__path__', '_version', '_version_from_git_describe', 'base_classes', 'config', 'dadict', 'data',
 'error', 'os', 'plist', 'pton_ntop', 're', 'subprocess', 'supersocket', 'themes', 'utils', 
'with_statement']

This is not working on WINDOWS

Using PyUSB with python 3.x .

C:\Python34\Scripts>pip3.4.exe install PyUSB
Downloading/unpacking PyUSB
  Running setup.py (path:C:\Users\mythcat\AppData\Local\Temp\pip_build_mythcat\PyUSB\setup.py) 
egg_info for package PyUSB

Installing collected packages: PyUSB
  Running setup.py install for PyUSB

Successfully installed PyUSB
Cleaning up...
Now you need to install this filter from here.
If not, you can get errors like this: raise NoBackendError('No backend available')
usb.core.NoBackendError: No backend available
Let's make a simple test example:
import usb.core
import usb.util
import sys

class find_class(object):
    def __init__(self, class_):
        self._class = class_
    def __call__(self, device):
        # first, let's check the device
        if device.bDeviceClass == self._class:
            return True
        # ok, transverse all devices to find an
        # interface that matches our class
        for cfg in device:
            # find_descriptor: what's it?
            intf = usb.util.find_descriptor(
                                        cfg,
                                        bInterfaceClass=self._class
                                )
            if intf is not None:
                return True

        return False

all = usb.core.find(find_all=1, custom_match=find_class(7))
print (all)
And show the result:
C:\Python34>python.exe usb_devs.py
< generator 0x0000000003d8d5e8="" at="" device_iter="" object="" >

The ansible python module - part 001.

Ansible is an IT automation tool.
It can configure systems, deploy software, and orchestrate more advanced IT tasks such as continuous deployments or zero downtime rolling updates.
First, you need to install the VCForPython27.
Install now the pycrypto python module:
C:\Python27\Scripts>pip install  --upgrade  --trusted-host  pypi.python.org pycrypto
Collecting pycrypto
  Downloading pycrypto-2.6.1.tar.gz (446kB)
    100% |################################| 450kB 3.8MB/s
Installing collected packages: pycrypto
  Running setup.py install for pycrypto ... done
Successfully installed pycrypto-2.6.1

C:\Python27\Scripts>pip install --trusted-host pypi.python.org ansible
Collecting ansible
Downloading ansible-2.3.0.0.tar.gz (4.3MB)
100% |################################| 4.3MB 365kB/s
Requirement already satisfied: jinja2 in c:\python27\lib\site-packages (from ansible)
Collecting PyYAML (from ansible)
...
Installing collected packages: ansible
  Running setup.py install for ansible ... done
Successfully installed ansible-2.3.0.0

Programmer's Notepad - free editor with PyPN python module.

Programmer's Notepad is a free, open source, text editor with special features for coders.
This editor comes with a variety of text clips representing common programming languages.
I saw 43 of text clips to start your programming.
Featuring
Syntax highlighting
Text Clips for simple text insertion
Code folding / outlining
Flexible Regular Expression support
Code navigation using Ctags
Projects for navigating large code bases
Extend using Python or C++
For example, if you start with the HTML then every tag will autocomplete with the end tag.
You can install the PyPN python module and used with this editor:
C:\Python364\Scripts>pip install PyPN
Collecting PyPN
...
Installing collected packages: PyPN
Successfully installed PyPN-0.9
More about PyPN module can be found here.
You can donate to support the project.

Friday, September 28, 2018

Python 2.7 : Python geocoding without key.

Today I will come with a simple example about geocoding.
I used JSON and requests python modules and python version 2.7.
About geocoding I use this service provide by datasciencetoolkit.
You can use this service free and you don't need to register to get a key.
Let's see the python script:
import requests
import json

url = u'http://www.datasciencetoolkit.org/maps/api/geocode/json'
par = {
    u'sensor': False,
    u'address': u'London'
}

my = requests.get(
    url,
    par
)
json_out = json.loads(my.text)

if json_out['status'] == 'OK':
    print([r['geometry']['location'] for r in json_out['results']])
I run this script and I test with google map to see if this works well.
This is output and working well with the geocoding service:

Friday, September 7, 2018

Python 3.6.4 : Test Django version 2.1.1 on Windows O.S.

I used the python version 3.6.4 to test the last Django framework version.
Add your python to the path environment variable under Windows O.S.
Create your working folder:
C:\Python364>mkdir mywebsite
Go to the folder to install all you need:
C:\Python364>cd mywebsite
Use a virtual environment using the virtualenv command:
C:\Python364\mywebsite>python -m venv myvenv
C:\Python364\mywebsite>myvenv\Scripts\activate
(myvenv) C:\Python364\mywebsite>python -m pip install --upgrade pip
(myvenv) C:\Python364\mywebsite>pip3.6 install django
Collecting django
...
If you try to run again this command you will see the version of Django:
(myvenv) C:\Python364\mywebsite>pip3.6 install django
Requirement already satisfied: django in c:\python364\mywebsite\myvenv\lib\
site-packages (2.1.1)
Requirement already satisfied: pytz in c:\python364\mywebsite\myvenv\lib\
site-packages (from django) (2018.5)
You need to run the django-admin command:
(myvenv) C:\Python364\mywebsite>cd myvenv
(myvenv) C:\Python364\mywebsite\myvenv>cd Scripts
(myvenv) C:\Python364\mywebsite\myvenv\Scripts>django-admin.exe startproject mysite
(myvenv) C:\Python364\mywebsite\myvenv\Scripts>dir my*
(myvenv) C:\Python364\mywebsite\myvenv\Scripts>cd mysite
(myvenv) C:\Python364\mywebsite\myvenv\Scripts\mysite&
Make a change to settings file:
(myvenv) C:\Python364\mywebsite\myvenv\Scripts\mysite>cd mysite
(myvenv) C:\Python364\mywebsite\myvenv\Scripts\mysite\mysite>notepad settings.py
Change UTC timezone:
TIME_ZONE = 'Europe/Paris'
Change host:
ALLOWED_HOSTS = ['192.168.0.185','mysite.com']
The next step is to use these commands:
(myvenv) C:\Python364\mywebsite\myvenv\Scripts\mysite\mysite>cd ..
(myvenv) C:\Python364\mywebsite\myvenv\Scripts\mysite>python manage.py migrate
Operations to perform:
  Apply all migrations: admin, auth, contenttypes, sessions
Running migrations:
  Applying contenttypes.0001_initial... OK
  Applying auth.0001_initial... OK
  Applying admin.0001_initial... OK
  Applying admin.0002_logentry_remove_auto_add... OK
  Applying admin.0003_logentry_add_action_flag_choices... OK
  Applying contenttypes.0002_remove_content_type_name... OK
  Applying auth.0002_alter_permission_name_max_length... OK
  Applying auth.0003_alter_user_email_max_length... OK
  Applying auth.0004_alter_user_username_opts... OK
  Applying auth.0005_alter_user_last_login_null... OK
  Applying auth.0006_require_contenttypes_0002... OK
  Applying auth.0007_alter_validators_add_error_messages... OK
  Applying auth.0008_alter_user_username_max_length... OK
  Applying auth.0009_alter_user_last_name_max_length... OK
  Applying sessions.0001_initial... OK
Let's try these steps with the browser:
(myvenv) C:\Python364\mywebsite\myvenv\Scripts\mysite>python manage.py runserver
 192.168.0.185:8080
Performing system checks...

System check identified no issues (0 silenced).
September 07, 2018 - 16:30:13
Django version 2.1.1, using settings 'mysite.settings'
Starting development server at http://192.168.0.185:8080/
Quit the server with CTRL-BREAK.
[07/Sep/2018 16:30:16] "GET / HTTP/1.1" 200 16348
[07/Sep/2018 16:30:21] "GET / HTTP/1.1" 200 16348
This is the result:

Let's start Django application named myblog and add to settings.py :
(myvenv) C:\Python364\mywebsite\myvenv\Scripts\mysite>python manage.py startapp
myblog

(myvenv) C:\Python364\mywebsite\myvenv\Scripts\mysite>dir
(myvenv) C:\Python364\mywebsite\myvenv\Scripts\mysite>cd mysite
(myvenv) C:\Python364\mywebsite\myvenv\Scripts\mysite\mysite>notepad settings.py
Search into settings.py this line and add 'myblog' and comma after, see:
# Application definition

INSTALLED_APPS = [
    'django.contrib.admin',
    'django.contrib.auth',
    'django.contrib.contenttypes',
    'django.contrib.sessions',
    'django.contrib.messages',
    'django.contrib.staticfiles',
    'myblog',
]
Let's change models.py from myblog folder:
(myvenv) C:\Python364\mywebsite\myvenv\Scripts\mysite\mysite>cd ..
(myvenv) C:\Python364\mywebsite\myvenv\Scripts\mysite>cd myblog
(myvenv) C:\Python364\mywebsite\myvenv\Scripts\mysite\myblog>notepad models.py
Add this source code:
from django.db import models
# Create your models here.
from django.utils import timezone
from django.contrib.auth.models import User

class Post(models.Model):
 author = models.ForeignKey(User,on_delete=models.PROTECT)
 title = models.CharField(max_length=200)
 text = models.TextField()
 create_date = models.DateTimeField(default=timezone.now)
 published_date = models.DateTimeField(blank=True, null=True)
 
 def publish(self):
  self.publish_date = timezone.now()
  self.save()
 def __str__(self):
  return self.title
Go and run this command manage.py for model Post with makemigrations myblog and migrate myblog :
(myvenv) C:\Python364\mywebsite\myvenv\Scripts\mysite\myblog>cd ..
(myvenv) C:\Python364\mywebsite\myvenv\Scripts\mysite>python manage.py 
makemigrations myblog
Migrations for 'myblog':
  myblog\migrations\0001_initial.py
    - Create model Post
(myvenv) C:\Python364\mywebsite\myvenv\Scripts\mysite>python manage.py migrate 
myblog
Operations to perform:
  Apply all migrations: myblog
Running migrations:
  Applying myblog.0001_initial... OK
Add this source code to admin.py from myblog folder:
(myvenv) C:\Python364\mywebsite\myvenv\Scripts\mysite>cd myblog
(myvenv) C:\Python364\mywebsite\myvenv\Scripts\mysite\myblog>notepad admin.py
Let's test again:
(myvenv) C:\Python364\mywebsite\myvenv\Scripts\mysite\myblog>cd ..
(myvenv) C:\Python364\mywebsite\myvenv\Scripts\mysite>python manage.py runserver
 192.168.0.185:8080
Performing system checks...

System check identified no issues (0 silenced).
September 07, 2018 - 17:19:00
Django version 2.1.1, using settings 'mysite.settings'
Starting development server at http://192.168.0.185:8080/
Quit the server with CTRL-BREAK.
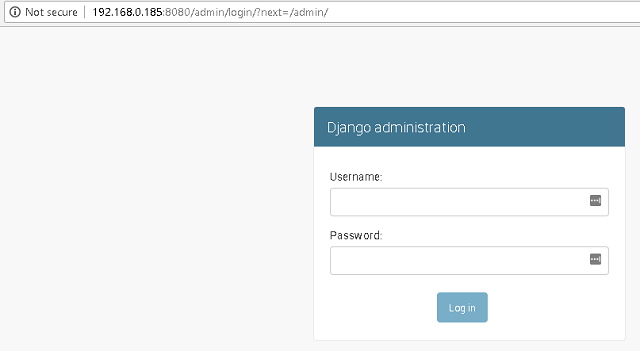
Check the admin interface with add admin word to link, see: http://192.168.0.185:8080/admin

If you see some errors this will be fixed later.
Let's make a superuser with this command:
(myvenv) C:\Python364\mywebsite\myvenv\Scripts\mysite>python manage.py 
createsuperuser
Username (leave blank to use 'catafest'): catafest
Email address: catafest@yahoo.com
Password:
Password (again):
This password is too short. It must contain at least 8 characters.
Bypass password validation and create user anyway? [y/N]: y
Superuser created successfully.
Run again this command and log in with your user and password:
(myvenv) C:\Python364\mywebsite\myvenv\Scripts\mysite>python manage.py runserver
 192.168.0.185:8080
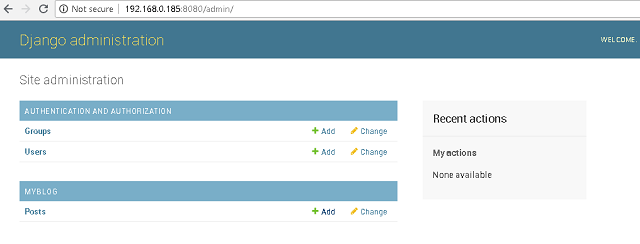
This is the result of users and posts.
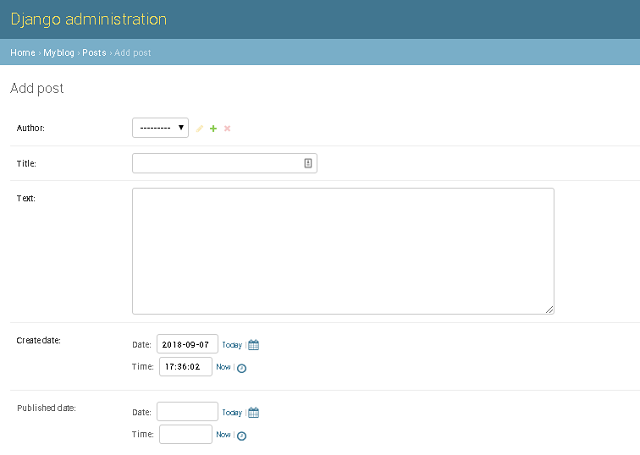
Click on the Add button from Posts to add your post.
The result is this:

I don't make settings for URL and view.
This will be changed by users.

Wednesday, August 29, 2018

PyOpenGL: Fix Attempt to call an undefined function glutInit .

This tutorial is about how to fix this error using Python version 3.6.4 :
OpenGL.error.NullFunctionError: Attempt to call an undefined function glutInit,
check for bool(glutInit) before calling
First I start with a common pip3.6 install.
Scripts>pip3.6.exe install PyOpenGL
Collecting PyOpenGL
  Downloading https://files.pythonhosted.org/packages/9c/1d/4544708aaa89f26c97cc
09450bb333a23724a320923e74d73e028b3560f9/PyOpenGL-3.1.0.tar.gz (1.2MB)
    100% |████████████████████████████████| 1.2MB 1.2MB/s
Building wheels for collected packages: PyOpenGL
  Running setup.py bdist_wheel for PyOpenGL ... done
  Stored in directory: C:\Users\catafest\AppData\Local\pip\Cache\wheels\6c\00\7f
\1dd736f380848720ad79a1a1de5272e0d3f79c15a42968fb58
Successfully built PyOpenGL
Installing collected packages: PyOpenGL
Successfully installed PyOpenGL-3.1.0
When I run my python script code I got this error:
c:\Python364\Scripts>cd ..
c:\Python364>python.exe opengl_001.py
Traceback (most recent call last):
  File "opengl_001.py", line 182, in 
    StereoDepth().main()
  File "opengl_001.py", line 173, in main
    glutInit()
  File "c:\Python364\lib\site-packages\OpenGL\GLUT\special.py", line 333, in glu
tInit
    _base_glutInit( ctypes.byref(count), holder )
  File "c:\Python364\lib\site-packages\OpenGL\platform\baseplatform.py", line 40
7, in __call__
    self.__name__, self.__name__,
OpenGL.error.NullFunctionError: Attempt to call an undefined function glutInit,
check for bool(glutInit) before calling
I use the whl files from here.
c:\Python364>cd Scripts

c:\Python364\Scripts>pip3.6.exe install PyOpenGL-3.1.2-cp36-cp36m-win_amd64.whl
Processing c:\python364\scripts\pyopengl-3.1.2-cp36-cp36m-win_amd64.whl
Installing collected packages: PyOpenGL
  Found existing installation: PyOpenGL 3.1.0
    Uninstalling PyOpenGL-3.1.0:
      Successfully uninstalled PyOpenGL-3.1.0
Successfully installed PyOpenGL-3.1.2

c:\Python364\Scripts>pip3.6.exe install PyOpenGL_accelerate-3.1.2-cp36-cp36m-win
_amd64.whl
Processing c:\python364\scripts\pyopengl_accelerate-3.1.2-cp36-cp36m-win_amd64.w
hl
Installing collected packages: PyOpenGL-accelerate
Successfully installed PyOpenGL-accelerate-3.1.2
This allow me to run well the python script with PyOpenGL python module.
This is result of shader stereo depth image: