analitics

Pages

Friday, May 26, 2017

OpenGL and OpenCV with python 2.7 - part 005.

In this tutorial, I will show you how to mount OpenCV in the Windows 10 operating system with any python version.
You can use the same steps for other versions of python.
Get the wheel binary package opencv_python-3.2.0.7-cp27-cp27m-win32.whl from here.
C:\Python27>

C:\Python27>cd Scripts

C:\Python27\Scripts>pip install opencv_python-3.2.0.7-cp27-cp27m-win32.whl
Processing c:\python27\scripts\opencv_python-3.2.0.7-cp27-cp27m-win32.whl
Requirement already satisfied: numpy>=1.11.1 in c:\python27\lib\site-packages (from opencv-python==3.2.0.7)
Installing collected packages: opencv-python
Successfully installed opencv-python-3.2.0.7

C:\Python27\Scripts>python
Python 2.7.13 (v2.7.13:a06454b1afa1, Dec 17 2016, 20:42:59) [MSC v.1500 32 bit (Intel)] on win32
Type "help", "copyright", "credits" or "license" for more information.
Let's test it with default source code:

>>> import cv2
>>> dir(cv2)
['', 'ACCESS_FAST', 'ACCESS_MASK', 'ACCESS_READ', 'ACCESS_RW', 'ACCESS_WRITE', 
'ADAPTIVE_THRESH_GAUSSIAN_C', 'ADAPTIVE_THRESH_MEAN_C', 'AGAST_FEATURE_DETECTOR_AGAST_5_8', 
'AGAST_FEATURE_DETECTOR_AGAST_7_12D', 'AGAST_FEATURE_DETECTOR_AGAST_7_12S',
 'AGAST_FEATURE_DETECTOR_NONMAX_SUPPRESSION', 'AGAST_FEATURE_DETECTOR_OAST_9_16',
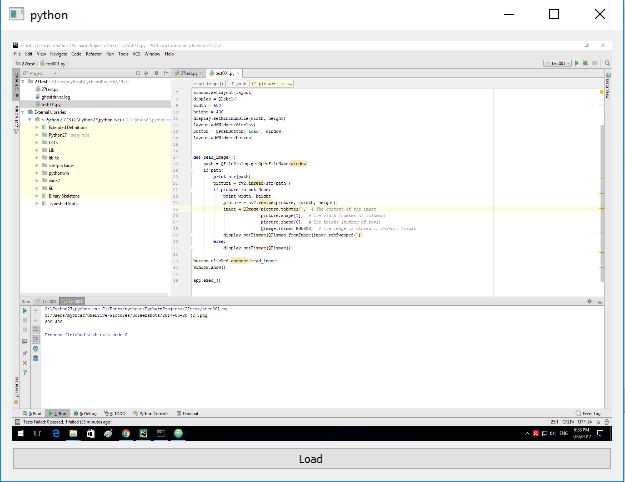
...
Now we can test this python script example with PyQt4 python module and cv2.resize function very easy.
The example loads an image with PyQt4 python module.
from PyQt4.QtGui import QApplication, QWidget, QVBoxLayout, QImage, QPixmap, QLabel, QPushButton, QFileDialog
import cv2
import sys
app = QApplication([])
window = QWidget()
layout = QVBoxLayout(window)
window.setLayout(layout)
display = QLabel()
width = 600
height = 400
display.setMinimumSize(width, height)
layout.addWidget(display)
button = QPushButton('Load', window)
layout.addWidget(button)

def read_image():
    path = QFileDialog.getOpenFileName(window)
    if path:
        print str(path)
        picture = cv2.imread(str(path))
        if picture is not None:
            print width, height
            picture = cv2.resize(picture, (width, height))
            image = QImage(picture.tobytes(),  # The content of the image
                           picture.shape[1],  # The width (number of columns)
                           picture.shape[0],  # The height (number of rows)
                           QImage.Format_RGB888)  # The image is stored in 3*8-bit format
            display.setPixmap(QPixmap.fromImage(image.rgbSwapped()))
        else:
            display.setPixmap(QPixmap())

button.clicked.connect(read_image)
window.show()

app.exec_()
See the result for this python script:

Monday, May 22, 2017

Make one executable from a python script.

The official website of this tool tells us:
PyInstaller bundles a Python application and all its dependencies into a single package. The user can run the packaged app without installing a Python interpreter or any modules. PyInstaller supports Python 2.7 and Python 3.3+, and correctly bundles the major Python packages such as numpy, PyQt, Django, wxPython, and others.

PyInstaller is tested against Windows, Mac OS X, and Linux. However, it is not a cross-compiler: to make a Windows app you run PyInstaller in Windows; to make a Linux app you run it in Linux, etc. PyInstaller has been used successfully with AIX, Solaris, and FreeBSD, but is not tested against them.

The manual of this tool can see it here.
C:\Python27>cd Scripts

C:\Python27\Scripts>pip install pyinstaller
Collecting pyinstaller
  Downloading PyInstaller-3.2.1.tar.bz2 (2.4MB)
    100% |################################| 2.4MB 453kB/s
....
Collecting pypiwin32 (from pyinstaller)
  Downloading pypiwin32-219-cp27-none-win32.whl (6.7MB)
    100% |################################| 6.7MB 175kB/s
...
Successfully installed pyinstaller-3.2.1 pypiwin32-219
Also, this will install the PyWin32 python module.
Let's make one test python script and then to make it executable.
I used this python script to test it:
from tkinter import Tk, Label, Button

class MyFirstGUI:
    def __init__(self, master):
        self.master = master
        master.title("A simple GUI")

        self.label = Label(master, text="This is our first GUI!")
        self.label.pack()

        self.greet_button = Button(master, text="Greet", command=self.greet)
        self.greet_button.pack()

        self.close_button = Button(master, text="Close", command=master.quit)
        self.close_button.pack()

    def greet(self):
        print("Greetings!")

root = Tk()
my_gui = MyFirstGUI(root)
root.mainloop()
The output of the command of pyinstaller:
C:\Python27\Scripts>pyinstaller.exe   --onefile --windowed ..\tk_app.py
92 INFO: PyInstaller: 3.2.1
92 INFO: Python: 2.7.13
93 INFO: Platform: Windows-10-10.0.14393
93 INFO: wrote C:\Python27\Scripts\tk_app.spec
95 INFO: UPX is not available.
96 INFO: Extending PYTHONPATH with paths
['C:\\Python27', 'C:\\Python27\\Scripts']
96 INFO: checking Analysis
135 INFO: checking PYZ
151 INFO: checking PKG
151 INFO: Building because toc changed
151 INFO: Building PKG (CArchive) out00-PKG.pkg
213 INFO: Redirecting Microsoft.VC90.CRT version (9, 0, 21022, 8) -> (9, 0, 30729, 9247)
2120 INFO: Building PKG (CArchive) out00-PKG.pkg completed successfully.
2251 INFO: Bootloader c:\python27\lib\site-packages\PyInstaller\bootloader\Windows-32bit\runw.exe
2251 INFO: checking EXE
2251 INFO: Rebuilding out00-EXE.toc because tk_app.exe missing
2251 INFO: Building EXE from out00-EXE.toc
2267 INFO: Appending archive to EXE C:\Python27\Scripts\dist\tk_app.exe
2267 INFO: Building EXE from out00-EXE.toc completed successfully.
Then I run the executable output:
C:\Python27\Scripts>C:\Python27\Scripts\dist\tk_app.exe

C:\Python27\Scripts>
...and working well.

The output file come with this icon:

Also, you can make changes by using your icons or set the type of this file, according to VS_FIXEDFILEINFO structure.
You need to have the icon file and/or version.txt file for VS_FIXEDFILEINFO structure.
Let's see the version.txt file:
# UTF-8
#
# For more details about fixed file info 'ffi' see:
# http://msdn.microsoft.com/en-us/library/ms646997.aspx
VSVersionInfo(
  ffi=FixedFileInfo(
    # filevers and prodvers should be always a tuple with four items: (1, 2, 3, 4)
    # Set not needed items to zero 0.
    filevers=(2017, 1, 1, 1),
    prodvers=(1, 1, 1, 1),
    # Contains a bitmask that specifies the valid bits 'flags'
    mask=0x3f,
    # Contains a bitmask that specifies the Boolean attributes of the file.
    flags=0x0,
    # The operating system for which this file was designed.
    # 0x4 - NT and there is no need to change it.
    OS=0x4,
    # The general type of file.
    # 0x1 - the file is an application.
    fileType=0x1,
    # The function of the file.
    # 0x0 - the function is not defined for this fileType
    subtype=0x0,
    # Creation date and time stamp.
    date=(0, 0)
    ),
  kids=[
    StringFileInfo(
      [
      StringTable(
        u'040904b0',
        [StringStruct(u'CompanyName', u'python-catalin'),
        StringStruct(u'ProductName', u'test'),
        StringStruct(u'ProductVersion', u'1, 1, 1, 1'),
        StringStruct(u'InternalName', u'tk_app'),
        StringStruct(u'OriginalFilename', u'tk_app.exe'),
        StringStruct(u'FileVersion', u'2017, 1, 1, 1'),
        StringStruct(u'FileDescription', u'test tk'),
        StringStruct(u'LegalCopyright', u'Copyright 2017 free-tutorials.org.'),
        StringStruct(u'LegalTrademarks', u'tk_app is a registered trademark of catafest.'),])
      ]),
    VarFileInfo([VarStruct(u'Translation', [0x409, 1200])])
  ]
)
Now you can use this command for tk_app.py and version.txt files from the C:\Python27 folder:
 pyinstaller.exe --onefile --windowed --version-file=..\version.txt ..\tk_app.py
Let's see this info into the executable file:

If you want to change the icon then you need to add the --icon=tk_app.ico, where tk_app.ico is the new icon of the executable.


Updating all Python with pip on Windows OS.

Just use this python module named pip-review.
C:\Python27\Scripts>pip install pip-review
C:\Python27\Scripts>pip-review.exe --auto --verbose
Checking for updates of ...
...
pip-review.exe --auto --verbose
Everything up-to-date

The pycrypto python module - part 001.

This python module name pycrypto is a collection of Python Cryptography Toolkit.
This python module has been created by Andrew Kuchling and now maintained by Dwayne C. Litzenberger.
Let's install under Windows 10 OS using Command Prompt (Admin) shell.
C:\WINDOWS\system32>cd ..

C:\Windows>cd ..

C:\>cd Python27\Scripts

C:\Python27\Scripts>pip install pycrypto
Requirement already satisfied: pycrypto in c:\python27\lib\site-packages
Some info and help under python shell can be seen using this:
C:\Python27>python.exe
Python 2.7.13 (v2.7.13:a06454b1afa1, Dec 17 2016, 20:42:59) [MSC v.1500 32 bit (Intel)] on win32
Type "help", "copyright", "credits" or "license" for more information.
>>> import Crypto
>>> dir(Crypto)
['__all__', '__builtins__', '__doc__', '__file__', '__name__', '__package__', '__path__', 
'__revision__', '__version__', 'version_info']
>>> help(Crypto)
Help on package Crypto:

NAME
    Crypto - Python Cryptography Toolkit

FILE
    c:\python27\lib\site-packages\crypto\__init__.py

DESCRIPTION
    A collection of cryptographic modules implementing various algorithms
    and protocols.

    Subpackages:

    Crypto.Cipher
     Secret-key (AES, DES, ARC4) and public-key encryption (RSA PKCS#1) algorithms    Crypto.Hash
     Hashing algorithms (MD5, SHA, HMAC)
    Crypto.Protocol
     Cryptographic protocols (Chaffing, all-or-nothing transform, key derivation
     functions). This package does not contain any network protocols.
    Crypto.PublicKey
     Public-key encryption and signature algorithms (RSA, DSA)
    Crypto.Signature
     Public-key signature algorithms (RSA PKCS#1)
    Crypto.Util
     Various useful modules and functions (long-to-string conversion, random number
     generation, number theoretic functions)

PACKAGE CONTENTS
    Cipher (package)
    Hash (package)
    Protocol (package)
    PublicKey (package)
    Random (package)
    SelfTest (package)
    Signature (package)
    Util (package)
    pct_warnings

DATA
    __all__ = ['Cipher', 'Hash', 'Protocol', 'PublicKey', 'Util', 'Signatu...
    __revision__ = '$Id$'
    __version__ = '2.6.1'

VERSION
    2.6.1
Let's test some examples with this python module.
The first example comes with encrypting and decrypt message based one key.
The key also needs to be one encryption key and fix to key32.
The iv will not be specified by the user, it will be generated and then encrypted with RSA.
NEVER make the IV constant and unique, it must be unique for every message.
Let's see the example source code:
from Crypto.Cipher import AES
from Crypto import Random
def encrypt(key32,message):
    cipher=AES.new(key32,AES.MODE_CFB,iv)
    msg=cipher.encrypt(message)
    print(msg)
    return msg
def decrypt(key32,msg):
    dec=AES.new(key32,AES.MODE_CFB,iv)
    return dec.decrypt(msg).decode('ascii')
if __name__=='__main__':
    global iv
    iv=Random.new().read(AES.block_size)
    key='free-tutorials.org'
    key32 = "".join([ ' ' if i >= len(key) else key[i] for i in range(32) ])
    message='another website with free tutorials'
    enc =encrypt(key32, message)
    print enc
    print(decrypt(key32,enc))
The resulting output is this:
ᄚ Cᆪ゚2 ᄊÕ|ýXÍ ᄇNäÇ3ヨ゙Lマᆱuï: ù メNᄚm
another website with free tutorials

Another more simplistic example:
from Crypto.Cipher import AES
from Crypto import Random
key = b'Sixteen byte key'
iv = Random.new().read(AES.block_size)
cipher = AES.new(key, AES.MODE_CFB, iv)
msg = iv + cipher.encrypt(b'Attack at dawn')
See the output of variables:
>>> print key
Sixteen byte key
>>> print iv
ÔÄ▀DÒ ÕØ} m║dÕ╚\
>>> print cipher.encrypt(b'Attack at dawn')
åÌ£┴\u\ÍÈSÕ╦╔.
Using MD5 example:
>>> from Crypto.Hash import MD5
>>> MD5.new('free text').hexdigest()
'be9420c1596a781119c53a9933a8234f'
Using RSA key example:
>>> from Crypto.PublicKey import RSA
>>> from Crypto import Random
>>> rng = Random.new().read
>>> RSAkey = RSA.generate(1024, rng)
>>> public_key = RSAkey.publickey()
>>> print public_key
<_rsaobj e="" n="" x3650b98="">
>>> enc_data = public_key.encrypt('test data', 32)[0]
>>> print enc_data
H +îÕÊ ÙH:?ª2S½Fã0á! f¬ = ·+,Í0r³┐o·¼ÉlWy¿6ôên(£jê¿ ╦çª|*°q Ò4ì┌çÏD¦¿╝û╠╠MY¶ïzµ>©a}hRô ]í;
_[v¸¤u:2¦y¾/ ²4R╩HvéÌ'÷Ç)KT:P _<! D
>>> dec_data = RSAkey.decrypt(enc_data)
>>> print dec_data
test data 
Encrypted and decrypted output texts may look different depending on how encoded the used text editor or python language.


Friday, May 5, 2017

The google-cloud-vision python module - part 001.

Google comes with $300 credit for free to sign up into Google Cloud Platform over the next 12 months.
This allows you to deal with access to all Cloud Platform Products.
Today I will show you how to install this platform into your Linux and Windows 10 OS.
For Linux, I used Fedora 26 distro.
Using the Windows 10 operating system and python 2.7 then you can use this command:
pip install --upgrade google-cloud-vision
If you got errors the fix with this command:
C:\Python27\Scripts>pip install --upgrade  --trusted-host  pypi.python.org google-cloud-vision
Collecting google-cloud-vision
  Downloading google_cloud_vision-0.24.0-py2.py3-none-any.whl (68kB)
    100% |################################| 71kB 270kB/s
Collecting google-cloud-core<0 .25dev="">=0.24.0 (from google-cloud-vision)
  Downloading google_cloud_core-0.24.1-py2.py3-none-any.whl (52kB)
    100% |################################| 61kB 1.6MB/s
...
Installing collected packages: appdirs, setuptools, protobuf, httplib2, rsa, pyasn1-modules,
 cachetools, google-auth, google-auth-httplib2, googleapis-common-protos, google-cloud-core,
 pyreadline, dill, futures, grpcio, oauth2client, ply, google-gax, proto-google-cloud-vision-v1,
 gapic-google-cloud-vision-v1, google-cloud-vision, pyparsing
  Found existing installation: appdirs 1.4.0
    Uninstalling appdirs-1.4.0:
      Successfully uninstalled appdirs-1.4.0
  Rolling back uninstall of appdirs
Exception:
Traceback (most recent call last):
  File "c:\python27\lib\site-packages\pip\basecommand.py", line 215, in main
    status = self.run(options, args)
...
    with open(path, 'rb') as stream:
IOError: [Errno 2] No such file or directory: 'c:\\python27\\lib\\site-packages\\
appdirs-1.4.0.dist-info\\METADATA'
I run again the command and I don't have errors:
C:\Python27\Scripts>pip install --upgrade  --trusted-host  pypi.python.org google-cloud-vision
Collecting google-cloud-vision
  Downloading google_cloud_vision-0.24.0-py2.py3-none-any.whl (68kB)
    100% |################################| 71kB 597kB/s
Collecting google-cloud-core<0 .25dev="">=0.24.0 (from google-cloud-vision)
...
  Downloading futures-3.1.1-py2-none-any.whl
Collecting pyparsing (from packaging>=16.8->setuptools->protobuf>=3.0.0->google-cloud-core<0 .25dev="">=0.24.0->google-cloud-vision)
  Downloading pyparsing-2.2.0-py2.py3-none-any.whl (56kB)
    100% |################################| 61kB 4.7MB/s
Installing collected packages: appdirs, setuptools, protobuf, httplib2, rsa, pyasn1-modules,
 cachetools, google-auth, google-auth-httplib2, googleapis-common-protos, google-cloud-core,
 oauth2client, ply, pyreadline, dill, futures, grpcio, google-gax, proto-google-cloud-vision-v1,
 gapic-google-cloud-vision-v1, google-cloud-vision, pyparsing
  Found existing installation: appdirs 1.4.0
    Uninstalling appdirs-1.4.0:
      Successfully uninstalled appdirs-1.4.0
  Found existing installation: setuptools 34.0.2
    Uninstalling setuptools-34.0.2:
      Successfully uninstalled setuptools-34.0.2
  Found existing installation: httplib2 0.9.2
    Uninstalling httplib2-0.9.2:
      Successfully uninstalled httplib2-0.9.2
  Found existing installation: pyparsing 2.1.10
    Uninstalling pyparsing-2.1.10:
      Successfully uninstalled pyparsing-2.1.10
Successfully installed appdirs-1.4.3 cachetools-2.0.0 dill-0.2.6 futures-3.1.1 
gapic-google-cloud-vision-v1-0.90.3 google-auth-1.0.0 google-auth-httplib2-0.0.2 
google-cloud-core-0.24.1 google-cloud-vision-0.24.0 google-gax-0.15.8 googleapis-common-protos-1.5.2
 grpcio-1.3.0 httplib2-0.10.3 oauth2client-3.0.0 ply-3.8 proto-google-cloud-vision-v1-0.90.3
 protobuf-3.2.0 pyasn1-modules-0.0.8 pyparsing-2.2.0 pyreadline-2.1 rsa-3.4.2 setuptools-35.0.2
For Fedora 26 distro I used this command to install the python module:
[root@localhost mythcat]# pip install --upgrade google-cloud-vision --ignore-installed
WARNING: Running pip install with root privileges is generally not a good idea. 
Try `pip install --user` instead.                                         
Collecting google-cloud-vision
  Using cached google_cloud_vision-0.24.0-py2.py3-none-any.whl
...
 google-auth-httplib2, google-cloud-core, google-cloud-vision
  Running setup.py install for dill ... done
  Running setup.py install for future ... done
  Running setup.py install for googleapis-common-protos ... done
  Running setup.py install for ply ... done
  Running setup.py install for google-gax ... done
  Running setup.py install for httplib2 ... done
  Running setup.py install for oauth2client ... done
  Running setup.py install for proto-google-cloud-vision-v1 ... done
  Running setup.py install for gapic-google-cloud-vision-v1 ... done
Successfully installed appdirs-1.4.3 cachetools-2.0.0 dill-0.2.6 enum34-1.1.6 
future-0.16.0 futures-3.1.1 gapic-google-cloud-vision-v1-0.90.3 google-auth-1.0.0
 google-auth-httplib2-0.0.2 google-cloud-core-0.24.1 google-cloud-vision-0.24.0
 google-gax-0.15.9 googleapis-common-protos-1.5.2 grpcio-1.3.0 httplib2-0.10.3
 oauth2client-3.0.0 packaging-16.8 ply-3.8 proto-google-cloud-vision-v1-0.90.3
 protobuf-3.2.0 pyasn1-0.2.3 pyasn1-modules-0.0.8 pyparsing-2.2.0 rsa-3.4.2 
setuptools-35.0.2 six-1.10.0


Tuesday, May 2, 2017

The nltk python module - part 001.

About nltk python module.
NLTK is a leading platform for building Python programs to work with human language data. The base of this issue is about Natural Language Processing techniques to analyze text like a processing of human language data. You can read the NLTK 3.0 documentation from here.
How to install nltk python module under Windows 10 and Fedora 26 distro.
Install under Windows 10, by using the pip command:
C:\Python27\Scripts>pip install --trusted-host pypi.python.org nltk
Collecting nltk
Downloading nltk-3.2.2.tar.gz (1.2MB)
100% |################################| 1.2MB 2.6MB/s
Requirement already satisfied: six in c:\python27\lib\site-packages (from nltk)
Building wheels for collected packages: nltk
...
Successfully built nltk
Installing collected packages: nltk
Successfully installed nltk-3.2.2
Download all packages into your Windows 10 with this python source code:
C:\Python27>python
Python 2.7.13 (v2.7.13:a06454b1afa1, Dec 17 2016, 20:42:59) [MSC v.1500 32 bit (Intel)] on win32
Type "help", "copyright", "credits" or "license" for more information.
>>> import nltk
>>> nltk.download()
showing info https://raw.githubusercontent.com/nltk/nltk_data/gh-pages/index.xml
True
Under Linux you can install by using the pip command, I used Fedora 26 distro:
[root@localhost mythcat]# pip install nltk
WARNING: Running pip install with root privileges is generally not a good idea.
 Try `pip install --user` instead.
Collecting nltk
  Retrying (Retry(total=4, connect=None, read=None, redirect=None)) after connection broken
 by 'ProtocolError('Connection aborted.', error(104, 'Connection reset by peer'))': /simple/nltk/
  Downloading nltk-3.2.2.tar.gz (1.2MB)
    100% |████████████████████████████████| 1.2MB 1.1MB/s 
Requirement already satisfied: six in /usr/lib/python2.7/site-packages (from nltk)
Installing collected packages: nltk
  Running setup.py install for nltk ... done
Successfully installed nltk-3.2.2
Download all packages into your Fedora 26 distro with this python source code:
[mythcat@localhost ~]$ python 
Python 2.7.13 (default, Feb 21 2017, 12:00:39) 
[GCC 7.0.1 20170219 (Red Hat 7.0.1-0.9)] on linux2
Type "help", "copyright", "credits" or "license" for more information.
>>> import nltk
>>> nltk.download()
NLTK Downloader
---------------------------------------------------------------------------
    d) Download   l) List    u) Update   c) Config   h) Help   q) Quit
---------------------------------------------------------------------------
Downloader> d

Download which package (l=list; x=cancel)?
  Identifier> l
Packages:
  [ ] abc................. Australian Broadcasting Commission 2006
  [ ] alpino.............. Alpino Dutch Treebank
...
Collections:
  [ ] all-corpora......... All the corpora
  [ ] all................. All packages
  [ ] book................ Everything used in the NLTK Book

([*] marks installed packages)

Download which package (l=list; x=cancel)?
  Identifier> all
    Downloading collection u'all'
       | 
       | Downloading package abc to /home/mythcat/nltk_data...
       |   Unzipping corpora/abc.zip.
       | Downloading package alpino to /home/mythcat/nltk_data...
       |   Unzipping corpora/alpino.zip.
       | Downloading package biocreative_ppi to
...
Let's start with a simple example by show sample example books:

>>> from nltk.book import *
*** Introductory Examples for the NLTK Book ***
Loading text1, ..., text9 and sent1, ..., sent9
Type the name of the text or sentence to view it.
Type: 'texts()' or 'sents()' to list the materials.
text1: Moby Dick by Herman Melville 1851
text2: Sense and Sensibility by Jane Austen 1811
text3: The Book of Genesis
text4: Inaugural Address Corpus
text5: Chat Corpus
text6: Monty Python and the Holy Grail
text7: Wall Street Journal
text8: Personals Corpus
text9: The Man Who Was Thursday by G . K . Chesterton 1908
>>> ... 
The next example let you import books from the sample area and use it:
#function count the word in the Text
>>> print text1.count("white")
191
# function concordance view shows us every occurrence of a given word, together with some context.
>>> print text3.concordance("white")
Displaying 5 of 5 matches:
potted , and every one that had some white in it , and all the brown among the 
 hazel and chesnut tree ; and pilled white strakes in them , and made the white
white strakes in them , and made the white appear which was in the rods . And h
y dream , and , behold , I had three white baskets on my he And in the uppermos
all be red with wine , and his teeth white with milk . Zebulun shall dwell at t
None
#function similar to the name of the text
>>> print text3.similar("white")
None
>>> print text3.similar("got")
named set arrayed bound brought see embraced kissed slew unto curse
built shewed laid digged sent gave offer offered blessed
None
#contexts are shared by two or more words
>>> text3.common_contexts(["white","blue"])
(u'The following word(s) were not found:', u'white blue')
>>> text3.common_contexts(["man","men"])
old_of the_and the_said the_that the_took young_and the_s
This is all for today.


Thursday, April 20, 2017

The twilio python module and cloud communications platform .

Let's build apps that communicate with everyone in the world. Voice & Video, Messaging, and Authentication APIs for every application.
First, let's try to install it under Windows 10 operating system:
C:\>cd Python27
C:\Python27>cd Scripts
C:\Python27\Scripts>pip install twilio
Collecting twilio
  Downloading twilio-5.6.0.tar.gz (194kB)
    100% |################################| 194kB 588kB/s
Collecting httplib2>=0.7 (from twilio)
  Downloading httplib2-0.9.2.zip (210kB)
    100% |################################| 215kB 519kB/s
Requirement already satisfied: six in c:\python27\lib\site-packages (from twilio)
Requirement already satisfied: pytz in c:\python27\lib\site-packages (from twilio)
Installing collected packages: httplib2, twilio
  Running setup.py install for httplib2 ... done
  Running setup.py install for twilio ... done
Successfully installed httplib2-0.9.2 twilio-5.6.0
Try some example:
C:\Python27>python.exe
Python 2.7.12 (v2.7.12:d33e0cf91556, Jun 27 2016, 15:19:22) [MSC v.1500 32 bit (Intel)] on win32
Type "help", "copyright", "credits" or "license" for more information.
>>> import twilio
>>> from twilio import *
>>> dir(twilio)
['TwilioException', 'TwilioRestException', 'TwimlException', '__builtins__', '__doc__', '__file__', '__name__', '__package__', '__path__', '__version__', '__version_info__', 'compat', 'exceptions', 'rest', 'sys', 'u', 'version']
>>> dir(twilio.rest)
['TwilioIpMessagingClient', 'TwilioLookupsClient', 'TwilioPricingClient', 'TwilioRestClient', 'TwilioTaskRouterClient', 'TwilioTrunkingClient', '__builtins__', '__doc__', '__file__', '__name__', '__package__', '__path__', '_hush_pyflakes', 'base', 'client', 'exceptions', 'ip_messaging', 'lookups', 'pricing', 'resources', 'set_twilio_proxy', 'task_router', 'trunking']
Under Fedora 25 you can use this command to install this API:
[root@localhost mythcat]# pip2.7 install twilio
Collecting twilio
  Downloading twilio-5.7.0.tar.gz (168kB)
    100% |████████████████████████████████| 174kB 1.8MB/s 
Requirement already satisfied: httplib2>=0.7 in /usr/lib/python2.7/site-packages (from twilio)
Requirement already satisfied: six in /usr/lib/python2.7/site-packages (from twilio)
Requirement already satisfied: pytz in /usr/lib/python2.7/site-packages (from twilio)
Installing collected packages: twilio
  Running setup.py install for twilio ... done
Successfully installed twilio-5.7.0
 
Make an account for Twilio here.
Now about phone Twilio numbers, then programmable phone Twilio numbers are a core part of Twilio’s platform, enabling you to receive SMS, MMS, and phone calls.
You can have some problems with SMS sending by country availability.
And one last example:
# /usr/bin/env python
# Download the twilio-python library from http://twilio.com/docs/libraries
from twilio.rest import Client

# Find these values at https://twilio.com/user/account
account_sid = "AC61b32be301f49f78f0ab3d69c4d335f6"
auth_token = "c8f37b65755900faa4fe7bbe1f948adb"
client = Client(account_sid, auth_token)

message = client.api.account.messages.create(to="+contry_allow_SMS",
                                             from_="++contry_allow_SMS",
                                             body="Hello python this is a twilio sms test")

Friday, April 14, 2017

Blender 3D - ellipsoid.

This is a simple way to use Blender 3D - version 2.78c with python scripting tool to make one ellipsoid.

The ellipsoid may be parameterized in several ways but I used the sin and cos functions:
x = sin(theta) * sin(phi)
y = cos(theta) * sin(phi)
z = cos(phi)

The steps I follow are:
  • make points of ellipsoid - CoordsPoints
  • define an ellipsoid vectors 
  • create a new mesh 
  • make rings for faces
  • make an ellipsoid
  • The verts_mesh and verts_mesh_face are used to make faces
  • put all into the Blender 3D scene

import bpy
import bmesh
from math import degrees, radians, sin, cos, tan
from mathutils import Vector


class CoordsPoints:
    @property
    def xyz(self):
        theta = self.theta
        phi = self.phi
        x = sin(theta) * sin(phi)
        y = cos(theta) * sin(phi)
        z = cos(phi)
        R = self.R
        return R * Vector((x,y,z))

    def __init__(self, R, theta, phi):
        self.R = R
        self.theta = theta
        self.phi = phi
        #self.xyz = self.point(theta, phi)

    def __repr__(self):
        return "Coords(%.4f, %.4f)" % (degrees(self.theta),
                                               degrees(self.phi))
# define the ellipsoid method.
def ellipsoid(a, b, c):
    def ellipsoid(v):
        x = a * (v.x)
        y = b * (v.y)
        z = c * (v.z)
        return Vector((x, y, z))
    return ellipsoid

# make the ellipsoid bmesh
bm = bmesh.new()

# TODO come up with a nicer way to do this.
rings = [[CoordsPoints(1, radians(theta), radians(phi)) 
                 for theta in range (0, 360, 2)]
                 for phi in range(0, 180, 2)]

h = ellipsoid(1.0, 1.0, 1.5)

verts_mesh = [bm.verts.new(h(p.xyz)) for p in rings[0]]
verts_mesh.append(verts_mesh[0])
for ring in range(1, len(rings)):

    verts_mesh_face = [bm.verts.new(h(p.xyz)) for p in rings[ring]]
    verts_mesh_face.append(verts_mesh_face[0])

    faces = [
        bm.faces.new((
            verts_mesh[i], verts_mesh_face[i],
            verts_mesh_face[i+1], verts_mesh[i+1]
        ))
        for i in range(len(verts_mesh) - 1)
    ]
    verts_mesh = verts_mesh_face

# create mesh link it to scene 
mesh = bpy.data.meshes.new("ellipsoid")
bm.to_mesh(mesh)
obj = bpy.data.objects.new("ellipsoid", mesh)
scene = bpy.context.scene
scene.objects.link(obj)
scene.objects.active = obj
obj.select = True
obj.location = scene.cursor_location

Wednesday, April 5, 2017

The scapy python module - part 001.

Today I will start with scapy python module.
This is a good python module to deal and interact with network packets.
[root@localhost mythcat]# pip install scapy
Collecting scapy
  Downloading scapy-2.3.3.tgz (1.4MB)
    100% |████████████████████████████████| 1.4MB 904kB/s 
Building wheels for collected packages: scapy
  Running setup.py bdist_wheel for scapy ... done
  Stored in directory: /root/.cache/pip/wheels/bd/cf/...
Installing collected packages: scapy
Successfully installed scapy-2.3.3
The first test is to test is the echo of Layer 3 ICMP.
Use the superuser shell to run this python script:
from scapy.all import *
dstip=raw_input("enter the ip address \n")
icmp=ICMP()
icmp.type=8
icmp.code=0
ip=IP()
ip.dst=dstip
p=sr1(ip/icmp,timeout=5, verbose=0)
if(p):
        print "Layer 3 is up"
else:
        print "Layer 3 status is down"
The next python script will about arp request:
from scapy.all import *
def arp_display(pkt):
    if pkt[ARP].op == 1: 
        return "Request: " + pkt[ARP].psrc + " is asking about " + pkt[ARP].pdst
    if pkt[ARP].op == 2: 
        return "*Response: " + pkt[ARP].hwsrc + " has address " + pkt[ARP].psrc
print sniff(prn=arp_display, filter="arp", store=0, count=10)
This will read the packages from source and destination and show me what ARP traffic my computer is seeing.

How to parse the OPML file.

For example, the Feedly (stylized as Feedly) is a news aggregator application for various web browsers and mobile devices can let you export and import the OPML file.

What is XML?
The Extensible Markup Language (XML) is a markup language much like HTML or SGML. This is recommended by the World Wide Web Consortium and available as an open standard.

Today I will show you how to parse the OPML file type with python 2.7 version and XML python module.
This is the source script:
from xml.etree import ElementTree
import sys

file_opml = sys.argv[1]
def extract_rss_urls_from_opml(filename):
    urls = []
    with open(filename, 'rt') as f:
        tree = ElementTree.parse(f)
    for node in tree.findall('.//outline'):
        url = node.attrib.get('xmlUrl')
        if url:
            urls.append(url)
    return urls
urls = extract_rss_urls_from_opml(file_opml)
print urls
The result is a list with all your RSS links.

Friday, March 24, 2017

Take weather data with pyowm from openweathermap .

This tutorial shows you how to download and install the pyowm python module.
One of the great things about using this python module let you to provide data from openweathermap website (need to have one account).
PyOWM runs on Python 2.7 and Python 3.2+, and integrates with Django 1.10+ models.
All documentation can be found here.

The install is simple with pip , python 2.7 and Fedora 25.
 
[root@localhost mythcat]# pip install pyowm
Collecting pyowm
  Downloading pyowm-2.6.1.tar.gz (3.6MB)
    100% |████████████████████████████████| 3.7MB 388kB/s 
Building wheels for collected packages: pyowm
  Running setup.py bdist_wheel for pyowm ... done
  Stored in directory: /root/.cache/pip/wheels/9a/91/17/bb120c765f08df77645cf70a16aa372d5a297f4ae2be749e81
Successfully built pyowm
Installing collected packages: pyowm
Successfully installed pyowm-2.6.1
The source code is very simple just connect with API key and print data.
#/usr/bin/env python
#" -*- coding: utf-8 -*-
import pyowm

print " Have a account to openweathermap.org and use with api key free or pro"
print " owm = pyowm.OWM(API_key='your-API-key', subscription_type='pro')"

owm = pyowm.OWM("327407589df060c7f825b63ec1d9a096")  
forecast = owm.daily_forecast("Falticeni,ro")
tomorrow = pyowm.timeutils.tomorrow()
forecast.will_be_sunny_at(tomorrow)  

observation = owm.weather_at_place('Falticeni,ro')
w = observation.get_weather()
print (w)                     
print " Weather details"
print " =============== "
                                    
print " Get cloud coverage"
print w.get_clouds() 
print " ----------------"                                     
print " Get rain volume"
print w.get_rain() 
print " ----------------"
print " Get snow volume"
print w.get_snow()                                       

print " Get wind degree and speed"
print w.get_wind() 
print " ----------------"                                      
print " Get humidity percentage"
print w.get_humidity()    
print " ----------------"                               
print " Get atmospheric pressure"
print w.get_pressure()                                   
print " ----------------"
print " Get temperature in Kelvin degs"
print w.get_temperature() 
print " ----------------"                              
print " Get temperature in Celsius degs"
print w.get_temperature(unit='celsius')
print " ----------------"                 
print " Get temperature in Fahrenheit degs"
print w.get_temperature('fahrenheit')                    
print " ----------------"
print " Get weather short status"
print w.get_status()                                     
print " ----------------"
print " Get detailed weather status"
print w.get_detailed_status()                           
print " ----------------"
print " Get OWM weather condition code"
print w.get_weather_code()                               
print " ----------------"
print " Get weather-related icon name"
print w.get_weather_icon_name()                          
print " ----------------"
print " Sunrise time (ISO 8601)"
print w.get_sunrise_time('iso')    
print " Sunrise time (GMT UNIXtime)"
print w.get_sunrise_time()                               
print " ----------------"
print " Sunset time (ISO 8601)"
print w.get_sunset_time('iso')  
print " Sunset time (GMT UNIXtime)"
print w.get_sunset_time()                          
print " ----------------"
print " Search current weather observations in the surroundings of"
print " Latitude and longitude coordinates for Fălticeni, Romania:"
observation_list = owm.weather_around_coords(47.46, 26.30)

Let's see and the result of running the python script for one random location:
 
[root@localhost mythcat]# python openweather.py 
 Have a account to openweathermap.org and use with api key free or pro
 owm = pyowm.OWM(API_key='your-API-key', subscription_type='pro')

 Weather details
 =============== 
 Get cloud coverage
20
 ----------------
 Get rain volume
{}
 ----------------
 Get snow volume
{}
 Get wind degree and speed
{u'speed': 5.7, u'deg': 340}
 ----------------
 Get humidity percentage
82
 ----------------
 Get atmospheric pressure
{'press': 1021, 'sea_level': None}
 ----------------
 Get temperature in Kelvin degs
{'temp_max': 287.15, 'temp_kf': None, 'temp': 287.15, 'temp_min': 287.15}
 ----------------
 Get temperature in Celsius degs
{'temp_max': 14.0, 'temp_kf': None, 'temp': 14.0, 'temp_min': 14.0}
 ----------------
 Get temperature in Fahrenheit degs
{'temp_max': 57.2, 'temp_kf': None, 'temp': 57.2, 'temp_min': 57.2}
 ----------------
 Get weather short status
Clouds
 ----------------
 Get detailed weather status
few clouds
 ----------------
 Get OWM weather condition code
801
 ----------------
 Get weather-related icon name
02d
 ----------------
 Sunrise time (ISO 8601)
2017-03-24 04:08:33+00
 Sunrise time (GMT UNIXtime)
1490328513
 ----------------
 Sunset time (ISO 8601)
2017-03-24 16:33:59+00
 Sunset time (GMT UNIXtime)
1490373239
 ----------------
 Search current weather observations in the surroundings of
 Latitude and longitude coordinates for Fălticeni, Romania:

Thursday, March 16, 2017

The tensorflow python module - part 003.

This short tutorial come to fix your work and help you with examples and tutorials.
You can look to the internet and you can search many examples and tutorials but you can get errors.
How to fix that:
The first step is to know what tensorflow version of you use.
[mythcat@localhost ~]$ python -c "import tensorflow; print(tensorflow.__version__)"
1.0.1
Then yo need to know what parts from tensorflow old version is deprecated from the last version.
One superannuated method is to fix old source code with this:
import tensorflow as tf
tf.scalar_summary = tf.summary.scalar
tf.merge_all_summaries = tf.summary.merge_all
tf.train.SummaryWriter = tf.summary.FileWriter
A better method is to fix your source code and read the documentation.

Monday, March 13, 2017

The tensorflow python module - part 002.

Today I will show you how to install tensorflow python module on Windows OS with pip tool.
I used python version 3.5.3.
C:\Python35>cd Scripts

C:\Python35\Scripts>pip3 install --upgrade tensorflow
Collecting tensorflow
  Downloading tensorflow-1.0.1-cp35-cp35m-win_amd64.whl (14.7MB)
    100% |################################| 14.7MB 43kB/s
...
Successfully installed appdirs-1.4.3 numpy-1.12.0 packaging-16.8 
protobuf-3.2.0 pyparsing-2.2.0 setuptools-34.3.2 six-1.10.0 
tensorflow-1.0.1 wheel-0.29.0
Next step is to install the GPU version of TensorFlow:
C:\Python35\Scripts>pip3 install --upgrade tensorflow-gpu
Collecting tensorflow-gpu
  Downloading tensorflow_gpu-1.0.1-cp35-cp35m-win_amd64.whl (43.1MB)
    100% |################################| 43.1MB 11kB/
...
Installing collected packages: tensorflow-gpu
Successfully installed tensorflow-gpu-1.0.1
If you are installing TensorFlow with GPU support then the following NVIDIA software must be installed on your system:

CUDA Toolkit 8.0. , the NVIDIA drivers associated with CUDA Toolkit 8.0 and cuDNN v5.1.
The cuDNN is typically installed in a different location from the other CUDA DLLs.
Now you need to add the directory where you installed the cuDNN DLL to your %PATH% environment variable.
The result will be output under python result when you import this python module, see my output:
 Creating TensorFlow device (/gpu:0) -> (device: 0, name: GeForce GT 740M, pci bus id: 0000:01:00.0)