C:\Python27\Scripts>pip install pip-review
C:\Python27\Scripts>pip-review.exe --auto --verbose
Checking for updates of ......pip-review.exe --auto --verbose
Everything up-to-dateC:\Python27\Scripts>pip install pip-review
C:\Python27\Scripts>pip-review.exe --auto --verbose
Checking for updates of ......pip-review.exe --auto --verbose
Everything up-to-dateC:\WINDOWS\system32>cd ..
C:\Windows>cd ..
C:\>cd Python27\Scripts
C:\Python27\Scripts>pip install pycrypto
Requirement already satisfied: pycrypto in c:\python27\lib\site-packagesC:\Python27>python.exe
Python 2.7.13 (v2.7.13:a06454b1afa1, Dec 17 2016, 20:42:59) [MSC v.1500 32 bit (Intel)] on win32
Type "help", "copyright", "credits" or "license" for more information.
>>> import Crypto
>>> dir(Crypto)
['__all__', '__builtins__', '__doc__', '__file__', '__name__', '__package__', '__path__',
'__revision__', '__version__', 'version_info']
>>> help(Crypto)
Help on package Crypto:
NAME
Crypto - Python Cryptography Toolkit
FILE
c:\python27\lib\site-packages\crypto\__init__.py
DESCRIPTION
A collection of cryptographic modules implementing various algorithms
and protocols.
Subpackages:
Crypto.Cipher
Secret-key (AES, DES, ARC4) and public-key encryption (RSA PKCS#1) algorithms Crypto.Hash
Hashing algorithms (MD5, SHA, HMAC)
Crypto.Protocol
Cryptographic protocols (Chaffing, all-or-nothing transform, key derivation
functions). This package does not contain any network protocols.
Crypto.PublicKey
Public-key encryption and signature algorithms (RSA, DSA)
Crypto.Signature
Public-key signature algorithms (RSA PKCS#1)
Crypto.Util
Various useful modules and functions (long-to-string conversion, random number
generation, number theoretic functions)
PACKAGE CONTENTS
Cipher (package)
Hash (package)
Protocol (package)
PublicKey (package)
Random (package)
SelfTest (package)
Signature (package)
Util (package)
pct_warnings
DATA
__all__ = ['Cipher', 'Hash', 'Protocol', 'PublicKey', 'Util', 'Signatu...
__revision__ = '$Id$'
__version__ = '2.6.1'
VERSION
2.6.1from Crypto.Cipher import AES
from Crypto import Random
def encrypt(key32,message):
cipher=AES.new(key32,AES.MODE_CFB,iv)
msg=cipher.encrypt(message)
print(msg)
return msg
def decrypt(key32,msg):
dec=AES.new(key32,AES.MODE_CFB,iv)
return dec.decrypt(msg).decode('ascii')
if __name__=='__main__':
global iv
iv=Random.new().read(AES.block_size)
key='free-tutorials.org'
key32 = "".join([ ' ' if i >= len(key) else key[i] for i in range(32) ])
message='another website with free tutorials'
enc =encrypt(key32, message)
print enc
print(decrypt(key32,enc))from Crypto.Cipher import AES
from Crypto import Random
key = b'Sixteen byte key'
iv = Random.new().read(AES.block_size)
cipher = AES.new(key, AES.MODE_CFB, iv)
msg = iv + cipher.encrypt(b'Attack at dawn')>>> print key
Sixteen byte key
>>> print iv
ÔÄ▀DÒ ÕØ} m║dÕ╚\
>>> print cipher.encrypt(b'Attack at dawn')
åÌ£┴\u\ÍÈSÕ╦╔.>>> from Crypto.Hash import MD5
>>> MD5.new('free text').hexdigest()
'be9420c1596a781119c53a9933a8234f'>>> from Crypto.PublicKey import RSA
>>> from Crypto import Random
>>> rng = Random.new().read
>>> RSAkey = RSA.generate(1024, rng)
>>> public_key = RSAkey.publickey()
>>> print public_key
<_rsaobj e="" n="" x3650b98="">
>>> enc_data = public_key.encrypt('test data', 32)[0]
>>> print enc_data
H +îÕÊ ÙH:?ª2S½Fã0á! f¬ = ·+,Í0r³┐o·¼ÉlWy¿6ôên(£jê¿ ╦çª|*°q Ò4ì┌çÏD¦¿╝û╠╠MY¶ïzµ>©a}hRô ]í;
_[v¸¤u:2¦y¾/ ²4R╩HvéÌ'÷Ç)KT:P _<! D
>>> dec_data = RSAkey.decrypt(enc_data)
>>> print dec_data
test data pip install --upgrade google-cloud-visionC:\Python27\Scripts>pip install --upgrade --trusted-host pypi.python.org google-cloud-vision
Collecting google-cloud-vision
Downloading google_cloud_vision-0.24.0-py2.py3-none-any.whl (68kB)
100% |################################| 71kB 270kB/s
Collecting google-cloud-core<0 .25dev="">=0.24.0 (from google-cloud-vision)
Downloading google_cloud_core-0.24.1-py2.py3-none-any.whl (52kB)
100% |################################| 61kB 1.6MB/s
...
Installing collected packages: appdirs, setuptools, protobuf, httplib2, rsa, pyasn1-modules,
cachetools, google-auth, google-auth-httplib2, googleapis-common-protos, google-cloud-core,
pyreadline, dill, futures, grpcio, oauth2client, ply, google-gax, proto-google-cloud-vision-v1,
gapic-google-cloud-vision-v1, google-cloud-vision, pyparsing
Found existing installation: appdirs 1.4.0
Uninstalling appdirs-1.4.0:
Successfully uninstalled appdirs-1.4.0
Rolling back uninstall of appdirs
Exception:
Traceback (most recent call last):
File "c:\python27\lib\site-packages\pip\basecommand.py", line 215, in main
status = self.run(options, args)
...
with open(path, 'rb') as stream:
IOError: [Errno 2] No such file or directory: 'c:\\python27\\lib\\site-packages\\
appdirs-1.4.0.dist-info\\METADATA'C:\Python27\Scripts>pip install --upgrade --trusted-host pypi.python.org google-cloud-vision
Collecting google-cloud-vision
Downloading google_cloud_vision-0.24.0-py2.py3-none-any.whl (68kB)
100% |################################| 71kB 597kB/s
Collecting google-cloud-core<0 .25dev="">=0.24.0 (from google-cloud-vision)
...
Downloading futures-3.1.1-py2-none-any.whl
Collecting pyparsing (from packaging>=16.8->setuptools->protobuf>=3.0.0->google-cloud-core<0 .25dev="">=0.24.0->google-cloud-vision)
Downloading pyparsing-2.2.0-py2.py3-none-any.whl (56kB)
100% |################################| 61kB 4.7MB/s
Installing collected packages: appdirs, setuptools, protobuf, httplib2, rsa, pyasn1-modules,
cachetools, google-auth, google-auth-httplib2, googleapis-common-protos, google-cloud-core,
oauth2client, ply, pyreadline, dill, futures, grpcio, google-gax, proto-google-cloud-vision-v1,
gapic-google-cloud-vision-v1, google-cloud-vision, pyparsing
Found existing installation: appdirs 1.4.0
Uninstalling appdirs-1.4.0:
Successfully uninstalled appdirs-1.4.0
Found existing installation: setuptools 34.0.2
Uninstalling setuptools-34.0.2:
Successfully uninstalled setuptools-34.0.2
Found existing installation: httplib2 0.9.2
Uninstalling httplib2-0.9.2:
Successfully uninstalled httplib2-0.9.2
Found existing installation: pyparsing 2.1.10
Uninstalling pyparsing-2.1.10:
Successfully uninstalled pyparsing-2.1.10
Successfully installed appdirs-1.4.3 cachetools-2.0.0 dill-0.2.6 futures-3.1.1
gapic-google-cloud-vision-v1-0.90.3 google-auth-1.0.0 google-auth-httplib2-0.0.2
google-cloud-core-0.24.1 google-cloud-vision-0.24.0 google-gax-0.15.8 googleapis-common-protos-1.5.2
grpcio-1.3.0 httplib2-0.10.3 oauth2client-3.0.0 ply-3.8 proto-google-cloud-vision-v1-0.90.3
protobuf-3.2.0 pyasn1-modules-0.0.8 pyparsing-2.2.0 pyreadline-2.1 rsa-3.4.2 setuptools-35.0.2[root@localhost mythcat]# pip install --upgrade google-cloud-vision --ignore-installed
WARNING: Running pip install with root privileges is generally not a good idea.
Try `pip install --user` instead.
Collecting google-cloud-vision
Using cached google_cloud_vision-0.24.0-py2.py3-none-any.whl
...
google-auth-httplib2, google-cloud-core, google-cloud-vision
Running setup.py install for dill ... done
Running setup.py install for future ... done
Running setup.py install for googleapis-common-protos ... done
Running setup.py install for ply ... done
Running setup.py install for google-gax ... done
Running setup.py install for httplib2 ... done
Running setup.py install for oauth2client ... done
Running setup.py install for proto-google-cloud-vision-v1 ... done
Running setup.py install for gapic-google-cloud-vision-v1 ... done
Successfully installed appdirs-1.4.3 cachetools-2.0.0 dill-0.2.6 enum34-1.1.6
future-0.16.0 futures-3.1.1 gapic-google-cloud-vision-v1-0.90.3 google-auth-1.0.0
google-auth-httplib2-0.0.2 google-cloud-core-0.24.1 google-cloud-vision-0.24.0
google-gax-0.15.9 googleapis-common-protos-1.5.2 grpcio-1.3.0 httplib2-0.10.3
oauth2client-3.0.0 packaging-16.8 ply-3.8 proto-google-cloud-vision-v1-0.90.3
protobuf-3.2.0 pyasn1-0.2.3 pyasn1-modules-0.0.8 pyparsing-2.2.0 rsa-3.4.2
setuptools-35.0.2 six-1.10.0C:\Python27\Scripts>pip install --trusted-host pypi.python.org nltk
Collecting nltk
Downloading nltk-3.2.2.tar.gz (1.2MB)
100% |################################| 1.2MB 2.6MB/s
Requirement already satisfied: six in c:\python27\lib\site-packages (from nltk)
Building wheels for collected packages: nltk
...
Successfully built nltk
Installing collected packages: nltk
Successfully installed nltk-3.2.2C:\Python27>python
Python 2.7.13 (v2.7.13:a06454b1afa1, Dec 17 2016, 20:42:59) [MSC v.1500 32 bit (Intel)] on win32
Type "help", "copyright", "credits" or "license" for more information.
>>> import nltk
>>> nltk.download()
showing info https://raw.githubusercontent.com/nltk/nltk_data/gh-pages/index.xml
True[root@localhost mythcat]# pip install nltk
WARNING: Running pip install with root privileges is generally not a good idea.
Try `pip install --user` instead.
Collecting nltk
Retrying (Retry(total=4, connect=None, read=None, redirect=None)) after connection broken
by 'ProtocolError('Connection aborted.', error(104, 'Connection reset by peer'))': /simple/nltk/
Downloading nltk-3.2.2.tar.gz (1.2MB)
100% |████████████████████████████████| 1.2MB 1.1MB/s
Requirement already satisfied: six in /usr/lib/python2.7/site-packages (from nltk)
Installing collected packages: nltk
Running setup.py install for nltk ... done
Successfully installed nltk-3.2.2[mythcat@localhost ~]$ python
Python 2.7.13 (default, Feb 21 2017, 12:00:39)
[GCC 7.0.1 20170219 (Red Hat 7.0.1-0.9)] on linux2
Type "help", "copyright", "credits" or "license" for more information.
>>> import nltk
>>> nltk.download()
NLTK Downloader
---------------------------------------------------------------------------
d) Download l) List u) Update c) Config h) Help q) Quit
---------------------------------------------------------------------------
Downloader> d
Download which package (l=list; x=cancel)?
Identifier> l
Packages:
[ ] abc................. Australian Broadcasting Commission 2006
[ ] alpino.............. Alpino Dutch Treebank
...
Collections:
[ ] all-corpora......... All the corpora
[ ] all................. All packages
[ ] book................ Everything used in the NLTK Book
([*] marks installed packages)
Download which package (l=list; x=cancel)?
Identifier> all
Downloading collection u'all'
|
| Downloading package abc to /home/mythcat/nltk_data...
| Unzipping corpora/abc.zip.
| Downloading package alpino to /home/mythcat/nltk_data...
| Unzipping corpora/alpino.zip.
| Downloading package biocreative_ppi to
...
>>> from nltk.book import *
*** Introductory Examples for the NLTK Book ***
Loading text1, ..., text9 and sent1, ..., sent9
Type the name of the text or sentence to view it.
Type: 'texts()' or 'sents()' to list the materials.
text1: Moby Dick by Herman Melville 1851
text2: Sense and Sensibility by Jane Austen 1811
text3: The Book of Genesis
text4: Inaugural Address Corpus
text5: Chat Corpus
text6: Monty Python and the Holy Grail
text7: Wall Street Journal
text8: Personals Corpus
text9: The Man Who Was Thursday by G . K . Chesterton 1908
>>> ... #function count the word in the Text
>>> print text1.count("white")
191
# function concordance view shows us every occurrence of a given word, together with some context.
>>> print text3.concordance("white")
Displaying 5 of 5 matches:
potted , and every one that had some white in it , and all the brown among the
hazel and chesnut tree ; and pilled white strakes in them , and made the white
white strakes in them , and made the white appear which was in the rods . And h
y dream , and , behold , I had three white baskets on my he And in the uppermos
all be red with wine , and his teeth white with milk . Zebulun shall dwell at t
None
#function similar to the name of the text
>>> print text3.similar("white")
None
>>> print text3.similar("got")
named set arrayed bound brought see embraced kissed slew unto curse
built shewed laid digged sent gave offer offered blessed
None
#contexts are shared by two or more words
>>> text3.common_contexts(["white","blue"])
(u'The following word(s) were not found:', u'white blue')
>>> text3.common_contexts(["man","men"])
old_of the_and the_said the_that the_took young_and the_sC:\>cd Python27
C:\Python27>cd Scripts
C:\Python27\Scripts>pip install twilio
Collecting twilio
Downloading twilio-5.6.0.tar.gz (194kB)
100% |################################| 194kB 588kB/s
Collecting httplib2>=0.7 (from twilio)
Downloading httplib2-0.9.2.zip (210kB)
100% |################################| 215kB 519kB/s
Requirement already satisfied: six in c:\python27\lib\site-packages (from twilio)
Requirement already satisfied: pytz in c:\python27\lib\site-packages (from twilio)
Installing collected packages: httplib2, twilio
Running setup.py install for httplib2 ... done
Running setup.py install for twilio ... done
Successfully installed httplib2-0.9.2 twilio-5.6.0C:\Python27>python.exe
Python 2.7.12 (v2.7.12:d33e0cf91556, Jun 27 2016, 15:19:22) [MSC v.1500 32 bit (Intel)] on win32
Type "help", "copyright", "credits" or "license" for more information.
>>> import twilio
>>> from twilio import *
>>> dir(twilio)
['TwilioException', 'TwilioRestException', 'TwimlException', '__builtins__', '__doc__', '__file__', '__name__', '__package__', '__path__', '__version__', '__version_info__', 'compat', 'exceptions', 'rest', 'sys', 'u', 'version']
>>> dir(twilio.rest)
['TwilioIpMessagingClient', 'TwilioLookupsClient', 'TwilioPricingClient', 'TwilioRestClient', 'TwilioTaskRouterClient', 'TwilioTrunkingClient', '__builtins__', '__doc__', '__file__', '__name__', '__package__', '__path__', '_hush_pyflakes', 'base', 'client', 'exceptions', 'ip_messaging', 'lookups', 'pricing', 'resources', 'set_twilio_proxy', 'task_router', 'trunking'][root@localhost mythcat]# pip2.7 install twilio
Collecting twilio
Downloading twilio-5.7.0.tar.gz (168kB)
100% |████████████████████████████████| 174kB 1.8MB/s
Requirement already satisfied: httplib2>=0.7 in /usr/lib/python2.7/site-packages (from twilio)
Requirement already satisfied: six in /usr/lib/python2.7/site-packages (from twilio)
Requirement already satisfied: pytz in /usr/lib/python2.7/site-packages (from twilio)
Installing collected packages: twilio
Running setup.py install for twilio ... done
Successfully installed twilio-5.7.0
# /usr/bin/env python
# Download the twilio-python library from http://twilio.com/docs/libraries
from twilio.rest import Client

# Find these values at https://twilio.com/user/account
account_sid = "AC61b32be301f49f78f0ab3d69c4d335f6"
auth_token = "c8f37b65755900faa4fe7bbe1f948adb"
client = Client(account_sid, auth_token)

message = client.api.account.messages.create(to="+contry_allow_SMS",
                                             from_="++contry_allow_SMS",
                                             body="Hello python this is a twilio sms test")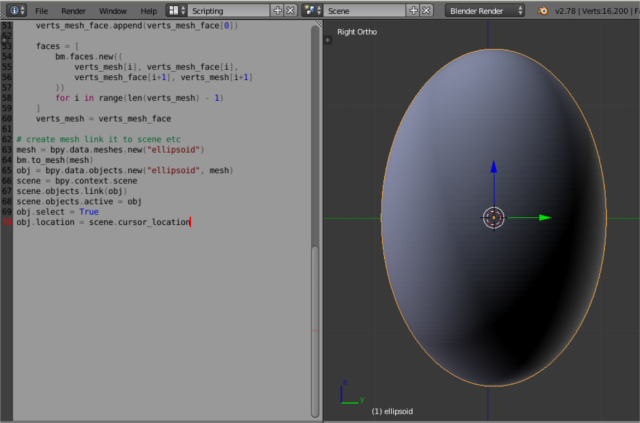
import bpy
import bmesh
from math import degrees, radians, sin, cos, tan
from mathutils import Vector


class CoordsPoints:
    @property
    def xyz(self):
        theta = self.theta
        phi = self.phi
        x = sin(theta) * sin(phi)
        y = cos(theta) * sin(phi)
        z = cos(phi)
        R = self.R
        return R * Vector((x,y,z))

    def __init__(self, R, theta, phi):
        self.R = R
        self.theta = theta
        self.phi = phi
        #self.xyz = self.point(theta, phi)

    def __repr__(self):
        return "Coords(%.4f, %.4f)" % (degrees(self.theta),
                                               degrees(self.phi))
# define the ellipsoid method.
def ellipsoid(a, b, c):
    def ellipsoid(v):
        x = a * (v.x)
        y = b * (v.y)
        z = c * (v.z)
        return Vector((x, y, z))
    return ellipsoid

# make the ellipsoid bmesh
bm = bmesh.new()

# TODO come up with a nicer way to do this.
rings = [[CoordsPoints(1, radians(theta), radians(phi))
                 for theta in range (0, 360, 2)]
                 for phi in range(0, 180, 2)]

h = ellipsoid(1.0, 1.0, 1.5)

verts_mesh = [bm.verts.new(h(p.xyz)) for p in rings[0]]
verts_mesh.append(verts_mesh[0])
for ring in range(1, len(rings)):

    verts_mesh_face = [bm.verts.new(h(p.xyz)) for p in rings[ring]]
    verts_mesh_face.append(verts_mesh_face[0])

    faces = [
        bm.faces.new((
            verts_mesh[i], verts_mesh_face[i],
            verts_mesh_face[i+1], verts_mesh[i+1]
        ))
        for i in range(len(verts_mesh) - 1)
    ]
    verts_mesh = verts_mesh_face

# create mesh link it to scene
mesh = bpy.data.meshes.new("ellipsoid")
bm.to_mesh(mesh)
obj = bpy.data.objects.new("ellipsoid", mesh)
scene = bpy.context.scene
scene.objects.link(obj)
scene.objects.active = obj
obj.select = True
obj.location = scene.cursor_location[root@localhost mythcat]# pip install scapy
Collecting scapy
Downloading scapy-2.3.3.tgz (1.4MB)
100% |████████████████████████████████| 1.4MB 904kB/s
Building wheels for collected packages: scapy
Running setup.py bdist_wheel for scapy ... done
Stored in directory: /root/.cache/pip/wheels/bd/cf/...
Installing collected packages: scapy
Successfully installed scapy-2.3.3from scapy.all import *
dstip=raw_input("enter the ip address \n")
icmp=ICMP()
icmp.type=8
icmp.code=0
ip=IP()
ip.dst=dstip
p=sr1(ip/icmp,timeout=5, verbose=0)
if(p):
print "Layer 3 is up"
else:
print "Layer 3 status is down"from scapy.all import *
def arp_display(pkt):
if pkt[ARP].op == 1:
return "Request: " + pkt[ARP].psrc + " is asking about " + pkt[ARP].pdst
if pkt[ARP].op == 2:
return "*Response: " + pkt[ARP].hwsrc + " has address " + pkt[ARP].psrc
print sniff(prn=arp_display, filter="arp", store=0, count=10)from xml.etree import ElementTree
import sys
file_opml = sys.argv[1]
def extract_rss_urls_from_opml(filename):
urls = []
with open(filename, 'rt') as f:
tree = ElementTree.parse(f)
for node in tree.findall('.//outline'):
url = node.attrib.get('xmlUrl')
if url:
urls.append(url)
return urls
urls = extract_rss_urls_from_opml(file_opml)
print urls [root@localhost mythcat]# pip install pyowm
Collecting pyowm
Downloading pyowm-2.6.1.tar.gz (3.6MB)
100% |████████████████████████████████| 3.7MB 388kB/s
Building wheels for collected packages: pyowm
Running setup.py bdist_wheel for pyowm ... done
Stored in directory: /root/.cache/pip/wheels/9a/91/17/bb120c765f08df77645cf70a16aa372d5a297f4ae2be749e81
Successfully built pyowm
Installing collected packages: pyowm
Successfully installed pyowm-2.6.1
#/usr/bin/env python
#" -*- coding: utf-8 -*-
import pyowm

print " Have a account to openweathermap.org and use with api key free or pro"
print " owm = pyowm.OWM(API_key='your-API-key', subscription_type='pro')"

owm = pyowm.OWM("327407589df060c7f825b63ec1d9a096")
forecast = owm.daily_forecast("Falticeni,ro")
tomorrow = pyowm.timeutils.tomorrow()
forecast.will_be_sunny_at(tomorrow)

observation = owm.weather_at_place('Falticeni,ro')
w = observation.get_weather()
print (w)
print " Weather details"
print " =============== "

print " Get cloud coverage"
print w.get_clouds()
print " ----------------"
print " Get rain volume"
print w.get_rain()
print " ----------------"
print " Get snow volume"
print w.get_snow()

print " Get wind degree and speed"
print w.get_wind()
print " ----------------"
print " Get humidity percentage"
print w.get_humidity()
print " ----------------"
print " Get atmospheric pressure"
print w.get_pressure()
print " ----------------"
print " Get temperature in Kelvin degs"
print w.get_temperature()
print " ----------------"
print " Get temperature in Celsius degs"
print w.get_temperature(unit='celsius')
print " ----------------"
print " Get temperature in Fahrenheit degs"
print w.get_temperature('fahrenheit')
print " ----------------"
print " Get weather short status"
print w.get_status()
print " ----------------"
print " Get detailed weather status"
print w.get_detailed_status()
print " ----------------"
print " Get OWM weather condition code"
print w.get_weather_code()
print " ----------------"
print " Get weather-related icon name"
print w.get_weather_icon_name()
print " ----------------"
print " Sunrise time (ISO 8601)"
print w.get_sunrise_time('iso')
print " Sunrise time (GMT UNIXtime)"
print w.get_sunrise_time()
print " ----------------"
print " Sunset time (ISO 8601)"
print w.get_sunset_time('iso')
print " Sunset time (GMT UNIXtime)"
print w.get_sunset_time()
print " ----------------"
print " Search current weather observations in the surroundings of"
print " Latitude and longitude coordinates for Fălticeni, Romania:"
observation_list = owm.weather_around_coords(47.46, 26.30) [root@localhost mythcat]# python openweather.py
Have a account to openweathermap.org and use with api key free or pro
owm = pyowm.OWM(API_key='your-API-key', subscription_type='pro')
Weather details
===============
Get cloud coverage
20
----------------
Get rain volume
{}
----------------
Get snow volume
{}
Get wind degree and speed
{u'speed': 5.7, u'deg': 340}
----------------
Get humidity percentage
82
----------------
Get atmospheric pressure
{'press': 1021, 'sea_level': None}
----------------
Get temperature in Kelvin degs
{'temp_max': 287.15, 'temp_kf': None, 'temp': 287.15, 'temp_min': 287.15}
----------------
Get temperature in Celsius degs
{'temp_max': 14.0, 'temp_kf': None, 'temp': 14.0, 'temp_min': 14.0}
----------------
Get temperature in Fahrenheit degs
{'temp_max': 57.2, 'temp_kf': None, 'temp': 57.2, 'temp_min': 57.2}
----------------
Get weather short status
Clouds
----------------
Get detailed weather status
few clouds
----------------
Get OWM weather condition code
801
----------------
Get weather-related icon name
02d
----------------
Sunrise time (ISO 8601)
2017-03-24 04:08:33+00
Sunrise time (GMT UNIXtime)
1490328513
----------------
Sunset time (ISO 8601)
2017-03-24 16:33:59+00
Sunset time (GMT UNIXtime)
1490373239
----------------
Search current weather observations in the surroundings of
Latitude and longitude coordinates for Fălticeni, Romania:
import tensorflow as tf
tf.scalar_summary = tf.summary.scalar
tf.merge_all_summaries = tf.summary.merge_all
tf.train.SummaryWriter = tf.summary.FileWriterC:\Python35>cd Scripts
C:\Python35\Scripts>pip3 install --upgrade tensorflow
Collecting tensorflow
Downloading tensorflow-1.0.1-cp35-cp35m-win_amd64.whl (14.7MB)
100% |################################| 14.7MB 43kB/s
...
Successfully installed appdirs-1.4.3 numpy-1.12.0 packaging-16.8
protobuf-3.2.0 pyparsing-2.2.0 setuptools-34.3.2 six-1.10.0
tensorflow-1.0.1 wheel-0.29.0C:\Python35\Scripts>pip3 install --upgrade tensorflow-gpu
Collecting tensorflow-gpu
Downloading tensorflow_gpu-1.0.1-cp35-cp35m-win_amd64.whl (43.1MB)
100% |################################| 43.1MB 11kB/
...
Installing collected packages: tensorflow-gpu
Successfully installed tensorflow-gpu-1.0.1Creating TensorFlow device (/gpu:0) -> (device: 0, name: GeForce GT 740M, pci bus id: 0000:01:00.0)
[root@localhost build]# pip install tensorflow
Collecting tensorflow
  Downloading tensorflow-1.0.1-cp27-cp27mu-manylinux1_x86_64.whl (44.1MB)
    100% |████████████████████████████████| 44.1MB 30kB/s
Collecting mock>=2.0.0 (from tensorflow)
  Downloading mock-2.0.0-py2.py3-none-any.whl (56kB)
    100% |████████████████████████████████| 61kB 341kB/s
Requirement already satisfied: six>=1.10.0 in /usr/lib/python2.7/site-packages (from tensorflow)
Requirement already satisfied: numpy>=1.11.0 in /usr/lib64/python2.7/site-packages (from tensorflow)
Collecting protobuf>=3.1.0 (from tensorflow)
  Downloading protobuf-3.2.0-cp27-cp27mu-manylinux1_x86_64.whl (5.6MB)
    100% |████████████████████████████████| 5.6MB 172kB/s
Collecting wheel (from tensorflow)
  Downloading wheel-0.29.0-py2.py3-none-any.whl (66kB)
    100% |████████████████████████████████| 71kB 532kB/s
Collecting funcsigs>=1; python_version < "3.3" (from mock>=2.0.0->tensorflow)
  Downloading funcsigs-1.0.2-py2.py3-none-any.whl
Collecting pbr>=0.11 (from mock>=2.0.0->tensorflow)
  Downloading pbr-2.0.0-py2.py3-none-any.whl (98kB)
    100% |████████████████████████████████| 102kB 518kB/s
Requirement already satisfied: setuptools in /usr/lib/python2.7/site-packages (from protobuf>=3.1.0->tensorflow)
Installing collected packages: funcsigs, pbr, mock, protobuf, wheel, tensorflow
Successfully installed funcsigs-1.0.2 mock-2.0.0 pbr-2.0.0 protobuf-3.2.0 tensorflow-1.0.1 wheel-0.29.0[root@localhost build]# pip install --upgrade tensorflow-gpu
Collecting tensorflow-gpu
Downloading tensorflow_gpu-1.0.1-cp27-cp27mu-manylinux1_x86_64.whl (94.8MB)
100% |████████████████████████████████| 94.8MB 15kB/s
Requirement already up-to-date: mock>=2.0.0 in /usr/lib/python2.7/site-packages (from tensorflow-gpu)
Requirement already up-to-date: six>=1.10.0 in /usr/lib/python2.7/site-packages (from tensorflow-gpu)
Collecting numpy>=1.11.0 (from tensorflow-gpu)
Downloading numpy-1.12.0-cp27-cp27mu-manylinux1_x86_64.whl (16.5MB)
100% |████████████████████████████████| 16.5MB 83kB/s
Requirement already up-to-date: protobuf>=3.1.0 in /usr/lib64/python2.7/site-packages (from tensorflow-gpu)
Requirement already up-to-date: wheel in /usr/lib/python2.7/site-packages (from tensorflow-gpu)
Requirement already up-to-date: funcsigs>=1; python_version < "3.3" in /usr/lib/python2.7/site-packages (from mock>=2.0.0->tensorflow-gpu)
Requirement already up-to-date: pbr>=0.11 in /usr/lib/python2.7/site-packages (from mock>=2.0.0->tensorflow-gpu)
Collecting setuptools (from protobuf>=3.1.0->tensorflow-gpu)
Downloading setuptools-34.3.1-py2.py3-none-any.whl (389kB)
100% |████████████████████████████████| 399kB 637kB/s
Collecting appdirs>=1.4.0 (from setuptools->protobuf>=3.1.0->tensorflow-gpu)
Downloading appdirs-1.4.3-py2.py3-none-any.whl
Collecting packaging>=16.8 (from setuptools->protobuf>=3.1.0->tensorflow-gpu)
Downloading packaging-16.8-py2.py3-none-any.whl
Collecting pyparsing (from packaging>=16.8->setuptools->protobuf>=3.1.0->tensorflow-gpu)
Downloading pyparsing-2.2.0-py2.py3-none-any.whl (56kB)
100% |████████████████████████████████| 61kB 577kB/s
Installing collected packages: numpy, tensorflow-gpu, appdirs, pyparsing, packaging, setuptools
Found existing installation: numpy 1.11.2
Uninstalling numpy-1.11.2:
Successfully uninstalled numpy-1.11.2
Found existing installation: setuptools 25.1.1
Uninstalling setuptools-25.1.1:
Successfully uninstalled setuptools-25.1.1
Successfully installed appdirs-1.4.3 numpy-1.12.0 packaging-16.8 pyparsing-2.2.0 setuptools-34.3.1 tensorflow-gpu-1.0.1
    _mod = imp.load_module('_pywrap_tensorflow', fp, pathname, description)
ImportError: libcudart.so.8.0: cannot open shared object file: No such file or directory


Failed to load the native TensorFlow runtime.

See https://github.com/tensorflow/tensorflow/blob/master/tensorflow/g3doc/get_started/os_setup.md#import_error

for some common reasons and solutions.  Include the entire stack trace
above this error message when asking for help.[root@localhost ~]# export TF_BINARY_URL=https://storage.googleapis.com/tensorflow/linux/cpu/tensorflow-0.11.0rc0-cp27-none-linux_x86_64.whl
[root@localhost ~]# pip install --upgrade $TF_BINARY_URL
Collecting tensorflow==0.11.0rc0 from https://storage.googleapis.com/tensorflow/linux/cpu/tensorflow-0.11.0rc0-cp27-none-linux_x86_64.whl
Downloading https://storage.googleapis.com/tensorflow/linux/cpu/tensorflow-0.11.0rc0-cp27-none-linux_x86_64.whl (39.7MB)
100% |████████████████████████████████| 39.8MB 37kB/s
Requirement already up-to-date: mock>=2.0.0 in /usr/lib/python2.7/site-packages (from tensorflow==0.11.0rc0)
Requirement already up-to-date: six>=1.10.0 in /usr/lib/python2.7/site-packages (from tensorflow==0.11.0rc0)
Requirement already up-to-date: numpy>=1.11.0 in /usr/lib64/python2.7/site-packages (from tensorflow==0.11.0rc0)
Collecting protobuf==3.0.0 (from tensorflow==0.11.0rc0)
Downloading protobuf-3.0.0-cp27-cp27mu-manylinux1_x86_64.whl (5.2MB)
100% |████████████████████████████████| 5.2MB 206kB/s
Requirement already up-to-date: wheel in /usr/lib/python2.7/site-packages (from tensorflow==0.11.0rc0)
Requirement already up-to-date: funcsigs>=1; python_version < "3.3" in /usr/lib/python2.7/site-packages (from mock>=2.0.0->tensorflow==0.11.0rc0)
Requirement already up-to-date: pbr>=0.11 in /usr/lib/python2.7/site-packages (from mock>=2.0.0->tensorflow==0.11.0rc0)
Requirement already up-to-date: setuptools in /usr/lib/python2.7/site-packages (from protobuf==3.0.0->tensorflow==0.11.0rc0)
Requirement already up-to-date: appdirs>=1.4.0 in /usr/lib/python2.7/site-packages (from setuptools->protobuf==3.0.0->tensorflow==0.11.0rc0)
Requirement already up-to-date: packaging>=16.8 in /usr/lib/python2.7/site-packages (from setuptools->protobuf==3.0.0->tensorflow==0.11.0rc0)
Requirement already up-to-date: pyparsing in /usr/lib/python2.7/site-packages (from packaging>=16.8->setuptools->protobuf==3.0.0->tensorflow==0.11.0rc0)
Installing collected packages: protobuf, tensorflow
Found existing installation: protobuf 3.2.0
Uninstalling protobuf-3.2.0:
Successfully uninstalled protobuf-3.2.0
Found existing installation: tensorflow 1.0.1
Uninstalling tensorflow-1.0.1:
Successfully uninstalled tensorflow-1.0.1
Successfully installed protobuf-3.0.0 tensorflow-0.11.0rc0
import tensorflow as tf
hello = tf.constant('Hello, TensorFlow!')
sess = tf.Session()
print(sess.run(hello))

Hello, TensorFlow!