analitics

Pages

Friday, April 14, 2017

Blender 3D - ellipsoid.

This is a simple way to use Blender 3D - version 2.78c with python scripting tool to make one ellipsoid.

The ellipsoid may be parameterized in several ways but I used the sin and cos functions:
x = sin(theta) * sin(phi)
y = cos(theta) * sin(phi)
z = cos(phi)

The steps I follow are:
  • make points of ellipsoid - CoordsPoints
  • define an ellipsoid vectors 
  • create a new mesh 
  • make rings for faces
  • make an ellipsoid
  • The verts_mesh and verts_mesh_face are used to make faces
  • put all into the Blender 3D scene

import bpy
import bmesh
from math import degrees, radians, sin, cos, tan
from mathutils import Vector


class CoordsPoints:
    @property
    def xyz(self):
        theta = self.theta
        phi = self.phi
        x = sin(theta) * sin(phi)
        y = cos(theta) * sin(phi)
        z = cos(phi)
        R = self.R
        return R * Vector((x,y,z))

    def __init__(self, R, theta, phi):
        self.R = R
        self.theta = theta
        self.phi = phi
        #self.xyz = self.point(theta, phi)

    def __repr__(self):
        return "Coords(%.4f, %.4f)" % (degrees(self.theta),
                                               degrees(self.phi))
# define the ellipsoid method.
def ellipsoid(a, b, c):
    def ellipsoid(v):
        x = a * (v.x)
        y = b * (v.y)
        z = c * (v.z)
        return Vector((x, y, z))
    return ellipsoid

# make the ellipsoid bmesh
bm = bmesh.new()

# TODO come up with a nicer way to do this.
rings = [[CoordsPoints(1, radians(theta), radians(phi)) 
                 for theta in range (0, 360, 2)]
                 for phi in range(0, 180, 2)]

h = ellipsoid(1.0, 1.0, 1.5)

verts_mesh = [bm.verts.new(h(p.xyz)) for p in rings[0]]
verts_mesh.append(verts_mesh[0])
for ring in range(1, len(rings)):

    verts_mesh_face = [bm.verts.new(h(p.xyz)) for p in rings[ring]]
    verts_mesh_face.append(verts_mesh_face[0])

    faces = [
        bm.faces.new((
            verts_mesh[i], verts_mesh_face[i],
            verts_mesh_face[i+1], verts_mesh[i+1]
        ))
        for i in range(len(verts_mesh) - 1)
    ]
    verts_mesh = verts_mesh_face

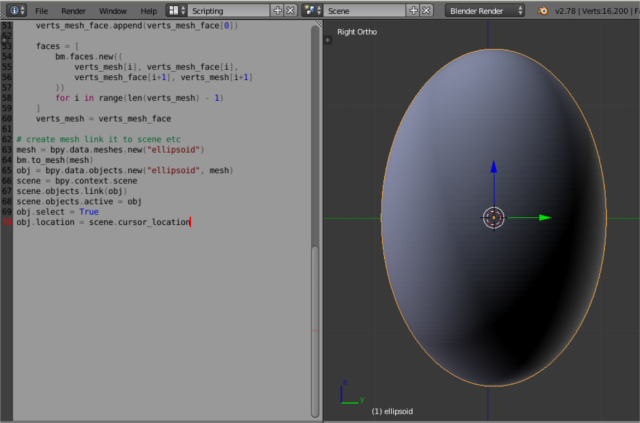
# create mesh link it to scene 
mesh = bpy.data.meshes.new("ellipsoid")
bm.to_mesh(mesh)
obj = bpy.data.objects.new("ellipsoid", mesh)
scene = bpy.context.scene
scene.objects.link(obj)
scene.objects.active = obj
obj.select = True
obj.location = scene.cursor_location

Wednesday, April 5, 2017

The scapy python module - part 001.

Today I will start with scapy python module.
This is a good python module to deal and interact with network packets.
[root@localhost mythcat]# pip install scapy
Collecting scapy
  Downloading scapy-2.3.3.tgz (1.4MB)
    100% |████████████████████████████████| 1.4MB 904kB/s 
Building wheels for collected packages: scapy
  Running setup.py bdist_wheel for scapy ... done
  Stored in directory: /root/.cache/pip/wheels/bd/cf/...
Installing collected packages: scapy
Successfully installed scapy-2.3.3
The first test is to test is the echo of Layer 3 ICMP.
Use the superuser shell to run this python script:
from scapy.all import *
dstip=raw_input("enter the ip address \n")
icmp=ICMP()
icmp.type=8
icmp.code=0
ip=IP()
ip.dst=dstip
p=sr1(ip/icmp,timeout=5, verbose=0)
if(p):
        print "Layer 3 is up"
else:
        print "Layer 3 status is down"
The next python script will about arp request:
from scapy.all import *
def arp_display(pkt):
    if pkt[ARP].op == 1: 
        return "Request: " + pkt[ARP].psrc + " is asking about " + pkt[ARP].pdst
    if pkt[ARP].op == 2: 
        return "*Response: " + pkt[ARP].hwsrc + " has address " + pkt[ARP].psrc
print sniff(prn=arp_display, filter="arp", store=0, count=10)
This will read the packages from source and destination and show me what ARP traffic my computer is seeing.

How to parse the OPML file.

For example, the Feedly (stylized as Feedly) is a news aggregator application for various web browsers and mobile devices can let you export and import the OPML file.

What is XML?
The Extensible Markup Language (XML) is a markup language much like HTML or SGML. This is recommended by the World Wide Web Consortium and available as an open standard.

Today I will show you how to parse the OPML file type with python 2.7 version and XML python module.
This is the source script:
from xml.etree import ElementTree
import sys

file_opml = sys.argv[1]
def extract_rss_urls_from_opml(filename):
    urls = []
    with open(filename, 'rt') as f:
        tree = ElementTree.parse(f)
    for node in tree.findall('.//outline'):
        url = node.attrib.get('xmlUrl')
        if url:
            urls.append(url)
    return urls
urls = extract_rss_urls_from_opml(file_opml)
print urls
The result is a list with all your RSS links.

Friday, March 24, 2017

Take weather data with pyowm from openweathermap .

This tutorial shows you how to download and install the pyowm python module.
One of the great things about using this python module let you to provide data from openweathermap website (need to have one account).
PyOWM runs on Python 2.7 and Python 3.2+, and integrates with Django 1.10+ models.
All documentation can be found here.

The install is simple with pip , python 2.7 and Fedora 25.
 
[root@localhost mythcat]# pip install pyowm
Collecting pyowm
  Downloading pyowm-2.6.1.tar.gz (3.6MB)
    100% |████████████████████████████████| 3.7MB 388kB/s 
Building wheels for collected packages: pyowm
  Running setup.py bdist_wheel for pyowm ... done
  Stored in directory: /root/.cache/pip/wheels/9a/91/17/bb120c765f08df77645cf70a16aa372d5a297f4ae2be749e81
Successfully built pyowm
Installing collected packages: pyowm
Successfully installed pyowm-2.6.1
The source code is very simple just connect with API key and print data.
#/usr/bin/env python
#" -*- coding: utf-8 -*-
import pyowm

print " Have a account to openweathermap.org and use with api key free or pro"
print " owm = pyowm.OWM(API_key='your-API-key', subscription_type='pro')"

owm = pyowm.OWM("327407589df060c7f825b63ec1d9a096")  
forecast = owm.daily_forecast("Falticeni,ro")
tomorrow = pyowm.timeutils.tomorrow()
forecast.will_be_sunny_at(tomorrow)  

observation = owm.weather_at_place('Falticeni,ro')
w = observation.get_weather()
print (w)                     
print " Weather details"
print " =============== "
                                    
print " Get cloud coverage"
print w.get_clouds() 
print " ----------------"                                     
print " Get rain volume"
print w.get_rain() 
print " ----------------"
print " Get snow volume"
print w.get_snow()                                       

print " Get wind degree and speed"
print w.get_wind() 
print " ----------------"                                      
print " Get humidity percentage"
print w.get_humidity()    
print " ----------------"                               
print " Get atmospheric pressure"
print w.get_pressure()                                   
print " ----------------"
print " Get temperature in Kelvin degs"
print w.get_temperature() 
print " ----------------"                              
print " Get temperature in Celsius degs"
print w.get_temperature(unit='celsius')
print " ----------------"                 
print " Get temperature in Fahrenheit degs"
print w.get_temperature('fahrenheit')                    
print " ----------------"
print " Get weather short status"
print w.get_status()                                     
print " ----------------"
print " Get detailed weather status"
print w.get_detailed_status()                           
print " ----------------"
print " Get OWM weather condition code"
print w.get_weather_code()                               
print " ----------------"
print " Get weather-related icon name"
print w.get_weather_icon_name()                          
print " ----------------"
print " Sunrise time (ISO 8601)"
print w.get_sunrise_time('iso')    
print " Sunrise time (GMT UNIXtime)"
print w.get_sunrise_time()                               
print " ----------------"
print " Sunset time (ISO 8601)"
print w.get_sunset_time('iso')  
print " Sunset time (GMT UNIXtime)"
print w.get_sunset_time()                          
print " ----------------"
print " Search current weather observations in the surroundings of"
print " Latitude and longitude coordinates for Fălticeni, Romania:"
observation_list = owm.weather_around_coords(47.46, 26.30)

Let's see and the result of running the python script for one random location:
 
[root@localhost mythcat]# python openweather.py 
 Have a account to openweathermap.org and use with api key free or pro
 owm = pyowm.OWM(API_key='your-API-key', subscription_type='pro')

 Weather details
 =============== 
 Get cloud coverage
20
 ----------------
 Get rain volume
{}
 ----------------
 Get snow volume
{}
 Get wind degree and speed
{u'speed': 5.7, u'deg': 340}
 ----------------
 Get humidity percentage
82
 ----------------
 Get atmospheric pressure
{'press': 1021, 'sea_level': None}
 ----------------
 Get temperature in Kelvin degs
{'temp_max': 287.15, 'temp_kf': None, 'temp': 287.15, 'temp_min': 287.15}
 ----------------
 Get temperature in Celsius degs
{'temp_max': 14.0, 'temp_kf': None, 'temp': 14.0, 'temp_min': 14.0}
 ----------------
 Get temperature in Fahrenheit degs
{'temp_max': 57.2, 'temp_kf': None, 'temp': 57.2, 'temp_min': 57.2}
 ----------------
 Get weather short status
Clouds
 ----------------
 Get detailed weather status
few clouds
 ----------------
 Get OWM weather condition code
801
 ----------------
 Get weather-related icon name
02d
 ----------------
 Sunrise time (ISO 8601)
2017-03-24 04:08:33+00
 Sunrise time (GMT UNIXtime)
1490328513
 ----------------
 Sunset time (ISO 8601)
2017-03-24 16:33:59+00
 Sunset time (GMT UNIXtime)
1490373239
 ----------------
 Search current weather observations in the surroundings of
 Latitude and longitude coordinates for Fălticeni, Romania:

Thursday, March 16, 2017

The tensorflow python module - part 003.

This short tutorial come to fix your work and help you with examples and tutorials.
You can look to the internet and you can search many examples and tutorials but you can get errors.
How to fix that:
The first step is to know what tensorflow version of you use.
[mythcat@localhost ~]$ python -c "import tensorflow; print(tensorflow.__version__)"
1.0.1
Then yo need to know what parts from tensorflow old version is deprecated from the last version.
One superannuated method is to fix old source code with this:
import tensorflow as tf
tf.scalar_summary = tf.summary.scalar
tf.merge_all_summaries = tf.summary.merge_all
tf.train.SummaryWriter = tf.summary.FileWriter
A better method is to fix your source code and read the documentation.

Monday, March 13, 2017

The tensorflow python module - part 002.

Today I will show you how to install tensorflow python module on Windows OS with pip tool.
I used python version 3.5.3.
C:\Python35>cd Scripts

C:\Python35\Scripts>pip3 install --upgrade tensorflow
Collecting tensorflow
  Downloading tensorflow-1.0.1-cp35-cp35m-win_amd64.whl (14.7MB)
    100% |################################| 14.7MB 43kB/s
...
Successfully installed appdirs-1.4.3 numpy-1.12.0 packaging-16.8 
protobuf-3.2.0 pyparsing-2.2.0 setuptools-34.3.2 six-1.10.0 
tensorflow-1.0.1 wheel-0.29.0
Next step is to install the GPU version of TensorFlow:
C:\Python35\Scripts>pip3 install --upgrade tensorflow-gpu
Collecting tensorflow-gpu
  Downloading tensorflow_gpu-1.0.1-cp35-cp35m-win_amd64.whl (43.1MB)
    100% |################################| 43.1MB 11kB/
...
Installing collected packages: tensorflow-gpu
Successfully installed tensorflow-gpu-1.0.1
If you are installing TensorFlow with GPU support then the following NVIDIA software must be installed on your system:

CUDA Toolkit 8.0. , the NVIDIA drivers associated with CUDA Toolkit 8.0 and cuDNN v5.1.
The cuDNN is typically installed in a different location from the other CUDA DLLs.
Now you need to add the directory where you installed the cuDNN DLL to your %PATH% environment variable.
The result will be output under python result when you import this python module, see my output:
 Creating TensorFlow device (/gpu:0) -> (device: 0, name: GeForce GT 740M, pci bus id: 0000:01:00.0)

Friday, March 10, 2017

Strange code in python.

Try this:

>>> 2*2
4
>>> _*2
8
>>> print _*3
24
>>> print _*'a'
aaaaaaaa

The tensorflow python module - part 001.

TensorFlow™ is an open source software library for numerical computation using data flow graphs.
I used Fedora 25 distro and python version 2.7.
The base of this installation was the official website.
Fist step of the installation was the base python module: tensorflow.

[root@localhost build]# pip install tensorflow  
Collecting tensorflow
  Downloading tensorflow-1.0.1-cp27-cp27mu-manylinux1_x86_64.whl (44.1MB)
    100% |████████████████████████████████| 44.1MB 30kB/s 
Collecting mock>=2.0.0 (from tensorflow)
  Downloading mock-2.0.0-py2.py3-none-any.whl (56kB)
    100% |████████████████████████████████| 61kB 341kB/s 
Requirement already satisfied: six>=1.10.0 in /usr/lib/python2.7/site-packages (from tensorflow)
Requirement already satisfied: numpy>=1.11.0 in /usr/lib64/python2.7/site-packages (from tensorflow)
Collecting protobuf>=3.1.0 (from tensorflow)
  Downloading protobuf-3.2.0-cp27-cp27mu-manylinux1_x86_64.whl (5.6MB)
    100% |████████████████████████████████| 5.6MB 172kB/s 
Collecting wheel (from tensorflow)
  Downloading wheel-0.29.0-py2.py3-none-any.whl (66kB)
    100% |████████████████████████████████| 71kB 532kB/s 
Collecting funcsigs>=1; python_version < "3.3" (from mock>=2.0.0->tensorflow)
  Downloading funcsigs-1.0.2-py2.py3-none-any.whl
Collecting pbr>=0.11 (from mock>=2.0.0->tensorflow)
  Downloading pbr-2.0.0-py2.py3-none-any.whl (98kB)
    100% |████████████████████████████████| 102kB 518kB/s 
Requirement already satisfied: setuptools in /usr/lib/python2.7/site-packages (from protobuf>=3.1.0->tensorflow)
Installing collected packages: funcsigs, pbr, mock, protobuf, wheel, tensorflow
Successfully installed funcsigs-1.0.2 mock-2.0.0 pbr-2.0.0 protobuf-3.2.0 tensorflow-1.0.1 wheel-0.29.0
The next step come with the installation of python module gpu: tensorflow-gpu.
[root@localhost build]# pip install --upgrade tensorflow-gpu
Collecting tensorflow-gpu
  Downloading tensorflow_gpu-1.0.1-cp27-cp27mu-manylinux1_x86_64.whl (94.8MB)
    100% |████████████████████████████████| 94.8MB 15kB/s 
Requirement already up-to-date: mock>=2.0.0 in /usr/lib/python2.7/site-packages (from tensorflow-gpu)
Requirement already up-to-date: six>=1.10.0 in /usr/lib/python2.7/site-packages (from tensorflow-gpu)
Collecting numpy>=1.11.0 (from tensorflow-gpu)
  Downloading numpy-1.12.0-cp27-cp27mu-manylinux1_x86_64.whl (16.5MB)
    100% |████████████████████████████████| 16.5MB 83kB/s 
Requirement already up-to-date: protobuf>=3.1.0 in /usr/lib64/python2.7/site-packages (from tensorflow-gpu)
Requirement already up-to-date: wheel in /usr/lib/python2.7/site-packages (from tensorflow-gpu)
Requirement already up-to-date: funcsigs>=1; python_version < "3.3" in /usr/lib/python2.7/site-packages (from mock>=2.0.0->tensorflow-gpu)
Requirement already up-to-date: pbr>=0.11 in /usr/lib/python2.7/site-packages (from mock>=2.0.0->tensorflow-gpu)
Collecting setuptools (from protobuf>=3.1.0->tensorflow-gpu)
  Downloading setuptools-34.3.1-py2.py3-none-any.whl (389kB)
    100% |████████████████████████████████| 399kB 637kB/s 
Collecting appdirs>=1.4.0 (from setuptools->protobuf>=3.1.0->tensorflow-gpu)
  Downloading appdirs-1.4.3-py2.py3-none-any.whl
Collecting packaging>=16.8 (from setuptools->protobuf>=3.1.0->tensorflow-gpu)
  Downloading packaging-16.8-py2.py3-none-any.whl
Collecting pyparsing (from packaging>=16.8->setuptools->protobuf>=3.1.0->tensorflow-gpu)
  Downloading pyparsing-2.2.0-py2.py3-none-any.whl (56kB)
    100% |████████████████████████████████| 61kB 577kB/s 
Installing collected packages: numpy, tensorflow-gpu, appdirs, pyparsing, packaging, setuptools
  Found existing installation: numpy 1.11.2
    Uninstalling numpy-1.11.2:
      Successfully uninstalled numpy-1.11.2
  Found existing installation: setuptools 25.1.1
    Uninstalling setuptools-25.1.1:
      Successfully uninstalled setuptools-25.1.1
Successfully installed appdirs-1.4.3 numpy-1.12.0 packaging-16.8 pyparsing-2.2.0 setuptools-34.3.1 tensorflow-gpu-1.0.1
I got errors when I try to run this python module (libcudart.so.8.0).
I have a Intel I5 CPU with a video card without CUDA features.
    _mod = imp.load_module('_pywrap_tensorflow', fp, pathname, description)
ImportError: libcudart.so.8.0: cannot open shared object file: No such file or directory


Failed to load the native TensorFlow runtime.

See https://github.com/tensorflow/tensorflow/blob/master/tensorflow/g3doc/get_started/os_setup.md#import_error

for some common reasons and solutions.  Include the entire stack trace
above this error message when asking for help.
So I used this command to fix with the pip upgrade:
[root@localhost ~]# export TF_BINARY_URL=https://storage.googleapis.com/tensorflow/linux/cpu/tensorflow-0.11.0rc0-cp27-none-linux_x86_64.whl
[root@localhost ~]# pip install --upgrade $TF_BINARY_URL
Collecting tensorflow==0.11.0rc0 from https://storage.googleapis.com/tensorflow/linux/cpu/tensorflow-0.11.0rc0-cp27-none-linux_x86_64.whl
  Downloading https://storage.googleapis.com/tensorflow/linux/cpu/tensorflow-0.11.0rc0-cp27-none-linux_x86_64.whl (39.7MB)
    100% |████████████████████████████████| 39.8MB 37kB/s 
Requirement already up-to-date: mock>=2.0.0 in /usr/lib/python2.7/site-packages (from tensorflow==0.11.0rc0)
Requirement already up-to-date: six>=1.10.0 in /usr/lib/python2.7/site-packages (from tensorflow==0.11.0rc0)
Requirement already up-to-date: numpy>=1.11.0 in /usr/lib64/python2.7/site-packages (from tensorflow==0.11.0rc0)
Collecting protobuf==3.0.0 (from tensorflow==0.11.0rc0)
  Downloading protobuf-3.0.0-cp27-cp27mu-manylinux1_x86_64.whl (5.2MB)
    100% |████████████████████████████████| 5.2MB 206kB/s 
Requirement already up-to-date: wheel in /usr/lib/python2.7/site-packages (from tensorflow==0.11.0rc0)
Requirement already up-to-date: funcsigs>=1; python_version < "3.3" in /usr/lib/python2.7/site-packages (from mock>=2.0.0->tensorflow==0.11.0rc0)
Requirement already up-to-date: pbr>=0.11 in /usr/lib/python2.7/site-packages (from mock>=2.0.0->tensorflow==0.11.0rc0)
Requirement already up-to-date: setuptools in /usr/lib/python2.7/site-packages (from protobuf==3.0.0->tensorflow==0.11.0rc0)
Requirement already up-to-date: appdirs>=1.4.0 in /usr/lib/python2.7/site-packages (from setuptools->protobuf==3.0.0->tensorflow==0.11.0rc0)
Requirement already up-to-date: packaging>=16.8 in /usr/lib/python2.7/site-packages (from setuptools->protobuf==3.0.0->tensorflow==0.11.0rc0)
Requirement already up-to-date: pyparsing in /usr/lib/python2.7/site-packages (from packaging>=16.8->setuptools->protobuf==3.0.0->tensorflow==0.11.0rc0)
Installing collected packages: protobuf, tensorflow
  Found existing installation: protobuf 3.2.0
    Uninstalling protobuf-3.2.0:
      Successfully uninstalled protobuf-3.2.0
  Found existing installation: tensorflow 1.0.1
    Uninstalling tensorflow-1.0.1:
      Successfully uninstalled tensorflow-1.0.1
Successfully installed protobuf-3.0.0 tensorflow-0.11.0rc0
The basic the python tensorflow works, so I need to test.

import tensorflow as tf
hello = tf.constant('Hello, TensorFlow!')
sess = tf.Session()
print(sess.run(hello))

Hello, TensorFlow!

Monday, March 6, 2017

The pattern python module - part 001.

This is a very short presentation of pattern python module.
This python module is full of options and features.
I will try to show you some parts useful for most python users.
About pattern python module:
Pattern is a web mining module for the Python programming language.
It has tools for data mining (Google, Twitter and Wikipedia API, a web crawler, a HTML DOM parser), natural language processing (part-of-speech taggers, n-gram search, sentiment analysis, WordNet), machine learning (vector space model, clustering, SVM), network analysis and visualization.
Pattern developer documentation
ModuleFunctionality
pattern.web Asynchronous requests, web services, web crawler, HTML DOM parser.
pattern.db Wrappers for databases (MySQL, SQLite) and CSV-files.
pattern.text Base classes for parsers, parse trees and sentiment analysis.
pattern.search Pattern matching algorithm for parsed text (syntax & semantics).
pattern.vector Vector space model, clustering, classification.
pattern.graph Graph analysis & visualization.

I used with Fedora linux and you can see the instalation of this python module:
[root@localhost ~]# pip install pattern
Collecting pattern
  Downloading pattern-2.6.zip (24.6MB)
    100% |████████████████████████████████| 24.6MB 61kB/s 
Installing collected packages: pattern
  Running setup.py install for pattern ... done
Successfully installed pattern-2.6

Frequently used single character variable names:
Variable Meaning Example
a array, all a = [normalize(w) for w in words]
b boolean while b is False:
d distance, document d = distance(v1, v2)
e element e = html.find('#nav')
f file, filter, function f = open('data.csv', 'r')
i index for i in range(len(matrix)):
j index for j in range(len(matrix[i])):
k key for k in vector.keys():
n list length n = len(a)
p parser, pattern p = pattern.search.compile('NN')
q query for r in twitter.search(q):
r result, row for r in csv('data.csv):
s string s = s.decode('utf-8').strip()
t time t = time.time() - t0
v value, vector for k, v in vector.items():
w word for i, w in enumerate(sentence.words):
x horizontal position node.x = 0
y vertical position node.y = 0
Pattern contains part-of-speech taggers for a number of languages (including English, Spanish, German, French and Dutch). Part-of-speech tagging is useful in many data mining tasks. A part-of-speech tagger takes a string of text and identifies the sentences and the words in the text along with their word type. 


LanguageCode Speakers Example countries
Spanish es 350M Argentina (40), Colombia (40), Mexico (100), Spain (45)
English en 340M Canada (30), United Kingdom (60), United States (300)
German de 100M Austria (10), Germany (80), Switzerland (7)
French fr 70M France (65), Côte d'Ivoire (20)
Italian it 60M Italy (60)
Dutch nl 27M The Netherlands (25), Belgium (6), Suriname (1)
import pattern.en  
import pattern.es
import pattern.du  
import pattern.de
You can deal with many websites, see examples:
from pattern.web import Wikipedia
from pattern.web import Yahoo
from pattern.web import Twitter
from pattern.web import Facebook
from pattern.web import Flickr
from pattern.web import GMAIL
from pattern.web import GOOGLE
Now, about pattern.db.
The pattern.db module contains wrappers for databases (SQLite, MySQL), Unicode CSV files and Python's datetime. It offers a convenient way to work with tabular data, for example retrieved with the pattern.web module.
import pattern 
from pattern.db import Database, field, pk, STRING, BOOLEAN, DATE, NOW 
db = Database('people')
db.create('area_people',fields=(
pk(),
field('name', STRING(80), index=True),
field('type', STRING(20)),
field('date_birth', DATE, default=None),
field('date_created', DATE, default=NOW)
))
db.area_people.append(name=u'George', type='male')
1
print db.area_people.rows()[0]
(1, u'George', u'male', None, Date('2017-03-06 22:38:13'))

Saturday, March 4, 2017

Working with datetime python module.

This module is very good and I worked with this issue by using MySQL and python.
The version of python I used is 2.7 under Fedora distro.
You can take a look at the official page.
I use the pip and not the DNF fedora Linux tool.
 
[root@localhost lucru]# pip install datetime
Collecting datetime
Downloading DateTime-4.1.1.zip (66kB)
100% |████████████████████████████████| 71kB 703kB/s 
Collecting zope.interface (from datetime)
Downloading zope.interface-4.3.3.tar.gz (150kB)
100% |████████████████████████████████| 153kB 2.2MB/s 
Collecting pytz (from datetime)
Downloading pytz-2016.10-py2.py3-none-any.whl (483kB)
100% |████████████████████████████████| 491kB 2.4MB/s 
Requirement already satisfied: setuptools in /usr/lib/python2.7/site-packages (from zope.interface->datetime)
Installing collected packages: zope.interface, pytz, datetime
Running setup.py install for zope.interface ... done
Running setup.py install for datetime ... done
Successfully installed datetime-4.1.1 pytz-2016.10 zope.interface-4.3.3

I solve this problem:
  • conversion using the lambda function
    parser.add_argument('date', type=lambda s: datetime.datetime.strptime(s, '%Y-%m-%d'))
  • solve last day
    datetime.datetime.strptime(new_value, '%Y-%m-%d %H:%M:%S')-timedelta(days=1)
  • print the today date
    print date.today()
  • show date using an explicit format string
    today=date.today()
    today.strftime("%A %d. %B %Y")
    'Sunday 05. March 2017'
    
  • using epoch issue [1]
    from datetime import datetime
    now_epoch = (datetime.utcnow() - datetime(1970, 1, 1)).total_seconds()
    datetime.utcfromtimestamp(now_epoch)
    datetime.datetime(2017, 3, 4, 22, 35, 13, 463409)
    datetime.fromtimestamp(now_epoch)
    datetime.datetime(2017, 3, 5, 0, 35, 13, 463409)
    import pytz
    datetime.fromtimestamp(now_epoch, pytz.utc)
    datetime.datetime(2017, 3, 4, 22, 35, 13, 463409, tzinfo=)
    
[1] The Unix epoch is the time 00:00:00 UTC on 1 January 1970. There is a problem with this definition, in that UTC did not exist in its current form until 1972;

Using pygeoip and maxmin database.


I try to locate one IP using the databases from maxmind website and is not good for me.
The database records show me the output from country area.
I read the docs from here.
This is the python script I used:
#wget -N -q http://geolite.maxmind.com/download/geoip/database/GeoLiteCity.dat.gz
import pygeoip 
gip = pygeoip.GeoIP('GeoLiteCity.dat')
rec = gip.record_by_addr('___________________')
for key,val in rec.items():
    print "%s: %s" %(key,val)

Saturday, February 25, 2017

Linux: OpenCV and using Lucas-Kanade Optical Flow function.

Fist I install OpenCV python module and I try using with Fedora 25.
I used python 2.7 version.
[root@localhost mythcat]# dnf install opencv-python.x86_64 
Last metadata expiration check: 0:21:12 ago on Sat Feb 25 23:26:59 2017.
Dependencies resolved.
================================================================================
 Package              Arch          Version                Repository      Size
================================================================================
Installing:
 opencv               x86_64        3.1.0-8.fc25           fedora         1.8 M
 opencv-python        x86_64        3.1.0-8.fc25           fedora         376 k
 python2-nose         noarch        1.3.7-11.fc25          updates        266 k
 python2-numpy        x86_64        1:1.11.2-1.fc25        fedora         3.2 M

Transaction Summary
================================================================================
Install  4 Packages

Total download size: 5.6 M
Installed size: 29 M
Is this ok [y/N]: y
Downloading Packages:
(1/4): opencv-python-3.1.0-8.fc25.x86_64.rpm    855 kB/s | 376 kB     00:00    
(2/4): opencv-3.1.0-8.fc25.x86_64.rpm           1.9 MB/s | 1.8 MB     00:00    
(3/4): python2-nose-1.3.7-11.fc25.noarch.rpm    543 kB/s | 266 kB     00:00    
(4/4): python2-numpy-1.11.2-1.fc25.x86_64.rpm   2.8 MB/s | 3.2 MB     00:01    
--------------------------------------------------------------------------------
Total                                           1.8 MB/s | 5.6 MB     00:03     
Running transaction check
Transaction check succeeded.
Running transaction test
Transaction test succeeded.
Running transaction
  Installing  : python2-nose-1.3.7-11.fc25.noarch                           1/4 
  Installing  : python2-numpy-1:1.11.2-1.fc25.x86_64                        2/4 
  Installing  : opencv-3.1.0-8.fc25.x86_64                                  3/4 
  Installing  : opencv-python-3.1.0-8.fc25.x86_64                           4/4 
  Verifying   : opencv-python-3.1.0-8.fc25.x86_64                           1/4 
  Verifying   : opencv-3.1.0-8.fc25.x86_64                                  2/4 
  Verifying   : python2-numpy-1:1.11.2-1.fc25.x86_64                        3/4 
  Verifying   : python2-nose-1.3.7-11.fc25.noarch                           4/4 

Installed:
  opencv.x86_64 3.1.0-8.fc25            opencv-python.x86_64 3.1.0-8.fc25       
  python2-nose.noarch 1.3.7-11.fc25     python2-numpy.x86_64 1:1.11.2-1.fc25    

Complete!
[root@localhost mythcat]# 
This is my test script with opencv to detect flow using Lucas-Kanade Optical Flow function.
This tracks some points in a black and white video.
First you need:
- one black and white video;
- not mp4 file type file;
- the color args need to be under 4 ( see is 3);
- I used this video:
I used cv2.goodFeaturesToTrack().
We take the first frame, detect some Shi-Tomasi corner points in it, then we iteratively track those points using Lucas-Kanade optical flow.
The function cv2.calcOpticalFlowPyrLK() we pass the previous frame, previous points and next frame.
The returns next points along with some status numbers which has a value of 1 if next point is found, else zero.
That iteratively pass these next points as previous points in next step.
See the code below:
import numpy as np
import cv2

cap = cv2.VideoCapture('candle')

# params for ShiTomasi corner detection
feature_params = dict( maxCorners = 77,
                       qualityLevel = 0.3,
                       minDistance = 7,
                       blockSize = 7 )

# Parameters for lucas kanade optical flow
lk_params = dict( winSize  = (17,17),
                  maxLevel = 1,
                  criteria = (cv2.TERM_CRITERIA_EPS | cv2.TERM_CRITERIA_COUNT, 10, 0.03))

# Create some random colors
color = np.random.randint(0,255,(100,3))

# Take first frame and find corners in it
ret, old_frame = cap.read()
old_gray = cv2.cvtColor(old_frame, cv2.COLOR_BGR2GRAY)
p0 = cv2.goodFeaturesToTrack(old_gray, mask = None, **feature_params)

# Create a mask image for drawing purposes
mask = np.zeros_like(old_frame)

while(1):
    ret,frame = cap.read()
    frame_gray = cv2.cvtColor(frame, cv2.COLOR_BGR2GRAY)

    # calculate optical flow
    p1, st, err = cv2.calcOpticalFlowPyrLK(old_gray, frame_gray, p0, None, **lk_params)

    # Select good points
    good_new = p1[st==1]
    good_old = p0[st==1]

    # draw the tracks
    for i,(new,old) in enumerate(zip(good_new,good_old)):
        a,b = new.ravel()
        c,d = old.ravel()
        mask = cv2.line(mask, (a,b),(c,d), color[i].tolist(), 2)
        frame = cv2.circle(frame,(a,b),5,color[i].tolist(),-1)
    img = cv2.add(frame,mask)

    cv2.imshow('frame',img)
    k = cv2.waitKey(30) & 0xff
    if k == 27:
        break

    # Now update the previous frame and previous points
    old_gray = frame_gray.copy()
    p0 = good_new.reshape(-1,1,2)

cv2.destroyAllWindows()
cap.release()
The output of this file is:

Thursday, February 23, 2017

The bad and good urllib.

This is a simple python script:
import urllib
opener = urllib.FancyURLopener({})
f = opener.open("http://www.ra___aer.ro/")
d=f.read()
fo = open('workfile.txt', 'w')
fo.write(d)
fo.close()
The really bad news comes from here:
http://blog.blindspotsecurity.com/2017/02/advisory-javapython-ftp-injections.html