I try to deal with python scripts under LibreOffice applications.
The full tutorial can be found here: Python and LibreOffice – part 001.
I will come with new tutorials about LibreOffice and python.
Sunday, December 11, 2016
Saturday, December 10, 2016
The python modules pygobject, pycairo and pygtk under Windows OS.
I used the python version 2.7 32 bits under .
The issue is to instal PyGTK python module but you can see I got errors.
I got the pygobject-2.28.3.win32-py2.7.msi, pycairo-1.8.10.win32-py2.7.msi and pygtk-2.24.0.win32-py2.7.msi from gnome website.
I install this python modules using registry and this option: Python from another location and I set my python path: C:\Python27\
As you can see this python modules works well.
C:\Python27>python

Python 2.7.12 (v2.7.12:d33e0cf91556, Jun 27 2016, 15:19:22) [MSC v.1500 32 bit (

Intel)] on win32

Type "help", "copyright", "credits" or "license" for more information.
The issue is to instal PyGTK python module but you can see I got errors.
C:\>cd Python27


C:\Python27>cd script

The system cannot find the path specified.


C:\Python27>cd Scripts


C:\Python27\Scripts>pip install PyGTK

Collecting PyGTK

Downloading pygtk-2.24.0.tar.bz2 (2.4MB)

100% |################################| 2.4MB 224kB/s

Complete output from command python setup.py egg_info:

ERROR: Could not import dsextras module: Make sure you have installed pygobj

ect.


----------------------------------------

Command "python setup.py egg_info" failed with error code 1 in c:\users\my_account

\appdata\local\temp\pip-build-os60hf\PyGTK\


C:\Python27\Scripts>pip install pygobject

Collecting pygobject

Downloading pygobject-2.28.3.tar.bz2 (889kB)

100% |################################| 890kB 550kB/s

Complete output from command python setup.py egg_info:

ERROR: Could not find pkg-config: Please check your PATH environment variabl

e.


----------------------------------------

Command "python setup.py egg_info" failed with error code 1 in c:\users\my_account

\appdata\local\temp\pip-build-lt0gbh\pygobject\
I got the pygobject-2.28.3.win32-py2.7.msi, pycairo-1.8.10.win32-py2.7.msi and pygtk-2.24.0.win32-py2.7.msi from gnome website.
I install this python modules using registry and this option: Python from another location and I set my python path: C:\Python27\
>>> import gobject

>>> dir(gobject)

['GBoxed', 'GEnum', 'GError', 'GFlags', 'GInterface', 'GObject', 'GObjectMeta',

...

>>> import cairo

>>> dir(cairo)

['ANTIALIAS_DEFAULT', 'ANTIALIAS_GRAY', 'ANTIALIAS_NONE', 'ANTIALIAS_SUBPIXEL',

>>> import pygtk

>>> dir(pygtk)

['__all__', '__builtins__', '__doc__', '__file__', '__name__', '__package__', '_

get_available_versions', '_our_dir', '_pygtk_2_0_dir', '_pygtk_dir_pat', '_pygtk

_required_version', 'fnmatch', 'glob', 'os', 'require', 'require20', 'sys']
As you can see this python modules works well.
Thursday, December 8, 2016
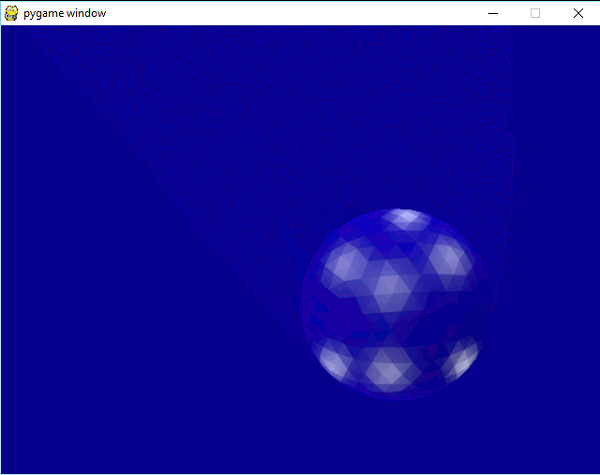
Noise 2D, 3D, 4D with opensimplex python module.
OpenSimplex noise is an n-dimensional gradient noise function that was developed in order to overcome the patent-related issues surrounding Simplex noise, while continuing to also avoid the visually-significant directional artifacts characteristic of Perlin noise.
Let's start with instalation:
Test some examples from official page:
Let's make a image example with noise 2D:
Let's start with instalation:
C:\Python27\Scripts>pip install OpenSimplex

Collecting OpenSimplex

Downloading opensimplex-0.2.tar.gz

Installing collected packages: OpenSimplex

Running setup.py install for OpenSimplex ... done

Successfully installed OpenSimplex-0.2
Test some examples from official page:
C:\Python27>python

Python 2.7.12 (v2.7.12:d33e0cf91556, Jun 27 2016, 15:19:22) [MSC v.1500 32 bit (

Intel)] on win32

Type "help", "copyright", "credits" or "license" for more information.

>>> from opensimplex import OpenSimplex

>>> tmp = OpenSimplex()

>>> print (tmp.noise2d(x=10, y=10))

-0.297251513589

>>> tmp = OpenSimplex(seed=1)

>>> print (tmp.noise2d(x=10, y=10))

-0.734782324747

>>> dir(OpenSimplex)

['__class__', '__delattr__', '__dict__', '__doc__', '__format__', '__getattribut

e__', '__hash__', '__init__', '__module__', '__new__', '__reduce__', '__reduce_e

x__', '__repr__', '__setattr__', '__sizeof__', '__str__', '__subclasshook__', '_

_weakref__', '_extrapolate2d', '_extrapolate3d', '_extrapolate4d', 'noise2d', 'n

oise3d', 'noise4d']
Let's make a image example with noise 2D:
from opensimplex import OpenSimplex

from PIL import Image


height = int(input("Enter in the map height: "))

width = int(input("Enter in the map width: "))


def main():

    simplex = OpenSimplex()

    im = Image.new('L', (width, height))

    for y in range(0, height):

        for x in range(0, width):

            value = simplex.noise2d(x , y )

            color = int((value + 1) * 128)

            im.putpixel((x, y), color)

    im.save('noise2d.png')

    im.show()

if __name__ == '__main__':

    main()
Tuesday, December 6, 2016
The python-nmap python module fail.
You can read about this python module here.
First let's install this python module.
About this python-nmap version you can read here.
I try to run the example source code but not of this example working.
For example I got this:
First let's install this python module.
C:\Python27>cd Scripts


C:\Python27\Scripts>pip install python-nmap

Collecting python-nmap

Downloading python-nmap-0.6.1.tar.gz (41kB)

100% |################################| 51kB 240kB/s

Installing collected packages: python-nmap

Running setup.py install for python-nmap ... done

Successfully installed python-nmap-0.6.1
About this python-nmap version you can read here.
I try to run the example source code but not of this example working.
For example I got this:
>>> nm.scan('127.0.0.1', '22-443')

{'nmap': {'scanstats': {'uphosts': '1', 'timestr': 'Wed Dec 07 08:13:01 2016', '

downhosts': '-1', 'totalhosts': '0', 'elapsed': '10.74'}, 'scaninfo': {'tcp': {'

services': '22-443', 'method': 'syn'}, 'error': [u'dnet: Failed to open device l

o0\r\nQUITTING!\r\n', u'dnet: Failed to open device lo0\r\nQUITTING!\r\n']}, 'co

mmand_line': 'nmap -oX - -p 22-443 -sV 127.0.0.1'}, 'scan': {}}
Thursday, December 1, 2016
Python 3.4 and Flask module - part 001.
This is a simple tutorial about how to install Flask python module under python 3.4 .
I think this can also working with any python 3.x versions.
Flask is a microframework for creating web applications.
First you need to install your python 3.4 and then you will get the pip script from here.
About pip you can read more on the pip webpage.
Run the pip install:
Go to into your Python folder and start the pip installation of Flask python module.
C:\Python34>cd Scripts
C:\Python34\Scripts>pip install Flask
Downloading/unpacking Flask
This is the first step. The next step is to start the default webpage.
Using python command shell you can test the Flask python module.
>>> from flask import Flask
>>>
>>> app = Flask(__name__)
>>>
>>> @app.route('/')
... def homepage():
... return "Hi there, how ya doin?"
...
>>>
>>> if __name__ == "__main__":
... app.run()
...
* Running on http://127.0.0.1:5000/
127.0.0.1 - - [26/Sep/2014 23:25:01] "GET / HTTP/1.1" 200 -
127.0.0.1 - - [26/Sep/2014 23:25:02] "GET /favicon.ico HTTP/1.1" 404 -
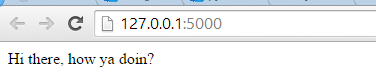
As you can see is running into browser at http://127.0.0.1:5000 .
Let's put this into one python script.
You need to make a new folder called
Make a new script named
Now you can just run the script and all will be working well.
Flask looks for template files inside the
Go to the folder
Now, create a file called
To call this
Start your python script and you will see the content of your
I think this can also working with any python 3.x versions.
Flask is a microframework for creating web applications.
First you need to install your python 3.4 and then you will get the pip script from here.
About pip you can read more on the pip webpage.
Run the pip install:
python get-pip.py
Go to into your Python folder and start the pip installation of Flask python module.
C:\Python34>cd Scripts
C:\Python34\Scripts>pip install Flask
Downloading/unpacking Flask
This is the first step. The next step is to start the default webpage.
Using python command shell you can test the Flask python module.
>>> from flask import Flask
>>>
>>> app = Flask(__name__)
>>>
>>> @app.route('/')
... def homepage():
... return "Hi there, how ya doin?"
...
>>>
>>> if __name__ == "__main__":
... app.run()
...
* Running on http://127.0.0.1:5000/
127.0.0.1 - - [26/Sep/2014 23:25:01] "GET / HTTP/1.1" 200 -
127.0.0.1 - - [26/Sep/2014 23:25:02] "GET /favicon.ico HTTP/1.1" 404 -
As you can see is running into browser at http://127.0.0.1:5000 .
Let's put this into one python script.
You need to make a new folder called
FlaskApp and go to this folder.Make a new script named
app.py with the source code you tested.Now you can just run the script and all will be working well.
Flask looks for template files inside the
templates folder.Go to the folder
FlaskApp and create a folder called templates.Now, create a file called
index.html and fill with you html source code.To call this
index.html you need to add this line of source code ino your script:from flask import Flask, render_template and def main():
return render_template('index.html')Start your python script and you will see the content of your
index.html.
Wednesday, November 30, 2016
OpenGL and OpenCV with python 2.7 - part 004.
Today I will continue the series of graphics processing in OpenGL and OpenCV.
The goal of this tutorial is the download and load into the python script of a youtube video.
To do that we need another two modules python.
First, I download and install the python 2.7.12 32 bit version from the internet.
First update the pip tool and install numpy python module:
The main reason to have the numpy python module: it is often used with OpenCV python module.
For OpenCV python module installation you need to see my tutorial.
After you install it, test the OpenCV python module:
Install pafy python module.
This module help you to download video from youtube but you need also the youtube-dl python module.
So let's install the youtube-dl and pafy python modules.
I make a simple python script named: get_yt.py.
The source code of this script is simple:
I used the URL of a video clip from youtube channel of Arden Cho to tested.
If you want to keep the video into your folder just remove the last line from the python script.
The result is this output:
C:\Python27>python.exe get_yt.py
video.title
Can't Help Falling in Love With You - Arden Cho
video.rating
4.99041318893
video.viewcount, video.author, video.length
10980 ardenBcho 168
video.duration, video.likes, video.dislikes
00:02:48 1665 4
video.description
Recorded this song a couple months ago when I was in Boston, this song always reminds
me of holidays and love so sharing that with you!
Guitar by Koo Chung https://youtube.com/koochung
Violin and Video editing/production by Daniel Jang https://www.youtube.com/metal
sides
Production + Keys by Tim Bongiovanni https://www.northgateproductions.net
Filmed by Rob Mark https://www.instagram.com/rmarq_
If you like my music comment and SHARE! You can also support me by buying & rati
ng my album on iTunes!! https://itunes.apple.com/us/album/my-true-happy/id592588
859
You can follow me at: SnapChat: ardencho
http://www.instagram.com/arden_cho
http://www.facebook.com/hiardencho
http://www.twitter.com/arden_cho
http://www.imdb.me/ardencho
resolution
video:mp4@1920x1080
input_movie5 Bytes [100.00%] received. Rate: [5371 KB/s]. ETA: [0 secs]
Can't Help Falling in Love With You - Arden Cho.mp4
delete movie
The goal of this tutorial is the download and load into the python script of a youtube video.
To do that we need another two modules python.
First, I download and install the python 2.7.12 32 bit version from the internet.
C:\Python27>python.exe

Python 2.7.12 (v2.7.12:d33e0cf91556, Jun 27 2016, 15:19:22) [MSC v.1500 32 bit (

Intel)] on win32

Type "help", "copyright", "credits" or "license" for more information.
First update the pip tool and install numpy python module:
C:\Python27\Scripts>python -m pip install --upgrade pip

Collecting pip

Downloading pip-9.0.1-py2.py3-none-any.whl (1.3MB)

100% |################################| 1.3MB 419kB/s

Installing collected packages: pip

Found existing installation: pip 8.1.1

Uninstalling pip-8.1.1:

Successfully uninstalled pip-8.1.1

Successfully installed pip-9.0.1

C:\Python27\Scripts>pip install numpy

Collecting numpy

  Downloading numpy-1.11.2-cp27-none-win32.whl (6.5MB)

    100% |################################| 6.5MB 79kB/s

Installing collected packages: numpy

Successfully installed numpy-1.11.2
The main reason to have the numpy python module: it is often used with OpenCV python module.
For OpenCV python module installation you need to see my tutorial.
After you install it, test the OpenCV python module:
C:\Python27>python.exe

Python 2.7.12 (v2.7.12:d33e0cf91556, Jun 27 2016, 15:19:22) [MSC v.1500 32 bit (

Intel)] on win32

Type "help", "copyright", "credits" or "license" for more information.

>>> import cv2

>>> print cv2.__version__

3.0.0
Install pafy python module.
This module help you to download video from youtube but you need also the youtube-dl python module.
So let's install the youtube-dl and pafy python modules.
C:\Python27>cd Scripts

C:\Python27\Scripts>pip install youtube-dl

Collecting youtube-dl

  Downloading youtube_dl-2016.12.1-py2.py3-none-any.whl (1.5MB)

    100% |################################| 1.5MB 377kB/s

Installing collected packages: youtube-dl

Successfully installed youtube-dl-2016.12.1

C:\Python27\Scripts>pip install pafy

Collecting pafy

  Downloading pafy-0.5.2-py2.py3-none-any.whl

Installing collected packages: pafy

Successfully installed pafy-0.5.2
I make a simple python script named: get_yt.py.
The source code of this script is simple:
import os

import pafy

# Download the video

video = pafy.new('https://www.youtube.com/watch?v=O5VCjktWVD4')

print "video.title"

print video.title

print "video.rating"

print video.rating

print "video.viewcount, video.author, video.length"

print video.viewcount, video.author, video.length

print "video.duration, video.likes, video.dislikes"

print video.duration, video.likes, video.dislikes

print "video.description"

print video.description

resolution = video.getbestvideo(preftype="mp4")

print "resolution"

print resolution

input_movie = resolution.download(quiet=False)

print "input_movie"

print input_movie

print "delete movie"

os.remove(input_movie)
I used the URL of a video clip from youtube channel of Arden Cho to tested.
If you want to keep the video into your folder just remove the last line from the python script.
The result is this output:
C:\Python27>python.exe get_yt.py
video.title
Can't Help Falling in Love With You - Arden Cho
video.rating
4.99041318893
video.viewcount, video.author, video.length
10980 ardenBcho 168
video.duration, video.likes, video.dislikes
00:02:48 1665 4
video.description
Recorded this song a couple months ago when I was in Boston, this song always reminds
me of holidays and love so sharing that with you!
Guitar by Koo Chung https://youtube.com/koochung
Violin and Video editing/production by Daniel Jang https://www.youtube.com/metal
sides
Production + Keys by Tim Bongiovanni https://www.northgateproductions.net
Filmed by Rob Mark https://www.instagram.com/rmarq_
If you like my music comment and SHARE! You can also support me by buying & rati
ng my album on iTunes!! https://itunes.apple.com/us/album/my-true-happy/id592588
859
You can follow me at: SnapChat: ardencho
http://www.instagram.com/arden_cho
http://www.facebook.com/hiardencho
http://www.twitter.com/arden_cho
http://www.imdb.me/ardencho
resolution
video:mp4@1920x1080
input_movie5 Bytes [100.00%] received. Rate: [5371 KB/s]. ETA: [0 secs]
Can't Help Falling in Love With You - Arden Cho.mp4
delete movie
Sunday, November 6, 2016
Python and OAuth2 with Google API.
If you want to do this then is simple to do. The most complex part comes from google settings.
But that can be easy if you make it from a few times.
I used OAuth2 with JSON file to make authentification.
You can see my full tutorial here.
Sunday, October 23, 2016
Using text file with python 2.7 .
This simple tutorial is about text file. The text file come with txt extension.
It is a file containing text that can be used and further processing by functions and modules python.
I used Tkinter python module. The reason I chose this python mpodule is:
The name of this file is: Tkinter_funct.txt
Open your python and try this source code:
You will see the content of dir python module.
The text file is also have this text output.
To read the file is need to open the file with open function, to put position for read by using seek function and to read with read function.
This example will show you how is working:
Will open the file named Tkinter_funct.txt and r+ access to file.
The position it is set to 1.
The read function make all with full content output.
Now let's see the next steps, by change the read and seek values.
This outputs come with parts of all content and show you how it's working.
It is a file containing text that can be used and further processing by functions and modules python.
I used Tkinter python module. The reason I chose this python mpodule is:
- old python module;
- rapidly developing graphical interfaces.
The name of this file is: Tkinter_funct.txt
Open your python and try this source code:
C:\Python27>python.exe

Python 2.7.8 (default, Jun 30 2014, 16:08:48) [MSC v.1500 64 bit (AMD64)] on win32

Type "help", "copyright", "credits" or "license" for more information.

>>> import Tkinter

>>> from Tkinter import *

>>> Tkinter_all=dir(Tkinter)

>>> Tkinter_file=open('Tkinter_funct.txt','w')

>>> Tkinter_file.write(str(Tkinter_all))

>>> print Tkinter_all
You will see the content of dir python module.
The text file is also have this text output.
To read the file is need to open the file with open function, to put position for read by using seek function and to read with read function.
This example will show you how is working:
>>> test=open('Tkinter_funct.txt','r+')

>>> test.seek(1)

>>> test.read()
Will open the file named Tkinter_funct.txt and r+ access to file.
The position it is set to 1.
The read function make all with full content output.
Now let's see the next steps, by change the read and seek values.
>>> test.read(1)

''

>>> test.read(2)

''

>>> test.read(10)

''

>>> test.seek(2)

>>> test.read(1)

'A'

>>> test.read(10)

"CTIVE', 'A"

>>> test.read(20)

"LL', 'ANCHOR', 'ARC'"
This outputs come with parts of all content and show you how it's working.
Monday, October 3, 2016
The python CacheControl module - part 002.
Today was a hard day and this is the reason I make this short tutorial.
Teory of HTTP:
HTTP specifies four response cache headers that you can set to enable caching:
Come with a simple class named DictCache. You can named with any name and is a BaseCache class.
The next step I make is to show you how can access it.
One simpe way is to see the page - first session.
The complex come when you need to access for example data and info like:
'adapters', 'auth', 'cert', 'close', 'cookies', 'delete', 'get', 'get_adapter', 'head', 'headers', 'hooks', 'max_redirects', 'merge_environment_settings', 'mount', 'options', 'params', 'patch', 'post', 'prepare_request', 'proxies', 'put', 'rebuild_auth', 'rebuild_method', 'rebuild_proxies', 'redirect_cache', 'request', 'resolve_redirects', 'send', 'stream', 'trust_env', 'verify'
And this is come with teh second session from this source code:
import requests
from cachecontrol import CacheControl
from cachecontrol.cache import BaseCache
class DictCache(BaseCache):
def __init__(self, init_dict=None):
self.data = init_dict or {}
def get(self, key):
return self.data.get(key, None)
def set(self, key, value):
self.data.update({key: value})
def delete(self, key):
self.data.pop(key)
print "first session requests"
sess = requests.session()
cached_sess = CacheControl(sess)
response = cached_sess.get('http://google.com')
print '=================='
print 'see page by add this: print response.text'
print '=================='
print "second session BaseCache"
sess2 = requests.session()
base=DictCache(sess2)
print '=================='
print "dir(base)"
print dir(base)
print '=================='
print"dir(base.data)"
print dir(base.data)
print '=================='
print"base.data.max_redirects"
print base.data.max_redirects
print '=================='
Teory of HTTP:
HTTP specifies four response cache headers that you can set to enable caching:
Cache-ControlExpiresETagLast-Modified
- Expiration Caching - used to cache your entire response for a specific amount of time (e.g. 24 hours), simple, but cache invalidation is more difficult;
- Validation Caching - this is more complex and used to cache your response, but allows you to dynamically invalidate it as soon as your content changes.
Come with a simple class named DictCache. You can named with any name and is a BaseCache class.
The next step I make is to show you how can access it.
One simpe way is to see the page - first session.
The complex come when you need to access for example data and info like:
'adapters', 'auth', 'cert', 'close', 'cookies', 'delete', 'get', 'get_adapter', 'head', 'headers', 'hooks', 'max_redirects', 'merge_environment_settings', 'mount', 'options', 'params', 'patch', 'post', 'prepare_request', 'proxies', 'put', 'rebuild_auth', 'rebuild_method', 'rebuild_proxies', 'redirect_cache', 'request', 'resolve_redirects', 'send', 'stream', 'trust_env', 'verify'
And this is come with teh second session from this source code:
import requests
from cachecontrol import CacheControl
from cachecontrol.cache import BaseCache
class DictCache(BaseCache):
def __init__(self, init_dict=None):
self.data = init_dict or {}
def get(self, key):
return self.data.get(key, None)
def set(self, key, value):
self.data.update({key: value})
def delete(self, key):
self.data.pop(key)
print "first session requests"
sess = requests.session()
cached_sess = CacheControl(sess)
response = cached_sess.get('http://google.com')
print '=================='
print 'see page by add this: print response.text'
print '=================='
print "second session BaseCache"
sess2 = requests.session()
base=DictCache(sess2)
print '=================='
print "dir(base)"
print dir(base)
print '=================='
print"dir(base.data)"
print dir(base.data)
print '=================='
print"base.data.max_redirects"
print base.data.max_redirects
print '=================='
Sunday, October 2, 2016
The python CacheControl module - part 001.
This tutorials series want to be a better approach to understand the several mechanisms that HTTP provides for web cache validation. Let's start with the first part.
You can install it with pip
This help you to add headers, form data, multipart files, and parameters with simple
Python dictionaries, and access the response data in the same way.
The theory part.
You can use CacheControl with the basic wrapper way or via a requests Transport Adapter.
The Transport Adapters provide a mechanism to define interaction methods for an HTTP service.
The code will come with this template (docs example):
So the Transport Adapter will cover the HTTPCore and WSGICore.
Now, both (the wrapper and adapter classes) allow providing a custom cache store object.
This is used for storing your cached data.
The next step will be
Also the CacheControl python module comes with a few storage backends for storing your cache objects.
First is DictCache is the default cache, next is FileCache is similar to the caching mechanism provided by httplib2 and the last is RedisCache uses a Redis database to store values.
One note about requesting the filecache extra can use dependency with: pip install cachecontrol[filecache].
The CacheControl’s support of ETags by returns a response with the appropriate If-None-Match header.
Seem the ETag support only takes effect when the time has expired.
The ETag or entity tag, is part of HTTP, the protocol for the World Wide Web and provides for web cache validation. You can also take a look at Hypertext Transfer Protocol (HTTP/1.1): Caching.
The documentation of cachecontrol python module tells us:
Caching is hard! It is considered one of the great challenges of computer science.
Yes! you can agree with that, because some parts need to be understand well.
This issues: Timezones, Cached Responses and Query String Params are the most important parts.
Any info about this issue will be grea, just put your comments.
You can install it with pip
C:\>cd Python27
C:\Python27>cd Scripts
C:\Python27\Scripts>pip install cachecontrol
Collecting cachecontrol
  Downloading CacheControl-0.11.7.tar.gz
Requirement already satisfied (use --upgrade to upgrade):
requests in c:\python27\lib\site-packages (from cachecontrol)
Building wheels for collected packages: cachecontrol
Running setup.py bdist_wheel for cachecontrol ... done
Stored in directory: C:\Users\GeorgeCatalin\AppData\Local\pip\\ Cache\wheels\9b\94\d2\1793b004461b5bc238a89e260cd2b9f770437c42424fdd0943
Successfully built cachecontrol
Installing collected packages: cachecontrol
Successfully installed cachecontrol-0.11.7 import requests
from cachecontrol import CacheControl
sess = requests.session()
cached_sess = CacheControl(sess)
response = cached_sess.get('http://google.com')
print response
print response.text
... This help you to add headers, form data, multipart files, and parameters with simple
Python dictionaries, and access the response data in the same way.
The theory part.
You can use CacheControl with the basic wrapper way or via a requests Transport Adapter.
The Transport Adapters provide a mechanism to define interaction methods for an HTTP service.
The code will come with this template (docs example):
sess = requests.Session()
sess.mount('http://', CacheControlAdapter()) So the Transport Adapter will cover the HTTPCore and WSGICore.
Now, both (the wrapper and adapter classes) allow providing a custom cache store object.
This is used for storing your cached data.
The next step will be
from cachecontrol.caches import FileCache
sess = CacheControl(requests.Session(),
cache=FileCache('.webcache')) Also the CacheControl python module comes with a few storage backends for storing your cache objects.
First is DictCache is the default cache, next is FileCache is similar to the caching mechanism provided by httplib2 and the last is RedisCache uses a Redis database to store values.
One note about requesting the filecache extra can use dependency with: pip install cachecontrol[filecache].
The CacheControl’s support of ETags by returns a response with the appropriate If-None-Match header.
Seem the ETag support only takes effect when the time has expired.
The ETag or entity tag, is part of HTTP, the protocol for the World Wide Web and provides for web cache validation. You can also take a look at Hypertext Transfer Protocol (HTTP/1.1): Caching.
The documentation of cachecontrol python module tells us:
Caching is hard! It is considered one of the great challenges of computer science.
Yes! you can agree with that, because some parts need to be understand well.
This issues: Timezones, Cached Responses and Query String Params are the most important parts.
Any info about this issue will be grea, just put your comments.
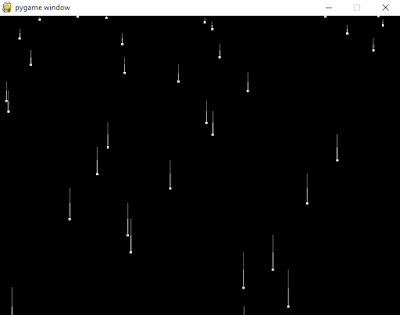
Another simple effect with pygame.
The pygame module come with many features for users.
I used the pygame version to make one simple tutorial about pallete functions :
>>> print pygame.version.ver
1.9.2b1
The result of my tutorial is this:
I used the pygame version to make one simple tutorial about pallete functions :
>>> print pygame.version.ver
1.9.2b1
The result of my tutorial is this:
Thursday, September 22, 2016
Another learning python post with pygame.
This is a simple python script with pygame python module.
I make it for for educational purposes for the children.
I used words into romanian language for variables, functions and two python class.
See this tutorial here
I make it for for educational purposes for the children.
I used words into romanian language for variables, functions and two python class.
See this tutorial here
Thursday, September 8, 2016
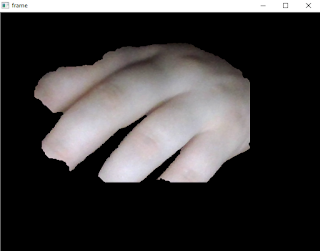
OpenGL and OpenCV with python 2.7 - part 003.
If you have seen the last tutorial about OpenCV, then this tutorial comes to complete with one source code.
This source code will cut the background of webcam.
The webcam output is take by VideoCapture function.
This part of source code: np.zeros((1,65),np.float64) will return a new array of given shape and type, filled with zeros.
The result of this parts is used with function grabCut from cv2 python module.
This is the source code:
import numpy as np
import cv2
cap = cv2.VideoCapture(0)
while(True):
    ret, img = cap.read()
    #img = cv2.imread('test002.jpg')
    mask = np.zeros(img.shape[:2],np.uint8)

    bgdModel = np.zeros((1,65),np.float64)
    fgdModel = np.zeros((1,65),np.float64)

    rect = (50,50,450,290)
    cv2.grabCut(img,mask,rect,bgdModel,fgdModel,5,cv2.GC_INIT_WITH_RECT)

    mask2 = np.where((mask==2)|(mask==0),0,1).astype('uint8')
    img = img*mask2[:,:,np.newaxis]
    cv2.imshow('frame',img)
    if 0xFF & cv2.waitKey(5) == 27:
        break
cap.release()
cv2.destroyAllWindows()
Subscribe to:
Posts (Atom)