You can download your free ebook from O'Reilly.
The Functional Programming in Python by David Mertz - publisher: O'Reilly - released: June 2015.
David Mertz is a director of the Python Software Foundation, and chair
of its Trademarks and Outreach & Education Committees. He wrote the
columns Charming Python and XML Matters for IBM developerWorks and the Addison-Wesley book Text Processing in Python. David has spoken at multiple OSCON and PyCon events.
This is the download link.
Saturday, March 19, 2016
Thursday, February 4, 2016
Testing PyQt4 under Python 3.5.1.
Today I working well with python 3.5.1.
Most of my source code was wrote with python 2.7 and the next step was to using pip3.5 to update and upgrade some python modules.
I try to install PyQt4 with pip3.5 - not working.
So I used the old way: whl file from here.
That was good, most of the scripts was running.
The main problem was OpenGL and that will make errors when you try to use QtOpenGL.
The result of this seam to me the python 3.5.1 it's now without OpenGL features.
The most short source code into Python 3.5.1 .
Just type this :
That will open your browser with one comics from xkcd website.
The antigravity module was added to Python 3.5.1. I'm not sure but seam working also with python 2.7 version.
import antigravity That will open your browser with one comics from xkcd website.
The antigravity module was added to Python 3.5.1. I'm not sure but seam working also with python 2.7 version.
Saturday, January 23, 2016
wmi python module - part 002.
According to MSDN Microsoft the Win32_Process WMI class represents a process on an operating system.
We can see all of the inherited properties of processes:
We can see all of the inherited properties of processes:
class Win32_Process : CIM_Process
{
  string   Caption;
  string   CommandLine;
  string   CreationClassName;
  datetime CreationDate;
  string   CSCreationClassName;
  string   CSName;
  string   Description;
  string   ExecutablePath;
  uint16   ExecutionState;
  string   Handle;
  uint32   HandleCount;
  datetime InstallDate;
  uint64   KernelModeTime;
  uint32   MaximumWorkingSetSize;
  uint32   MinimumWorkingSetSize;
  string   Name;
  string   OSCreationClassName;
  string   OSName;
  uint64   OtherOperationCount;
  uint64   OtherTransferCount;
  uint32   PageFaults;
  uint32   PageFileUsage;
  uint32   ParentProcessId;
  uint32   PeakPageFileUsage;
  uint64   PeakVirtualSize;
  uint32   PeakWorkingSetSize;
  uint32   Priority = NULL;
  uint64   PrivatePageCount;
  uint32   ProcessId;
  uint32   QuotaNonPagedPoolUsage;
  uint32   QuotaPagedPoolUsage;
  uint32   QuotaPeakNonPagedPoolUsage;
  uint32   QuotaPeakPagedPoolUsage;
  uint64   ReadOperationCount;
  uint64   ReadTransferCount;
  uint32   SessionId;
  string   Status;
  datetime TerminationDate;
  uint32   ThreadCount;
  uint64   UserModeTime;
  uint64   VirtualSize;
  string   WindowsVersion;
  uint64   WorkingSetSize;
  uint64   WriteOperationCount;
  uint64   WriteTransferCount;
}; import wmi
c = wmi.WMI()
for process in c.Win32_Process ():
name = process.Properties_("Name").Value
pid = process.Properties_('ProcessID').Value
parent = process.Properties_('ParentProcessId')
termination = process.Properties_('TerminationDate')
print (name,' = pid -',pid,'+', parent,'|termination_date-',termination) firefox.exe = pid - 13788 + 2564 |termination_date- None
explorer.exe = pid - 1048 + 772 |termination_date- None
sublime_text.exe = pid - 11404 + 2564 |termination_date- None
plugin_host.exe = pid - 7432 + 11404 |termination_date- None
cmd.exe = pid - 9568 + 2564 |termination_date- None
conhost.exe = pid - 14124 + 9568 |termination_date- None
conhost.exe = pid - 9700 + 11208 |termination_date- None
Taskmgr.exe = pid - 9424 + 13404 |termination_date- None
WmiPrvSE.exe = pid - 9764 + 772 |termination_date- None
SpfService64.exe = pid - 11908 + 684 |termination_date- None
python.exe = pid - 1308 + 9568 |termination_date- None Friday, January 22, 2016
wmi python module - part 001.
Named WMI from Windows Management Instrumentation, this python module allow you to use Microsoft’s implementation of Web-Based Enterprise Management ( WBEM ).
Is a set of extensions to the Windows Driver Model AND that provides an operating system interface.
allows you to scripting languages like VBScript to manage Microsoft Windows personal computers and servers, both locally and remotely.
You cand read about this python module here.
Let try first example :
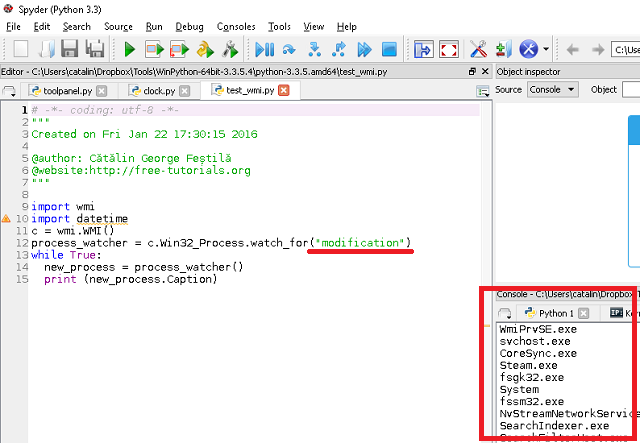
Now let's see another example can used by you with wmi python module.
This example let you see your processes.
I used the python version 3.3.5 and Spyder ( Scientific PYthon Development EnviRonment ) to test the script.
You can change .watch_for method args with: creation, deletion, modification or operation.
Is a set of extensions to the Windows Driver Model AND that provides an operating system interface.
allows you to scripting languages like VBScript to manage Microsoft Windows personal computers and servers, both locally and remotely.
You cand read about this python module here.
C:\Python34\Scripts>pip install  wmi
...
Installing collected packages: wmi
Running setup.py install for wmi
warning: install_data: setup script did not provide a directory for 'readme.
txt' -- installing right in 'C:\Python34'
...
Successfully installed wmi
Cleaning up...
Let try first example :
C:\Python34>python
Python 3.4.1 (v3.4.1:c0e311e010fc, May 18 2014, 10:45:13) [MSC v.1600 64 bit (AM
D64)] on win32
Type "help", "copyright", "credits" or "license" for more information.
>>> import wmi
>>> remote_process = wmi.WMI (computer="home").new ("Win32_Process")
>>> for i in wmi.WMI ().Win32_OperatingSystem ():
...     print (i.Caption)
...
Microsoft Windows 10 Home
Now let's see another example can used by you with wmi python module.
This example let you see your processes.
import wmi
import datetime
c = wmi.WMI()
process_watcher = c.Win32_Process.watch_for("modification")
while True:
  new_process = process_watcher()
  print (new_process.Caption)
I used the python version 3.3.5 and Spyder ( Scientific PYthon Development EnviRonment ) to test the script.
You can change .watch_for method args with: creation, deletion, modification or operation.
Subscribe to:
Posts (Atom)