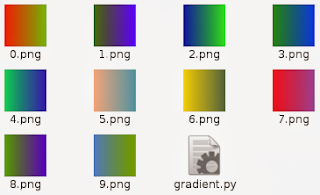
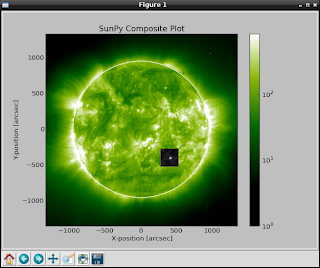
analitics

Pages

Saturday, November 30, 2013

How I saw the Comet C/2012 S1 ISON with python .

I use sunpy python module to see the Comet C/2012 S1 ISON and SOHO LASCO C3 instrument.
This is the result:

The script is simple.
$ python
Python 2.7.3 (default, Jan  2 2013, 16:53:07) 
[GCC 4.7.2] on linux2
Type "help", "copyright", "credits" or "license" for more information.
>>> import sunpy
>>> from sunpy.net.helioviewer import HelioviewerClient
>>> 
>>> hv = HelioviewerClient()
>>> datasources = hv.get_data_sources()
>>> 
>>> # print a list of datasources and their associated ids
... for observatory, instruments in datasources.items():
...     for inst, detectors in instruments.items():
...         for det, measurements in detectors.items():
...             for meas, params in measurements.items():
...                 print("%s %s: %d" % (observatory, params['nickname'], params['sourceId']))
... 
Yohkoh SXT AlMgMn: 33
Yohkoh SXT thin-Al: 34
Yohkoh SXT white-light: 35
PROBA2 SWAP 174: 32
STEREO_A EUVI-A 195: 21
STEREO_A EUVI-A 304: 23
STEREO_A EUVI-A 284: 22
STEREO_A EUVI-A 171: 20
STEREO_A COR2-A: 29
STEREO_A COR1-A: 28
STEREO_B EUVI-B 195: 25
STEREO_B EUVI-B 304: 27
STEREO_B EUVI-B 284: 26
STEREO_B EUVI-B 171: 24
STEREO_B COR2-B: 31
STEREO_B COR1-B: 30
SOHO MDI Mag: 6
SOHO MDI Int: 7
SOHO EIT 195: 1
SOHO EIT 304: 3
SOHO EIT 284: 2
SOHO EIT 171: 0
SOHO LASCO C3: 5
SOHO LASCO C2: 4
SDO AIA 1700: 16
SDO AIA 211: 12
SDO AIA 335: 14
SDO AIA 1600: 15
SDO AIA 304: 13
SDO AIA 193: 11
SDO AIA 131: 9
SDO AIA 4500: 17
SDO AIA 94: 8
SDO AIA 171: 10
SDO HMI Mag: 19
SDO HMI Int: 18
This show me all instruments from sunpy. You see all instruments online here
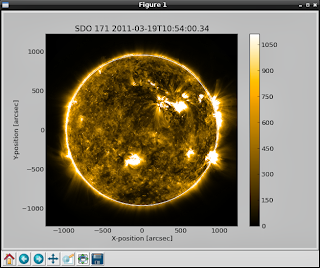
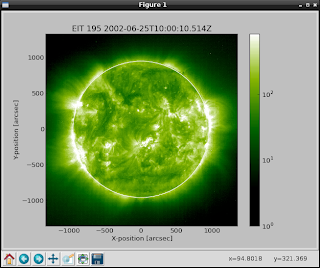
The next step is to take one png image :
>>> hv.download_png('2013/11/29 00:15:00', 50, "[SOHO,LASCO,C3,white-light,1,100]", x0=0, y0=0, width=768, height=768)
The settings are : date and time , the image resolution (arcseconds per pixel), the SOHO LASCO C3 instrument with the layer visibility , center points and size

Friday, November 8, 2013

Using python with Image, ImageFilter, ImageChops and custom image filter.

Today I will sow you some filters using python Image, ImageFilter and ImageChops.

I make this default python script to open one image and after will be delete from memory.See the default image:


I make also one python class named TEST_FILTER.

This class will have all data from filter, see filterargs.

The filterargs args it's one matrix and this will be the filter.

The default script ...

import Image
import ImageFilter
import ImageChops

class TEST_FILTER(ImageFilter.BuiltinFilter):
    name="TestFilter"
    filterargs = (3,3),10,0,(1,0,1,0,0,0,1,0,1)

def main ():
    filename = "test-gentoo.jpg"
    image = Image.open(filename);
    del image;
if (__name__ =="__main__"):
   main();

Let's try first filter : TEST_FILTER

import Image
import ImageFilter
import ImageChops

class TEST_FILTER(ImageFilter.BuiltinFilter):
    name="TestFilter"
    filterargs = (3,3),10,0,(1,0,1,0,0,0,1,0,1)

def main ():
    filename = "test-gentoo.jpg"
    image = Image.open(filename);
    image.filter(TEST_FILTER).show();
    del image;
if (__name__ =="__main__"):
   main();

The result will be this:


Now for each filter will change this source code...

    image.filter(TEST_FILTER).show();

...with the new filter source code.

Let's see some filters ...

EMBOSS - filter

    image.filter(ImageFilter.EMBOSS).show();

FIND_EDGES - filter

    image.filter(ImageFilter.FIND_EDGES).show();

BLUR - filter

    image.filter(ImageFilter.BLUR).show();

CONTOUR - filter

    image.filter(ImageFilter.CONTOUR).show();

DETAIL - filter

    image.filter(ImageFilter.DETAIL).show();

EDGE_ENHANCE - filter

    image.filter(ImageFilter.EDGE_ENHANCE).show();

Now image convert with bit 1.

    image.convert("1").show();

Invert image with ImageChops.

    ImageChops.invert(image).show();

Thursday, October 31, 2013

News Python 2.6.9 final was released on October 29 2013.

News about python from www.python.org.
Python 2.6.9 is a security-fix source-only release for Python 2.6.8, fixing several reported security issues: issue 16037, issue 16038, issue 16039, issue 16040, issue 16041, and issue 16042 (CVE-2013-1752, long lines consuming too much memory), as well as issue 14984 (security enforcement on $HOME/.netrc files), issue 16248 (code execution vulnerability in tkinter), and issue 18709 (CVE-2013-4238, SSL module handling of NULL bytes inside subjectAltName).

Monday, October 21, 2013

Python versus Matlab - good article by Luis Pedro Coelho

Luis Pedro Coelho is a computational biologist at EMBL.
In this article Luis Pedro Coelho come with many arguments about Python versus Matlab.
Very good article ...

Thursday, October 17, 2013

How to make a color gradient and images with python script.

The Image and ImageDraw provide simple 2D graphics to create new images, annotate or retouch existing images, and to generate graphics.

Also this can help you to make on the fly images for you.

Let's see one example ...

First you need to import this modules and random python module

import Image,ImageDraw
from random import randint as rint

The next step : make one image , get some random numbers...

You need two colors : first is one random color and second is make from first color, see next source code:

img = Image.new("RGB", (500,500), "#FFFFFF")
draw = ImageDraw.Draw(img)
r,g,b = rint(0,255), rint(0,255), rint(0,255)
dr = (rint(0,255) - r)/500.
dg = (rint(0,255) - g)/500.
db = (rint(0,255) - b)/500.

Now you need to draw lines with this gradient of two colors.

    for i in range(500):
        r,g,b = r+dr, g+dg, b+db
        draw.line((i,0,i,500), fill=(int(r),int(g),int(b)))

... and the python script source code:

import Image,ImageDraw
from random import randint as rint

def random_gradient(name):
    img = Image.new("RGB", (500,500), "#FFFFFF")
    draw = ImageDraw.Draw(img)

    r,g,b = rint(0,255), rint(0,255), rint(0,255)
    dr = (rint(0,255) - r)/500.
    dg = (rint(0,255) - g)/500.
    db = (rint(0,255) - b)/500.
    for i in range(500):
        r,g,b = r+dr, g+dg, b+db
        draw.line((i,0,i,500), fill=(int(r),int(g),int(b)))

    img.save(name+".png", "PNG")

if __name__ == "__main__":
    for name in range(10):
        random_gradient(str(name))

The result of this script will make images :

Sunday, September 22, 2013

Jython - funny and simple scripts - first steps .

I play today with jython and can be fun but seams to be to slow in a linux os.

Jython is invoked using the "jython" script and it's an implementation of Python for the JVM.

Install the package jython in your linux distro and you can start to deal with java and python.

When you use jython then script will start with :

#!/usr/bin/env jython

I make also some very simple scripts...

First script make one button and give a action to exit.


#!/usr/bin/env jython
from javax import *
import java
from java import *
import sys

frame = awt.Frame(size=(500,100))
frame.background = 255,255,0
def exit(event):
  java.lang.System.exit(0)

my_button = awt.Button("Exit!", actionPerformed=exit)
frame.add(my_button,"Center")
frame.pack()
frame.setVisible(1)

The output is:


The script is easy to make ... it's like gtk with add, pack and action ...

Let's see the next script : one list.

from javax import *
from java import awt
import sys
python_list=[]
python_list.append('text 1')
python_list.append('text 2')
python_list.append('text 3')
python_list.append('text 4')
python_list.append('text 5')

frame=awt.Frame("test list")
panel=swing.JList(python_list)
frame.add(panel,"Center")
frame.pack()
frame.setVisible(1)

... and this is the gui with the list:


I make a simple list and add to the gui using pack() function.

The jython is not easy is much to learn and if you want then go to this website.

Check system , distro and commands using python scripts .

This is a simple example with two functions.

First will check the linux command : ls linux command.

The next function will give us some infos about system.

import shlex 
import subprocess
from subprocess import Popen, PIPE

import platform

def check_command(command):
    cmd='which ' + command 
    output = Popen(shlex.split(cmd), stdout=PIPE).communicate()[0]
    command_path =output.split('\n')[0]
    print command_path
    return command_path

def check_platform():
    arch, exe = platform.architecture()
    my_system = platform.system()
    if my_system == 'Linux':
        distro_name, distro_version, distro_id = platform.linux_distribution()
    elif my_system == 'Darwin':
        distro_name, distro_version, distro_id = platform.mac_ver()
    elif my_system == 'Windows':
 distro_name, distro_version, distro_id = platform.win32_ver()
    elif my_system == 'Java':
 distro_name, distro_version, distro_id = platform.java_ver()
    processor = platform.processor() or 'i386'
    print processor, my_system, arch, distro_name, distro_version, distro_id
    return processor, my_system, arch, distro_name, distro_version, distro_id

check_command('ls')

check_platform()

This python script can be use with any scripts when we need to test commands and system , distro version.

Thursday, September 12, 2013

Working with SunPy python module - part 001 .

The SunPy python module it's an open-source software library for solar physics using the Python programming language.

The SunPy module is included into nasa projects.

Now, if you want to use this python module then you need to install lapack and blas libraries for development.

I use # pip under super user account to install sunpy and the python modules required by SunPy.

# pip install --upgrade distribute
# pip install --upgrade pyfits
# pip install --upgrade suds
# pip install --upgrade pandas
# pip install --upgrade beautifulsoup4

... also you need to have this python modules: Scipy and Matplotlib.

After that you can install sunpy using:

# pip install sunpy
# pip install --upgrade sunpy

The basic example is one output created by Map() function.

This function can deal with many data sources, like:

SDO/AIA, SDO/HMI

STEREO/EUVI, STEREO/COR

Hinode/XRT

SOHO/EIT, SOHO/LASCO, SOHO/MDI

PROBA2/SWAP

Yohkoh/SXT

Let's try a simple example and will show the result...

>>> import sunpy 
>>> ati_map=sunpy.Map(sunpy.AIA_171_IMAGE).peek()

... and output is:


Let's make more sun maps...

>>> eit_map=sunpy.Map(sunpy.EIT_195_IMAGE).peek()

The the output is:


>>> rhessi_map=sunpy.Map(sunpy.RHESSI_IMAGE).peek()

You can see radio spectrometer image using:

>>> callisto_radio_maps=sunpy.Map(sunpy.CALLISTO_IMAGE).peek()

Also you can combine the maps , like in the next example:

>>> eti_rhessi_maps=sunpy.Map(sunpy.EIT_195_IMAGE, sunpy.RHESSI_IMAGE, composite=True).peek()

You can get more infos about Map using :

>>> help(sunpy.Map)

If you want more data to show then you can request data from here.

Also you can give parameters to the Map, like:

date : datetime
 |          Image observation time
...

This allow you to take more data and info...

Using matplotlib and scipy modules can help to parse and show all infos.

How to fix error: fatal error: Python.h: No such file or directory

This is a common error when your system don't have the python-dev.

I got this error when I try to use : pip .

Just install the package python-dev and then all will working well.

Monday, September 9, 2013

News - Python 3.4.0 Alpha 2 was released .

From python official website I found this :

Python 3.4.0 alpha 2 was released on September 9th, 2013. This is a preview release of the next major release of Python, Python 3.4, and is not suitable for production environments.

Major new features of the 3.4 series, compared to 3.3

Python 3.4 includes a range of improvements of the 3.x series, including hundreds of small improvements and bug fixes. Major new features and changes in the 3.4 release series so far include:

PEP 435, a standardized "enum" module

PEP 442, improved semantics for object finalization

PEP 443, adding single-dispatch generic functions to the standard library

PEP 445, a new C API for implementing custom memory allocators

PEP 446, changing file descriptors to not be inherited by default in subprocesses...

Saturday, August 17, 2013

Working with PEP 8 conventions ...

I am wrote my own python scripts to long time ago and now I saw many of this scripts are a mess  in terms of PEP criteria.
What is the pep criteria? The PEP describing style guidelines for the C code in the C implementation of Python.
If you using Blender 3D/Python development  then you need to follow the PEP 8.
The PEP 8 and can be found here and the authors are: Guido van Rossum , Barry Warsaw and Nick Coghlan.
Today I will show you a brief listing of pep8 criteria:
-indentation of 4 spaces not use tabs
-camel caps for class names: MyClass , AnotherClass
-all lower case underscore separated module names: my_module, another_module
-use explicit imports, not importing '*'
-imports should usually be on separate lines, not import os,sys
-adding whitespace around the operators , not 1+2 or 7+ 3
-don't use spaces around the = sign , not a = b +1
-use single quotes for enums, and double quotes for strings
-each line of a block comment starts with a # and a single space
-don't make comments that contradict the code
-if you want to writing good documentation strings then follow the PEP 257 conventions.
-run checks for pep8 compliance
# <pep8 compliant=""></pep8>
-and enable line length checks use this instead
# <pep8-80 compliant=""></pep8-80>
-don't use multiple statements on the same line, like:
if foo == 'test': do_test_thing()
one_test(); two_test()
... this is the correct way:
if foo == 'test':
    do_test_thing()
one_test()
two_test()
Also you can read about Blender 3D/Python and PEP 8 best practice here.

Saturday, August 10, 2013

Fix python error: SyntaxError: Non-ASCII character.

This can be fix easy ... just add the below line at top of the python file:
# coding: utf-8
You will see now something like this error:
SyntaxError: invalid syntax
... but also will be point to the bad encoding character with : ^
For example I had this:
usertest@home:~$ python sunet.py 
  File "sunet.py", line 22
    def  __init__ ( self , a , b , c ) :
                                 ^
SyntaxError: invalid syntax

How to deal with environment variables using python script.

Any OS like Linux, Unix, Windows has environment variables.

Also any variables which must not be committed on a public code can be used in this way.

You can give this variables to your application.

Let's see one simple example about how to do that:

import os
ENV_VAR = os.environ.get("ENV_VAR", None)
if not ENV_VAR:
        print "not ENV_VAR"
if ENV_VAR:
        print "yes ! is ENV_VAR"

Now you can give this ENV_VAR to the script or not. See next...

usertest@home:~$ ENV_VAR=true python demo-env.py 
yes ! is ENV_VAR
usertest@home:~$ python demo-env.py 
not ENV_VAR

With Python 3 on Unix, environment variables are decoded using the file system encoding.