This is a common error when your system don't have the python-dev.
I got this error when I try to use : pip .
Just install the package python-dev and then all will working well.
This is a common error when your system don't have the python-dev.
I got this error when I try to use : pip .
Just install the package python-dev and then all will working well.
From python official website I found this :
Python 3.4.0 alpha 2 was released on September 9th, 2013. This is a preview release of the next major release of Python, Python 3.4, and is not suitable for production environments.
Major new features of the 3.4 series, compared to 3.3
Python 3.4 includes a range of improvements of the 3.x series, including hundreds of small improvements and bug fixes. Major new features and changes in the 3.4 release series so far include:
PEP 435, a standardized "enum" module
PEP 442, improved semantics for object finalization
PEP 443, adding single-dispatch generic functions to the standard library
PEP 445, a new C API for implementing custom memory allocators
PEP 446, changing file descriptors to not be inherited by default in subprocesses...
# <pep8 compliant=""></pep8> # <pep8-80 compliant=""></pep8-80> if foo == 'test': do_test_thing()
one_test(); two_test() if foo == 'test':
do_test_thing()
one_test()
two_test() # coding: utf-8 SyntaxError: invalid syntax usertest@home:~$ python sunet.py
File "sunet.py", line 22
def __init__ ( self , a , b , c ) :
^
SyntaxError: invalid syntax Any OS like Linux, Unix, Windows has environment variables.
Also any variables which must not be committed on a public code can be used in this way.
You can give this variables to your application.
Let's see one simple example about how to do that:
import os
ENV_VAR = os.environ.get("ENV_VAR", None)
if not ENV_VAR:
        print "not ENV_VAR"
if ENV_VAR:
        print "yes ! is ENV_VAR"
Now you can give this ENV_VAR to the script or not. See next...
usertest@home:~$ ENV_VAR=true python demo-env.py
yes ! is ENV_VAR
usertest@home:~$ python demo-env.py
not ENV_VAR
With Python 3 on Unix, environment variables are decoded using the file system encoding.
GObject is a object system used by GTK+, GStreamer and other libraries.
The new PyGObject 3.9.5 provides a convenient wrapper for use in Python programs when
accessing GObject libraries.
The news come from Simon Feltman - pygtk digest: I am pleased to announce version 3.9.5 of the Python bindings for
GObject. This is the third release of the 3.9.x series which will
eventually result in the stable 3.10 release for GNOME 3.10.
The new release is available from ftp.gnome.org.
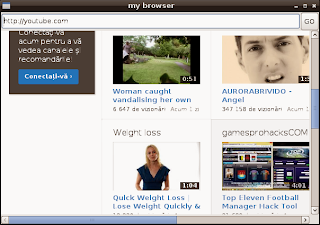
Today I will show you a simple example with webkit python module.
I will make one simple browser using this two python modules.
Read the full tutorial here.
The result can be see in the next image:
links = browser.find_elements_by_partial_link_text('')
for link in links:
print link.get_attribute("href") Today I will show how to deal with cookies and Firefox.
Selenium Python Client Driver is a Python language binding for Selenium Remote Control.
You can read more about this module here.
You can find some examples , but most of webpages working with cookies.So let's make one simple tutorial.
The next source code is very simple and most of the python users knows what means.
$ python
Python 2.7.3 (default, Jan  2 2013, 16:53:07)
[GCC 4.7.2] on linux2
Type "help", "copyright", "credits" or "license" for more information.
>>> from selenium import webdriver
>>> from selenium.common.exceptions import NoSuchElementException
>>> from selenium.webdriver.common.keys import Keys
>>> browser = webdriver.Firefox()
>>> browser.get("http://facebook.com/")
>>> browser.get("http://facebook.com/home.php")
The next source codes will get your cookies from the webpage.
>>> for cookie in browser.get_cookies():
...     print(cookie['name'] + ' --> your cookie data ' + cookie['value'])
...
datr --> your cookie data
locale --> your cookie data
xs --> your cookie data
s --> your cookie data
lu --> your cookie data
fr --> your cookie data
csm --> your cookie data
c_user --> your cookie data
act --> your cookie data
x-src --> your cookie data
sub --> your cookie data
p --> your cookie data
presence --> your cookie data
>>>
You can deal with all functions of selenium python module , see :
>>> dir(browser)
['NATIVE_EVENTS_ALLOWED', '__class__', '__delattr__', '__dict__', '__doc__',
'__format__', '__getattribute__', '__hash__', '__init__', '__module__', '__new__'
, '__reduce__', '__reduce_ex__', '__repr__', '__setattr__', '__sizeof__', '__str__'
, '__subclasshook__', '__weakref__', '_is_remote', '_unwrap_value', '_wrap_value'
, 'add_cookie', 'application_cache', 'back', 'binary', 'capabilities', 'close',
'command_executor', 'create_web_element', 'current_url', 'current_window_handle'
, 'delete_all_cookies', 'delete_cookie', 'desired_capabilities', 'error_handler'
, 'execute', 'execute_async_script', 'execute_script', 'find_element',
'find_element_by_class_name', 'find_element_by_css_selector', 'find_element_by_id'
, 'find_element_by_link_text', 'find_element_by_name', 'find_element_by_partial_link_text'
, 'find_element_by_tag_name', 'find_element_by_xpath', 'find_elements',
'find_elements_by_class_name', 'find_elements_by_css_selector', 'find_elements_by_id',
 'find_elements_by_link_text', 'find_elements_by_name', 'find_elements_by_partial_link_text'
 , 'find_elements_by_tag_name', 'find_elements_by_xpath', 'firefox_profile', 'forward',
  'get', 'get_cookie', 'get_cookies', 'get_screenshot_as_base64', 'get_screenshot_as_file'
  , 'get_window_position', 'get_window_size', 'implicitly_wait', 'is_online',
  'maximize_window', 'name', 'orientation', 'page_source', 'profile', 'quit', 'refresh'
  , 'save_screenshot', 'session_id', 'set_page_load_timeout', 'set_script_timeout',
  'set_window_position', 'set_window_size', 'start_client', 'start_session', 'stop_client'
  , 'switch_to_active_element', 'switch_to_alert', 'switch_to_default_content',
  'switch_to_frame', 'switch_to_window', 'title', 'window_handles']
This module can be a way for you to testing your webpages , save cookie , restore and more...
Also , if you know networking development also you can use scapy module to test more.
I hope will like this simple tutorial about python.
Today I will show something nice about OpenCV Analysis and Shape Descriptors.
This function finds contours in a binary image.
All detected contours is stored as a vector of points for each contour.
#!/usr/bin/python2.7
import cv2
im = cv2.imread('your_image.jpg')
img_gray = cv2.cvtColor(im,cv2.COLOR_RGB2GRAY)
ret,thresh = cv2.threshold(img_gray,127,255,0)
contours, hierarchy = cv2.findContours(thresh,cv2.RETR_TREE,cv2.CHAIN_APPROX_SIMPLE)
cv2.drawContours(im,contours,-1,(250,250,250),2)
cv2.imshow('your_image.jpg',im)
cv2.waitKey()
cv2.destroyAllWindows()
If you got this error:
findContours error 'support only 8uC1 images'
then the main reason it's findContours requires a monochrome image.
Let's see the result of the python script.

The contour it's draw with 250,250,250 color.
Many python users have a lot of scripts.
They use some words for classes or some functions.
Sometime is hard to remember where it's this scripts.
So the easy way to do that is to find the script where is some words.
For example you need to find this : word_in_your_script
To do that just see next linux command:
$ find ~/ -type f -iname "*.py" -exec grep -l 'word_in_your_script' {} \; My question is much more complicated than intended and I will show you in this tutorial.
Most users use print or print() - if it used in python 3.
For example you can use this without import any python module.
$ python
Python 2.6.8 (unknown, Apr 14 2013, 18:10:41)
[GCC 4.3.2 20081105 (Red Hat 4.3.2-7)] on linux2
Type "help", "copyright", "credits" or "license" for more information.
>>> print "my text"
my text
>>>
This is simple to show some strings.
What the most people don't know about print function it's the interface of stdout.write.
Let's see another example with stdout.write .
>>> sys.stdout.write(str(my text) + '\n')
  File "<stdin>", line 1
    sys.stdout.write(str(my text) + '\n')
                               ^
SyntaxError: invalid syntax
>>> sys.stdout.write(str("my text") + '\n')
Traceback (most recent call last):
  File "<stdin>", line 1, in <module>
NameError: name 'sys' is not defined
First error tells us about function str.It's need just one arg not this my text.
The next error tells us about sys module is not import by python.
Note: This restriction can help us sometime.
Some example using stdout.write :
First is : my text example , see I add '\n' to go to the next row.
>>> import sys
>>> sys.stdout.write("my text"+'\n')
my text
Let's try to change the output.
See the next image :

You can say : I can do this with print function.
>>> print "\033[0;32m"+"my text"+"\033[0m"
my text
Yes! Right. Can you do this ? (see the next video)
The python script is very simple.
I used my scene with Mickey Mouse (my boy like this funny cartoon).
This is the python script.
import bpy
bpy.context.scene.render.use_border = False
bpy.context.scene.render.use_crop_to_border = False
bpy.ops.render.render()
R="Render Result"
bpy.data.images[R].save_render("/home/your_username/test_render.png")
See the output image:

The next source code it's used for border and crop.
Only if you want to use it.
bpy.context.scene.render.use_border = False
bpy.context.scene.render.use_crop_to_border = False
Also you can use this to set resolution percentage.
For example if you want to render just 10% of resolution use this:
bpy.context.scene.render.resolution_percentage =10