analitics

Pages

Showing posts with label tool. Show all posts

Thursday, June 2, 2022

Blender 3D and python scripting - part 010.

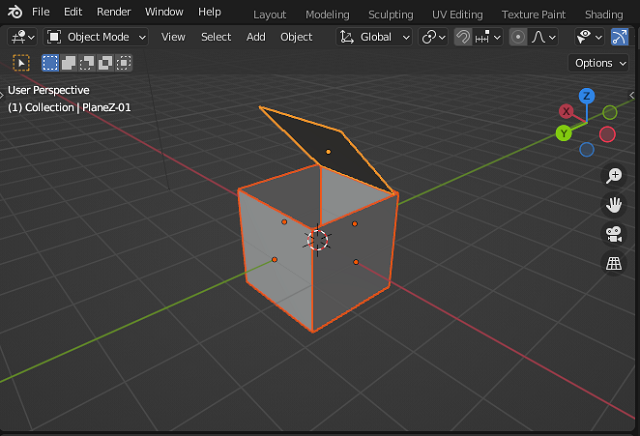
In this tutorial, I will use the source code from the previous tutorial and with the selected mesh I will resize and translate it on an axis then I will select the newly selected mesh and I will rotate it to obtain a roof shape.
This is the source code I used:
bpy.ops.object.mode_set(mode = 'EDIT') 

# let set the object mode 
bpy.ops.object.mode_set(mode="OBJECT")
# resize the selected areas 
bpy.ops.transform.resize(value=(1, 2, 1))
# translate 
bpy.ops.transform.translate(value=(0, 0.25, 0.31))

# rotate selected only if not is the initial mesh 
for ob in bpy.context.selected_objects:
    if ob.name != 'Plane-Y+Z':
        ob.rotation_euler[0] = pi/-4
        ob.convert_space(from_space='LOCAL', to_space='WORLD')

# define the new camera named NewCamera
See the result of this source code:

Wednesday, June 1, 2022

Blender 3D and python scripting - part 009.

In this tutorial I will show you a source code in python that allows the selection of vertices by a coordinate, and separates this selection into a new object according to the faces.
The source code is presented below and is commented on accordingly to understand how it works.
bpy.ops.object.mode_set(mode="EDIT")
bpy.ops.mesh.subdivide(number_cuts=3)
bpy.ops.object.mode_set(mode="OBJECT")

# add this source code     
bpy.ops.object.mode_set(mode = 'EDIT') 
# need to use bmesh
import bmesh
# select the plane and get data mesh 
plane_obj = bpy.data.objects['Plane-Y+Z']
plane_mesh = plane_obj.data
bm = bmesh.from_edit_mesh(plane_mesh)

# select vertices by points 
for v in bm.verts:
    v.select_set(v.co.y < 0.5)
#get mode 
bm.select_mode = {'VERT', 'EDGE', 'FACE'}
# this will update the selection 
bm.select_flush_mode()
# select by FACE   
bpy.context.tool_settings.mesh_select_mode = (False, False, True)
# separate selection by face
bpy.ops.mesh.separate(type='SELECTED')
# select by EDGE
bpy.context.tool_settings.mesh_select_mode = (True, False, False)

# define the new camera named NewCamera

Monday, May 30, 2022

Blender 3D and python scripting - part 008.

In this tutorial I will show you how to use the subdivision operation using the python language and A.P.I from the Blender 3D software.
To use the subdivision operation you must have an active object and be in edit mode.
This is the source code used for this operation with tree cuts for subdivision operation.
bpy.ops.object.mode_set(mode="EDIT")
bpy.ops.mesh.subdivide(number_cuts=3)
bpy.ops.object.mode_set(mode="OBJECT")
You can see in the screenshot below where I added this source code in the old script used in the last tutorial and how the subdivision operation was performed.

Thursday, May 26, 2022

Blender 3D and python scripting - part 007.

In this tutorial I will show you how you create and use lights.
I used the same old source sode from the last tutorial.
Depending on the type of light created, their properties may change. Changing the on-fly light type cannot be done by a simple source code. Obviously you can recreate a new type of light with the new type you want.
This source code I added after this line of source code: scene = bpy.context.scene
# this create a light by type ['POINT', 'SUN', 'SPOT', 'HEMI', 'AREA']
light_data = bpy.data.lights.new('light', type='POINT')
# set light object 
light = bpy.data.objects.new('light', light_data)
# link light to collections
bpy.context.collection.objects.link(light)

light.location[0] = -1
light.location[1] = 3
light.location[2] = 3

light.data.color = (1.0, 0.0, 0.0)
light.data.energy=200.0
light.data.specular_factor = 0.5
# if you use another type like 'SUN' 
# then you can change properties like: angle 
#light.data.angle = pi * 10.0 / 180.0 

# get the name of the object light 
lamp = bpy.data.lights[light.name]

Wednesday, May 25, 2022

Blender 3D and python scripting - part 006.

In this tutorial I will show you how to use the camera and render an image.
I kept the source code from the old tutorial 005 and made the following changes:
I defined the global PI constant because I used it outside the definition.
import bpy

#define the pi global 
pi = 3.1415926
I added to the old source code the part of adding camera, translation, rotation, rendering settings and rendering an image called box_640_480.png in the 3D folder on the local disk.
You can see in the example below the added source code:
# define the new camera named NewCamera
camera_data = bpy.data.cameras.new(name='NewCamera')
# set camera_data to object 
camera_object = bpy.data.objects.new('ObjectCamera', camera_data)
# link camera object to scene
bpy.context.scene.collection.objects.link(camera_object)
# set active camera in the current scene by object
bpy.context.scene.camera = bpy.data.objects['ObjectCamera']
# set location 
camera_object.location = [0,-5,1]
# set rotation mode
camera_object.rotation_mode = 'XYZ'
# set the rotate the camerea using rotation_euler
bpy.data.objects[camera_object.name_full].rotation_euler = (90*(pi/180),0,0)

scene = bpy.context.scene

#these settings will set the render output
bpy.context.scene.cycles.samples = 1
scene.render.resolution_x = 640
scene.render.resolution_y = 480
scene.render.resolution_percentage = 100
scene.render.use_border = False
scene.render.image_settings.file_format='PNG'
scene.render.filepath='C:/3D/box_640_480.png'
bpy.ops.render.render(write_still=1)

Tuesday, May 24, 2022

Blender 3D and python scripting - part 005.

In this tutorial I will recreate the same box but with a more complex source code.
In the previous tutorial I used the same source code several times...
    obj = bpy.ops.mesh.primitive_plane_add(size=2, 
    calc_uvs=True, 
    enter_editmode=False, 
    align='CURSOR', 
    location=location, 
    rotation=(0, 0, 0), 
    scale=(0,0,0)
    )
    
    # rename the object
    bpy.context.object.name = obj_name
    # return the object reference
    return bpy.context.object
It is easier to understand the steps taken and then move on to optimizing them in complex forms.
Obviously a presentation of the source code in this tutorial will show you the differences.
I will add that the source code does not include scalar transformations and is limited to a box with size 1.
import bpy

def create_plane_XYZ(loc, obj_name):
    #define the pi 
    pi = 3.1415926
    # this is a definition like a tuple
    rot = (0,0,0)
    # need to convert it to a list in order to add new values
    rot_list = list(rot)
    # this ang variable will rotate obj to the 90-degree angle 
    ang = -90*(pi/180)
    ang_inc = 45*(pi/180)
    if loc[0] < 0:
        rot_list[1]=ang

    if loc[0] > 0: 
        rot_list[1]=ang

    if loc[1] < 0:
        rot_list[0]=ang
        
    if loc[1] > 0: 
        rot_list[0]=ang
    # this check if the two value from position of plane is not zero
    if loc[1] != loc[2] != 0: 
        rot_list[0]=ang_inc
    # this convert a list back to tuple 
    rot=tuple(rot_list)
    # this create the plane 
    obj = bpy.ops.mesh.primitive_plane_add(size=2, 
    calc_uvs=True, 
    enter_editmode=False, 
    align='CURSOR', 
    location=loc, 
    rotation= rot, 
    scale=(0,0,0)
    )
    # rename the object
    bpy.context.object.name = obj_name
    # return the object reference
    return bpy.context.object

# this will create a plane on X and translate with -1 on Y 
planeX001 = create_plane_XYZ((0,-1,0), "Plane-X")
# this will create a plane on X and translate with 1 on Y 
planeX002 = create_plane_XYZ((0,1,0), "Plane+X")
# this will create a plane on Y and translate with -1 on X 
planeY001 = create_plane_XYZ((-1,0,0), "Plane-Y")
# this will create a plane on X and translate with 1 on Y 
planeY002 = create_plane_XYZ((1,0,0), "Plane+Y")
# this will create a plane with 45 degree because two value on tuple is not zero
planeZ001 = create_plane_XYZ((0,-0.25,1.66), "Plane-Y+Z")

Monday, May 23, 2022

Blender 3D and python scripting - part 004.

In this tutorial, I will show you how to create a box from planes, see the screenshot:
You can see I used the math python package and I created rotation by radians and rotation object for three custom planes.
This is the source code:
import bpy

import math

def DegToRad(angle):
    """convert to radians"""
    return angle*(math.pi/180)


def RotOBJ(name, angles):
    """rotate obj to the specified angles"""
    rotation = [DegToRad(angle) for angle in angles]
    bpy.data.objects[name].rotation_euler = rotation
    
def create_plane_X(location, obj_name):

    obj = bpy.ops.mesh.primitive_plane_add(size=2, 
    calc_uvs=True, 
    enter_editmode=False, 
    align='CURSOR', 
    location=location, 
    rotation=(0, 0, 0), 
    scale=(0,0,0)
    )
    
    # rename the object
    bpy.context.object.name = obj_name
    # return the object reference
    return bpy.context.object

def create_plane_Y(location, obj_name):

    obj = bpy.ops.mesh.primitive_plane_add(size=2, 
    calc_uvs=True, 
    enter_editmode=False, 
    align='CURSOR', 
    location=location, 
    rotation=(0, 0, 0), 
    scale=(0,0,0)
    )
    
    # rename the object
    bpy.context.object.name = obj_name
    # return the object reference
    return bpy.context.object

def create_plane_Z(location, obj_name):

    obj = bpy.ops.mesh.primitive_plane_add(size=2, 
    calc_uvs=True, 
    enter_editmode=False, 
    align='CURSOR', 
    location=location, 
    rotation=(0, 0, 0), 
    scale=(0,0,0)
    )
    
    # rename the object
    bpy.context.object.name = obj_name
    # return the object reference
    return bpy.context.object

n = 1

planeX001 = create_plane_X((0,-1,0), "PlaneX-{:02d}".format(n))
RotOBJ(planeX001.name, [-90, 0, 0])
planeX002 = create_plane_X((0,1,0), "PlaneX-{:02d}".format(n))
RotOBJ(planeX002.name, [-90, -0, 0])

planeY001 = create_plane_Y((-1,0,0), "PlaneY-{:02d}".format(n))
RotOBJ(planeY001.name, [0, -90, 0])
planeY002 = create_plane_Y((1,0,0), "PlaneY-{:02d}".format(n))
RotOBJ(planeY002.name, [0, -90, 0])

planeZ001 = create_plane_Z((0,-0.25,1.66), "PlaneZ-{:02d}".format(n))
RotOBJ(planeZ001.name, [45, 0, 0])

Sunday, May 22, 2022

Blender 3D and python scripting - part 003.

In the first tutorial I presented a simple script and in this one I improved it with a way to create lines with a number of points, to use pressurization and coloring according to these points.
I added comments in the source code to make it easier to understand.
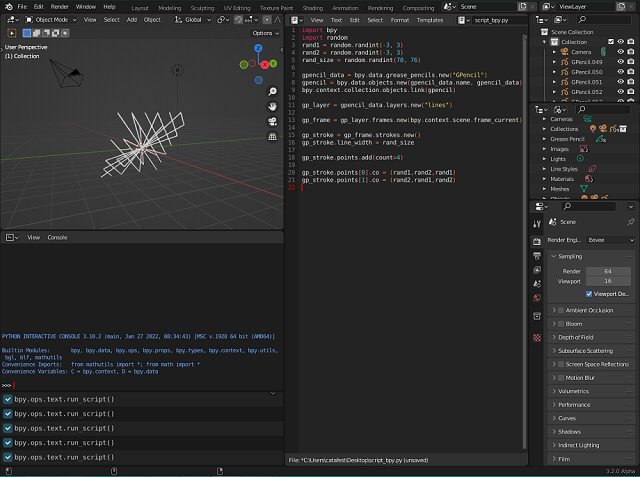
Here is the result obtained for nineteen points:
This is the source code:
import bpy 
import random

#this is a for lines with N poins 
N = 19 

# this is default python script from the first tutorial
gpencil_data = bpy.data.grease_pencils.new("GPencil")
gpencil = bpy.data.objects.new(gpencil_data.name, gpencil_data)
bpy.context.collection.objects.link(gpencil)

gp_layer = gpencil_data.layers.new("lines")

gp_frame = gp_layer.frames.new(bpy.context.scene.frame_current)

gp_stroke = gp_frame.strokes.new()

gp_stroke.points.add(count=N)

# let's create a new material for pencil stroke 
gp_material_001 = bpy.data.materials.new(name="Grease pencil material 001")

# if you want to use Nodes 
gp_material_001.use_nodes = True

#this will add a diffuse color for this material 
gp_material_001.diffuse_color = (0.0, 0.0, 0.0, 1)

# create a new material for this grease pencil
bpy.data.materials.create_gpencil_data(gp_material_001)
# add the material to the grese pencil defined like gpencil 
gpencil.data.materials.append(gp_material_001)

for i in range (N):
    rand1 = random.randint(-3, 3)
    rand2 = random.randint(-3, 3)
    rand_size = random.randint(70, 76)
    gp_stroke.line_width = rand_size
    gp_stroke.points[i].co = (rand1,rand2,rand1)
    gp_stroke.points[i].co = (rand2,rand1,rand2)

    #this will create a random pressure 
    rand_pressure = random.randint(-3, 3) * 3
    #create random color for Red Green and Blue 
    rand_color_R = random.randint(0, 1)
    rand_color_G = random.randint(0, 1)
    rand_color_B = random.randint(0, 1)
    # set the pressure 
    gp_stroke.points[i].pressure = rand_pressure
    # set the color RGB with transparency 1
    gp_stroke.points[i].vertex_color = (rand_color_R,rand_color_G,rand_color_B, 1) 

Thursday, May 19, 2022

Blender 3D and python scripting - part 002.

In today's tutorial I will show you how to create a sphere and how to add a material to it.
The source code is very simple with two functions one is for the sphere and the second one is the material of this, see:
import bpy

def create_sphere(radius, distance_to_center, obj_name):

    obj = bpy.ops.mesh.primitive_uv_sphere_add(
        radius=radius,
        location=(distance_to_center, 0, 0),
        scale=(1, 1, 1)
    )
    # rename the object
    bpy.context.object.name = obj_name
    # return the object reference
    return bpy.context.object


def create_emission_shader(color, strength, mat_name):
    # create a new material shader
    mat = bpy.data.materials.new(mat_name)
    # enable the node-graph edition mode
    mat.use_nodes = True
    
    # clear all starter nodes
    nodes = mat.node_tree.nodes
    nodes.clear()

    # add the Emission node
    node_emission = nodes.new(type="ShaderNodeEmission")
    # (input[0] is the color)
    node_emission.inputs[0].default_value = color
    # (input[1] is the strength)
    node_emission.inputs[1].default_value = strength
    
    # add the Output node
    node_output = nodes.new(type="ShaderNodeOutputMaterial")
    
    # link the two nodes
    links = mat.node_tree.links
    link = links.new(node_emission.outputs[0], node_output.inputs[0])

    # return the material reference
    return mat

n = 1
r = 1.0
d = 1.5

sphere001 = create_sphere(r, d, "Sphere-{:02d}".format(n))

sphere001.data.materials.append(
    create_emission_shader(
        (1, 1, 1, 1), 100, "SphereMat001"
    )
)

Wednesday, May 18, 2022

Blender 3D and python scripting - part 001.

Today I started a series of tutorials on python scripting and Blender 3D.
The first tutorial is how to draw using the Blender 3D features with the grease pencil utility using the Python scripting language.
Open Blender 3D in the scripting section and enter the source code below.
import bpy 
import random
rand1 = random.randint(-3, 3)
rand2 = random.randint(-3, 3)
rand_size = random.randint(70, 76)

gpencil_data = bpy.data.grease_pencils.new("GPencil")
gpencil = bpy.data.objects.new(gpencil_data.name, gpencil_data)
bpy.context.collection.objects.link(gpencil)

gp_layer = gpencil_data.layers.new("lines")

gp_frame = gp_layer.frames.new(bpy.context.scene.frame_current)

gp_stroke = gp_frame.strokes.new()
gp_stroke.line_width = rand_size

gp_stroke.points.add(count=4)

gp_stroke.points[0].co = (rand1,rand2,rand1)
gp_stroke.points[1].co = (rand2,rand1,rand2)
Run the script several times to see the effect produced.
Here is the result of running this script:

Friday, January 14, 2022

Python 3.10.1 : Django and channels on Fedora distro - sync and async features.

A consumer is a subclass of either channels.consumer.AsyncConsumer or channels.consumer.SyncConsumer.
Consumers do a couple of things in particular: 
  • Structures your code as a series of functions to be called whenever an event happens, rather than making you write an event loop. 
  • Allow you to write synchronous or async code and deals with handoffs and threading for you.
This is another tutorial about Django and channels, you can see the first one.
For testing area you need the postman tool and I install and used with snap tool.
[root@fedora mythcat]# dnf install snapd
Last metadata expiration check: 0:40:03 ago on Fri 14 Jan 2022 03:38:55 PM EET.
...
[root@fedora mythcat]# ln -s /var/lib/snapd/snap /snap
[root@fedora mythcat]# snap install postman
2022-01-14T16:22:15+02:00 INFO Waiting for automatic snapd restart...
postman (v9/stable) 9.8.3 from Postman, Inc. (postman-inc✓) installed
[mythcat@fedora ~]$ snap run postman
Let's go on the project folder:
[mythcat@fedora ~]$ cd djangotest001/
[mythcat@fedora djangotest001]$ cd website001/
In this folder I have two folders: appsite001 and website001.
In the appsite001 I add these scripts.
I create a new python script named consumers.py with this source code:
from channels.consumer import SyncConsumer, AsyncConsumer
from channels.exceptions import StopConsumer

class MySyncConsumer(SyncConsumer):
    def websocket_connect(self,event):
        print('Websocket Connected ...')
        self.send({
        'type':'websocket.accept',
        })
    def websocket_receive(self, event):
        print('Messaged Received ...')
        print(event['text'])
        self.send({
        'type':'websocket.send',
        'text':'Message sent to client'
        })
    def websocket_diconnect(self, event):
        print('Websocket Disconnected ...')
        raise StopConsumer
        
class MyAsyncConsumer(AsyncConsumer):
    async def websocket_connect(self,event):
        print('Websocket Connected ...')
    async def websocket_receive(self, event):
        print('Messaged Received ...')
    async def websocket_diconnect(self, event):
        print('Websocket Disconnected ...')
I created routing.py python script with this source code:
from django.urls import path
from . import consumers

websocket_urlpatterns = [
    path('ws/sc/',consumers.MySyncConsumer.as_asgi()),
    ]
In the website001 I change this script named asgi.py.
import os

from django.core.asgi import get_asgi_application

from channels.routing import ProtocolTypeRouter, URLRouter

import appsite001.routing

os.environ.setdefault('DJANGO_SETTINGS_MODULE', 'website001.settings')

application = ProtocolTypeRouter({
    'http':get_asgi_application(),
    'websocket':URLRouter(
        appsite001.routing.websocket_urlpatterns
    )
})
Run the Django project with :
[mythcat@fedora website001]$ python manage.py runserver
Watching for file changes with StatReloader
Performing system checks...

System check identified no issues (0 silenced).
January 14, 2022 - 15:32:29
Django version 4.0.1, using settings 'website001.settings'
Starting ASGI/Channels version 3.0.4 development server at http://127.0.0.1:8000/
Quit the server with CONTROL-C.
WebSocket HANDSHAKING /ws/sc/ [127.0.0.1:33944]
Websocket Connected ...
WebSocket CONNECT /ws/sc/ [127.0.0.1:33944]
Messaged Received ...
This is a message from mythcat
...
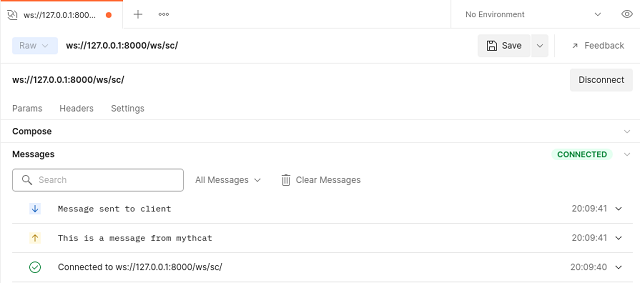
Use postman tool with websocket to send this message to Django project:
This is a message from mythcat
You can see how this works:

Thursday, April 18, 2019

About psychopy tool.

A good definition for this tool can be found at the Wikipedia website:
2002: PsychoPy was originally written by Peirce as a proof of concept - that a high-level scripting language could generate experimental stimuli in real time (existing solutions, such as Psychtoolbox, had to pre-generate movies or use CLUT animation techniques).
The install of this python module is very simple:
C:\Python373\Scripts>pip install psychopy
Using this command to start this tool:
C:\Python373>psychopy
The tool starts with two graphical interfaces:
  • one for Coder area;
  • one for the project with an untitled.psyexp;
Let's see one screenshot with this tool:

This open source tool, written in the Python programming language, help you to run a wide range of neuroscience, psychology and psychophysics experiments.
I searched the internet for the capabilities of this tool and the obvious conclusion is a utility for building experiments with a wide range of applicability.
This tool lets you use the pavlovia website, see more:
Pavlovia is a place for the wide community of researchers in the behavioural sciences to run, share, and explore experiments online.
This tool used commonly-used components for linguistic experiments:
  1. Text Component (display text on the screen);
  2. Sound Component (play sounds);
  3. Keyboard Component (receive input from the keyboard);
  4. RatingScale Component (collect a numeric rating or a choice from a few alternatives, via the mouse, the keyboard or both);
  5. Code Component (insert short pieces of python code into your experiments (e.g. time stamp for the production task);
The easy way is to use the Builder tool to generate a wide range of experiments easily from the Builder using its intuitive, graphical user interface (GUI).
Today I will use the Coder with programming a simple example.
To access demos, you need to create a python script in the Coder area (use File menu - New) then use the Demos from the application menu.
Everything in a PsychoPy experiment needs a unique name.
The name must contain only letters, numbers and underscores and not contain spaces, punctuation or mathematical symbols.
This tool saves several data files: a Microsoft Excel (spreadsheet) file, a psydat file, and a log file.
The example I used today for this tutorial is how to import from a CSV file named colors_001.csv and used with psychopy python module to create stimuli:
3.3;"red"
1.1;"green"
4.4;"red"
2.2;"green"
This python script named colors.py I used to import the CSV file and use it:
from psychopy import core, visual, event
import csv
  
## Setup section, read experiment variables from file
win = visual.Window([400,300], monitor="testMonitor", units="cm", fullscr=False)
stimuli = []
datafile = open("colors_001.csv", "r",encoding="utf8")
reader = csv.reader(datafile, delimiter=";")
for row in reader:
    if len(row)==2:         # ignore empty and incomplete lines
        size = float(row[0])  # the first element in the row converted to a floating point number
        color = row[1]        # the second element in the row
        stimulus = visual.Rect(win, width=size, height=size)
        stimulus.fillColor = color
        stimuli.append(stimulus)
datafile.close()
  
## Experiment Section, use experiment variables here
for stimulus in stimuli:
    stimulus.draw()
    win.flip()
    core.wait(1.000)

## Closing Section
win.close()
core.quit()
The result of this script will show you four squares colored by the CSV file.
If you don't like to use the Builder or Coder areas, then you can simply use the python:
C:\Python373>python.exe
Python 3.7.3 (v3.7.3:ef4ec6ed12, Mar 25 2019, 22:22:05) [MSC v.1916 64 bit (AMD64)]
 on win32
Type "help", "copyright", "credits" or "license" for more information.
>>> from psychopy import visual, core
pygame 1.9.5
Hello from the pygame community. https://www.pygame.org/contribute.html
>>> win = visual.Window()
>>> msg = visual.TextStim(win, text=u"Hello python users!")
>>> msg.draw()
>>> win.flip()
47.541564770566765
The output will be a window with a text message.

Wednesday, April 17, 2019

Update python modules of 3.73 version.

Today we tested an older tool with the new version of python 3.7.3.
This is a tool that will help you update your python modules.
Here's how to install:
C:\Python373\Scripts>pip install pip-review
Collecting pip-review
...
Requirement already satisfied: pyparsing>=2.0.2 in c:\python373\lib\site-package
s (from packaging->pip-review) (2.4.0)
Installing collected packages: packaging, pip-review
Successfully installed packaging-19.0 pip-review-1.0
Here is the complete overview of the options.
C:\Python373\Scripts>pip-review -h
usage: pip-review [-h] [--verbose] [--raw] [--interactive] [--auto]

Keeps your Python packages fresh.

optional arguments:
  -h, --help         show this help message and exit
  --verbose, -v      Show more output
  --raw, -r          Print raw lines (suitable for passing to pip install)
  --interactive, -i  Ask interactively to install updates
  --auto, -a         Automatically install every update found

Unrecognised arguments will be forwarded to pip list --outdated, so you can
pass things such as --user, --pre and --timeout and they will do exactly what
you expect. See pip list -h for a full overview of the options.
To update all python modules you can use:
C:\Python373\Scripts>pip-review --auto
To run interactively, you can ask to upgrade for each package:
C:\Python373\Scripts>pip-review --interactive


Wednesday, April 3, 2019

About Ninja IDE for python programming.

This I.D.E. is a very good tool for python programming and development.
The version of this tool is 2.3.
I tested with my Django project on Windows OS and works great.
The development team comes with this info:
NINJA-IDE (from the recursive acronym: "Ninja-IDE Is Not Just Another IDE"), is a cross-platform integrated development environment (IDE). NINJA-IDE runs on Linux/X11, Mac OS X and Windows desktop operating systems, and allows developers to create applications for several purposes using all the tools and utilities of NINJA-IDE, making the task of writing software easier and more enjoyable.
The official webpage can be found here.
If you want to use it with Django the easy way is to install the plugin for this area.
You can see all about the development team about page.

Tuesday, June 26, 2018

Python 3.6.4 : Trying to use the python azurure on the windows.

In this tutorial, I used the python version 3.6.4 and Windows 8.1 OS.
You can start with pip install tool for some azure modules:
Install the latest Batch runtime library
C:\Python364\Scripts>pip install azure-batch 
This will install the latest Storage management library
C:\Python364\Scripts>pip install azure-mgmt-scheduler 
Will install only the latest compute installed using the --pre flag:
C:\Python364\Scripts>pip install --pre azure-mgmt-compute 
Finally the storage I used into this tutorial:
C:\Python364\Scripts>pip install azure-storage --upgrade
You can install all of the azure python modules:
C:\Python364\Scripts>pip install --pre azure
...
Installing collected packages: azure-storage-nspkg, azure-storage-common, azure-
storage-queue, azure-servicebus, azure-servicefabric, azure-storage-file, azure-
servicemanagement-legacy, azure-mgmt-consumption, azure-mgmt-media, azure-mgmt-d
ns, azure-mgmt-search, azure-mgmt-cdn, azure-mgmt-compute, azure-mgmt-eventhub,
azure-mgmt-containerinstance, azure-mgmt-datalake-nspkg, azure-mgmt-datalake-ana
lytics, azure-mgmt-recoveryservices, azure-mgmt-authorization, azure-mgmt-adviso
r, azure-mgmt-recoveryservicesbackup, azure-mgmt-billing, azure-mgmt-devtestlabs
, azure-mgmt-network, azure-mgmt-web, azure-mgmt-applicationinsights, azure-mgmt
-cognitiveservices, azure-mgmt-rdbms, azure-mgmt-monitor, azure-mgmt-reservation
s, azure-mgmt-notificationhubs, azure-mgmt-loganalytics, azure-mgmt-logic, azure
-mgmt-iothubprovisioningservices, azure-mgmt-marketplaceordering, azure-mgmt-res
ource, azure-mgmt-scheduler, azure-mgmt-powerbiembedded, azure-mgmt-servicefabri
c, azure-mgmt-commerce, azure-mgmt-sql, azure-mgmt-cosmosdb, azure-mgmt-relay, a
zure-mgmt-storage, azure-mgmt-redis, azure-mgmt-managementpartner, azure-mgmt-tr
afficmanager, azure-mgmt-machinelearningcompute, azure-mgmt-datafactory, azure-m
gmt-hanaonazure, azure-mgmt-iothub, azure-mgmt-servermanager, azure-mgmt-batch,
azure-mgmt-keyvault, azure-mgmt-subscription, azure-mgmt-eventgrid, azure-mgmt-s
ervicebus, azure-mgmt-batchai, azure-mgmt-containerservice, azure-mgmt-container
registry, azure-mgmt-msi, azure-mgmt-datalake-store, azure-mgmt, azure-datalake-
store, azure-eventgrid, azure-keyvault, azure-cosmosdb-nspkg, futures, azure-cos
mosdb-table, azure-graphrbac, azure-storage-blob, azure
I tested with all azure python modules, but you can use just you need.
The next step is to open the Azure account - I have a trial free account.
I create a Resource Group named python-azure and a Storage account named pythonazure.
Into pythonazure I add the Files service and I upload an HTML file named default.html .
See the next images with the steps I make:
Let's make one simple test:
C:\Python364\Scripts>python
Python 3.6.4 (v3.6.4:d48eceb, Dec 19 2017, 06:54:40) [MSC v.1900 64 bit (AMD64)]
 on win32
Type "help", "copyright", "credits" or "license" for more information.
>>> from azure.common.credentials import UserPassCredentials
>>> from azure.mgmt.resource import ResourceManagementClient
>>> from azure.mgmt.storage import StorageManagementClient
>>> from azure.storage import CloudStorageAccount
>>> from azure.storage.blob.models import ContentSettings, PublicAccess
>>> 
I have not been able to authenticate myself with a python script in Azure.
I found some inconsistencies and issues on GitHub so I still have to document.

Any help in this regard is welcome.

Wednesday, March 14, 2018

The regex online tool for python and any programming languages.

Today I tested this online tool.
Is a tool for a regular expression (regex or regexp for short) for many programming languages.
These programming languages are php, javascript, golang and python.
The tool is easy to use it.
First, you need to select the programming language that is used for regular expression.
The next step is to put the regular expression into the edit box and add your text to be parsed by this regular expression.
For example, if you use this inputs for a regular expression:
([a-zA-Z]+) \d+
and this text example:
March 7 1976, June 1, August 9, Dec 25
the result output will be this:
March , June , August , Dec

Tuesday, October 10, 2017

The online editor for python and google .

This is a good online editor for python and google.
Like any online editor, some python modules are not available for online security reasons.
I do not know what python modules are implemented in this online editor.
I tested just sys and math python modules.
The Google Apps come with this tool integration like application for Google drive:
Edit your python file directly in your browser:
- Save it to Google Drive integrated with Google Drive
- Test it in your browser with Skulpt
- Use autocompletion code (CTRL+SPACE)
- No registration required and totally free
- Export your file
- Work offline
New python libraries partially supported: numpy, matplotlib.

Monday, July 10, 2017

Python tutor - web tool for python programming.

The website comes with this intro about this web tool.
Python Tutor, created by Philip Guo, helps people overcome a fundamental barrier to learning programming: understanding what happens as the computer runs each line of source code.
Using this tool, you can write Python, Java, JavaScript, TypeScript, Ruby, C, and C++ code in your web browser and visualize what the computer is doing step-by-step as it runs your code.
Over 3.5 million people in over 180 countries have used Python Tutor to visualize over 30 million pieces of code, often as a supplement to textbooks, lectures, and online tutorials.

I tested and worked very well.
You can use python programming language 2.7 and 3.6 versions.
No need to import python modules, you will get an error.
Just programming on the fly to test and see the result.
The website comes with some example to see how to deal with this tool.
Let's see some examples:

example with factorial :

# dumb recursive factorial
def fact(n):
    if (n <= 1):
        return 1
    else:
        return n * fact(n - 1)

print(fact(6))

example with for - else:

# find primes using a for-else construct
for n in range(2, 10):
    x_range = range(2, n)
    for x in x_range:
        if n % x == 0:
            break
    else:
        # loop fell through without finding a factor
        print(n)

example with inputs:

prefix = "Hello "

n1 = raw_input("Enter your name")

n2 = raw_input("Enter another name")

res = prefix + n1 + " and " + n2
print(res)

Run your script just press: Visualize Execution or Live Programming Mode buttons and the will run step by step with:
First, Back, Forward and Last.
One good feature of this tool - with a single line of JavaScript code, you can embed a Python Tutor visualization within any webpage.
Another good feature is COLLABORATE to learn together - this allow us to give and get direction with real-time python programming.
Can be a good tool for python chat users.
Let's show you a screenshot to see how this tool working with python scripting.

Monday, May 22, 2017

Make one executable from a python script.

The official website of this tool tells us:
PyInstaller bundles a Python application and all its dependencies into a single package. The user can run the packaged app without installing a Python interpreter or any modules. PyInstaller supports Python 2.7 and Python 3.3+, and correctly bundles the major Python packages such as numpy, PyQt, Django, wxPython, and others.

PyInstaller is tested against Windows, Mac OS X, and Linux. However, it is not a cross-compiler: to make a Windows app you run PyInstaller in Windows; to make a Linux app you run it in Linux, etc. PyInstaller has been used successfully with AIX, Solaris, and FreeBSD, but is not tested against them.

The manual of this tool can see it here.
C:\Python27>cd Scripts

C:\Python27\Scripts>pip install pyinstaller
Collecting pyinstaller
  Downloading PyInstaller-3.2.1.tar.bz2 (2.4MB)
    100% |################################| 2.4MB 453kB/s
....
Collecting pypiwin32 (from pyinstaller)
  Downloading pypiwin32-219-cp27-none-win32.whl (6.7MB)
    100% |################################| 6.7MB 175kB/s
...
Successfully installed pyinstaller-3.2.1 pypiwin32-219
Also, this will install the PyWin32 python module.
Let's make one test python script and then to make it executable.
I used this python script to test it:
from tkinter import Tk, Label, Button

class MyFirstGUI:
    def __init__(self, master):
        self.master = master
        master.title("A simple GUI")

        self.label = Label(master, text="This is our first GUI!")
        self.label.pack()

        self.greet_button = Button(master, text="Greet", command=self.greet)
        self.greet_button.pack()

        self.close_button = Button(master, text="Close", command=master.quit)
        self.close_button.pack()

    def greet(self):
        print("Greetings!")

root = Tk()
my_gui = MyFirstGUI(root)
root.mainloop()
The output of the command of pyinstaller:
C:\Python27\Scripts>pyinstaller.exe   --onefile --windowed ..\tk_app.py
92 INFO: PyInstaller: 3.2.1
92 INFO: Python: 2.7.13
93 INFO: Platform: Windows-10-10.0.14393
93 INFO: wrote C:\Python27\Scripts\tk_app.spec
95 INFO: UPX is not available.
96 INFO: Extending PYTHONPATH with paths
['C:\\Python27', 'C:\\Python27\\Scripts']
96 INFO: checking Analysis
135 INFO: checking PYZ
151 INFO: checking PKG
151 INFO: Building because toc changed
151 INFO: Building PKG (CArchive) out00-PKG.pkg
213 INFO: Redirecting Microsoft.VC90.CRT version (9, 0, 21022, 8) -> (9, 0, 30729, 9247)
2120 INFO: Building PKG (CArchive) out00-PKG.pkg completed successfully.
2251 INFO: Bootloader c:\python27\lib\site-packages\PyInstaller\bootloader\Windows-32bit\runw.exe
2251 INFO: checking EXE
2251 INFO: Rebuilding out00-EXE.toc because tk_app.exe missing
2251 INFO: Building EXE from out00-EXE.toc
2267 INFO: Appending archive to EXE C:\Python27\Scripts\dist\tk_app.exe
2267 INFO: Building EXE from out00-EXE.toc completed successfully.
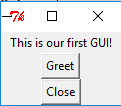
Then I run the executable output:
C:\Python27\Scripts>C:\Python27\Scripts\dist\tk_app.exe

C:\Python27\Scripts>
...and working well.

The output file come with this icon:

Also, you can make changes by using your icons or set the type of this file, according to VS_FIXEDFILEINFO structure.
You need to have the icon file and/or version.txt file for VS_FIXEDFILEINFO structure.
Let's see the version.txt file:
# UTF-8
#
# For more details about fixed file info 'ffi' see:
# http://msdn.microsoft.com/en-us/library/ms646997.aspx
VSVersionInfo(
  ffi=FixedFileInfo(
    # filevers and prodvers should be always a tuple with four items: (1, 2, 3, 4)
    # Set not needed items to zero 0.
    filevers=(2017, 1, 1, 1),
    prodvers=(1, 1, 1, 1),
    # Contains a bitmask that specifies the valid bits 'flags'
    mask=0x3f,
    # Contains a bitmask that specifies the Boolean attributes of the file.
    flags=0x0,
    # The operating system for which this file was designed.
    # 0x4 - NT and there is no need to change it.
    OS=0x4,
    # The general type of file.
    # 0x1 - the file is an application.
    fileType=0x1,
    # The function of the file.
    # 0x0 - the function is not defined for this fileType
    subtype=0x0,
    # Creation date and time stamp.
    date=(0, 0)
    ),
  kids=[
    StringFileInfo(
      [
      StringTable(
        u'040904b0',
        [StringStruct(u'CompanyName', u'python-catalin'),
        StringStruct(u'ProductName', u'test'),
        StringStruct(u'ProductVersion', u'1, 1, 1, 1'),
        StringStruct(u'InternalName', u'tk_app'),
        StringStruct(u'OriginalFilename', u'tk_app.exe'),
        StringStruct(u'FileVersion', u'2017, 1, 1, 1'),
        StringStruct(u'FileDescription', u'test tk'),
        StringStruct(u'LegalCopyright', u'Copyright 2017 free-tutorials.org.'),
        StringStruct(u'LegalTrademarks', u'tk_app is a registered trademark of catafest.'),])
      ]),
    VarFileInfo([VarStruct(u'Translation', [0x409, 1200])])
  ]
)
Now you can use this command for tk_app.py and version.txt files from the C:\Python27 folder:
 pyinstaller.exe --onefile --windowed --version-file=..\version.txt ..\tk_app.py
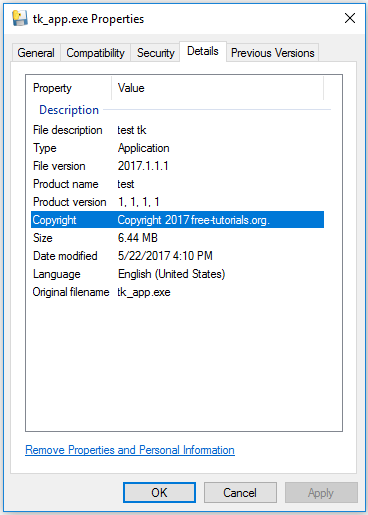
Let's see this info into the executable file:

If you want to change the icon then you need to add the --icon=tk_app.ico, where tk_app.ico is the new icon of the executable.