import bpy
import math

# Define the parameters of the ovoid
a = 1.9
b = 1.5
c = 1.5

# Define the number of vertices in each direction
n_long = 32
n_lat = 16

# Create a new mesh
mesh = bpy.data.meshes.new(name="Ovoid")

# Create the vertices
verts = []
for j in range(n_lat):
    lat = (j / (n_lat - 1)) * math.pi
    for i in range(n_long):
        lon = (i / (n_long - 1)) * 2 * math.pi
        x = a * math.sin(lat) * math.cos(lon)
        y = b * math.sin(lat) * math.sin(lon)
        z = c * math.cos(lat)
        verts.append((x, y, z))

# Create the faces
faces = []
for j in range(n_lat - 1):
    for i in range(n_long - 1):
        v1 = j * n_long + i
        v2 = j * n_long + i + 1
        v3 = (j + 1) * n_long + i + 1
        v4 = (j + 1) * n_long + i
        faces.append((v1, v2, v3, v4))

# Create the mesh and object
mesh.from_pydata(verts, [], faces)
obj = bpy.data.objects.new(name="Ovoid", object_data=mesh)

# Add the object to the scene
scene = bpy.context.scene
scene.collection.objects.link(obj)
Showing posts with label python modules. Show all posts
Showing posts with label python modules. Show all posts
Saturday, April 8, 2023
Create an ovoid with python on Blender 3D.
Blender 3D use python version 3.10.9 and you can write your scripts with the Blender 3D features.
This script can also be found on the website where I write tutorials.
This Python script for Blender 3D creates an ovoid model using the math formula for ovoid:
Saturday, April 1, 2023
Python 3.11.0 : about execnet python package - part 001.
The execnet Python package allows you to use lightweight interprocess communication using remote Python interpreters. It provides a simple way to execute code in a remote Python interpreter, allowing for easy distribution of work across multiple machines or processes.
With this package, you can create gateways to remote Python interpreters and then execute Python code in that interpreter.
This package provides a simple interface for creating these gateways and for executing code on them, making it easy to distribute work and run code in parallel.
It can be particularly useful for running tests on multiple versions of Python or for distributing computational tasks across multiple machines.
Let's see the first example:
import execnet

def multiplier(channel, factor):
    while not channel.isclosed():
        param = channel.receive()
        channel.send(param * factor)

gw = execnet.makegateway()
channel = gw.remote_exec(multiplier, factor=10)
print(channel)
for i in range(5):
    channel.send(i)
    result = channel.receive()
    print(result)
    assert result == i * 10
gw.exit()
This is the result
<Channel id=1 open>
0
10
20
30
40
Let's see the next example:
import execnet

gw = execnet.makegateway()
channel = gw.remote_exec("""
    def multiply(x, y):
        return x * y

    result = 0
    for i in range(10):
        result += multiply(i, 1)
        print("This is result for ",i," ",result)
    channel.send(result)

""")

result = channel.receive()
print("This is channel receive result : ", result)
assert result == 45
This is result:
This is channel receive result : 45Wednesday, March 29, 2023
Python : Open3D cannot be used on Windows 10 and Fedora Linux Distro .
Open3D is an open-source library that supports rapid development of software that deals with 3D data. The Open3D frontend exposes a set of carefully selected data structures and algorithms in both C++ and Python. The backend is highly optimized and is set up for parallelization. Open3D was developed from a clean slate with a small and carefully considered set of dependencies. It can be set up on different platforms and compiled from source with minimal effort. The code is clean, consistently styled, and maintained via a clear code review mechanism. Open3D has been used in a number of published research projects and is actively deployed in the cloud. We welcome contributions from the open-source community.
Today I tested this python package with Windows 10 and Fedora Linux Distro with python versions 11 and 10 ...
This package does not work and you will see why ...
C:\PythonProjects\Open3D001>git clone https://github.com/isl-org/Open3D.git
Cloning into 'Open3D'...
remote: Enumerating objects: 67435, done.
remote: Counting objects: 100% (2280/2280), done.
remote: Compressing objects: 100% (1894/1894), done.
remote: Total 67435 (delta 886), reused 599 (delta 385), pack-reused 65155
Receiving objects: 100% (67435/67435), 237.23 MiB | 17.11 MiB/s, done.

Resolving deltas: 100% (50682/50682), done.
Updating files: 100% (2315/2315), done.

C:\PythonProjects\Open3D001>cd Open3D

C:\PythonProjects\Open3D001\Open3D>mkdir build

C:\PythonProjects\Open3D001\Open3D>cd build

C:\PythonProjects\Open3D001\Open3D\build>cmake -DBUILD_SHARED_LIBS=ON -DCMAKE_INSTALL_PREFIX=C:\open3d_install ..
-- Building for: Visual Studio 17 2022
-- Setting build type to Release as none was specified.
-- CMAKE_BUILD_TYPE is set to Release.
-- Downloading third-party dependencies to C:/PythonProjects/Open3D001/Open3D/3rdparty_downloads
CMake Deprecation Warning at CMakeLists.txt:189 (cmake_policy):
  The OLD behavior for policy CMP0072 will be removed from a future version
  of CMake.

  The cmake-policies(7) manual explains that the OLD behaviors of all
  policies are deprecated and that a policy should be set to OLD only under
  specific short-term circumstances.  Projects should be ported to the NEW
  behavior and not rely on setting a policy to OLD.

...
According to this issue number 4796 and my test on Windows 10 with a Python version greater than 10 and on Fedora Linux Distro you cannot use this python package.
You can try an older version of Python and try it, see this example:
C:\PythonProjects\Open3D001>C:\Python310\python.exe -m pip install --user open3d --no-warn-script-location
C:\PythonProjects\Open3D001>C:\Python310\python.exe -c "import open3d as o3d; print(o3d)"
Traceback (most recent call last):
 ...
    from open3d.cpu.pybind import (core, camera, data, geometry, io, pipelines,
ImportError: DLL load failed while importing pybind: A dynamic link library (DLL) initialization routine failed.
...
pip install pybind --user
Collecting pybind
  Using cached pybind-0.1.35.tar.gz (15.5 MB)
ERROR: Could not install packages due to an OSError: [WinError 206] The filename or extension is too
long: 'C:\\Users\\catafest\\AppData\\Local\\Temp\\pip-install-7ccpzu3z\\pybind_
...Basically, this python package cannot be used with an old python version in Windows 10.
Sunday, March 26, 2023
Python 3.11.0 : Image generation with OpenAI.
In this tutorial I will show you a python script with PyQt6 and OpenAI that generates an image based on OpenAI token keys and a text that describes the image.
The script is quite simple and requires the installation of python packets: PyQt6,openai.
In the script you can find a python class called MainWindow in which graphic user interface elements are included and openai elements for generating images.
You also need a token key from the official openai page to use for generation.
The script runs with the command python numa_script.py and in the two editboxes is inserted chaie from token API OpenAI and the text that will describe the image to be generated.
This is the python script with the source code:
#create_image.py

import os
import openai

from PyQt6.QtCore import Qt, QSize
from PyQt6.QtGui import QImage, QPixmap
from PyQt6.QtWidgets import QApplication, QWidget, QLabel, QLineEdit, QVBoxLayout, QHBoxLayout, QPushButton
import requests

class MainWindow(QWidget):
    def __init__(self):
        super().__init__()
        self.resize(500, 500)
        self.setWindowTitle("AI Data Input")

        # create widgets
        self.image_label = QLabel(self)
        self.image_label.setFixedSize(QSize(300, 300))
        self.url_edit = QLineEdit(self)
        self.api_key = QLineEdit(self)
        self.send_button = QPushButton("Send data to AI", self)
        self.send_button.clicked.connect(self.on_send_button_clicked)

        # create layout
        layout = QVBoxLayout()
        url_layout = QHBoxLayout()
        url_layout.addWidget(QLabel("Text request AI: "))
        url_layout.addWidget(self.url_edit)
        api_layout = QHBoxLayout()
        api_layout.addWidget(QLabel("OpenAI API Key: "))
        api_layout.addWidget(self.api_key)

        layout.addLayout(url_layout)
        layout.addLayout(api_layout)
        layout.addWidget(self.image_label, alignment=Qt.AlignmentFlag.AlignCenter)
        layout.addWidget(self.send_button, alignment=Qt.AlignmentFlag.AlignCenter)

        self.setLayout(layout)

    def on_send_button_clicked(self):
        #openai.api_key = "your api key generated by OpenAI API"
        openai.api_key = self.api_key.text()
        PROMPT = self.url_edit.text()
        url = openai.Image.create(
            prompt=PROMPT,
            n=1,
            size="256x256",
        )

        # extract the url value
        url_value = url['data'][0]['url']
        if url_value :
            response = requests.get(url_value)
            if response.status_code == 200:
                image = QImage.fromData(response.content)
                pixmap = QPixmap.fromImage(image)
                self.image_label.setPixmap(pixmap)
                self.image_label.setScaledContents(True)

if __name__ == "__main__":
    app = QApplication([])
    window = MainWindow()
    window.show()
    app.exec()
This is the result of the source script:

Wednesday, March 22, 2023
Python 3.11.0 : clean from frequent folder and the list of recent files.
This python script that clears all entries in the Windows File Explorer from frequent folder and the list of recent files:
import os
import shutil

# Quick Access folder path on Windows
quick_access_path = os.path.join(os.environ['USERPROFILE'], 'AppData', 'Roaming', 'Microsoft', 'Windows', 'Recent', 'AutomaticDestinations')

# List all files in the Quick Access folder
files = os.listdir(quick_access_path)
print(files)
# Loop through all files in the Quick Access folder
for file in files:
    # Check if the file name contains "tmp" or "temp"
    if 'tmp' in file.lower() or 'temp' in file.lower():
        # Construct the full file path
        file_path = os.path.join(quick_access_path, file)
        # Delete the file
        os.remove(file_path)
        # Print a message to the console
        print(f"{file_path} deleted successfully.")

# Clear Frequent folder
frequent_folder = os.path.join(os.environ['APPDATA'], 'Microsoft', 'Windows', 'Recent', 'AutomaticDestinations')
os.system('del /f /q "{}\*"'.format(frequent_folder))

# Clear Recent files list
recent_folder = os.path.join(os.environ['APPDATA'], 'Microsoft', 'Windows', 'Recent')
os.system('del /f /q "{}\*"'.format(recent_folder))Monday, March 20, 2023
Python 3.11.0 : PySimpleGUI - part 001.
PySimpleGUI runs on Windows, Linux and Mac, just like tkinter, Qt, WxPython and Remi do.
pip install PySimpleGUI --user
Collecting PySimpleGUI
  Downloading PySimpleGUI-4.60.4-py3-none-any.whl (509 kB)
     ---------------------------------------- 510.0/510.0 kB 2.5 MB/s eta 0:00:00
Installing collected packages: PySimpleGUI
Successfully installed PySimpleGUI-4.60.4
I try the default source code and works well:
import PySimpleGUI as sg
sg.theme('DarkAmber')   # Add a little color to your windows
# All the stuff inside your window. This is the PSG magic code compactor...
layout = [  [sg.Text('Some text on Row 1')],
            [sg.Text('Enter something on Row 2'), sg.InputText()],
            [sg.OK(), sg.Cancel()]]

# Create the Window
window = sg.Window('Window Title', layout)
# Event Loop to process "events"
while True:
    event, values = window.read()
    if event in (sg.WIN_CLOSED, 'Cancel'):
        break

window.close()
Wednesday, March 1, 2023
Python 3.11.0 : The sunpy python package - part 002.
In the last article tutorial, I show some simple examples with the sunpy python package.
Today I installed it again with all of these python packages using the pip tool.
You don't need all of these if you just start, but in time you will need to install them:
pip install sunpy --user
Collecting sunpy
  Downloading sunpy-4.1.3.tar.gz (3.6 MB)
     ---------------------------------------- 3.6/3.6 MB 3.6 MB/s eta 0:00:00
     ...
     Successfully installed PyYAML-6.0 aioftp-0.21.4 astropy-5.2.1 pyerfa-2.0.0.1 sunpy-4.1.3
...
pip install zeep --user
Collecting zeep
  Using cached zeep-4.2.1-py3-none-any.whl (101 kB)
  ...
  Successfully installed isodate-0.6.1 pytz-2022.7.1 requests-file-1.5.1 requests-toolbelt-0.10.1 zeep-4.2.1
  ...
pip install drms --user
Collecting drms
  Downloading drms-0.6.3-py3-none-any.whl (35 kB)
  ...
  Successfully installed drms-0.6.3 pandas-1.5.3
pip install hvpy --user
Collecting hvpy
  Downloading hvpy-1.0.1-py3-none-any.whl (44 kB)
     ---------------------------------------- 44.0/44.0 kB 359.5 kB/s eta 0:00:00
     ...
     Successfully installed hvpy-1.0.1
pip install scipy --user
Collecting scipy
  Downloading scipy-1.10.1-cp311-cp311-win_amd64.whl (42.2 MB)
     ---------------------------------------- 42.2/42.2 MB 7.4 MB/s eta 0:00:00
     ...
     Successfully installed scipy-1.10.1
pip install glymur --user
Collecting glymur
  Downloading Glymur-0.12.2-py3-none-any.whl (2.7 MB)
     ---------------------------------------- 2.7/2.7 MB 4.2 MB/s eta 0:00:00
     ...
     Successfully installed glymur-0.12.2
Let's use the 1600 Angstrom from these all data of spectral range: 335 Angstrom, 131 Angstrom, 191-195 Angstrom, 211 Angstrom, 1600 Angstrom, 1700 Angstrom, 4500 Angstrom, 171-175 Angstrom, 304 Angstrom, 94 Angstrom
from datetime import datetime
from hvpy import createMovie, DataSource, create_events, create_layers
createMovie(
     startTime=datetime(2023, 2, 27),                    # start from 1st September 2022
     endTime=datetime(2023, 2, 28),                      # end at 5th September 2022
     layers=create_layers([(DataSource.AIA_1600, 100)]), # use AIA_193 Lens with 100% Opacity
     events=create_events(["CH"]),                      # show the Active regions
     eventsLabels=True,                                 # event labels should be included
     imageScale=1,                                      # Image scale in arcseconds per pixel
     hq=True,                                           # Download a higher-quality movie file
     timeout=10,                                        # Wait 10 minutes to get a response
     overwrite=True
)
The result is a video that looks like this :
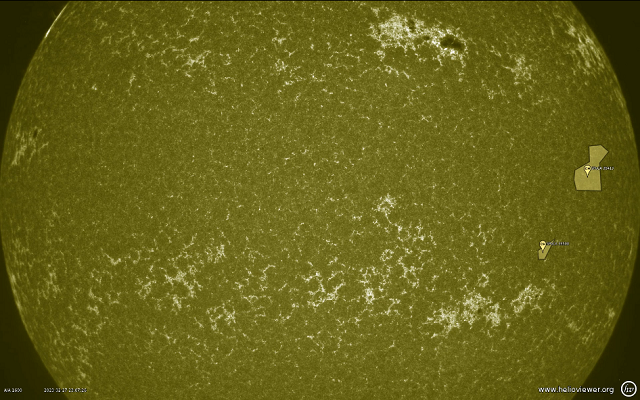
There are easier ways to get information about the sun…
You can take one screenshot using the api.helioviewer.org feature in your browser.
https://api.helioviewer.org/v2/takeScreenshot/?imageScale=1&layers=[SDO,AIA,AIA,304,1,100]&events=&eventLabels=true&scale=true&scaleType=earth&scaleX=0&scaleY=0&date=2023-02-28T15:00:00.000Z&x1=-1100.0&x2=1100.0&y1=-1100.0&y2=1100.0&display=true&watermark=true&events=[CH,all,1]Monday, February 27, 2023
Python 3.11.0 : EbookLib python library - part 002.
The last version 3.3 of this file type was published by the EPUB 3 Working Group as a Candidate Recommendation Snapshot on 21 February 2023 ...
I haven't written about the ePub format and python since 2022 because I was busy with all kinds of tasks.
Then I presented a short introduction with some examples on how to create an ePUB file, see that tutorial article.
I like this file type, especially the last format that allows many features, including inserting SVG vector files.
Installing the package is easy on a windows 10 with the pip utility.
pip install ebooklib --userIn the folder with the svg image named cover.svg I created a python file with this content.
from ebooklib import epub

# Create a new EPUB book
book = epub.EpubBook()

# Set the book metadata
book.set_title('My EPUB Book')
book.set_language('en')

# Add a cover image
cover_svg = epub.EpubItem(uid="cover_svg", file_name="cover.svg", media_type="image/svg+xml", content=open("cover.svg").read())
book.add_item(cover_svg)

# Create a new chapter for the cover page
cover_page = epub.EpubHtml(title='Cover Page', file_name='cover.xhtml', lang='en')
cover_page.content = '<img alt="Cover Image" src="cover.svg" />'

# Add the cover page to the book
book.add_item(cover_page)

# Add a chapter to the book
chapter1 = epub.EpubHtml(title='Chapter 1', file_name='chap_1.xhtml', lang='en')
chapter1.content = '<h1>Chapter 1</h1><p>This is the first chapter of my book.</p>'

# Add the chapter to the book
book.add_item(chapter1)

# Create the spine
book.spine = [cover_page, chapter1]

# Generate the EPUB file
epub.write_epub('my_book.epub', book, {})
after running the script this was the result a epub file named my_book.epub.
The result is this simple epub with an SVG file from Wikipedia, see the screenshot take with the Sumatra PDF free software.

Thursday, February 9, 2023
Python 3.6.9 : Anvil platform for web with python - part 001.
Anvil is a platform for building and hosting full-stack web apps written entirely in Python. Drag and drop your UI, then write Python on the front-end and back-end to make it all work ...
Yesterday I tested Anvil with python and was amazed at how simple it can be used to develop a web application. Anvil use python version 3.6.9. The tutorial I tested is available on the official website and is a feedback form that sends an email with your name, email address and content to your Anvil account address.
You can see this web application I follow from web tutorials on this webpage.
You can find some tutorials on this webpage.
How it works: Create a free account that can also be paid for via a web interface that you build with drag and drop and populate interface properties, add defined python modules and services, and write source code. I noticed that it uses beginner level python decorators and not very complex source code. The good part is that it is a fast development and the bad part is that it is limited to the free tier. After only three emails received, they came back with messages saying: ... his email quota has been exceeded.
These are features for anvil, I used in my project just the email:

Saturday, February 4, 2023
Python 3.7.0 : CodeSkulptor online compiler and editor.
CodeSkulptor uses Skulpt to provide a browser-based coding environment and can be tested on the official website.
You can see an online default example with simplegui python package on that website with online editor.

Saturday, January 28, 2023
Python : Fix error with pip and pylupdate6.exe .
I try to upgrade the PyQt6 package and I got this error:
pip3 install --upgrade --force-reinstall PyQt6
...
ERROR: Could not install packages due to an OSError: [WinError 2] The system cannot find the file specified:
...pylupdate6.exe
...pylupdate6.exe.deleteme'
I think this solution will work for any python package
Open a command shell run as administrator and run it again:
pip3 install --upgrade --force-reinstall PyQt6
Collecting PyQt6
...
Successfully installed PyQt6-6.4.1 PyQt6-Qt6-6.4.2 PyQt6-sip-13.4.1
If you want to re-download the packages instead of using the files from your pip cache, then use:
pip install --force-reinstall --no-cache-dirTuesday, January 24, 2023
Python : Fix DLL load failed while importing ...
This error DLL load failed while importing ... can have many causes like conflicts with the already installed packages, and also it can break your current environment.
>>> import PyQt6
>>> from PyQt6.QtCore import QUrl
Traceback (most recent call last):
  ...
ImportError: DLL load failed while importing QtCore: The specified module could not be found.
You can see I used to reinstall the PyQt6 python package with this argument --ignore-installed:
pip3 install PyQt6 --user --ignore-installed
Collecting PyQt6
  ...
Installing collected packages: PyQt6-Qt6, PyQt6-sip, PyQt6
  WARNING: The scripts pylupdate6.exe and pyuic6.exe are installed in
  ...
  which is not on PATH.
  Consider adding this directory to PATH or, if you prefer to suppress this warning, use --no-warn-script-location.
Successfully installed PyQt6-6.4.0 PyQt6-Qt6-6.4.2 PyQt6-sip-13.4.0
The --ignore-installed option for the pip package manager was first introduced in version 6.0, which was released in April 2014.
The old install give me this error and when I try to use I got this:
>>> from PyQt6 import *
>>> dir(PyQt6)
['__builtins__', '__cached__', '__doc__', '__file__', '__loader__', '__name__', '__package__', '__path__', '__spec__']
Now after I reinstall with this option the result is good:
>>> import PyQt6
>>> from PyQt6 import QtCore
>>> dir(PyQt6)
['QtCore', '__builtins__', '__cached__', '__doc__', '__file__', '__loader__', '__name__', '__package__', '__path__', '__spec__', 'sip']
>>> from PyQt6.QtCore import QUrlPython 3.11.0 : The openai python package - part 001.
The OpenAI Python library provides convenient access to the OpenAI API from applications written in the Python language. It includes a pre-defined set of classes for API resources that initialize themselves dynamically from API responses which makes it compatible with a wide range of versions of the OpenAI API.
You can see more about this on the GitHub project.
in order to use this package you need to have a A.P.I. key for OpenAI beta features from this website.
Create a key and copy into file or clipboard beacuse this cannot be accesed after you created.
Use the pip tool to install the openai package:
pip3 install openai --userI tested with a default example and a simple question: What is the python programmin language?
import os
import openai


openai.api_key = "your_API_OpenAI_key"

response = openai.Completion.create(
    model="text-davinci-003",
    prompt="What is the python programmin language?",
    temperature=0.7,
    max_tokens=100,
    top_p=1,
    frequency_penalty=0,
    presence_penalty=0
)

print(response)
I run this python script code and the result is this:
python openai001.py
{
  "choices": [
    {
      "finish_reason": "stop",
      "index": 0,
      "logprobs": null,
      "text": "\n\nPython is a high-level, interpreted, general-purpose programming language.
      It was created by Guido van Rossum and first released in 1991. Python has a wide variety of
      uses and is a popular language for data science, web development, automation, and artificial
      intelligence. It is also a popular language for scripting and general-purpose programming."
    }
  ],
  "created": 1674588982,
  "id": "cmpl-6cJNeACMtayBlExV1GJpilde0KcBN",
  "model": "text-davinci-003",
  "object": "text_completion",
  "usage": {
    "completion_tokens": 71,
    "prompt_tokens": 8,
    "total_tokens": 79
  }
}
Monday, January 23, 2023
Python 3.11.0 : About py launcher tool for Windows.
The py launcher tool for Windows is included in the Python for Windows installer starting from version 3.3.
This command-line tool allows you to easily configure and switch between multiple versions of Python installed on a Windows system.
This tool allows you to easily switch between different versions of Python without modifying the system's PATH environment variable, and it also allows you to set default versions of Python for different file extensions.
Let's see some examples
This will argument will give you the current version of your python command:
py --version
Python 3.11.0
This will enumerate all your python versions from Windows O.S.:
py -0
 -V:3.11 *        Python 3.11 (64-bit)
 -V:3.10          Python 3.10 (64-bit)
 -V:3.9           Python 3.9 (64-bit)
 -V:3.7           Python 3.7 (64-bit)
This will set the python command to a specific version in this case 3.10 :
>py -3.10
Python 3.10.7 (tags/v3.10.7:6cc6b13, Sep  5 2022, 14:08:36) [MSC v.1933 64 bit (AMD64)] on win32
Type "help", "copyright", "credits" or "license" for more information.
>>> exit()
This will run a python script named scripting001.py with a specific version of python:
py -3.10 scripting001.pyThursday, January 19, 2023
Python 3.11.0 : The parfive python package.
Today I tested this simple parfive 2.0.2 version python package with the default example from the official website.
A parallel file downloader using asyncio. parfive can handle downloading multiple files in parallel as well as downloading each file in a number of chunks.
The default example works great but when I try to get direct movie files from free web this not work.
Parfive is a lightweight library, I try to download large files but give me error 206.
Thursday, January 12, 2023
Python 3.11.0 : The numpy-quaternion python package - part 001.
I write an article on my website about artificial intelligence and I used python to show a simple example with quaternions.
This Python module adds a quaternion dtype to NumPy and you can read about this on the official website.
I may have mistakenly installed a python packet with a similar name and I had to install it with the command:
python -m pip uninstall quaternionthe next step was to install this command
python -m pip install --upgrade --no-deps --force-reinstall numpy-quaternionThe source code I used defines two quaternions, one with real part a and imaginary parts, and one quaternion using Euler angles.
Then is perform the rotation uses quaternion multiplication.
Let's see the source code
import numpy as np
import quaternion

# define a quaternion with real part a and imaginary parts bi, cj, dk
a = 1
b = 2
c = 3
d = 4
q = np.quaternion(a, b, c, d)

# define a quaternion using euler angles
x = 1.0
y = 2.0
z = 3.0
q2 = quaternion.from_euler_angles(x, y, z)

# define a vector to rotate
v = [1, 0, 0]

# perform the rotation using quaternion multiplication

# quaternion multiplication is not commutative, the order matters
# because this line of source code will not work:  rotated_v = q2 * v * q2.conj()

rotated_v = (q2 * quaternion.quaternion(0, *v)) * q2.conj()

print(rotated_v)
This is the result:
quaternion(0, 0.103846565151668, 0.422918571742548, 0.900197629735517)Wednesday, January 11, 2023
Python 3.7.9 : simple zodiac diagrams with ephem and matplotlib.
I used openai chat to test another issue with these python packages: ephem and matplotlib.
It seems that openai is limited to new changes in python packages, but it resolves quite well combinations of source code that it has corrected with defined errors. It can't really extract source code from general questions. Anyway, it is a very good help for a programmer in the initial phase of any project.
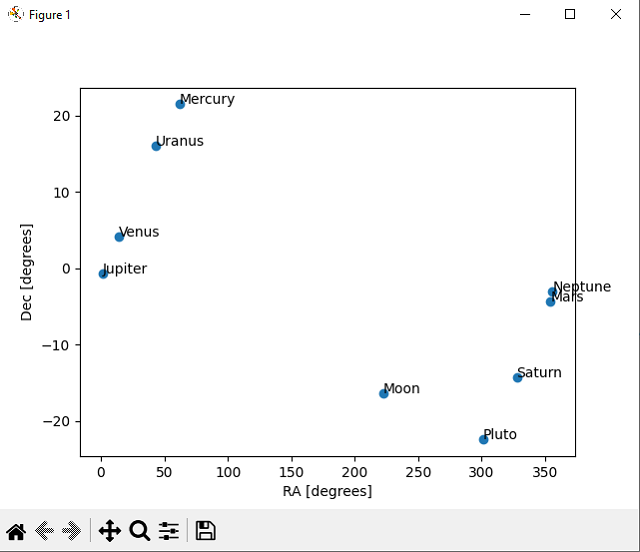
This source code show two diagrams about the solar system on a specific date:
import ephem
import matplotlib.pyplot as plt
# create an observer
obs = ephem.Observer()
# set the observer's location
obs.lat = '47.27' # latitude
obs.lon = '26.18' # longitude
obs.elevation = 307 # elevation (meters)
# set the date and time of the observation
obs.date = '2022/05/15 12:00:00' # date and time
# if you want you can use now() for real time data
# create the bodies
mercury = ephem.Mercury(obs)
venus = ephem.Venus(obs)
mars = ephem.Mars(obs)
jupiter = ephem.Jupiter(obs)
saturn = ephem.Saturn(obs)
uranus = ephem.Uranus(obs)
neptune = ephem.Neptune(obs)
pluto = ephem.Pluto(obs)
moon = ephem.Moon(obs)
# compute the position of each planet and the moon
mercury.compute(obs)
venus.compute(obs)
mars.compute(obs)
jupiter.compute(obs)
saturn.compute(obs)
uranus.compute(obs)
neptune.compute(obs)
pluto.compute(obs)
moon.compute(obs)
# extract ra and dec coordinates of each body
ra = [mercury.ra, venus.ra, mars.ra, jupiter.ra, saturn.ra, uranus.ra, neptune.ra, pluto.ra,moon.ra]
dec = [mercury.dec, venus.dec, mars.dec, jupiter.dec, saturn.dec, uranus.dec, neptune.dec, pluto.dec,moon.dec]
# convert ra,dec from radians to degrees
ra = [r*180/ephem.pi for r in ra]
dec = [d*180/ephem.pi for d in dec]
print(ra,dec)
# create a scatter plot of the positions
plt.scatter(ra, dec)
# add labels for each planet
plt.annotate('Mercury', (ra[0], dec[0]))
plt.annotate('Venus', (ra[1], dec[1]))
plt.annotate('Mars', (ra[2], dec[2]))
plt.annotate('Jupiter', (ra[3], dec[3]))
plt.annotate('Saturn', (ra[4], dec[4]))
plt.annotate('Uranus', (ra[5], dec[5]))
plt.annotate('Neptune', (ra[6], dec[6]))
plt.annotate('Pluto', (ra[7], dec[7]))
plt.annotate('Moon', (ra[8], dec[8]))
plt.xlabel("RA [degrees]")
plt.ylabel("Dec [degrees]")
# show the plot
plt.show()
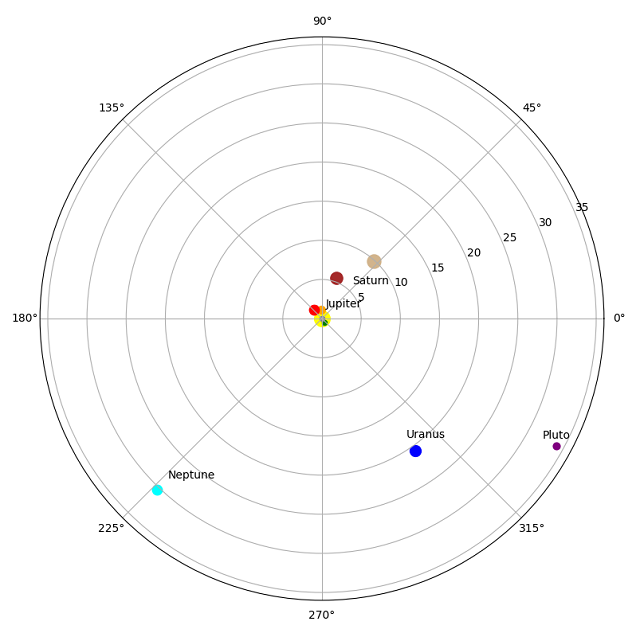
# Set the figure size
plt.figure(figsize=(10, 10))
# Define the polar axis
ax = plt.subplot(111, projection='polar')
# Set the axis limits
ax.set_ylim(0, 36)
# Plot the Sun at the center
plt.scatter(0, 0, s=200, color='yellow')
mercury_distance = mercury.earth_distance
venus_distance= venus.earth_distance
mars_distance= mars.earth_distance
jupiter_distance= jupiter.earth_distance
saturn_distance= saturn.earth_distance
uranus_distance= uranus.earth_distance
neptune_distance= neptune.earth_distance
pluto_distance= pluto.earth_distance
moon_distance= moon.earth_distance
print(mercury_distance)
distance = [mercury_distance,venus_distance,mars_distance,jupiter_distance,saturn_distance,uranus_distance,neptune_distance,pluto_distance,moon_distance]
# Plot the planets
plt.scatter(ra[0], distance[0], s=20, color='green')
plt.scatter(ra[1], distance[1], s=50, color='orange')
plt.scatter(ra[2], distance[2], s=80, color='red')
plt.scatter(ra[3], distance[3], s=120, color='brown')
plt.scatter(ra[4], distance[4], s=150, color='tan')
plt.scatter(ra[5], distance[5], s=100, color='blue')
plt.scatter(ra[6], distance[6], s=80, color='cyan')
plt.scatter(ra[7], distance[7], s=40, color='purple')
plt.scatter(ra[8], distance[8], s=20, color='gray')
# add the labels for each planet
plt.annotate('Mercury',(ra[0], distance[0]),xytext=(ra[0], distance[0] - 2))
plt.annotate('Venus',(ra[1], distance[1]),xytext=(ra[1], distance[1] - 2))
plt.annotate('Mars',(ra[2], distance[2]),xytext=(ra[2], distance[2] - 2))
plt.annotate('Jupiter',(ra[3], distance[3]),xytext=(ra[3], distance[3] - 4))
plt.annotate('Saturn',(ra[4], distance[4]),xytext=(ra[4], distance[4] - 4))
plt.annotate('Uranus',(ra[5], distance[5]),xytext=(ra[5], distance[5] - 2))
plt.annotate('Neptune',(ra[6], distance[6]),xytext=(ra[6], distance[6] - 2))
plt.annotate('Pluto',(ra[7], distance[7]),xytext=(ra[7], distance[7] - 2))
plt.annotate('Moon',(ra[8], distance[8]),xytext=(ra[8], distance[8] - 2))
# Show the plot
plt.show()This is the result of this source code:
Python 3.7.9 : simple zodiac constellation with ephem.
This time I used openai chat to create my source code and with small changes it worked…
PyEphem provides an ephem Python package for performing high-precision astronomy computations. The underlying numeric routines are coded in C and are the same ones that drive the popular XEphem astronomy application, whose author, Elwood Charles Downey, generously gave permission for their use in PyEphem. The name ephem is short for the word ephemeris, which is the traditional term for a table giving the position of a planet, asteroid, or comet for a series of dates.
import ephem

# create an observer
obs = ephem.Observer()

# set the observer's location
obs.lat = '47.27' # latitude
obs.lon = '26.18' # longitude
obs.elevation = 307 # elevation (meters)

# set the date and time of the observation
obs.date = '2022/05/15 12:00:00' # date and time

# create the bodies
mercury = ephem.Mercury(obs)
venus = ephem.Venus(obs)
mars = ephem.Mars(obs)
jupiter = ephem.Jupiter(obs)
saturn = ephem.Saturn(obs)
uranus = ephem.Uranus(obs)
neptune = ephem.Neptune(obs)
pluto = ephem.Pluto(obs)
moon = ephem.Moon(obs)

# print the constellation
print("Mercury:", ephem.constellation(mercury))
print("Venus:", ephem.constellation(venus))
print("Mars:", ephem.constellation(mars))
print("Jupiter:", ephem.constellation(jupiter))
print("Saturn:", ephem.constellation(saturn))
print("Uranus:", ephem.constellation(uranus))
print("Neptune:", ephem.constellation(neptune))
print("Pluto:", ephem.constellation(pluto))
print("Moon:", ephem.constellation(moon))
This is result of the running source code:
python constelation001.py
Mercury: ('Tau', 'Taurus')
Venus: ('Psc', 'Pisces')
Mars: ('Aqr', 'Aquarius')
Jupiter: ('Psc', 'Pisces')
Saturn: ('Cap', 'Capricornus')
Uranus: ('Ari', 'Aries')
Neptune: ('Psc', 'Pisces')
Pluto: ('Sgr', 'Sagittarius')
Moon: ('Lib', 'Libra')Tuesday, January 10, 2023
Python 3.7.9 : simple zodiac with pyephem and ephem.
I don't know how to calculate a zodiac exactly, from what I understand the planets and the moon must overlap. so I tested a script that calculates the dates between the planets and the moon when they appear within one degree of each other and displays them in an array with rows and columns created from these planets and the moon. The intersections on the diagonal should be none because there's obviously no way to overlap the same object, and they only occur when there's this less than one degree rule.
If you think it is wrong then you can try to fix it.
You can install pyephem and ephem with pip tool, I used both python packages:
pip install pyephem --user
Requirement already satisfied: pyephem in
... site-packages (9.99)
Requirement already satisfied: ephem in
...
site-packages (from pyephem) (4.1.4)
This is the source script.
import ephem

# create a list with planets objects from ephem
planets = [ephem.Mercury(), ephem.Venus(), ephem.Mars(), ephem.Jupiter(), ephem.Saturn(), ephem.Uranus(), ephem.Neptune(), ephem.Moon()]

start_date = ephem.Date("2023/01/01")
end_date = ephem.Date("2023/12/31")
date = start_date

# create matrix to store planet names and conjunction dates
matrix = [[None for _ in range(len(planets) + 1)] for _ in range(len(planets))]

# create list to store planet names
planet_names = [planet.name for planet in planets]
# list all planets names as first row in matrix
matrix.insert(0, [""] + planet_names)

while date < end_date:
    for i, planet1 in enumerate(planets):
        for j, planet2 in enumerate(planets):
            if i < j:
                planet1.compute(date)
                planet2.compute(date)
                sep = ephem.separation(planet1, planet2) #  calculate the angular distance
                # compare the separation, if less than 0.01 degree then it's a conjunction
                if sep < 1.0:
                    date_formatted = date.datetime().strftime("%d %B %Y")
                    matrix[i+1][j+1] = date_formatted
                    break
    date = ephem.Date(date + 1)
# print a matrix with date is separation from 1 degree between planets on rows and column
for row in matrix:
    print(row)
This is the result:
['', 'Mercury', 'Venus', 'Mars', 'Jupiter', 'Saturn', 'Uranus', 'Neptune', 'Moon']
[None, None, '30 December 2023', '14 December 2023', '20 June 2023', None, None, None, None]
[None, None, None, '30 December 2023', '15 March 2023', '06 January 2023', None, None, '12 October 2023']
[None, None, None, None, None, None, '24 April 2023', None, '16 December 2023']
[None, None, None, None, None, '05 June 2023', '30 December 2023', None, None]
[None, None, None, None, None, None, None, '30 December 2023', None]
[None, None, None, None, None, None, None, '30 December 2023', None]
[None, None, None, None, None, None, None, None, '23 December 2023']
[None, None, None, None, None, None, None, None, None]Sunday, January 8, 2023
Python 3.7.9 : The sunpy python package - part 001.
In the past, I have written several small tutorials related to this Python package. Now I have some news related to the sunpy python package:
- HelioviewerClient is deprecated;
- The Helioviewer Project now maintains a Python Wrapper called hvpy.
- sunpy users are encouraged to upgrade parfive python package;
- the sunpy.database deprecation; the sample data files provided through sunpy.data.sample are now downloaded individually on demand;
- SunPy is tested against Python 2.7, 3.5, and 3.6.;
- SunPy no longer supports Python 3.4.;
- easy to extract data values from a GenericMap along a curve specified by a set of coordinates using the new sunpy.map.extract_along_coord function;
- has a new make_heliographic_header() function that simplifies creating map headers that span the whole solar surface in Carrington or Stonyhurst coordinates;
- aiaprep is now deprecated;
- ... and more on the official website.
I install this python package on the Windows OS with the pip tool:
pip install "sunpy[all] -U"You can install extra available options: [asdf], [dask], [database], [image], [jpeg2000], [map], [net], [timeseries], [visualization].
You can see the version of this python package with this source code:
 import sunpy
print(sunpy.__version__)
3.1.8
I tested this package with this simple source code:
from matplotlib import pyplot as plt
import sunpy.map
import sunpy.data.sample
sunpyAIA = sunpy.map.Map(sunpy.data.sample.AIA_171_IMAGE)
sunpyAIA.plot()
plt.colorbar()
plt.show()
The instrument is AIA and the measurement is 171, see more on this online tool named helioviewer.
After I run I got this image:

Subscribe to:
Posts (Atom)